![]()


REST Client allows you to send HTTP request and view the response in Visual Studio Code directly. It eliminates the need for a separate tool to test REST APIs and makes API testing convenient and efficient.
- Send/Cancel/Rerun HTTP request in editor and view response in a separate pane with syntax highlight
- Send GraphQL query and author GraphQL variables in editor
- Send cURL command in editor and copy HTTP request as
cURL command - Auto save and view/clear request history
- Compose MULTIPLE requests in a single file (separated by
###delimiter) - View image response directly in pane
- Save raw response and response body only to local disk
- Fold and unfold response body
- Customize font(size/family/weight) in response preview
- Preview response with expected parts(headers only, body only, full response and both request and response)
- Authentication support for:
- Basic Auth
- Digest Auth
- SSL Client Certificates
- Azure Active Directory
- Microsoft Identity Platform
- AWS Signature v4
- Environments and custom/system variables support
- Use variables in any place of request(URL, Headers, Body)
- Support environment, file, request and prompt custom variables
- Interactively assign prompt custom variables per request
- Auto completion and hover support for both environment, file and request custom variables
- Diagnostic support for request, file and prompt custom variables
- Go to definition support for request and file custom variables
- Find all references support ONLY for file custom variables
- Provide system dynamic variables
{{$guid}}{{$randomInt min max}}{{$timestamp [offset option]}}{{$datetime rfc1123|iso8601 [offset option]}}{{$localDatetime rfc1123|iso8601 [offset option]}}{{$processEnv [%]envVarName}}{{$dotenv [%]variableName}}{{$aadToken [new] [public|cn|de|us|ppe] [<domain|tenantId>] [aud:<domain|tenantId>]}}
- Easily create/update/delete environments and environment variables in setting file
- File variables can reference both custom and system variables
- Support environment switch
- Support shared environment to provide variables that available in all environments
- Generate code snippets for HTTP request in languages like
Python,JavaScriptand more! - Remember Cookies for subsequent requests
- Proxy support
- Send SOAP requests, as well as snippet support to build SOAP envelope easily
HTTPlanguage support.httpand.restfile extensions support- Syntax highlight (Request and Response)
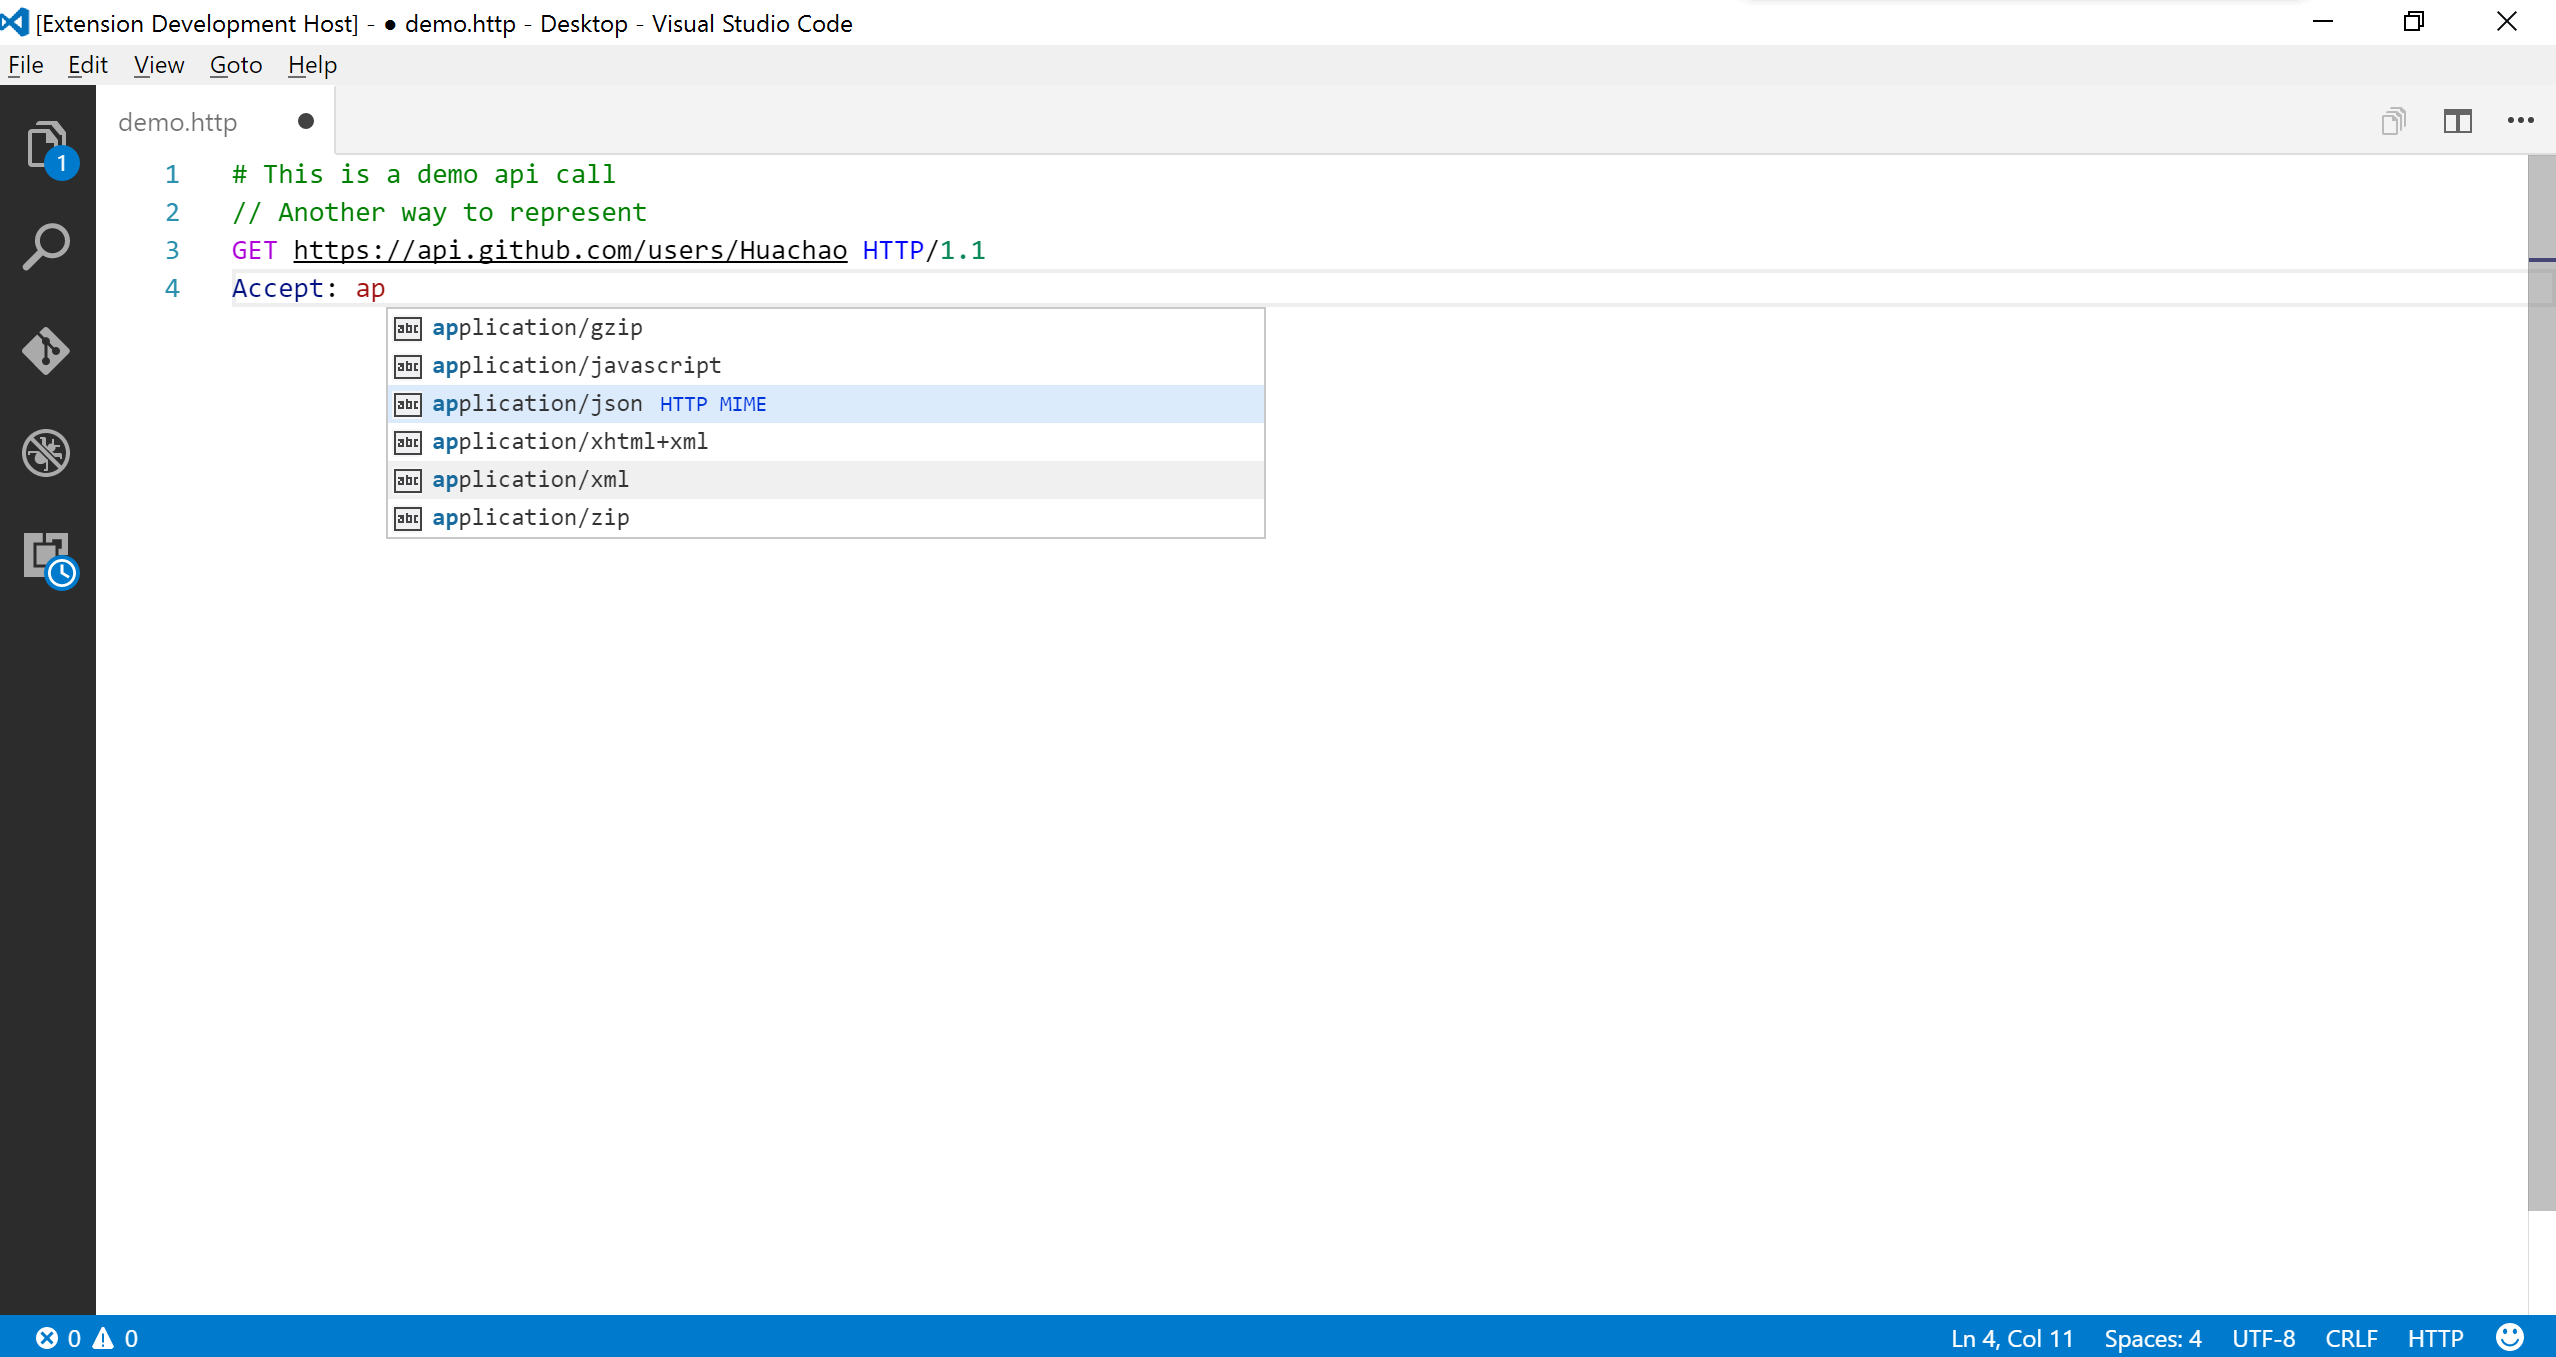
- Auto completion for method, url, header, custom/system variables, mime types and so on
- Comments (line starts with
#or//) support - Support
jsonandxmlbody indentation, comment shortcut and auto closing brackets - Code snippets for operations like
GETandPOST - Support navigate to symbol definitions(request and file level custom variable) in open
httpfile - CodeLens support to add an actionable link to send request
- Fold/Unfold for request block
- Support for Markdown fenced code blocks with either
httporrest
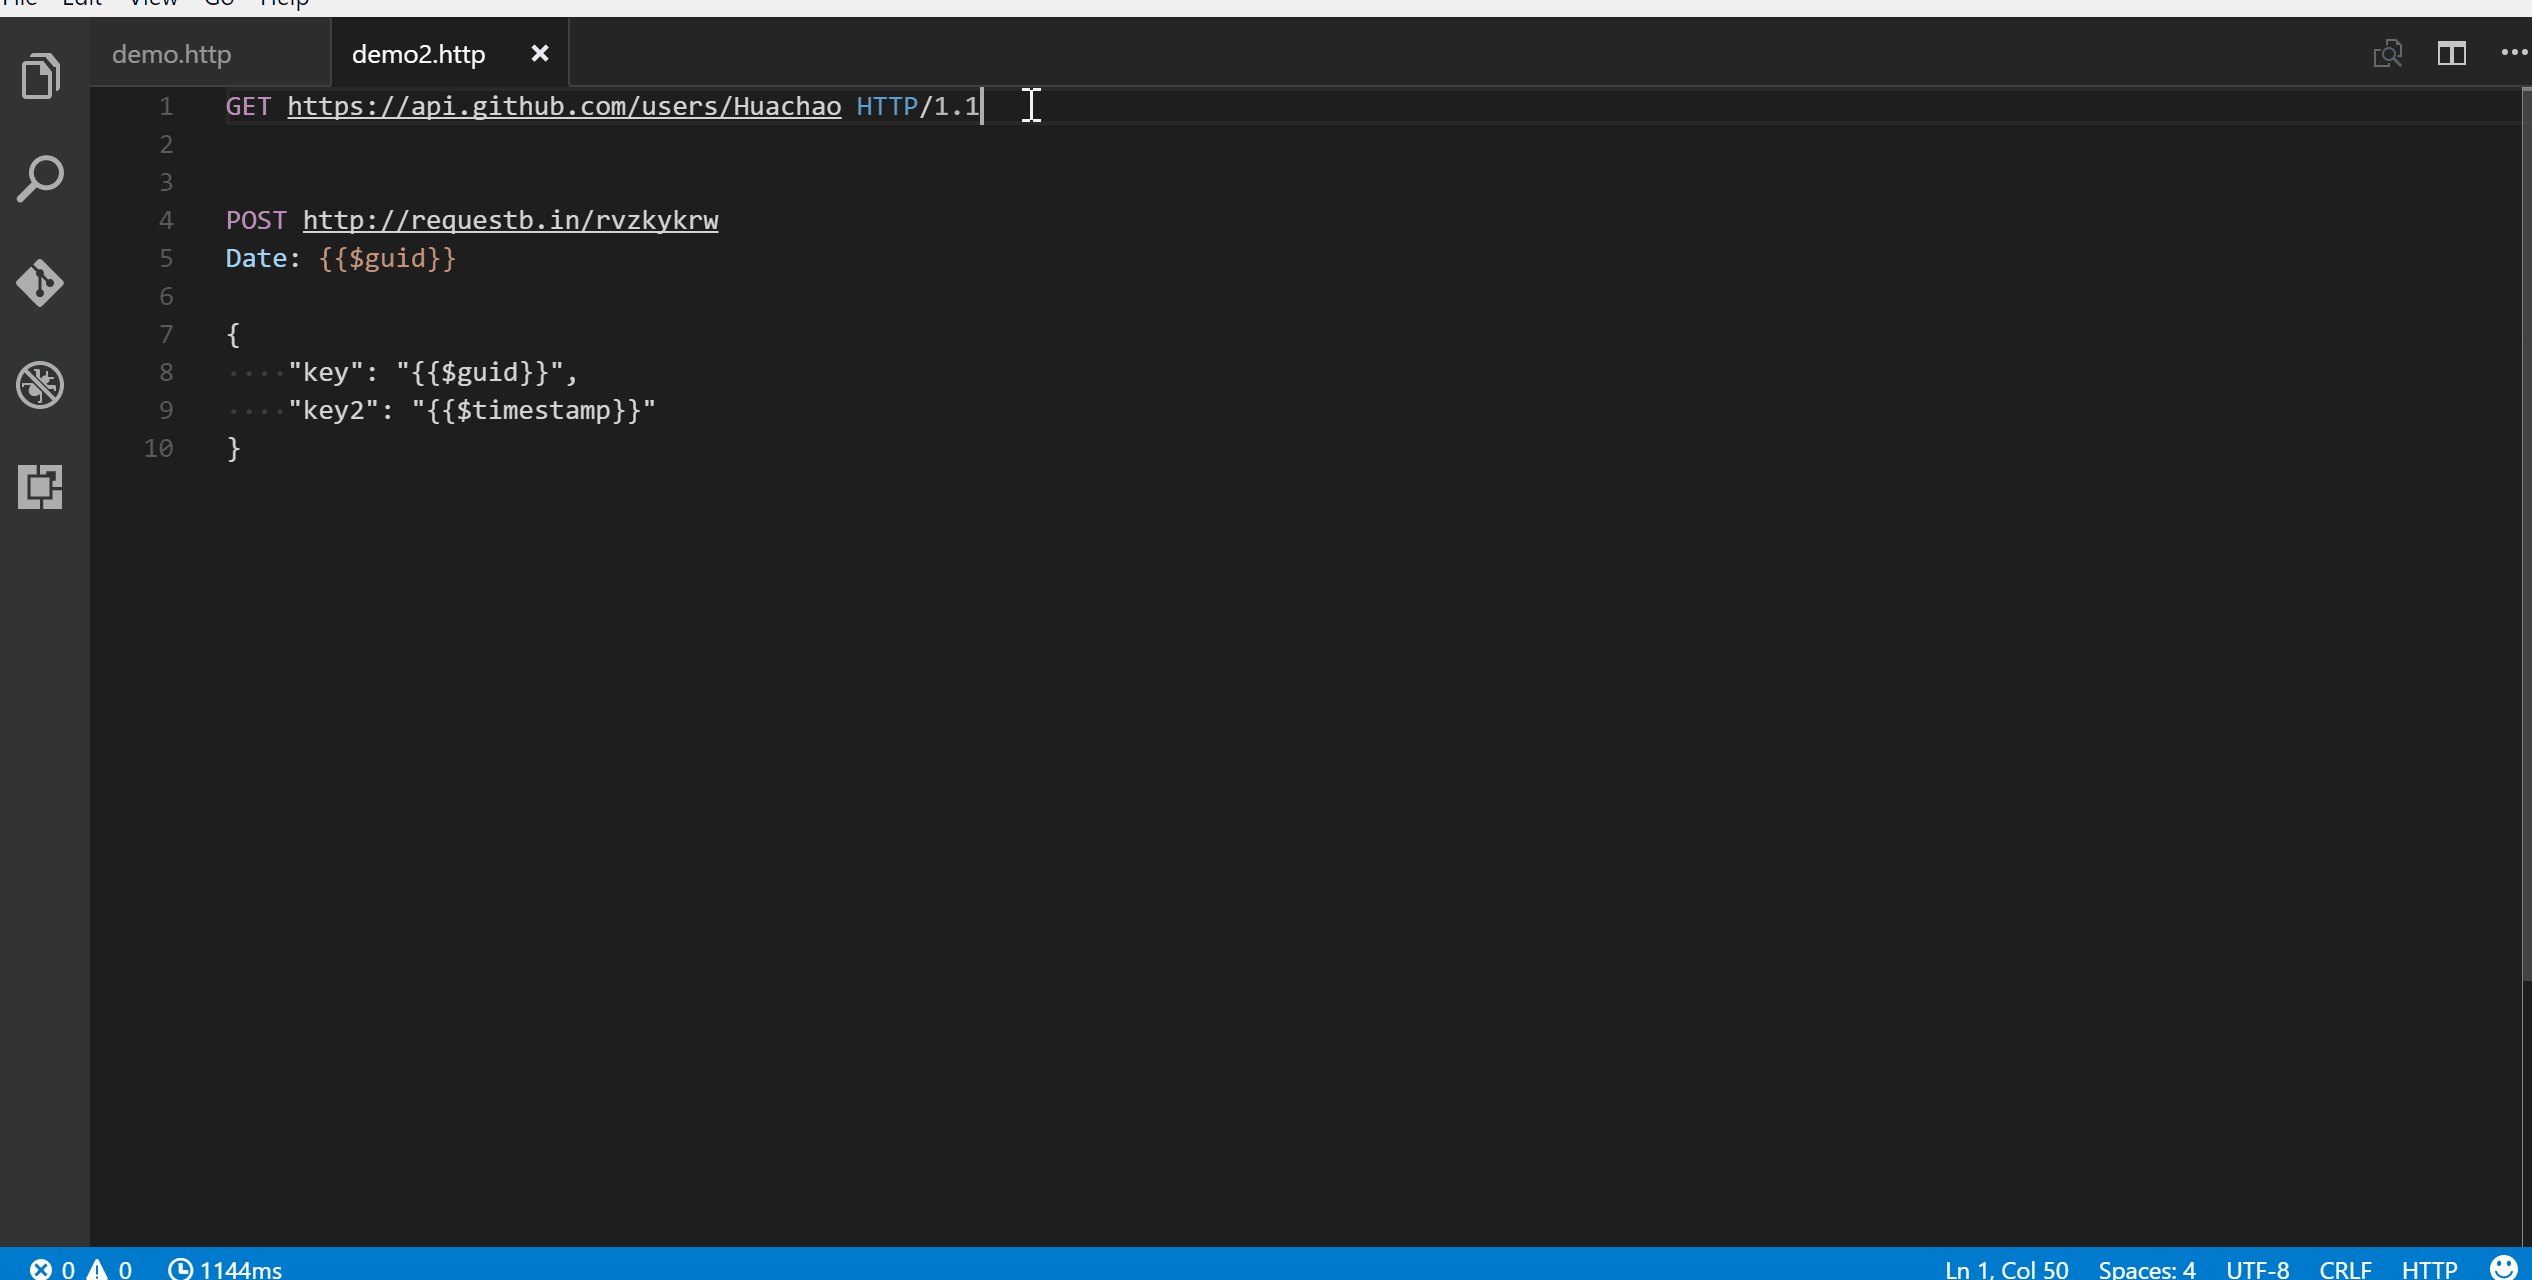
In editor, type an HTTP request as simple as below:
https://example.com/comments/1Or, you can follow the standard RFC 2616 that including request method, headers, and body.
POST https://example.com/comments HTTP/1.1
content-type: application/json

{
    "name": "sample",
    "time": "Wed, 21 Oct 2015 18:27:50 GMT"
}
To send a prepared request, you have several options. The easiest way is to click the Send Request link above the request. This link will appear automatically if the file's language mode is set to HTTP. You can also use the shortcut Ctrl+Alt+R(Cmd+Alt+R for macOS), right-click in the editor and select Send Request from the context menu, or press F1 and select/type Rest Client: Send Request.
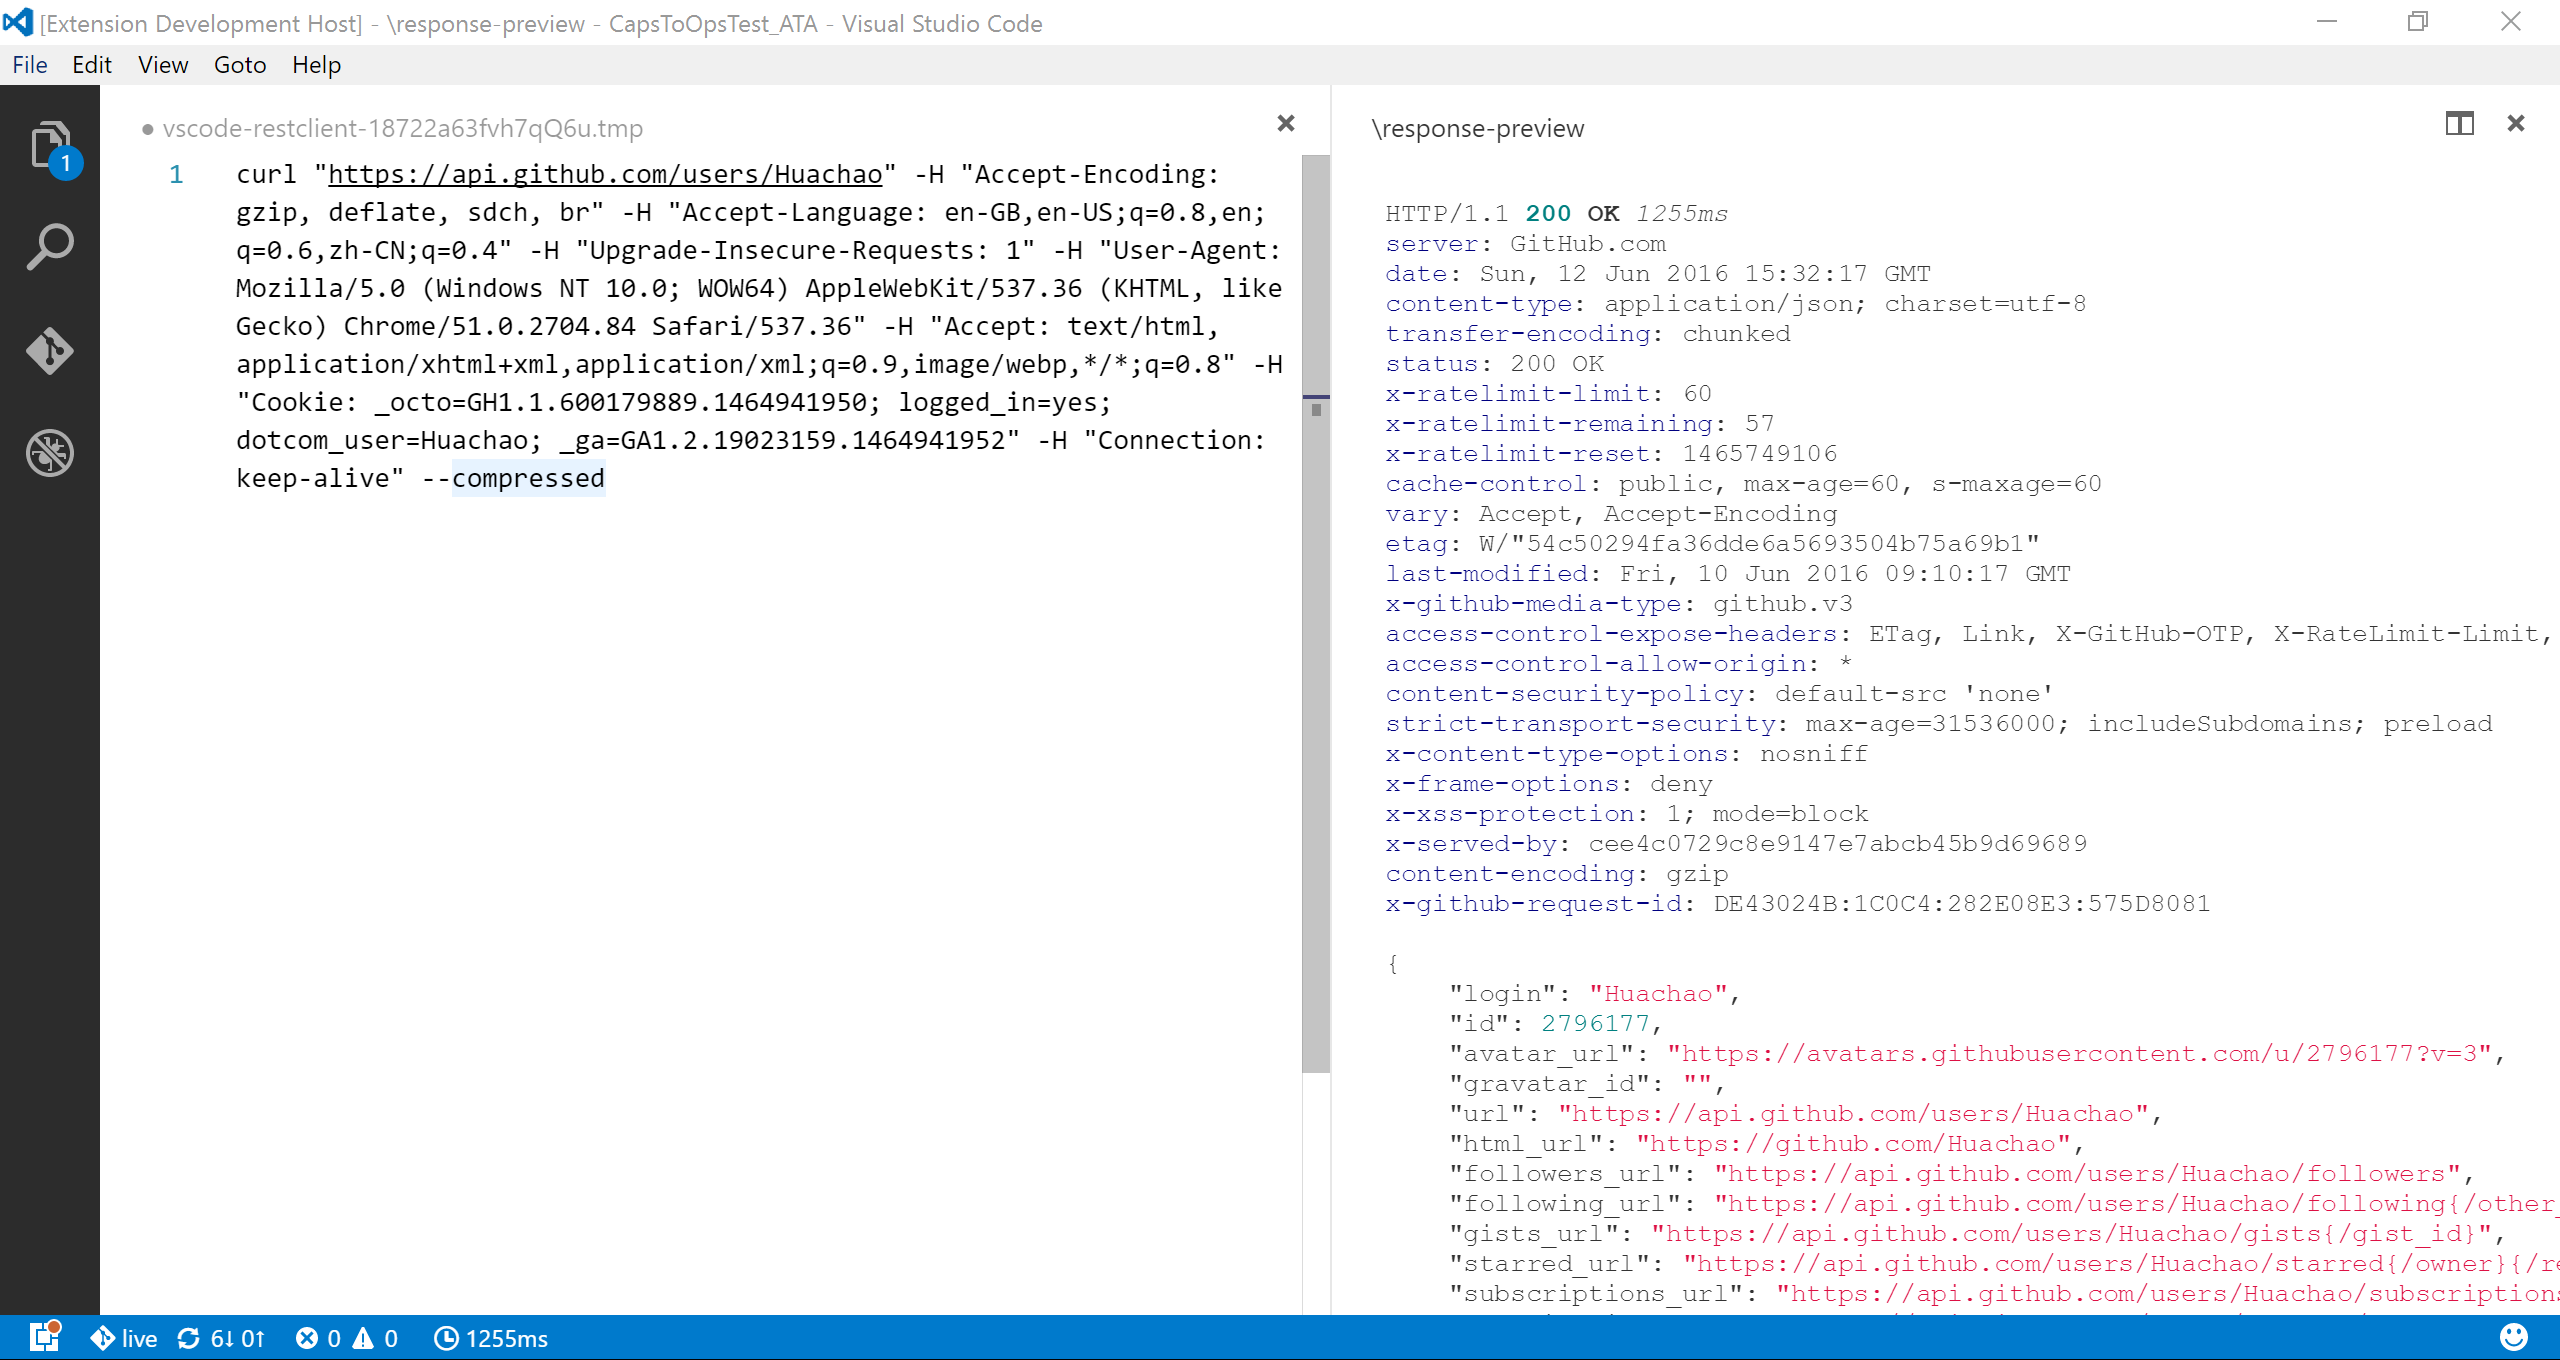
The response will be previewed in a separate webview panel inside Visual Studio Code. If you prefer to use the full power of searching, selecting, or manipulating in Visual Studio Code, you can preview the response in an untitled document by setting rest-client.previewResponseInUntitledDocument to true.
When you issue a request, a waiting spin icon will appear in the status bar until the response is received. You can click the spin icon to cancel the request. Once the response is received, the waiting icon will be replaced with the total duration and response size. By hovering over the total duration in the status bar, you can view a breakdown of the response time, including details on Socket, DNS, TCP, First Byte and Download. By hovering over the response size displayed in the status bar, you can view a breakdown of the response size details for both the headers and body.
The shortcuts in the REST Client Extension can be accessed exclusively when using the file language modes
httpandplaintext.
If you need to store multiple requests in the same file and execute them at your convenience, REST Client Extension has got you covered. By using the three or more consecutive # symbol as a delimiter, you can create a separation between the requests that the extension can recognize. Once you have done this, simply place your cursor between the delimiters of the desired request, issue it as usual, and the extension will send it out without any hassle.
GET https://example.com/comments/1 HTTP/1.1

###

GET https://example.com/topics/1 HTTP/1.1

###

POST https://example.com/comments HTTP/1.1
content-type: application/json

{
    "name": "sample",
    "time": "Wed, 21 Oct 2015 18:27:50 GMT"
}
REST Client extension also provides the flexibility that you can send the request with your selected text in editor.
Press F1, type ext install then search for rest-client.
The first non-empty line of the selection (or document if nothing is selected) is the Request Line. Below are some examples of Request Line:
GET https://example.com/comments/1 HTTP/1.1GET https://example.com/comments/1https://example.com/comments/1If request method is omitted, request will be treated as GET, so above requests are the same after parsing.
You can always write query strings in the request line, like:
GET https://example.com/comments?page=2&pageSize=10Sometimes there may be several query parameters in a single request, putting all the query parameters in Request Line is difficult to read and modify. So we allow you to spread query parameters into multiple lines(one line one query parameter), we will parse the lines in immediately after the Request Line which starts with ? and &, like
GET https://example.com/comments
    ?page=2
&pageSize=10Once you've written your Request line, the lines that immediately follow until the first empty line will be parsed as Request Headers. These headers should follow the standard field-name: field-value format, with each line representing a single header. By default if you don't explicitly specify a User-Agent header, REST Client Extension will automatically add one with the value vscode-restclient. However, if you want to change the default value, you can do so in the rest-client.defaultHeaders setting.
Below are examples of Request Headers:
User-Agent: rest-client
Accept-Language: en-GB,en-US;q=0.8,en;q=0.6,zh-CN;q=0.4
Content-Type: application/jsonIf you want to provide a request body, simply add a blank line following the request headers, as demonstrated in the POST example in the usage section. Anything written after the blank line will be treated as Request Body content. Here are some examples:
POST https://example.com/comments HTTP/1.1
Content-Type: application/xml
Authorization: token xxx

<request>
    <name>sample</name>
    <time>Wed, 21 Oct 2015 18:27:50 GMT</time>
</request>
You can also specify file path to use as a body, which starts with < , the file path(whitespaces should be preserved) can be either in absolute or relative(relative to workspace root or current http file) formats:
POST https://example.com/comments HTTP/1.1
Content-Type: application/xml
Authorization: token xxx

< C:\Users\Default\Desktop\demo.xml
POST https://example.com/comments HTTP/1.1
Content-Type: application/xml
Authorization: token xxx
< ./demo.xmlIf you want to use variables in that file, you'll have to use an @ to ensure variables are processed when referencing a file (UTF-8 is assumed as the default encoding)
POST https://example.com/comments HTTP/1.1
Content-Type: application/xml
Authorization: token xxx

<@ ./demo.xml
to override the default encoding, simply type it next to the @ like the below example
POST https://example.com/comments HTTP/1.1
Content-Type: application/xml
Authorization: token xxx

<@latin1 ./demo.xml
When content type of request body is multipart/form-data, you may have the mixed format of the request body as follows:
POST https://api.example.com/user/upload
Content-Type: multipart/form-data; boundary=----WebKitFormBoundary7MA4YWxkTrZu0gW

------WebKitFormBoundary7MA4YWxkTrZu0gW
Content-Disposition: form-data; name="text"

title
------WebKitFormBoundary7MA4YWxkTrZu0gW
Content-Disposition: form-data; name="image"; filename="1.png"
Content-Type: image/png

< ./1.png
------WebKitFormBoundary7MA4YWxkTrZu0gW--
When content type of request body is application/x-www-form-urlencoded, you may even divide the request body into multiple lines. And each key and value pair should occupy a single line which starts with &:
POST https://api.example.com/login HTTP/1.1
Content-Type: application/x-www-form-urlencoded

name=foo
&password=bar
When your mouse is over the document link, you can
Ctrl+Click(Cmd+Clickfor macOS) to open the file in a new tab.
With GraphQL support in REST Client extension, you can author and send GraphQL query using the request body. Besides that you can also author GraphQL variables in the request body. GraphQL variables part in request body is optional, you also need to add a blank line between GraphQL query and variables if you need it.
You can specify a request as GraphQL Request by adding a custom request header X-Request-Type: GraphQL in your headers. The following code illustrates this:
POST https://api.github.com/graphql
Content-Type: application/json
Authorization: Bearer xxx
X-REQUEST-TYPE: GraphQL

query ($name: String!, $owner: String!) {
  repository(name: $name, owner: $owner) {
    name
    fullName: nameWithOwner
    description
    diskUsage
    forkCount
    stargazers(first: 5) {
        totalCount
        nodes {
            login
            name
        }
    }
    watchers {
        totalCount
    }
  }
}

{
    "name": "vscode-restclient",
    "owner": "Huachao"
} We add the capability to directly run curl request in REST Client extension. The issuing request command is the same as raw HTTP one. REST Client will automatically parse the request with specified parser.
REST Client doesn't fully support all the options of cURL, since underneath we use request library to send request which doesn't accept all the cURL options. Supported options are listed below:
- -X, --request
- -L, --location, --url
- -H, --header(no @ support)
- -I, --head
- -b, --cookie(no cookie jar file support)
- -u, --user(Basic auth support only)
- -d, --data, --data-ascii,--data-binary, --data-raw
If you need to quickly obtain the curl format of an HTTP request and save it to your clipboard, you can use a handy shortcut. Simply hit F1 and select/type Rest Client: Copy Request As cURL. Alternatively, you can right-click in the editor and select Copy Request As cURL.
If you want to cancel a processing request, click the waiting spin icon or use shortcut Ctrl+Alt+K(Cmd+Alt+K for macOS), or press F1 and then select/type Rest Client: Cancel Request.
Sometimes you may want to refresh the API response, now you could do it simply using shortcut Ctrl+Alt+L(Cmd+Alt+L for macOS), or press F1 and then select/type Rest Client: Rerun Last Request to rerun the last request.
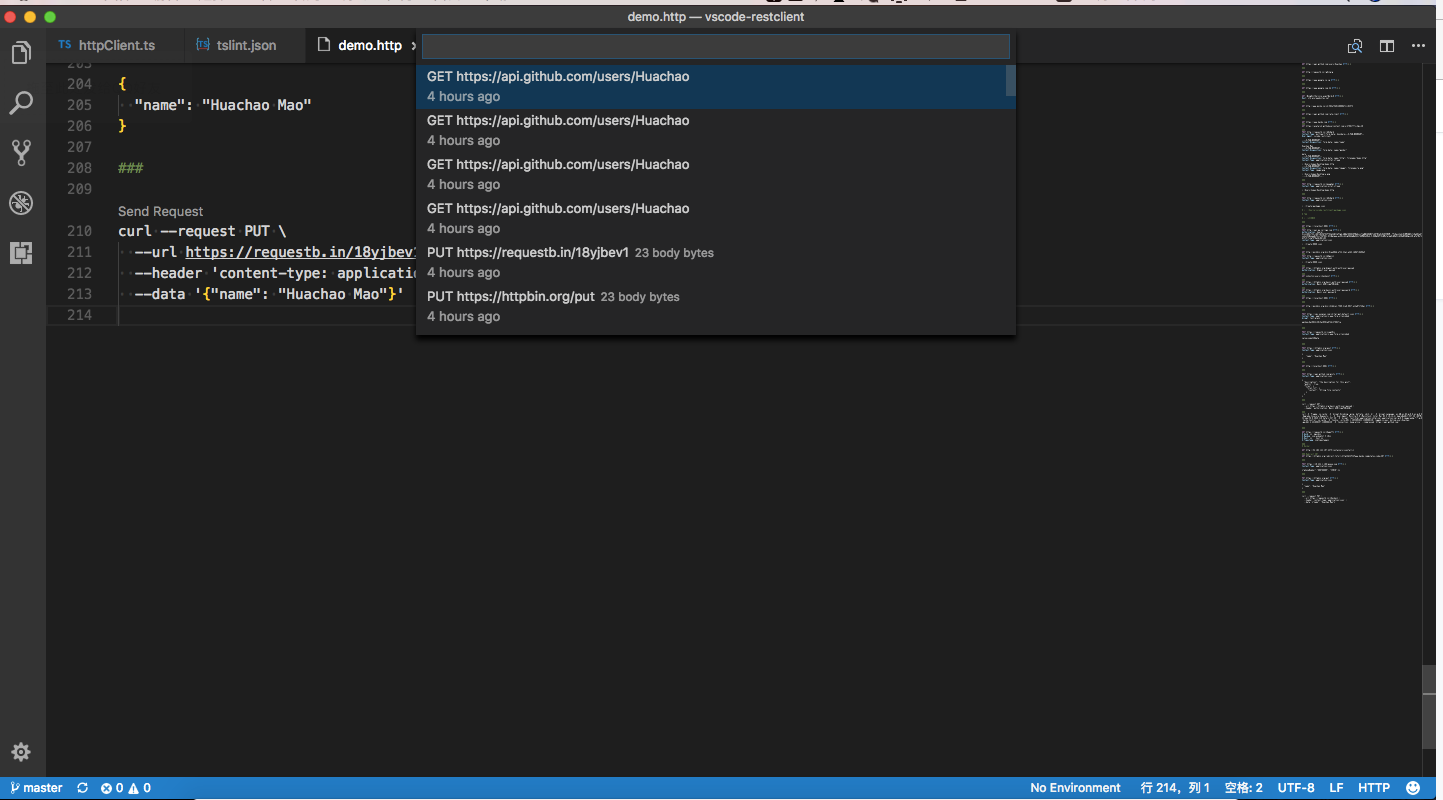 Every time you send an http request, the request details, including method, url, headers, and body, are saved into a file for future reference. To access this content, you can use the shortcut
 Ctrl+Alt+H(Cmd+Alt+H for macOS), or press F1 and then select/type Rest Client: Request History. This will allow you to view the last 50 request items in time reversing order, displaying the method, url, and request time for each one. After specified request history item is selected, the request details would be displayed in a temp file, you can view the request details or follow previous step to trigger the request again.
You can also clear request history by pressing F1 and then selecting/typing Rest Client: Clear Request History.
 In the upper right corner of the response preview tab, we add a new icon to save the latest response to local file system. After you click the
 Save Full Response icon, it will prompt the window with the saved response file path. You can click the Open button to open the saved response file in current workspace or click Copy Path to copy the saved response path to clipboard.
Another icon in the upper right corner of the response preview tab is the Save Response Body button, it will only save the response body ONLY to local file system. The extension of saved file is set according to the response MIME type, like if the Content-Type value in response header is application/json, the saved file will have extension .json. You can also overwrite the MIME type and extension mapping according to your requirement with the rest-client.mimeAndFileExtensionMapping setting.
"rest-client.mimeAndFileExtensionMapping": {
    "application/atom+xml": "xml"
}In the response webview panel, there are two options Fold Response and Unfold Response after clicking the More Actions... button. Sometimes you may want to fold or unfold the whole response body, these options provide a straightforward way to achieve this.
We have supported some most common authentication schemes like Basic Auth, Digest Auth, SSL Client Certificates, Azure Active Directory(Azure AD) and AWS Signature v4.
HTTP Basic Auth is a widely used protocol for simple username/password authentication. We support three formats of Authorization header to use Basic Auth.
- Add the value of Authorization header in the raw value of
username:password. - Add the value of Authorization header in the base64 encoding of
username:password. - Add the value of Authorization header in the raw value of
usernameandpassword, which is separated by space. REST Client extension will do the base64 encoding automatically.
The corresponding examples are as follows, they are equivalent:
GET https://httpbin.org/basic-auth/user/passwd HTTP/1.1
Authorization: Basic user:passwd
and
GET https://httpbin.org/basic-auth/user/passwd HTTP/1.1
Authorization: Basic dXNlcjpwYXNzd2Q=
and
GET https://httpbin.org/basic-auth/user/passwd HTTP/1.1
Authorization: Basic user passwdHTTP Digest Auth is also a username/password authentication protocol that aims to be slightly safer than Basic Auth. The format of Authorization header for Digest Auth is similar to Basic Auth. You just need to set the scheme to Digest, as well as the raw user name and password.
GET https://httpbin.org/digest-auth/auth/user/passwd
Authorization: Digest user passwdWe support PFX, PKCS12, and PEM certificates. Before using your certificates, you need to set the certificates paths(absolute/relative to workspace/relative to current http file) in the setting file for expected host name(port is optional). For each host, you can specify the key cert, key, pfx and passphrase.
cert: Path of public x509 certificatekey: Path of private keypfx: Path of PKCS #12 or PFX certificatepassphrase: Optional passphrase for the certificate if required You can add following piece of code in your setting file if your certificate is inPEMformat:
"rest-client.certificates": {
    "localhost:8081": {
        "cert": "/Users/demo/Certificates/client.crt",
        "key": "/Users/demo/Keys/client.key"
    },
    "example.com": {
        "cert": "/Users/demo/Certificates/client.crt",
        "key": "/Users/demo/Keys/client.key"
    }
}
Or if you have certificate in PFX or PKCS12 format, setting code can be like this:
"rest-client.certificates": {
    "localhost:8081": {
        "pfx": "/Users/demo/Certificates/clientcert.p12",
        "passphrase": "123456"
    }
}
Azure AD is Microsoft’s multi-tenant, cloud-based directory and identity management service, you can refer to the System Variables section for more details.
Microsoft identity platform is an evolution of the Azure Active Directory (Azure AD) developer platform. It allows developers to build applications that sign in all Microsoft identities and get tokens to call Microsoft APIs such as Microsoft Graph or APIs that developers have built. Microsoft Identity platform supports OAuth2 scopes, incremental consent and advanced features like multi-factor authentication and conditional access.
AWS Signature version 4 authenticates requests to AWS services. To use it you need to set the Authorization header schema to AWS and provide your AWS credentials separated by spaces:
<accessId>: AWS Access Key Id<accessKey>: AWS Secret Access Keytoken:<sessionToken>: AWS Session Token - required only for temporary credentialsregion:<regionName>: AWS Region - required only if region can't be deduced from URLservice:<serviceName>: AWS Service - required only if service can't be deduced from URL
GET https://httpbin.org/aws-auth HTTP/1.1
Authorization: AWS <accessId> <accessKey> [token:<sessionToken>] [region:<regionName>] [service:<serviceName>]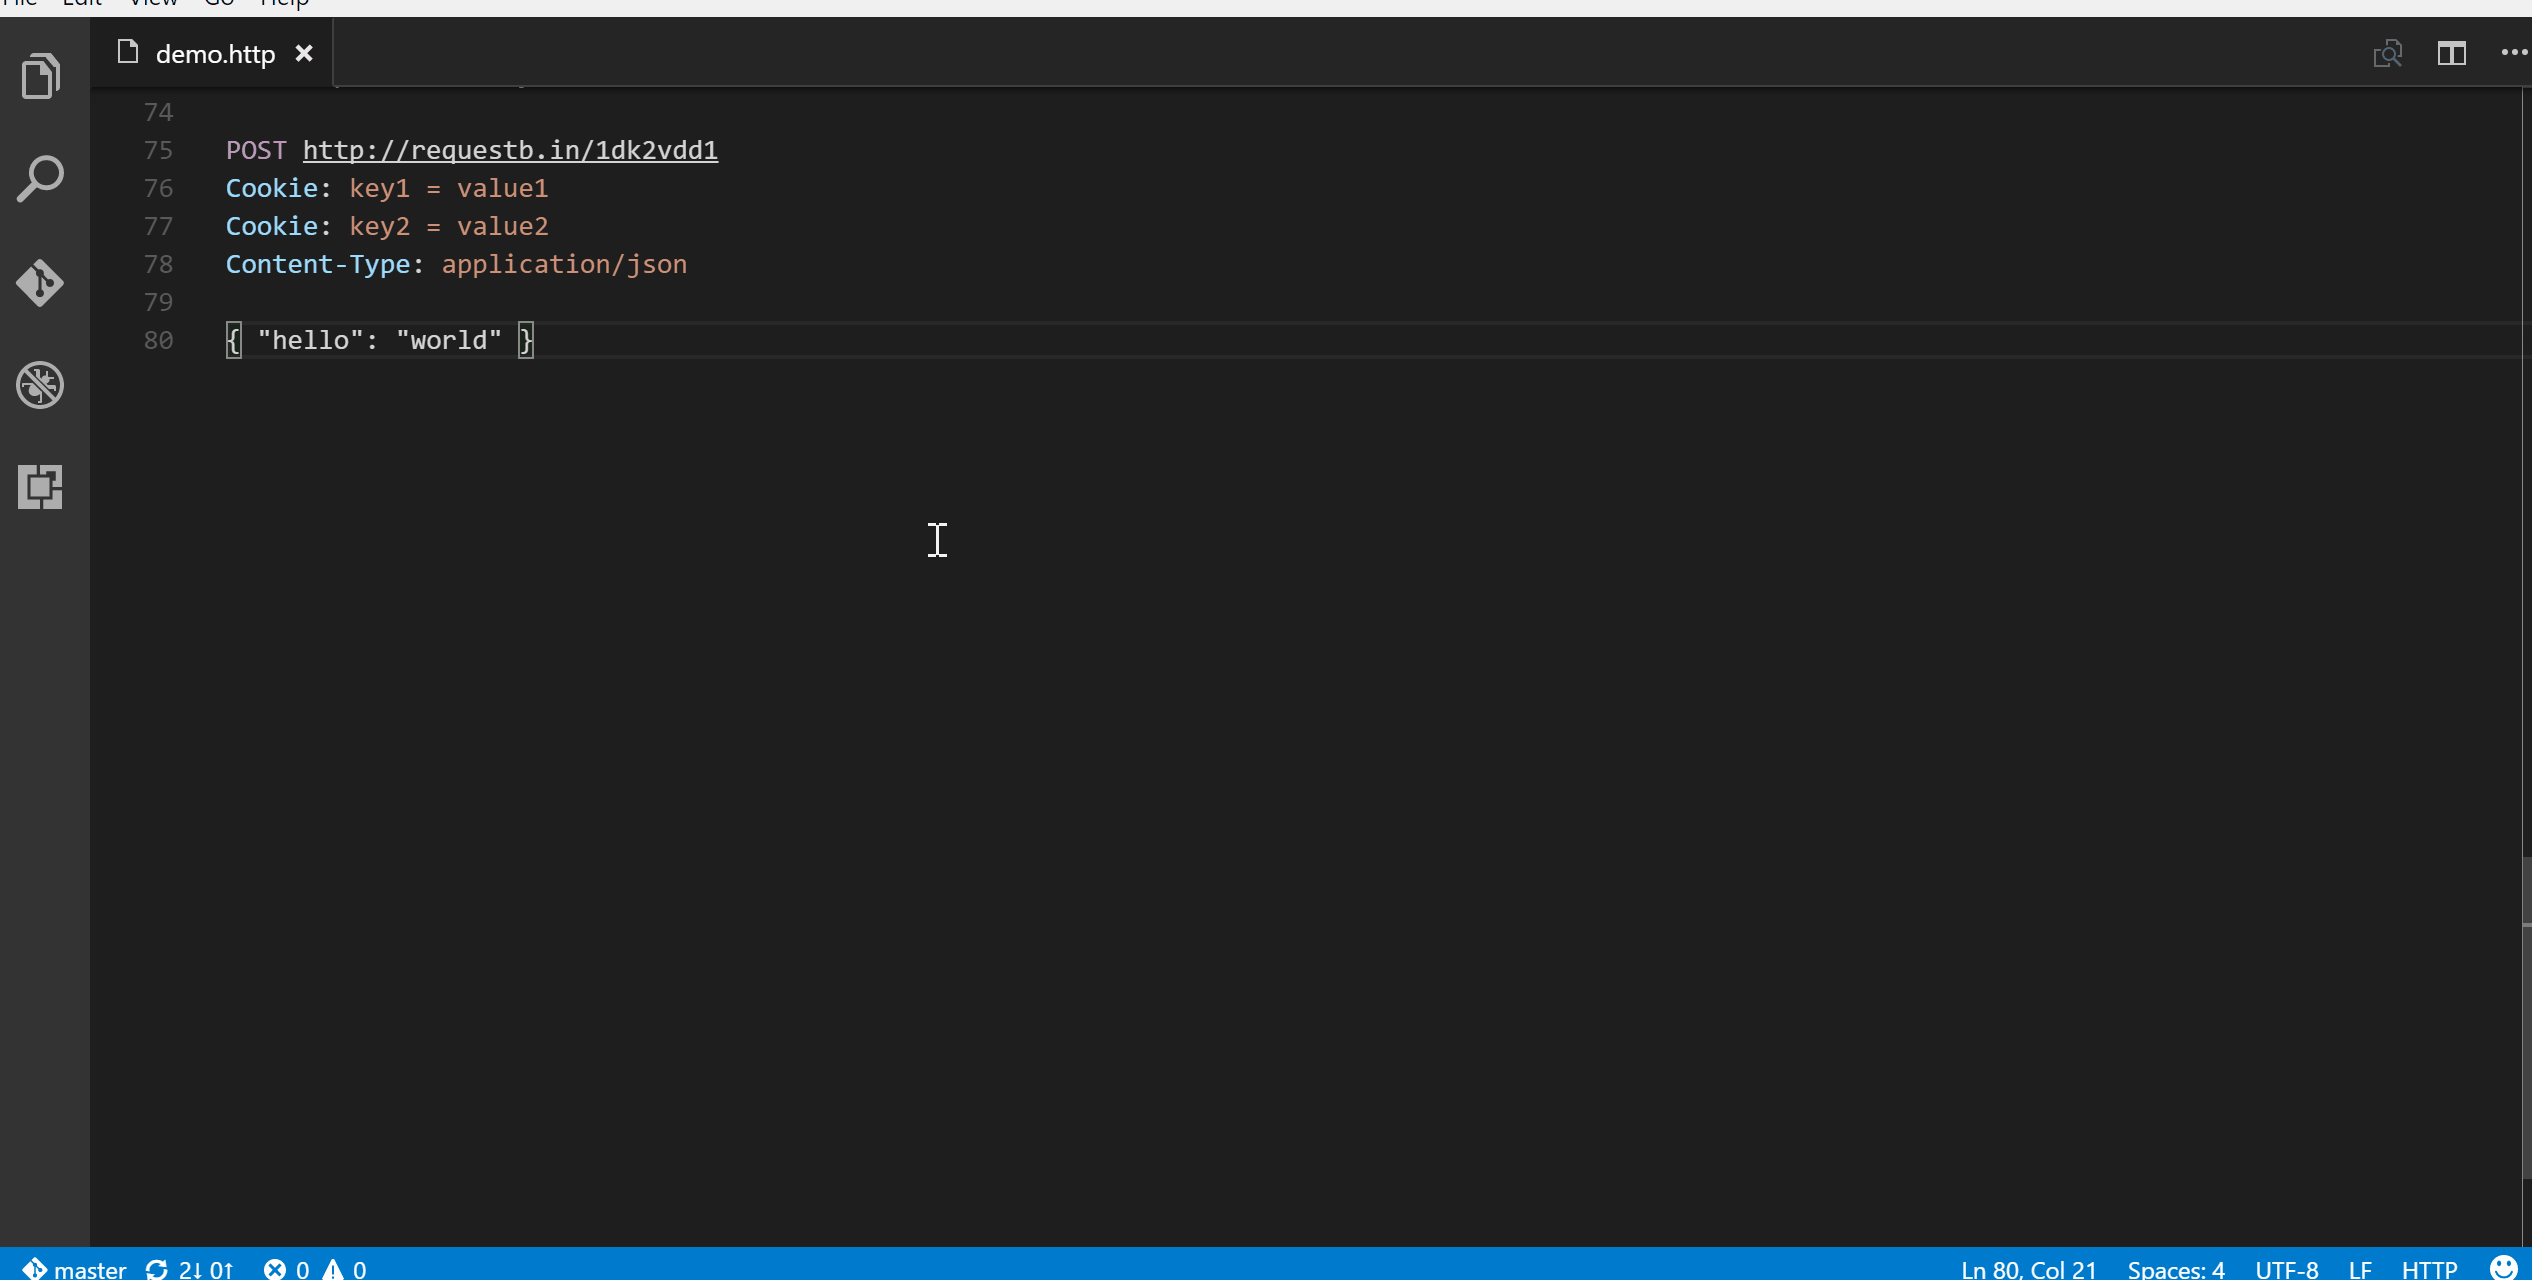 Once you’ve finalized your request in REST Client extension, you might want to make the same request from your source code. We allow you to generate snippets of code in various languages and libraries that will help you achieve this. Once you prepared a request as previously, use shortcut
 Ctrl+Alt+C(Cmd+Alt+C for macOS), or right-click in the editor and then select Generate Code Snippet in the menu, or press F1 and then select/type Rest Client: Generate Code Snippet, it will pop up the language pick list, as well as library list. After you selected the code snippet language/library you want, the generated code snippet will be previewed in a separate panel of Visual Studio Code, you can click the Copy Code Snippet icon in the tab title to copy it to clipboard.
Add language support for HTTP request, with features like syntax highlight, auto completion, code lens and comment support, when writing HTTP request in Visual Studio Code. By default, the language association will be automatically activated in two cases:
- File with extension
.httpor.rest - First line of file follows standard request line in RFC 2616, with
Method SP Request-URI SP HTTP-Versionformat
If you want to enable language association in other cases, just change the language mode in the right bottom of Visual Studio Code to HTTP.
Currently, auto completion will be enabled for following seven categories:
- HTTP Method
- HTTP URL from request history
- HTTP Header
- System variables
- Custom variables in current environment/file/request
- MIME Types for
AcceptandContent-Typeheaders - Authentication scheme for
BasicandDigest
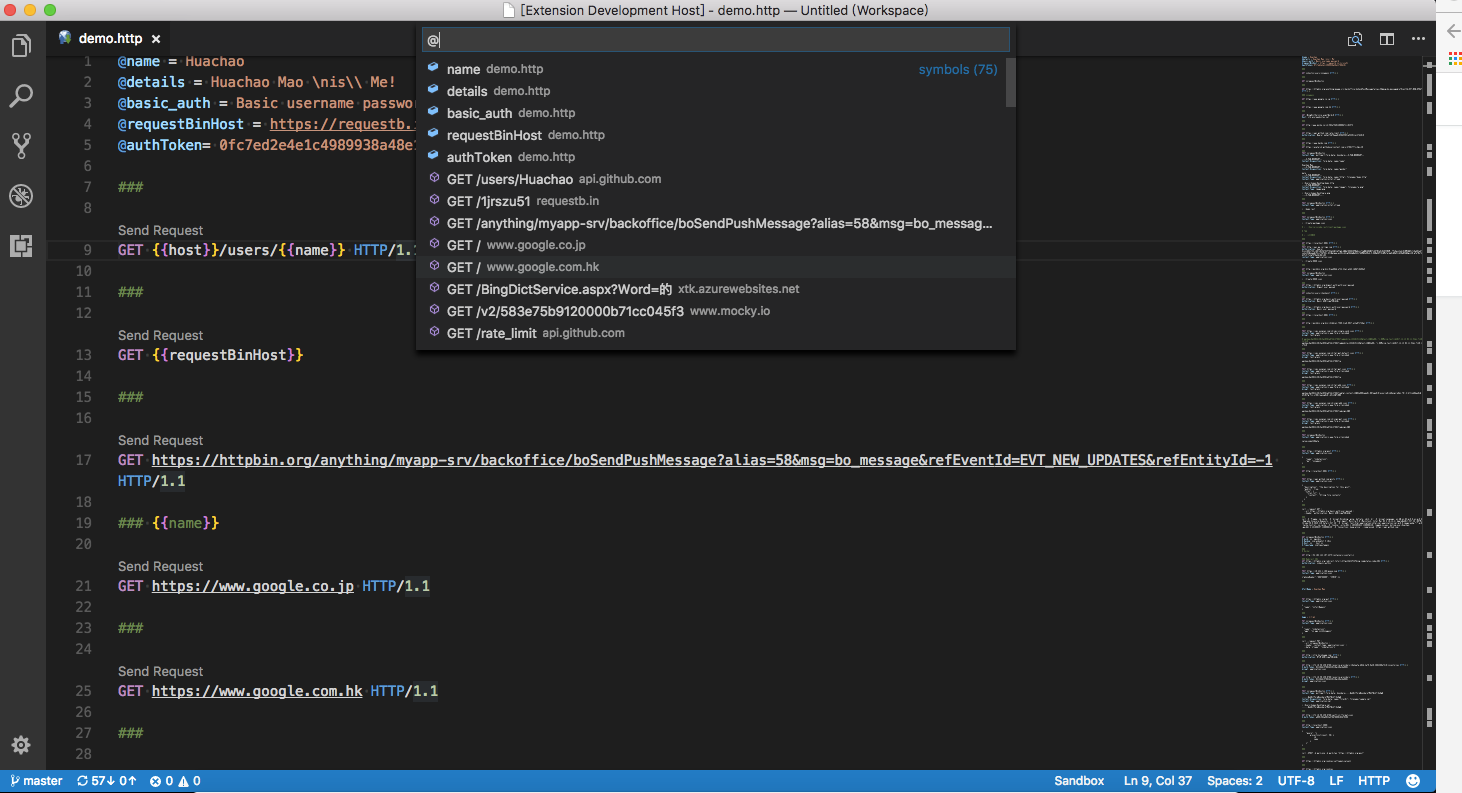
A single http file may define lots of requests and file level custom variables, it will be difficult to find the request/variable you want. We leverage from the Goto Symbol Feature of Visual Studio Code to support to navigate(goto) to request/variable with shortcut Ctrl+Shift+O(Cmd+Shift+O for macOS), or simply press F1, type @.
Environments give you the ability to customize requests using variables, and you can easily switch environment without changing requests in http file. A common usage is having different configurations for different web service environments, like devbox, sandbox, and production. We also support the shared environment(identified by special environment name $shared) to provide a set of variables that are available in all environments. And you can define the same name variable in your specified environment to overwrite the value in shared environment. Currently, active environment's name is displayed at the right bottom of Visual Studio Code, when you click it, you can switch environment in the pop-up list. And you can also switch environment using shortcut Ctrl+Alt+E(Cmd+Alt+E for macOS), or press F1 and then select/type Rest Client: Switch Environment.
Environments and including variables are defined directly in Visual Studio Code setting file, so you can create/update/delete environments and variables at any time you wish. If you DO NOT want to use any environment, you can choose No Environment in the environment list. Notice that if you select No Environment, variables defined in shared environment are still available. See Environment Variables for more details about environment variables.
We support two types of variables, one is Custom Variables which is defined by user and can be further divided into Environment Variables, File Variables, Prompt Variables, and Request Variables, the other is System Variables which is a predefined set of variables out-of-box.
The reference syntax of system and custom variables types has a subtle difference, for the former the syntax is {{$SystemVariableName}}, while for the latter the syntax is {{CustomVariableName}}, without preceding $ before variable name. The definition syntax and location for different types of custom variables are different. Notice that when the same name used for custom variables, request variables takes higher resolving precedence over file variables, file variables takes higher precedence over environment variables.
Custom variables can cover different user scenarios with the benefit of environment variables, file variables, and request variables. Environment variables are mainly used for storing values that may vary in different environments. Since environment variables are directly defined in Visual Studio Code setting file, they can be referenced across different http files. File variables are mainly used for representing values that are constant throughout the http file. Request variables are used for the chaining requests scenarios which means a request needs to reference some part(header or body) of another request/response in the same http file, imagine we need to retrieve the auth token dynamically from the login response, request variable fits the case well. Both file and request variables are defined in the http file and only have File Scope.
For environment variables, each environment comprises a set of key value pairs defined in setting file, key and value are variable name and value respectively. Only variables defined in selected environment and shared environment are available to you. You can also reference the variables in shared environment with {{$shared variableName}} syntax in your active environment. Below is a sample piece of setting file for custom environments and environment level variables:
"rest-client.environmentVariables": {
    "$shared": {
        "version": "v1",
        "prodToken": "foo",
        "nonProdToken": "bar"
    },
    "local": {
        "version": "v2",
        "host": "localhost",
        "token": "{{$shared nonProdToken}}",
        "secretKey": "devSecret"
    },
    "production": {
        "host": "example.com",
        "token": "{{$shared prodToken}}",
        "secretKey" : "prodSecret"
    }
}
A sample usage in http file for above environment variables is listed below, note that if you switch to local environment, the version would be v2, if you change to production environment, the version would be v1 which is inherited from the $shared environment:
GET https://{{host}}/api/{{version}}comments/1 HTTP/1.1
Authorization: {{token}}For file variables, the definition follows syntax @variableName = variableValue which occupies a complete line. And variable name MUST NOT contain any spaces. As for variable value, it can consist of any characters, even whitespaces are allowed for them (leading and trailing whitespaces will be trimmed). If you want to preserve some special characters like line break, you can use the backslash \ to escape, like \n. File variable value can even contain references to all of other kinds of variables. For instance, you can create a file variable with value of other request variables like @token = {{loginAPI.response.body.token}}. When referencing a file variable, you can use the percent % to percent-encode the value.
File variables can be defined in a separate request block only filled with variable definitions, as well as define request variables before any request url, which needs an extra blank line between variable definitions and request url. However, no matter where you define the file variables in the http file, they can be referenced in any requests of whole file. For file variables, you can also benefit from some Visual Studio Code features like Go To Definition and Find All References. Below is a sample of file variable definitions and references in an http file.
@hostname = api.example.com
@port = 8080
@host = {{hostname}}:{{port}}
@contentType = application/json
@createdAt = {{$datetime iso8601}}
@modifiedBy = {{$processEnv USERNAME}}

###

@name = Strunk & White

GET https://{{host}}/authors/{{%name}} HTTP/1.1

###

PATCH https://{{host}}/authors/{{%name}} HTTP/1.1
Content-Type: {{contentType}}

{
    "content": "foo bar",
    "created_at": "{{createdAt}}",
    "modified_by": "{{modifiedBy}}"
}
With prompt variables, user can input the variables to be used when sending a request. This gives a flexibility to change most dynamic variables without having to change the http file. User can specify more than one prompt variables. The definition syntax of prompt variables is like a single-line comment by adding the syntax before the desired request url with the following syntax // @prompt {var1} or # @prompt {var1}. A variable description is also assignable using // @prompt {var1} {description} or # @prompt {var1} {description} which will prompt an input popup with a desired description message.
The user input will be hidden as typed if the variable is any one of these names: password, Password, PASSWORD, passwd, Passwd, PASSWD, pass, Pass, PASS.
The reference syntax is the same as others, follows {{var}}. The prompt variable will override any preceding assigned variable and will never be stored to be used in other requests.
@hostname = api.example.com
@port = 8080
@host = {{hostname}}:{{port}}
@contentType = application/json

###
# @prompt username
# @prompt refCode Your reference code display on webpage
# @prompt otp Your one-time password in your mailbox
POST https://{{host}}/verify-otp/{{refCode}} HTTP/1.1
Content-Type: {{contentType}}

{
    "username": "{{username}}",
    "otp": "{{otp}}"
}
Request variables are similar to file variables in some aspects like scope and definition location. However, they have some obvious differences. The definition syntax of request variables is just like a single-line comment, and follows // @name requestName or # @name requestName just before the desired request url. You can think of request variable as attaching a name metadata to the underlying request, and this kind of requests can be called with Named Request, while normal requests can be called with Anonymous Request. Other requests can use requestName as an identifier to reference the expected part of the named request or its latest response. Notice that if you want to refer the response of a named request, you need to manually trigger the named request to retrieve its response first, otherwise the plain text of variable reference like {{requestName.response.body.$.id}} will be sent instead.
The reference syntax of a request variable is a bit more complex than other kinds of custom variables. The request variable reference syntax follows {{requestName.(response|request).(body|headers).(*|JSONPath|XPath|Header Name)}}. You have two reference part choices of the response or request: body and headers. For body part, you can use * to reference the full response body, and for JSON and XML responses, you can use JSONPath and XPath to extract specific property or attribute. For example, if a JSON response returns body {"id": "mock"}, you can set the JSONPath part to $.id to reference the id. For headers part, you can specify the header name to extract the header value. Additionally, the header name is case-insensitive.
If the JSONPath or XPath of body, or Header Name of headers can't be resolved, the plain text of variable reference will be sent instead. And in this case, diagnostic information will be displayed to help you to inspect this. And you can also hover over the request variables to view the actual resolved value.
Below is a sample of request variable definitions and references in an http file.
@baseUrl = https://example.com/api

# @name login
POST {{baseUrl}}/api/login HTTP/1.1
Content-Type: application/x-www-form-urlencoded

name=foo&password=bar

###

@authToken = {{login.response.headers.X-AuthToken}}

# @name createComment
POST {{baseUrl}}/comments HTTP/1.1
Authorization: {{authToken}}
Content-Type: application/json

{
    "content": "fake content"
}

###

@commentId = {{createComment.response.body.$.id}}

# @name getCreatedComment
GET {{baseUrl}}/comments/{{commentId}} HTTP/1.1
Authorization: {{authToken}}

###

# @name getReplies
GET {{baseUrl}}/comments/{{commentId}}/replies HTTP/1.1
Accept: application/xml

###

# @name getFirstReply
GET {{baseUrl}}/comments/{{commentId}}/replies/{{getReplies.response.body.//reply[1]/@id}}
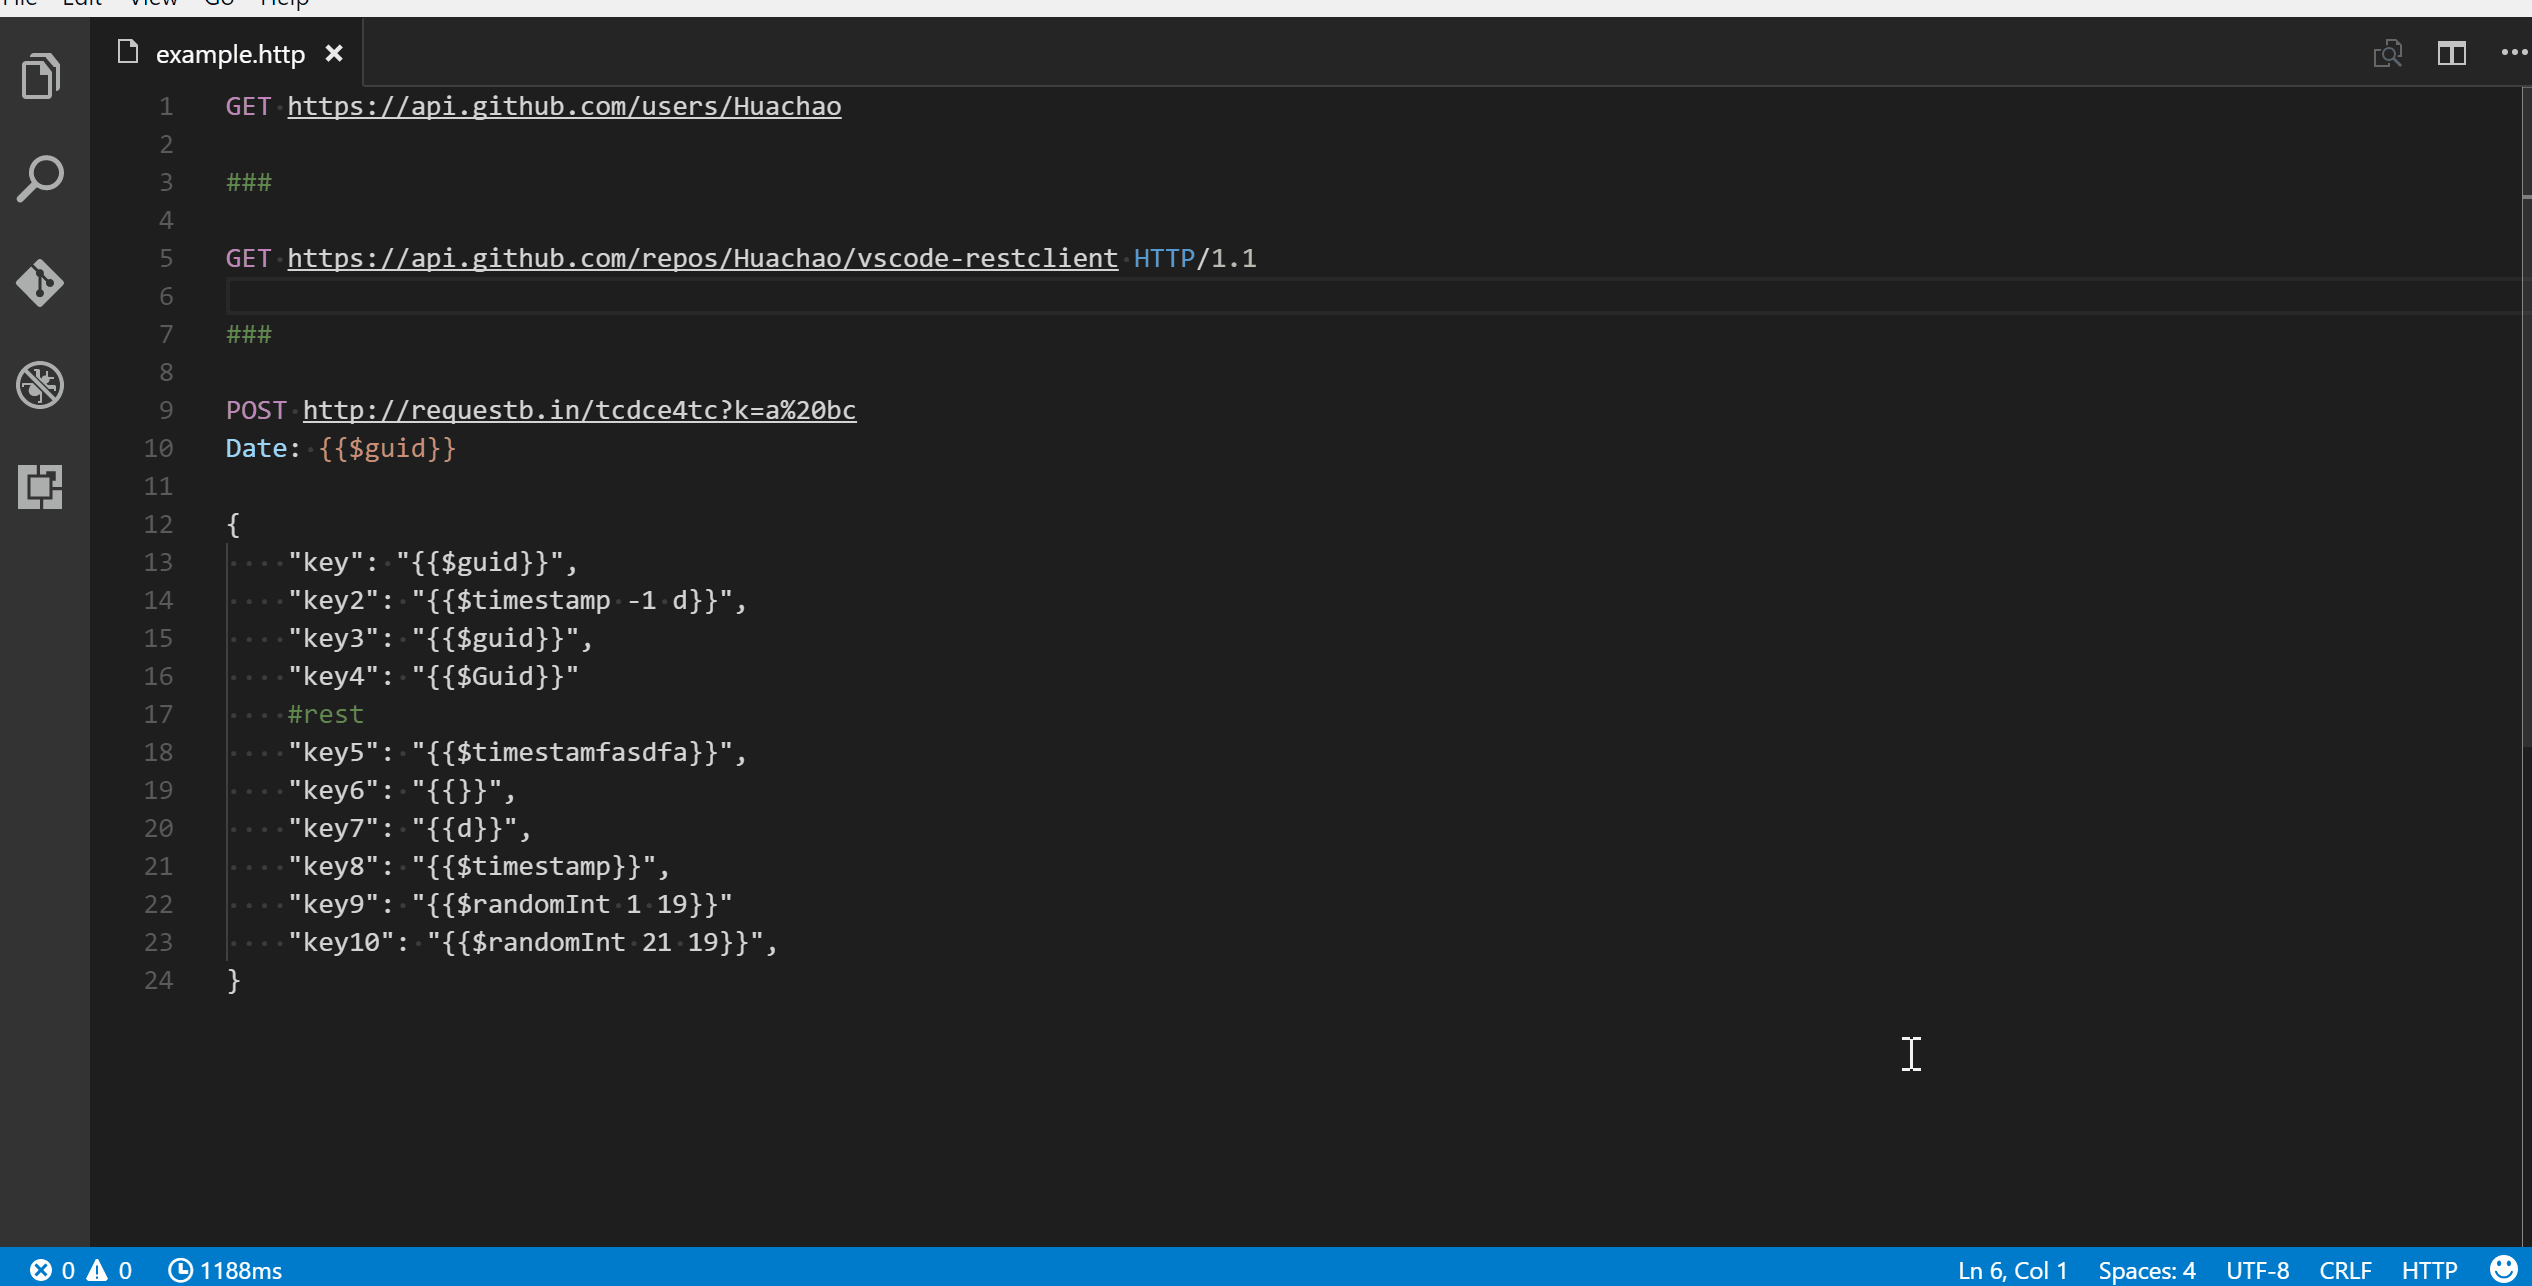
System variables provide a pre-defined set of variables that can be used in any part of the request(Url/Headers/Body) in the format {{$variableName}}. Currently, we provide a few dynamic variables which you can use in your requests. The variable names are case-sensitive.
-
{{$aadToken [new] [public|cn|de|us|ppe] [<domain|tenantId>] [aud:<domain|tenantId>]}}: Add an Azure Active Directory token based on the following options (must be specified in order):new: Optional. Specifynewto force re-authentication and get a new token for the specified directory. Default: Reuse previous token for the specified directory from an in-memory cache. Expired tokens are refreshed automatically. (UseF1 > Rest Client: Clear Azure AD Token Cacheor restart Visual Studio Code to clear the cache.)public|cn|de|us|ppe: Optional. Specify top-level domain (TLD) to get a token for the specified government cloud,publicfor the public cloud, orppefor internal testing. Default: TLD of the REST endpoint;publicif not valid.<domain|tenantId>: Optional. Domain or tenant id for the directory to sign in to. Default: Pick a directory from a drop-down or pressEscto use the home directory (commonfor Microsoft Account).aud:<domain|tenantId>: Optional. Target Azure AD app id (aka client id) or domain the token should be created for (aka audience or resource). Default: Domain of the REST endpoint. -
{{$aadV2Token [new] [AzureCloud|AzureChinaCloud|AzureUSGovernment|ppe] [appOnly ][scopes:<scope[,]>] [tenantid:<domain|tenantId>] [clientid:<clientId>]}}: Add an Azure Active Directory token based on the following options (must be specified in order):new: Optional. Specifynewto force re-authentication and get a new token for the specified directory. Default: Reuse previous token for the specified tenantId and clientId from an in-memory cache. Expired tokens are refreshed automatically. (Restart Visual Studio Code to clear the cache.)AzureCloud|AzureChinaCloud|AzureUSGovernment|ppe: Optional. Specify sovereign cloud (orppefor internal testing) to get a token for. Default: 'AzureCloud`.appOnly: Optional. SpecifyappOnlyto use make to use a client credentials flow to obtain a token.aadV2ClientSecretandaadV2AppUrimust be provided as REST Client environment variables.aadV2ClientId,aadV2TenantIdandaadV2Cloudmay also be optionally provided via the environment.aadV2ClientIdin environment will only be used forappOnlycalls.scopes:<scope[,]>: Optional. Comma delimited list of scopes that must have consent to allow the call to be successful. Not applicable forappOnlycalls.tenantId:<domain|tenantId>: Optional. Domain or tenant id for the tenant to sign in to. (commonto determine tenant from sign in).clientId:<clientid>: Optional. Identifier of the application registration to use to obtain the token. Default uses an application registration created specifically for this plugin. -
{{$guid}}: Add a RFC 4122 v4 UUID -
{{$processEnv [%]envVarName}}: Allows the resolution of a local machine environment variable to a string value. A typical use case is for secret keys that you don't want to commit to source control. For example: Define a shell environment variable in.bashrcor similar on windowsexport DEVSECRET="XlII3JUaEZldVg=" export PRODSECRET="qMTkleUgjclRoRmV1WA==" export USERNAME="sameUsernameInDevAndProd"
and with extension setting environment variables.
"rest-client.environmentVariables": {
    "$shared": {
        "version": "v1"
    },
    "local": {
        "version": "v2",
        "host": "localhost",
        "secretKey": "DEVSECRET"
    },
    "production": {
        "host": "example.com",
        "secretKey" : "PRODSECRET"
    }
}
You can refer directly to the key (e.g.
PRODSECRET) in the script, for example if running in the production environment# Lookup PRODSECRET from local machine environment GET https://{{host}}/{{version}}/values/item1?user={{$processEnv USERNAME}} Authorization: {{$processEnv PRODSECRET}}
or, it can be rewritten to indirectly refer to the key using an extension environment setting (e.g.
%secretKey) to be environment independent using the optional%modifier.# Use secretKey from extension environment settings to determine which local machine environment variable to use GET https://{{host}}/{{version}}/values/item1?user={{$processEnv USERNAME}} Authorization: {{$processEnv %secretKey}}
envVarName: Mandatory. Specifies the local machine environment variable%: Optional. If specified, treats envVarName as an extension setting environment variable, and uses the value of that for the lookup. -
{{$dotenv [%]variableName}}: Returns the environment value stored in the.envfile which exists in the same directory of your.httpfile. -
{{$randomInt min max}}: Returns a random integer between min (included) and max (excluded) -
{{$timestamp [offset option]}}: Add UTC timestamp of now. You can even specify any date time based on current time in the format{{$timestamp number option}}, e.g., to represent 3 hours ago, simply{{$timestamp -3 h}}; to represent the day after tomorrow, simply{{$timestamp 2 d}}. -
{{$datetime rfc1123|iso8601|"custom format"|'custom format' [offset option]}}: Add a datetime string in either ISO8601, RFC1123 or a custom display format. You can even specify a date time relative to the current date similar totimestamplike:{{$datetime iso8601 1 y}}to represent a year later in ISO8601 format. If specifying a custom format, wrap it in single or double quotes like:{{$datetime "DD-MM-YYYY" 1 y}}. The date is formatted using Day.js, read here for information on format strings. -
{{$localDatetime rfc1123|iso8601|"custom format"|'custom format' [offset option]}}: Similar to$datetimeexcept that$localDatetimereturns a time string in your local time zone.
The offset options you can specify in timestamp and datetime are:
| Option | Description |
|---|---|
| y | Year |
| M | Month |
| w | Week |
| d | Day |
| h | Hour |
| m | Minute |
| s | Second |
| ms | Millisecond |
Below is a example using system variables:
POST https://api.example.com/comments HTTP/1.1
Content-Type: application/xml
Date: {{$datetime rfc1123}}

{
    "user_name": "{{$dotenv USERNAME}}",
    "request_id": "{{$guid}}",
    "updated_at": "{{$timestamp}}",
    "created_at": "{{$timestamp -1 d}}",
    "review_count": "{{$randomInt 5 200}}",
    "custom_date": "{{$datetime 'YYYY-MM-DD'}}",
    "local_custom_date": "{{$localDatetime 'YYYY-MM-DD'}}"
}
More details about
aadToken(Azure Active Directory Token) can be found on Wiki
REST Client Extension adds the ability to control the font family, size and weight used in the response preview.
By default, REST Client Extension only previews the full response in preview panel(status line, headers and body). You can control which part should be previewed via the rest-client.previewOption setting:
| Option | Description |
|---|---|
| full | Default. Full response is previewed |
| headers | Only the response headers(including status line) are previewed |
| body | Only the response body is previewed |
| exchange | Preview the whole HTTP exchange(request and response) |
rest-client.followredirect: Follow HTTP 3xx responses as redirects. (Default is true)rest-client.defaultHeaders: If particular headers are omitted in request header, these will be added as headers for each request. (Default is{ "User-Agent": "vscode-restclient", "Accept-Encoding": "gzip" })rest-client.timeoutinmilliseconds: Timeout in milliseconds. 0 for infinity. (Default is 0)rest-client.showResponseInDifferentTab: Show response in different tab. (Default is false)rest-client.requestNameAsResponseTabTitle: Show request name as the response tab title. Only valid when using html view, if no request name is specified defaults to "Response". (Default is false)rest-client.rememberCookiesForSubsequentRequests: Save cookies fromSet-Cookieheader in response and use for subsequent requests. (Default is true)rest-client.enableTelemetry: Send out anonymous usage data. (Default is true)rest-client.excludeHostsForProxy: Excluded hosts when using proxy settings. (Default is [])rest-client.fontSize: Controls the font size in pixels used in the response preview. (Default is 13)rest-client.fontFamily: Controls the font family used in the response preview. (Default is Menlo, Monaco, Consolas, "Droid Sans Mono", "Courier New", monospace, "Droid Sans Fallback")rest-client.fontWeight: Controls the font weight used in the response preview. (Default is normal)rest-client.environmentVariables: Sets the environments and custom variables belongs to it (e.g.,{"production": {"host": "api.example.com"}, "sandbox":{"host":"sandbox.api.example.com"}}). (Default is {})rest-client.mimeAndFileExtensionMapping: Sets the custom mapping of mime type and file extension of saved response body. (Default is {})rest-client.previewResponseInUntitledDocument: Preview response in untitled document if set to true, otherwise displayed in html view. (Default is false)rest-client.certificates: Certificate paths for different hosts. The path can be absolute path or relative path(relative to workspace or current http file). (Default is {})rest-client.suppressResponseBodyContentTypeValidationWarning: Suppress response body content type validation. (Default is false)rest-client.previewOption: Response preview output option. Option details is described above. (Default is full)rest-client.disableHighlightResponseBodyForLargeResponse: Controls whether to highlight response body for response whose size is larger than limit specified byrest-client.largeResponseSizeLimitInMB. (Default is true)rest-client.disableAddingHrefLinkForLargeResponse: Controls whether to add href link in previewed response for response whose size is larger than limit specified byrest-client.largeResponseSizeLimitInMB. (Default is true)rest-client.largeResponseBodySizeLimitInMB: Set the response body size threshold of MB to identify whether a response is a so-called 'large response', only used whenrest-client.disableHighlightResponseBodyForLargeResponseand/orrest-client.disableAddingHrefLinkForLargeResponseis set to true. (Default is 5)rest-client.previewColumn: Response preview column option. 'current' for previewing in the column of current request file. 'beside' for previewing at the side of the current active column and the side direction depends onworkbench.editor.openSideBySideDirectionsetting, either right or below the current editor column. (Default is beside)rest-client.previewResponsePanelTakeFocus: Preview response panel will take focus after receiving response. (Default is True)rest-client.formParamEncodingStrategy: Form param encoding strategy for request body of x-www-form-urlencoded.automaticfor detecting encoding or not automatically and do the encoding job if necessary.neverfor treating provided request body as is, no encoding job will be applied.alwaysfor only use for the scenario thatautomaticoption not working properly, e.g., some special characters(+) are not encoded correctly. (Default is automatic)rest-client.addRequestBodyLineIndentationAroundBrackets: Add line indentation around brackets({},<>,[]) in request body when pressing enter. (Default is true)rest-client.decodeEscapedUnicodeCharacters: Decode escaped unicode characters in response body. (Default is false)rest-client.logLevel: The verbosity of logging in the REST output panel. (Default is error)rest-client.enableSendRequestCodeLens: Enable/disable sending request CodeLens in request file. (Default is true)rest-client.enableCustomVariableReferencesCodeLens: Enable/disable custom variable references CodeLens in request file. (Default is true)rest-client.useContentDispositionFilename: Usefilename=from'content-disposition'header (if available), to determine output file name, when saving response body. (Default is true)
Rest Client extension respects the proxy settings made for Visual Studio Code (http.proxy and http.proxyStrictSSL). Only HTTP and HTTPS proxies are supported.
REST Client Extension also supports request-level settings for each independent request. The syntax is similar with the request name definition, # @settingName [settingValue], a required setting name as well as the optional setting value. Available settings are listed as following:
| Name | Syntax | Description |
|---|---|---|
| note | # @note |
Use for request confirmation, especially for critical request |
| no-redirect | # @no-redirect |
Don't follow the 3XX response as redirects |
| no-cookie-jar | # @no-cookie-jar |
Don't save cookies in the cookie jar |
All the above leading
#can be replaced with//
See CHANGELOG here
All the amazing contributors❤️
Please provide feedback through the GitHub Issue system, or fork the repository and submit PR.


![dependabot[bot] avatar](https://avatars.githubusercontent.com/in/29110?v=4 "dependabot[bot]")