Prerequisites to use Appium:
1.Android SDK (Android Studio with bundled SDK). 2.JDK (Java Development Kit). 3.Appium Client for Windows (client). 4.IDE and testing framework of choice. In our case, we will use node.js and mocha testing frameworks, so we need to install js. Even though Appium client supplied with bundled “Node.exe” and NPM (node package manager), we will install those manually to have the latest version.
Appium installation on Mac
Step 1. Download and install JDK. After installation, you will need to set your “JAVA_HOME” environment variable. (see here
Step 2. Download and install Android SDK.After installation, you will need to set the “ANDROID_HOME” environment variable. (see here )
Step 3. Download and install node.js. Just follow installation guidelines and that is it.
Step 4. Install Appium client. Just follow installation guide and that is it.( see here )
Step 5. Run Appium client as administrator.
Step 6. We will start Appium server on localhost (type “localhost” into “Host” with default port.
Device setup for running the tests
Step 1. Start Android emulator of choice or attach a real device via USB cable.
The most comfortable way to run emulator is to run Android Studio, then go “Tools” → “Android” → “AVD Manager” and configure desired device.
Step 2. Open Command Prompt and navigate to your ANDROID_HOME directory, for instance “cd C:\Users\zelri\AppData\Local\Android\sdk1\platform-tools” (without quotes).
Step 3. Run “adb devices” to see the list of attached devices, both real and emulated.
Step 4. In current directory start android-debugging-bridge (adb) by typing and executing “adb start-server” command Next, allow USB debugging on your device.
Step 5. Run “npm install appium-doctor –g” command to install command line tool called “appium-doctor” for verifying Appium installation for particular platform. This command will install this tool via NPM and make it available to use from everywhere.
Step 6. Run “appium-doctor –android” command to check that everything is ready to work. You should see the below output
Step 7. Now we want to install our application under test (AUT) on the device. In order to do this, we need to click the “Start new session” button in our running Appium client.
Step 8. In order to install desired application on device, we need to fill in form on the “Desired Capabilities” tab with correct info, for example:
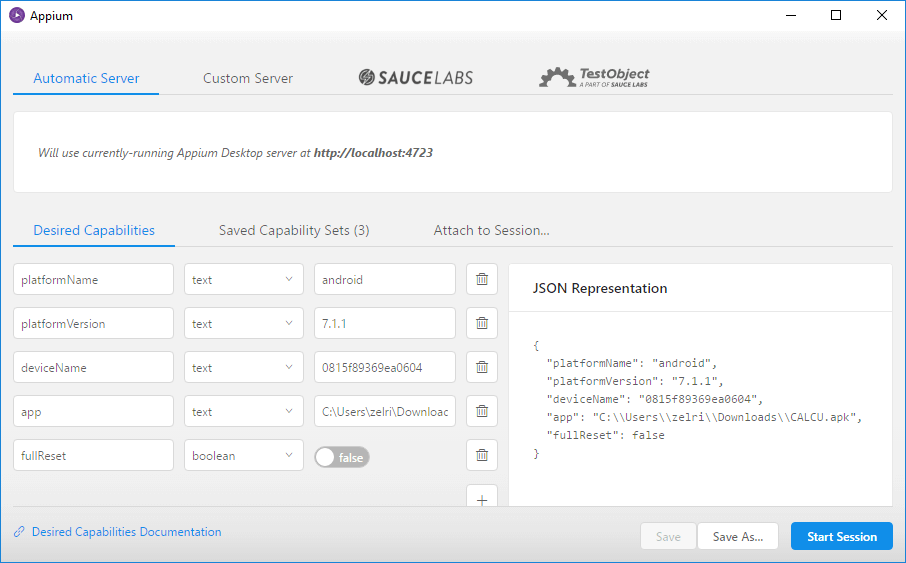
Here:
platformName – either Android or iOS. In our case it is Android; platformVersion – version of OS on our device. For emulators, you have to set their version according to the “Target” column of AVD Manager. For real devices check their version by going to “Settings” → “About phone” → “Android version”; deviceName – name of your device. Even though this option is technically omitted in current version of Appium (1.6.5), it is required to start the session. Use an appropriate one from “adb devices” commands result. app – path to application we want to install. In my case, I’ve used a full path to .apk file of CALCU calculator for sake of this guide. fullReset – this option indicates whenever we want or not to rollback all actions were done after we’ve finished the session. Set to “false” because we want to install the app and use it after session ending.
Step 9. Click the “Start Session” button. You should see your app’s launch activity on your device screen. And now you should see the Appium inspector for your app.
Writing tests
Now, our environment is set up and ready for further manipulations and tests. Let’s start with a project setup.
Step 1. Create a new folder and name it “EXAMPLE node.js android test”.
Step 2. Navigate to your folder in a Command Prompt or start one directly in the folder.
Step 3. Execute the “npm init” command in the folder. Follow setup process in a command line to configure package.json file of your project.
Step 4. After the basic setup, we need to add a bunch of dependencies in order to make our tests work. We will use mocha as our testing framework with chai for assertions. Also, we will require webdriverio testing utility, which improves interaction with mobile web, native and hybrid apps. So, run the following commands:
npm install appium-uiautomator2-driver npm install mocha npm install chai npm install chai-as-promised npm install wd npm install wdio-appium-service –D (–D parameter here stands for installation this dependency only for developers) npm install webdriverio –D npm install wdio-mocha-framework –D
Step 5. Create a subfolder and call it “helpers”. In “helpers” create a file with .js extension and name it “desiredCapabilities”. In this file we will specify all the necessary details for our script, such as application we want to run and device we want to use for testing. Here is the completed content of the file, which follows our previous steps:

Now, our desired capabilities are set and test knows what to do on launch.
Step 6. Return to the project folder and create a file “webriverio-calcu.js”. This will be our script to run. In order to locate elements, we will use mobile selectors, provided by webdriverio, for example:
~client.click('android=new UiSelector().resourceId("com.candl.athena:id/digit5")')
This resource is specific to the exampled application. To get resource id of the element or any other available identifier we will use Appium Inspector. Just click the element while in the “Select” mod to properties panel to appear and grab the most suitable attribute or identifier. More usages of UiSelector class are available here
Step 7. With that in place, we are ready to start scripting. As I said earlier, we will use webdriverio for writing our test, so consider looking at their docs for more info.
7.1. Let’s import all the required components and create client – the main object for interactions and actions:
var expect = require('chai').expect;
var config = require('./helpers/desiredCapabilities').options;
var client = webdriverio.remote(config);
7.2. Now, create the main function by using describe keyword and pass “MSSNGR Testing” as the first parameter. This function will wrap our tests and declare before and afterEach hooks. Those will be executed before our test-suite and after each method respectively.
    before(function () {
        this.timeout(50000);
        return client.init();
    });

    afterEach(function(){
        this.timeout(5000);
        return client.click('android=new UiSelector().resourceId("com.candl.athena:id/clear")');
    });
7.3. Create a sub-function by using describe keyword and call it “Test open application”. Set timeout for executing tests of this suite and write the tests with use of it keyword.
example:
        this.timeout(15000);
        it("test-close-startup-screen", function(){
            return client.click('android=new UiSelector().resourceId("com.candl.athena:id/btn_close")');
        });

        it("test-two-positive-addition",function(){
           return client.click('android=new UiSelector().resourceId("com.candl.athena:id/digit5")')
           .click('android=new UiSelector().resourceId("com.candl.athena:id/plus")')
           .click('android=new UiSelector().resourceId("com.candl.athena:id/digit2")')
           .click('android=new UiSelector().resourceId("com.candl.athena:id/equal")')
           .element('android=new UiSelector().resourceId("com.candl.athena:id/display").childSelector(new UiSelector().className("android.widget.TextView"))')
           .getText()
           .then(function (text){
               console.log("Text we've got from output: ",text);
               expect(text).to.equal('7');
            });
        });
        it("test-negative-positive-addition", function(){
           return client.click('android=new UiSelector().resourceId("com.candl.athena:id/minus")')
           .click('android=new UiSelector().resourceId("com.candl.athena:id/digit5")')
           .click('android=new UiSelector().resourceId("com.candl.athena:id/plus")')
           .click('android=new UiSelector().resourceId("com.candl.athena:id/digit2")')
           .click('android=new UiSelector().resourceId("com.candl.athena:id/equal")')
           .element('android=new UiSelector().resourceId("com.candl.athena:id/display").childSelector(new UiSelector().className("android.widget.TextView"))')
           .getText()
           .then(function (text){
               console.log("Text we've got from output: ",text);
               expect(text).to.equal('-3');
            });
        });
        it("test-negative-addition", function(){
           return client.click('android=new UiSelector().resourceId("com.candl.athena:id/minus")')
           .click('android=new UiSelector().resourceId("com.candl.athena:id/digit5")')
           .click('android=new UiSelector().resourceId("com.candl.athena:id/plus")')
           .click('android=new UiSelector().resourceId("com.candl.athena:id/minus")')
           .click('android=new UiSelector().resourceId("com.candl.athena:id/digit2")')
           .click('android=new UiSelector().resourceId("com.candl.athena:id/equal")')
           .element('android=new UiSelector().resourceId("com.candl.athena:id/display").childSelector(new UiSelector().className("android.widget.TextView"))')
           .getText()
           .then(function (text){
               console.log("Text we've got from output: ",text);
               expect(text).to.equal('-7');
            });
        });
    });
7.4. In the scope of wrapper function, add after hook, which will close the connection as well as the AUT.
        return client.end();
    });
});
Step 8. Open “package.json” and under scripts section add exactly the same line: "webdriverio-mssngr": "mocha webdriverio-mssngr.js". This will allow us to run our test by “npm run webriverio-calcu”.
