

Report Bug · Request Feature · Email Us Privately
Welcome to microfeed, a lightweight content management system (CMS) self-hosted on Cloudflare. With microfeed, you can easily publish a variety of content such as audios, videos, photos, documents, blog posts, and external URLs to a feed in the form of web, RSS, and JSON. It's the perfect solution for tech-savvy individuals who want to self-host their own CMS without having to run their own servers.
microfeed is built by Listen Notes and is hosted on Cloudflare's Pages, R2, D1, and Zero Trust.
If you have any questions or feedback, please don't hesitate to reach out to us at [email protected]. We'd love to hear from you!
![]()
![]()
Since the 1990s, a significant portion of the web has been powered by feeds. People (and bots) publish items to a feed, and others can subscribe to that feed to receive new content.
microfeed makes it easy for individuals to self-host their own feed on Cloudflare, including but not limited to
- a podcast feed of audios
- a blog feed of posts
- an Instagram-like feed of images (e.g., llamacorn.listennotes.com, brand-assets.listennotes.com)
- a YouTube-like feed of videos
- a personal website with custom links (e.g., wenbin.org)
- a content curation feed of external news article urls
- a marketing site with updates and press coverage (e.g., microfeed.org)
- a headless cms with a GUI dashboard and a public json feed (e.g., microfeed.org/json with OpenAPI spec in YAML and HTML)
- a list of domain names for sale (e.g., ListenHost.com...)
- a website for an entire book (e.g., The Art of War)
- a changelog website (e.g., changelog.listennotes.com)
- ...
microfeed uses Cloudflare Pages to host and run the code, R2 to host and serve media files, D1 to store metadata, and Zero Trust to provide logins to the admin dashboard. Cloudflare provides very generous free usage quotas, making it an affordable solution for personal or small business use. While you will still need to pay for a domain name, hosting microfeed on Cloudflare is essentially free.
With microfeed, you can publish a variety of content such as audios, videos, photos, documents, blog posts, and external URLs to a customizable website, an RSS feed, and a JSON feed. Check out some examples of microfeed in action:
- Web feed: https://llamacorn.listennotes.com/
- Rss feed: https://llamacorn.listennotes.com/rss/
- Json feed: https://llamacorn.listennotes.com/json/
microfeed provides a simple yet powerful admin dashboard that makes it easy to add items to the feed, upload media files, and customize web page styles. If you've used WordPress before, you'll find it familiar.

Roughly you'll follow these steps to install a microfeed instance to Cloudflare:
- Fork the microfeed repo to your personal (or organizational) GitHub account.
- Obtain Cloudflare API tokens and save them as secrets on your forked GitHub repository.
- Use the predefined GitHub Action in your forked repository to deploy the code to Cloudflare Pages, using the secrets from step 2.
- Make a few clicks on Cloudflare's dashboard to set up custom domains and configure some security settings.
- Done. Start publishing!
We understand that not everyone is comfortable with reading documentation, so we've made it as easy as possible to get started with microfeed. However, we'd love to see Cloudflare implement a "Login with Cloudflare" OAuth feature, which would allow for almost one-click deployment of microfeed. In the meantime, we've tried to make the setup process as straightforward as possible for tech-savvy users.
- Have a Cloudflare account. If you don't have one already, you can sign up for free at Cloudflare.com.
- Have a GitHub account. If you don't have one, you can sign up for free at GitHub.com.
Simply click on https://github.com/microfeed/microfeed/fork to fork the repository.
You may choose to modify the code in your forked repository in the future, but it's likely that you won't need to touch the code at all. Simply fork the repository and keep it synced for future use.
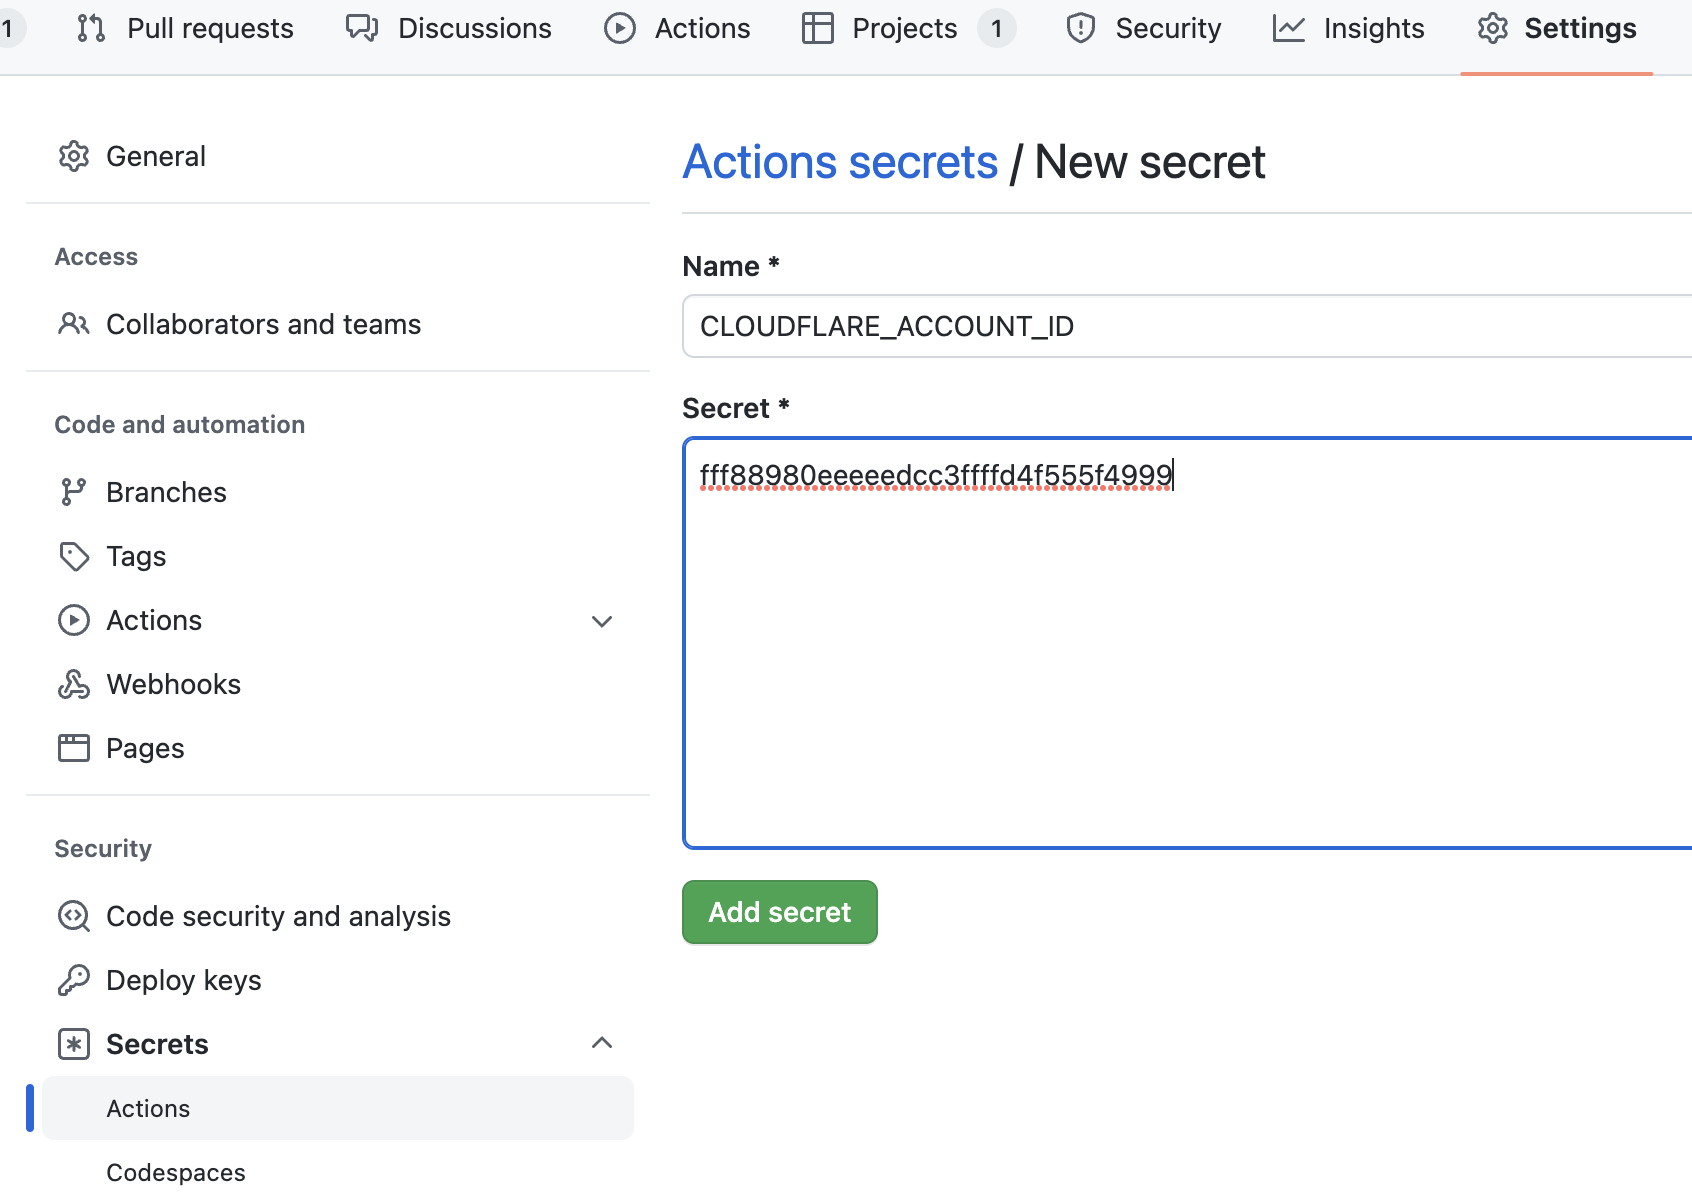
Go to your forked repo's Settings -> Secrets -> Actions, and create 5 secrets (click for more details). With these secrets in place, you'll be able to use GitHub Actions to deploy your microfeed instance to Cloudflare Pages.
CLOUDFLARE_ACCOUNT_ID
You can get your cloudflare account id from your dashboard's url:
After you login your Cloudflare account, you'll be redirected to a url like this
https://dash.cloudflare.com/[your-cloudflare-account-id-here]
The last part of the url is your cloudflare account id.
For example, if you see a url like this:
https://dash.cloudflare.com/fff88980eeeeedcc3ffffd4f555f4999
Then you'll set CLOUDFLARE_ACCOUNT_ID to fff88980eeeeedcc3ffffd4f555f4999:
CLOUDFLARE_API_TOKEN
You'll need to create an API token here: https://dash.cloudflare.com/profile/api-tokens
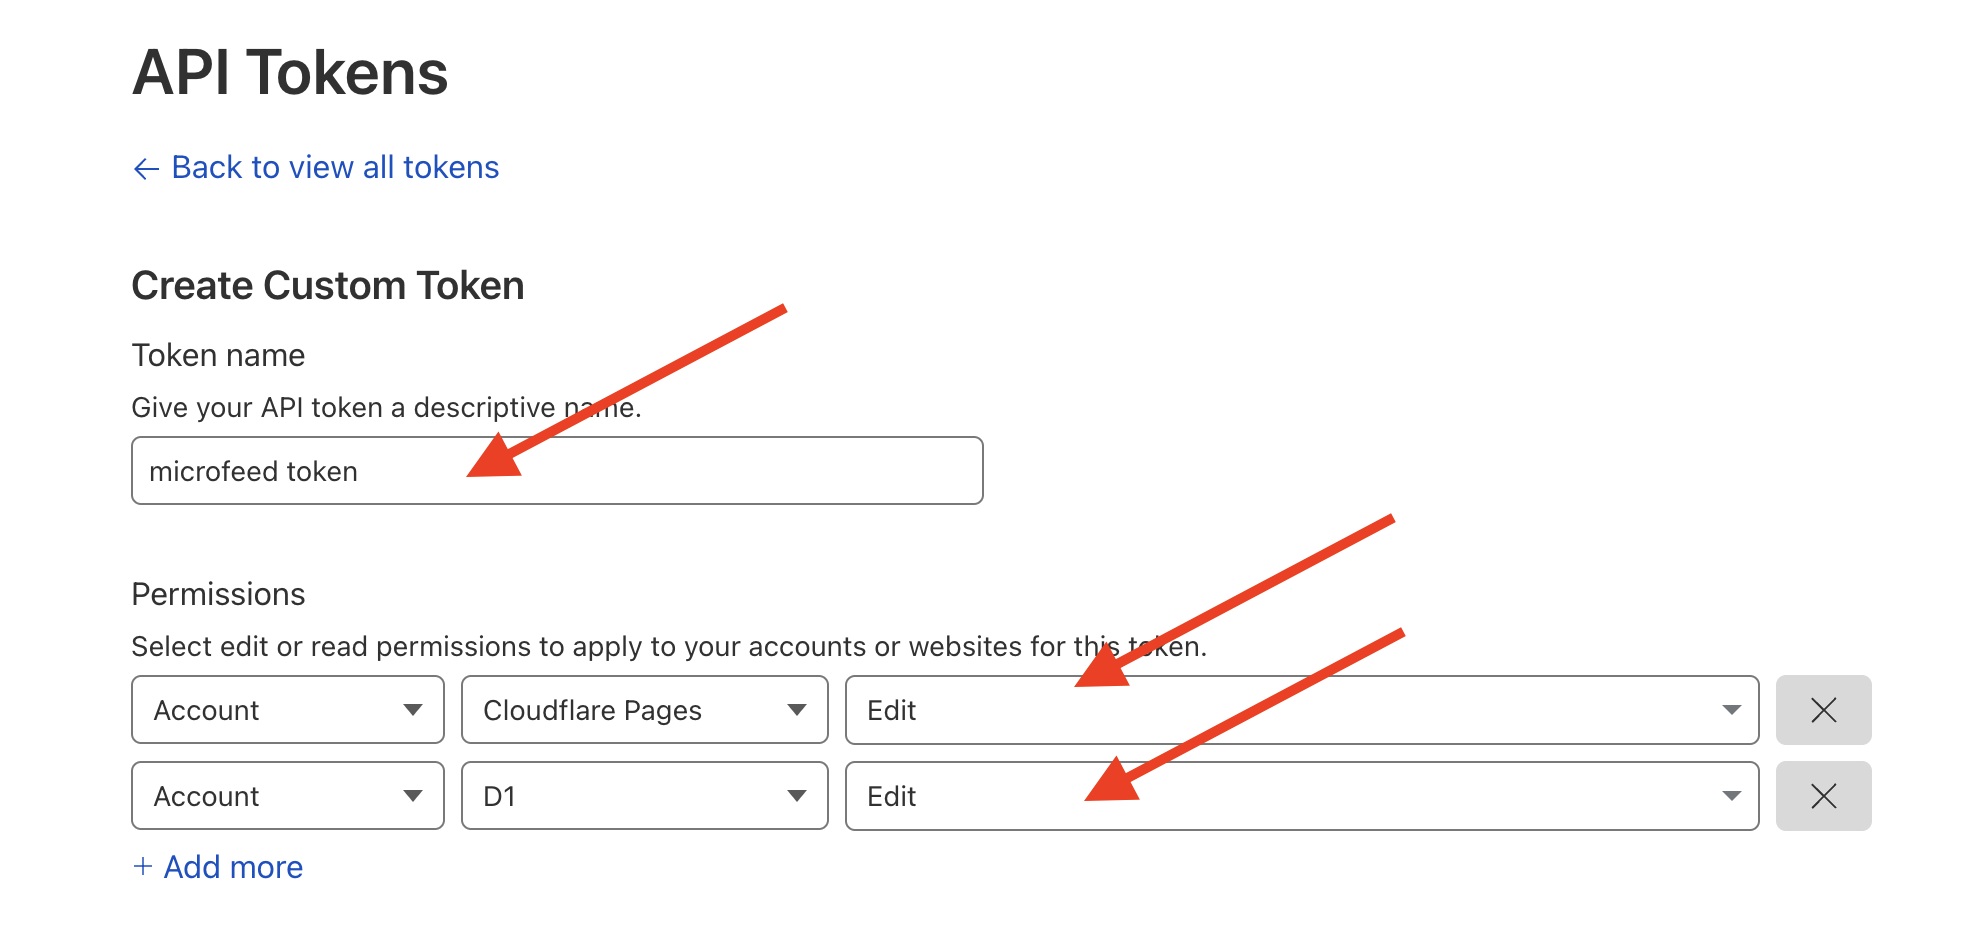
Create a custom token:
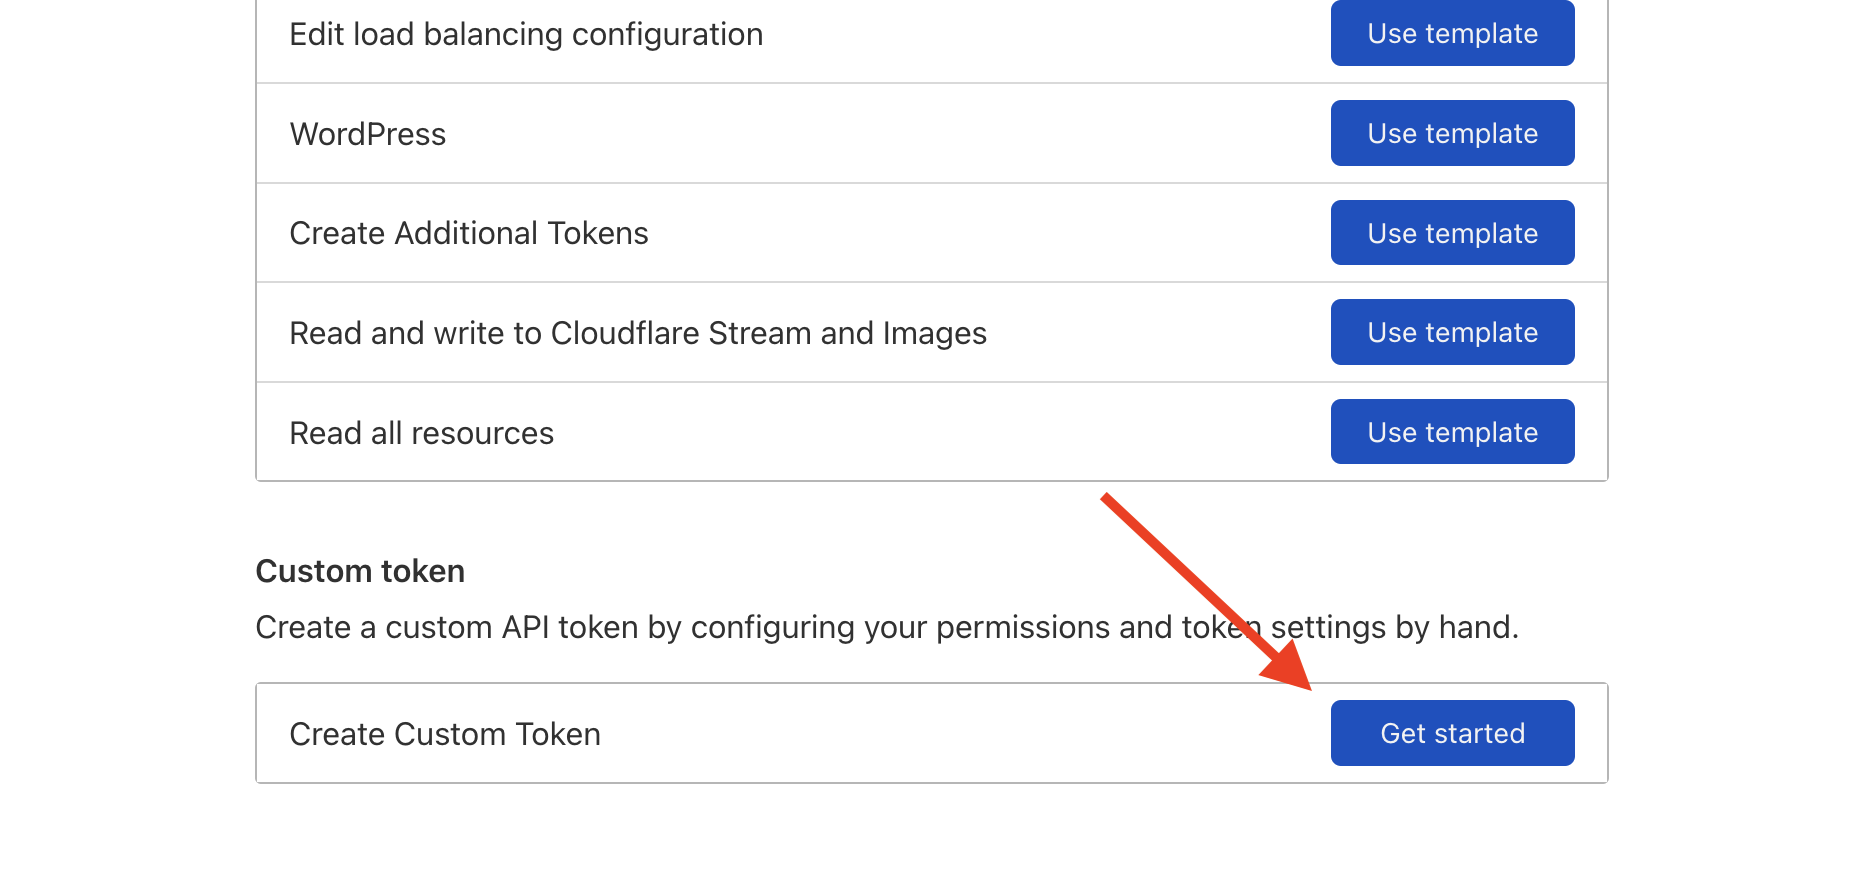
We need edit permission for both Cloudflare Pages and D1:
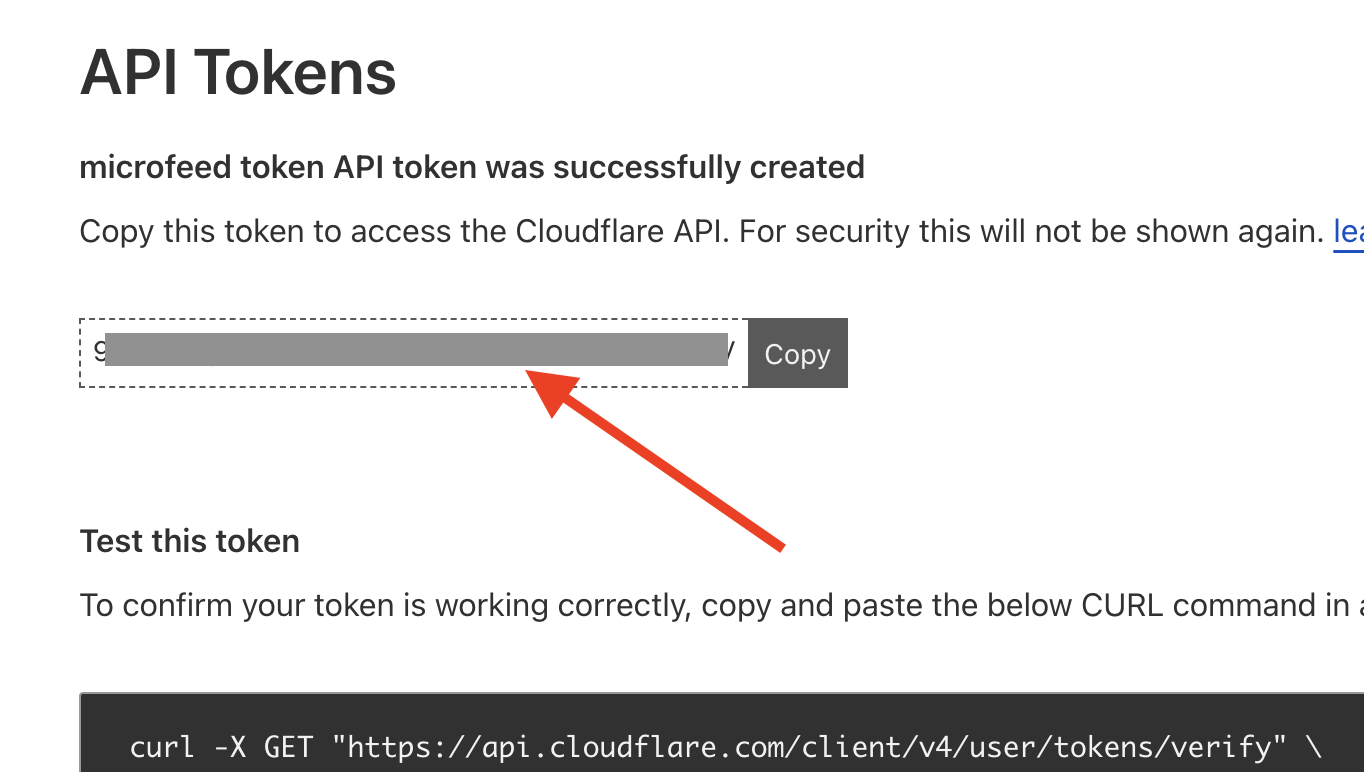
Finally, copy the API token here:
R2_ACCESS_KEY_ID and R2_SECRET_ACCESS_KEY
Go to your R2 dashboard page. You may need to put your credit card there first. You won't need to pay, unless your usage exceeds the very generous free quota limit (i.e., 10GB storage + 10 million reads/month + 1 million writes/month).
Create an R2 API token here:

Select "Admin Read & Write" permission and create an API token:

Copy Access Key ID for R2_ACCESS_KEY_ID, and Secret Access Key for R2_SECRET_ACCESS_KEY

CLOUDFLARE_PROJECT_NAME
A legit project name should have these characters: [a-z], [A-Z], [0-9], and -
We recommend using the custom domain name that you'll use for this project and replace dot (.) with dash (-)
For example, if you use photos.mycustomdomain.com, then the project name should be photos-mycustomdomain-com
Note: Don't use underscore (_), space ( ), and other characters outside [a-z], [A-Z], [0-9] and -. Or Cloudflare Pages won't let you create a project.
In total, you'll add 5 secrets for GitHub Actions:

Go to Actions -> Deploy to Cloudflare Pages and run Workflow

If you see the green checkmark, then the deployment is successful. And you can see a Pages project in your Cloudflare dashboard:

You can access the site via ${CLOUDFLARE_PROJECT_NAME}.pages.dev, for example, https://microfeed-org.pages.dev/
To manage your microfeed instance, you'll use the admin dashboard at ${CLOUDFLARE_PROJECT_NAME}.pages.dev/admin, for example, https://microfeed-org.pages.dev/admin/ (the admin dashboard needs to be protected by Cloudflare Zero Trust).
Upon accessing the admin dashboard for the first time, you'll complete the setup process by following the checklist:

Once you've completed the setup process, your microfeed instance will be ready to use. You can add, update, or delete items from the admin dashboard.
You can also customize the appearance of the website at Settings / Custom code by editing the raw HTML and CSS:

The HTML code is using mustache.js as a templating language, where you can access to variables from Feed Json or Item Json. For example, on our marketing website microfeed.org's home page (Feed Web), we use variables in the html code from microfeed.org/json/, and on an item's page (Item Web), we use variables from ${item_url}/json.
With the easy access to the json data of a microfeed instance (i.e., Feed Json and Item Json, you can use it as a headless CMS and build your own client apps to display the content.
We'll continue to add new features and fix bugs in this microfeed repo. You may want to update your forked repo with the new code.
You'll first sync up the code in your forked repo:

Then go to Actions -> Deploy to Cloudflare Pages and run Workflow to deploy the new code.
How can I track podcast / video / image downloads?
To track podcast, video, or image downloads with microfeed, you can use the tracking URLs feature. This allows you to set up third-party tracking URLs for your media files, such as those provided by OP3, Podtrac, Chartable...
To set up tracking URLs, you will need to go to Settings / Tracking URLs:

From there, you can add the third-party tracking URLs that you want to use. microfeed will automatically add these URLs to the front of the URL for your media files, allowing you to track download statistics.
This is a common practice in the podcast industry and can be a useful way to monitor the performance of your content and understand how it is being consumed by your audience.
Why Cloudflare? Isn't it dangerous to trust a for-profit company?
Many individuals and organizations trust and use Cloudflare's services because it has a reputation for providing reliable and effective services. We (Listen Notes) have been using Cloudflare for many years.
It's convenient to manage all things on a one-stop platform like Cloudflare (e.g., DNS, Cache, firewall, running code, CDN, trustless logins...).
microfeed is still in open alpha phase. Cloudflare is the first platform we support. We may consider supporting other serverless platforms, so you can easily migrate away if needed.
What if Cloudflare de-platforms my microfeed instance?
It is important to carefully review the terms of service for any service that you use, including Cloudflare. It is possible that if you violate the terms of service, the service may take action, such as de-platforming your instance.
To protect against the possibility of being de-platformed, it is a good idea to regularly backup your data from Cloudflare. This will allow you to recover your contents and potentially migrate them to a different platform if necessary. It is also a good idea to use your own custom domain, as this will give you more control over your content and make it easier to move your data to a different platform if needed.
Why should I use microfeed?
If you are already using Cloudflare and are satisfied with its services, then using microfeed may be a good option for you.
If you don't want to manage your own servers, microfeed can be a convenient alternative that allows you to take advantage of Cloudflare's infrastructure and security features.
If you don't want to pay for servers, microfeed can be a cost-effective solution, as Cloudflare provides generous free usage quotas.
If you are looking for something new and are interested in exploring different options, microfeed could be a good choice to consider. It is always a good idea to carefully evaluate any service before using it to ensure that it meets your needs and is a good fit for your use case.
How to download / backup data from microfeed / Cloudflare?
microfeed stores data in Cloudflare D1 and R2. Therefore, you'll download two things to backup your microfeed data:
- a sqlite database from Cloudflare D1, including all metadata.
- media files from Cloudflare R2, including audio, image, video...
How to download a sqlite database from D1?
You can use the command line tool wrangler to find sqlite database files and download backups:
https://developers.cloudflare.com/workers/wrangler/commands/#d1
How to download media files from R2?
As of Feb 16, 2023, Cloudflare has not provided tools to to batch download all files from a R2 bucket.
You may need to write a script to use S3-compatible APIs to fetch all objects from a specific R2 bucket.
We welcome contributions to microfeed! If you have an idea for a new feature or have found a bug, please open an issue in the repository. If you'd like to submit a fix or new feature, please create a pull request with a detailed description of your changes.
Pre-requisites: node / npm, yarn, and wrangler
First, create a .vars.toml file in microfeed's root directory (same level as this README.md file) and put 5 secrets in the .vars.toml file (Similar to Step 2. Put some secrets on your forked repo):
# .vars.toml
CLOUDFLARE_PROJECT_NAME = "your-project-org"
CLOUDFLARE_ACCOUNT_ID = "account id"
CLOUDFLARE_API_TOKEN = 'api token'

R2_ACCESS_KEY_ID = "access key"
R2_SECRET_ACCESS_KEY = "secret key"
Second, run local dev server:
npm run devYou should be able to access to a local microfeed instance via http://127.0.0.1:8788/.
microfeed is licensed under the AGPL-3.0 license. Please see the LICENSE file for more information.