Comments (10)
 onlaj
commented on May 18, 2024
onlaj
commented on May 18, 2024
Yes, the led strip needs to receive data from RPi or some other controller.
from piano-led-visualizer.
 Dilanka-lakshan
commented on May 18, 2024
Dilanka-lakshan
commented on May 18, 2024
how can i assure that the strip working correctly without a controller. still i dont have a controller. how to test that is working? i ordered form the link you mentioned in your site. i want to verify it working correctly. i got the order.
from piano-led-visualizer.
 Mihairu023
commented on May 18, 2024
Mihairu023
commented on May 18, 2024
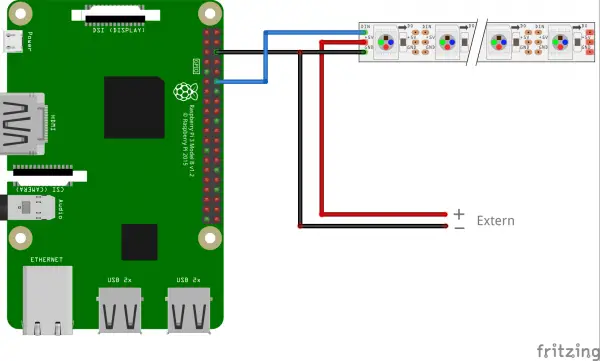
Depends. If you've got a Raspberry Pi then connect everything using the instruction and this picture, prepare your RPi and test the WS2812B by launching visualizer.py.
If not, get a Raspberry Pi (Zero WH is preferrable).
Easier way to just test the LED strip is to buy any WS2812B controller, Google and AliExpress offer a wide variety of those (I used this because of WiFi control support, this link is not affiliate). Depending on results of the test you can proceed to acquire an RPi and other required items (whichever you need) or repair/change your WS2812B strip if it's broken.
Anyway, I guess the photo of your strip's connection will be welcomed here as it may make it easier to help you.
from piano-led-visualizer.
 The-Torrent
commented on May 18, 2024
The-Torrent
commented on May 18, 2024
how can i assure that the strip working correctly without a controller. still i dont have a controller. how to test that is working? i ordered form the link you mentioned in your site. i want to verify it working correctly. i got the order.
if you quickly tap the data wire on ground led's will light up.
from piano-led-visualizer.
The-Torrent
commented on May 18, 2024
Depends. If you've got a Raspberry Pi then connect everything using the instruction and this picture, prepare your RPi and test the WS2812B by launching visualizer.py.
If not, get a Raspberry Pi (Zero WH is preferrable).
Easier way to just test the LED strip is to buy any WS2812B controller, Google and AliExpress offer a wide variety of those (I used this because of WiFi control support, this link is not affiliate). Depending on results of the test you can proceed to acquire an RPi and other required items (whichever you need) or repair/change your WS2812B strip if it's broken.
Anyway, I guess the photo of your strip's connection will be welcomed here as it may make it easier to help you.
that photo you got in 'this picture', is that how led strip is wired up for this project?
from piano-led-visualizer.
Mihairu023
commented on May 18, 2024
that photo you got in 'this picture', is that how led strip is wired up for this project?
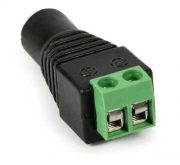
Yes. Not being skillful with wiring (and schemes like that depicted on the picture), I've been searching for more detailed steps to set things up. The trick is to put two ground jumper wires into the same "-" socket of the connector.
Not sure of this one but putting wires themselves is probably better than putting metal pins there as it may get harder to fix metal pins securely (I have the "pins" version right now, guess that's the reason of leds randomly lighting up).
Overall instruction: (no, you need 144 leds/m, not 60)
And a picture of how did I connect those ground wires.
from piano-led-visualizer.
The-Torrent
commented on May 18, 2024
that photo you got in 'this picture', is that how led strip is wired up for this project?
Yes. Not being skillful with wiring (and schemes like that depicted on the picture), I've been searching for more detailed steps to set things up. The trick is to put two ground jumper wires into the same "-" socket of the connector.
Not sure of this one but putting wires themselves is probably better than putting metal pins there as it may get harder to fix metal pins securely (I have the "pins" version right now, guess that's the reason of leds randomly lighting up).
Overall instruction: (no, you need 144 leds/m, not 60)
And a picture of how did I connect those ground wires.
the more issue i'm having is figuring out how the power wires go into the raspberry pi zero itself.
also not 60/meter, but 72 so that its 1led per meter im wondering if that would work.
I'll probably attempt a build in march some time when i have a evening free or so i could test it out.
from piano-led-visualizer.
Mihairu023
commented on May 18, 2024
the more issue i'm having is figuring out how the power wires go into the raspberry pi zero itself.
Powering the RPi seems to be the easiest part - power bank does it good.
The harder one is to fix data wire and one of the ground wires to RPi - you either need to solder them to corresponding pins or you need to remove insulation at the "RPi side" (over 1 cm or 0.4 inches) and wrap the bare wires over the pins so they don't touch the adjacent pins. In the second case heat shrink bands will help you a lot (they're cheap, AFAIC). That's how Onlaj did it.
If you're fine with white color only (or you know Python a little and can change settings manually) you can skip the soldering/wrapping part and just connect everything with jumper wires. But as for me, that's rather temporary solution as you won't be able to attach the LCD hat that lets you configure the lighting how ever you want.
Anyway, RPi needs only two wires - ground (from power supply to right pin, third from top) and data (from LED strip to right pin, sixth from top). "That picture" at one of the upper comments may explain it better.
also not 60/meter, but 72 so that its 1led per meter im wondering if that would work.
Please no. Already failed because of similar reason - now I occasionally use that "not-so-dense" led strip for house lighting. Long story short - visualizer won't work properly with led strips other than 144 leds/meter, and also "144 strip" is the only one that can cover every single piano key - otherwise a lot of keys will be skipped.
So please get a 144 leds per meter led strip.
I'll probably attempt a build in march some time when i have a evening free or so i could test it out.
Good luck!
P.S. It is said that you can discard the external power supply as well - RPi's power can light up over 20 leds simultaneously. But that's suitable for testing purposes only: you won't be able to play piano pieces that are too dynamic/difficult and led animations will go to waste too.
from piano-led-visualizer.
The-Torrent
commented on May 18, 2024
the more issue i'm having is figuring out how the power wires go into the raspberry pi zero itself.
Powering the RPi seems to be the easiest part - power bank does it good.
The harder one is to fix data wire and one of the ground wires to RPi - you either need to solder them to corresponding pins or you need to remove insulation at the "RPi side" (over 1 cm or 0.4 inches) and wrap the bare wires over the pins so they don't touch the adjacent pins. In the second case heat shrink bands will help you a lot (they're cheap, AFAIC). That's how Onlaj did it.
If you're fine with white color only (or you know Python a little and can change settings manually) you can skip the soldering/wrapping part and just connect everything with jumper wires. But as for me, that's rather temporary solution as you won't be able to attach the LCD hat that lets you configure the lighting how ever you want.
Anyway, RPi needs only two wires - ground (from power supply to right pin, third from top) and data (from LED strip to right pin, sixth from top). "That picture" at one of the upper comments may explain it better.also not 60/meter, but 72 so that its 1led per meter im wondering if that would work.
Please no. Already failed because of similar reason - now I occasionally use that "not-so-dense" led strip for house lighting. Long story short - visualizer won't work properly with led strips other than 144 leds/meter, and also "144 strip" is the only one that can cover every single piano key - otherwise a lot of keys will be skipped.
So please get a 144 leds per meter led strip.I'll probably attempt a build in march some time when i have a evening free or so i could test it out.
Good luck!
P.S. It is said that you can discard the external power supply as well - RPi's power can light up over 20 leds simultaneously. But that's suitable for testing purposes only: you won't be able to play piano pieces that are too dynamic/difficult and led animations will go to waste too.
Fixing data wires won’t be too hard imo for me anyway I got loads of shrink wrap no biggie.
I think I know how to make it all now will attempt in March.
Also 144/meter is 2 LED’s per key, not 1. I don’t see advantage of using 2 over one as it’s just harder to power. Much harder. Have you tried 72/meter at all? (72x1.22 = 88, 88 keys on piano). This is the strip density I have used for all my other visualisers I have made with arduino and esp methods.
Just a quick few questions for you as you’ve built it, is ws2812b latching issue around? As I transitioned to apa102b for the clock pin due to the latching issue as well as better colour etc, but me using ws2812b would be much easier than recoding it to work with apa102 if the latching issue does not exist.
Do you use all LED’s at 50% power or max?
On pre-programmed modes, I’m not sure how many there are, for each key pressed does 1 led turn on or 2? As density wise there is 2 per key. (144 x 0.22 = 172, 172/88(keys in piano) = 2)
Thanks
from piano-led-visualizer.
Mihairu023
commented on May 18, 2024
That's great then.
As for 72/meter strip, can't tell much because I didn't try it indeed. Everyone who tried using it will be welcomed here
Guess it all depends on the piano used for the project though, as Onlaj suggested that 176 leds are needed (at least that's default value specified in code) while my Yamaha P-45 only fits 174 of them, and 172 is your value. Seems like a question of guessing.
Don't know this one too, alas. Judging by what I've googled apa102 is better than ws2812b but is less known and uses the whole different protocol.
"whining"
Still stuck with first led always glowing in white/light blue color, sometimes long delays, sometimes only 6 first leds half-working/half-flickering... in other words there was everything between "working really smoothly" and "nothing but that uncontrollable first led works". Yet all the time I've just made sure that pins of jumper wires touch RPi's pins without any additional fixing. What makes me wonder is why did it managed to work anyway (although it happened only once, yet still video is available) and how do I actually wrap those stranded and quite brittle wires around the pins; last time I tried to do it, wires either got out of "the single wire" shape sometimes resulting in embracing all the adjacent pins too or they began to crumble when I tried to make them embrace the required pin only. Bare enthusiasm, lots of tries and little to no knowledge of wiring and stuff - that's how it started and that's how it keeps going on for me. Didn't even know about WS2812B, RPi and stuff before seeing this manual. Looks like I still don't know a lot of related things.
"/whining"
Sorry for that. Actually I didn't even understood what is the latching issue you've mentioned. No offence.
Regarding the LED power - it's 50%, I've ordered the "5v 6a" power supply as suggested and the strip still shines brightly enough.
One led per key. The code contains specific offset function - because without it even with 144/meter strip being used, wrong leds (with inaccuracy of 1-2 leds) are getting lit in the right half of piano... presumably, as I didn't yet try to remove/edit that function.
BTW, there's an option to let 3 leds per key be turned on instead thanks to Dec's commit.
from piano-led-visualizer.
Related Issues (20)
- piano_light_visualizer
- Trying a fresh manual install (without RTP and autoconnect and web interface) HOT 3
- Getting Error in lib/functions.py HOT 3
- My own syntesia HOT 2
- Led lights are not lighting up when keys are pressed HOT 12
- Midi interface not recognized
- Recording Midi file HOT 4
- Web Interface access HOT 1
- 3D Case model for the pi zero HOT 8
- Problems editing sequences HOT 1
- No module named "websockets" HOT 2
- Display remains white HOT 4
- Not an Issue but could expand possibilities of PLV
- What does Clean LED Strip do? HOT 1
- from werkzeug.utils import safe_join HOT 1
- Support for 160 leds/m strip HOT 8
- How does the "LED offset settings" work ?? HOT 1
- Gradient mode in sequences crashes LED Visualizer HOT 7
- LCD Display remains white HOT 5
- CPU Usage hovering 100% and input lag between key press and LED strip HOT 6
Recommend Projects
-
 React
React
A declarative, efficient, and flexible JavaScript library for building user interfaces.
-
Vue.js
🖖 Vue.js is a progressive, incrementally-adoptable JavaScript framework for building UI on the web.
-
 Typescript
TypeScript is a superset of JavaScript that compiles to clean JavaScript output.
-
TensorFlow
An Open Source Machine Learning Framework for Everyone
-
Django
The Web framework for perfectionists with deadlines.
-
 Laravel
A PHP framework for web artisans
-
D3
Bring data to life with SVG, Canvas and HTML. 📊📈🎉
-
Recommend Topics
-
javascript
JavaScript (JS) is a lightweight interpreted programming language with first-class functions.
-
web
Some thing interesting about web. New door for the world.
-
server
A server is a program made to process requests and deliver data to clients.
-
Machine learning
Machine learning is a way of modeling and interpreting data that allows a piece of software to respond intelligently.
-
Visualization
Some thing interesting about visualization, use data art
-
Game
Some thing interesting about game, make everyone happy.
Recommend Org
-
Facebook
We are working to build community through open source technology. NB: members must have two-factor auth.
-
Microsoft
Open source projects and samples from Microsoft.
-
Google
Google ❤️ Open Source for everyone.
-
Alibaba
Alibaba Open Source for everyone
-
D3
Data-Driven Documents codes.
-
Tencent
China tencent open source team.
from piano-led-visualizer.