
Peergos is building the next web - the private web, where end users are in control. Imagine web apps being secure by default and unable to track you. Imagine being able to control exactly what personal data each web app can see. Imagine never having to log in to an app ever again. You own your data and decide where it is stored and who can see it. At Peergos, we believe that privacy is a fundamental human right and we want to make it easy for everyone to interact online in ways that respect this right.
The foundation of Peergos is a peer-to-peer encrypted global filesystem with fine-grained access control designed to be resistant to surveillance of data content or friendship graphs. It has a secure messenger, an encrypted email client and bridge, and a totally private and secure social network, where users are in control of who sees what (executed cryptographically). Our motto at Peergos is, "Control your data, control your destiny."
The name Peergos comes from the Greek word Πύργος (Pyrgos), which means stronghold or tower, but phonetically spelt with the nice connection to being peer-to-peer. Pronunciation: peer-goss (as in gossip).

See more screenshots in the web-ui repository https://github.com/Peergos/web-ui.
Want to try it out now? Here's a read-only secret link to a folder;
We run a server at https://peergos.net/. There are a limited number of free accounts available. You can upgrade to a paid account to get more storage.
You can read more detail about our features and architecture in our tech book.
To see recent developments read the latest release notes or see our web-ui repo releases.
The slides of a talk introducing Peergos are here
Overview at IPFS Thing:

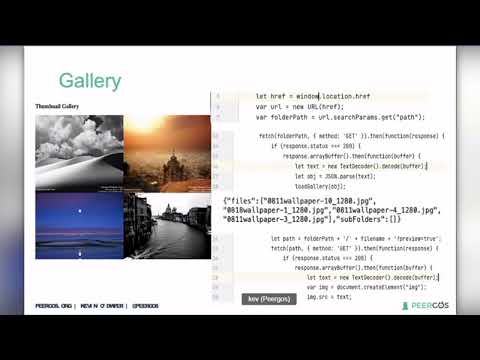
Applications on Peergos:
Applications deep dive:
Architecture talk at IPFS Lab Day:
Introduction and 2020 update:
Introduction:

If you would like to support Peergos development, then please make a
recurring donation less than 100 EUR per week
or a
Cure53 conducted an audit of Peergos in June 2019. The final report is here.
There is a public chat room for Peergos on Matrix.
- To allow individuals to securely and privately store files in a peer to peer network which has no central node and is generally difficult to disrupt or surveil
- To allow secure sharing of files with other users of the network without visible meta-data (who shares with who)
- Allow web apps to be loaded and run directly from Peergos in a sandbox that prevents data exfiltration and with user granted permissions
- To have a beautiful user interface that any computer or mobile user can understand
- To be independent of the central TLS Certificate Authority trust architecture
- Self hostable - A user should be able to easily run Peergos on a machine in their home and get their own Peergos storage space, and social communication platform from it.
- A secure web interface
- Peergos does not provide anonymity, yet. Anonymity can be achieved by creating and only ever accessing a User account over Tor
1.0 Layers of architecture
- 1: Peer-to-peer and data layer - IPFS provides the data storage, routing and retrieval. A User must have at least one peergos instance storing their data for it to be available.
- 2: Authorization Layer - a key pair controls who is able to modify parts of the file system (every write is signed)
- 3: Data storage - controlled by a given public key there is a merkle-champ of encrypted chunks under random labels, without any cross links visible to the server (the server can't deduce the size of files)
- 4: Encryption - Strong encryption is done on the user's machine using TweetNaCl, with each 5MiB chunk of a file being encrypted independently.
- 5: Social layer implementing the concept of following or being friends with another user, without exposing the friend network to anyone.
- 6: Sharing - Secure cryptographic sharing of files with friends.
2.0 Language
- The IPFS layer is coded in Java - we have a minimal ipfs replacement - Nabu
- The Peergos server is coded to run on JVM to get portability and speed, predominantly Java
- The web interface is mostly coded in Java and cross compiled to Javascript, with the exception of the Tweetnacl and scrypt libraries, and a small amount of GUI code in JS for Vue.js.
- Apps are written in HTML5
3.0 Nodes
- There is a pki node which ensures unique usernames using a structure similar to certificate transparency. This data is mirrored on every peergos server.
- A new node contacts any public Peergos server to join the network
4.0 Trust
- New versions of the software will be delivered through Peergos itself. (Able to be turned off by the user if desired)
- A user who trusts a public Peergos server (and the SSL Certificate authority chain) can use the web interface over TLS
- A less trusting user can run a Peergos server on their own machine and use the web interface over localhost
- A more paranoid user can run a Peergos server on their own machine and use the CLI or the fuse binding
- Servers are trustless - your data and metadata cannot be exposed even if your server is compromised (assuming your client is not compromised)
- IPFS itself is not trusted and all data stored or retrieved from it is self-certifying.
- The data store (which may not be ipfs directly, but S3 compatible service for example) is also not trusted
4.0 Logging in
- A user's username is used along with a random salt and the hash of their password and run through scrypt (with parameters 17, 8, 1, 96, though users can choose harder parameters if desired) to generate a symmetric key and a signing keypair. The signing keypair is then used to auth and retrieve encrypted login data. This login data is then decrypted using the symmetric key to obtain the identity key pair, social keypair and root directory capability. This means that a user can log in from any machine without transferring any keys, and also that their keys are protected from a brute force attack (see slides mentioned above for a cost estimate).
5.0 Encryption
- private keys never leave client node, two random symmetric keys are generated for every file or directory (explicitly not convergent encryption, which leaks information)
5.1 Post-quantum encryption
- Files that haven't been shared with another user are already resistant to quantum computer based attacks. This is because the operations to decrypt them from logging in, to seeing plain-text, include only hashing and symmetric encryption, both of which are currently believed to not be significantly weakened with a quantum computer.
- Files that have been shared between users are, currently, vulnerable to a large enough quantum computer if an attacker is able to log the initial follow requests sent between the users (before the user retrieves and deletes them). This will be replaced with a post-quantum asymmetric algorithm as soon as a clear candidate arrives.
6.0 Friend network
- Anyone can send anyone else a "follow request". This amounts to "following" someone and is a one way protocol. This is stored in the target user's server, but the server cannot see who is sending the friend request (it is cryptographically blinded).
- The target user can respond to friend requests with their own friend request to make it bi-directional (the usual concept of a friend).
- Once onion routing is integrated, there will be no way for an attacker (or us) to deduce the friendship graph (who is friends with who).
7.0 Sharing of a file (with another user, through a secret link, or publicly)
- Once user A is being followed by user B, then A can share files with user B (B can revoke their following at any time)
- File access control is based on cryptree system used by Wuala
- a link can be generated to a file or a folder which can be shared with anyone through any medium. A link is of the form https://demo.peergos.net/#KEY_MATERIAL which has the property that even the link doesn't leak the file contents to the network, as the key material after the # is not sent to the server, but interpreted locally in the browser. We have extended cryptree to protect much more metadata, including file size, names, thumbnails, directory structure and more.
- a user can publish a capability to a file or folder they control which makes it publicly visible
Use this method to login to a peergos account on another instance without any reliance on DNS or the TLS certificate authorities.
-
Download a release from https://peergos.net/public/peergos/releases
-
Install Java - You will need Java >= 17 installed.
-
Run Peergos with:
java -jar Peergos.jar daemon
All the peergos data will be stored in ~/.peergos by default, which can be overridden with the environment var or arg - PEERGOS_PATH.
You can then access the web interface and login via http://localhost:8000.
In this mode of operation all your writes are proxied directly to your home server. The local instance caches any blocks you access for faster subsequent access.
Use this method to run a new home-server (which is best with a publicly routable IP, and always on machine) to create accounts on or migrate accounts to.
-
Download a release from https://peergos.net/public/peergos/releases
-
Install Java - You will need Java >= 17 installed.
-
Run Peergos with:
java -jar Peergos.jar daemon -generate-token true
-
Ensure you can listen on a public IP address
Some cloud hosts don't add your public ip to the network interfaces by default. For these cases you may need to run something like
sudo ip address add MY.PUBLIC.IP dev eth0All the peergos data will be stored in ~/.peergos by default, which can be overridden with the environment var or arg - PEERGOS_PATH
You can then access the web interface and signup via the localhost address printed, which includes a single use signup token.
The config is stored in $PEERGOS_PATH/config, so for subsequent runs you can just use the following unless you want to override any config
java -jar Peergos.jar daemon
Note that whichever Peergos server you sign up through (your home server) will be storing your data, so if you don't intend on leaving your Peergos server running permanently, then we recommend signing up on https://peergos.net and then you can log in through a local Peergos instance and all your data will magically end up on the peergos.net server. Peergos can work behind NATs and firewalls, but we recommend using a server with a public IP. If you want to expose your web interface publicly you will need to arrange a domain name and TLS certificates (we recommend using nginx and letsencrypt).
If you don't set up a domain name and TLS you can still log in to your account from another Peergos instance, e.g. one you run locally on your laptop - connections are routed securely over P2P TLS1.3 streams to your home server. In this case, any writes are proxied to your home server so your data is always persisted there. If you do expose your instance via a DNS name and TLS certificate, you will need to add this parameter:
-public-server true
If you are also using a reverse proxy like nginx to terminate TLS you will need to tell peergos which domain you are using with the following arg:
-public-domain $YOUR_DOMAIN
And the TLS certificate will also need to cover the wildcard subdomain for the applications (like the PDF viewer, text editor, calendar, and custom 3rd party apps) to work. For example, it should have A records that cover $YOUR_DOMAIN and *.$YOUR_DOMAIN
If you are using a reverse proxy like nginx to terminate TLS here is a good example of the nginx config file (replace $YOUR_DOMAIN_NAME):
# Peergos server config

server {
    listen 80 default_server;
    listen [::]:80 default_server;

    location ^~ /.well-known {
         allow all;
         proxy_pass http://127.0.0.1:8888;
    }

    # redirect all HTTP requests to HTTPS with a 301 Moved Permanently response.
    return 301 https://$host$request_uri;
}

server {
        # SSL configuration
        listen 443 ssl http2;
        ssl_protocols TLSv1.2 TLSv1.3;
        ssl_prefer_server_ciphers on;
        ssl_session_cache shared:SSL:10m;
        ssl_session_timeout 10m;

        ssl_ciphers TLS_CHACHA20_POLY1305_SHA256:TLS_AES_256_GCM_SHA384:ECDHE-ECDSA-AES256-GCM-SHA384:ECDHE-RSA-AES256-GCM-SHA384:ECDHE-ECDSA-CHACHA20-POLY1305:ECDHE-RSA-CHACHA20-POLY1305:!TLS_AES_128_GCM_SHA256;
        ssl_certificate /etc/letsencrypt/live/$YOUR_DOMAIN_NAME/fullchain.pem;
        ssl_certificate_key /etc/letsencrypt/live/$YOUR_DOMAIN_NAME/privkey.pem;

        add_header Strict-Transport-Security "max-age=31536000" always;
        server_name $YOUR_DOMAIN_NAME;

        client_max_body_size 2M;

        location / {
                proxy_pass http://localhost:8000;
                proxy_set_header X-Real-IP $remote_addr;
                proxy_set_header Host $http_host;
                allow all;
        }

	# pass through for letsencrypt
        location ^~ /.well-known {
                 allow all;
                 proxy_pass http://127.0.0.1:8888;
        }
}
Follow the instructions for self hosting but add the following parameters (either on the command line, or in the .peergos/config file after first run):
-use-s3 true
-authed-s3-reads true
-direct-s3-writes true
-s3.accessKey $ACCESS_KEY
-s3.bucket $BUCKET
-s3.region $REGION
-s3.region.endpoint $ENDPOINT (e.g. us-east-1.linodeobjects.com)
-s3.secretKey #SECRET_KEY
You will also need to set the cors.xml for the bucket to the following:
<CORSConfiguration>
  <CORSRule>
    <AllowedOrigin>https://$YOUR_DOMAIN</AllowedOrigin>
    <AllowedMethod>HEAD</AllowedMethod>
    <AllowedMethod>GET</AllowedMethod>
    <AllowedMethod>PUT</AllowedMethod>
    <AllowedHeader>*</AllowedHeader>
    <ExposeHeader>ETag</ExposeHeader>
    <ExposeHeader>Content-Length</ExposeHeader>
    <MaxAgeSeconds>3600</MaxAgeSeconds>
  </CORSRule>
</CORSConfiguration>
Follow the instructions for self hosting but add the following parameters (either on the command line, or in the .peergos/config file after first run):
-use-postgres true
-postgres.database $DATABASE
-postgres.host $HOST
-postgres.password $PASSWORD
-postgres.username $USERNAME
- You can run with "-log-to-conosle true" to also show any logging on the console.
- The very first run will sync the pki and this takes several minutes. Subsequent runs should start within seconds.
There are a range of commands available from a command line. You can run -help to find the available commands or details on any command or sub-command. Most users should only need the daemon and shell commands, and maybe identity or fuse. You can use the migrate command to move all your data to a new server (where the command is run).
>> java -Djava.library.path=native-lib -jar Peergos.jar -help
Main: Run a Peergos command
Sub commands:
	daemon: The user facing Peergos server
	shell: An interactive command-line-interface to a Peergos server
	fuse: Mount a Peergos user's filesystem natively
	quota: Manage quota of users on this server
	server-msg: Send and receive messages to/from users of this server
	gateway: Serve websites directly from Peergos
	migrate: Move a Peergos account to this server
	identity: Create or verify an identity proof
	ipfs: Install, configure and start IPFS daemon
	pki: Start the Peergos PKI Server that has already been bootstrapped
	pki-init: Bootstrap and start the Peergos PKI Server
or
>> java -Djava.library.path=native-lib -jar Peergos.jar identity -help
identity: Create or verify an identity proof

Sub commands:
	link: Link your Peergos identity to an account on another service.
	verify: Verify an identity link post from another service.
You can mount your Peergos space with the following command
>> java -Djava.library.path=native-lib -jar Peergos.jar fuse -peergos-url https://peergos.net -username $username -password $password
Install osxfuse with
>> brew install --cask osxfuse
Install winfsp with
>> choco install winfsp
To mirror all of your data on another server first run the following command (on any instance):
java -jar Peergos.jar mirror init -username $username
It will ask for your password and then print three parameters you need to supply to the mirror daemon.
Then run daemon, on the instance you want to mirror your data, with the following additional args provided by the init command.
java -jar Peergos.jar daemon -mirror.username $username -mirror.bat $mirrorBat -login-keypair $loginKeypair
This will then continuously mirror that user's data on this instance.
To migrate to another server first ensure you have sufficient quota on it, then run the migrate command on it.
java -jar Peergos.jar migrate
It will ask for your username and password, mirror all your data locally, and then update the PKI to make this your home server.
After migration, your identity is unchanged, all links to your data continue to work, and you keep your social graph without needing to tell anyone.
Various operation can be done using the shell.
java -jar Peergos.jar shellTo connect to a server you will need to provide the Server address (including http/https), Username and Password.
Enter Server address
> https://peergos.net
Enter username
> demo
Enter password for 'demo'
> **************************************
Generating keys
Logging in
Retrieving Friends
demo@https://peergos.net >
To show all available commands
demo@https://peergos.net > helpHint: The following command might be useful to do an initial upload for larger folders.
put local_path remote_path Requires jdk17 and ant to build. Use the following to install dependencies:
sudo apt-get install ant
sudo apt-get install openjdk-17-jdkbrew install ant # installs openjdk as a dependency
ant -version
Apache Ant(TM) version 1.10.8 compiled on May 10 2020Note that this doesn't include any web ui, for the full build including the web interface build https://github.com/peergos/web-ui
ant distant gwtcYou need to have ant-optional installed:
sudo apt-get install ant-optionalNothing additional is needed for the ant package on macOS.
Running tests will install and configure the correct version of IPFS automatically, run the daemon, and terminate it afterwards.
ant testThe ant compile target will only compile sources in src/peergos/{client,server,shared} folders.