We have created the Multi-Attribute Decision (MAD) builder for researchers to help to design a Mouselab task in a browser-based experiment. The MAD builder is available as either a template in the lab.js or as a complete task in Open Lab. There are two ways to work with the builder. One option is to open the task in Open Lab, a platform for deployment of online experiments. The second option is to open the template (as a JSON file) in the lab.js builder, which is free open-source software for building online experiments. Working in lab.js offers flexibility, as you can change not only the parameters, but also the design of your study. To modify the task in lab.js or in Open Lab, you have to edit its parameters (see Table 1). In the following, we will show how to open the template in Open Lab and lab.js. Then, we will describe four different application scenarios to demonstrate how the parameters can be customized to your needs.
When you follow the link to the task in Open Lab, you will be redirected to the Open Lab repository of online experiments. In case you are not registered in Open Lab yet, you will be asked to do so in order to work with the task. Registering as a researcher is simple and requires only an email address and a password. After registration, you will be able to run the task.
If you want to use the task in your project or edit task parameters, first create a project and then add the task to your project. The documentation with the necessary steps is here.
If you need further task customization (e.g. editing CSS styles), you can change the task in lab.js. Please, check the documentation to familiarize yourself with lab.js.
You can open the examples below by clicking on them. On the lab.js builder page, you should see a pop-up dialogue such as "Would you like to load the study from ... ?" If you do not see the message, dialogues may be blocked in your browser. Then, you can turn blockers off or try another browser.
Alternatively, if you have saved the file with the task on your computer, you can open the lab.js builder page, proceed to the main menu on the left (with a downward-pointing arrow), and select the Study/Open. Now, you can pick a JSON file from your local directory and open it in the builder.
The task consists of four nested components. The main component "Multi-attribute decision" is a sequence that contains the task parameters. Inside is the loop that takes care of repeating trials. Everything within the loop is repeated in each trial. The sequence inside of the loop allows to repeat a sequence of screens. At the current moment, there is only a trial screen, but you can add more screens if you like. The trial screen contains the task content ( tab Content) and logic (tab Scripts). Feel free to explore the code or change the appearance of the task.
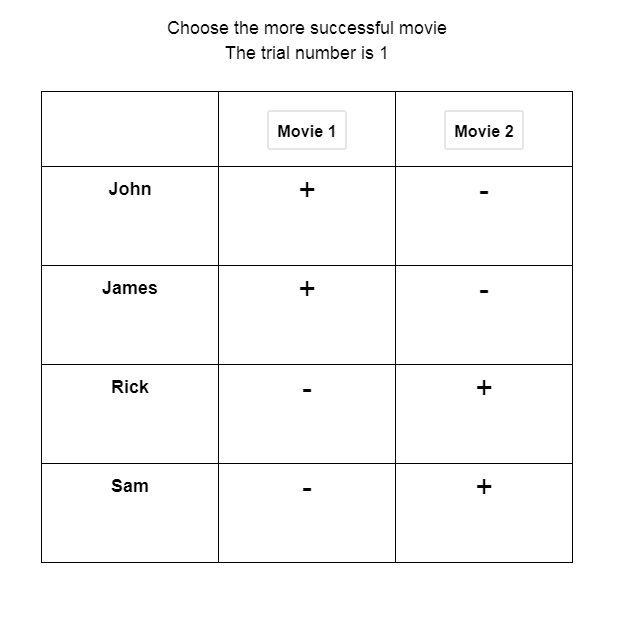
In the first example, we will demonstrate the task with predefined cue values that are shown to a participants from the beginning of a trial. We will consider the choice between two movies (“Movie 1” and “Movie 2”) based on the opinions of four experts who can either recommend a movie (+) or give no recommendation (-). Let's say we need 5 trials with feedback for 2 seconds after each trial telling participants whether they are correct or wrong. We assume that a researcher knows exactly which cues should be shown in each trial and specifies them inside of the parameter __cueValuesForEachTrial.
Open the example in the lab.js builder
Figure 1: The movie task
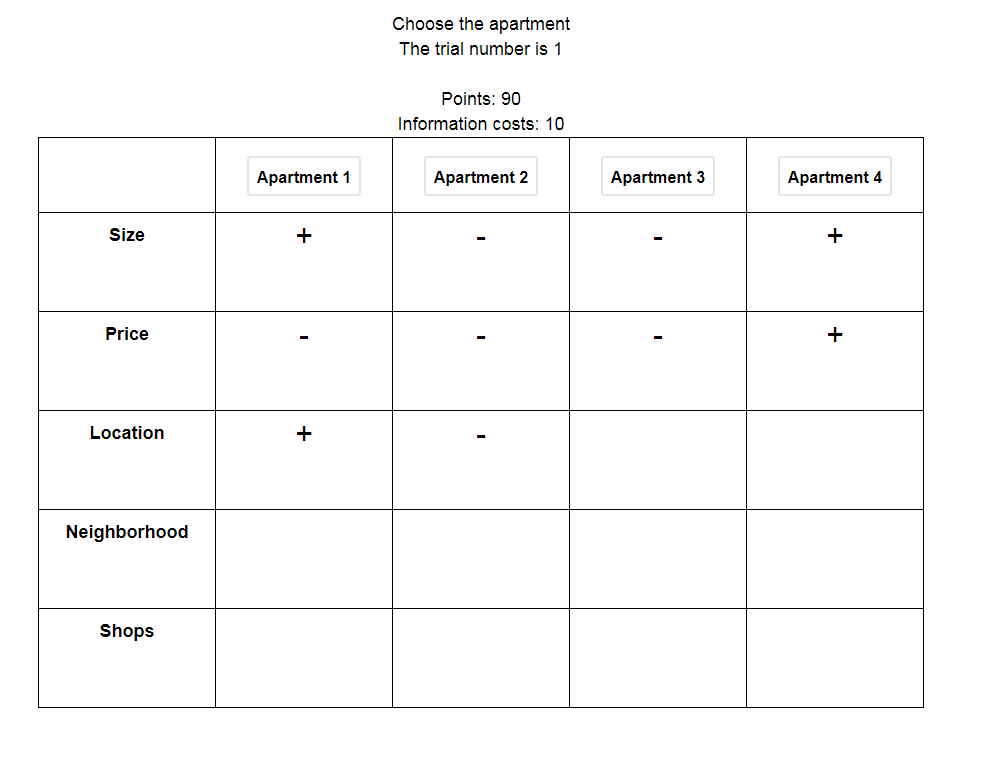
The second application scenario will show randomization options and the closed Mouselab paradigm in which users have to click on the boxes to open information. This time, the task is about choosing between four different apartments based on five different cues. The cue values are generated independently with a probability of 40% to be a positive one. The feedback and the number of points are also displayed to participants. The participants click on the boxes to open the information and this information remains open until the end of the trial. We also make the information search costly and charge a certain number of points for each opened box. The options and cues are kept in the same order across trials.
Open the example in the lab.js builder
Figure 2: Apartment-hunting task
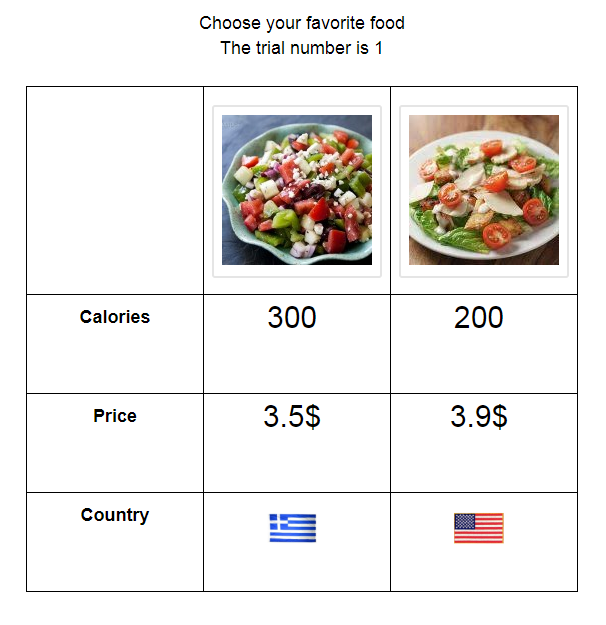
The flexibility of the MAD Builder arises from the capability to upload your own images and use them as options, cues or cue values. In this case, we consider the task in which we ask people to choose between two food products. The first cue is the amount of calories (in numbers), the second is the price (in $), and the third cue is the country of origin (shown as images of flags). Since it is a preferential choice, we will not estimate how correct the answer is and will not give participants any feedback. In the lab.js experiment builder, the images can be uploaded in the component “Screen” and renamed to correspond to the values of the parameter _displayOptionsNames. The example already includes the images.
Open the example in the lab.js builder
Figure 3: Food preferences task
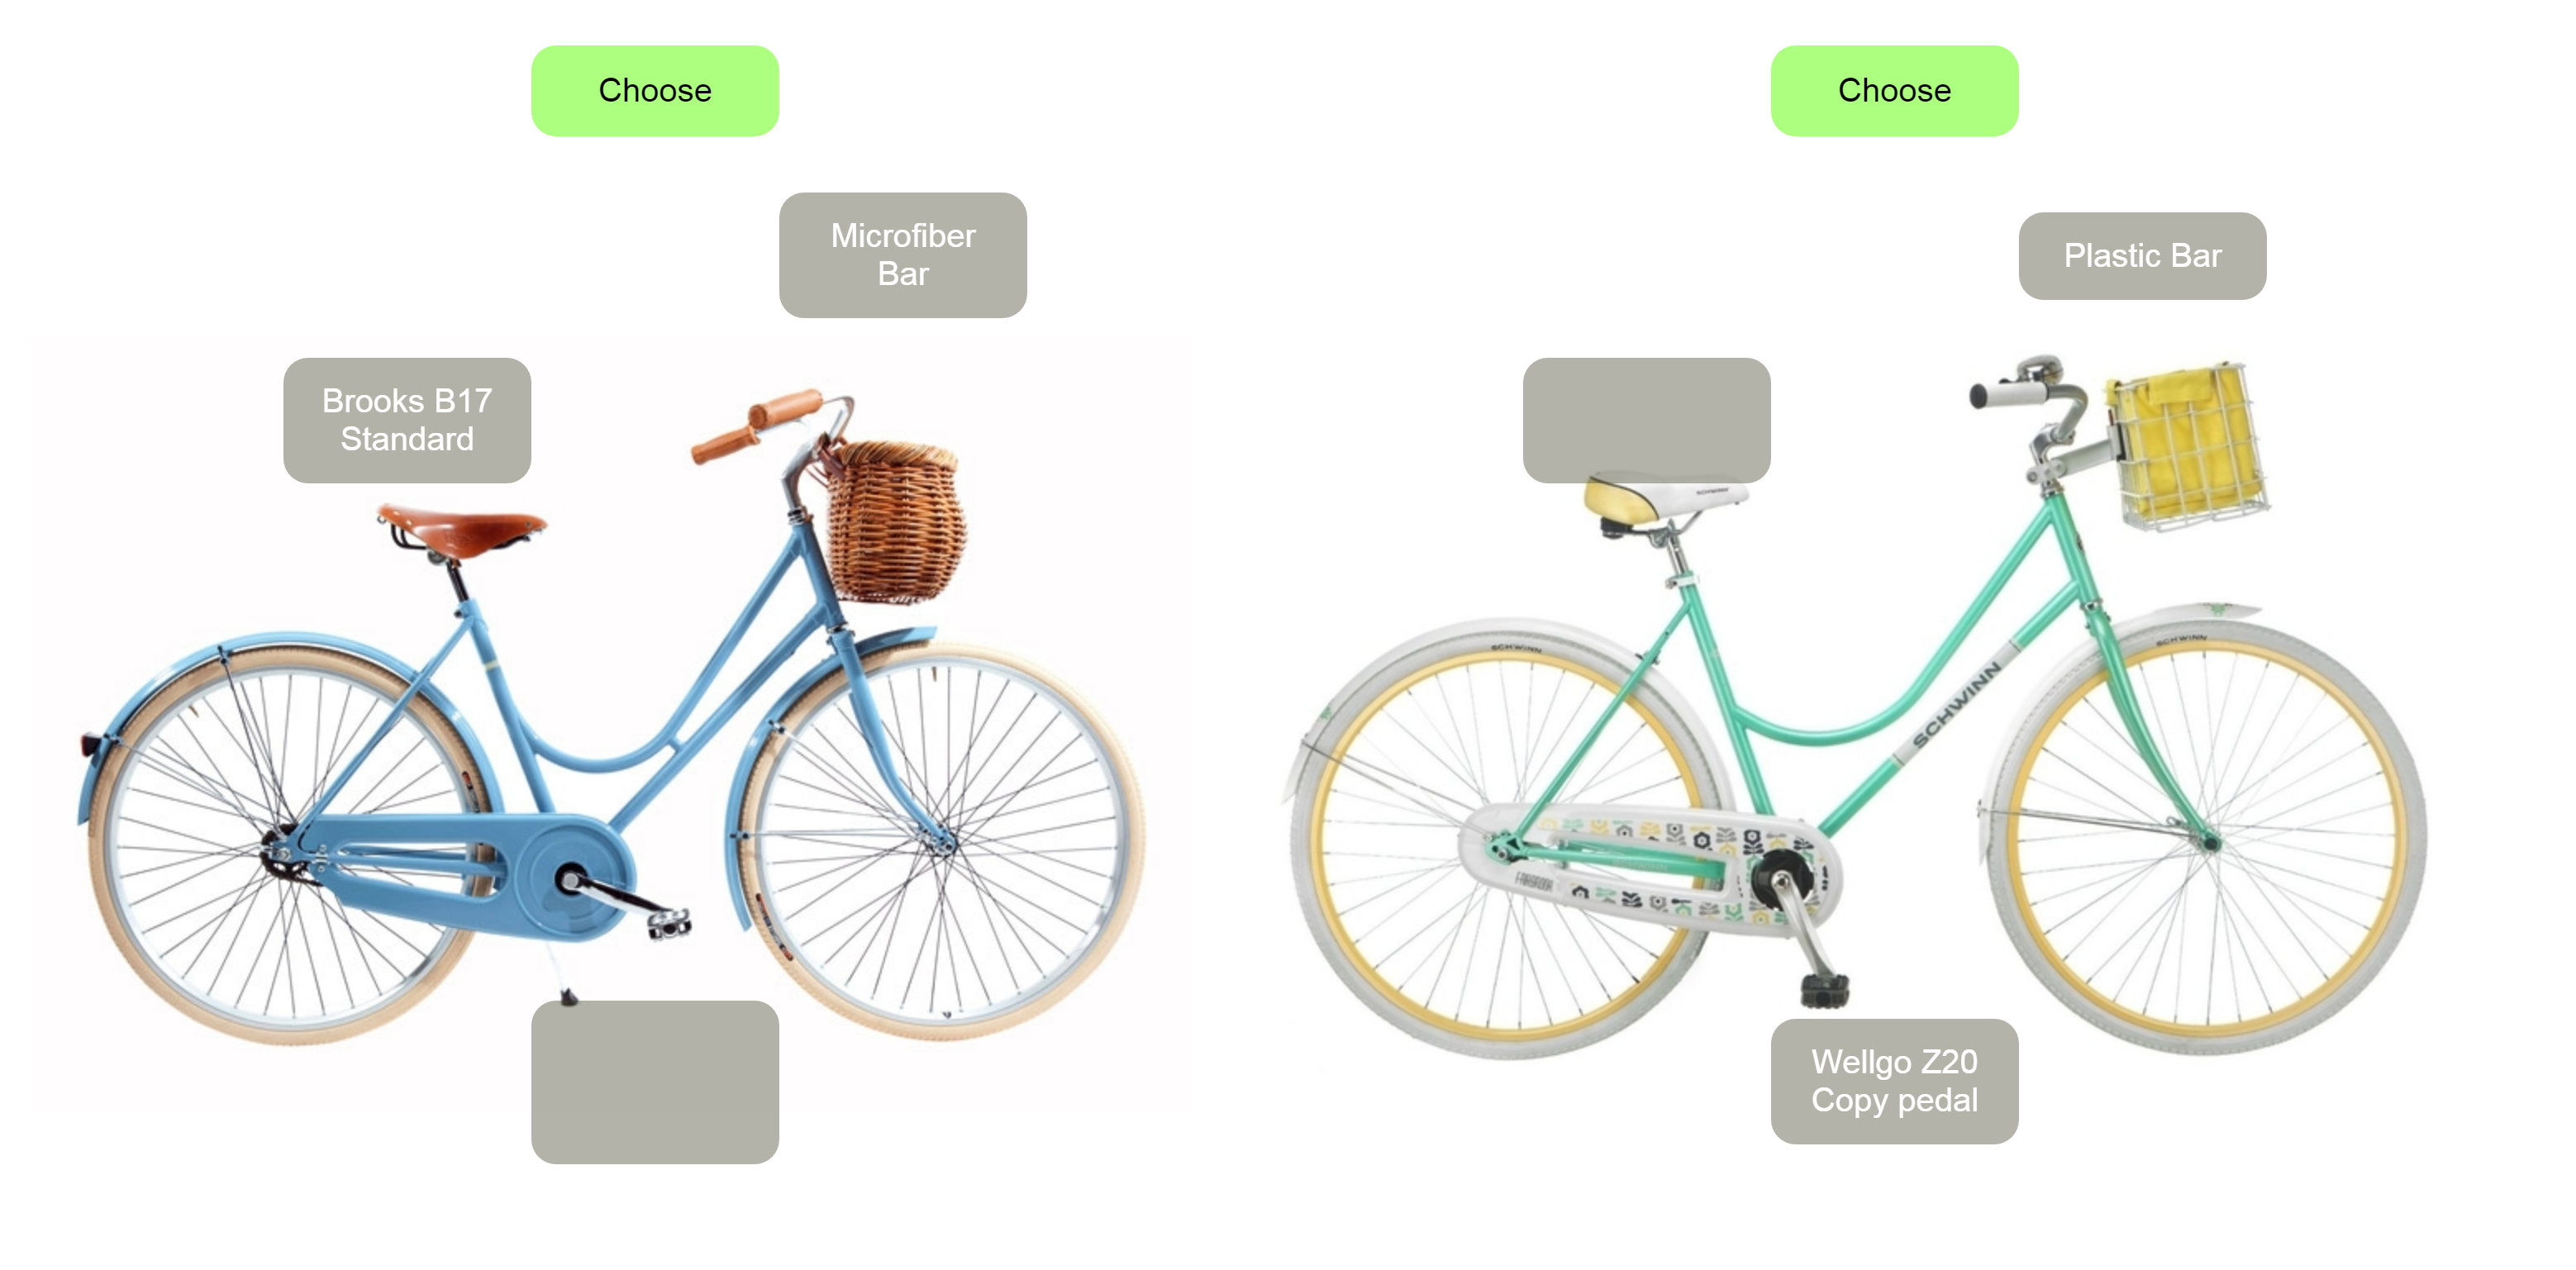
The previous examples have demonstrated the tabular format of the task. However, researchers might be interested in analyzing behavior in more natural contexts, in which the information is embedded into the environment. In this example, we consider the task where a participant can choose between different types of bicycles. The participants can see the information about the options by clicking of designating areas around the bicycles (see Figure 4).
To customize the display, we need to set the parameter _customDisplay to true. Then, we have to work with the “Content” of the screen, where we create both options and cues elements. For each of the options that participants can click to make a decision (i.e., "Choose" buttons), we need to define an id that corresponds to the internal name of the option. The id can be set for any HTML element, giving you freedom to decide what the element should look like: it can be a text, an image, or a field.
<div id = “Option1”>
  Your text
</div>
To display cues, you should create two divs: a wrapper and an inner one. For the wrapper, set the id with the following pattern: “option name” – “cue name”. The second inner div should be inside the wrapper. Within this inner div, you can place any elements, which will be displayed on click (if the paradigm is the closed Mouselab). For example:
<div id = “Option1-Cue1”>
  <div>
    Your text
  </div>
</div>
Open the example in the lab.js builder
Figure 4: The bicycle task
| Parameter name | Example | Format | Description |
|---|---|---|---|
| _taskTitle | The multi-attribute decision task | Text | The title shown in the task |
| _numberOfTrials | 10 | Integer (min = 1) | The number of trials |
| _taskInstruction | Choose the bigger city | Text | The instruction shown in the task |
| _optionsNames | Option1; Option2 | Text, names are separated be semicolons. | The option names are for the researcher and not shown to a participant. |
| _displayOptionsNames | London; Paris | Text, names are separated be semicolons. | The display options names are shown to a participant. |
| _cuesNames | Airport; Power Plant; University; Football team | Text, names are separated be semicolons. | The cues names displayed to the participant. |
| _cuesValidity | 0.40; 0.30; 0.20; 0.10 | Number, separated be semicolons. | The validity values of the cues. The values should sum up to one and are used to calculate the correct option in each trial (by applying a weighted additive rule). |
| _randomlyGenerateCues | true | true / false | Whether to generate each cue independently with some probability. If true, then each cue value will be generated randomly and will be positive with the probability of the parameter _probabilityOfPositiveCue. If false, then each cue value will be assigned a value from the parameter _cueValuesForEachTrial. |
| _probabilityOfPositiveCue | 0.5 | Number between zero and one | The probability of generating a positive cue. The parameter _randomlyGenerateCues should be true. |
| _randomizeOrderOfTrials | true | true / false | Whether or not to randomize the order of trials. |
| _showFeedback | true | true / false | Whether or not to show feedback after each trial. |
| _timeForFeedback | 1500 | Number of milliseconds (1000 is 1 sec) | How long to show feedback after the trial. |
| _startingPoints | 1000 | Number | How many points participants have at the beginning of the task. |
| _costOfLossTrial | 5 | Number | How many points participants lose in case of a wrong answer. |
| _prizeOfWinTrial | 20 | Number | How many points participants win in case of a correct answer. |
| _costOfOpenningOneCue | 2 | Number | How many points participants pay to open one information box (in the closed Mouselab paradigm). Set it to 0, if you don't want to display information costs. |
| _numberOfOptions | 2 | Number | The number of options. The number should be consistent with the parameters: _optionsNames, _displayOptionsNames, _cueValuesForEachTrial (if _randomlyGenerateCues is false). |
| _numberOfCues | 4 | Number | The number of cues. The number should be consistent with the parameters: _cuesNames, _cuesValidity, _cueValuesForEachTrial (if _randomlyGenerateCues is false). |
| _closedMouselab | true | true / false | Whether to close the boxes with information and make them open on the mouse click (true) or show all cues from the beginning (false). |
| _closeCuesOnLeave | false | true / false | For closed Mouselab (_closedMouselab is true), whether to hide the cue when the mouse leaves the box (true) or leave the boxes open after a click (false). |
| _numberOfOpenCuesFromStart | 0 | Integer (min = 0) | For closed Mouselab (_informationSearchParadigm is closed), you can specify how many cues are visible from the beginning of the trial. |
| _firstCuesToBeShownOnClick | undefined | Undefined or an array of first cues to show (separated by semicolons). | For closed Mouselab (_informationSearchParadigm is closed), you can specify which cue values to show on the first click. The cue values should be given as an array, which length is equal to the number of trials. |
| _randomizeOptions | true | true / false | Whether or not to randomize the presentation order of options specified in _optionsNames. |
| _randomizeCues | false | true / false | Whether or not to randomize the presentation order of cues. |
| _decoupleOptionsAndDisplay | true | true / false | Whether or not to decouple display options names from options names. When true, the presentation order of displayed names is randomized independently from options. |
| _showPoints | FALSE | true / false | Whether or not to show participants the amount of collected points. |
| _cueValuesForEachTrial | 0;0;0;0;1;1;1;1 1;1;1;0;0;0;1;1 1;1;1;0;0;0;1;1 | Trials separated by a space or a new line. Cues are separated by semicolons. For convenience, the data can be copied from a csv file. | The cue values for each option and trial. The number of values should correspond to the number of trials, options and cues. The parameter _randomlyGenerateCues should be false. |
| _imageNamePositive | thumbUp | String, name of the image. | In case if the parameter _typeOfCues is name, the positive cue value (bigger than 0) will be displayed with the image with given name. The image should uploaded to the screen component MouseLab in the lab.js builder, and the names should match. |
| _imageNameNegative | thumbDown | String, name of the image. | In case if the parameter _typeOfCues is name, the negative cue value (smaller or equal to 0) will be displayed with the image with given name. |
| _showOptionsAsImages | true | true / false | Whether or not to show options as images. If true, display names will be used as images names. |
| _showCuesAsImages | FALSE | true / false | Whether or not to show cues as images. If true, cues names will be used as images names. |
| _typeOfCues | binary | binary / raw / image / name / any | How to display cues: Binary: + or -. If the cue is of binary type, the value bigger than zero is displayed as a plus sign, otherwise as a minus sign. Raw: the way how values are written in the parameter _cueValuesForEachTrial. Image: as images for positive and negative values. The value bigger than zero is displayed as an image with the name from _imageNamePositive, otherwise as an image with the name from _imageNameNegative. Name: as images. The names of the images are in the parameter _displayOptions. Any: as images. The names of the images are in the parameter _displayOptions. If there is no image with the specified name, the raw value of cue is shown. |
The results are saved in the csv format divided by comma, so you can open the file in your favorite program (Excel, SPSS, R, etc.). Inside of the file, some of the columns are default data columns supplied by lab.js: sender, sender_type, sender_id, timestamp, meta, ended_on, response, time_commit, time_end, time_render, time_run, time_show, and time_switch. Please consult with lab.js documentation for descriptions here .
The other variable record participants’ behavior and parameters that were used to construct each trial:
answer: chosen answer in terms of the displayed nameanswerOption: chosen answer in terms of the internally used nameboxHistory: the array with the numbers of opened boxes. All boxed are numbered from left to right, from top to bottom, e.g. [“1”,”2”,”3”,”4”].calculatedValuesOfOptions: the array of calculated values for each option. The option with the highest value is a correct option in the trial. Ties are broken randomly.correctOption: correct answer in terms of the displayed namecueCost: cost of opening one information boxcuesHistory: the array with information about opened information boxes. Each box is presented by contains the name of the option, displayed name of the option and the cue name, e.g. ["Option1-Apartment 1-Size","Option2-Apartment 2-Size","Option3-Apartment 3-Size","Option4-Apartment 4-Size"].cuesNum: number of the cues in the trialcuesOrder: order of the cues in the trialcuesReaction: whether information boxes remain open or close after the mouse pointer leaves the box (applied only to the closed Mouselab paradigm).cuesType: type of the cues (name, binary, raw, image, name, or any)cuesValuesHistory: the array with the shown values of opened information boxes, e.g. ["-","-","+","-"]currentTrial: the current trial numberdisplayCuesNames: the displayed names of the cues in the trialdisplayOptions: the information about the options presented from left to right. Each option contains the option number, the internally used option name, the display name, the array of cue values, the calculated option value.duration: the time length of the trial.feedback: whether feedback was shown in the trialfirstCueValue: the first cue value shown to the participant (if it was specified in the task parameters)infoCost: cost of opening one information box in the trialinstruction:the instruction text in the trialloseCost: cost of losing in the trialnumberOfOpenedCues: the number of opened information boxed (applied only to the closed Mouselab paradigm).openCues: the number of opened cues from the beginning of the trial (if it was specified in the task parameters)optionsNum: the number of options in the trialparadigm: the open or closed Mouselab paradigmpayneIndex: the Payne information search index (for closed Mouselab paradigm)points: the number of points at the end of the trialpositionOfWinOption: the displayed position of the correct option in the trial (counter from left to right)showCuesAsImages: the way cues presented in the trialshowOptionsAsImages: the way options presented in the trialshowPoints: whether to show points in the trialstartBalance: the starting amount of points for the trialstheValueOfWinOption: the calculated value of the correct option in the trialtimeCueHistory: The array with the times spent on each opened box (between opening a cue and leaving the box with the cue)timeForFeedback: the time length of the shown feedback in the trialtrialNumber: the original trial’s number (in case if the order of trials is randomized)trialTime: the time between presentation of the task board and the click on a choicewinCost: prize of winning in this trial
Thank you for considering to contribute to the development of the multi-attribute decision builder! You can submit an issue or a bug report via GitHub. If you want to contribute to the code development, submit a pull request or get in touch with us via Slack chat. You can also share your tasks in Open Lab, read more about uploading a task here.
If you have problems with the multi-attribute decision builder and seek support, please feel free to join our Slack chat that is dedicated to Open Lab.


