minhuaf / blog Goto Github PK
View Code? Open in Web Editor NEWI will write my front-end story.
I will write my front-end story.


终于有一个具体的示例让我能不用靠司机硬背
apply和call的区别了。
今天看到一段高级的代码,觉得有必要好好记录一下。大概就是下面这样的
const list = [].map(item => item.clientHeight);
const maxHeight = Math.max.apply(null, list);
哇,看完感觉又学到了奇奇怪怪的知识。(其实估计是比较菜...
能理解上面代码的意思,就是寻找数组中的最大值,但是Math.max.apply(null, list),这样的用法是第一次看到。
所以有2个疑问
apply的第一个参数是null;调用已知知识库理解一下
Math.max() 是用来查找最大值;Math.max() 的语法是 Math.max(value1[,value2, ...]),它不能接受数组形式的参数;apply 方法的第一个参数是调用者,是调用apply方法的对象指向,第二个参数是一个数据集合;apply可以将一个数组默认地转换为一个参数列表,比如[param1, param2, param3] => param1, param2, param3
这里已经把apply的特性说明白了,就是apply方法能将数据的每一项,转换成参数的列表项。
var max = Math.max.apply(null, [3,2,5,3])

        等同于

var max = Math.max(3,2,5,3)
如果要自己代码编写获取数组中的最大值,常用的估计就是这样了
var getMath = (array) => {
    let max = array[0];
    let len = array.length;
    for(let i = 1; i < len; i++) {
        max = Math.max(max, array[i]);
    }

    return max;
}
看着就比较繁琐。
第一个疑问解决,其实就是使用apply的特性,能比较高效简单地获取到数组的最大值或者最小值。
那第二个问题,apply的第一个参数为什么是null?
对于apply的第一个参数:代表的是函数运行时this的值。
在此处,并没有任何对象调用Math.max,如果有,只能算是全局对象,所以,需要设置成null,通俗点理解其实就是,此处不需要任何的对象调用这个方法,只需要帮忙执行并返回结果即可。
一般别人问前端性能优化的时候,都会有个cdn加速的答案,可是对于cdn加速,并不是说自己可以顺便搭建的,就算要搭建也是需要规划和搭建缓存分发服务器,成本比较大。
有幸负责公司移动端web项目的cdn部署,刚接到需求的时候还是比较紧张的,毕竟这个如果工程是自己搭建的话,工作量还是比较大的.......当你很紧张地科普自己的背景知识的时候。。。

运营处给你丢过来一份文件,说只需要填好这个文件就好了,我们找的是第三方cdn服务商....
额....好吧,既然已经找好了,那就填就是了,结果。。
部署完之后,把我们的后台弄坏了,主要原因是cdn服务商到我们服务器的时候,不是转发用户原来的链接,而是直接新建一个请求,导致我们获取不到用户的真实请求参数,一系列的鉴权和防爬什么的都gg了。。。背了大锅,不过这个也是因为对接之前没有了解清楚我们目前的情况以及cdn的原理导致的。
教训就是要清楚所有的情况再做决定,不然会很尴尬。。。

好了,悲剧介绍完毕了,接下来说下这个过程中,对cdn的一写概念的理解。。。预告,了解完之后估计你会剁手....
分几个点来说:概念,原理,目前的状况,痛点,以及新的cdn模式....期待吧?又有小惊喜了
CDN (Content Delivery Network) ,中文名内容分发网络。解决互联网上影响传递速度和稳定性的问题,使内容传递的更快和更稳定。
通过构建网络分发点,减少主服务器的网络传输压力,将链接到IP网络上的内容迅速分发到用户终端。接入cdn的主要流程组成有初始服务器、缓存服务器、重定向DNS服务器和内容交换服务器。
初始服务器:一般指的就是我们部署内容的服务器,是信息的源头,俗称源站;
缓存服务器:分布在各个地方,用户存储初始服务器的部分内容或全部内容(要缓存哪些内容,是通过机制来配置的,这里一般都有一个缓存机制策略的制定);
重定向DNS服务器:DNS是什么,就是域名解析,这个的意思就是用户打开域名的时候,会经过域名解析系统,帮我们找到对应域名的主机ip,再把用户的请求发送到对应的主机;重定向DNS服务器就是为用户提供最近的服务器IP地址,减少源站网络的压力;
内容交换服务器:总感觉这个比较6的样子...这个负责的是整个网络中各个缓存服务器之间的负载均衡的...什么是负载均衡,怎么实现负载均衡...我也母鸡,百度一下..
呼.....
一口气说了那么多,都是看着百度百科记下来的。。。
经过一番百度之后,基本把CDN相关的一些概念和原理已经弄清楚了。之后就是看下如果要实践的话,一般需要做什么,以及目前会有哪些相关的解决方案...
目前做CDN服务的公司并不多,而且都是传统下来的公司,因为要提供CDN服务,需要大量的服务器用于加速节点,这个成本是很高的,而且不是随便安置,还要有根据不同地区的访问量进行分布。所以结论就是CDN服务的优劣是直接受限于服务器的数量多少和地域分布情况的,然后成本就上去...用户使用起来就很尴尬了....
登登登登.....
由于上面的痛点,所以就有了一个创新型CDN模式,星域的出现。创新在于共享经济的模式,用的同时还可以为其他人提供服务赚取收益。星域生产了硬件,用户可以用来存储资源,同时也是一个加速器,星域会对这些加速器进行处理...详情看星域就好了
以上已经把CDN的大概介绍了一下,其实知道了这个之后,我感觉还是对CDN一脸懵逼,其实里面还有比较多的实现细节没有涉及,主要是实现上的细节,比如:加速运行商、加速区域、缓存策略、监控链接、缓存内容等等,需要根据源站的需要以及实际的资源进行配置。
目前就这么多,有表述错误的还请大家提一下,谢谢,over
ES6提供了新的数据机构: Set、WeakSep、Map和WeakMap。
数据结构Set类型数组,但是没有重复值,值都是唯一的,值可以任何类型。
Set本身是构造函数,可以通过new直接创建对应的结构。
const set = new Set();
// or 传入初始化数组
const set1 = new Set([1,2,3])
// or 传入具有 iterable 接口的其他数据结构
const set2 = new Set(document.querySelectorAll('div'));
由于Set数据结构中的元素是不重复的,所以可以用来作为数组去重的方式
[...new Set(array)]属性
方法
const set = new Set();

// 由于add方法返回的是Set结构本身,所以可以连续操作
set.add(1).add(3);- Set.prototype.keys():返回键名的遍历器
- Set.prototype.values():返回键值的遍历器
- Set.prototype.entries():返回键值对的遍历器
- Set.prototype.forEach():使用回调函数遍历每个成员数据结构WeakSet与Set类型,没有重复值,值也是唯一的,但是成员只能是对象,而不能是其他类型的值。
对于WeakSet的细节介绍,阮一峰老师已经解说的很详细了,这边没补充,就直接引用了,有需要可查看原文
其次,WeakSet 中的对象都是弱引用,即垃圾回收机制不考虑 WeakSet 对该对象的引用,也就是说,如果其他对象都不再引用该对象,那么垃圾回收机制会自动回收该对象所占用的内存,不考虑该对象还存在于 WeakSet 之中。
这是因为垃圾回收机制依赖引用计数,如果一个值的引用次数不为0,垃圾回收机制就不会释放这块内存。结束使用该值之后,有时会忘记取消引用,导致内存无法释放,进而可能会引发内存泄漏。WeakSet 里面的引用,都不计入垃圾回收机制,所以就不存在这个问题。因此,WeakSet 适合临时存放一组对象,以及存放跟对象绑定的信息。只要这些对象在外部消失,它在 WeakSet 里面的引用就会自动消失。
由于上面这个特点,WeakSet 的成员是不适合引用的,因为它会随时消失。另外,由于 WeakSet 内部有多少个成员,取决于垃圾回收机制有没有运行,运行前后很可能成员个数是不一样的,而垃圾回收机制何时运行是不可预测的,因此 ES6 规定 WeakSet 不可遍历。
属性
方法
数据结构Map与Object类型,本质上是键值对的集合(Hash结构);
Map数据结构的出现主要是为了解决原有的Object对象的键只能是字符串的局限;
Map的”键“支持各种类型的结构;
属性
方法
WeakMap结构与Map结构类似,也是用于生成键值对的集合;
WeakMap只接受对象作为键名(null除外),不接受其他类型的值作为键名;
WeakMap的键名所指向的对象,不计入垃圾回收机制;
属性
方法
咳咳咳....
其实我一直觉得什么linux呀,服务器端部署什么的离我比较远的,可是会发现越来越多的工作内容涉及到这些情况,比如说要排除故障呀,查看修改配置之类的,如果不会的话,其实还是很被动的,纠正下自己的**,之前一直觉得前端可以不用理解这些内容,如果想要扩展自己的发展道路,还是来者不拒比较友好一点。
如果单独介绍命令的话,感觉太教科书化了,而且一般这些命令的用途都是网上一大堆的,那我就不再复述了,我觉得从实际使用场景出发会比较靠谱一点。
linux服务器,并在/home下创建一个code目录,如果已经存在,则把内容清空;code目录的权限,指定访问账号;nodejs,指定端口;javascript中字符串的操作比较常用的是字符串截取函数slice() substr() substring() ,在用的时候不一样需要三个都用,其实用其中一个或两个就可以满足业务需求,可是内在的区别以及参数原理弄清楚还是有助于我们学习的。
slice(start, [end])
substr(start, [, length])
substring(start, [end])
第一次在Linux上面玩装东西,还是挺好玩的,不过有点头晕,多打点命令就好了。
首先,在Linux上下载和安装ftp的安装程序,如果是内部服务器,不能链接外网的话,就需要在另一台服务器拷贝文件过去目标服务器;如果服务器是可以联网的话,就直接通过命令来处理就好了。
检查是否已安装ftp
rpm -qa | grep ftp
离线安装
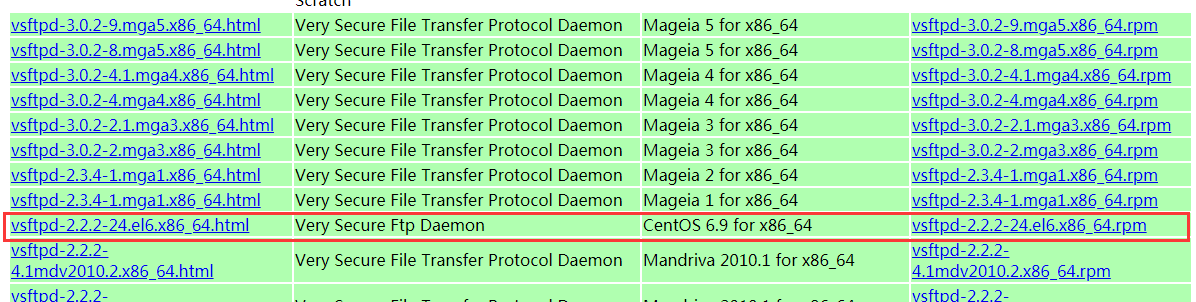
需下载和拷贝安装程序,然后安装。下载 FTP:http://rpmfind.net/linux/rpm2html/search.php?query=vsftpd(x86-64)
拷贝上传到对应的服务器
scp -r /home/test [email protected]:/home/lk/cpfile
rpm -ivh vsftpd-3.0.2-21.el7.x86_64.rpm
在线安装
通过命令直接下载安装
yum install vsftpd
service vsftpd start
展示[确定]即安装成功

anonymous_enable=NO      # 是否开启匿名登录
local_enable=YES                # 是否允许本地用户登录
write_enable=YES               # 是否允许上传
local_umask=022                # 默认的umask码
diremssage_enable=YES    # 是否显示目录说明文件
xferlog_enable=YES           # 是否记录ftp传输过程
connect_from_prot_20=YES      # 是否确定端口传输来自20
xferlog_ftd_format=YES           # 是否使用标准的ftp xferlog模式
chroot_list_enable=YES            # 是否将系统用户限制在自己的home目录下
chroot_list_file=/etc/vsftpd/chroot_list    # 列表不受限制的用户
listen=YES     # 是否开启监听
pam_service_name=vsftpd  # 服务名称
userlist_enable=YES
tcp_wrappers=YES
一般内网情况下,端口通信是有限制的,ftp默认是21端口,如果网络不通的情况下,建议修改ftp的默认端口,使其能直接通信。
vi /etc/vsftpd/vsftpd.conf
在末尾加上,然后重启
listen_port=8080 #注意等号两边不用空格
修改系统services的配置(这个系统的端口,我尝试了下不修改也是没有问题的,具体为什么要修改这个,还不确认)
vi /etc/services
修改以下配置,然后重启vsftpd即可
ftp 21/tcp  改为 ftp 8080/tcp ,
ftp 21/udp  改为 ftp 8080/tcp
可查看vsftpd的端口使用情况
netstat -tnulp | grep vsftpd
设置了上面的步骤之后,需要查看下服务器的防火墙是否对21、2323端口开启了权限。
cat /etc/sysconfig/iptables
查看配置,要是没有对使用的端口进行配置,则需要添加上
vi /etc/sysconfig/iptables
添加下面语句
-A INPUT -m state --state NEW -m tcp -p tcp --dport 端口号 -j ACCEPT
添加后需要重启防火墙,使配置生效
service iptables restart
如果原来没有/etc/sysconfig/iptables,则需要新建。
vi /etc/sysconfig/iptables
添加以下内容
# Firewall configuration written by system-config-firewall
# Manual customization of this file is not recommended.
*filter
:INPUT ACCEPT [0:0]
:FORWARD ACCEPT [0:0]
:OUTPUT ACCEPT [0:0]
-A INPUT -m state --state ESTABLISHED,RELATED -j ACCEPT
-A INPUT -p icmp -j ACCEPT
-A INPUT -i lo -j ACCEPT
-A INPUT -m state --state NEW -m tcp -p tcp --dport 80 -j ACCEPT
-A INPUT -m state --state NEW -m tcp -p tcp --dport 21 -j ACCEPT
-A INPUT -m state --state NEW -m tcp -p tcp --dport 2323 -j ACCEPT

-A INPUT -j REJECT --reject-with icmp-host-prohibited
-A FORWARD -j REJECT --reject-with icmp-host-prohibited
COMMIT
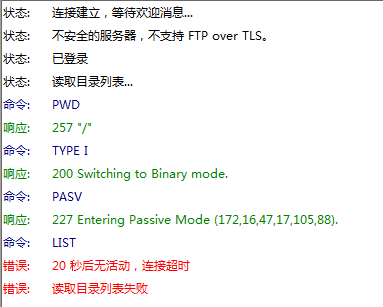
一般配置完之后,试试能不能登录和访问,这个时候一般是不行的,看报错提示语,是获取List的问题,是没有配置ftp默认访问路径导致的。我用的是filezilla。
创建一个用户,然后修改用户的登陆shell为nologin,让用户不能登陆系统,只能使用ftp之内的服务
useradd -d /home/ftp -g ftpgroups -s /sbin/nologin ftpuser
passwd ftpuser #设置该用户的密码
chmod -R 777 /home/ftp #修改ftp账号的权限
取消匿名登录,进入编进页面,把第一行 anonymous_enable=YES ,改为NO,然后重启。
vi /etc/vsftpd/vsftpd.conf
指定ftp默认访问路径,在vsftpd.conf上添加local_root=/home/ftp,即可。
service vsftpd restart #修改完之后需要重启vsftpd
登录账号查看发现也能访问上层目录,甚至根目录,这不是我们想要的,修改一下配置文件让其只能访问自身目录。如下设置。
vi /etc/vsftpd/vsftpd.conf
chroot_local_user=YES
chroot_list_enable=YES
# (default follows)
chroot_list_file=/etc/vsftpd/chroot_list
service vsftpd restart #修改完之后需要重启vsftpd
一般完成以上步骤之后,已经可以在客户端通过8080端口匿名访问ftp的目录,不过可能会报错,可能会很慢。ftp通信有2种模式,一种是主动模式,一种是被动模式。主要使用的是ftp的被动模式,在/etc/vsftpd/csftpd.conf后面添加以下配置,即可设置为被动模式。配置结束后重启vsftpd
pasv_enable=YES
pasv_min_port=2323
pasv_max_port=2323
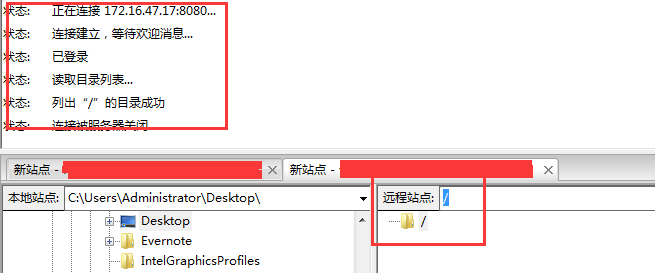
重新登录,大功告成!
对git commit message 进行规范和约束,既方便团队协作、也能快速定位问题。针对commit message,已经有现成的工具 Commitlint。
Commitlint的底层逻辑其实是使用了 git hook。
npm install --save-dev @commitlint/config-conventional @commitlint/cli

echo "module.exports = {extends: ['@commitlint/config-conventional']};" > commitlint.config.js
提交的一些规范示例此处有详细说明:@commitlint/config-conventional
如果需要定制 commit rule,可移步 这里
$ npm install husky -D
package.json中添加prepare脚本$ npm set-script prepare "husky install"
$ npm run prepare
prepare脚本会在npm install(不带参数)之后自动执行。也就是说在执行npm install之后会执行husky install命令,改命令会创建.husky/目录并指定该目录为git hooks所在的目录。
hook$ npx husky add .husky/commit-msg 'npx --no-install commitlint --edit "$1"'
commit message的约束package.json文件中添加"husky": {
"hooks": {
"commit-msg": "commitlint -e $HUSKY_GIT_PARAMS" // 校验commit时添加的备注信息是否符合要求的规范
}
}$ git commit -m 'add commitlint'
⧗ input: add commitlint
✖ subject may not be empty [subject-empty]
✖ type may not be empty [type-empty]
✖ found 2 problems, 0 warnings
ⓘ Get help: https://github.com/conventional-changelog/commitlint/#what-is-commitlint
$ git commit -m 'foo: add commitlint'
⧗   input: foo: add commitlint
✖   type must be one of [build, chore, ci, docs, feat, fix, perf, refactor, revert, style, test] [type-enum]

✖   found 1 problems, 0 warnings
ⓘ   Get help: https://github.com/conventional-changelog/commitlint/#what-is-commitlint
内置的常用type类别
demo
chore: run tests on travis ci
fix(scope): add api params
feat(scope): add comment section
(待补充)
有了commitlint的提交约束,能方便直接生成changelog,而不需要人为地添加进去
$ npm i standard-version -D
script$ npm set-script release "standard-version"
第一次提交使用
$ npm run release -- --first-release
之后的提交使用
$ npm run release
changlog产生的tag并不会传送到远程仓库服务器上,创建完之后需要显示的推送标签,详情参考官方文档,这边简单地列举下操作流程
列出所有的标签
$ git tag
推送所有标签到远程仓库
$ git push origin --tags
删除标签
$ git tag -d <tagname>
...
通过上面生成 changelog 时,需要同步push tag。
优雅的提交你的 Git Commit Message
使用 husky、commitlint 和 lint-staged 来构建你的前端工作流(vue、react、dva)
FlexBox Layout 旨在提供一种更加有效的方式来布局、对齐和分配容器中各个项目直接的空间,即使它们的大小未知或是动态改变的。
FlexBox Layout 的主要**是使容器能更改其项目的宽度/高度(和顺序),来最好地填充可用空间(主要是使用所有类型的显示设备和屏幕尺寸)。FLex容器会扩展项目以填充可用的可用空间,或收缩它们以防止溢出。
最重要的是,和常规布局(块是垂直的,内联是水平的)相比,flexbox布局与方向无关的。虽然方向这些功能在页面上工作的很好,但是常规布局缺乏支持大型或复杂应用程序的灵活性(特别是在改变方向、调整大小、拉伸、收缩等方面)。
注意:Flexbox 布局最适合应用程序的组件和小规模布局,而Grid布局则用于较大规模的布局。

FlexBox Layout从2017年出现以来,社区已经和完善,也有很多布道师发布了教程,借此记录下,下次有疑问的时候可以直接在这里找了
图解CSS:Flexbox布局(Part1) - 大漠老师对flex系列的讲解太棒了
A Complete Guide to Flexbox
今天review代码时看到了这个
if([VAR_1, VAR_2, VAR_3].indexOf(target) !== -1){}想到了自己写的这个
if([VAR_1, VAR_2, VAR_3].includes(target)){}都能实现同样的功能,那为什么会有不同的写法,它们又有什么区别呢?
抱着死记硬背不如了解下原理的原则,找了indexOf和includes的源码做了下对比,这里就不重新实现源码的,了解功能和区别就好了,所以直接从MDN上面把对应的代码搬到这里吧.
找了一遍,没有找到哪里能看javascript的源码,只能参考indexOf的ployfill
arr.indexOf(searchElement[, fromIndex])
// indexOf polyfill
// Production steps of ECMA-262, Edition 5, 15.4.4.14
// Reference: http://es5.github.io/#x15.4.4.14
if (!Array.prototype.indexOf) {
  Array.prototype.indexOf = function(searchElement, fromIndex) {

    var k;

    // 1. Let O be the result of calling ToObject passing
    //    the this value as the argument.
    if (this == null) {
      throw new TypeError('"this" is null or not defined');
    }

    var O = Object(this);

    // 2. Let lenValue be the result of calling the Get
    //    internal method of O with the argument "length".
    // 3. Let len be ToUint32(lenValue).
    var len = O.length >>> 0;

    // 4. If len is 0, return -1.
    if (len === 0) {
      return -1;
    }

    // 5. If argument fromIndex was passed let n be
    //    ToInteger(fromIndex); else let n be 0.
    var n = +fromIndex || 0;

    if (Math.abs(n) === Infinity) {
      n = 0;
    }

    // 6. If n >= len, return -1.
    if (n >= len) {
      return -1;
    }

    // 7. If n >= 0, then Let k be n.
    // 8. Else, n<0, Let k be len - abs(n).
    //    If k is less than 0, then let k be 0.
    k = Math.max(n >= 0 ? n : len - Math.abs(n), 0);

    // 9. Repeat, while k < len
    while (k < len) {
      // a. Let Pk be ToString(k).
      //   This is implicit for LHS operands of the in operator
      // b. Let kPresent be the result of calling the
      //    HasProperty internal method of O with argument Pk.
      //   This step can be combined with c
      // c. If kPresent is true, then
      //    i.  Let elementK be the result of calling the Get
      //        internal method of O with the argument ToString(k).
      //   ii.  Let same be the result of applying the
      //        Strict Equality Comparison Algorithm to
      //        searchElement and elementK.
      //  iii.  If same is true, return k.
      if (k in O && O[k] === searchElement) {
        return k;
      }
      k++;
    }
    return -1;
  };
}从代码中可以看到indexOf
===,全等比较隐藏的问题就是类型装换问题,典型的就是 (NaN === NaN) === false;所以使用Array.prototype.indeOf()是判断不了NaN是否存在的。if (k in O && O[k] === searchElement) {
return k;
}includes的实现也是参考polyfill
arr.includes(valueToFind[, fromIndex])
// https://tc39.github.io/ecma262/#sec-array.prototype.includes
if (!Array.prototype.includes) {
  Object.defineProperty(Array.prototype, 'includes', {
    value: function(valueToFind, fromIndex) {

      if (this == null) {
        throw new TypeError('"this" is null or not defined');
      }

      // 1. Let O be ? ToObject(this value).
      var o = Object(this);

      // 2. Let len be ? ToLength(? Get(O, "length")).
      var len = o.length >>> 0;

      // 3. If len is 0, return false.
      if (len === 0) {
        return false;
      }

      // 4. Let n be ? ToInteger(fromIndex).
      //    (If fromIndex is undefined, this step produces the value 0.)
      var n = fromIndex | 0;

      // 5. If n ≥ 0, then
      //  a. Let k be n.
      // 6. Else n < 0,
      //  a. Let k be len + n.
      //  b. If k < 0, let k be 0.
      var k = Math.max(n >= 0 ? n : len - Math.abs(n), 0);

      function sameValueZero(x, y) {
        return x === y || (typeof x === 'number' && typeof y === 'number' && isNaN(x) && isNaN(y));
      }

      // 7. Repeat, while k < len
      while (k < len) {
        // a. Let elementK be the result of ? Get(O, ! ToString(k)).
        // b. If SameValueZero(valueToFind, elementK) is true, return true.
        if (sameValueZero(o[k], valueToFind)) {
          return true;
        }
        // c. Increase k by 1.
        k++;
      }

      // 8. Return false
      return false;
    }
  });
}从实现中得出includes
bool===,但是有对NaN有特殊的处理function sameValueZero(x, y) {
return x === y || (typeof x === 'number' && typeof y === 'number' && isNaN(x) && isNaN(y));
}indexOf;includes会比较方便;indexOf不能判断NaN,includes可以;这个就是说多无畏,动手实践就能理解系列
触发高频事件后 n秒内 函数只会执行一次,如果n秒内高频事件再次被触发,则重新计算时间。
高频事件触发,但在n秒内只会执行一次,所以节流会稀释函数的执行频率。
...... 不知怎么表达系列,直接看下面代码吧
以下实现是基于react的,如果想看原生的话,请点击这里
我用react代码实现了一个按钮的点击事件
场景假设:用户点击按钮会发送接口请求,用户频繁点击了很多次,那这个按钮的交互要怎么处理呢?
import React from 'react';

let timer = null;

/**
 * 防抖
 * 点击按钮发送异步请求
 */
export default function Debounce() {
  const fetchData = () => {
    clearTimeout(timer);
    timer = setTimeout(() => {
      console.log('间隔1s,请求响应')
    }, 1000)
  }
  return (
    <div >
      <button onClick={fetchData}>点击发送请求</button>
    </div>
  )
}节流这个最常见的便是鼠标移动元素了
场景假设:页面上有个小公仔,鼠标移动的时候,公仔会更着移动
import React, { useState, useRef, useEffect } from 'react';
import strawberry from '../../assets/img/strawberry.png';

/**
 * 节流
 * 图标跟随图标移动
 * 实现思路:节流阀控制函数触发的机制
 */
export default function Throttle() {
  const ref = useRef(null);
  const flag = useRef(true);
  const [style, setStyle] = useState({
    left: 0,
    top: 0,
  });
  useEffect(() => {
    let timer = null;
    document.addEventListener('mousemove', (e) => {
      if(flag.current) {
        if(!flag.current) return;
        flag.current = false;
        timer = setTimeout(() => {
          console.log('strawberry move')
          setStyle({
            left: e.pageX,
            top: e.pageY
          })
          flag.current = true;
        }, 50)
      }
    })
    return () => clearTimeout(timer);
  }, [])
  return (
    <div>
      <img
        style={{
          position: 'absolute',
          ...style
        }}
        src={strawberry}
        alt="strawberry"
        ref={ref}
      />
    </div>
  )
}对于防抖和节流,掌握的最好方式就是根据实际场景去解决问题,对比效果之后就能掌握它们的概念和区别,那么在后面的编程中,也能熟悉应用。
个人理解口述,如有误解欢迎
对于webpack来说,一切都是模块,在打包过程中,webpack会分析各个模块之间的依赖关系,然后根据loader和plugin相关的配置,把代码之间的依赖关系替换成对应模块的引用。
Undefined, Null, String, Number, Boolean, Symbol
Object, Array, Date, RegExp, Function
const deepClone = (source) => {
  if (!source || typeof source !== 'object') {
    throw new Error('error arguments')
  }
  // 判断类型时有的使用 `instanceof`, 这个和 `constructor ` 有什么不一样?
  let targetObj = source.constructor === Array ? [] : {}
  for (let key in source) {
    if (source.hasOwnProperty(key)) {
      if (source[key] && typeof source[key] == 'object') {
        targetObj[key] = source[key].constructor === Array ? [] : {}
        targetObj[key] = deepClone(source[key])
      } else {
        targetObj[key] = source[key]
      }
    }
  }
  return targetObj
}早上看笔试题目时,看到有一个阿里的笔试题目
实现一个EventEmitter类,这个类包含以下方法:
on(监听事件,该事件可以被触发多次)
once(也是监听事件,但只能被触发一次)
fire(触发指定的事件)
off(移除指定事件的某个回调方法或者所有回调方法)
class EventEmitter {
  /**请补充你的代码***/
}
const event = new EventEmitter()
const drank = (person) => {
  console.log(person + '喝水')
}
event.on('drank', drank)
event.on('eat', (person) => {
  console.log(person + '吃东西')
})
event.once('buy', (person) => {
  console.log(person + '买东西')
})
event.fire('drank', '我')   // 我喝水
event.fire('drank', '我')   // 我喝水
event.fire('eat', '其它人')   // 其它人吃东西
event.fire('eat', '其它人')   // 其它人吃东西
event.fire('buy', '其它人')  //其它人买东西
event.fire('buy', '其它人')  //这里不会再次触发buy事件,因为once只能触发一次
event.off('eat')  //移除eat事件
event.fire('eat', '其它人') //这里不会触发eat事件,因为已经移除了根据提供这个题目的作者描述,这是一个订阅发布模式的题目。故收集下来,并巩固下这个模式的用法。
订阅发布模式定义的是一对多的关系,让多个订阅者同时监听某个发布者对象;这个发布者对象在自身状态发生变化时会通知所有订阅者,使他们能更新对应的状态。
刷LeetCode的时候发现按照同类型的数据结构来进行会比较有趣,能发现到同种数据结构的很多中变形算法,但是有时候可能会不是很好记得所有算法的实现,特此在这里记录。
如代码中有误请指正~
var levelOrder = function(root) {
  if(!root) return [];
  let result = [];
  let quene = [root];
  while(quene.length > 0) { // 层级循环
    let arr = [];
    const len = quene.length;
    while(len > 0) { // 每层级的节点个数层级
      let node = quene.shift();
      arr.push(node.val);
      // 把每层级节点的每个子树都添加到队列中
      if(node.left) quene.push(node.left);
      if(node.right) quene.push(node.right);
      len--;
    }
    result.push(arr);
  }
  return result;
};/**
* Definition for a binary tree node.
* function TreeNode(val, left, right) {
* this.val = (val===undefined ? 0 : val)
* this.left = (left===undefined ? null : left)
* this.right = (right===undefined ? null : right)
* }
*/
/**
* 递归
* @param {TreeNode} root
* @return {number[]}
*/
const preorderTraversal = function(root) {
let result = [];
const helper = (node) => {
if(!node) return null;
result.push(node.val);
helper(node.left);
helper(node.right);
}
helper(root);
return result;
};/**
* Definition for a binary tree node.
* function TreeNode(val, left, right) {
* this.val = (val===undefined ? 0 : val)
* this.left = (left===undefined ? null : left)
* this.right = (right===undefined ? null : right)
* }
*/
/**
* @param {TreeNode} root
* @return {number[]}
*/
var inorderTraversal = function(root) {
var result = [];
var helper = function(node) {
if(!node) return null;
helper(node.left);
result.push(node.val);
helper(node.right);
}
helper(root);
return result;
};/**
* Definition for a binary tree node.
* function TreeNode(val, left, right) {
* this.val = (val===undefined ? 0 : val)
* this.left = (left===undefined ? null : left)
* this.right = (right===undefined ? null : right)
* }
*/
/**
* @param {TreeNode} root
* @return {number[]}
*/
const postorderTraversal = function(root) {
let result = [];
const helper = (node) => {
if(!node) return null;
helper(node.left);
helper(node.right);
result.push(node.val);
}
helper(root);
return result;
};广度优先遍历实现
二叉树的层序遍历
/**
 * Definition for a binary tree node.
 * function TreeNode(val, left, right) {
 *     this.val = (val===undefined ? 0 : val)
 *     this.left = (left===undefined ? null : left)
 *     this.right = (right===undefined ? null : right)
 * }
 */
/**
 * @param {TreeNode} root
 * @return {number[][]}
 */
var levelOrder = function (root) {
    if (!root) return [];
    let res = [];
    let quene = [root];
    while (quene.length > 0) { // 遍历所有节点
    let arr = []; // 每一层的元素
    let len = quene.length; // 第一次是1,第二次是2 ....
    while (len) {
        const node = quene.shift(); // 遍历每层的时候,根据之前获取的每层的个数,就循环遍历多少次,把第一个节点取出,以达到目的
        arr.push(node.val);
        if (node.left) quene.push(node.left); // 把左右节点放进队列中,方便知道下一层有多少个节点
        if (node.right) quene.push(node.right);
        len--;
    }
    res.push(arr); // 每次循环获取的都是当前层级的节点数据
    }
    return res;
};广度优先遍历实现
/**
 * // Definition for a Node.
 * function Node(val,children) {
 *    this.val = val;
 *    this.children = children;
 * };
 */

/**
 * @param {Node} root
 * @return {number[][]}
 */
var levelOrder = function(root) {
    if(!root) return [];
    let result = [];
    let quene = [root];
    while(quene.length > 0) {
        let arr = [];
        let len = quene.length;
        while(len > 0) {
            let node = quene.shift();
            arr.push(node.val);
            for(let i = 0; i < node.children.length; i++) {  // 与二叉树主要的不同点
                quene.push(node.children[i]);
            }
            len--;
        }
        result.push(arr);
    }
    return result;
};此文档可用于调试和学习react源码,适用于当前最新版本(17.0.2)
react源码的步骤debug-react 包括了步骤1、2、3,可以直接下载使用;
生成react项目
npx create-react-app debug-react
webpack 配置npm run eject
3.在src目录下下载react(此文章编写时react版本是17.0.2)
git submodule add https://github.com/facebook/react
4.在 config/webpack.config.js 中修改 react 的引用
resolve: {
    alias: {
        'react-native': 'react-native-web',
        'react': path.resolve(__dirname, '../src/react/packages/react'),
        'react-dom': path.resolve(__dirname, '../src/react/packages/react-dom'),
        'shared': path.resolve(__dirname, '../src/react/packages/shared'),
        'react-reconciler': path.resolve(__dirname, '../src/react/packages/react-reconciler'),
         //'react-events': path.resolve(__dirname, '../src/react/packages/events')
    }
}react的引用// import React from 'react';
// import ReactDOM from 'react-dom';
import * as React from "react";
import * as ReactDOM from "react-dom";const stringified = {
'process.env': Object.keys(raw).reduce((env, key) => {
env[key] = JSON.stringify(raw[key]);
return env;
}, {}),
__DEV__: true,
__PROFILE__: true,
__UMD__: true,
__EXPERIMENTAL__: true,
};react 包// import invariant from 'shared/invariant';
//invariant(false, 'This module must be shimmed by a specific renderer.'); //sy
export * from './forks/ReactFiberHostConfig.dom';export default function invariant(condition, format, a, b, c, d, e, f) {
if (condition) return; // 加上这行
throw new Error(
"Internal React error: invariant() is meant to be replaced at compile " +
"time. There is no runtime version."
);
}// import React from 'react';
// const ReactSharedInternals =
// React.__SECRET_INTERNALS_DO_NOT_USE_OR_YOU_WILL_BE_FIRED;
import ReactSharedInternals from '../react/src/ReactSharedInternals';"use strict";
export * from "./src/Scheduler";
// 添加以下内容
export {
unstable_flushAllWithoutAsserting,
unstable_flushNumberOfYields,
unstable_flushExpired,
unstable_clearYields,
unstable_flushUntilNextPaint,
unstable_flushAll,
unstable_yieldValue,
unstable_advanceTime,
} from "./src/SchedulerHostConfig.js";no-function-declare-after-return和react-internal 相关配置屏蔽,并搜索 /src/react/packages/,把相关的注释都删除。react/packages/react-dom/src/client下创建CONST.js文件,内容如下(主要解决循环引用问题)/**
* Copyright (c) Facebook, Inc. and its affiliates.
*
* This source code is licensed under the MIT license found in the
* LICENSE file in the root directory of this source tree.
*
* @flow
*/
export const isPrimaryRenderer = true;
export const warnsIfNotActing = true;
// This initialization code may run even on server environments
// if a component just imports ReactDOM (e.g. for findDOMNode).
// Some environments might not have setTimeout or clearTimeout.
export const scheduleTimeout: any =
typeof setTimeout === 'function' ? setTimeout : (undefined: any);
export const cancelTimeout: any =
typeof clearTimeout === 'function' ? clearTimeout : (undefined: any);
export const noTimeout = -1;
// -------------------
// Microtasks
// -------------------
export const supportsMicrotasks = true;
export const scheduleMicrotask: any =
typeof queueMicrotask === 'function'
? queueMicrotask
: typeof Promise !== 'undefined'
? callback =>
Promise.resolve(null)
.then(callback)
.catch(handleErrorInNextTick)
: scheduleTimeout; // TODO: Determine the best fallback here.
function handleErrorInNextTick(error) {
setTimeout(() => {
throw error;
});
}
export const supportsMutation = true;
export const supportsHydration = true;
export const supportsTestSelectors = true;在react/packages/react-dom/src/client/ReactDOMHostConfig.js 中找到CONST.js文件中定义的变量并注释,在ReactDOMHostConfig.js文件最后添加export * from './CONST.js'
启动项目npm start, 控制台显示success,但是打开页面会有error,直接在/src/react项目下搜索并删除即可,有点多,建议批量操作
src/react/packages/react-dom/src/client/ReactDOM.js
  Line 238:9:  Definition for rule 'react-internal/no-production-logging' was not found  react-internal/no-production-logging

src/react/packages/react-reconciler/src/ReactFiberHooks.new.js
  Line 1014:7:  Definition for rule 'react-internal/no-production-logging' was not found  react-internal/no-production-logging

src/react/packages/react-reconciler/src/ReactFiberHooks.old.js
  Line 1014:7:  Definition for rule 'react-internal/no-production-logging' was not found  react-internal/no-production-logging

src/react/packages/react-reconciler/src/ReactFiberHostConfig.js
  Line 10:1:   Definition for rule 'react-internal/invariant-args' was not found  react-internal/invariant-args
  Line 23:15:  Strings must use singlequote                                       quotes

src/react/packages/react-reconciler/src/ReactFiberWorkLoop.new.js
  Line 3201:7:  Definition for rule 'react-internal/no-production-logging' was not found  react-internal/no-production-logging

src/react/packages/react-reconciler/src/ReactFiberWorkLoop.old.js
  Line 3201:7:  Definition for rule 'react-internal/no-production-logging' was not found  react-internal/no-production-logging

src/react/packages/shared/ConsolePatchingDev.js
  Line 30:7:  Definition for rule 'react-internal/no-production-logging' was not found  react-internal/no-production-logging
  Line 55:7:  Definition for rule 'react-internal/no-production-logging' was not found  react-internal/no-production-logging
  Line 65:7:  Definition for rule 'react-internal/no-production-logging' was not found  react-internal/no-production-logging
  Line 81:7:  Definition for rule 'react-internal/no-production-logging' was not found  react-internal/no-production-logging

src/react/packages/shared/ReactSharedInternals.js
  Line 14:36:  Strings must use singlequote  quotes

Search for the keywords to learn more about each error.在 src\react\packages\react\src\ReactBaseClasses.js 的Component中打个debugger,刷新页面即可看到断点进去了。
/**
 * Base class helpers for the updating state of a component.
 */
function Component(props, context, updater) {
  debugger
  this.props = props;
  this.context = context;
  // If a component has string refs, we will assign a different object later.
  this.refs = emptyObject;
  // We initialize the default updater but the real one gets injected by the
  // renderer.
  this.updater = updater || ReactNoopUpdateQueue;
}未完待续...
下面提及的例子是方式,都是以宽为例,也就是flex-direction: row的情况,flex-direction: column的情况同理,只是把宽度改成高度
FlexBox Layout 旨在提供一种更加有效的方式来布局、对齐和分配容器中各个项目直接的空间,即使它们的大小未知或是动态改变的。
FlexBox Layout 的主要**是使容器能更改其项目的宽度/高度(和顺序),来最好地填充可用空间(主要是使用所有类型的显示设备和屏幕尺寸)。FLex容器会扩展项目以填充可用的可用空间,或收缩它们以防止溢出。
最重要的是,和常规布局(块是垂直的,内联是水平的)相比,flexbox布局与方向无关的。虽然方向这些功能在页面上工作的很好,但是常规布局缺乏支持大型或复杂应用程序的灵活性(特别是在改变方向、调整大小、拉伸、收缩等方面)。
注意:Flexbox 布局最适合应用程序的组件和小规模布局,而Grid布局则用于较大规模的布局。

爆炸,脑图原稿找不到了......
先来默读三遍下MDN上面的对flex-grow的介绍:
css属性flex-grow设置了一个flex项主尺寸的flex增长系数。它指定了flex容器中剩余空间的多少应该分配给项目(flex增长系数)。主尺寸是项的宽度和高度,这取决于
flex-direction的值。剩余的空间是flex容器的大小减去所有flex项的大小加起来的大小。如果所有的兄弟项目都有相同的
flex-grow系数,那么所有的项目将获得相同的剩余空间,否则将根据不同的flex-grow系数定义的比例进行分配。
上面的解说其实很清晰的说明白了flex-grow的定义,但不够接地气,可能有的小伙伴读完之后还不能很清晰了理解到flex-grow的用法,那这边就列举具体的例子来介绍下flex-grow的用法。
首先,flex-grow的值是一个<number>,它代表的是一个系数(也就是一个权重,如果还不是十分理解权重,建议先去了解下,方便后续理解)。默认值是0,默认并不会对剩余空间进行分配。
然后,flex-grow属性决定的是父元素在空间分配上有剩余空间时,如何分配这些剩余空间。
最后,得出设置了flex-grow属性时,剩余空间的分配公式是这样子的:比如剩余空间是 x, 子元素A、B、C的flex-grow 属性分别是a,b,c,那么flex-grow的系数总和就是sum = a + b + c,根据上面的解说,A、B、C三个元素将得到的剩余空间:
              a
A ===>  x * —————  (A获得的剩余空间)
             sum

              b
B ===>  x * —————  (B获得的剩余空间)
             sum

              c
C ===>  x * —————  (C获得的剩余空间)
             sum
flex-grow的取值不能是负数,那么情况有3种 x 表示每个子元素是flex-grow的值
接下来示例说明:父元素的宽度是1000px,里面有3个子元素,设置的宽度分别是100px,200px,300px,那么剩余空间就是400px,代码如下:
  <style>
    * {
      padding: 0;
      margin: 0;
      color: #fff;
    }

    h2 {
      color: #000;
    }

    .container {
      display: flex;
      flex-direction: row;
      width: 1000px;
      margin: 0 auto;
      border: 1px solid red;
    }

    .start {
      background-color: green;
      width: 100px;
    }

    .mid {
      background-color: blueviolet;
      width: 200px;
    }

    .end {
      background-color: darkgrey;
      width: 300px;
    }
  </style>
  <div class="container">
    <div class="start">w100</div>
    <div class="mid">w200</div>
    <div class="end">w300</div>
  </div>
看到剩余空间是400px,此时分别给子元素添加flex-grow属性,flex-grow取值情况不能是负数,默认是0 ,所以取值的情况只会有两种
默认值;相当于都没有设置flex-grow属性的情况;不会分配剩余空间
每个子元素的flex-grow属性都小于1,所有子元素的flex-grow属性加起来就小于1,上面式子中的sum将会等于1,意思是说,如果flex-grow属性设置小于0的时候,父元素的剩余空间不会全部分配给子元素:
.start {
  background-color: green;
  width: 100px;
  flex-grow: 0.1;
}

.mid {
  background-color: blueviolet;
  width: 200px;
  flex-grow: 0.2;
}

.end {
  background-color: darkgrey;
  width: 300px;
  flex-grow: 0.3;
}根据上面的公式计算下设置了flex-grow属性情况下,各个子元素的宽度
sum = 0.1 + 0.2 + 0.3 = 0.6 < 1
sum = 1

               0.1
A ===>  400 * —————  = 40 (A获得的剩余空间)+ 100(原来宽度) = 140 (当前宽度)
                1

               0.2
B ===>  400 * —————  = 80(B获得的剩余空间)+ 200(原来宽度) = 280 (当前宽度)
                1

               0.3
C ===>  400 * —————  = 120(C获得的剩余空间)+ 300(原来宽度) = 320 (当前宽度)
                1

所有子元素的flex-grow属性都设置成1,是一种特殊的情况,表示的是所有元素将按权重均分剩余空间;
所有子元素的flex-grow属性都大于1,它们的和也大于1;
.start {
  background-color: green;
  width: 100px;
  flex-grow: 1;
}

.mid {
  background-color: blueviolet;
  width: 200px;
  flex-grow: 2;
}

.end {
  background-color: darkgrey;
  width: 300px;
  flex-grow: 3;
}根据上面的公式计算下设置了flex-grow属性情况下,各个子元素的宽度
sum = 1 + 2 + 3 = 6

               1
A ===>  400 * —————  = 66.67 (A获得的剩余空间)+ 100(原来宽度) = 166.67 (当前宽度)
               6

               2
B ===>  400 * —————  = 133.33(B获得的剩余空间)+ 200(原来宽度) = 333.33 (当前宽度)
               6

               3
C ===>  400 * —————  = 200(C获得的剩余空间)+ 300(原来宽度) = 500 (当前宽度)
               6
验证下:

好了,到此就把flex-grow的计算方式介绍完成,但是,剩余空间的分配后的宽度收到max-width的影响,如果分配之后的宽度大于max-width,那么mqx-width的优先级更高,看下面代码:
.start {
  background-color: green;
  width: 100px;
  flex-grow: 1;
}

.mid {
  background-color: blueviolet;
  width: 200px;
  flex-grow: 2;
}

.end {
  background-color: darkgrey;
  width: 300px;
  max-width: 400px;
  flex-grow: 3;
}最后一个元素被添加了max-width: 400px,按照上面的计算,如果不加max-width属性的话,三个元素的宽度经过分配之后分别是166.67px、333.33px、500px,加了max-width之后却是200px、400px、400px,完全不一样,分析下这种情况下的计算规则。
由于最后一个元素剩余了 100px 没有被占用,那么这 100px 会被前面的2个元素按权重分配,所以是
sum = 1 + 2 = 3

               1
A ===>  100 * —————  = 33.33 (A获得的剩余空间)+ 166.67(原来分配之后宽度) = 200 (当前宽度)
               3

               2
B ===>  100 * —————  = 66.67(B获得的剩余空间)+ 333.33(原来分配之后宽度) = 400 (当前宽度)
               3
同样,先来默读三遍下MDN上面的对flex-shrink的介绍:
CSS
flex-shrink属性指定了flex元素的收缩规则。flex元素尽在默认宽度之和大于容器的时候才会发生收缩,其收缩的大小是依据flex-shrink的值。
我觉得这个说明也还算接地气吧,哈哈,不过还是就要实例来解说下,会比较容易理解。
首先,flex-shrink的值也是一个<number>,也是代表一个系数(权重)。默认值是1,表示会按照1的权重进行空间收缩。
然后,flex-shrink属性决定的是如果所有子元素的宽度和大于容器的时候,如何收缩以适应父元素的宽度。
最后,得出设置了flex-shrink属性时,元素总宽超出部分的收缩分配公式是这样子的:比如超出空间是 y, 子元素A、B、C的宽度分别是wA、wB、wC,设置的flex-shrink 属性分别是a,b,c,(不设置的话,就是默认值1)那么flex-shrink的总权重weight = a * wA + b * wB + c * wC,接下来可能需要运用点数学计算了,假设单个元素的收缩宽度是v,那么v与已知数据的关系是:
 元素需要收缩的值(v)              元素所占的权重(元素的宽度 * flex-shrink)
——————————————————————————  =  ——————————————————————————————————————————
所有元素收缩的值的总和(已知)              所有元素的总权重(weight)
变换下等式
                     元素所占的权重(元素的宽度 * flex-shrink)* 所有元素收缩的值的总和
元素需要收缩的值(v) =  ——————————————————————————————————————————————————————————————
                                    所有元素的总权重(weight)
和flex-grow一样,flex-shrink的取值和不能是负数,那么,取值情况有4种
接下来示例说明: 父元素的宽度是500px,里面有3个子元素,设置的宽度分别是100px,200px,300px,代码如下:
  <style>
    * {
      padding: 0;
      margin: 0;
      color: #fff;
    }

    h2 {
      color: #000;
    }

    .container {
      display: flex;
      flex-direction: row;
      width: 500px;
      margin: 0 auto;
      border: 1px solid red;
    }

    .start {
      background-color: green;
      width: 100px;
    }

    .mid {
      background-color: blueviolet;
      width: 200px;
    }

    .end {
      background-color: darkgrey;
      width: 300px;
    }
  </style>
  <body>
   <div class="container">
    <div class="start">w100</div>
    <div class="mid">w200</div>
    <div class="end">w300</div>
   </div>
</body>根据定义和公式可以get到,flex-shrink为0,其实就是表示在宽度和超出父元素总宽度的时,不进行任何系数的收缩。如下表示,给第一个子元素设置了flex-shrink = 0之后,在宽度不足的情况下,并没有压缩,而是压缩了其他元素以适应。
.start {
  background-color: green;
  width: 100px;
  flex-shrink: 0;
}
.start {
  background-color: green;
  width: 100px;
  flex-shrink: 0.3;
}

.mid {
  background-color: blueviolet;
  width: 200px;
  flex-shrink: 0.2;
}

.end {
  background-color: darkgrey;
  width: 300px;
  flex-shrink: 0.1;
}
代入公式
weight = 100 * 0.3 + 200 * 0.2 + 300 * 0.1 = 100

由于每个每个元素的flex-shrink属性都小于0,那么实际收缩的宽度就不是 100,而是 (0.3 + 0.2 + 0.1) / 1 = 0.6 * 100 = 60

       ( 100 * 0.3) * 60
A ===> —————————————————— = 18(A需要收缩的空间)==> 100 - 18 = 82(A收缩后的宽度)
            100

       ( 200 * 0.2) * 60
B ===> —————————————————— = 24(B需要收缩的空间)==> 200 - 24 = 176(A收缩后的宽度)
           100

       ( 300 * 0.1) * 60
C ===> —————————————————— = 18 (C需要收缩的空间)==> 300 - 18 = 282(A收缩后的宽度)
             100

从实际图片中看到计算结果和渲染结果一致。
代入公式
weight = 100 * 1 + 200 * 1 + 300 * 1 = 600

       ( 100 * 1) * 100
A ===> —————————————————— = 16.67(A需要收缩的空间)==> 100 - 16.67 = 83.33(A收缩后的宽度)
            600

       ( 200 * 1) * 100
B ===> —————————————————— = 33.33(B需要收缩的空间)==> 200 - 33.33 = 166.67(A收缩后的宽度)
           600

       ( 300 * 1) * 100
C ===> —————————————————— = 50 (C需要收缩的空间)==> 300 - 50 = 250(A收缩后的宽度)
             600


从实际图片中看到计算结果和渲染结果一致。
.start {
  background-color: green;
  width: 100px;
  flex-shrink: 3;
}

.mid {
  background-color: blueviolet;
  width: 200px;
  flex-shrink: 2;
}

.end {
  background-color: darkgrey;
  width: 300px;
  flex-shrink: 1;
}
带入等式计算每个元素收缩之后的宽度
weight = 100 * 3 + 200 * 2 + 300 * 1 = 1000

       ( 100 * 3) * 100
A ===> —————————————————— = 30(A需要收缩的空间)==> 100 - 30 = 70(A收缩后的宽度)
            1000

       ( 200 * 2) * 100
B ===> —————————————————— = 40(B需要收缩的空间)==> 200 - 40 = 160(A收缩后的宽度)
           1000

       ( 300 * 1) * 100
C ===> —————————————————— = 30 (C需要收缩的空间)==> 300 - 30 = 270(A收缩后的宽度)
             1000

从实际图片中看到计算结果和渲染结果一致。
计算方式和【情况4】是一致的,那这里就不贴代码了。
子元素被设置了min-width属性,那么min-width的属性优先级将会比较高
.start {
  background-color: green;
  width: 100px;
  flex-shrink: 1;
}

.mid {
  background-color: blueviolet;
  width: 200px;
  flex-shrink: 2;
}

.end {
  background-color: darkgrey;
  width: 300px;
  min-width: 300px;
  flex-shrink: 3;
}
设置了min-width的元素将不会被压缩,其他元素按权重压缩。
MDN 上的介绍:
CSS属性
flex-basis指定了flex元素在主轴方向上的初始大小。
flex-basis 一般取值是0、auto、<number>,(其他值暂时没见到过)
flex-basis属性不涉及到计算,就是理解对值的获取,下面是对3种取值的示例
<style>
.container {
    display: flex;
    flex-direction: row;
    width: 500px;
    margin: 0 auto;
    border: 1px solid red;
  }

  .start {
    background-color: green;
  }

  .mid {
    background-color: blueviolet;
    flex-grow: 1;
    flex-shrink: 1;
  }

  .end {
    background-color: darkgrey;
    flex-grow: 1;
    flex-shrink: 1;
  }
</style>
<body>
<div class="container">
  <div class="start">w100 w100</div>
  <div class="mid">w200 w200</div>
  <div class="end">w300 w300</div>
</div>
</body>
示例代码中,第一个子元素没有设置flex-grow、flex-shrink属性,其他两个子元素都设置了,可以更好的对比flex-basis属性表现出来的样式;
flex-basis:0
flex-basis:auto
flex-basis:400px 具体的值

同时设置了width和flex-basis属性的情况下,flex-basis的优先级更高。
如果看完还没有全懂,或者还没有解答你的问题,记得留言,让我也不懂,未完,待续
FlexBox Layout从2017年出现以来,社区已经和完善,也有很多布道师发布了教程,借此记录下,下次有疑问的时候可以直接在这里找了
图解CSS:Flexbox布局(Part1) - 大漠老师对flex系列的讲解太棒了
A Complete Guide to Flexbox
详解 flex-grow 与 flex-shrink
“Suspense就是让组件‘等待’某个异步操作,直到该异步操作结束即可渲染。”
在代码的实际应用有两种情况:
Suspense正式发布是于版本v16.6.0
到目前v17.0.2,Suspense的异步请求数据也还没有正式发布,还在试验阶段。
所以,目前只能用Suspense来进行资源异步加载;(没有Suspense之前都是怎么做的组件异步记载呢?)
hooks开发时,如果嵌套的组件各自都有接口请求,有可能会造成"瀑布问题",用Suspense能避免此问题发生;直接上代码,会比较清晰;
const sleep = (time) => {
  return new Promise((resolve) => {
    setTimeout(() => {
      resolve({
        message: 'success',
        time: time
      })
    }, time)
  })
}

const Father = () => {
  const [loading, setLoading] = useState(true);
  useEffect(() => {
    console.log('Father 开始请求...')
    sleep(5000).then(() => {
      console.log('Father 结束请求...')
      setLoading(false)
    })
  }, []);

  if(loading) {
    return (<div>Father loading ...</div>)
  };

  return (
    <div>
      {console.log('Father 开始渲染...')}
      This is Father!
      <Child/>
    </div>
  )
}

const Child = () => {
  const [loading, setLoading] = useState(true);
  useEffect(() => {
    console.log('Child 开始请求...')
    sleep(2000).then(() => {
      console.log('Child 结束请求...')
      setLoading(false)
    })
  }, []);

  if(loading) {
    return (<div>Child loading ...</div>)
  };

  return (
    <div>
      {console.log('Child 开始渲染...')}
      This is Child
    </div>
  )
}

ReactDOM.render( <Father />,  document.getElementById('root'));
上面代码在控制台的输出如下:

从上面的代码和执行过程来看,Child组件的请求是在Father组件请求完成之后才发出,这并不是期望的效果,期待的效果是能同时发出请求,减少用户等待的时间。
const warpPromise = (promise) => {
  let status = 'pending';
  let result;
  let suspender = promise.then(
    r => {
      status = 'success';
      result = r;
    },
    e => {
      status = 'error';
      result = e;
    }
  );
  return {
    read() {
      if (status === 'pending') {
        throw suspender;
      } else if (status === 'error') {
        throw result
      } else if (status === 'success') {
        return result
      }
    }
  }
}

const fetchProfileData = () => {
  let fatherPromse = fatherHander();
  let childPromse = childHander();
  return {
    father: warpPromise(fatherPromse),
    child: warpPromise(childPromse),
  }
}

const fatherHander = () => {
  console.log('Father 开始请求...')
  return new Promise(resolve => {
    setTimeout(() => {
      console.log('Father 结束请求...')
      resolve({
        msg: 'This is Father'
      })
    }, 5000)
  })
}

const childHander = () => {
  console.log('Child 开始请求...')
  return new Promise(resolve => {
    setTimeout(() => {
      console.log('Child 结束请求...')
      resolve({
        msg: 'This is Child'
      })
    }, 2000)
  })
}

const resource = fetchProfileData();

const FatherPage = () => {
  return (
    <Suspense fallback={<div>Father loading ...</div>}>
      <Father />
    </Suspense>
  )
}

const Father = () => {
  const data = resource.father.read();
  return (
    <div>
      {console.log('Father 开始渲染...')}
      {data.msg}
      <Suspense fallback={<div>Child loading ...</div>}>
        <Child />
      </Suspense>
    </div>
  )
}

const Child = () => {
  const data = resource.child.read();
  return (
    <div>
      {console.log('Child 开始渲染...')}
      {data.msg}
    </div>
  )
}

ReactDOM.createRoot(document.getElementById('root')).render(<Father />)
上面代码执行的结果(Father是5s,Child是2s)

如果改下Father和Child接口请求的延迟:Father 是1s,Child是2s,结果如下

细品下上面的区别(不会截gif图...)
结论就是:
在React v16.6.0 版本中,新增了React.lazy函数,能让你像渲染常规组件一样处理动态引用的组件,配置webpack的code Splitting,实现只有当组件被加载时,对应的资源才会被导入,从而达到懒加载的效果。
React.lazy 不能单独使用,需要配合Suspense组件一起使用,不然react会报错。
LazyLoadComponent.js
import React from "react";

const LazyLoadComponent = () => {
  return (
    <div>This is the LazyLoadComponent</div>
  )
}

export default LazyLoadComponent;
SuspenseLazyLoadDemo.js
import React, { Suspense, useState, lazy } from 'react';

const LazyLoadComponent = lazy(() => import(/* webpackChunkName: "LazyLoadComponent" */ './LazyLoadComponent'));

/**
 * 点击按钮时改变状态,加载对应的组件
 */
export default function SuspenseLazyLoadDemo() {
  const [showChildren, setshowChildren] = useState(false);
  const showChildrenHandler = () => {
    if (!showChildren) {
      setshowChildren(true)
    }
  }
  return (
    <div>
      <div onClick={showChildrenHandler}>Click me can load child...</div>
      {
        showChildren &&
        <Suspense fallback={<div>loading....</div>}>
          <LazyLoadComponent />
        </Suspense>
      }
    </div>
  )
}运行上方代码,从控制台中可以看到LazyLoadComponent组件被单独出来一个chunk。
达到了资源异步加载的效果

拆分的代码会异步加载,可以有效地减少首屏包的体积。在实际操作中,发现fallback中添加对应组件的背景或者骨架图或者布局占位,能达到较好的用户体验,而且状态也不需要开发手动去控制。
拆分的代码会异步加载,可以有效地减少首屏包的体积。在实际操作中,发现fallback中添加对应组件的背景或者骨架图或者布局占位,能达到较好的用户体验,而且状态也不需要开发手动去控制。
(TODO: 待补充......)
(TODO: 待补充......)
精读《Suspense 改变开发方式》
React Suspense for Data(分析数据“瀑布”问题)
用于数据获取的 Suspense
这是由一位有追求的设计大哥引起的血案。
设计大哥截图过来说下面的小眼睛位置偏了,需要调整(这是Chrome)

Chrome 在用户登录过某个网站之后,会自动记住密码,当你下次再次进入该网站的时候,可以自由地选择登录的账号,Chrome能自动填充密码,而你无需再输入密码,对于用户来说是一个很好的功能。
但是对于开发者和设计师来说,却比较头疼。
但用户选择账号密码之后,输入框会变成黄色,这样开发设置的背景颜色就会被覆盖,比较影响美观。
一般效果就是如下图这样:

在Chrome下回出现这样的样式,是因为Chrome会自动为input增肌如下样式
input:-webkit-autofill, textarea:-webkit-autofill, select:-webkit-autofill {
  background-color: rgb(250, 255, 189);
  background-image: none;
  color: rgb(0, 0, 0);
}
解决方法
解决办法有很多种,这里只列出了推荐的用法
/*
  99999s 基本上就是一个无限长的时间
  通过延长增加自动填充背景色的方式, 使用户感受不到样式的变化
*/
input:-webkit-autofill,
input:-webkit-autofill:hover,
input:-webkit-autofill:focus,
input:-webkit-autofill:active {
  transition-delay: 99999s;
  transition: color 99999s ease-out,      background-color 99999s ease-out;
}firefox 下会出现黄色的背景,查看一下firefox的源码,是由于下面这个代码引起的。
view-source:resource://gre-resources/forms.css
:-moz-autofill, :-moz-autofill-preview {
  filter: grayscale(21%) brightness(88%) contrast(161%) invert(10%) sepia(40%) saturate(206%);
}
解决方法
input {
  filter: none;
}想要input框在chrome和firfox下,不会有默认的背景颜色,可以添加以下样式代码
input {
  filter: none;
}
input:-webkit-autofill,
input:-webkit-autofill:hover,
input:-webkit-autofill:focus,
input:-webkit-autofill:active {
  transition-delay: 99999s;
  transition: color 99999s ease-out, background-color 99999s ease-out;
}原文地址:https://netbasal.com/create-and-test-decorators-in-javascript-85e8d5cf879c
I remember the first time I saw this sexy symbol. Yes, you know what I’m talking about. The at sign (@), above or before class, property or a method — a Decorator.
我记得我第一次看见这个性感符号的时候,是的,你知道我说的是什么。在类、属性或者方法的前面或者后面的符号(@)—— 装饰器。
Decorators are a mechanism for observing, modifying, or replacing classes, methods or properties in a declarative fashion.
装饰器是一种以声明方式观察、修改或者替换类型、方法或者属性的机制。
Decorators are a proposed standard in ECMAScript2016. In Typescript, we can enable them by setting the “experimentalDecorators” compiler flag, or with babel by installing the babel-plugin-transform-decorators plugin.
装饰器是ECMAScript2016中的一个提议标准。在Typescript中,我们可以通过设置“experimentalDecorators”编辑器标志来启动它们,或者借助babel通过安装babel-plugin-transform-decorators插件来启动。
Creating decorators is actually quite easy. Let’s explore the various decorators.
创建装饰器真的很容易。让我们开始探索各种各样的装饰器。
A Class decorator is a function that takes the constructor of the class as the only parameter. If the class decorator returns a value, it will replace the class declaration with the provided constructor function, i.e., override the constructor.
Class装饰器是将类的构造函数作为唯一参数的函数。如果Class装饰器返回一个值,它将用提供的构造函数替换类声明,也就是重写构造函数。
Let’s see an example of how to override the constructor.
看一个重写构造函数的例子
function clean(constructor) {
  return class extends constructor {
    ngOnDestroy() {
      console.log('Cleaning....')
      // Auto Clean things and call the original method
      constructor.prototype.ngOnDestroy.apply(this, arguments);
    }
  }
}

@clean
class HelloComponent {
  ngOnDestroy() {
    console.log('ngOnDestroy - HelloComponent');
  }
}

const helloComponet = new HelloComponent();
helloComponet.ngOnDestroy();
编译之后的代码:
var _class;

function clean(constructor) {
  return class extends constructor {
    ngOnDestroy() {
      console.log('Cleaning....'); // Auto Clean things and call the original method

      constructor.prototype.ngOnDestroy.apply(this, arguments);
    }

  };
}

let HelloComponent = clean(_class = class HelloComponent {
  ngOnDestroy() {
    console.log('ngOnDestroy - HelloComponent');
  }

}) || _class;

const helloComponet = new HelloComponent();
helloComponet.ngOnDestroy();
We are returning a brand new Class that extends the original constructor function, in our case, the HelloComponent.
我们返回了一个全新的类,它继承了原始的构造函数,在我们的例子中,就是 HelloComponent。
Let’s see an example of how to decorate the existing constructor. Let’s say we work with React and we want to know when React calls the render method.
让我们看一个如何装饰现有构造函数的示例。假设我们使用React,我们想要知道React何时调用render方法。
function logRender(constructor) {
  const original = constructor.prototype.render;

  constructor.prototype.render = function(){
    console.log(`Rendering ${constructor.name}...`);
    return original.apply(this, arguments);
  }
}

@logRender
class Todos extends Component {
  render() {
    return null
  }
}
We start by saving a reference to the original method, create a new one, call what we need and return the original method, letting React do its magic.
我们首先保存对原始方法的引用,然后创建一个新的犯方法,执行我们需要的内容然后返回原始的方法,让React表现出魔法。
You can find a real-life example in this repository.
你可以在这个仓库中找到一些真实的例子。
A Method decorator is a function that takes three parameters.
Mathod装饰器是一个有三个参数的方法。
Either the constructor function of the class for a static member, or the prototype of the class for an instance member.
对于静态成员的类的构造函数,或者实例成员的类的原型。
The key:
The method name.
方法的名字。
The descriptor:
The Property Descriptor for the method.
方法的属性描述。
Let’s see an example of how to decorate an existing method with the setTimeout API. But before we can proceed, if you remember, the setTimeout function takes a number of milliseconds to wait before executing the code, so we need to learn how to pass options to a decorator by using a Decorator Factory.
让我们看一个如何使用setTimeout装饰现有方法的示例。但是在我们继续之前,如果你还记得,setTimeout方法会在执行前等待几毫秒,所以我们需要学习如何使用装饰器工厂传递参数给装饰器。
A Decorator Factory is simply a function that returns the expression that will be called by the decorator at runtime.
装饰器工厂只是一个函数,它返回装饰器运行时调用的表达式。
Or in plain English, function that returns function.
用简单的英语来说,就是返回函数的函数。
function clean(constructor) {
  return class extends constructor {
    ngOnDestroy() {
      console.log('Cleaning....')
      // Auto Clean things and call the original method
      constructor.prototype.ngOnDestroy.apply(this, arguments);
    }
  }
}

function timeout(milliseconds = 0) {
  return function(target, propertyKey, descriptor) {
    const originalMethod = descriptor.value;

    descriptor.value = function() {
      setTimeout(() => {
        originalMethod.apply(this, arguments);
      }, milliseconds)
    };

    return descriptor;
  }
}

@clean
class HelloComponent {
  ngOnDestroy() {
    console.log('ngOnDestroy - HelloComponent');
  }

  @timeout()
  demoMethod() {
    console.log('demoMethod');
  }

  @timeout(2000)
  demoMethod2() {
    console.log('demoMethod2');
  }
}

const helloComponet = new HelloComponent();
helloComponet.ngOnDestroy();
helloComponet.demoMethod();
helloComponet.demoMethod2();
We can get a reference to the original method from the descriptor value property.
Then, we will override the original value and create a new function that wraps the original with setTimeout.
我们可以从descriptor 的 value 属性中获取到原方法的引用。
然后,我们会重写这个原始的value并创建一个被setTimeout包裹的新函数。
Remember that you can also use a method decorator with static methods, for example:
请记住,你也可以使用静态方法的方法装饰器,例如:
class Test {

    @log
    static someMethod() {}
}
The only difference in this case is you will get the constructor function of the class and not the prototype of the class.
在这种情况下,唯一的区别就是你会获取到类的构造函数,而不是类似的原型。
You can find a real-life examples in this repository.
你可以在这个仓库找到一些示例。
A Property Decorator is declared just before a property declaration. Same as the others, it’s a function that takes two parameters.
属性装饰器是在属性声明之前声明的。与其他函数一样,它是一个有两个参数的函数。
Either the constructor function of the class for a static member, or the prototype of the class for an instance member.
要不就是对于静态成员来说是类的构造方法,要不就是对于实例成员来说是类的原型。
The property name.
属性名字
Let’s see an example of how to decorate a property.
看一个如何装饰属性的例子。
/**
 * 属性装饰器
 */

function logProperty(target, key) {
  let value;
  const getter = function() {
    console.log(`Get => ${key}`);
    return value;
  }

  const setter = function(newVal) {
    console.log(`Set: ${key} => ${newVal}`);
    value = newVal;
  }

  Object.defineProperty(target, key, {
    get: getter,
    set: setter,
    enumerable: true,
    configurable: true
  })
}
The logProperty decorator above redefines the decorated property on the object. We can define a new property to the constructor’s prototype by using the Object.defineProperty() method. Here, we’re using get to return the value and log it. Secondly, we’re using set to directly write a value to the internal property and log it.
上面的 logProperty decorator重新定义了对象上的属性。我们可以使用Object.defineProperty()方法在构造函数的原型上定义一个新属性。这里,我们使用get返回值并记录它。其次,我们使用set直接向内部属性写入一个值并记录它。
We can also use the new Reflect API instead of the defineProperty() method.
我们还可以使用新的 Reflect API来代替 defineProperty()方法。
Reflect.deleteProperty[key];
Reflect.defineProperty(target, key, {
    get: getter,
    set: setter,
})
Now we can use our decorator like this:
现在可以这样使用我们的装饰器:
class Person {

  @logProperty
  public name: string;

  constructor(name : string) {
    this.name = name;
  }
}

let p = new Person("netanel");
p.name = "Netanel";
const name = p.name;

// Set: name => netanel
// Set: name => Netanel
// Get => name
You can find a real-life example in this repository.
你可以在这个仓库找到一些真实的例子。
I’m going to skip this explanation because it’s the least common and it usually comes in conjunction with a method decorator. You can find a detailed example in the official documentation.
我将跳过这一段的讲解,因为它并不常见,它通常与方法装饰器结合使用,可以在官方文档中找到一个详细示例。
When multiple decorators apply to a single declaration, their evaluation is similar to function composition in mathematics. For example, the following code:
当多个装饰器应用到单个声明中,他们的计算类似于数学中的函数组合,类型下面的例子:
class TodosService {

  @decoratorTwo
  @decoratorOne
  someMethod(){

  }
}
is equivalent to decoratorTwo(decoratorOne(someMethod)).
等价于decoratorTwo(decoratorOne(someMethod))。
I’m going to use jest for testing, but you can use whatever test library you like. We have two ways to test decorators.
我将使用jest作为测试,但是你可以用任何你喜欢的库。我们有两个方式去测试装饰器。
describe('@logRender Decorator', () => {

  @logRender
  class Todos {
    render() {
      return ...
    }
  }

  it('should call console.log', () => {
     const spy = jest.spyOn(console, 'log');
     const todos = new Todos().render();
     expect(spy).toBeCalledWith('Rendering Todos...');
  });

});describe('@logRender Decorator', () => {
class Todos {
render() {
return ...
}
}
it('should call console.log', () => {
const spy = jest.spyOn(console, 'log');
logRender(Todos);
const todos = new Todos().render();
expect(spy).toBeCalledWith('Rendering Todos...');
});
});Let’s close the article by testing the @timeout decorator.
让我们通过测试@timeout装饰器来结束文章。
jest.useFakeTimers();

class Test {
  method() {
    console.log('Worked');
  }
}

describe('@timeout', function () {

  it('should call setTimeout', function () {
    timeout(1000)(Test.prototype, 'method', Object.getOwnPropertyDescriptor(Test.prototype, 'method'));
    new Test().method();
    expect(setTimeout['mock'].calls.length).toBe(1);
    expect(setTimeout['mock'].calls[0][1]).toBe(1000);
  });

});
We are passing the necessary parameters manually to the timeout decorator and leveraging the useFakeTimers feature from jest to check if our setTimeout function was called.
我们将手动将必要的参数传递给超时装饰器,并利用jest中的useFakeTimers特性来检查是否调用了setTimeout函数。
You can leverage decorators in your apps and create powerful things with them. Decorators are not only for frameworks or libraries, they are worth the time to learn as they can make your code more extensible and even more readable. Decorators also promote code reuse. Give them a try sometime soon 🙏
你可以在你的引用中使用装饰器来创建伟大的东西。装饰器不仅仅是在框架和库中使用,它们非常值得学习,因为装饰器能是你的代码更具有可扩展性和有更好的可读性。装饰器也能促进代码重用。尽快试试吧
前段时间在使用hooks编写代码时,对
useCallback的用法有的模糊,不是很能准确判断什么时候需要使用useCallback,什么时候不需要,所以所有的函数基本都套上了一层useCallback,有备无患,但是,总觉得有点滥用了,就搜索了些资料,补充下知识,看到这篇文章后有点廓然开朗,借此翻译下,作为学习笔记。若有不对或不清楚的地方,请各位多指教!
我在Facebook上的一个读者给我提了一个有趣的问题。他说他的队友,不管是什么情况,都给用useCallback包装每个函数:
import React, { useCallback } from 'react';
  function MyComponent() {
    const handleClick = useCallback(() => {
      // handle the click event
    }, [])
    return <MyChild onClick={ handleClick } />
  }
他队友的理由是:每个回调函数都应该被缓存,以防止使用这些回调函数的子组件产生的不必要的重新渲染。
在这篇问题,我将会解释下如何正确使用useCallback();
functions 的相等性检测在深入useCallback()的使用之前,先来区分清楚useCallback()解决的问题 - frunctions的相等性检测。
写一个factory() function来生产函数:
function factory() {
   return (a, b) => a+b;
}
const sum1 = factory();
const sum2 = factory();

sum1(1, 2); // => 3
sum2(1, 2); // => 3

sum1 === sum2; // => false
sum1 === sum1; // => truesum1和sum2是用来计算两数和的函数,它们都是使用factory()函数创建的。
函数在Javascript中是一等公民,意味着函数时一个规则的对象。一个函数对象可以被另一个函数返回,也可以被用来比较,或用来做其他事情:一个对象能做的所有事情。
函数sum1和sum2共享同样的代码源,但却是不一样的函数对象,比较sum1 === sum2,得到的值是false。
这就是Javascript对象的工作方式,任何对象,包括函数对象,只会和它自己相等。
useCallback()的目的共享相同代码的不同函数对象经常在React组件中被创建:
import React from 'react';

function MyComponent() {
  // handleClick is re-created on each render
  const handleClick = () => {
    console.log('click');
  }
}在MyComponent每次渲染时,handleClick都是不同的函数对象;
因为内联函数很便宜,所以在每次渲染时都重新创建函数不是问题。每个组件有几个内联函数是可以接受的。
在某些情况下,你需要在每次渲染时,保留一个函数实例:
React.memo()包裹的组件接收一个函数对象prophooks,比如useEffect(..., [callback])这个时候useCallback(callbaneFun, deps)能提供帮助:给定相同的依赖项deps,这个钩子会在每次渲染时被记住的函数实例:
import React, { useCallback } from 'react';

function MyComponent() {
  // handleClick is re-created on each render
  const handleClick = useCallback(() => {
    console.log('click');
  }, []);
}handleClick变量在MyComponent每次渲染时都会返回相同的回调函数对象。
想象你有一个需要渲染很多项的长列表组件:
import React from 'react';
import useSearch from './fetch-items';

function MyBigList({ term, onItemClick }) {
  const items = useSearch(term);

  const map = item => <div onClick={onItemClick}>{item}</div>;

  return <div>{items.map(map)}</div>;
}

export default React.memo(MyBigList);这个列表可能会很多,可能会有数百个项目。为了防止无用的列表重渲染,可使用React.memo()封装起来。
MyBigList的父组件提供一个点击事件,用于告知列表项何时被点击:
import React, { useCallback } from 'react';

export default function MyParent({ term }) {
  const onItemClick = useCallback(event => {
    console.log('You clicked ', event.currentTarget);
  }, [term]);

  return (
    <MyBigList
      term={term}
      onItemClick={onItemClick}
    />
  );
}onItemClick回调函数会被useCallback()记住。只要term相同,useCallback()就会返回相同的函数对象。
当MyParent组件重新渲染时,onItemClick函数维持不变,同时也不会打断MyBigList的记忆。
这就是useCallback()的正确用法。
来看下另一个示例:
import React, { useCallback } from 'react';

function MyComponent() {
  const handleClick = useCallback(() => {
    // handle the click event
  }, []);

  return <MyChild onClick={handleClick} />
}

function MyChild({ onClick }) {
  return <button onClick={onClick}> I am a child </button>
}这例子使用useCallback()有意义吗?显然没有。
MyComponent每次渲染都会调用useCallback()钩子函数。即使useCallback()每次都返回相同的函数对象,每次渲染时,内联函数也是会被重新创建(useCallback()只是跳过创建)。
这没有带来任何的优化效果,因为优化的成本比没有优化的成本还要高。
不要忘记增加的代码的复杂度。你必须在使用中保持useCallback(..., deps)中的deps不变。
只要接受每次渲染时都会创建先函数:
import React, { useCallback } from 'react';

function MyComponent() {
  const handleClick = () => {
    // handle the click event
  };

  return <MyChild onClick={handleClick} />;
}

function MyChild ({ onClick }) {
return <button onClick={onClick}>I am a child</button>;在想性能优化时,回想这句话Profile before optimizing。
任何优化都增加的复杂度。任何过早的优化都有风险,因为优化的代码可能会被修改多次。
这些考虑也适用于useCallback()钩子。它的适用于记忆回调函数,这些函数被提供给大量的子组件。
总之:
然后问自己:与增加的复杂度相比,提升的性能是否值得使用useCallback()?
你还知道哪些场景值得使用useCallback()?
在一个由二维数组表示的地图上,寻找从节点[0,0] 到 节点[55, 55]的路径,可以怎么找?这个问题作为认识启发式算法的背景吧。可以先思考下~
启发式算法是相对于最优化算法提出的。可以这样定义启发式算法:一个基于直观或经验结构的算法,在可接受的花费(时间和空间)下给出待解决组合最优化问题每个实例的一个可行解,该可行解与最优解的偏离程度一般不能被预计。
启发式算法表示为A算法,可用公式表示为: f(n) = g(n)+h(n),其中
Note:g(n) 一般是已知的固定值,所以启发信息越多,g(n)越大,A算法处理的搜索状态数越少,效率越高。但并不是说估价函数值越大越好
那么根据A算法的定义,A* 算法是A算法中求解最优解的算法,即(A-Star/A*) 算法是一种静态路网中求解最短路径最有效的直接搜索方法。用公式定义为 f*(n) = g*(n) + h*(n),其中
所以,启发式算法的核心部分就是对估价函数的设计和实现。
问题背景
在网路服务器上新建了一个目录,用来给产品同学上传用户的半身像,突然有一天产品跑来说,我在服务器上替换了一个用户的半身像,为什么在页面上看到的还是旧的图片而不是新的?
此时的你可以怎么解释给产品同学听呢?反正这时的只跟产品说是缓存的问题,但是对于缓存的细节还是没有很能解释清楚,比如
基于上面这些问题,就整理了下面这个文章,希望能一篇文章把Web缓存的各个方面都理解了,那我们就带着上面的问题场景,来阅读下面的内容吧。
默读三百遍,背下来!
既然Web缓存好处那么多,那永久缓存资源是否可行呢?答案当然是不可以的,因为缓存只有有限的空间用户存储资源副本,所以缓存会定期将一些副本删除,这个过程叫做缓存驱逐。
所以才有下面比较复杂的缓存机制,有人也会说,既然那么麻烦,能不能服务器资源更新的时候,自动通知客户端缓存更新呀?答案当然是不可以的,因为HTTP是C/S模式的协议。意思就是说,服务器与客户端的通讯只能由客户端主动发起,而不能由服务器端自动下发的。
简单流程如下

比较具体的流程如下

Expires是HTTP/1制定的,受限于本地时间,所以会有不准确的情况,目前部分网站已经放弃了对这个字段的缓存策略,毕竟如果有Cache-control,Expires就会被忽略,这里对Expires的流程就后补吧(其实是发现同时在一个流程图上面体现有点困难...)
这两个字段由服务器的响应头返回,
Cache-control可以在响应头或请求头中设置,并可以组合使用多种指令:
| 指令 | 作用 |
|---|---|
| public | 表示响应可以被客户端和代理服务器缓存 |
| private | 表示响应只可以被客户端缓存 |
| max-age=30 | 缓存30秒后过期,需要重新请求 |
| s-maxage=30 | 覆盖max-age,缓存30秒后过期,需要重新请求;只在代理服务器中生效 |
| no-store | 不缓存任何响应 |
| no-cache | 资源被缓存,但是立即失效,下次会发起请求验证资源是否过期 |
| max-stale=30 | 30秒内,即使缓存过期,也使用该缓存 |
| min-fresh | 希望在30秒内获取最新的响应 |

协商缓存就是强缓存失效后,浏览器携带缓存标识想服务器发起请求,有服务器根据缓存标识决定是否使用缓存的过程。
Age 消息头里包含对象在缓存代理中存储的时长,已秒为单位;
Etag 是资源的特定版本的标识符。给定URL中的资源变更,则一定要生成新的Etag值。(Etag的生成方式,不同类型服务器有不同的生成方法)
外边距塌陷也叫做外边距合并,在文档流中相邻(兄弟、父子元素)的块级元素的外边距组合在一起变成单个外边距,只有上线外边距会出现塌陷,左右不会出现。
w3c 中对这部分的说明:点击跳转
padding-top或border-top,那么上边距会和它的文档流中的第一个子元素的上边距重合,取两者的较大者,父元素的padding-top为0,也会发生重合;margin-bottom,下面元素层margin-top,那么他们之间外边距不是margin-top + margin-bottom,而是取两者中的较大者。可在父级元素上设置以下任一属性:
1px solid transparentfloat: leftposition: absolutepadding: 1px;display: inline-block;overflow: hidden;overflow: auto;原则:
padding或border,使子元素能有对应的定位参照物BFC(Block formatting contexts) 是css三大基本定位机制中,普通流布局中的一种。
三大基本定位机制

A tool for managing JavaScript projects with multiple packages.


Splitting up large codebases into separate independently versioned packages
is extremely useful for code sharing. However, making changes across many
repositories is messy and difficult to track, and testing across repositories
gets complicated really fast.
把一个大型代码库拆分成相互分离独立的版本包,对于代码共享来说是非常有帮助的。
To solve these (and many other) problems, some projects will organize their
codebases into multi-package repositories (sometimes called monorepos). Projects like Babel, React, Angular,
Ember, Meteor, Jest, and many others develop all of their packages within a single repository.
为了解决这些问题(或其他问题), 一些项目将他们的代码库用多包库(也称作 monorepos)的方式组织。像 Babel,React,Angular,Meteor,Jest等其他项目都是在一个单一的代码库中开发包的。
Lerna is a tool that optimizes the workflow around managing multi-package
repositories with git and npm.
** Lerna 是一个用git和npm来优化这个管理多包库工作流的工具 **
Lerna can also reduce the time and space requirements for numerous
copies of packages in development and build environments - normally a
downside of dividing a project into many separate NPM package. See the
hoist documentation for details.
Lerna 可以在开发和生产环境为多份复制的package减少构建时间和空间。通常一个下载将项目分离成多个npm package。
There's actually very little to it. You have a file system that looks like this:
事实上,它几乎没有什么东西,只有像下面这样的几个系统文件:
my-lerna-repo/
  package.json
  packages/
    package-1/
      package.json
    package-2/
      package.json
The two primary commands in Lerna are lerna bootstrap and lerna publish.
Lerna 的两个主要命令是 lerna boostrap 和 lerna publish。
bootstrap will link dependencies in the repo together.
publish will help publish any updated packages.
bootstrap 会把库的依赖链接在一起
publish 会把任何一个有变更的package发布
The instructions below are for Lerna 2.x.
We recommend using it instead of 1.x for a new Lerna project. Check the wiki if you need to see the 1.x README.
下面的命令是用于 Lerna 2.x的。
在一个新的 Lerna 项目中,推荐使用 2.x 而不是 1.x。若有需要请在wiki上看 1.x 的README。
Let's start by installing Lerna globally with npm.
使用 npm 全局安装Lerna,并开始使用。
$ npm install --global lernaNext we'll create a new folder:
创建一个新的文件夹
$ mkdir lerna-repo
$ cd lerna-repo
And now let's turn it into a Lerna repo:
把文件夹变成 Lerna 库
$ lerna initThis will create a lerna.json configuration file as well as a packages folder, so your folder should now look like this:
创建了一个和 package文件类似的 lerna.json配置配置文件,现在的文件夹应该长这样:
lerna-repo/
  packages/
  package.json
  lerna.json
Lerna allows you to manage your project using one of two modes: Fixed or Independent.
Lerna 有两种模式去管理项目: 固定模式,相互独立模式
Fixed mode Lerna projects operate on a single version line. The version is kept in the lerna.json file at the root of your project under the version key. When you run lerna publish, if a module has been updated since the last time a release was made, it will be updated to the new version you're releasing. This means that you only publish a new version of a package when you need to.
固定模式的Lerna项目是在一条单一的版本线上操作的,这个版本是在项目根目录的 lerna.json文件中的 version字段中控制的。当执行 lerna publish时,如果一个模块自上次发布以来有更新,它将会更新为你要发布的新的版本,这意味着你只需在需要时发布新版本的package。
This is the mode that Babel is currently using. Use this if you want to automatically tie all package versions together. One issue with this approach is that a major change in any package will result in all packages having a new major version.
这是目前Babel在用的模式。如果你想自动把所有依赖包版本捆绑在一起,请使用这种模式。这种方法的一个问题是,任何package的一个重大改动,都会导致所有的package会有一个新的主要版本。
--independent)--independent)Independent mode Lerna projects allows maintainers to increment package versions independently of each other. Each time you publish, you will get a prompt for each package that has changed to specify if it's a patch, minor, major or custom change.
独立模式的Lerna允许维护者相互独立地变更package的版本。你会得到每个已变更的package的提示,以指定它是补丁,次要的,重要的自定义的修改。
Independent mode allows you to more specifically update versions for each package and makes sense for a group of components. Combining this mode with something like semantic-release would make it less painful. (There is work on this already at atlassian/lerna-semantic-release).
独立模式允许你更具体地更新各个package的版本,并对一组组件更加有意义。将这种模式和一些像 semantic-release相结合起来会没有那么困难。
The
versionkey inlerna.jsonis ignored in independent mode.
在独立模式中
lerna.json文件中的version字段会被忽略
If you encounter any issues while using Lerna please check out our Troubleshooting document where you might find the answer to your problem.
如果在使用Lerna过程中,没有找到任何有帮助的issues,请查看Troubleshooting文档,这里应该可以找到问题的答案。
See FAQ.md.
$ lerna initCreate a new Lerna repo or upgrade an existing repo to the current version of Lerna.
创建一个Lerna库或用现在的Lerna版本升级一个已存在的库
Lerna assumes the repo has already been initialized with
git init.
Lerna 默认假设你的库已经关联git,既已经有默认的
git init命令
When run, this command will:
lerna as a devDependency in package.json if it doesn't already exist.lerna.json config file to store the version number.运行时,这个命令会:
package.json中不存在lerna,就添加进去;lerna.json配置文件来存储version号码;Example output on a new git repo:
$ lerna init
lerna info version v2.0.0
lerna info Updating package.json
lerna info Creating lerna.json
lerna success Initialized Lerna files$ lerna init --independentThis flag tells Lerna to use independent versioning mode.
这个标识是设置Lerna用独立版本模式
$ lerna init --exactBy default, lerna init will use a caret range when adding or updating the local version of lerna, just like npm install --save-dev lerna.
默认情况下,lerna init 会在添加或更新本地lerna版本时使用插入符号范围的命令,就像 npm install --save-dev lerna
To retain the lerna 1.x behavior of "exact" comparison, pass this flag.
It will configure lerna.json to enforce exact match for all subsequent executions.
要保留lerna 1.x的"exact"行为,请传递这个标识,它会配置 lerna.json去执行后续全部的完全执行。
{
  "commands": {
    "init": {
      "exact": true
    }
  },
  "version": "0.0.0"
}$ lerna bootstrapBootstrap the packages in the current Lerna repo.
Installs all of their dependencies and links any cross-dependencies.
引导目前Lerna库的所有package,安装它们全部的依赖关系并连接任何相互交叉依赖的关系。
When run, this command will:
当这个命令执行时,会发生下面的情况:
npm install all external dependencies of each package.
Symlink together all Lerna packages that are dependencies of each other.
npm run prepublish in all bootstrapped packages.
npm run prepare in all bootstrapped packages.
npm install 安装每个package的额外依赖;
把所有相互有依赖的Lerna packages 链接起来;
npm run prepublish 在所有有联系的包中执行;
npm run prepare 在所有有联系的包中执行;
lerna bootstrap respects the --ignore, --ignore-scripts, --scope and --include-filtered-dependencies flags (see Flags).
Pass extra arguments to npm client by placing them after --:
通过将它们放在‘--’后面,将额外的参数传递给npm客户端;
$ lerna bootstrap -- --production --no-optionalMay also be configured in lerna.json:
{
  ...
  "npmClient": "yarn",
  "npmClientArgs": ["--production", "--no-optional"]
}bootstrap worksLet's use babel as an example.
babel-generator and source-map (among others) are dependencies of babel-core.babel-core's package.json lists both these packages as keys in dependencies, as shown below.$ lerna add <package>[@version] [--dev]Add local or remote package as dependency to packages in the current Lerna repo.
在当前的Lerna库中,给packages安装本地或远端的依赖;
When run, this command will:
执行该命令时:
package to each applicable package. Applicable are packages that are not package and are in scopepackage.json)pacakge到每个适用的包中,适用于哪些不是pacakge可是又在范围中的 packages中;lerna add respects the --ignore, --scope and --include-filtered-dependencies flags (see Flags).
lerna add 可以有--ignore, --scope and --include-filtered-dependencies这些标识
lerna add module-1 --scope=module-2 # Install module-1 to module-2
lerna add module-1 --scope=module-2 --dev # Install module-1 to module-2 in devDependencies
lerna add module-1 # Install module-1 in all modules except module-1
lerna add babel-core # Install babel-core in all modules
// babel-core package.json
{
  "name": "babel-core",
  ...
  "dependencies": {
    ...
    "babel-generator": "^6.9.0",
    ...
    "source-map": "^0.5.0"
  }
}babel-generator can be an internal dependency, while source-map is always an external dependency.babel-generator in the package.json of babel-core is satisfied by packages/babel-generator, passing for an internal dependency.source-map is npm installed (or yarned) like normal.packages/babel-core/node_modules/babel-generator symlinks to packages/babel-generatorNotes:
npm installed (or yarned) like normal.latest, do not satisfy semver ranges.Webstorm locks up when circular symlinks are present. To prevent this, add node_modules to the list of ignored files and folders in Preferences | Editor | File Types | Ignored files and folders.
$ lerna publishPublish packages in the current Lerna project. When run, this command does the following:
Creates a new release of the packages that have been updated.
Prompts for a new version.
Creates a new git commit/tag in the process of publishing to npm.
More specifically, this command will:
lerna updated to determine which packages need to be published.version key in lerna.json.package.json of all updated packages to their new versions.Lerna won't publish packages which are marked as private (
"private": truein thepackage.json).
Note: to publish scoped packages, you need to add the following to each package.json:
"publishConfig": {
  "access": "public"
}$ lerna publish --exactWhen run with this flag, publish will specify updated dependencies in updated packages exactly (with no punctuation), instead of as semver compatible (with a ^).
For more information, see the package.json dependencies documentation.
$ lerna publish --npm-tag=nextWhen run with this flag, publish will publish to npm with the given npm dist-tag (defaults to latest).
This option can be used to publish a prerelease or beta version.
Note: the
latesttag is the one that is used when a user runsnpm install my-package.
To install a different tag, a user can runnpm install my-package@prerelease.
$ lerna publish --canary
$ lerna publish --canary=beta
When run with this flag, publish publishes packages in a more granular way (per commit). Before publishing to npm, it creates the new version tag by taking the current version, bumping it to the next minor version, adding the provided meta suffix (defaults to alpha) and appending the current git sha (ex: 1.0.0 becomes 1.1.0-alpha.81e3b443).
The intended use case for this flag is a per commit level release or nightly release.
$ lerna publish --conventional-commitsWhen run with this flag, publish will use the Conventional Commits Specification to determine the version bump and generate CHANGELOG
$ lerna publish --conventional-commits --changelog-preset angular-bitbucketBy default, the changelog preset is set to angular.
In some cases you might want to change either use a another preset or a custom one.
Presets are names of built-in or installable configuration for conventional changelog.
Presets may be passed as the full name of the package, or the auto-expanded suffix
(e.g., angular is expanded to conventional-changelog-angular).
$ lerna publish --git-remote upstreamWhen run with this flag, publish will push the git changes to the specified remote instead of origin.
$ lerna publish --skip-gitWhen run with this flag, publish will publish to npm without running any of the git commands.
Only publish to npm; skip committing, tagging, and pushing git changes (this only affects publish).
$ lerna publish --skip-npmWhen run with this flag, publish will update all package.json package
versions and dependency versions, but it will not actually publish the
packages to npm.
This flag can be combined with --skip-git to just update versions and
dependencies, without committing, tagging, pushing or publishing.
Only update versions and dependencies; don't actually publish (this only affects publish).
$ lerna publish --force-publish=package-2,package-4
# force publish all packages
$ lerna publish --force-publish=*
When run with this flag, publish will force publish the specified packages (comma-separated) or all packages using *.
This will skip the
lerna updatedcheck for changed packages and forces a package that didn't have agit diffchange to be updated.
$ lerna publish --canary --yes
# skips `Are you sure you want to publish the above changes?`
When run with this flag, publish will skip all confirmation prompts.
Useful in Continuous integration (CI) to automatically answer the publish confirmation prompt.
$ lerna publish --cd-version (major | minor | patch | premajor | preminor | prepatch | prerelease)
# uses the next semantic version(s) value and this skips `Select a new version for...` prompt
When run with this flag, publish will skip the version selection prompt (in independent mode) and use the next specified semantic version.
You must still use the --yes flag to avoid all prompts. This is useful when build systems need to publish without command prompts. Works in both normal and independent modes.
If you have any packages with a prerelease version number (e.g. 2.0.0-beta.3) and you run lerna publish with --cd-version and a non-prerelease version increment (major / minor / patch), it will publish those packages in addition to the packages that have changed since the last release.
$ lerna publish --cd-version=prerelease
# uses the next semantic prerelease version, e.g.
# 1.0.0 => 1.0.0-0

$ lerna publish --cd-version=prepatch --preid=next
# uses the next semantic prerelease version with a specific prerelease identifier, e.g.
# 1.0.0 => 1.0.1-next.0
When run with this flag, lerna publish --cd-version will
increment premajor, preminor, prepatch, or prerelease
versions using the specified prerelease identifier.
$ lerna publish --repo-version 1.0.1
# applies version and skips `Select a new version for...` prompt
When run with this flag, publish will skip the version selection prompt and use the specified version.
Useful for bypassing the user input prompt if you already know which version to publish.
$ lerna publish -m "chore(release): publish %s"
# commit message = "chore(release): publish v1.0.0"

$ lerna publish -m "chore(release): publish %v"
# commit message = "chore(release): publish 1.0.0"

$ lerna publish -m "chore(release): publish" --independent
# commit message = "chore(release): publish
#
# - [email protected]
# - [email protected]"
When run with this flag, publish will use the provided message when committing the version updates
for publication. Useful for integrating lerna into projects that expect commit messages to adhere
to certain guidelines, such as projects which use commitizen and/or semantic-release.
If the message contains %s, it will be replaced with the new global version version number prefixed with a "v".
If the message contains %v, it will be replaced with the new global version version number without the leading "v".
Note that this only applies when using the default "fixed" versioning mode, as there is no "global" version when using --independent.
This can be configured in lerna.json, as well:
{
  "commands": {
    "publish": {
      "message": "chore(release): publish %s"
    }
  }
}Lerna allows you to specify a glob or an array of globs in your lerna.json that your current branch needs to match to be publishable.
You can use this flag to override this setting.
If your lerna.json contains something like this:
{
  "commands": {
    "publish": {
      "allowBranch": "master"
    }
  }
}
{
"command": {
"publish": {
"allowBranch": ["master", "feature/*"]
}
}
}and you are not on the branch master lerna will prevent you from publishing. To force a publish despite this config, pass the --allow-branch flag:
$ lerna publish --allow-branch my-new-feature$ lerna updatedCheck which packages have changed since the last release (the last git tag).
Lerna determines the last git tag created and runs git diff --name-only v6.8.1 to get all files changed since that tag. It then returns an array of packages that have an updated file.
Note that configuration for the publish command also affects the
updated command. For example config.publish.ignore
$ lerna updated --jsonWhen run with this flag, updated will return an array of objects in the following format:
[
  {
    "name": "package",
    "version": "1.0.0",
    "private": false
  }
]$ lerna cleanRemove the node_modules directory from all packages.
lerna clean respects the --ignore, --scope, and --yes flags (see Flags).
$ lerna diff [package?]

$ lerna diff
# diff a specific package
$ lerna diff package-name
Diff all packages or a single package since the last release.
Similar to
lerna updated. This command runsgit diff.
$ lerna lsList all of the public packages in the current Lerna repo.
lerna ls respects the --ignore and --scope flags (see Flags).
$ lerna ls --jsonWhen run with this flag, ls will return an array of objects in the following format:
[
  {
    "name": "package",
    "version": "1.0.0",
    "private": false
  }
]$ lerna run <script> -- [..args] # runs npm run my-script in all packages that have it
$ lerna run test
$ lerna run build
# watch all packages and transpile on change, streaming prefixed output
$ lerna run --parallel watchRun an npm script in each package that contains that script. A double-dash (--) is necessary to pass dashed arguments to the script execution.
lerna run respects the --concurrency, --scope, --ignore, --stream, and --parallel flags (see Flags).
$ lerna run --scope my-component testNote: It is advised to constrain the scope of this command (and
lerna exec,
below) when using the--parallelflag, as spawning dozens of subprocesses
may be harmful to your shell's equanimity (or maximum file descriptor limit,
for example). YMMV
$ lerna exec -- <command> [..args] # runs the command in all packages
$ lerna exec -- rm -rf ./node_modules
$ lerna exec -- protractor conf.js
Run an arbitrary command in each package.
A double-dash (--) is necessary to pass dashed flags to the spawned command, but is not necessary when all the arguments are positional.
lerna exec respects the --concurrency, --scope, --ignore, --stream and --parallel flags (see Flags).
$ lerna exec --scope my-component -- ls -laTo spawn long-running processes, pass the --parallel flag:
# transpile all modules as they change in every package
$ lerna exec --parallel -- babel src -d lib -w
You may also get the name of the current package through the environment variable LERNA_PACKAGE_NAME:
$ lerna exec -- npm view \$LERNA_PACKAGE_NAMEYou may also run a script located in the root dir, in a complicated dir structure through the environment variable LERNA_ROOT_PATH:
$ lerna exec -- node \$LERNA_ROOT_PATH/scripts/some-script.jsHint: The commands are spawned in parallel, using the concurrency given (except with
--parallel).
The output is piped through, so not deterministic.
If you want to run the command in one package after another, use it like this:
$ lerna exec --concurrency 1 -- ls -la$ lerna exec --bail=<boolean> <command>This flag signifies whether or not the exec command should halt execution upon encountering an error thrown by one of the spawned subprocesses. Its default value is true.
$ lerna import <path-to-external-repository>Import the package at <path-to-external-repository>, with commit history,
into packages/<directory-name>. Original commit authors, dates and messages
are preserved. Commits are applied to the current branch.
This is useful for gathering pre-existing standalone packages into a Lerna
repo. Each commit is modified to make changes relative to the package
directory. So, for example, the commit that added package.json will
instead add packages/<directory-name>/package.json.
$ lerna linkSymlink together all Lerna packages that are dependencies of each other in the current Lerna repo.
$ lerna link --force-localWhen passed, this flag causes the link command to always symlink local dependencies regardless of matching version range.
Lerna will log to a lerna-debug.log file (same as npm-debug.log) when it encounters an error running a command.
Lerna also has support for scoped packages.
Running lerna without arguments will show all commands/options.
{
  "version": "1.1.3",
  "commands": {
    "publish": {
      "ignore": [
        "ignored-file",
        "*.md"
      ]
    },
    "bootstrap": {
      "ignore": "component-*"
    }
  },
  "packages": ["packages/*"]
}lerna: the current version of Lerna being used.version: the current version of the repository.commands.publish.ignore: an array of globs that won't be included in lerna updated/publish. Use this to prevent publishing a new version unnecessarily for changes, such as fixing a README.md typo.commands.bootstrap.ignore: an array of globs that won't be bootstrapped when running the lerna bootstrap command.commands.bootstrap.scope: an array of globs that restricts which packages will be bootstrapped when running the lerna bootstrap command.packages: Array of globs to use as package locations.devDependenciesMost devDependencies can be pulled up to the root of a Lerna repo.
This has a few benefits:
Note that devDependencies providing "binary" executables that are used by
npm scripts still need to be installed directly in each package where they're
used.
For example the nsp dependency is necessary in this case for lerna run nsp
(and npm run nsp within the package's directory) to work correctly:
{
  "scripts": {
    "nsp": "nsp"
  },
  "devDependencies": {
    "nsp": "^2.3.3"
  }
}Lerna allows target versions of local dependent packages to be written as a git remote url with a committish (e.g., #v1.0.0 or #semver:^1.0.0) instead of the normal numeric version range.
This allows packages to be distributed via git repositories when packages must be private and a private npm registry is not desired.
Please note that lerna does not perform the actual splitting of git history into the separate read-only repositories. This is the responsibility of the user. (See this comment for implementation details)
// packages/pkg-1/package.json
{
  name: "pkg-1",
  version: "1.0.0",
  dependencies: {
    "pkg-2": "github:example-user/pkg-2#v1.0.0"
  }
}

// packages/pkg-2/package.json
{
  name: "pkg-2",
  version: "1.0.0"
}
In the example above,
lerna bootstrap will properly symlink pkg-2 into pkg-1.lerna publish will update the committish (#v1.0.0) in pkg-1 when pkg-2 changes.Options to Lerna can come from configuration (lerna.json) or on the command
line. Additionally options in config can live at the top level or may be
applied to specific commands.
Example:
{
  "version": "1.2.0",
  "exampleOption": "foo",
  "commands": {
    "init": {
      "exampleOption": "bar"
    }
  }
}
In this case exampleOption will be "foo" for all commands except init,
where it will be "bar". In all cases it may be overridden to "baz" on the
command-line with --example-option=baz.
How many threads to use when Lerna parallelizes the tasks (defaults to 4)
$ lerna publish --concurrency 1Scopes a command to a subset of packages.
$ lerna exec --scope my-component -- ls -la$ lerna run --scope toolbar-* testWhen executing a script or command, scope the operation to packages that have been updated since the specified ref. If ref is not specified, it defaults to the latest tag.
List the contents of packages that have changed since the latest tag:
$ lerna exec --since -- ls -laRun the tests for all packages that have changed since master:
$ lerna run test --since master
List all packages that have changed since some-branch:
$ lerna ls --since some-branch
This can be particularly useful when used in CI, if you can obtain the target branch a PR will be going into, because you can use that as the ref to the --since option. This works well for PRs going into master as well as feature branches.
When importing repositories with merge commits with conflicts, the import command will fail trying to apply all commits. The user can use this flag to ask for import of "flat" history, i.e. with each merge commit as a single change the merge introduced.
$ lerna import ~/Product --flatten
Excludes a subset of packages when running a command.
$ lerna bootstrap --ignore component-*The ignore flag, when used with the bootstrap command, can also be set in lerna.json under the commands.bootstrap key. The command-line flag will take precedence over this option.
Example
{
  "version": "0.0.0",
  "commands": {
    "bootstrap": {
      "ignore": "component-*"
    }
  }
}
Hint: The glob is matched against the package name defined in
package.json,
not the directory name the package lives in.
When used with the bootstrap command it won't run any lifecycle scripts in bootstrapped packages.
$ lerna bootstrap --ignore-scriptsUsed in combination with any command that accepts --scope (bootstrap, clean, ls, run, exec). Ensures that all dependencies (and dev dependencies) of any scoped packages (either through --scope or --ignore) are operated on as well.
Note: This will override the
--scopeand--ignoreflags.i.e. A package matched by the
--ignoreflag will still be bootstrapped if it is depended on by another package that is being bootstrapped.
This is useful for situations where you want to "set up" a single package that relies on other packages being set up.
$ lerna bootstrap --scope my-component --include-filtered-dependencies
# my-component and all of its dependencies will be bootstrapped
$ lerna bootstrap --scope "package-*" --ignore "package-util-*" --include-filtered-dependencies
# all package-util's will be ignored unless they are depended upon by a
# package matched by "package-*"What level of logs to report. On failure, all logs are written to lerna-debug.log in the current working directory.
Any logs of a higher level than the setting are shown. The default is "info".
Set a max buffer length for each underlying process call. Useful for example
when someone wants to import a repo with a larger amount of commits while
running lerna import. In that case the built-in buffer length might not
be sufficient.
By default, all tasks execute on packages in topologically sorted order as to respect the dependency relationships of the packages in question. Cycles are broken on a best-effort basis in a way not guaranteed to be consistent across Lerna invocations.
Topological sorting can cause concurrency bottlenecks if there are a small number of packages with many dependents or if some packages take a disproportionately long time to execute. The --no-sort option disables sorting, instead executing tasks in an arbitrary order with maximum concurrency.
This option can also help if you run multiple "watch" commands. Since lerna run will execute commands in topologically sorted order, it can end up waiting for a command before moving on. This will block execution when you run "watch" commands, since they typically never end. An example of a "watch" command is running babel with the --watch CLI flag.
Install external dependencies matching glob at the repo root so they're
available to all packages. Any binaries from these dependencies will be
linked into dependent package node_modules/.bin/ directories so they're
available for npm scripts. If the option is present but no glob is given
the default is ** (hoist everything). This option only affects the
bootstrap command.
$ lerna bootstrap --hoistFor background on --hoist, see the hoist documentation.
Note: If packages depend on different versions of an external dependency,
the most commonly used version will be hoisted, and a warning will be emitted.
Do not install external dependencies matching glob at the repo root. This
can be used to opt out of hoisting for certain dependencies.
$ lerna bootstrap --hoist --nohoist=babel-*Install external dependencies using [client] install. Must be an executable
that knows how to install npm dependencies.
$ lerna bootstrap --npm-client=yarnMay also be configured in lerna.json:
{
  ...
  "npmClient": "yarn"
}Fail immediately if a cycle is found (in bootstrap, exec, publish or run).
$ lerna bootstrap --reject-cyclesEnables integration with Yarn Workspaces (available since [email protected]+).
The values in the array are the commands in which Lerna will delegate operation to Yarn (currently only bootstrapping).
If --use-workspaces is true then packages will be overridden by the value from package.json/workspaces.
May also be configured in lerna.json:
{
  ...
  "npmClient": "yarn",
  "useWorkspaces": true
}
The root-level package.json must also include a workspaces array:
{
  "private": true,
  "devDependencies": {
    "lerna": "^2.2.0"
  },
  "workspaces": ["packages/*"]
}
This list is broadly similar to lerna's packages config (a list of globs matching directories with a package.json),
except it does not support recursive globs ("**", a.k.a. "globstars").
Stream output from child processes immediately, prefixed with the originating
package name. This allows output from different packages to be interleaved.
$ lerna run watch --streamSimilar to --stream, but completely disregards concurrency and topological sorting, running a given command or script immediately in all matching packages with prefixed streaming output. This is the preferred flag for long-running processes such as babel src -d lib -w run over many packages.
$ lerna exec --parallel -- babel src -d lib -wWhen run with this flag, forwarded npm commands will use the specified registry for your package(s).
This is useful if you do not want to explicitly set up your registry
configuration in all of your package.json files individually when e.g. using
private registries.
When passed, this flag will alter the default publish process by first publishing
all changed packages to a temporary dist-tag (lerna-temp) and then moving the
new version(s) to the default dist-tag (latest).
This is not generally necessary, as Lerna will publish packages in topological
order (all dependencies before dependents) by default.
Using Lerna? Add a README badge to show it off:
[](https://lernajs.io/)
If you prefer some guidance for cli (in case you're about to start using lerna or introducing it to a new team), you might like lerna-wizard. It will lead you through a series of well-defined steps:
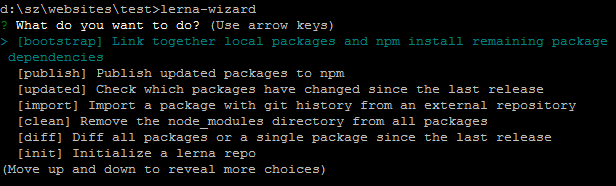
A declarative, efficient, and flexible JavaScript library for building user interfaces.
🖖 Vue.js is a progressive, incrementally-adoptable JavaScript framework for building UI on the web.
TypeScript is a superset of JavaScript that compiles to clean JavaScript output.
An Open Source Machine Learning Framework for Everyone
The Web framework for perfectionists with deadlines.
A PHP framework for web artisans
Bring data to life with SVG, Canvas and HTML. 📊📈🎉
JavaScript (JS) is a lightweight interpreted programming language with first-class functions.
Some thing interesting about web. New door for the world.
A server is a program made to process requests and deliver data to clients.
Machine learning is a way of modeling and interpreting data that allows a piece of software to respond intelligently.
Some thing interesting about visualization, use data art
Some thing interesting about game, make everyone happy.
We are working to build community through open source technology. NB: members must have two-factor auth.
Open source projects and samples from Microsoft.
Google ❤️ Open Source for everyone.
Alibaba Open Source for everyone
Data-Driven Documents codes.
China tencent open source team.