blog's People
Contributors

Stargazers


Watchers


blog's Issues
ThreadPoolExecutor源码分析及阻塞提交任务方法
目录
ThreadPoolExecutor源码
ThreadPoolExecutor 基本使用参考:ThreadPoolExecutor执行过程分析
线程池状态标志
private final AtomicInteger ctl = new AtomicInteger(ctlOf(RUNNING, 0));ctl 保存了线程池的运行状态(runState)和线程池内有效线程数量(workerCount)。
// Packing and unpacking ctl
private static int runStateOf(int c)     { return c & ~CAPACITY; }
private static int workerCountOf(int c)  { return c & CAPACITY; }
private static int ctlOf(int rs, int wc) { return rs | wc; }
用 ctl 的高3位来表示线程池的运行状态, 用低29位来表示线程池内有效线程的数量。ctlOf() 方法用于计算出ctl的值。runStateOf()和workerCountOf()方法分别通过CAPACITY来计算得到其runState和workerCount,CAPACITY=29个1。
线程池的运行状态:
// runState is stored in the high-order bits
private static final int RUNNING    = -1 << COUNT_BITS;
//shutdown() -> SHUTDONW , 不加新任务,继续执行阻塞队列中的任务
private static final int SHUTDOWN   =  0 << COUNT_BITS;
//shutdownNow() -> STOP, 中断一切操作。
private static final int STOP       =  1 << COUNT_BITS;
//线程池没有线程,阻塞队列没有任务 -> TIDYING
private static final int TIDYING    =  2 << COUNT_BITS;
//terminated() -> TERMINATED
private static final int TERMINATED =  3 << COUNT_BITS;
execute(Runnable command)
/**
 * Executes the given task sometime in the future.  The task
 * may execute in a new thread or in an existing pooled thread.
 *
 * If the task cannot be submitted for execution, either because this
 * executor has been shutdown or because its capacity has been reached,
 * the task is handled by the current {@code RejectedExecutionHandler}.
 *
 * @param command the task to execute
 * @throws RejectedExecutionException at discretion of
 *         {@code RejectedExecutionHandler}, if the task
 *         cannot be accepted for execution
 * @throws NullPointerException if {@code command} is null
 */
public void execute(Runnable command) {
    if (command == null)
        throw new NullPointerException();
    /*
     * Proceed in 3 steps:
     *
     * 1. If fewer than corePoolSize threads are running, try to
     * start a new thread with the given command as its first
     * task.  The call to addWorker atomically checks runState and
     * workerCount, and so prevents false alarms that would add
     * threads when it shouldn't, by returning false.
     *
     * 2. If a task can be successfully queued, then we still need
     * to double-check whether we should have added a thread
     * (because existing ones died since last checking) or that
     * the pool shut down since entry into this method. So we
     * recheck state and if necessary roll back the enqueuing if
     * stopped, or start a new thread if there are none.
     *
     * 3. If we cannot queue task, then we try to add a new
     * thread.  If it fails, we know we are shut down or saturated
     * and so reject the task.
     */
    int c = ctl.get();
    if (workerCountOf(c) < corePoolSize) {
        //如果线程池中线程数没有达到corePoolSize,则新增线程(worker)
        if (addWorker(command, true))
            return;
        //更新c值。
        c = ctl.get();
    }
    //线程池处于RUNNING状态,并且阻塞队列未满
    //workQueue.offer(command)是非阻塞方法,当队列满时直接返回false(例如,SynchronousQueue如果没有线程在阻塞take,则返回false)
    if (isRunning(c) && workQueue.offer(command)) {
        int recheck = ctl.get();
        //再次检查状态,如果发现不是RUNNING状态,则remove掉刚才offer的任务。
        if (! isRunning(recheck) && remove(command))
            reject(command);
        //如果有效线程数==0,添加一个线程,而不去启动它。??
        //怎么会==0?
        else if (workerCountOf(recheck) == 0)
            addWorker(null, false);
    }
    //如果不是RUNNING状态,或者阻塞队列已满,则添加线程
    //如果不能添加,则reject。
    //false 表示添加的线程属于maximumPoolSize,如果线程数已经达到maximumPoolSize,则reject
    else if (!addWorker(command, false))
        reject(command);
}
BlockingQueue的一些操作方法
抛出异常 特殊值 阻塞 超时 插入 add(e)offer(e)put(e)offer(e, time, unit)移除 remove()poll()take()poll(time, unit)检查 element()peek()不可用 不可用
addWorker(Runnable firstTask, boolean core)
private boolean addWorker(Runnable firstTask, boolean core) {
    retry:
    for (;;) {
        int c = ctl.get();
        int rs = runStateOf(c);

        // Check if queue empty only if necessary.
        if (rs >= SHUTDOWN &&
            ! (rs == SHUTDOWN &&
               firstTask == null &&
               ! workQueue.isEmpty()))
            //1. 处于 STOP, TYDING 或 TERMINATD 状态 并且
            //2. 不是SUHTDOWN 或者 firsttask != null 或 queue不为空
            return false;

        for (;;) {
            int wc = workerCountOf(c);
            //wc大于最大容量。
            if (wc >= CAPACITY ||
                wc >= (core ? corePoolSize : maximumPoolSize))
                //没有空余的线程了。
                return false;
            //有效线程数加一,加一成功后break
            if (compareAndIncrementWorkerCount(c))
                break retry;
            c = ctl.get();  // Re-read ctl
            //runState改变,从头执行逻辑。
            if (runStateOf(c) != rs)
                continue retry;
            // else CAS failed due to workerCount change; retry inner loop
            //else runState 没变,重新去执行加一操作。
        }
    }

    boolean workerStarted = false;
    boolean workerAdded = false;
    Worker w = null;
    try {
        //创建worker
        w = new Worker(firstTask);
        final Thread t = w.thread;
        if (t != null) {
            final ReentrantLock mainLock = this.mainLock;
            mainLock.lock();
            try {
                // Recheck while holding lock.
                // Back out on ThreadFactory failure or if
                // shut down before lock acquired.
                int rs = runStateOf(ctl.get());

                if (rs < SHUTDOWN ||
                    (rs == SHUTDOWN && firstTask == null)) {
                    if (t.isAlive()) // precheck that t is startable
                        throw new IllegalThreadStateException();
                    workers.add(w);
                    int s = workers.size();
                    if (s > largestPoolSize)
                        largestPoolSize = s;
                    workerAdded = true;
                }
            } finally {
                mainLock.unlock();
            }
            if (workerAdded) {
                //添加成功,启动线程
                //启动后执行runWorker(this);
                t.start();
                workerStarted = true;
            }
        }
    } finally {
        if (! workerStarted)
            addWorkerFailed(w);
    }
    return workerStarted;
}
runWorker(Worker w)
运行worker,该线程不断的getTask()从队列中获取任务,然后 task.run();运行。只要队列中有值则不断循环。
final void runWorker(Worker w) {
    Thread wt = Thread.currentThread();
    Runnable task = w.firstTask;
    w.firstTask = null;
    w.unlock(); // allow interrupts
    boolean completedAbruptly = true;
    try {
        //getTask()方法是个无限循环, 会从阻塞队列 workQueue中不断取出任务来执行.
        //addWorker(null, false);情况,task==null,这样就需要getTask从队列中取任务执行(自己不带任务)。直到getTask返回null
        while (task != null || (task = getTask()) != null) {
            w.lock();
            // If pool is stopping, ensure thread is interrupted;
            // if not, ensure thread is not interrupted.  This
            // requires a recheck in second case to deal with
            // shutdownNow race while clearing interrupt
            if ((runStateAtLeast(ctl.get(), STOP) ||
                 (Thread.interrupted() &&
                  runStateAtLeast(ctl.get(), STOP))) &&
                !wt.isInterrupted())
                wt.interrupt();
            try {
                beforeExecute(wt, task);
                Throwable thrown = null;
                try {
                    //执行
                    task.run();
                } catch (RuntimeException x) {
                    thrown = x; throw x;
                } catch (Error x) {
                    thrown = x; throw x;
                } catch (Throwable x) {
                    thrown = x; throw new Error(x);
                } finally {
                    afterExecute(task, thrown);
                }
            } finally {
                task = null;
                w.completedTasks++;
                w.unlock();
            }
        }
        completedAbruptly = false;
    } finally {
        processWorkerExit(w, completedAbruptly);
    }
}
getTask()
private Runnable getTask() {
    boolean timedOut = false; // Did the last poll() time out?

    for (;;) {
        int c = ctl.get();
        int rs = runStateOf(c);

        // Check if queue empty only if necessary.
        // STOP以上状态,或者SHUTDOWN状态下queue为空,即都没有任务要执行了。
        if (rs >= SHUTDOWN && (rs >= STOP || workQueue.isEmpty())) {
            //线程数减一
            decrementWorkerCount();
            //该线程退出。
            return null;
        }
        //下面都是RUNNING状态,或SHUTDOWN状态queue!=null

        int wc = workerCountOf(c);

        // Are workers subject to culling?
        //设置了allowCoreThreadTimeOut,或者线程数大于core线程数。
        //是否剔除超时的线程?
        boolean timed = allowCoreThreadTimeOut || wc > corePoolSize;

        // 通过返回 null 结束线程。
        if ((wc > maximumPoolSize || (timed && timedOut))
            && (wc > 1 || workQueue.isEmpty())) {
            if (compareAndDecrementWorkerCount(c))
                return null;
            continue;
        }

        try {
            Runnable r = timed ?
                workQueue.poll(keepAliveTime, TimeUnit.NANOSECONDS) :
                workQueue.take();
           	//线程已经准备好,正在take(),没有什么标志位?

            //取出runnable 返回
            if (r != null)
                return r;
            timedOut = true;
        } catch (InterruptedException retry) {
            timedOut = false;
        }
    }
}
ThreadPoolExecutor阻塞添加任务
使用semaphore限流ThreadPoolExecutor(失效及原因)
考虑到当线程池满时(任务数 > maximumPoolSize + Queue.size()),会执行饱和策略。默认AbortPolicy ,抛出RejectedExecutionException。
怎么能避免线程池拒绝提交的任务呢?首先想到通过信号量Semaphore来控制任务的添加。代码如下:
注意:该代码是无效的。
Semaphore semaphore;

/**
 * 使用semaphore,控制提交任务速度
 * @throws InterruptedException
 * @throws ExecutionException
 */
@Test
public void test555() throws InterruptedException, ExecutionException {
   ThreadPoolExecutor threadPoolExecutor = new ThreadPoolExecutor(3, 7, 10, TimeUnit.SECONDS, new SynchronousQueue<>());
   //信号量设置为线程池最大线程数
   semaphore = new Semaphore(threadPoolExecutor.getMaximumPoolSize());
   ExecutorCompletionService<String> executorCompletionService = new ExecutorCompletionService(threadPoolExecutor);

   Runnable runnable = new Runnable() {
      @Override
      public void run() {
         for (int i = 0; i < 50; i++) {
            String name = "name_" + i;
            TestCallable testCallable = new TestCallable(name);
            try {
               //RetryUtil.createThreadPoolExecutor()
               semaphore.acquire();

               executorCompletionService.submit(testCallable);
               logger.info("+++添加任务 name: " + name + poolInfo(threadPoolExecutor));
               //threadPoolExecutor.submit(testCallable);
            } catch (RejectedExecutionException e) {
               logger.info("拒绝:" + name);
            } catch (InterruptedException e) {
               e.printStackTrace();
            }
            try {
               //添加任务间隔200ms
               Thread.sleep(200);
            } catch (InterruptedException e) {
               e.printStackTrace();
            }
         }
         finishState = 1;
      }
   };

   Thread addThread = new Thread(runnable);
   addThread.start();

   //logger.info(" taskCount: " + threadPoolExecutor.getTaskCount());

   //添加的任务有被抛弃的。taskCount不一定等于添加的任务。
   int completeCount = 0;
   while (!(completeCount == threadPoolExecutor.getTaskCount() && finishState == 1)) {
      Future<String> take = executorCompletionService.take();
      String taskName = null;

      try {
         taskName = take.get();
         //有可能线程池还没准备好?
         semaphore.release();
         System.out.println("???" + take.isDone());

      } catch (InterruptedException e) {
         e.printStackTrace();
      } catch (ExecutionException e) {
         logger.info(e.getMessage());
      }

      logger.info("---完成任务 name: "
            + taskName + poolInfo(threadPoolExecutor)
            + " finishTask:" + (++completeCount));

   }

   addThread.join();


   while (threadPoolExecutor.getPoolSize() > 0) {
      Thread.sleep(1000);
      SimpleDateFormat simpleDateFormat = new SimpleDateFormat("HH:mm:ss");
      logger.info(simpleDateFormat.format(new Date()) + poolInfo(threadPoolExecutor));
   }

   // Tell threads to finish off.
   threadPoolExecutor.shutdown();
   // Wait for everything to finish.
   while (!threadPoolExecutor.awaitTermination(10, TimeUnit.SECONDS)) {
      logger.info("complete");
   }

}

public String poolInfo(ThreadPoolExecutor threadPoolExecutor) {
   return " ActiveCount: " + threadPoolExecutor.getActiveCount()
         + " poolSize: " + threadPoolExecutor.getPoolSize()
         + " queueSize: " + threadPoolExecutor.getQueue().size()
         + " taskCount: " + threadPoolExecutor.getTaskCount();
}
只是在submit之前添加semaphore.acquire(); 在获取future后,添加semaphore.release();。
但这样依然会产生RejectedExecutionException。
通过源码分析原因,
当线程池中线程已满,并且都处于忙碌状态。此时semaphore的值==线程池线程数,addThread被semaphore.acquire()阻塞,禁止submit新任务。当线程池中一个线程t1执行了runWorker(Worker w)中的task.run(),main线程就可以执行Future take = executorCompletionService.take()获取结果并semaphore.release()释放信号量。
释放信号量semaphore后,addThread线程可以submit新任务,假设此时t1线程还没有执行到getTask() 中的poll()和take()方法。此时workQueue队列依然是满的。
Runnable r = timed ?
                workQueue.poll(keepAliveTime, TimeUnit.NANOSECONDS) :
                workQueue.take();
而addThread已经执行到execute()的
if (isRunning(c) && workQueue.offer(command)) {当workQueue已满,offer() 直接返回false(正确的顺序应该是等t1线程执行到workQueue.take()后addThread再开始执行workQueue.offer(command)。)。执行execute() 如下逻辑
else if (!addWorker(command, false))
    reject(command);
addWork()中,wc = maximumPoolSize 返回false。
 if (wc >= CAPACITY ||
                wc >= (core ? corePoolSize : maximumPoolSize))
                //没有空余的线程了。
                return false;
执行reject(),抛出RejectedExecutionException。
使用自定义队列(不建议)
public class LimitedQueue<E> extends LinkedBlockingQueue<E>
{
    public LimitedQueue(int maxSize)
    {
        super(maxSize);
    }

    @Override
    public boolean offer(E e)
    {
        // turn offer() and add() into a blocking calls (unless interrupted)
        try {
            put(e);
            return true;
        } catch(InterruptedException ie) {
            Thread.currentThread().interrupt();
        }
        return false;
    }

}
其**就是替换BlockingQueue中的offer()方法为put()方法,这样execute() 中的workQueue.offer(command),就变成put(),阻塞添加任务,不会存在workQueue.offer() 返回false的情况。
//void execute(Runnable command) 中代码

if (isRunning(c) && workQueue.offer(command)) {
    int recheck = ctl.get();
    if (! isRunning(recheck) && remove(command))
        reject(command);
    else if (workerCountOf(recheck) == 0)
        addWorker(null, false);
}
//一下代码,无法执行
else if (!addWorker(command, false))
    reject(command);
但这样的问题是下面的else if (!addWorker(command, false)) 代码逻辑将无法执行,导致的结果就是,只针对corePoolSize==maxPoolSize 时有效。不建议这么做。
自定义RejectedExecutionHandler
RejectedExecutionHandler block = new RejectedExecutionHandler() {
  rejectedExecution(Runnable r, ThreadPoolExecutor executor) {
     executor.getQueue().put( r );
  }
};

ThreadPoolExecutor pool = new ...
pool.setRejectedExecutionHandler(block);
通过自定义RejectedExecutionHandler,在reject时调用Queue的put()方法,阻塞式添加任务。
使用CallerRunsPolicy
其实忙活一圈,发现最简单的方式就是使用ThreadPoolExecutor.CallerRunsPolicy。
CallerRunsPolicy被拒绝的任务,谁submit的谁执行。想想之前的各种阻塞也对,负责添加任务的线程因为线程池满了就阻塞在那里,还不如帮着执行一些任务..
Reference
《effective java》笔记
目录
- 1.静态工厂方法代替构造器
- 2. 多个构造器参数时使用构建器(builder模式)
- 3.使用私有构造器或枚举类型强化Singleton
- 4. 将不需要实例化的类的构造函数设为private
- 5.不要创建没有必要的对象
- 6. 消除无用的对象引用
- 7.避免使用终结方法finalize()
- 8. 覆盖equals时请遵守通用约定
- 9. 覆盖equals时总要覆盖hashCode
- 10. 覆盖toString方法
- 11.谨慎地覆盖clone
- 12. 考虑实现Comparable接口
- 13. 使类和成员的可访问性最小化
- 14. 使用方法访问数据(get/set),而不是直接访问字段
- 15. 使可变性最小化
- 16. 复合优于继承
- 17. 要么为继承而设计,并提供文档说明,要么就禁止继承
- 18. 接口优于抽象类
- 19. 不要把接口沦为定义常量工具
- 20. 类层次优于标签类
- 21. 用函数对象表示策略
- 22. 优先考虑静态成员类
- 23.请不要新代码中使用原生态类型
- 24. 消除一切警告
- 25.列表优于数组
- 26.优先考虑泛型
- 27. 优先考虑泛型方法
- 28.利用有限制通配符来提升API的灵活性
- 30.用enum代替int常量
- 31.用实例域代替序数
- 32.用EnumSet代替位域
- 33.用EnumMap代替序数索引
- 34.用接口模拟可伸缩的枚举
- 35.注解优先于命名模式
- 36.坚持使用Override注解
- 37.标记接口定义类型
- 38. 养成校验参数的好习惯
- *39. 必要时进行保护性拷贝
- 40. 设计方法签名
- 41.慎用重载
- 42. 使用可变参数
- 43.返回零长度的数组或者集合,而不是null
- 44. 为API写好注释
- 45. 将局部变量的作用域最小化
- 46.for-each循环优先于传统的for循环
- 47. 了解和使用类库
- 48.如果需要精确的答案,请避免使用float和double
- 49. 基本类型优先于装箱基本类型
- 50.如果其他类型更合适,则尽量避免使用字符串
- 51. 当心字符串连接的性能
- 52.通过接口引用对象
- 53.接口优先于反射机制
- 54.谨慎地使用本地方法
- 55. 谨慎地进行优化
- 56. 遵守普遍接受的命名惯例
- 57.只针对异常的情况才使用异常
- 58.对可恢复的情况使用受检异常,对程序错误使用运行时异常
- 59.避免不必要地使用受检的异常
- 60.优先使用标准的异常
- 61.抛出与抽象相对应的异常
- 62.每个方法抛出的异常都要有文档
- 63.在细节信息中包含能捕获失败的信息
- 64.努力使失败保持原子性
- 65.不要忽略异常
- 66.同步访问共享的可变数据
- 67.避免过度同步
- 68.executor和task优先于线程
- 69.并发工具优先于wait和notify
- 70.线程安全性的文档化
- 71.慎用延迟初始化
- 72.不要依赖于线程调度器
- 73.避免使用线程组
- 74.谨慎地实现Serializable接口
- 75.考虑使用自定义的序列化形式
1.静态工厂方法代替构造器
几大优势
- 有名称
BigInteger.probablePrime 优于 BigInterger(int ,int,random)
-
不用每次创建新对象
-
返回原返回类型的子类型对象
2. 多个构造器参数时使用构建器(builder模式)
多个参数,且可选的情况下,使用builder
// Builder Pattern - Pages 14-15
package org.effectivejava.examples.chapter02.item02.builder;

public class NutritionFacts {
   private final int servingSize;
   private final int servings;
   private final int calories;
   private final int fat;
   private final int sodium;
   private final int carbohydrate;

   public static class Builder {
      // Required parameters
      private final int servingSize;
      private final int servings;

      // Optional parameters - initialized to default values
      private int calories = 0;
      private int fat = 0;
      private int carbohydrate = 0;
      private int sodium = 0;

      public Builder(int servingSize, int servings) {
         this.servingSize = servingSize;
         this.servings = servings;
      }

      public Builder calories(int val) {
         calories = val;
         return this;
      }

      public Builder fat(int val) {
         fat = val;
         return this;
      }

      public Builder carbohydrate(int val) {
         carbohydrate = val;
         return this;
      }

      public Builder sodium(int val) {
         sodium = val;
         return this;
      }

      public NutritionFacts build() {
         return new NutritionFacts(this);
      }
   }

   private NutritionFacts(Builder builder) {
      servingSize = builder.servingSize;
      servings = builder.servings;
      calories = builder.calories;
      fat = builder.fat;
      sodium = builder.sodium;
      carbohydrate = builder.carbohydrate;
   }

   public static void main(String[] args) {
      NutritionFacts cocaCola = new NutritionFacts.Builder(240, 8)
            .calories(100).sodium(35).carbohydrate(27).build();
   }
}
3.使用私有构造器或枚举类型强化Singleton
通过反射可以破坏单利的特性,解决方法,可以在构造方法中抛出异常,而不单单是设置为private。
为了解决反射破坏单利的问题,可以写一个readResolve() 方法。
public final class MySingleton implements Serializable{
    private MySingleton() { }
    private static final MySingleton INSTANCE = new MySingleton();
    public static MySingleton getInstance() { return INSTANCE; }
    private Object readResolve() throws ObjectStreamException {
       // instead of the object we're on,
       // return the class variable INSTANCE
      return INSTANCE;
   }
推荐使用枚举来实现单例模式。
4. 将不需要实例化的类的构造函数设为private
5.不要创建没有必要的对象
不要这样做String s = new String("test");
反例:
public boolean isBabyBoomer() {
   // Unnecessary allocation of expensive object
   Calendar gmtCal = Calendar.getInstance(TimeZone.getTimeZone("GMT"));
   gmtCal.set(1946, Calendar.JANUARY, 1, 0, 0, 0);
   Date boomStart = gmtCal.getTime();
   gmtCal.set(1965, Calendar.JANUARY, 1, 0, 0, 0);
   Date boomEnd = gmtCal.getTime();
   return birthDate.compareTo(boomStart) >= 0
         && birthDate.compareTo(boomEnd) < 0;
}
推荐使用static初始化,不用每次都构造一个Calendar.getInstance对象:
/**
 * The starting and ending dates of the baby boom.
 */
private static final Date BOOM_START;
private static final Date BOOM_END;

static {
   Calendar gmtCal = Calendar.getInstance(TimeZone.getTimeZone("GMT"));
   gmtCal.set(1946, Calendar.JANUARY, 1, 0, 0, 0);
   BOOM_START = gmtCal.getTime();
   gmtCal.set(1965, Calendar.JANUARY, 1, 0, 0, 0);
   BOOM_END = gmtCal.getTime();
}

public boolean isBabyBoomer() {
   return birthDate.compareTo(BOOM_START) >= 0
         && birthDate.compareTo(BOOM_END) < 0;
}
注意装箱拆箱,也会产生不必要的对象创建。
public static void main(String[] args) {
   Long sum = 0L;//Long -> long 会提高很多性能。
   for (long i = 0; i < Integer.MAX_VALUE; i++) {
      sum += i;
   }
   System.out.println(sum);
}
6. 消除无用的对象引用
public Object pop() {
    if (size == 0) {
        throw new EmptyStackException();
    }
    Object result = elements[--size];
    elements[size] = null;//消除无用的对象引用,避免内存泄露
    return result;
}
7.避免使用终结方法finalize()
jvm调用GC时间未知。
8. 覆盖equals时请遵守通用约定
9. 覆盖equals时总要覆盖hashCode
两个对象使用equals返回true,则它们的hashCode也一定相等;如果两个对象的hashCode相等,则它们的equals则不一定相等。
10. 覆盖toString方法
11.谨慎地覆盖clone
12. 考虑实现Comparable接口
compareTo应该返回和equals方法相同的结果
13. 使类和成员的可访问性最小化
private default protected public 使用
14. 使用方法访问数据(get/set),而不是直接访问字段
15. 使可变性最小化
巧用final关键字。
- 修饰类,不可继承
- 修饰成员变量,引用不可变。
16. 复合优于继承
17. 要么为继承而设计,并提供文档说明,要么就禁止继承
书中给出建议如果类并不是为了继承而生,那么这个类应该用final修饰禁止子类化。
18. 接口优于抽象类
因为java是单继承。能用接口尽量接口。
19. 不要把接口沦为定义常量工具
不要使用接口来保存常量。
为什么?因为,如果一个类实现了这个借口,其所有子类都将包含这些常量。会将这些常量暴漏到API中。
应该怎么样。可以使用一个工具类,将构造函数私有化,保存常量。或使用枚举方式。工具类可以通过静态导入(static import)使用起来方便。
20. 类层次优于标签类
公共方法提取到公共父类中。
21. 用函数对象表示策略
原来传递一个对象函数,就是通过回调,执行目标方法。
现在可以用lambda表达式。
22. 优先考虑静态成员类
如果单独的作为一个类,只不过作为主类的特定的一种组件类。使用静态内部类,更能体现这种关联关系。
非静态内部类有一个很大的优点:可以自由使用外部类的所有变量和方法
为什么Java内部类要设计成静态和非静态两种? - wuxinliulei的回答 - 知乎
https://www.zhihu.com/question/28197253/answer/71366574
23.请不要新代码中使用原生态类型
List 不用原始的List
List<?>和List的区别? - 胖君的回答 - 知乎
https://www.zhihu.com/question/31429113/answer/118039516
24. 消除一切警告
尽力消除警告,如果消除不了确保是安全的,则使用@SuppressWarnings("unchecked");忽略警告
25.列表优于数组
26.优先考虑泛型
public class Test<E> {
    private E[] elements;

    public Test() {
        //elements = new E[16];    //编译时出错,不能创建不可具体化的类型的数组
        elements = (E[]) new Object[16];
    }
}
27. 优先考虑泛型方法
28.利用有限制通配符来提升API的灵活性
/**
 * Created by yulinfeng on 8/17/17.
 */
public class Main {

    public static void main(String[] args) {
        Favorites f = new Favorites();
        f.putFavorite(String.class, "Java");
        f.putFavorite(Integer.class, 0xcafebabe);
        f.putFavorite(Class.class, Favorites.class);
        //此处直接返回就是String类型,而直接使用map则,还要object类型转换。
        String favoriteString = f.getFavorite(String.class);
        Integer favoriteInteger = f.getFavorite(Integer.class);
        Class<?> favoriteClass = f.getFavorite(Class.class);
        System.out.printf("%s %x %s", favoriteString, favoriteInteger, favoriteClass.getName());
    }
}
30.用enum代替int常量
/**
 * 加减乘除枚举
 * Created by yulinfeng on 8/20/17.
 */
public enum Operation {
    PLUS {

        double apply(double x, double y) {
            return x + y;
        }
    },
    MIUS {
        double apply(double x, double y) {
            return x - y;
        }
    },
    TIMES {
        double apply(double x, double y) {
            return x * y;
        }
    },
    DEVIDE {
        double apply(double x, double y) {
            return x / y;
        }
    };

    //定义abstract方法,为了避免漏写apply。
    abstract double apply(double x, double y);
}
31.用实例域代替序数
枚举类型有一个ordinal方法,返回枚举的序列id(从0开始)。
但是,不推荐使用ordinal。不好维护。
32.用EnumSet代替位域
EnumSet中的元素必须来自同一个Enum
EnumSet底层使用bit vector表示所包含的多个枚举量,因此性能上与直接使用int常量差不多
33.用EnumMap代替序数索引
同样它的键也只允许来自同一个Enum枚举
34.用接口模拟可伸缩的枚举
枚举优化,定义接口。方便扩展。
public interface Operation {
    double apply(double x, double y);
}
/**
* 基本操作符,实现自Operation接口
* Created by yulinfeng on 8/20/17.
*/
public enum BasicOperation implements Operation{
PLUS("+") {
public double apply(double x, double y) {
return x + y;
}
},
MIUS("-") {
public double apply(double x, double y) {
return x - y;
}
},
TIMES ("*") {
public double apply(double x, double y) {
return x * y;
}
},
DEVIDE ("/") {
public double apply(double x, double y) {
return x / y;
}
};
private final String symbol;
BasicOperation(String symbol) {
this.symbol = symbol;
}
}35.注解优先于命名模式
36.坚持使用Override注解
37.标记接口定义类型
Serializable就是一个标记接口(空接口)
38. 养成校验参数的好习惯
可以通过assert来检查参数合法性。
*39. 必要时进行保护性拷贝
import java.util.Date;

/**
 * 开始时间不能大于结束时间
 * Created by yulinfeng on 2017/8/21/0021.
 */
public class Period {
    private final Date start;   //定义为不可变的引用
    private final Date end;

    public Period(Date start, Date end) {
        /*实例的创建应在有效性检查之前进行,避免在“从检查参数开始直到拷贝参数之间的时间段期间”从另一个线程改变类的参数*/

        //new一个新的,防止外部修改Date
        this.start = new Date(start.getTime());
        this.end = new Date(start.getTime());

        if (this.start.compareTo(this.end) > 0) {
            throw new IllegalArgumentException(start + "after" + end);

        }
    }

    //同样,返回属性也new一个新的返回,防止修改对象。
    public Date start() {
        return new Date(start.getTime());
    }

    public Date end() {
        return new Date(end.getTime());
    }
}
40. 设计方法签名
41.慎用重载
重载参数有歧义。
42. 使用可变参数
43.返回零长度的数组或者集合,而不是null
零长度的数组或者集合不应该返回null
44. 为API写好注释
45. 将局部变量的作用域最小化
46.for-each循环优先于传统的for循环
47. 了解和使用类库
每个程序员都应该熟悉java.lang、java.util
48.如果需要精确的答案,请避免使用float和double
首推BigDecimal,或者可以使用int、long型将单位缩小不再有小数点
49. 基本类型优先于装箱基本类型
Integer中会缓存-128~127的小数值,在自动装箱的时候对这些小数值能直接比较
50.如果其他类型更合适,则尽量避免使用字符串
51. 当心字符串连接的性能
字符串做修改应该使用StringBuilder(线程不安全)或者StringgBuffer(线程安全)
52.通过接口引用对象
53.接口优先于反射机制
54.谨慎地使用本地方法
55. 谨慎地进行优化
写出结构优美、设计良好的代码,不是写出快的程序
56. 遵守普遍接受的命名惯例
57.只针对异常的情况才使用异常
58.对可恢复的情况使用受检异常,对程序错误使用运行时异常
59.避免不必要地使用受检的异常
60.优先使用标准的异常
61.抛出与抽象相对应的异常
此时要考虑是否做异常转译,使得上层方法的调用者易于理解
62.每个方法抛出的异常都要有文档
63.在细节信息中包含能捕获失败的信息
64.努力使失败保持原子性
65.不要忽略异常
66.同步访问共享的可变数据
67.避免过度同步
68.executor和task优先于线程
69.并发工具优先于wait和notify
70.线程安全性的文档化
71.慎用延迟初始化
72.不要依赖于线程调度器
73.避免使用线程组
74.谨慎地实现Serializable接口
几个代价
- 这意味着你不可随意更改这个类,也就是大大降低了“改变这个类的实现”的灵活性
- 反序列化可以看作是一个“隐藏的构造器”,这也就是说如果按照默认的反序列化机制很容易不按照约定的构造器建立约束关系
- 因为类的改变需要不断检查测试新版本与旧版本之间的“序列化-反序列化”是否兼容。
75.考虑使用自定义的序列化形式
《Java并发编程实战》第九章~第十六章
目录
第十章 避免活跃性危险
10.1 死锁
10.1.1 锁顺序死锁
所有线程以固定的顺序来获得锁,就不会出现死锁问题。
10.1.2 动态的锁顺序死锁
下面的代码会死锁么?
    // Warning: deadlock-prone!
    public static void transferMoney(Account fromAccount,
                                     Account toAccount,
                                     DollarAmount amount)
            throws InsufficientFundsException {
        synchronized (fromAccount) {
            synchronized (toAccount) {
                if (fromAccount.getBalance().compareTo(amount) < 0)
                    throw new InsufficientFundsException();
                else {
                    fromAccount.debit(amount);
                    toAccount.credit(amount);
                }
            }
        }
    }
看上去好像没什么问题。
问题在于,他加锁的顺序取决于参数。如果x向y转账,就先加锁x。如果y向x转账就先加锁y。产生死锁。
我们要人为的定义锁的顺序,且保持不变。
可以通过System.identityHashCode(fromAcct)来获取对象的hashcode。根据hashcode大小来决定锁的顺序。
hashcode会有相同的情况,怎么办?hashcode相同的情况很低,单独的引入一个锁,来保证同一时刻只能有一组hashcode相同的锁来执行。
public class InduceLockOrder {
    //针对hashcode相同的情况
    private static final Object tieLock = new Object();

    public void transferMoney(final Account fromAcct,
                              final Account toAcct,
                              final DollarAmount amount)
            throws InsufficientFundsException {
        class Helper {
            public void transfer() throws InsufficientFundsException {
                if (fromAcct.getBalance().compareTo(amount) < 0)
                    throw new InsufficientFundsException();
                else {
                    fromAcct.debit(amount);
                    toAcct.credit(amount);
                }
            }
        }
        //获取锁的hashcode
        int fromHash = System.identityHashCode(fromAcct);
        int toHash = System.identityHashCode(toAcct);

        if (fromHash < toHash) {
            synchronized (fromAcct) {
                synchronized (toAcct) {
                    new Helper().transfer();
                }
            }
        } else if (fromHash > toHash) {
            synchronized (toAcct) {
                synchronized (fromAcct) {
                    new Helper().transfer();
                }
            }
        } else {
            //hashcode相同的情况
            synchronized (tieLock) {
                synchronized (fromAcct) {
                    synchronized (toAcct) {
                        new Helper().transfer();
                    }
                }
            }
        }
    }

    interface DollarAmount extends Comparable<DollarAmount> {
    }

    interface Account {
        void debit(DollarAmount d);

        void credit(DollarAmount d);

        DollarAmount getBalance();

        int getAcctNo();
    }

    class InsufficientFundsException extends Exception {
    }
}
10.1.3 在协作对象之间发生的死锁
两个相关对象之间产生死锁。
public class CooperatingDeadlock {
    // Warning: deadlock-prone!
    class Taxi {
        @GuardedBy("this") private Point location, destination;
        private final Dispatcher dispatcher;

        public Taxi(Dispatcher dispatcher) {
            this.dispatcher = dispatcher;
        }

        public synchronized Point getLocation() {
            return location;
        }

        //获取了taxi的锁,去请求Dispatcher的锁。
        public synchronized void setLocation(Point location) {
            this.location = location;
            if (location.equals(destination))
                dispatcher.notifyAvailable(this);
        }

        public synchronized Point getDestination() {
            return destination;
        }

        public synchronized void setDestination(Point destination) {
            this.destination = destination;
        }
    }

    class Dispatcher {
        @GuardedBy("this") private final Set<Taxi> taxis;
        @GuardedBy("this") private final Set<Taxi> availableTaxis;

        public Dispatcher() {
            taxis = new HashSet<Taxi>();
            availableTaxis = new HashSet<Taxi>();
        }

        public synchronized void notifyAvailable(Taxi taxi) {
            availableTaxis.add(taxi);
        }

        //先获取了this(dispatcher)的锁,去请求Taxi的锁
        public synchronized Image getImage() {
            Image image = new Image();
            for (Taxi t : taxis)
                image.drawMarker(t.getLocation());
            return image;
        }
    }

    class Image {
        public void drawMarker(Point p) {
        }
    }
}
持有锁的情况下调用外部方法,需要警惕死锁。
10.1.4 开放调用
调用某个方法不需要获取锁,就是开放调用。
这里涉及到synchronized 方法、synchronized(this)与synchronized(class)的区别
参考:synchronized(this)与synchronized(class)的区别
class CooperatingNoDeadlock {
    @ThreadSafe
    class Taxi {
        @GuardedBy("this") private Point location, destination;
        private final Dispatcher dispatcher;

        public Taxi(Dispatcher dispatcher) {
            this.dispatcher = dispatcher;
        }

        public synchronized Point getLocation() {
            return location;
        }

       //主要是将两个嵌套的锁分开了,
        public void setLocation(Point location) {
            boolean reachedDestination;
            //先获取Taxi锁
            synchronized (this) {
                this.location = location;
                reachedDestination = location.equals(destination);
            }
            //释放Taxi锁
            //再获取dispatcher锁
            if (reachedDestination)
                dispatcher.notifyAvailable(this);
        }

        public synchronized Point getDestination() {
            return destination;
        }

        public synchronized void setDestination(Point destination) {
            this.destination = destination;
        }
    }

    @ThreadSafe
    class Dispatcher {
        @GuardedBy("this") private final Set<Taxi> taxis;
        @GuardedBy("this") private final Set<Taxi> availableTaxis;

        public Dispatcher() {
            taxis = new HashSet<Taxi>();
            availableTaxis = new HashSet<Taxi>();
        }

        public synchronized void notifyAvailable(Taxi taxi) {
            availableTaxis.add(taxi);
        }

        public Image getImage() {
            Set<Taxi> copy;
            synchronized (this) {
                copy = new HashSet<Taxi>(taxis);
            }
            Image image = new Image();
            for (Taxi t : copy)
                image.drawMarker(t.getLocation());
            return image;
        }
    }

    class Image {
        public void drawMarker(Point p) {
        }
    }

}
10.1.5 资源死锁
有界线程池与相互依赖的任务不能一起使用。
10.2 死锁的避免与诊断
10.2.1 支持定时的锁
显示锁 tryLock ,第十三章。
10.2.2 通过线程转储(Thread Dump)信息来分析死锁
10.3 其他活跃性危险
10.3.1 饥饿
避免使用线程优先级。
活锁:过度的错误恢复代码造成的,将不可修复的作为可修复的。不断重试。
第十一章 性能与可伸缩性
第十二章 并发程序的测试
第十三章 显示锁
13.1 Lock与ReentrantLock
public interface Lock {
    void lock();
    void lockInterruptibly() throws InterruptedException;
    boolean tryLock();
    boolean tryLock(long time, TimeUnit unit) throws InterruptedException;
    void unlock();
    Condition newCondition();
}
必须使用finally来释放Lock。
13.1.1 轮询锁与定时锁
为了防止死锁,通过tryLock来实现可轮训、可定时的锁的获取模式。
使用tryLock来避免顺序死锁。
public class DeadlockAvoidance {
    private static Random rnd = new Random();

    public boolean transferMoney(Account fromAcct,
                                 Account toAcct,
                                 DollarAmount amount,
                                 long timeout,
                                 TimeUnit unit)
            throws InsufficientFundsException, InterruptedException {
        long fixedDelay = getFixedDelayComponentNanos(timeout, unit);
        long randMod = getRandomDelayModulusNanos(timeout, unit);
        long stopTime = System.nanoTime() + unit.toNanos(timeout);

        while (true) {
            //tryLock
            if (fromAcct.lock.tryLock()) {
                try {
                    if (toAcct.lock.tryLock()) {
                        try {
                            if (fromAcct.getBalance().compareTo(amount) < 0)
                                throw new InsufficientFundsException();
                            else {
                                fromAcct.debit(amount);
                                toAcct.credit(amount);
                                return true;
                            }
                        } finally {
                            toAcct.lock.unlock();
                        }
                    }
                } finally {
                    fromAcct.lock.unlock();
                }
            }
            if (System.nanoTime() < stopTime)
                return false;
            NANOSECONDS.sleep(fixedDelay + rnd.nextLong() % randMod);
        }
    }
}
带时间限制的加锁
public boolean trySendOnSharedLine(String message,long timeout,TimeUnit unit)
               throws InterruptedException{
    long nanosToLock=unit.toNanos(timeout)-estimatedNanosToSend(message);
	//带时间的trylock
    if (!lock.tryLock(nanosToLock,NANOSECONDS)) return false;
    try{
        return sendOnSharedLine(message);
    }finally {lock.unlock();}
}
13.1.2 可中断的锁获取操作
7.1.6节内容:请求内置锁是不响应中断的。
lockInterruptibly可以保持获取锁时对中断的响应。
public boolean sendOnSharedLine(String message)
    throws InterruptedException {
    //可中断
    lock.lockInterruptibly();
    try {
        return cancellableSendOnSharedLine(message);
    } finally {
        lock.unlock();
    }
}
13.1.3 非块结构的加锁
13.2 性能
ReentrantLock可内置锁性能忽略。
13.3 公平性
公平锁和非公平锁(默认)。非公平锁性能高于公平锁。
13.4 在synchronized和ReentrantLock之间进行选择
ReentrantLock优点:定时、可中断、公平锁、非块结构加锁。
synchronized使用简单。没有忘记释放锁的风险。一般情况推荐使用synchronized。
13.5 读-写锁
public interface ReadWriteLock {
    Lock readLock();
    Lock writeLock();
}
读锁与写锁之间的交互可以采用多种方式。
- 释放优先:写释放,选先读先写先来的?
- 读线程插队:读释放,先读先写?
- 重入性:是否可重入
- 降级:写线程不释放,降为读线程?
- 升级
ReentrantReadWriteLock
构造时可以选择非公平锁或公平锁
公平锁:
等待时间最长的获得锁。
非公平锁:
线程获得访问顺序不确定。写线程降为读线程可以,反之不行。
用读写锁来包装map,读写锁的性能较差。
public class ReadWriteMap <K,V> {
    private final Map<K, V> map;
    private final ReadWriteLock lock = new ReentrantReadWriteLock();
    private final Lock r = lock.readLock();
    private final Lock w = lock.writeLock();

    public ReadWriteMap(Map<K, V> map) {
        this.map = map;
    }

    public V put(K key, V value) {
        w.lock();
        try {
            return map.put(key, value);
        } finally {
            w.unlock();
        }
    }

    public V remove(Object key) {
        w.lock();
        try {
            return map.remove(key);
        } finally {
            w.unlock();
        }
    }

    public void putAll(Map<? extends K, ? extends V> m) {
        w.lock();
        try {
            map.putAll(m);
        } finally {
            w.unlock();
        }
    }

    public void clear() {
        w.lock();
        try {
            map.clear();
        } finally {
            w.unlock();
        }
    }

    public V get(Object key) {
        r.lock();
        try {
            return map.get(key);
        } finally {
            r.unlock();
        }
    }

    public int size() {
        r.lock();
        try {
            return map.size();
        } finally {
            r.unlock();
        }
    }

    public boolean isEmpty() {
        r.lock();
        try {
            return map.isEmpty();
        } finally {
            r.unlock();
        }
    }

    public boolean containsKey(Object key) {
        r.lock();
        try {
            return map.containsKey(key);
        } finally {
            r.unlock();
        }
    }

    public boolean containsValue(Object value) {
        r.lock();
        try {
            return map.containsValue(value);
        } finally {
            r.unlock();
        }
    }
}
第十四章 构建自定义的同步工具
14.1 状态依赖性的管理
几种有界缓存的实现,通过采用不同的方法来处理前提条件失败的问题。
基类:
public abstract class BaseBoundedBuffer <V> {
    @GuardedBy("this") private final V[] buf;
    @GuardedBy("this") private int tail;
    @GuardedBy("this") private int head;
    @GuardedBy("this") private int count;

    protected BaseBoundedBuffer(int capacity) {
        this.buf = (V[]) new Object[capacity];
    }

    protected synchronized final void doPut(V v) {
        buf[tail] = v;
        if (++tail == buf.length)
            tail = 0;
        ++count;
    }

    protected synchronized final V doTake() {
        V v = buf[head];
        buf[head] = null;
        if (++head == buf.length)
            head = 0;
        --count;
        return v;
    }

    public synchronized final boolean isFull() {
        return count == buf.length;
    }

    public synchronized final boolean isEmpty() {
        return count == 0;
    }
}
14.1.1 示例:将前提条件的失败传递给调用者
public class GrumpyBoundedBuffer <V> extends BaseBoundedBuffer<V> {
    public GrumpyBoundedBuffer() {
        this(100);
    }

    public GrumpyBoundedBuffer(int size) {
        super(size);
    }

    public synchronized void put(V v) throws BufferFullException {
        if (isFull())
            //条件不满足,直接抛出异常。由客户端处理。
            throw new BufferFullException();
        doPut(v);
    }

    public synchronized V take() throws BufferEmptyException {
        if (isEmpty())
            throw new BufferEmptyException();
        return doTake();
    }
}

//以上缓存实现,使用起来很麻烦,需要不断的循环。
class ExampleUsage {
    private GrumpyBoundedBuffer<String> buffer;
    int SLEEP_GRANULARITY = 50;

    void useBuffer() throws InterruptedException {
        while (true) {
            try {
                String item = buffer.take();
                // use item
                break;
            } catch (BufferEmptyException e) {
                Thread.sleep(SLEEP_GRANULARITY);
            }
        }
    }
}
14.1.2 示例:通过轮询与休眠来实现简单的阻塞
增加了轮询等待,还要增加处理中断请求。因为阻塞操作需要提供一种取消机制。
sleep效率差。
@ThreadSafe
//内部增加轮询
public class SleepyBoundedBuffer <V> extends BaseBoundedBuffer<V> {
    int SLEEP_GRANULARITY = 60;

    public SleepyBoundedBuffer() {
        this(100);
    }

    public SleepyBoundedBuffer(int size) {
        super(size);
    }

    public void put(V v) throws InterruptedException {
        while (true) {
            synchronized (this) {
                if (!isFull()) {
                    doPut(v);
                    return;
                }
            }
            Thread.sleep(SLEEP_GRANULARITY);
        }
    }

    public V take() throws InterruptedException {
        while (true) {
            synchronized (this) {
                if (!isEmpty())
                    return doTake();
            }
            Thread.sleep(SLEEP_GRANULARITY);
        }
    }
}
14.1.3 条件队列
使用synchronized结合wait、notifyAll比sleep更高效。
public class BoundedBuffer <V> extends BaseBoundedBuffer<V> {
    // CONDITION PREDICATE: not-full (!isFull())
    // CONDITION PREDICATE: not-empty (!isEmpty())
    public BoundedBuffer() {
        this(100);
    }

    public BoundedBuffer(int size) {
        super(size);
    }

    // BLOCKS-UNTIL: not-full
    public synchronized void put(V v) throws InterruptedException {
        while (isFull())
            wait();
        doPut(v);
        notifyAll();
    }

    // BLOCKS-UNTIL: not-empty
    public synchronized V take() throws InterruptedException {
        while (isEmpty())
            wait();
        V v = doTake();
        notifyAll();
        return v;
    }

    // BLOCKS-UNTIL: not-full
    // Alternate form of put() using conditional notification
    public synchronized void alternatePut(V v) throws InterruptedException {
        while (isFull())
            wait();
        boolean wasEmpty = isEmpty();
        doPut(v);
        if (wasEmpty)
            notifyAll();
    }
}
14.2 使用条件队列
14.2.1 条件谓词
条件等待三元关系,加锁(synchronized)、wait、条件。当满足某个条件时wait。
14.2.2 过早唤醒
wait方法被唤醒不一定是notify。
void stateDependentMethod() throws InterruptedExceeption(){
    //加锁
    synchronized(lock){
        //while判断条件谓词,因为代码其他地方还有别的条件谓词去wait线程,线程notify 不确定是发送哪个条件的notify。
	    while(!conditionPredicate())
		    lock.wait();
        while(!conditionPredicate2())
		    lock.wait();
	}
}
14.2.3 丢失的信号
上面的代码貌似也能解决信号丢失问题。
14.2.4 通知
不同的条件谓词在同一个线程上等待。使用NotifyAll,而不是notify。
一般情况推荐使用notifyAll。
14.2.5 示例:阀门类
public class ThreadGate {
    // CONDITION-PREDICATE: opened-since(n) (isOpen || generation>n)
    @GuardedBy("this") private boolean isOpen;
    @GuardedBy("this") private int generation;

    public synchronized void close() {
        isOpen = false;
    }

    public synchronized void open() {
        ++generation;
        isOpen = true;
        notifyAll();
    }

    // BLOCKS-UNTIL: opened-since(generation on entry)
    //generation代表第几代请求,
    //arrivalGeneration == generation 说明还没有open被调用过,
    //arrivalGeneration != generation 说明该线程来之后,open已经被调用过了。这个线程可以通过了。
    public synchronized void await() throws InterruptedException {
        int arrivalGeneration = generation;
        while (!isOpen && arrivalGeneration == generation)
            wait();
    }
}
14.2.6 子类安全问题
为了安全问题,可以完全禁止子类化,final类,或相关变量隐藏。
14.3 显示的Condition对象
Lock + Condition 比 synchronized + wait + notify 更灵活一点。
注意:Condition 也是Object子类,也有wait notify方法。但是应该使用的是await、signal、signalAll方法。
public class ConditionBoundedBuffer <T> {
    protected final Lock lock = new ReentrantLock();
    //不同的条件谓词
    // CONDITION PREDICATE: notFull (count < items.length)
    private final Condition notFull = lock.newCondition();
    // CONDITION PREDICATE: notEmpty (count > 0)
    private final Condition notEmpty = lock.newCondition();
    private static final int BUFFER_SIZE = 100;
    @GuardedBy("lock") private final T[] items = (T[]) new Object[BUFFER_SIZE];
    @GuardedBy("lock") private int tail, head, count;

    // BLOCKS-UNTIL: notFull
    public void put(T x) throws InterruptedException {
        lock.lock();
        try {
            while (count == items.length)
                notFull.await();
            items[tail] = x;
            if (++tail == items.length)
                tail = 0;
            ++count;
            notEmpty.signal();
        } finally {
            lock.unlock();
        }
    }

    // BLOCKS-UNTIL: notEmpty
    public T take() throws InterruptedException {
        lock.lock();
        try {
            while (count == 0)
                notEmpty.await();
            T x = items[head];
            items[head] = null;
            if (++head == items.length)
                head = 0;
            --count;
            notFull.signal();
            return x;
        } finally {
            lock.unlock();
        }
    }
}
14.4 Synchronizer 剖析

ReentrantLock 和 Semaphore 都是基于AbstractQueuedSynchronizer。
使用AQS来构建同步器有许多优势。
14.5 AbstractQueuedSynchronizer
略
第十五章 原子变量与非阻塞同步机制
用底层的原子机器指令(例如,比较交换指令)代替锁来确保数据在并发的一致性。
15.1 锁的劣势
锁的局限:锁会发生上下文切换或线程调度等操作。
volatile的局限:提供了相似的(与原子操作)可见性,但不能用于构建原子的复合操作。
15.2 硬件对并发的支持
15.2.1 比较并交换
乐观CAS,先比较再赋值
15.2.2 非阻塞的计数器
@ThreadSafe
public class CasCounter {
    private SimulatedCAS value;

    public int getValue() {
        return value.get();
    }

    public int increment() {
        int v;
        do {
            //先获取原来的值
            v = value.get();
            //执行compareAndSwap使v=v+1,并返回原来的值,
            //如果 v != v2了,说明这句执行之前v的值被修改了。所以,循环再试。
        } while (v != value.compareAndSwap(v, v + 1));
        return v + 1;
    }
}
竞争程度不高时,基于CAS的计数器在性能上远远超过基于锁的计数器。
15.2.3 JVM对CAS的支持
Java 5.0 引入底层支持了CAS操作。
在支持CAS操作的平台上,编译为响应的机器指令。
如果不支持CAS指令,JVM将使用自旋锁。
15.3 原子变量类
15.3.1 原子变量是一种“更好的volatile”
通过CAS来维持包含多个变量的不变特性条件
@ThreadSafe
public class CasNumberRange {
    //将多个变量放在一个类中,并且是final,要设置一个,就是设置所有。
    @Immutable
    private static class IntPair {
        // INVARIANT: lower <= upper
        final int lower;
        final int upper;

        public IntPair(int lower, int upper) {
            this.lower = lower;
            this.upper = upper;
        }
    }

    private final AtomicReference<IntPair> values =
            new AtomicReference<IntPair>(new IntPair(0, 0));

    public int getLower() {
        return values.get().lower;
    }

    public int getUpper() {
        return values.get().upper;
    }

    public void setLower(int i) {
        while (true) {
            //获取之前的所有变量。
            IntPair oldv = values.get();
            if (i > oldv.upper)
                throw new IllegalArgumentException("Can't set lower to " + i + " > upper");
            //构造新的变量包装类
            IntPair newv = new IntPair(i, oldv.upper);
            //设置
            if (values.compareAndSet(oldv, newv))
                return;
        }
    }

    public void setUpper(int i) {
        while (true) {
            IntPair oldv = values.get();
            if (i < oldv.lower)
                throw new IllegalArgumentException("Can't set upper to " + i + " < lower");
            IntPair newv = new IntPair(oldv.lower, i);
            if (values.compareAndSet(oldv, newv))
                return;
        }
    }
}
15.4 非阻塞算法
15.4.1 非阻塞的栈
@ThreadSafe
public class ConcurrentStack <E> {
    //保存栈顶元素
    AtomicReference<Node<E>> top = new AtomicReference<Node<E>>();

    public void push(E item) {
        Node<E> newHead = new Node<E>(item);
        Node<E> oldHead;
        do {
            oldHead = top.get();
            newHead.next = oldHead;
        } while (!top.compareAndSet(oldHead, newHead));
    }

    public E pop() {
        Node<E> oldHead;
        Node<E> newHead;
        do {
            oldHead = top.get();
            if (oldHead == null)
                return null;
            //出栈后,将next设置为栈顶
            newHead = oldHead.next;
        } while (!top.compareAndSet(oldHead, newHead));
        return oldHead.item;
    }

    private static class Node <E> {
        public final E item;
        public Node<E> next;

        public Node(E item) {
            this.item = item;
        }
    }
}
15.4.2 非阻塞的链表
15.4.4 ABA问题
针对ABA问题,解决方案:
不是更新某个引用的值,而是更新两个值,包括一个引用,一个版本号。AtomicStampedReference更新一个“对象-引用”二元组,在引用上加上版本号。AtomicMarableReference更新一个“对象引用-布尔值”。
第十六章 Java内存模型
16.1 什么是内存模型,为什么需要他
编译器生成的指令顺序,可以与源代码中的顺序不同。
编译器会把变量保存在寄存器而不是内存。
16.1.1 平台内存模型
每个处理器都有自己的缓存,不同的处理器架构提供不同级别的缓存一致性。
16.1.2 重排序
16.1.3 Java内存模型简介
《Spring源码深度解析》第七章 AOP
目录
创建AOP代理

AnnotationAwareAspectJAutoProxyCreator(AbstractAutoProxyCreator)
- 既实现了InstantiationAwareBeanPostProcessor.postProcessBeforeInstantiation()
- 又实现了BeanPostProcessor.postProcessAfterInitialization()
postProcessAfterInitialization
//AbstractAutoProxyCreator
public Object postProcessAfterInitialization(@Nullable Object bean, String beanName) throws BeansException {
   if (bean != null) {
      Object cacheKey = getCacheKey(bean.getClass(), beanName);
      if (!this.earlyProxyReferences.contains(cacheKey)) {
          //包装bean
         return wrapIfNecessary(bean, beanName, cacheKey);
      }
   }
   return bean;
}
protected Object wrapIfNecessary(Object bean, String beanName, Object cacheKey) {
if (StringUtils.hasLength(beanName) && this.targetSourcedBeans.contains(beanName)) {
return bean;
}
if (Boolean.FALSE.equals(this.advisedBeans.get(cacheKey))) {
return bean;
}
//基础类别不代理
if (isInfrastructureClass(bean.getClass()) || shouldSkip(bean.getClass(), beanName)) {
this.advisedBeans.put(cacheKey, Boolean.FALSE);
return bean;
}
// Create proxy if we have advice.
//获取增强方法Interceptors↓
Object[] specificInterceptors = getAdvicesAndAdvisorsForBean(bean.getClass(), beanName, null);
if (specificInterceptors != DO_NOT_PROXY) {
this.advisedBeans.put(cacheKey, Boolean.TRUE);
//创建代理↓
Object proxy = createProxy(
bean.getClass(), beanName, specificInterceptors, new SingletonTargetSource(bean));
this.proxyTypes.put(cacheKey, proxy.getClass());
return proxy;
}
this.advisedBeans.put(cacheKey, Boolean.FALSE);
return bean;
}获取增强getAdvicesAndAdvisorsForBean
protected Object[] getAdvicesAndAdvisorsForBean(
      Class<?> beanClass, String beanName, @Nullable TargetSource targetSource) {

   List<Advisor> advisors = findEligibleAdvisors(beanClass, beanName);
   if (advisors.isEmpty()) {
      return DO_NOT_PROXY;
   }
   return advisors.toArray();
}
protected List<Advisor> findEligibleAdvisors(Class<?> beanClass, String beanName) {
//获取候选增强器
List<Advisor> candidateAdvisors = findCandidateAdvisors();
//获取匹配增强器
List<Advisor> eligibleAdvisors = findAdvisorsThatCanApply(candidateAdvisors, beanClass, beanName);
extendAdvisors(eligibleAdvisors);
if (!eligibleAdvisors.isEmpty()) {
eligibleAdvisors = sortAdvisors(eligibleAdvisors);
}
return eligibleAdvisors;
}//org.springframework.aop.aspectj.annotation.AnnotationAwareAspectJAutoProxyCreator#findCandidateAdvisors
protected List<Advisor> findCandidateAdvisors() {
// Add all the Spring advisors found according to superclass rules.
// 根据Advisor.class来获取增强,
List<Advisor> advisors = super.findCandidateAdvisors();
// Build Advisors for all AspectJ aspects in the bean factory.
if (this.aspectJAdvisorsBuilder != null) {
//通过BeanFactoryAspectJAdvisorsBuilder构造增强
advisors.addAll(this.aspectJAdvisorsBuilder.buildAspectJAdvisors());
}
return advisors;
}//org.springframework.aop.aspectj.annotation.BeanFactoryAspectJAdvisorsBuilder#buildAspectJAdvisors
public List<Advisor> buildAspectJAdvisors() {
List<String> aspectNames = this.aspectBeanNames;
if (aspectNames == null) {
synchronized (this) {
aspectNames = this.aspectBeanNames;
if (aspectNames == null) {
List<Advisor> advisors = new ArrayList<>();
aspectNames = new ArrayList<>();
//1.获取所有Beanname
String[] beanNames = BeanFactoryUtils.beanNamesForTypeIncludingAncestors(
this.beanFactory, Object.class, true, false);
for (String beanName : beanNames) {
if (!isEligibleBean(beanName)) {
continue;
}
// We must be careful not to instantiate beans eagerly as in this case they
// would be cached by the Spring container but would not have been weaved.
Class<?> beanType = this.beanFactory.getType(beanName);
if (beanType == null) {
continue;
}
//是否有@Aspect注解
if (this.advisorFactory.isAspect(beanType)) {
aspectNames.add(beanName);
AspectMetadata amd = new AspectMetadata(beanType, beanName);
if (amd.getAjType().getPerClause().getKind() == PerClauseKind.SINGLETON) {
MetadataAwareAspectInstanceFactory factory =
new BeanFactoryAspectInstanceFactory(this.beanFactory, beanName);
//获取增强方法↓
List<Advisor> classAdvisors = this.advisorFactory.getAdvisors(factory);
if (this.beanFactory.isSingleton(beanName)) {
this.advisorsCache.put(beanName, classAdvisors);
}
else {
this.aspectFactoryCache.put(beanName, factory);
}
advisors.addAll(classAdvisors);
}
else {
// Per target or per this.
if (this.beanFactory.isSingleton(beanName)) {
throw new IllegalArgumentException("Bean with name '" + beanName +
"' is a singleton, but aspect instantiation model is not singleton");
}
MetadataAwareAspectInstanceFactory factory =
new PrototypeAspectInstanceFactory(this.beanFactory, beanName);
this.aspectFactoryCache.put(beanName, factory);
advisors.addAll(this.advisorFactory.getAdvisors(factory));
}
}
}
this.aspectBeanNames = aspectNames;
return advisors;
}
}
}
if (aspectNames.isEmpty()) {
return Collections.emptyList();
}
//记录到缓存
List<Advisor> advisors = new ArrayList<>();
for (String aspectName : aspectNames) {
List<Advisor> cachedAdvisors = this.advisorsCache.get(aspectName);
if (cachedAdvisors != null) {
advisors.addAll(cachedAdvisors);
}
else {
MetadataAwareAspectInstanceFactory factory = this.aspectFactoryCache.get(aspectName);
advisors.addAll(this.advisorFactory.getAdvisors(factory));
}
}
return advisors;
}//org.springframework.aop.aspectj.annotation.ReflectiveAspectJAdvisorFactory#getAdvisors
public List<Advisor> getAdvisors(MetadataAwareAspectInstanceFactory aspectInstanceFactory) {
//获取AspectJ类
Class<?> aspectClass = aspectInstanceFactory.getAspectMetadata().getAspectClass();
String aspectName = aspectInstanceFactory.getAspectMetadata().getAspectName();
validate(aspectClass);
// We need to wrap the MetadataAwareAspectInstanceFactory with a decorator
// so that it will only instantiate once.
MetadataAwareAspectInstanceFactory lazySingletonAspectInstanceFactory =
new LazySingletonAspectInstanceFactoryDecorator(aspectInstanceFactory);
List<Advisor> advisors = new ArrayList<>();
for (Method method : getAdvisorMethods(aspectClass)) {
//获取普通的增强器
Advisor advisor = getAdvisor(method, lazySingletonAspectInstanceFactory, advisors.size(), aspectName);
if (advisor != null) {
advisors.add(advisor);
}
}
// If it's a per target aspect, emit the dummy instantiating aspect.
//增强配置延迟初始化??
if (!advisors.isEmpty() && lazySingletonAspectInstanceFactory.getAspectMetadata().isLazilyInstantiated()) {
Advisor instantiationAdvisor = new SyntheticInstantiationAdvisor(lazySingletonAspectInstanceFactory);
advisors.add(0, instantiationAdvisor);
}
// Find introduction fields.
//@DeclareParents,@DeclareParents可以引入新的方法
for (Field field : aspectClass.getDeclaredFields()) {
Advisor advisor = getDeclareParentsAdvisor(field);
if (advisor != null) {
advisors.add(advisor);
}
}
return advisors;
}普通增强获取
//org.springframework.aop.aspectj.annotation.ReflectiveAspectJAdvisorFactory#getAdvisor
public Advisor getAdvisor(Method candidateAdviceMethod, MetadataAwareAspectInstanceFactory aspectInstanceFactory,
      int declarationOrderInAspect, String aspectName) {

   validate(aspectInstanceFactory.getAspectMetadata().getAspectClass());

    //切点信息获取
   AspectJExpressionPointcut expressionPointcut = getPointcut(
         candidateAdviceMethod, aspectInstanceFactory.getAspectMetadata().getAspectClass());
   if (expressionPointcut == null) {
      return null;
   }
	//根据切点信息生成增强器
    //根据不同的注解类型封装不同的增强器
   return new InstantiationModelAwarePointcutAdvisorImpl(expressionPointcut, candidateAdviceMethod,
         this, aspectInstanceFactory, declarationOrderInAspect, aspectName);
}
BeforeAdvice
最终都是通过MethodBeforeAdviceInterceptor来应用BeforeAdvice的,将AspectJMethodBeforeAdvice包装为Interceptor
public class MethodBeforeAdviceInterceptor implements MethodInterceptor, BeforeAdvice, Serializable {

   private final MethodBeforeAdvice advice;


   /**
    * Create a new MethodBeforeAdviceInterceptor for the given advice.
    * @param advice the MethodBeforeAdvice to wrap
    */
   public MethodBeforeAdviceInterceptor(MethodBeforeAdvice advice) {
      Assert.notNull(advice, "Advice must not be null");
      this.advice = advice;
   }


   @Override
   public Object invoke(MethodInvocation mi) throws Throwable {
       //调用advice
      this.advice.before(mi.getMethod(), mi.getArguments(), mi.getThis());
      return mi.proceed();
   }

}
AfterAdvice
与beforeAdvice不一样,AspectJAfterAdvice直接实现了MethodInterceptor。为什么和beforeAfvice要不一样呢??
public class AspectJAfterAdvice extends AbstractAspectJAdvice
      implements MethodInterceptor, AfterAdvice, Serializable {

   public AspectJAfterAdvice(
         Method aspectJBeforeAdviceMethod, AspectJExpressionPointcut pointcut, AspectInstanceFactory aif) {

      super(aspectJBeforeAdviceMethod, pointcut, aif);
   }


   @Override
   public Object invoke(MethodInvocation mi) throws Throwable {
      try {
         return mi.proceed();
      }
      finally {
         invokeAdviceMethod(getJoinPointMatch(), null, null);
      }
   }

   @Override
   public boolean isBeforeAdvice() {
      return false;
   }

   @Override
   public boolean isAfterAdvice() {
      return true;
   }

}
获取匹配增强器
public static List<Advisor> findAdvisorsThatCanApply(List<Advisor> candidateAdvisors, Class<?> clazz) {
   if (candidateAdvisors.isEmpty()) {
      return candidateAdvisors;
   }
   List<Advisor> eligibleAdvisors = new ArrayList<>();
    //IntroductionAdvisor,先处理引介增强
   for (Advisor candidate : candidateAdvisors) {
      if (candidate instanceof IntroductionAdvisor && canApply(candidate, clazz)) {
         eligibleAdvisors.add(candidate);
      }
   }
   boolean hasIntroductions = !eligibleAdvisors.isEmpty();
   for (Advisor candidate : candidateAdvisors) {
      if (candidate instanceof IntroductionAdvisor) {
         // already processed
         continue;
      }
       //普通bean
      if (canApply(candidate, clazz, hasIntroductions)) {
         eligibleAdvisors.add(candidate);
      }
   }
   return eligibleAdvisors;
}
创建代理类
protected Object createProxy(Class<?><?> beanClass, @Nullable String beanName,
      @Nullable Object[] specificInterceptors, TargetSource targetSource) {

   if (this.beanFactory instanceof ConfigurableListableBeanFactory) {
      AutoProxyUtils.exposeTargetClass((ConfigurableListableBeanFactory) this.beanFactory, beanName, beanClass);
   }

   ProxyFactory proxyFactory = new ProxyFactory();
   proxyFactory.copyFrom(this);

   if (!proxyFactory.isProxyTargetClass()) {
      if (shouldProxyTargetClass(beanClass, beanName)) {
         proxyFactory.setProxyTargetClass(true);
      }
      else {
         evaluateProxyInterfaces(beanClass, proxyFactory);
      }
   }
	//将拦截器interceptor(MethodInterceptor和有Adapter的advice)封装为Advice
   Advisor[] advisors = buildAdvisors(beanName, specificInterceptors);
    //加入增强器
   proxyFactory.addAdvisors(advisors);
    //需要代理的类
   proxyFactory.setTargetSource(targetSource);
   customizeProxyFactory(proxyFactory);

   proxyFactory.setFrozen(this.freezeProxy);
   if (advisorsPreFiltered()) {
      proxyFactory.setPreFiltered(true);
   }

   return proxyFactory.getProxy(getProxyClassLoader());
}
将拦截器interceptor(MethodInterceptor)封装为Advice
protected Advisor[] buildAdvisors(@Nullable String beanName, @Nullable Object[] specificInterceptors) {
	// Handle prototypes correctly...
	Advisor[] commonInterceptors = resolveInterceptorNames();

	List<Object> allInterceptors = new ArrayList<>();
	if (specificInterceptors != null) {
		allInterceptors.addAll(Arrays.asList(specificInterceptors));
		if (commonInterceptors.length > 0) {
			if (this.applyCommonInterceptorsFirst) {
				allInterceptors.addAll(0, Arrays.asList(commonInterceptors));
			}
			else {
				allInterceptors.addAll(Arrays.asList(commonInterceptors));
			}
		}
	}
	if (logger.isDebugEnabled()) {
		int nrOfCommonInterceptors = commonInterceptors.length;
		int nrOfSpecificInterceptors = (specificInterceptors != null ? specificInterceptors.length : 0);
		logger.debug("Creating implicit proxy for bean '" + beanName + "' with " + nrOfCommonInterceptors +
				" common interceptors and " + nrOfSpecificInterceptors + " specific interceptors");
	}

	Advisor[] advisors = new Advisor[allInterceptors.size()];
	for (int i = 0; i < allInterceptors.size(); i++) {
        //拦截器包装为advisor
		advisors[i] = this.advisorAdapterRegistry.wrap(allInterceptors.get(i));
	}
	return advisors;
}
public Advisor wrap(Object adviceObject) throws UnknownAdviceTypeException {
//本身是advisor类型,不处理
if (adviceObject instanceof Advisor) {
return (Advisor) adviceObject;
}
//不是advice,抛异常。
if (!(adviceObject instanceof Advice)) {
throw new UnknownAdviceTypeException(adviceObject);
}
Advice advice = (Advice) adviceObject;
//MethodInterceptor包装
if (advice instanceof MethodInterceptor) {
// So well-known it doesn't even need an adapter.
return new DefaultPointcutAdvisor(advice);
}
//如果存在对应的适配器,adapter也需要包装
for (AdvisorAdapter adapter : this.adapters) {
// Check that it is supported.
if (adapter.supportsAdvice(advice)) {
return new DefaultPointcutAdvisor(advice);
}
}
throw new UnknownAdviceTypeException(advice);
}ProxyFactory创建代理
public Object getProxy(@Nullable ClassLoader classLoader) {
	//先创建代理类,再获取代理
   return createAopProxy().getProxy(classLoader);
}
1. 创建代理类
public AopProxy createAopProxy(AdvisedSupport config) throws AopConfigException {
   if (config.isOptimize() || config.isProxyTargetClass() || hasNoUserSuppliedProxyInterfaces(config)) {
      Class<?> targetClass = config.getTargetClass();
      if (targetClass == null) {
         throw new AopConfigException("TargetSource cannot determine target class: " +
               "Either an interface or a target is required for proxy creation.");
      }
       //如果被代理的类是一个接口,或者被代理的类是使用Jdk代理生成的类,此时还是使用Jdk代理
      if (targetClass.isInterface() || Proxy.isProxyClass(targetClass)) {
         return new JdkDynamicAopProxy(config);
      }
      return new ObjenesisCglibAopProxy(config);
   }
   else {
      return new JdkDynamicAopProxy(config);
   }
}
创建JDKProxy或者CglibProxy,判断条件:
- optimize:不推荐,
- proxyTargetClass
- hasNoUserSuppliedProxyInterfaces:是否存在代理接口
如何强制使用Cglib?配置proxy-target-class="true"
2.获取代理
# JDK 代理
public Object getProxy(@Nullable ClassLoader classLoader) {
   if (logger.isDebugEnabled()) {
      logger.debug("Creating JDK dynamic proxy: target source is " + this.advised.getTargetSource());
   }
    // 完善代理对象需要实现的接口,主要是会默认增加三个需要实现的接口:SpringProxy,
    // Advised和DecoratingProxy。这三个接口的作用主要如下:
    // SpringProxy:该接口没有任何方法,主要用于标识当前对象是Spring生成的代理对象;
    // Advised:用于封装生成代理对象所需要的所有信息;
    // DecoratingProxy:其有一个getDecoratedClass()方法,用于返回当前代理对象的目标对象的Class类型
   Class<?>[] proxiedInterfaces = AopProxyUtils.completeProxiedInterfaces(this.advised, true);
    // 找到接口中是否包含有equals()和hashCode()方法,并进行标识
   findDefinedEqualsAndHashCodeMethods(proxiedInterfaces);
    // 使用动态代理生成代理对象
   return Proxy.newProxyInstance(classLoader, proxiedInterfaces, this);
}
动态代理一定有invoke 方法
public Object invoke(Object proxy, Method method, Object[] args) throws Throwable {
   MethodInvocation invocation;
   Object oldProxy = null;
   boolean setProxyContext = false;

   TargetSource targetSource = this.advised.targetSource;
   Object target = null;

   try {
      if (!this.equalsDefined && AopUtils.isEqualsMethod(method)) {
         // The target does not implement the equals(Object) method itself.
          // 如果当前方法是equals()方法,并且接口中并未定义该方法,就使用自动生成的equals()方法
         return equals(args[0]);
      }
      else if (!this.hashCodeDefined && AopUtils.isHashCodeMethod(method)) {
         // The target does not implement the hashCode() method itself.
          //如果是hashCode方法,自动生成
         return hashCode();
      }
      else if (method.getDeclaringClass() == DecoratingProxy.class) {
         // There is only getDecoratedClass() declared -> dispatch to proxy config.
         return AopProxyUtils.ultimateTargetClass(this.advised);
      }
      else if (!this.advised.opaque && method.getDeclaringClass().isInterface() &&
            method.getDeclaringClass().isAssignableFrom(Advised.class)) {
         // Service invocations on ProxyConfig with the proxy config...
         return AopUtils.invokeJoinpointUsingReflection(this.advised, method, args);
      }

      Object retVal;

      if (this.advised.exposeProxy) {
         // Make invocation available if necessary.
         oldProxy = AopContext.setCurrentProxy(proxy);
         setProxyContext = true;
      }

      // Get as late as possible to minimize the time we "own" the target,
      // in case it comes from a pool.
      target = targetSource.getTarget();
      Class<?> targetClass = (target != null ? target.getClass() : null);

      // Get the interception chain for this method.
       //获取调用拦截器链
      List<Object> chain = this.advised.getInterceptorsAndDynamicInterceptionAdvice(method, targetClass);

      // Check whether we have any advice. If we don't, we can fallback on direct
      // reflective invocation of the target, and avoid creating a MethodInvocation.
      if (chain.isEmpty()) {
         // We can skip creating a MethodInvocation: just invoke the target directly
         // Note that the final invoker must be an InvokerInterceptor so we know it does
         // nothing but a reflective operation on the target, and no hot swapping or fancy proxying.
         Object[] argsToUse = AopProxyUtils.adaptArgumentsIfNecessary(method, args);
         retVal = AopUtils.invokeJoinpointUsingReflection(target, method, argsToUse);
      }
      else {
         // We need to create a method invocation...
          //使用ReflectiveMethodInvocation封装拦截器链。
         invocation = new ReflectiveMethodInvocation(proxy, target, method, args, targetClass, chain);
         // Proceed to the joinpoint through the interceptor chain.
          //执行拦截器链,在ReflectiveMethodInvocation中逐一调用拦截器。
         retVal = invocation.proceed();
      }

      // Massage return value if necessary.
      Class<?> returnType = method.getReturnType();
      if (retVal != null && retVal == target &&
            returnType != Object.class && returnType.isInstance(proxy) &&
            !RawTargetAccess.class.isAssignableFrom(method.getDeclaringClass())) {
         // Special case: it returned "this" and the return type of the method
         // is type-compatible. Note that we can't help if the target sets
         // a reference to itself in another returned object.
         retVal = proxy;
      }
      else if (retVal == null && returnType != Void.TYPE && returnType.isPrimitive()) {
         throw new AopInvocationException(
               "Null return value from advice does not match primitive return type for: " + method);
      }
      return retVal;
   }
   finally {
      if (target != null && !targetSource.isStatic()) {
         // Must have come from TargetSource.
         targetSource.releaseTarget(target);
      }
      if (setProxyContext) {
         // Restore old proxy.
         AopContext.setCurrentProxy(oldProxy);
      }
   }
}参考:https://my.oschina.net/zhangxufeng/blog/1934124
还有CGLIB注入
CGLIB织入分两种
- 一种动态运行期织入
- 一种静态编译器织入(load-time-weaver)
HandlerAdapter源码分析
目录
- HandlerAdapter
- RequestMappingHandlerAdapter
- ModelAndViewContainer
- SessionAttributeHandler&SessionAttributeStore
- ModelFactory
- ServletInvocableHandlerMethod
- HandlerMethodArgumentResolver
- HandlerMethodReturnValueHandler
HandlerAdapter
就是使用HandlerAdapter调用Handler处理请求。
处理步骤
- 准备处理器所需参数
- 处理请求
- 处理返回值,处理成ModelAndView
处理参数最麻烦
有哪些参数需要处理?
- request中的参数(url、post、head)
- cookie中的参数
- session参数
- FlashMap参数
- @SessionAttributes 参数
- @ModelAttribute参数
解析参数使用ArgumentResolver
@InitBinder 方法也需要ArgumentResolver 但和Handler使用的不是一套的。
RequestMappingHandlerAdapter
构造 RequestMappingHandlerAdapter
六大组件
public class RequestMappingHandlerAdapter extends AbstractHandlerMethodAdapter
      implements BeanFactoryAware, InitializingBean {

   @Nullable
   private List<HandlerMethodArgumentResolver> customArgumentResolvers;

	//处理器方法 & @ModelAttribute
   @Nullable
   private HandlerMethodArgumentResolverComposite argumentResolvers;

	//@InitBinder参数
   @Nullable
   private HandlerMethodArgumentResolverComposite initBinderArgumentResolvers;

   @Nullable
   private List<HandlerMethodReturnValueHandler> customReturnValueHandlers;

	//返回值 -> ModelAndView
   @Nullable
   private HandlerMethodReturnValueHandlerComposite returnValueHandlers;

   @Nullable
   private List<ModelAndViewResolver> modelAndViewResolvers;

   private ContentNegotiationManager contentNegotiationManager = new ContentNegotiationManager();

	private List<HttpMessageConverter<?>> messageConverters;

	//保存ResponseBodyAdvice 接口类
	private List<Object> requestResponseBodyAdvice = new ArrayList<>();

	@Nullable
	private WebBindingInitializer webBindingInitializer;

	private AsyncTaskExecutor taskExecutor = new SimpleAsyncTaskExecutor("MvcAsync");

	@Nullable
	private Long asyncRequestTimeout;

	private CallableProcessingInterceptor[] callableInterceptors = new CallableProcessingInterceptor[0];

	private DeferredResultProcessingInterceptor[] deferredResultInterceptors = new DeferredResultProcessingInterceptor[0];

	private ReactiveAdapterRegistry reactiveAdapterRegistry = ReactiveAdapterRegistry.getSharedInstance();

	private boolean ignoreDefaultModelOnRedirect = false;

	private int cacheSecondsForSessionAttributeHandlers = 0;

	private boolean synchronizeOnSession = false;

	private SessionAttributeStore sessionAttributeStore = new DefaultSessionAttributeStore();

	private ParameterNameDiscoverer parameterNameDiscoverer = new DefaultParameterNameDiscoverer();

	@Nullable
	private ConfigurableBeanFactory beanFactory;


	private final Map<Class<?>, SessionAttributesHandler> sessionAttributesHandlerCache = new ConcurrentHashMap<>(64);

	private final Map<Class<?>, Set<Method>> initBinderCache = new ConcurrentHashMap<>(64);

	@ControllerAdvice 中的@ModelAttribute @InitBinder方法
	private final Map<ControllerAdviceBean, Set<Method>> initBinderAdviceCache = new LinkedHashMap<>();

	private final Map<Class<?>, Set<Method>> modelAttributeCache = new ConcurrentHashMap<>(64);

	private final Map<ControllerAdviceBean, Set<Method>> modelAttributeAdviceCache = new LinkedHashMap<>();
afterPropertiesSet() 初始化
public void afterPropertiesSet() {
   // Do this first, it may add ResponseBody advice beans
    //初始化注释@ControllerAdvice类,设置到cache中。
   initControllerAdviceCache();

   if (this.argumentResolvers == null) {
      List<HandlerMethodArgumentResolver> resolvers = getDefaultArgumentResolvers();
       //都是构造xxxComposite类型,责任链模式,持有多个Resolver,逐一调用。
      this.argumentResolvers = new HandlerMethodArgumentResolverComposite().addResolvers(resolvers);
   }
   if (this.initBinderArgumentResolvers == null) {
      List<HandlerMethodArgumentResolver> resolvers = getDefaultInitBinderArgumentResolvers();
      this.initBinderArgumentResolvers = new HandlerMethodArgumentResolverComposite().addResolvers(resolvers);
   }
   if (this.returnValueHandlers == null) {
      List<HandlerMethodReturnValueHandler> handlers = getDefaultReturnValueHandlers();
      this.returnValueHandlers = new HandlerMethodReturnValueHandlerComposite().addHandlers(handlers);
   }
}
初始化@ControllerAdvice的Bean:initControllerAdviceCache
设置到cache中。
//处理@ControllerAdvice的Bean
private void initControllerAdviceCache() {
   if (getApplicationContext() == null) {
      return;
   }
   if (logger.isInfoEnabled()) {
      logger.info("Looking for @ControllerAdvice: " + getApplicationContext());
   }

    //获取所有@ControllerAdvice的bean
   List<ControllerAdviceBean> adviceBeans = ControllerAdviceBean.findAnnotatedBeans(getApplicationContext());
   AnnotationAwareOrderComparator.sort(adviceBeans);

   List<Object> requestResponseBodyAdviceBeans = new ArrayList<>();

   for (ControllerAdviceBean adviceBean : adviceBeans) {
      Class<?> beanType = adviceBean.getBeanType();
      if (beanType == null) {
         throw new IllegalStateException("Unresolvable type for ControllerAdviceBean: " + adviceBean);
      }
       //public static final MethodFilter MODEL_ATTRIBUTE_METHODS = method ->
      //((AnnotationUtils.findAnnotation(method, RequestMapping.class) == null) &&
      //(AnnotationUtils.findAnnotation(method, ModelAttribute.class) != null));
       //有@ModelAttribute而没有@RequestMapping的 方法。MethodIntrospector
      Set<Method> attrMethods = MethodIntrospector.selectMethods(beanType, MODEL_ATTRIBUTE_METHODS);
      if (!attrMethods.isEmpty()) {
          //设置到cache中
         this.modelAttributeAdviceCache.put(adviceBean, attrMethods);
         if (logger.isInfoEnabled()) {
            logger.info("Detected @ModelAttribute methods in " + adviceBean);
         }
      }
       //注视了@InitBinder 方法
      Set<Method> binderMethods = MethodIntrospector.selectMethods(beanType, INIT_BINDER_METHODS);
      if (!binderMethods.isEmpty()) {
         this.initBinderAdviceCache.put(adviceBean, binderMethods);
         if (logger.isInfoEnabled()) {
            logger.info("Detected @InitBinder methods in " + adviceBean);
         }
      }
       //RequestBodyAdvice接口的类
      if (RequestBodyAdvice.class.isAssignableFrom(beanType)) {
         requestResponseBodyAdviceBeans.add(adviceBean);
         if (logger.isInfoEnabled()) {
            logger.info("Detected RequestBodyAdvice bean in " + adviceBean);
         }
      }
       //ResponseBodyAdvice接口类
      if (ResponseBodyAdvice.class.isAssignableFrom(beanType)) {
         requestResponseBodyAdviceBeans.add(adviceBean);
         if (logger.isInfoEnabled()) {
            logger.info("Detected ResponseBodyAdvice bean in " + adviceBean);
         }
      }
   }

   if (!requestResponseBodyAdviceBeans.isEmpty()) {
       //注册requestResponseBodyAdvice有两种方式
       //1. 直接注册到RequestMappingHandlerAdapter
       //2. 通过@ControllerAdvice 注册(此处表明,优先级高)
      this.requestResponseBodyAdvice.addAll(0, requestResponseBodyAdviceBeans);
   }
}
获取默认Resolver:getDefaultArgumentResolvers
四种ArgumentResolvers
- annotation
- type
- 自定义
- 所有类型
按优先级排序,自定义处理器优先级低于系统自带处理器
private List<HandlerMethodArgumentResolver> getDefaultArgumentResolvers() {
   List<HandlerMethodArgumentResolver> resolvers = new ArrayList<>();

   // Annotation-based argument resolution
   resolvers.add(new RequestParamMethodArgumentResolver(getBeanFactory(), false));
   resolvers.add(new RequestParamMapMethodArgumentResolver());
   resolvers.add(new PathVariableMethodArgumentResolver());
   resolvers.add(new PathVariableMapMethodArgumentResolver());
   resolvers.add(new MatrixVariableMethodArgumentResolver());
   resolvers.add(new MatrixVariableMapMethodArgumentResolver());
   resolvers.add(new ServletModelAttributeMethodProcessor(false));
   resolvers.add(new RequestResponseBodyMethodProcessor(getMessageConverters(), this.requestResponseBodyAdvice));
   resolvers.add(new RequestPartMethodArgumentResolver(getMessageConverters(), this.requestResponseBodyAdvice));
   resolvers.add(new RequestHeaderMethodArgumentResolver(getBeanFactory()));
   resolvers.add(new RequestHeaderMapMethodArgumentResolver());
   resolvers.add(new ServletCookieValueMethodArgumentResolver(getBeanFactory()));
   resolvers.add(new ExpressionValueMethodArgumentResolver(getBeanFactory()));
   resolvers.add(new SessionAttributeMethodArgumentResolver());
   resolvers.add(new RequestAttributeMethodArgumentResolver());

   // Type-based argument resolution
   resolvers.add(new ServletRequestMethodArgumentResolver());
   resolvers.add(new ServletResponseMethodArgumentResolver());
   resolvers.add(new HttpEntityMethodProcessor(getMessageConverters(), this.requestResponseBodyAdvice));
   resolvers.add(new RedirectAttributesMethodArgumentResolver());
   resolvers.add(new ModelMethodProcessor());
   resolvers.add(new MapMethodProcessor());
   resolvers.add(new ErrorsMethodArgumentResolver());
   resolvers.add(new SessionStatusMethodArgumentResolver());
   resolvers.add(new UriComponentsBuilderMethodArgumentResolver());

   // Custom arguments
   if (getCustomArgumentResolvers() != null) {
      resolvers.addAll(getCustomArgumentResolvers());
   }

   // Catch-all
   resolvers.add(new RequestParamMethodArgumentResolver(getBeanFactory(), true));
   resolvers.add(new ServletModelAttributeMethodProcessor(true));

   return resolvers;
}
使用RequestMappingHandlerAdapter
处理请求:handleInternal
- 使用Adapter调用HandlerMethod
protected ModelAndView handleInternal(HttpServletRequest request,
      HttpServletResponse response, HandlerMethod handlerMethod) throws Exception {

   ModelAndView mav;
    //默认不检查请求类型,默认配置为支持POST\GET\HEAD,但不检查。
   checkRequest(request);

   // Execute invokeHandlerMethod in synchronized block if required.
    //同步Session,同时多个Ajax发请求,修改同一个session?
   if (this.synchronizeOnSession) {
      HttpSession session = request.getSession(false);
      if (session != null) {
         Object mutex = WebUtils.getSessionMutex(session);
         synchronized (mutex) {
            mav = invokeHandlerMethod(request, response, handlerMethod);
         }
      }
      else {
         // No HttpSession available -> no mutex necessary
         mav = invokeHandlerMethod(request, response, handlerMethod);
      }
   }
   else {
      // No synchronization on session demanded at all...
      mav = invokeHandlerMethod(request, response, handlerMethod);
   }

    //response不包含Cache-Control,【也就是如果response设置了Cache-Control,@SessionAttribute就失效了?】
   if (!response.containsHeader(HEADER_CACHE_CONTROL)) {
       //@SessionAttributes
      if (getSessionAttributesHandler(handlerMethod).hasSessionAttributes()) {
          //给response设置过期时间。Pragma、Expires
         applyCacheSeconds(response, this.cacheSecondsForSessionAttributeHandlers);
      }
      else {
         prepareResponse(response);
      }
   }

   return mav;
}
调用HandlerMethod:invokeHandlerMethod
- 从handlerMethod中找@InitBinder方法
- 从handlerMethod中找@ModelAttribute
- 构建ServletInvocableHandlerMethod,添加组件
- argumentResolvers
- returnValueHandlers
- binderFactory
- parameterNameDiscoverer
protected ModelAndView invokeHandlerMethod(HttpServletRequest request,
      HttpServletResponse response, HandlerMethod handlerMethod) throws Exception {

    //为什么要包装ServletWebRequest(adapter?),ArgumentResolvers中使用的是ServletWebRequest
   ServletWebRequest webRequest = new ServletWebRequest(request, response);
   try {
       //从handlerMethod中找@InitBinder方法
       //创建@InitBinder方法(ServletRequestDataBinderFactory)
       //@InitBinder包含两部分:1.@ControllerAdvice中的InitBinder方法,2.自身的InitBinder方法
       //先添加全局,再添加自身。
       //自身InitBinder被调用一次后保存到缓存,全局InitBinder在创建RequestMappingHandlerAdapter时已经缓存。
      WebDataBinderFactory binderFactory = getDataBinderFactory(handlerMethod);
       //从handlerMethod中找@ModelAttribute
       //ModelFactory用来处理Model,
       //	1. 在处理器处理之前,model初始化
       //	2. 处理器处理之后,model更新。
       //对Model初始化:
       //	1. SessionAttribute 设置到 Model
       //	2. @ModelAttribute 设置到 Model
       //	3. @ModelAttribute有&SessionAttribute有&mavContainer没有,从SessionAttribute中取
       //对Model更新:
       //	1. 如果调用了SessionStatus.setComplete,将SessionAttribute清空
       //	2. 将mavContainer的defaultModel对应的参数设置到SessionAttribute,按需要设置BindingResult
      ModelFactory modelFactory = getModelFactory(handlerMethod, binderFactory);

       //构建ServletInvocableHandlerMethod
      ServletInvocableHandlerMethod invocableMethod = createInvocableHandlerMethod(handlerMethod);
      if (this.argumentResolvers != null) {
         invocableMethod.setHandlerMethodArgumentResolvers(this.argumentResolvers);
      }
      if (this.returnValueHandlers != null) {
         invocableMethod.setHandlerMethodReturnValueHandlers(this.returnValueHandlers);
      }
      invocableMethod.setDataBinderFactory(binderFactory);
      invocableMethod.setParameterNameDiscoverer(this.parameterNameDiscoverer);

       //新建ModelAndViewContainer
       //ModelAndView和ModelAndViewContainer有什么关系
      ModelAndViewContainer mavContainer = new ModelAndViewContainer();
       //1.设置FlashMap到Model
      mavContainer.addAllAttributes(RequestContextUtils.getInputFlashMap(request));
       //2. ↓
      modelFactory.initModel(webRequest, mavContainer, invocableMethod);
      mavContainer.setIgnoreDefaultModelOnRedirect(this.ignoreDefaultModelOnRedirect);

      AsyncWebRequest asyncWebRequest = WebAsyncUtils.createAsyncWebRequest(request, response);
      asyncWebRequest.setTimeout(this.asyncRequestTimeout);

      WebAsyncManager asyncManager = WebAsyncUtils.getAsyncManager(request);
      asyncManager.setTaskExecutor(this.taskExecutor);
      asyncManager.setAsyncWebRequest(asyncWebRequest);
      asyncManager.registerCallableInterceptors(this.callableInterceptors);
      asyncManager.registerDeferredResultInterceptors(this.deferredResultInterceptors);

      if (asyncManager.hasConcurrentResult()) {
         Object result = asyncManager.getConcurrentResult();
         mavContainer = (ModelAndViewContainer) asyncManager.getConcurrentResultContext()[0];
         asyncManager.clearConcurrentResult();
         if (logger.isDebugEnabled()) {
            logger.debug("Found concurrent result value [" + result + "]");
         }
         invocableMethod = invocableMethod.wrapConcurrentResult(result);
      }

       //执行
      invocableMethod.invokeAndHandle(webRequest, mavContainer);
      if (asyncManager.isConcurrentHandlingStarted()) {
         return null;
      }

       //后置处理
       //	1.调用ModelFactory.updateModel(包括设置了SessionAttributes,给Model设置BindingResult)
       //		只有defaultModel(不是Redirect),才设置SessionAttribute、BindingResult
       //	2.创建ModelAndView
       //	3.RedirectAttribute 类型,设置到FlashMap
      return getModelAndView(mavContainer, modelFactory, webRequest);
   }
   finally {
      webRequest.requestCompleted();
   }
}
private ModelFactory getModelFactory(HandlerMethod handlerMethod, WebDataBinderFactory binderFactory) {
SessionAttributesHandler sessionAttrHandler = getSessionAttributesHandler(handlerMethod);
Class<?> handlerType = handlerMethod.getBeanType();
Set<Method> methods = this.modelAttributeCache.get(handlerType);
if (methods == null) {
//有@ModelAttribute 没有@RequestMapping
methods = MethodIntrospector.selectMethods(handlerType, MODEL_ATTRIBUTE_METHODS);
this.modelAttributeCache.put(handlerType, methods);
}
List<InvocableHandlerMethod> attrMethods = new ArrayList<>();
// Global methods first
//全局@ModelAttribute方法
this.modelAttributeAdviceCache.forEach((clazz, methodSet) -> {
if (clazz.isApplicableToBeanType(handlerType)) {
Object bean = clazz.resolveBean();
for (Method method : methodSet) {
//先添加全局的@ModelAttribute方法
attrMethods.add(createModelAttributeMethod(binderFactory, bean, method));
}
}
});
for (Method method : methods) {
Object bean = handlerMethod.getBean();
attrMethods.add(createModelAttributeMethod(binderFactory, bean, method));
}
return new ModelFactory(attrMethods, binderFactory, sessionAttrHandler);
}ModelFactory
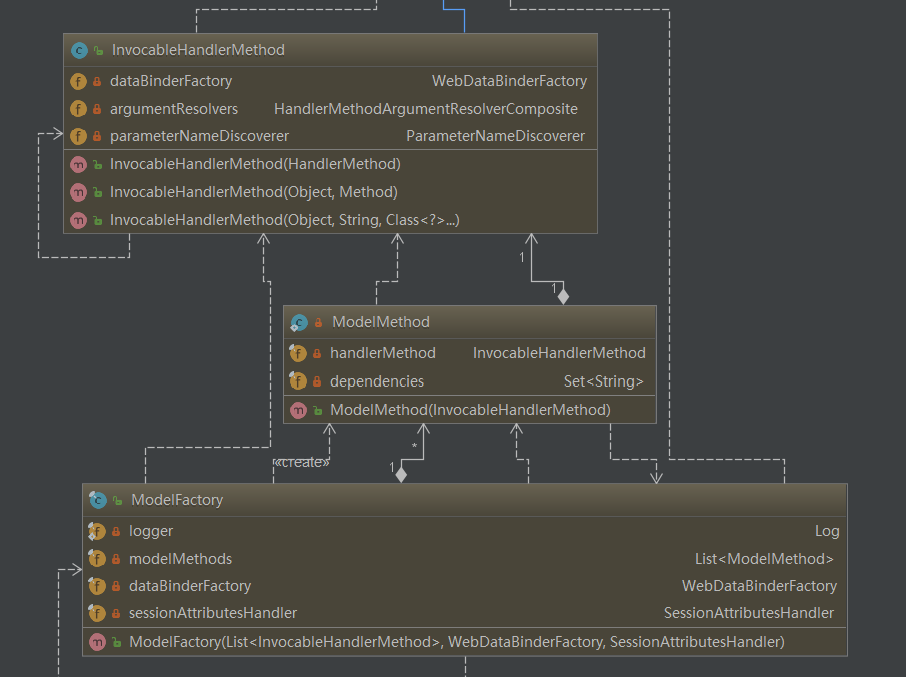
-
List
ModelFactory中持有List, modelMethod中持有handlerMethod外,还有dependencies,dependencies保存ModelMethod 要设置到Model中的属性名。
//attrName就在dependencies中。
@ModelAttribute("attrName")
public String setModelTest() {
    return "TestName";
}-
WebDataBinderFactory
ModelFactory中需要WebDataBinderFactory?在最后updateBindingResult的时候需要dataBinder.getBindingResult()
-
SessionAttributeHandler
用来操作Session,最终request.setAttribute(storeAttributeName, attributeValue, WebRequest.SCOPE_SESSION);
modelFactory.initModel
public void initModel(NativeWebRequest request, ModelAndViewContainer container, HandlerMethod handlerMethod)
      throws Exception {
	//1. 设置sessionAttributes,mergeAttributes有则不添加
   Map<String, ?> sessionAttributes = this.sessionAttributesHandler.retrieveAttributes(request);
   container.mergeAttributes(sessionAttributes);
    //2. 执行@ModelAttribute方法
    //	如果container中没有这个Attribute,就添加。
   invokeModelAttributeMethods(request, container);

    //查找既有@ModelAttribute 方法的参数,有在@SessionAttribute中有。
   for (String name : findSessionAttributeArguments(handlerMethod)) {
      if (!container.containsAttribute(name)) {
         Object value = this.sessionAttributesHandler.retrieveAttribute(request, name);
          //从session中取不到,就抛异常
         if (value == null) {
            throw new HttpSessionRequiredException("Expected session attribute '" + name + "'", name);
         }
          //添加到container,之前sessionAttributesHandler不是已经添加过了么?
         container.addAttribute(name, value);
      }
   }
}
ModelAndViewContainer
两个Model,container根据条件返回一个。
//RedirectAttributes类型的参数,ArgumentResolvers会传入redirectModel
private ModelMap redirectModel;

//Model、ModelMap、ArgumentResolver传入
private final ModelMap defaultModel = new BindingAwareModelMap();


private boolean redirectModelScenario = false;
private boolean ignoreDefaultModelOnRedirect = false;

//SessionAttribute是否已经用完
private final SessionStatus sessionStatus = new SimpleSessionStatus();
//是否已经全部处理完(true,不再处理直接返回),
//@ResponseBody或者返回类型HttpEntity,都会将requestHandled设置为true。getModelAndView中直接返回null,不会设置view。
private boolean requestHandled = false;
- 返回redirectModel的情况:
- 返回redirect视图[判断redirect是通过redirectModelScenario属性,redirectModelScenario在ReturnValueHandler中设置] & (redirectModel != null || ignoreDefaultModelOnRedirect = true)

TestModelMap extends ModelMap implements Model 这么设计也不是很明白用意
为什么不TestModelMap extends LinkedHashMap implements Model?
SessionAttributeHandler&SessionAttributeStore
由RequestMappingHandlerAdapter持有
private final Map<Class<?>, SessionAttributesHandler> sessionAttributesHandlerCache = new ConcurrentHashMap<>(64);构造ModelFactory会将sessionAttrHandler传入。由ModelFactory使用
//org.springframework.web.servlet.mvc.method.annotation.RequestMappingHandlerAdapter#getModelFactory
return new ModelFactory(attrMethods, binderFactory, sessionAttrHandler);
public class SessionAttributesHandler {
//@SessionAttribute 中的value
private final Set<String> attributeNames = new HashSet<>();
//@SessionAttribute 中的type
private final Set<Class<?>> attributeTypes = new HashSet<>();
//保存所有已知的可以被当作处理器处理的属性名。
private final Set<String> knownAttributeNames = Collections.newSetFromMap(new ConcurrentHashMap<>(4));
private final SessionAttributeStore sessionAttributeStore;SessionAttributeStore完成对具体的每个参数的保存、取回、删除操作。最终调用WebRequest方法。
request.setAttribute(storeAttributeName, attributeValue, WebRequest.SCOPE_SESSION);ModelFactory
作用:
- 初始化Model
- 处理器执行后,更新SessionAttribute
初始化Model
public void initModel(NativeWebRequest request, ModelAndViewContainer container, HandlerMethod handlerMethod)
      throws Exception {
	//1. 设置sessionAttributes,mergeAttributes有则不添加
   Map<String, ?> sessionAttributes = this.sessionAttributesHandler.retrieveAttributes(request);
   container.mergeAttributes(sessionAttributes);
    //2. 执行@ModelAttribute方法
    //	如果container中没有这个Attribute,就添加。
    //	如果container中已存在name,那么都不用执行@ModelAttribute方法。
    // 	其中还涉及到name的转换。
   invokeModelAttributeMethods(request, container);

    //3. 查找既有@ModelAttribute**方法的参数**,有在@SessionAttribute中有。
    //	这个SessionAttribute中有,可能不是本handler自己设置的,而是其他handler设置的。
   for (String name : findSessionAttributeArguments(handlerMethod)) {
      if (!container.containsAttribute(name)) {
         Object value = this.sessionAttributesHandler.retrieveAttribute(request, name);
          //从session中取不到,就抛异常
         if (value == null) {
            throw new HttpSessionRequiredException("Expected session attribute '" + name + "'", name);
         }
          //添加到container,之前sessionAttributesHandler不是已经添加过了么?
         container.addAttribute(name, value);
      }
   }
}
Model参数优先级
- FlashMap
- SessionAttribute
- @ModelAttribute(全局优先,局部次之)
- @ModelAttribute 又 @SessionAttribute 方法参数
更新Model
- 如果调用了SessionStatus#setComplete,将SessionAttribute清空。否则将defaultModel中的相应的参数设置到SessionAttribute。
- 判断是否已经处理完成,redirect类型返回值。(需不需要渲染页面)如果需要渲染,给Model中相应的参数设置BindingResult(有什么用?)。
//org.springframework.web.method.annotation.ModelFactory#updateBindingResult
private void updateBindingResult(NativeWebRequest request, ModelMap model) throws Exception {
   List<String> keyNames = new ArrayList<>(model.keySet());
   for (String name : keyNames) {
      Object value = model.get(name);
       //判断是否设置BindingResult
       //如果不是BindingResult、null、数组、Collection、Map、简单类型就为true
       //如果是这些类型,但在SessionAttribute中也设置了(除了BindingResult),也为true
      if (value != null && isBindingCandidate(name, value)) {
         String bindingResultKey = BindingResult.MODEL_KEY_PREFIX + name;
         if (!model.containsAttribute(bindingResultKey)) {
            WebDataBinder dataBinder = this.dataBinderFactory.createBinder(request, value, name);
            model.put(bindingResultKey, dataBinder.getBindingResult());
         }
      }
   }
}
Redirect转发后的参数怎么校验
-
通过SessionAttribute传递
@SessionAttributes(type={BindingResult.class}),所有BindingResult都会被放入SessionAttribute。
-
重新校验
SpringMVC使用ModelAttributeMethodProcessor来校验参数。校验后将结果设置到BindingResult。
ServletInvocableHandlerMethod
HandlerMethod
InvocableHandlerMethod
增加了调用功能(Invocable),@InitBinder方法和注释了@ModelAttribute方法封装成了InvocableHandlerMethod
public class InvocableHandlerMethod extends HandlerMethod {

   @Nullable
    //创建WebDataBinder,用于ArgumentResolver中
   private WebDataBinderFactory dataBinderFactory;

    //ArgumentResolvers
   private HandlerMethodArgumentResolverComposite argumentResolvers = new HandlerMethodArgumentResolverComposite();

    //获取参数名。
   private ParameterNameDiscoverer parameterNameDiscoverer = new DefaultParameterNameDiscoverer();
invokeForRequest
public Object invokeForRequest(NativeWebRequest request, @Nullable ModelAndViewContainer mavContainer,
      Object... providedArgs) throws Exception {

    //获取参数
   Object[] args = getMethodArgumentValues(request, mavContainer, providedArgs);
   if (logger.isTraceEnabled()) {
      logger.trace("Invoking '" + ClassUtils.getQualifiedMethodName(getMethod(), getBeanType()) +
            "' with arguments " + Arrays.toString(args));
   }
    //执行
   Object returnValue = doInvoke(args);
   if (logger.isTraceEnabled()) {
      logger.trace("Method [" + ClassUtils.getQualifiedMethodName(getMethod(), getBeanType()) +
            "] returned [" + returnValue + "]");
   }
   return returnValue;
}
getMethodArgumentValues
//org.springframework.web.method.support.InvocableHandlerMethod#getMethodArgumentValues
private Object[] getMethodArgumentValues(NativeWebRequest request, @Nullable ModelAndViewContainer mavContainer,
      Object... providedArgs) throws Exception {

   MethodParameter[] parameters = getMethodParameters();
   Object[] args = new Object[parameters.length];
   for (int i = 0; i < parameters.length; i++) {
      MethodParameter parameter = parameters[i];
      parameter.initParameterNameDiscovery(this.parameterNameDiscoverer);
       //RequestMappingHandlerAdapter中没有
      args[i] = resolveProvidedArgument(parameter, providedArgs);
      if (args[i] != null) {
         continue;
      }
       //使用argumentResolvers
      if (this.argumentResolvers.supportsParameter(parameter)) {
         try {
            args[i] = this.argumentResolvers.resolveArgument(
                  parameter, mavContainer, request, this.dataBinderFactory);
            continue;
         }
         catch (Exception ex) {
            if (logger.isDebugEnabled()) {
               logger.debug(getArgumentResolutionErrorMessage("Failed to resolve", i), ex);
            }
            throw ex;
         }
      }
      if (args[i] == null) {
         throw new IllegalStateException("Could not resolve method parameter at index " +
               parameter.getParameterIndex() + " in " + parameter.getExecutable().toGenericString() +
               ": " + getArgumentResolutionErrorMessage("No suitable resolver for", i));
      }
   }
   return args;
}
ServletInvocableHandlerMethod
增加三个功能
- @ResponseStatus支持
- 返回值处理
- 对异步处理结果处理
持有returnValueHandlers
public class ServletInvocableHandlerMethod extends InvocableHandlerMethod {

   private static final Method CALLABLE_METHOD = ClassUtils.getMethod(Callable.class, "call");

   @Nullable
   private HandlerMethodReturnValueHandlerComposite returnValueHandlers;
invokeAndHandle
public void invokeAndHandle(ServletWebRequest webRequest, ModelAndViewContainer mavContainer,
      Object... providedArgs) throws Exception {

   Object returnValue = invokeForRequest(webRequest, mavContainer, providedArgs);
    //@ResponseStatus
   setResponseStatus(webRequest);

    //setRequestHandled
   if (returnValue == null) {
      if (isRequestNotModified(webRequest) || getResponseStatus() != null || mavContainer.isRequestHandled()) {
         mavContainer.setRequestHandled(true);
         return;
      }
   }
   else if (StringUtils.hasText(getResponseStatusReason())) {
      mavContainer.setRequestHandled(true);
      return;
   }

   mavContainer.setRequestHandled(false);
   Assert.state(this.returnValueHandlers != null, "No return value handlers");
   try {
       //returnValueHandlers
      this.returnValueHandlers.handleReturnValue(
            returnValue, getReturnValueType(returnValue), mavContainer, webRequest);
   }
   catch (Exception ex) {
      if (logger.isTraceEnabled()) {
         logger.trace(getReturnValueHandlingErrorMessage("Error handling return value", returnValue), ex);
      }
      throw ex;
   }
}
HandlerMethodArgumentResolver
被ServletInvocableHandlerMethod持有,HandlerMethodArgumentResolverComposite。
- 一种xxxMethodArgumentResolver
- 一种xxxMethodProcessor,除了解析参数,处理相应类型的返回值。也就是同时也是HandlerMethodReturnValueHandler。
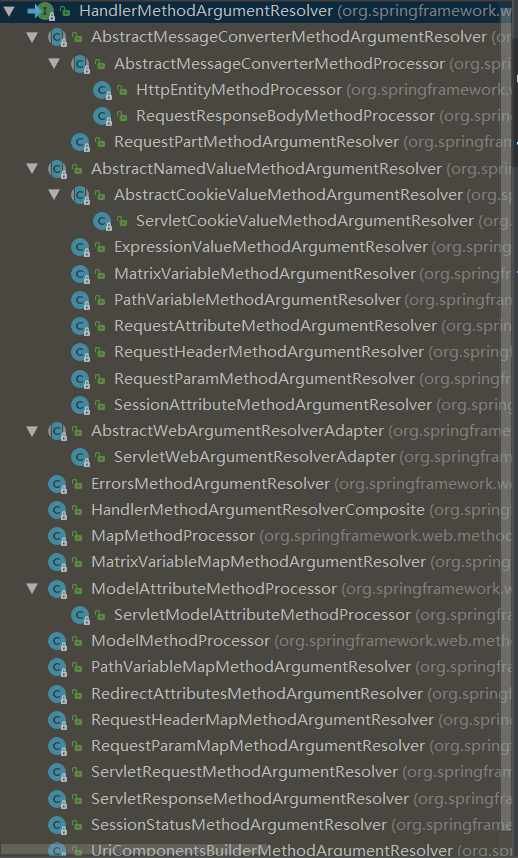
ModelMethodProcessor
比较简单,方法Model参数,就是从mavContainer中获取。Handler处理完后将Model中的参数设置到mavContainer。
public class ModelMethodProcessor implements HandlerMethodArgumentResolver, HandlerMethodReturnValueHandler {

   @Override
   public boolean supportsParameter(MethodParameter parameter) {
      return Model.class.isAssignableFrom(parameter.getParameterType());
   }

   @Override
   @Nullable
   public Object resolveArgument(MethodParameter parameter, @Nullable ModelAndViewContainer mavContainer,
         NativeWebRequest webRequest, @Nullable WebDataBinderFactory binderFactory) throws Exception {

      Assert.state(mavContainer != null, "ModelAndViewContainer is required for model exposure");
      return mavContainer.getModel();
   }

   @Override
   public boolean supportsReturnType(MethodParameter returnType) {
      return Model.class.isAssignableFrom(returnType.getParameterType());
   }

   @Override
   public void handleReturnValue(@Nullable Object returnValue, MethodParameter returnType,
         ModelAndViewContainer mavContainer, NativeWebRequest webRequest) throws Exception {

      if (returnValue == null) {
         return;
      }
      else if (returnValue instanceof Model) {
         mavContainer.addAllAttributes(((Model) returnValue).asMap());
      }
      else {
         // should not happen
         throw new UnsupportedOperationException("Unexpected return type: " +
               returnType.getParameterType().getName() + " in method: " + returnType.getMethod());
      }
   }

}
PathVariableMethodArgumentResolver
//org.springframework.web.method.annotation.AbstractNamedValueMethodArgumentResolver#resolveArgument
public final Object resolveArgument(MethodParameter parameter, @Nullable ModelAndViewContainer mavContainer,
      NativeWebRequest webRequest, @Nullable WebDataBinderFactory binderFactory) throws Exception {
	//要解析哪些参数?如果是PathVariable,就从@PathVariable的参数中获取
   NamedValueInfo namedValueInfo = getNamedValueInfo(parameter);
    //Optional?
   MethodParameter nestedParameter = parameter.nestedIfOptional();

   Object resolvedName = resolveStringValue(namedValueInfo.name);
   if (resolvedName == null) {
      throw new IllegalArgumentException(
            "Specified name must not resolve to null: [" + namedValueInfo.name + "]");
   }

    //模版方法,解析参数
   Object arg = resolveName(resolvedName.toString(), nestedParameter, webRequest);
    //没有解析到参数
   if (arg == null) {
      if (namedValueInfo.defaultValue != null) {
          //默认值
         arg = resolveStringValue(namedValueInfo.defaultValue);
      }
      else if (namedValueInfo.required && !nestedParameter.isOptional()) {
          //模版
         handleMissingValue(namedValueInfo.name, nestedParameter, webRequest);
      }
      arg = handleNullValue(namedValueInfo.name, arg, nestedParameter.getNestedParameterType());
   }
   else if ("".equals(arg) && namedValueInfo.defaultValue != null) {
      arg = resolveStringValue(namedValueInfo.defaultValue);
   }

    //类型转换相关
   if (binderFactory != null) {
      WebDataBinder binder = binderFactory.createBinder(webRequest, null, namedValueInfo.name);
      try {
         arg = binder.convertIfNecessary(arg, parameter.getParameterType(), parameter);
      }
      catch (ConversionNotSupportedException ex) {
         throw new MethodArgumentConversionNotSupportedException(arg, ex.getRequiredType(),
               namedValueInfo.name, parameter, ex.getCause());
      }
      catch (TypeMismatchException ex) {
         throw new MethodArgumentTypeMismatchException(arg, ex.getRequiredType(),
               namedValueInfo.name, parameter, ex.getCause());

      }
   }

    //模版,处理解析出的参数值,将解析出的参数设置到request
   handleResolvedValue(arg, namedValueInfo.name, parameter, mavContainer, webRequest);

   return arg;
}
protected Object resolveName(String name, MethodParameter parameter, NativeWebRequest request) throws Exception {
//request中的URI_TEMPLATE_VARIABLES_ATTRIBUTE是RequestMappingInfoHandlerMapping的handleMatch中设置的。
//HandlerMapping都解析好url了,直接取就行
Map<String, String> uriTemplateVars = (Map<String, String>) request.getAttribute(
HandlerMapping.URI_TEMPLATE_VARIABLES_ATTRIBUTE, RequestAttributes.SCOPE_REQUEST);
return (uriTemplateVars != null ? uriTemplateVars.get(name) : null);
}HandlerMethodReturnValueHandler
功能:
- 相应参数添加到Model
- 设置View
- 请求已完成,设置ModelAndViewContainer.requestHandled = true
ViewNameMethodReturnValueHandler
//支持void和String类型返回值
public boolean supportsReturnType(MethodParameter returnType) {
   Class<?> paramType = returnType.getParameterType();
   return (void.class == paramType || CharSequence.class.isAssignableFrom(paramType));
}

public void handleReturnValue(@Nullable Object returnValue, MethodParameter returnType,
      ModelAndViewContainer mavContainer, NativeWebRequest webRequest) throws Exception {

    //返回String,就设置Viewname
   if (returnValue instanceof CharSequence) {
      String viewName = returnValue.toString();
      mavContainer.setViewName(viewName);
       //如果是Redirect视图,设置标志位Scenario
      if (isRedirectViewName(viewName)) {
         mavContainer.setRedirectModelScenario(true);
      }
   }
   else if (returnValue != null){
      // should not happen
      throw new UnsupportedOperationException("Unexpected return type: " +
            returnType.getParameterType().getName() + " in method: " + returnType.getMethod());
   }
}

protected boolean isRedirectViewName(String viewName) {
    return (PatternMatchUtils.simpleMatch(this.redirectPatterns, viewName) || viewName.startsWith("redirect:"));
}
ClassLoader
类的加载、连接和初始化
-
加载:加载二进制
-
连接
- 验证:验证类二进制的正确性
- 准备:静态变量分配内存(清空内存),初始化默认值 static a = 0;
- 解析:类中符号引用转为直接引用。ClassLoader.loadClass(className)执行到这里,没有使用不进行初始化。
-
初始化:1. 静态变量初始化 static a = 3; 2. 静态代码块。(只初始化时执行一次,第二次new就没有了)
-
非静态代码块,在创建对象的时候(即new一个对象的时候)执行,每次创建对象都会执行一次
-
Class.forName(className, true, this.getClass().getClassLoader())。注意第二个参数,是指Class被loading后是不是必须被初始化。
-
构造函数是实例化阶段运行,即new。
静态变量不属于任何对象,在类加载后就分配内存。
final变量是编译期间赋值。
在编译阶段会存入到调用这个常量的的方法所在的类的常量池中,【可以理解为占位符替换】
接口中的static变量默认都是final的。
public class Demo{
	static {
		i = 20;
	}
	public static int i;
	public static void main(String[] args) {
		System.out.println(Demo.i);//输出20
	}
}
public class Demo{
static {
i = 20;
}
public static int i=1;
public static void main(String[] args) {
System.out.println(Demo.i);.//输出1,
}
}因为jvm是先分配内存,再初始化,初始化顺序从上到下。
- jvm准备阶段:分配内存后i=0,
- 初始化阶段:先赋值20,再赋值1;
主动使用
- 创建类实例:new
- 读写类的静态变量
- 调用类静态方法
- 反射:Class.forName("xxx")
- 初始化类的子类
- jvm启动时被标明为启动类
- ..
主动使用导致类的初始化。
主动使用导致类的初始化。
主动使用导致类的初始化。
类加载
类的加载指的是将类的.class文件中的二进制数据读入到内存中,将其放在运行时数据区的方法区内,然后在堆区创建一个java.lang.Class对象,用来封装类在方法区内的数据结构。
获取Class对象
获取类的Class对象的方式:
- Class.forName
- 对象.getClass
- 类名.class
ClassLoader.loadClass 和 Class.forName() 有什么区别?【loadClass的参数是是否解析,forName参数是是否初始化】
- ClassLoader#loadClass(java.lang.String, boolean)
protected Class<?> loadClass(String name, boolean resolve) throws ClassNotFoundException 第二个参数resolve ,是否进行解析。
- Class.forName()
public static Class < ?>forName(String className) throws ClassNotFoundException {
    Class < ?>caller = Reflection.getCallerClass();
    return forName0(className, true, ClassLoader.getClassLoader(caller), caller);
}
forName0 第二个参数为true,表示是否进行初始化。
可以传入指定的ClassLoader。
Class.forName(className)实际上是调用Class.forName(className, true, this.getClass().getClassLoader())。注意第二个参数,是指Class被loading后是不是必须被初始化。
ClassLoader.loadClass(className)实际上调用的是ClassLoader.loadClass(name, false),第二个参数指出Class是否被link。
java下Class.forName的作用是什么,为什么要使用它 - 青鸟飞鱼 - CSDN博客
结论:区别就是
- loadClass参数最多到“解析(Resolve)”阶段,forName可以通过参数进行类“初始化”。
- loadClass可以指定ClassLoader,forName可以指定ClassLoader,没有指定就用调用者的ClassLoader。
loadClass和Class.forName的区别 - 简书
加载驱动为什么用Class.forName("com.mysql.jdbc.Driver");,而不是放在classpath下自动加载?
Class.forName 不是为了加载类,
Class.forName 不是为了加载类,
Class.forName 不是为了加载类,而是为了执行Driver中的static 代码块。static代码块中将mysql的driver实现注册到了jdk中的DriverManager中。

然后,DriverManager#getConnection(java.lang.String, java.util.Properties, java.lang.Class<?>)就会用到注册的driver。
类加载器
自带的类加载器:
- 根加载器Bootstrp
- 扩展类加载器Extension PlatformClassLoader
- 系统加载器getSystemClassloader(),AppClassLoader
数组类型不是由类加载器来加载,是由jvm在运行时自动创建出来的
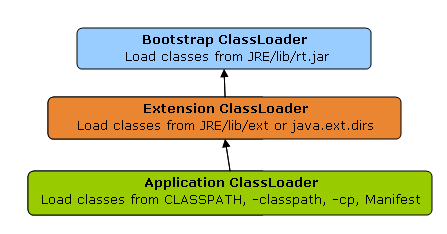
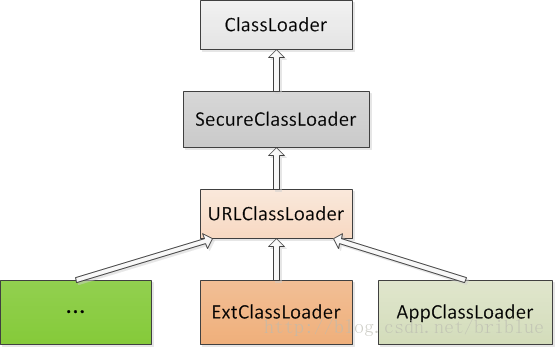
ExtClassLoader、AppclassLoader不是继承关系,是在Launcher中初始化时候设置的。
public Launcher() {
	Launcher.ExtClassLoader var1;
	try {
		var1 = Launcher.ExtClassLoader.getExtClassLoader();
	} catch(IOException var10) {
		throw new InternalError("Could not create extension class loader", var10);
	}

	try {
		this.loader = Launcher.AppClassLoader.getAppClassLoader(var1);
	} catch(IOException var9) {
		throw new InternalError("Could not create application class loader", var9);
	}
    ...
}
类的BinaryNames
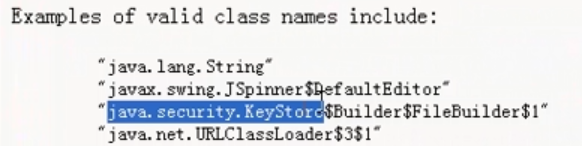
$后面是内部类,$1数字是匿名内部类
类加载器的父委托机制

SPI打破双亲委托机制?
为什么说java spi破坏双亲委派模型? - 知乎
??? 感觉并没有违反双亲委托。
父加载器能使用当前线程Thread.currentThread().getContextLoader() 所指定的ClassLoader来加载类【也就是父加载器使用子加载器加载类】
举例:Connection 接口是java提供的,jdbc实现了Connection接口。Connection接口是由bootstrap classloader加载的,如果jdbc Connection被appClassLoader加载,则不能访问Connection接口。
DriverManager是通过BootstrapClassLoader加载的,在DriveManager中使用spi
ServiceLoader loadedDrivers = ServiceLoader.load(Driver.class);
serviceLoader是bootstrap 类加载器加载,那通过serviceLoader加载出来的类是什么加载器加载的呢?
AppClassLoader
获取线程上下文ClassLoader

spi中使用ClassLoader cl = Thread.currentThread().getContextClassLoader(); 获取当前线程的类加载器appClassLoader,来加载mysql包中的Driver类。
Tomcat ClassLoader 打破双亲委派机制?、
Tomcat5 & Tomcat7 ClassLoader

Tomcat ClassLoader 加载顺序
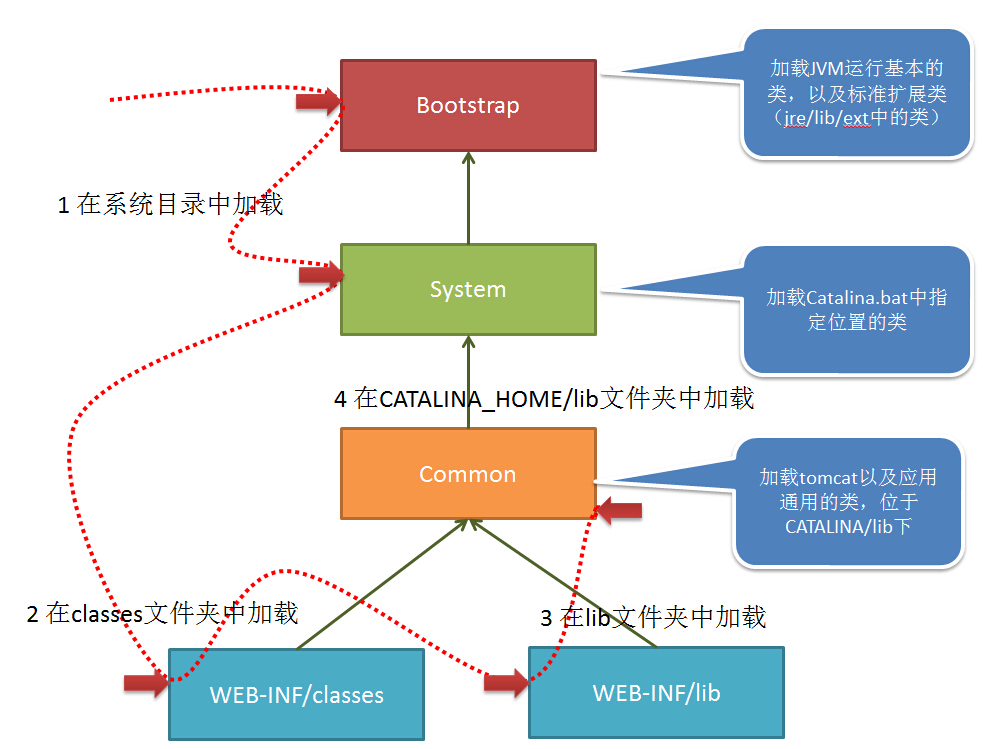
Apache Tomcat 8 (8.0.53) - Class Loader HOW-TO
具体查看
这里的Bootstrap是extension classloader
官方文档中的Bootstrap = Bootstrap + Extension
加载顺序【重要】
加载顺序【重要】
加载顺序【重要】
当应用需要到某个类时,则会按照下面的顺序进行类加载:
- 使用bootstrap引导类加载器加载
- 使用system系统类加载器加载(AppClassLoader)
- 使用应用类加载器在WEB-INF/classes中加载(WebappX ClassLoader)
- 使用应用类加载器在WEB-INF/lib中加载(WebappX ClassLoader)
- 使用common类加载器在CATALINA_HOME/lib中加载 (Common ClassLoader)
- Bootstrap classes of your JVM(rt.jar)
- System class loader classes(bootstrap.jar、tomcat-juli.jar、commons-deamon.jar)
- /WEB-INF/classes of your web application
- /WEB-INF/lib/* .jar of your web application
- Common class loader classes (在$CATALINA_HOME/lib里的jar包)
在 CATALINA_HOME/lib 以及 WEB-INF/lib 中放置了 不同版本的jar包,此时就会导致某些情况下报加载不到类的错误。
Tomcat ClassLoader违反双亲委派模型
Tomcat的类加载机制是违反了双亲委托原则的,对于一些未加载的非基础类(Object,String等),各个web应用 自己的类加载器(WebAppClassLoader) 会优先加载,加载不到时再交给commonClassLoader走双亲委托。【前面的bootstrap ClassLoader 和 extClassloader不受影响】
可以通过在Context.xml文件中加上开启正统的“双亲委派”加载机制
delegate值为true时,使用代理模式,加载前先访问上级loader。 false代表从本web应用程序中查找。
tomcat类加载器为什么要破坏双亲委派机制? - 牧云文仔 - 博客园
自定义ClassLoader加载顺序
可以自定义ClassLoader重写loadClass 方法,
通常我们重写的是findClass方法。
loadClass先检查父classloader,然后调用findClass()方法。
但即便重写loadClass方法也不能加载自定义的java.lang.String类
因为针对java.*开头的类,jvm的实现中已经保证了必须由bootstrap来加载
SpringMVC整体框架
目录
ContextLoaderListener
<!-- Context ConfigLocation -->
<context-param>
    <param-name>contextConfigLocation</param-name>
    <param-value>classpath*:/spring-context*.xml</param-value>
</context-param>
<listener>
    <listener-class> org.springframework.web.context.ContextLoaderListener</listener-class>
</listener>
在web.xml中需要配置ContextLoaderListener
public class ContextLoaderListener extends ContextLoader implements ServletContextListener {ContextLoaderListener是ServletContextListener实现类
ServletContextListener
是一个监听器,当web应用启动时会调用listener的方法。
public interface ServletContextListener extends EventListener {
   /**
    ** Notification that the web application initialization
    ** process is starting.
    ** All ServletContextListeners are notified of context
    ** initialization before any filter or servlet in the web
    ** application is initialized.
    */
	//从ServletContextEvent中我们可以获取到ServletContext
    public void contextInitialized ( ServletContextEvent sce );

   /**
    ** Notification that the servlet context is about to be shut down.
    ** All servlets and filters have been destroy()ed before any
    ** ServletContextListeners are notified of context
    ** destruction.
    */
    public void contextDestroyed ( ServletContextEvent sce );
}
ContextLoaderListener.contextInitialized
public WebApplicationContext initWebApplicationContext(ServletContext servletContext) {
    //1. 已经存在ROOT_WEB_APPLICATION_CONTEXT_ATTRIBUTE抛异常
   if (servletContext.getAttribute(WebApplicationContext.ROOT_WEB_APPLICATION_CONTEXT_ATTRIBUTE) != null) {
      throw new IllegalStateException(
            "Cannot initialize context because there is already a root application context present - " +
            "check whether you have multiple ContextLoader* definitions in your web.xml!");
   }

   Log logger = LogFactory.getLog(ContextLoader.class);
   servletContext.log("Initializing Spring root WebApplicationContext");
   if (logger.isInfoEnabled()) {
      logger.info("Root WebApplicationContext: initialization started");
   }
   long startTime = System.currentTimeMillis();

   try {
      // Store context in local instance variable, to guarantee that
      // it is available on ServletContext shutdown.
      if (this.context == null) {
          //2. 创建WebApplicationContext
         this.context = createWebApplicationContext(servletContext);
      }
      if (this.context instanceof ConfigurableWebApplicationContext) {
         ConfigurableWebApplicationContext cwac = (ConfigurableWebApplicationContext) this.context;
         if (!cwac.isActive()) {
            // The context has not yet been refreshed -> provide services such as
            // setting the parent context, setting the application context id, etc
            if (cwac.getParent() == null) {
               // The context instance was injected without an explicit parent ->
               // determine parent for root web application context, if any.
               ApplicationContext parent = loadParentContext(servletContext);
               cwac.setParent(parent);
            }
            configureAndRefreshWebApplicationContext(cwac, servletContext);
         }
      }
       //3. 设置到到servletContext中
      servletContext.setAttribute(WebApplicationContext.ROOT_WEB_APPLICATION_CONTEXT_ATTRIBUTE, this.context);

      ClassLoader ccl = Thread.currentThread().getContextClassLoader();
      if (ccl == ContextLoader.class.getClassLoader()) {
         currentContext = this.context;
      }
      else if (ccl != null) {
          //4. 保存<类加载器,applicationContext>
         currentContextPerThread.put(ccl, this.context);
      }

      if (logger.isDebugEnabled()) {
         logger.debug("Published root WebApplicationContext as ServletContext attribute with name [" +
               WebApplicationContext.ROOT_WEB_APPLICATION_CONTEXT_ATTRIBUTE + "]");
      }
      if (logger.isInfoEnabled()) {
         long elapsedTime = System.currentTimeMillis() - startTime;
         logger.info("Root WebApplicationContext: initialization completed in " + elapsedTime + " ms");
      }

      return this.context;
   }

}
createWebApplicationContext() 创建applicationContext。
问题:创建什么类型的applicationContext呢?
//org.springframework.web.context.ContextLoader#determineContextClass
protected Class<?> determineContextClass(ServletContext servletContext) {
   String contextClassName = servletContext.getInitParameter(CONTEXT_CLASS_PARAM);
   if (contextClassName != null) {
      try {
         return ClassUtils.forName(contextClassName, ClassUtils.getDefaultClassLoader());
      }
      catch (ClassNotFoundException ex) {
         throw new ApplicationContextException(
               "Failed to load custom context class [" + contextClassName + "]", ex);
      }
   }
   else {
       //从defaultStrategies中获取属性,返回contextClassName
      contextClassName = defaultStrategies.getProperty(WebApplicationContext.class.getName());
      try {
         return ClassUtils.forName(contextClassName, ContextLoader.class.getClassLoader());
      }
      catch (ClassNotFoundException ex) {
         throw new ApplicationContextException(
               "Failed to load default context class [" + contextClassName + "]", ex);
      }
   }
}
问题:defaultStrategies是从哪来的?
//org.springframework.web.context.ContextLoader 静态代码块
private static final String DEFAULT_STRATEGIES_PATH = "ContextLoader.properties";

static {
   // Load default strategy implementations from properties file.
   // This is currently strictly internal and not meant to be customized
   // by application developers.
   try {
      ClassPathResource resource = new ClassPathResource(DEFAULT_STRATEGIES_PATH, ContextLoader.class);
      defaultStrategies = PropertiesLoaderUtils.loadProperties(resource);
   }
   catch (IOException ex) {
      throw new IllegalStateException("Could not load 'ContextLoader.properties': " + ex.getMessage());
   }
}
在静态代码块中,通过ClassPathResource,从ContextLoader.properties文件中获取默认的ApplicationContext类型。
org.springframework.web.context.WebApplicationContext=org.springframework.web.context.support.XmlWebApplicationContextSpringMVC整体结构(创建)
GenericServlet
//javax.servlet.GenericServlet#init(javax.servlet.ServletConfig)
public void init(ServletConfig config) throws ServletException {
    this.config = config;
    //模版方法
    this.init();
}
容器初始化Servlet,会调用init(ServletConfig config) 方法。其中ServletConfig 中持有ServletContext。
一个应用中所有Servlet共享一个ServletContext。而ServletConfig 是一个Servlet一个。
在web.xml中配置参数的位置也不一样。
参考:ServletConfig和ServletContext的区别及应用
HttpServlet
就是和Http有关咯。就是将service() 方法 根据 http postMethod 分到 doGet() doPost() 等
HttpServletBean
他是一个Servlet,也是一个Bean。这里更看重作为Bean的功能,主要参与创建工作。在init() 方法中使用BeanWrapper,来给自己(自己的子类)赋值相关配置属性(Bean的属性赋值)。
public final void init() throws ServletException {
   if (logger.isDebugEnabled()) {
      logger.debug("Initializing servlet '" + getServletName() + "'");
   }

   // Set bean properties from init parameters.
   PropertyValues pvs = new ServletConfigPropertyValues(getServletConfig(), this.requiredProperties);
   if (!pvs.isEmpty()) {
      try {
         BeanWrapper bw = PropertyAccessorFactory.forBeanPropertyAccess(this);
         ResourceLoader resourceLoader = new ServletContextResourceLoader(getServletContext());
         bw.registerCustomEditor(Resource.class, new ResourceEditor(resourceLoader, getEnvironment()));
         initBeanWrapper(bw);
         bw.setPropertyValues(pvs, true);
      }
      catch (BeansException ex) {
         if (logger.isErrorEnabled()) {
            logger.error("Failed to set bean properties on servlet '" + getServletName() + "'", ex);
         }
         throw ex;
      }
   }

   // Let subclasses do whatever initialization they like.
   initServletBean();

   if (logger.isDebugEnabled()) {
      logger.debug("Servlet '" + getServletName() + "' configured successfully");
   }
}
FrameworkServlet
其实可以完整的叫Spring FrameworkServlet。无非就是增加了Spring框架的支持。增加Spring框架无非就是增加了ApplicationContext。
问题:RootContext什么时候创建的呢?
就是在ContextLoaderListener中。参见前文ContextLoaderListener。
protected final void initServletBean() throws ServletException {
   getServletContext().log("Initializing Spring FrameworkServlet '" + getServletName() + "'");
   if (this.logger.isInfoEnabled()) {
      this.logger.info("FrameworkServlet '" + getServletName() + "': initialization started");
   }
   long startTime = System.currentTimeMillis();

   try {
       //初始化ApplicationContext
      this.webApplicationContext = initWebApplicationContext();
      initFrameworkServlet();
   }
   catch (ServletException | RuntimeException ex) {
      this.logger.error("Context initialization failed", ex);
      throw ex;
   }

   if (this.logger.isInfoEnabled()) {
      long elapsedTime = System.currentTimeMillis() - startTime;
      this.logger.info("FrameworkServlet '" + getServletName() + "': initialization completed in " +
            elapsedTime + " ms");
   }
}
protected WebApplicationContext initWebApplicationContext() {
//获取rootContext,rootContext就是ContextLoaderListener中创建的
WebApplicationContext rootContext =
WebApplicationContextUtils.getWebApplicationContext(getServletContext());
WebApplicationContext wac = null;
//wac 是Servlet的webApplicationContext。子容器。
//如果this.webApplicationContext!=null,说明webApplicationContext已经使用构造函数初始化
//也就是如果是contextLoaderListener创建的话 this.webApplicationContex ==null
if (this.webApplicationContext != null) {
// A context instance was injected at construction time -> use it
wac = this.webApplicationContext;
if (wac instanceof ConfigurableWebApplicationContext) {
ConfigurableWebApplicationContext cwac = (ConfigurableWebApplicationContext) wac;
if (!cwac.isActive()) {
// The context has not yet been refreshed -> provide services such as
// setting the parent context, setting the application context id, etc
if (cwac.getParent() == null) {
// The context instance was injected without an explicit parent -> set
// the root application context (if any; may be null) as the parent
cwac.setParent(rootContext);
}
configureAndRefreshWebApplicationContext(cwac);
}
}
}
if (wac == null) {
// No context instance was injected at construction time -> see if one
// has been registered in the servlet context. If one exists, it is assumed
// that the parent context (if any) has already been set and that the
// user has performed any initialization such as setting the context id
//通过contextAttribute初始化,通过contextAttribute配置的属性,从ServletContext中查找WebApplicationContext实例。
//contextAttribute属性是通过HttpServletBean中的BeanWrapper从配置文件中设置到FrameworkServlet中的。
wac = findWebApplicationContext();
}
if (wac == null) {
// No context instance is defined for this servlet -> create a local one
//不是构造函数创建的。contextAttribute没找到wac,新建。
wac = createWebApplicationContext(rootContext);
}
if (!this.refreshEventReceived) {
// Either the context is not a ConfigurableApplicationContext with refresh
// support or the context injected at construction time had already been
// refreshed -> trigger initial onRefresh manually here.
onRefresh(wac);
}
//publishContext这个属性也是可以配置的,作用:是否将wac设置到ServletContext中。
if (this.publishContext) {
// Publish the context as a servlet context attribute.
String attrName = getServletContextAttributeName();
getServletContext().setAttribute(attrName, wac);
if (this.logger.isDebugEnabled()) {
this.logger.debug("Published WebApplicationContext of servlet '" + getServletName() +
"' as ServletContext attribute with name [" + attrName + "]");
}
}
return wac;
}//org.springframework.web.servlet.FrameworkServlet#createWebApplicationContext(org.springframework.context.ApplicationContext)
//ContextLoader中也有 WebApplicationContext createWebApplicationContext(ServletContext sc)
protected WebApplicationContext createWebApplicationContext(@Nullable ApplicationContext parent) {
Class<?> contextClass = getContextClass();
if (this.logger.isDebugEnabled()) {
this.logger.debug("Servlet with name '" + getServletName() +
"' will try to create custom WebApplicationContext context of class '" +
contextClass.getName() + "'" + ", using parent context [" + parent + "]");
}
if (!ConfigurableWebApplicationContext.class.isAssignableFrom(contextClass)) {
throw new ApplicationContextException(
"Fatal initialization error in servlet with name '" + getServletName() +
"': custom WebApplicationContext class [" + contextClass.getName() +
"] is not of type ConfigurableWebApplicationContext");
}
ConfigurableWebApplicationContext wac =
(ConfigurableWebApplicationContext) BeanUtils.instantiateClass(contextClass);
wac.setEnvironment(getEnvironment());
//设置父容器
wac.setParent(parent);
String configLocation = getContextConfigLocation();
if (configLocation != null) {
//设置configLocation,configLocation为空就默认拼接WEB-INFO/[servletName]-Servlet.xml
wac.setConfigLocation(configLocation);
}
//设置ServletContext -> wac
//设置ServletConfig -> wac
//添加监听器,实际监听器是ContextRefreshListener,每次监听到事件就是onRefresh(),这里是DispatcherServlet.onRefresh();
//还有容器wac.refresh();
configureAndRefreshWebApplicationContext(wac);
return wac;
}DispatcherServlet#onRefresh
//org.springframework.web.servlet.DispatcherServlet#onRefresh
protected void onRefresh(ApplicationContext context) {
   initStrategies(context);
}

/**
 * Initialize the strategy objects that this servlet uses.
 * <p>May be overridden in subclasses in order to initialize further strategy objects.
 */
protected void initStrategies(ApplicationContext context) {
   initMultipartResolver(context);
   initLocaleResolver(context);
   initThemeResolver(context);
    //默认加载所有HandlerMapping.class类型的bean
   initHandlerMappings(context);
   initHandlerAdapters(context);
   initHandlerExceptionResolvers(context);
   initRequestToViewNameTranslator(context);
   initViewResolvers(context);
   initFlashMapManager(context);
}
初始化方法默认都有一个保底参数,如果找不到对应的bean就加载这些bean,记录在DispatcherServlet.properties文件中中。
private static final Properties defaultStrategies;

static {
   // Load default strategy implementations from properties file.
   // This is currently strictly internal and not meant to be customized
   // by application developers.
   try {
       //DispatcherServlet.properties
      ClassPathResource resource = new ClassPathResource(DEFAULT_STRATEGIES_PATH, DispatcherServlet.class);
      defaultStrategies = PropertiesLoaderUtils.loadProperties(resource);
   }
   catch (IOException ex) {
      throw new IllegalStateException("Could not load '" + DEFAULT_STRATEGIES_PATH + "': " + ex.getMessage());
   }
}
请求调用
doGet()、doPost() -> processRequest()
FrameworkServlet#processRequest
protected final void processRequest(HttpServletRequest request, HttpServletResponse response)
      throws ServletException, IOException {

   long startTime = System.currentTimeMillis();
   Throwable failureCause = null;

    //1. 保存之前的LocaleContext & previousAttributes , 以便以后恢复
    //LocaleContextHolder是通过ThreadLocal存放
   LocaleContext previousLocaleContext = LocaleContextHolder.getLocaleContext();
   LocaleContext localeContext = buildLocaleContext(request);

   RequestAttributes previousAttributes = RequestContextHolder.getRequestAttributes();
   ServletRequestAttributes requestAttributes = buildRequestAttributes(request, response, previousAttributes);

    //异步
   WebAsyncManager asyncManager = WebAsyncUtils.getAsyncManager(request);
   asyncManager.registerCallableInterceptor(FrameworkServlet.class.getName(), new RequestBindingInterceptor());

    //2. localeContext, requestAttributes 绑定到当前线程
   initContextHolders(request, localeContext, requestAttributes);

   try {
       //3. 处理请求
      doService(request, response);
   }
   catch (ServletException | IOException ex) {
      failureCause = ex;
      throw ex;
   }
   catch (Throwable ex) {
      failureCause = ex;
      throw new NestedServletException("Request processing failed", ex);
   }

   finally {
       //4. 恢复
      resetContextHolders(request, previousLocaleContext, previousAttributes);
      if (requestAttributes != null) {
         requestAttributes.requestCompleted();
      }

      if (logger.isDebugEnabled()) {
         if (failureCause != null) {
            this.logger.debug("Could not complete request", failureCause);
         }
         else {
            if (asyncManager.isConcurrentHandlingStarted()) {
               logger.debug("Leaving response open for concurrent processing");
            }
            else {
               this.logger.debug("Successfully completed request");
            }
         }
      }

       //5. 发布事件,通过this.webApplicationContext.publishEvent()
      publishRequestHandledEvent(request, response, startTime, failureCause);
   }
}
DispatcherServlet#doService
protected void doService(HttpServletRequest request, HttpServletResponse response) throws Exception {
   if (logger.isDebugEnabled()) {
      String resumed = WebAsyncUtils.getAsyncManager(request).hasConcurrentResult() ? " resumed" : "";
      logger.debug("DispatcherServlet with name '" + getServletName() + "'" + resumed +
            " processing " + request.getMethod() + " request for [" + getRequestUri(request) + "]");
   }

   // Keep a snapshot of the request attributes in case of an include,
   // to be able to restore the original attributes after the include.
   Map<String, Object> attributesSnapshot = null;
    //是否是Include请求。include请求保存快照
   if (WebUtils.isIncludeRequest(request)) {
      attributesSnapshot = new HashMap<>();
      Enumeration<?> attrNames = request.getAttributeNames();
      while (attrNames.hasMoreElements()) {
         String attrName = (String) attrNames.nextElement();
         if (this.cleanupAfterInclude || attrName.startsWith(DEFAULT_STRATEGIES_PREFIX)) {
            attributesSnapshot.put(attrName, request.getAttribute(attrName));
         }
      }
   }

   // Make framework objects available to handlers and view objects.
    //将之前初始化的组件设置到request中。
   request.setAttribute(WEB_APPLICATION_CONTEXT_ATTRIBUTE, getWebApplicationContext());
   request.setAttribute(LOCALE_RESOLVER_ATTRIBUTE, this.localeResolver);
   request.setAttribute(THEME_RESOLVER_ATTRIBUTE, this.themeResolver);
   request.setAttribute(THEME_SOURCE_ATTRIBUTE, getThemeSource());

    //处理flashMap,应用:RedirectAttributes.addFlashAttribute()
   if (this.flashMapManager != null) {
      FlashMap inputFlashMap = this.flashMapManager.retrieveAndUpdate(request, response);
      if (inputFlashMap != null) {
         request.setAttribute(INPUT_FLASH_MAP_ATTRIBUTE, Collections.unmodifiableMap(inputFlashMap));
      }
      request.setAttribute(OUTPUT_FLASH_MAP_ATTRIBUTE, new FlashMap());
      request.setAttribute(FLASH_MAP_MANAGER_ATTRIBUTE, this.flashMapManager);
   }

   try {
      doDispatch(request, response);
   }
   finally {
      if (!WebAsyncUtils.getAsyncManager(request).isConcurrentHandlingStarted()) {
         // Restore the original attribute snapshot, in case of an include.
         if (attributesSnapshot != null) {
            restoreAttributesAfterInclude(request, attributesSnapshot);
         }
      }
   }
}
doDispatch()
protected void doDispatch(HttpServletRequest request, HttpServletResponse response) throws Exception {
   HttpServletRequest processedRequest = request;
   HandlerExecutionChain mappedHandler = null;
   boolean multipartRequestParsed = false;

   WebAsyncManager asyncManager = WebAsyncUtils.getAsyncManager(request);

   try {
      ModelAndView mv = null;
      Exception dispatchException = null;

      try {
          //1. 如果是Multipart类型,转换request类型为MultipartHttpServletRequest
         processedRequest = checkMultipart(request);
         multipartRequestParsed = (processedRequest != request);

         // Determine handler for the current request.
          //2. 根据HandlerMapping来getHandler
         mappedHandler = getHandler(processedRequest);
         if (mappedHandler == null) {
            noHandlerFound(processedRequest, response);
            return;
         }

         // Determine handler adapter for the current request.
          //3. 根据handler找handlerAdapter
         HandlerAdapter ha = getHandlerAdapter(mappedHandler.getHandler());

         // Process last-modified header, if supported by the handler.
          //4. lastModified 处理
          // 只适用一个Controller中只支持一个请求的HandlerMapping。例如:AbstractController子类。
          //注解方式的controller不支持。
         String method = request.getMethod();
         boolean isGet = "GET".equals(method);
         if (isGet || "HEAD".equals(method)) {
            long lastModified = ha.getLastModified(request, mappedHandler.getHandler());
            if (logger.isDebugEnabled()) {
               logger.debug("Last-Modified value for [" + getRequestUri(request) + "] is: " + lastModified);
            }
            if (new ServletWebRequest(request, response).checkNotModified(lastModified) && isGet) {
               return;
            }
         }

          //5. interceptor.PreHandle
         if (!mappedHandler.applyPreHandle(processedRequest, response)) {
            return;
         }

         // Actually invoke the handler.
          //6. HandlerAdapter调用Handler
         mv = ha.handle(processedRequest, response, mappedHandler.getHandler());

         if (asyncManager.isConcurrentHandlingStarted()) {
            return;
         }

         applyDefaultViewName(processedRequest, mv);
          //7. interceptor.postHandle
         mappedHandler.applyPostHandle(processedRequest, response, mv);
      }
      catch (Exception ex) {
         dispatchException = ex;
      }
      catch (Throwable err) {
         // As of 4.3, we're processing Errors thrown from handler methods as well,
         // making them available for @ExceptionHandler methods and other scenarios.
         dispatchException = new NestedServletException("Handler dispatch failed", err);
      }
       //处理结果
       //异常处理,渲染页面,interceptor.afterCompletion()
      processDispatchResult(processedRequest, response, mappedHandler, mv, dispatchException);
   }
   catch (Exception ex) {
      triggerAfterCompletion(processedRequest, response, mappedHandler, ex);
   }
   catch (Throwable err) {
      triggerAfterCompletion(processedRequest, response, mappedHandler,
            new NestedServletException("Handler processing failed", err));
   }
   finally {
      if (asyncManager.isConcurrentHandlingStarted()) {
         // Instead of postHandle and afterCompletion
         if (mappedHandler != null) {
            mappedHandler.applyAfterConcurrentHandlingStarted(processedRequest, response);
         }
      }
      else {
         // Clean up any resources used by a multipart request.
         if (multipartRequestParsed) {
            cleanupMultipart(processedRequest);
         }
      }
   }
}
doDispatch流程图

AQS
AQS
简单总结
- 队列头节点永远thread == null
- head.next有资格tryAcquire 去尝试获取锁。(检查state是否==0)
- 一个node获取锁后,将自己变为head,head.thread=null。
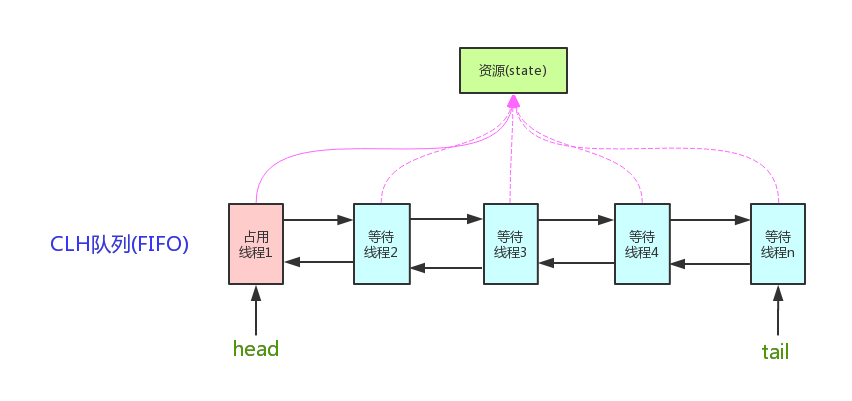
- 一个state(int类型,cas修改)
- getState()
- setState()
- compareAndSetState()
- 一个FIFO队列(阻塞队列)
AQS定义两种资源共享方式:Exclusive(独占,只有一个线程能执行,如ReentrantLock)和Share(共享,多个线程可同时执行,如Semaphore/CountDownLatch)。
自定义同步器在实现时只需要实现共享资源state的获取与释放方式即可
这里之所以没有定义成abstract,是因为独占模式下只用实现tryAcquire-tryRelease,而共享模式下只用实现tryAcquireShared-tryReleaseShared。
- isHeldExclusively():该线程是否正在独占资源。只有用到condition才需要去实现它。
- tryAcquire(int):独占方式。尝试获取资源,成功则返回true,失败则返回false。
- tryRelease(int):独占方式。尝试释放资源,成功则返回true,失败则返回false
- tryAcquireShared(int):共享方式。尝试获取资源。负数表示失败;0表示成功,但没有剩余可用资源;正数表示成功,且有剩余资源。
- tryReleaseShared(int):共享方式。尝试释放资源,如果释放后允许唤醒后续等待结点返回true,否则返回false。
acquire()
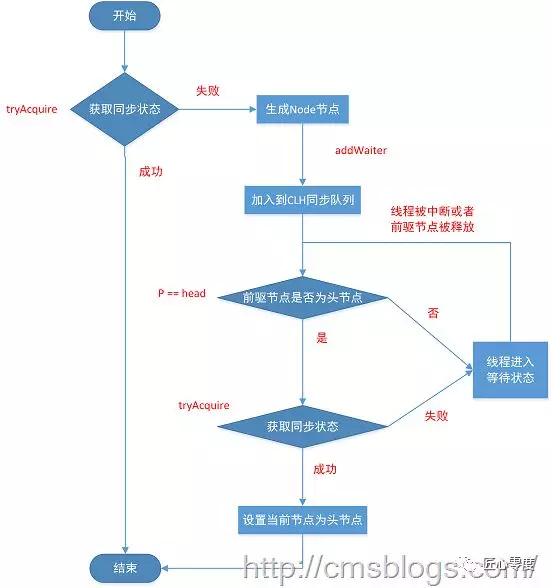
public final void acquire(int arg) {
    if (!tryAcquire(arg) &&
        acquireQueued(addWaiter(Node.EXCLUSIVE), arg))
        selfInterrupt();
}
执行顺序:
- tryAcquire()尝试直接去获取资源,如果成功则直接返回;【此方法由子类实现】
- addWaiter()将该线程加入等待队列的尾部,并标记为独占模式;
- acquireQueued()使线程在等待队列中获取资源,一直获取到资源后才返回。如果在整个等待过程中被中断过,则返回true,否则返回false。
- 如果线程在等待过程中被中断过,它是不响应的。只是获取资源后才再进行自我中断selfInterrupt(),将中断补上。
tryAcquire():尝试获取锁
根据要实现的锁逻辑自己实现。
例如:ReentrantReadWriteLock中有一个内部类class Sync extends AbstractQueuedSynchronizer,通过aqs来实现重入锁。
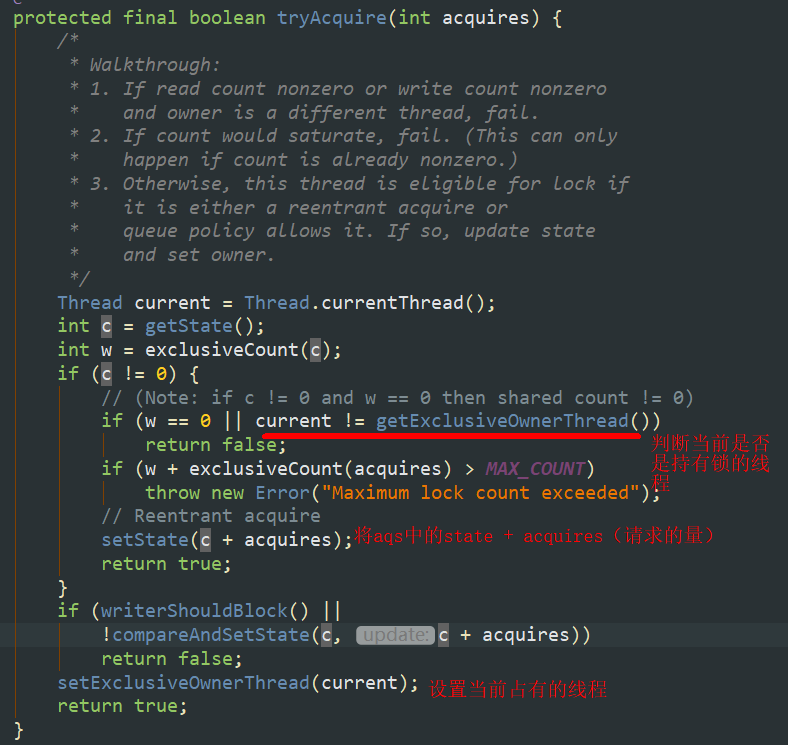
addWaiter():入队
private Node addWaiter(Node mode) {
	Node node = new Node(Thread.currentThread(), mode);
	// Try the fast path of enq; backup to full enq on failure
	Node pred = tail;
    //当前队尾是否为空
	if (pred != null) {
		node.prev = pred;
		if (compareAndSetTail(pred, node)) {
			pred.next = node;
			return node;
		}
	}
	enq(node);
	return node;
}
private Node enq(final Node node) {
for (;;) {
Node t = tail;
if (t == null) { // Must initialize
//先初始化,头尾都指向new node(唯一的节点)
//head是volatile,也不是并发安全的,还需要cas
if (compareAndSetHead(new Node())) tail = head;
} else {
// 当队列不为空,
node.prev = t;
if (compareAndSetTail(t, node)) {
t.next = node;
return t;
}
}
}
}acquireQueued():循环尝试获取锁tryAcquire,拿不到锁park阻塞
final boolean acquireQueued(final Node node, int arg) {
	boolean failed = true;
	try {
		boolean interrupted = false;
		for (;;) {
			final Node p = node.predecessor();
			if (p == head && tryAcquire(arg)) {

              //设置新head,head的thread设置为null,prev与前head断开。
              //拿到锁才能修改Head,释放锁不修改head
				setHead(node);

              //help gc,前一个head与新head断开连接
				p.next = null; // help GC
				failed = false;
				return interrupted;
			}
			if (shouldParkAfterFailedAcquire(p, node) && parkAndCheckInterrupt()) interrupted = true;
		}
	} finally {
		if (failed) cancelAcquire(node);
	}
}
如果前面的节点是head,那么就可以尝试获取资源
- tryAcquire() 返回true则表示获取到资源(资源就是state)
shouldParkAfterFailedAcquire()如果前面不是head,那么看前面的节点的状态,如果前面的已放弃那么就可以插队前面的节点。
- 把前驱的状态设置成SIGNAL,告诉它拿完号后通知自己一下。
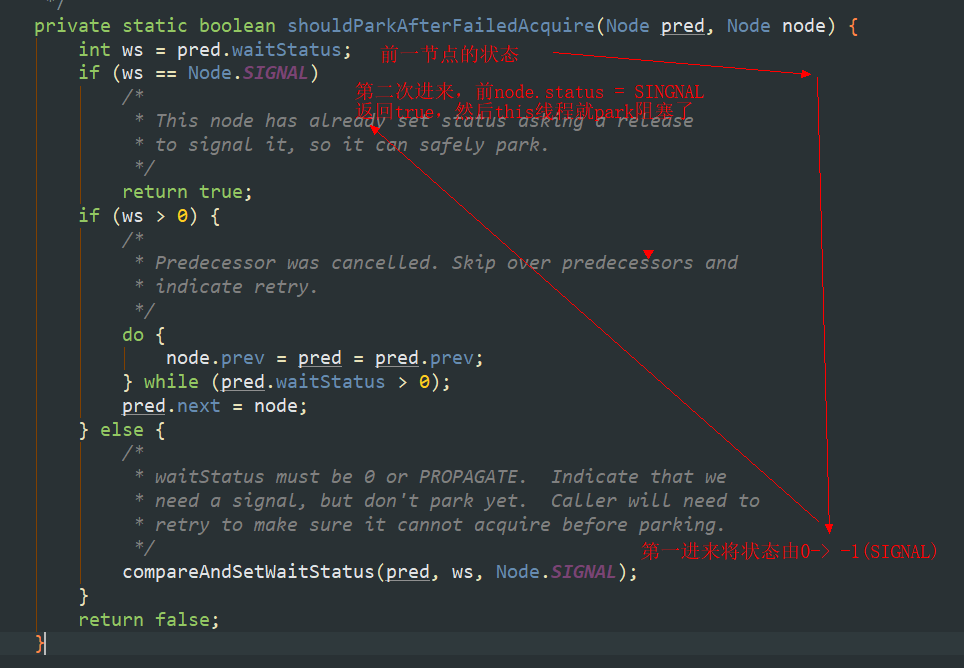
为什么第一次执行不直接返回true?
传说是为了,锁升级的**,先自旋一次,不行再park?
节点状态
-
CANCELLED(1):表示当前结点已取消调度。当timeout或被中断(响应中断的情况下),会触发变更为此状态,进入该状态后的结点将不会再变化。
-
SIGNAL(-1):表示后继结点在等待当前结点唤醒。后继结点入队时,会将前继结点的状态更新为SIGNAL。
-
CONDITION(-2):表示结点等待在Condition上,当其他线程调用了Condition的signal()方法后,CONDITION状态的结点将从等待队列转移到同步队列中,等待获取同步锁。
-
PROPAGATE(-3):共享模式下,前继结点不仅会唤醒其后继结点,同时也可能会唤醒后继的后继结点。
-
0:新结点入队时的默认状态。
注意,负值表示结点处于有效等待状态,而正值表示结点已被取消。所以源码中很多地方用>0、<0来判断结点的状态是否正常。
阻塞规则
- 前驱节点waitStatus = Node.SIGNAL,返回true。
- 如果前驱节点waitStatus=CANCELLED,则插队直到前驱节点waitStatus<0,返回false。
- 如果前驱节点非SINNAL,非CANCELLED,则通过CAS的方式将其前驱节点设置为SINNAL,返回false
parkAndCheckInterrupt()
private final boolean parkAndCheckInterrupt() {
	LockSupport.park(this);
	return Thread.interrupted();
}
LockSupport.park(this);休息,被唤醒有两种方式:1)被unpark();2)被interrupt()
所以:return Thread.interrupted();判断是哪种方式的唤醒。
Thread.interrupted()会返回线程中断状态,同时清除线程中断状态。
public final void acquire(int arg) {
    if (!tryAcquire(arg) &&
        acquireQueued(addWaiter(Node.EXCLUSIVE), arg))
        selfInterrupt();
}
如果线程在等待过程中被中断过,它是不响应的。只是获取资源后才再进行自我中断selfInterrupt(),将中断补上。
最后中断状态会返回,acquireQueued(addWaiter(Node.EXCLUSIVE), arg)==true
selfInterrupt会补充thread状态设置为interrupt。
这个interrupt状态由我们自己定义的具体的线程任务来处理(是中断执行还是怎么样)【所以,我们自己实现线程要用while (!Thread.currentThread().isInterrupted())来响应线程中断】
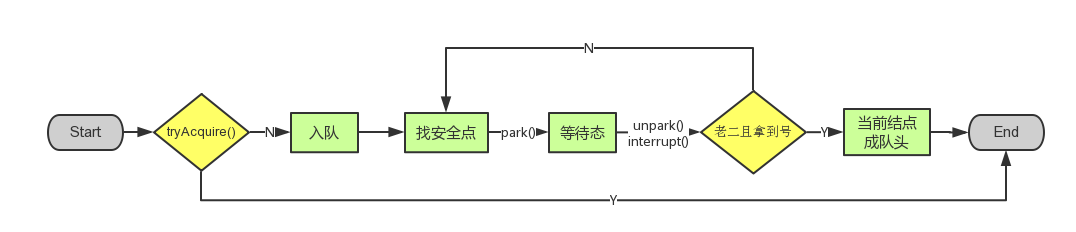
release()
1 public final boolean release(int arg) {
2     if (tryRelease(arg)) {
3         Node h = head;//找到头结点
4         if (h != null && h.waitStatus != 0)
5             unparkSuccessor(h);//**唤醒等待队列里的下一个线程**,用unpark()唤醒等待队列中最前边的那个未放弃线程
6         return true;
7     }
8     return false;
9 }它调用tryRelease()来释放资源。有一点需要注意的是,它是根据tryRelease()的返回值来判断该线程是否已经完成释放掉资源了!所以自定义同步器在设计tryRelease()的时候要明确这一点!
Spring对JDBC的封装
目录
JDBC
步骤
- 加载驱动
- 创建DriverManager
- getConnection
- createStatement
- excute sql
- 得到ResultSet
- Connection.close
Spring对JDBC的封装是使用JdbcTemplate来包装JDBC原始的操作。下面主要看下JdbcTemplate的一些具体操作。
Save&Update
protected int update(final PreparedStatementCreator psc, @Nullable final PreparedStatementSetter pss)
      throws DataAccessException {

   logger.debug("Executing prepared SQL update");
	//转到execute
   return updateCount(execute(psc, ps -> {
      try {
         if (pss != null) {
            pss.setValues(ps);
         }
         int rows = ps.executeUpdate();
         if (logger.isDebugEnabled()) {
            logger.debug("SQL update affected " + rows + " rows");
         }
         return rows;
      }
      finally {
         if (pss instanceof ParameterDisposer) {
            ((ParameterDisposer) pss).cleanupParameters();
         }
      }
   }));
}
execute
将个性化操作使用PreparedStatementCallback进行回调。
public <T> T execute(PreparedStatementCreator psc, PreparedStatementCallback<T> action)
      throws DataAccessException {

   Assert.notNull(psc, "PreparedStatementCreator must not be null");
   Assert.notNull(action, "Callback object must not be null");
   if (logger.isDebugEnabled()) {
      String sql = getSql(psc);
      logger.debug("Executing prepared SQL statement" + (sql != null ? " [" + sql + "]" : ""));
   }
	//1. 获取连接
   Connection con = DataSourceUtils.getConnection(obtainDataSource());
   PreparedStatement ps = null;
   try {
      ps = psc.createPreparedStatement(con);
       //2. 应用用户设定的输入参数,设置FetchSize和MaxRows
      applyStatementSettings(ps);
       //3. 调用回调函数
      T result = action.doInPreparedStatement(ps);
       //4. 警告处理,如果忽略异常就打印,不忽略就抛出SQLWarningException(例如DataTruncation类型的SQLWarning)
      handleWarnings(ps);
      return result;
   }
   catch (SQLException ex) {
      // Release Connection early, to avoid potential connection pool deadlock
      // in the case when the exception translator hasn't been initialized yet.
      if (psc instanceof ParameterDisposer) {
         ((ParameterDisposer) psc).cleanupParameters();
      }
      String sql = getSql(psc);
      JdbcUtils.closeStatement(ps);
      ps = null;
      DataSourceUtils.releaseConnection(con, getDataSource());
      con = null;
      throw translateException("PreparedStatementCallback", sql, ex);
   }
   finally {
      if (psc instanceof ParameterDisposer) {
         ((ParameterDisposer) psc).cleanupParameters();
      }
      JdbcUtils.closeStatement(ps);
      DataSourceUtils.releaseConnection(con, getDataSource());
   }
}
doGetConnection
主要考虑事物方面的处理,保证线程中的数据库操作使用同一个连接(同一个事务)
public static Connection doGetConnection(DataSource dataSource) throws SQLException {
   Assert.notNull(dataSource, "No DataSource specified");

   ConnectionHolder conHolder = (ConnectionHolder) TransactionSynchronizationManager.getResource(dataSource);
   if (conHolder != null && (conHolder.hasConnection() || conHolder.isSynchronizedWithTransaction())) {
      conHolder.requested();
      if (!conHolder.hasConnection()) {
         logger.debug("Fetching resumed JDBC Connection from DataSource");
         conHolder.setConnection(fetchConnection(dataSource));
      }
      return conHolder.getConnection();
   }
   // Else we either got no holder or an empty thread-bound holder here.

   logger.debug("Fetching JDBC Connection from DataSource");
    //从dataSource获取Connection
   Connection con = fetchConnection(dataSource);

    //当前线程支持同步
   if (TransactionSynchronizationManager.isSynchronizationActive()) {
      logger.debug("Registering transaction synchronization for JDBC Connection");
      // Use same Connection for further JDBC actions within the transaction.
      // Thread-bound object will get removed by synchronization at transaction completion.
      ConnectionHolder holderToUse = conHolder;
      if (holderToUse == null) {
         holderToUse = new ConnectionHolder(con);
      }
      else {
         holderToUse.setConnection(con);
      }
      holderToUse.requested();
       //记录数据库连接
       //private static final ThreadLocal<Set<TransactionSynchronization>> synchronizations =
		//	new NamedThreadLocal<>("Transaction synchronizations");
      TransactionSynchronizationManager.registerSynchronization(
            new ConnectionSynchronization(holderToUse, dataSource));
      holderToUse.setSynchronizedWithTransaction(true);
      if (holderToUse != conHolder) {
          //private static final ThreadLocal<Map<Object, Object>> resources =
			//new NamedThreadLocal<>("Transactional resources");
         TransactionSynchronizationManager.bindResource(dataSource, holderToUse);
      }
   }

   return con;
}
query
带参数的query
public <T> T query(
      PreparedStatementCreator psc, @Nullable final PreparedStatementSetter pss, final ResultSetExtractor<T> rse)
      throws DataAccessException {

   Assert.notNull(rse, "ResultSetExtractor must not be null");
   logger.debug("Executing prepared SQL query");

   return execute(psc, new PreparedStatementCallback<T>() {
      @Override
      @Nullable
      public T doInPreparedStatement(PreparedStatement ps) throws SQLException {
         ResultSet rs = null;
         try {
            if (pss != null) {
               pss.setValues(ps);
            }
             //和update区别,使用executeQuery可以返回查询结果
            rs = ps.executeQuery();
             //将结果ResultSet转为List<T>
            return rse.extractData(rs);
         }
         finally {
            JdbcUtils.closeResultSet(rs);
            if (pss instanceof ParameterDisposer) {
               ((ParameterDisposer) pss).cleanupParameters();
            }
         }
      }
   });
}
不带参数的query
public <T> T query(final String sql, final ResultSetExtractor<T> rse) throws DataAccessException {
   Assert.notNull(sql, "SQL must not be null");
   Assert.notNull(rse, "ResultSetExtractor must not be null");
   if (logger.isDebugEnabled()) {
      logger.debug("Executing SQL query [" + sql + "]");
   }

   class QueryStatementCallback implements StatementCallback<T>, SqlProvider {
      @Override
      @Nullable
      public T doInStatement(Statement stmt) throws SQLException {
         ResultSet rs = null;
         try {
             //需要传入sql
            rs = stmt.executeQuery(sql);
            return rse.extractData(rs);
         }
         finally {
            JdbcUtils.closeResultSet(rs);
         }
      }
      @Override
      public String getSql() {
         return sql;
      }
   }

   return execute(new QueryStatementCallback());
}
不带参数的Query使用的是Statement,而带参数的Query使用的是PreparedStatement。
- PreparedStatement包含已经编译的SQL
QueryForObject
return rse.extractData(rs);public List<T> extractData(ResultSet rs) throws SQLException {
List<T> results = (this.rowsExpected > 0 ? new ArrayList<>(this.rowsExpected) : new ArrayList<>());
int rowNum = 0;
while (rs.next()) {
results.add(this.rowMapper.mapRow(rs, rowNum++));
}
return results;
}通过rowMapper
public T mapRow(ResultSet rs, int rowNum) throws SQLException {
   // Validate column count.
   ResultSetMetaData rsmd = rs.getMetaData();
   int nrOfColumns = rsmd.getColumnCount();
   if (nrOfColumns != 1) {
      throw new IncorrectResultSetColumnCountException(1, nrOfColumns);
   }

   // Extract column value from JDBC ResultSet.
   Object result = getColumnValue(rs, 1, this.requiredType);
   if (result != null && this.requiredType != null && !this.requiredType.isInstance(result)) {
      // Extracted value does not match already: try to convert it.
      try {
          //类型转换
         return (T) convertValueToRequiredType(result, this.requiredType);
      }
      catch (IllegalArgumentException ex) {
         throw new TypeMismatchDataAccessException(
               "Type mismatch affecting row number " + rowNum + " and column type '" +
               rsmd.getColumnTypeName(1) + "': " + ex.getMessage());
      }
   }
   return (T) result;
}
对应的类型转换函数
protected Object convertValueToRequiredType(Object value, Class<?> requiredType) {
   if (String.class == requiredType) {
      return value.toString();
   }
   else if (Number.class.isAssignableFrom(requiredType)) {
      if (value instanceof Number) {
         // Convert original Number to target Number class.
         return NumberUtils.convertNumberToTargetClass(((Number) value), (Class<Number>) requiredType);
      }
      else {
         // Convert stringified value to target Number class.
         return NumberUtils.parseNumber(value.toString(),(Class<Number>) requiredType);
      }
   }
    //会调用conversionServcie进行转换
   else if (this.conversionService != null && this.conversionService.canConvert(value.getClass(), requiredType)) {
      return this.conversionService.convert(value, requiredType);
   }
   else {
      throw new IllegalArgumentException(
            "Value [" + value + "] is of type [" + value.getClass().getName() +
            "] and cannot be converted to required type [" + requiredType.getName() + "]");
   }
}
Thread&ThreadPoolExecutor异常处理
Thread&ThreadPoolExecutor异常处理
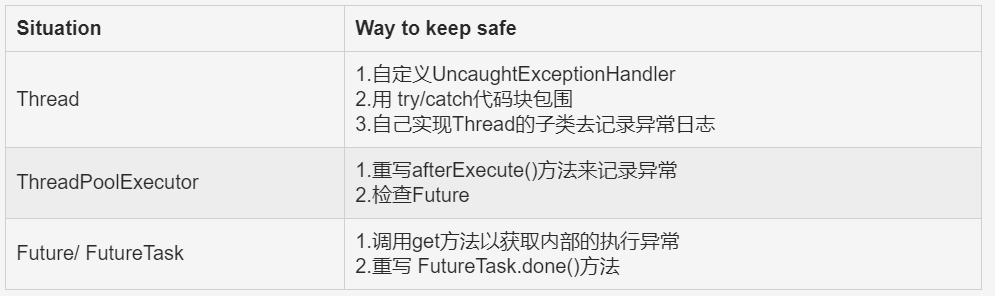
Thread异常处理
1. Thread外部Catch,捕获不到
public class NoCaughtThread
{
    public static void main(String[] args)
    {
        try
        {
            Thread thread = new Thread(new Task());
            thread.start();
        }
        catch (Exception e)//不会被catch
        {
            System.out.println("==Exception: "+e.getMessage());
        }
    }
}

class Task implements Runnable
{
    @Override
    public void run()
    {
        System.out.println(3/2);
        System.out.println(3/0);
        System.out.println(3/1);
    }
}
2. Thread Run内部catch,可以捕获
public class InitiativeCaught
{
    public void threadDeal(Runnable r, Throwable t)
    {
        System.out.println("==Exception: "+t.getMessage());
    }

    class InitialtiveThread implements Runnable
    {
        @Override
        public void run()
        {
            Throwable thrown = null;
            try
            {
                System.out.println(3/2);
                System.out.println(3/0);
                System.out.println(3/1);
            }
            catch(Throwable e)
            {
                thrown =e;
            }
            finally{
                threadDeal(this,thrown);
            }
        }
    }

    public static void main(String[] args)
    {
        ExecutorService exec = Executors.newCachedThreadPool();
        exec.execute(new InitiativeCaught().new InitialtiveThread());
        exec.shutdown();
    }

}
3. 通过UncaughtExceptionHandler捕获异常
public class WitchCaughtThread
{
    public static void main(String args[])
    {
        Thread thread = new Thread(new Task());
        //为所有的Thread设置一个默认的UncaughtExceptionHandler
        //Thread.setDefaultUncaughtExceptionHandler(new ExceptionHandler()); 给
        thread.setUncaughtExceptionHandler(new ExceptionHandler());
        thread.start();
    }
}

class ExceptionHandler implements UncaughtExceptionHandler
{
    @Override
    public void uncaughtException(Thread t, Throwable e)
    {
        System.out.println("==Exception: "+e.getMessage());
    }
}
ThreadPoolExecutor线程池异常处理
1. UncaughtExceptionHandler在线程池中失效
public class ExecuteCaught
{
public static void main(String[] args)
{
ExecutorService exec = Executors.newCachedThreadPool();
Thread thread = new Thread(new Task());
//这样不管用
thread.setUncaughtExceptionHandler(new ExceptionHandler());
exec.execute(thread);
exec.shutdown();
}
}2. 在run内部设置UncaughtExceptionHandler,只能用于executorService.execute,不能用于executorService.submit
public static void main(String[] args) {
   ExecutorService executorService = Executors.newFixedThreadPool(5);

   //execute可以通过UncaughtExceptionHandler捕获
   /*executorService.execute(new Runnable() {

      @Override
      public void run() {
         Thread.currentThread().setUncaughtExceptionHandler(new CustomUncaughtExceptionHandler());

         int a = 1/0;
      }
   });*/


   //submit 不能捕获
   executorService.submit(new Runnable() {

      @Override
      public void run() {
         Thread.currentThread().setUncaughtExceptionHandler(new CustomUncaughtExceptionHandler());

         int a = 1/0;
      }
   });


}

public static class CustomUncaughtExceptionHandler implements Thread.UncaughtExceptionHandler {

   @Override
   public void uncaughtException(Thread t, Throwable e) {
      System.out.println("eee:" + e);
   }
}
2.1. 不能通过ThreadFactory 设置线程池UncaughtExceptionHandler
ThreadFactory threadFactory = new ThreadFactory() {
            @Override
            public Thread newThread(Runnable r) {
                System.out.println("creating pooled thread");
                final Thread thread = new Thread(r);
               //以为这样可以抓住执行过程的异常
                thread.setUncaughtExceptionHandler(exceptionHandler);
                return thread;
            }
        };
ExecutorService threadPool = Executors.newFixedThreadPool(1, threadFactory);
3. executorService.submit要通过future.get来捕获异常
Future<?> submit = executorService.submit(new Runnable() {

   @Override
   public void run() {
      Thread.currentThread().setUncaughtExceptionHandler(new CustomUncaughtExceptionHandler());

      int a = 1 / 0;
   }
});

try {
   Object o = submit.get();
} catch (InterruptedException e) {
   e.printStackTrace();
} catch (ExecutionException e) {
   System.out.println("eee:" + e);//可以捕获
}
4. 重写ThreadPoolExecutor的afterExecute方法捕获异常
public class ThreadStudy2 {
    public static class ExceptionCaughtThreadPool extends ThreadPoolExecutor {
        List<Throwable> exceptions=new LinkedList();

      public ExceptionCaughtThreadPool(int corePoolSize, int maximumPoolSize, long keepAliveTime, TimeUnit unit, BlockingQueue<Runnable> workQueue) {
         super(corePoolSize, maximumPoolSize, keepAliveTime, unit, workQueue);
      }

      //构造函数省略
        @Override
        protected void afterExecute(Runnable r, Throwable t) {
            if (t!=null){
                exceptions.add(t);
                System.out.println("catch exception in afterExecute");
                return;
            }
            System.out.println("everything is ok");
        }
    }
    public static void main(String[] args){
        ExceptionCaughtThreadPool threadPool=new ExceptionCaughtThreadPool(1,1,100,TimeUnit.SECONDS,new LinkedBlockingQueue<>());
        threadPool.execute(new Runnable() {
            @Override
            public void run() {
                throw new RuntimeException();
            }
        });
        System.out.println("--------DONE-----------");
    }
}
参考
通过BeanPostProcessor理解Spring中Bean的生命周期及AOP原理
目录
- 目录
- Spring中Bean的生命周期
- 注册BeanPostProcessor
- ApplicationContextAware 在哪被调用?
- 多个BeanPostProcessor,先注册的会不会对后面注册的BeanPostProcessor起作用?
- InstantiationAwareBeanPostProcessor应用——AOP
流程图
代码流程可参见 https://4rnold.github.io/Blog/BeanPostProcessor%E6%9E%84%E5%BB%BA%E6%B5%81%E7%A8%8B.html
Spring中Bean的生命周期

Spring作为一个优秀的框架,拥有良好的可扩展性。Spring对对象的可扩展性主要就是依靠InstantiationAwareBeanPostProcessor和BeanPostProcessor来实现的。
- InstantiationAwareBeanPostProcessor 主要是作用于实例化阶段。
- BeanPostProcessor 主要作用与 初始化阶段。
public AnnotationConfigApplicationContext(Class<?>... annotatedClasses) {
   this();
   register(annotatedClasses);
   refresh();
}
applicationContext构造方法中调用refresh()方法
refresh() 方法中这里主要关心两个放
- registerBeanPostProcessors(beanFactory); 注册BeanPostProcessor
- finishBeanFactoryInitialization(beanFactory); 注册余下的Singletions Bean
注册BeanPostProcessor
public static void registerBeanPostProcessors(
      ConfigurableListableBeanFactory beanFactory, AbstractApplicationContext applicationContext) {

   String[] postProcessorNames = beanFactory.getBeanNamesForType(BeanPostProcessor.class, true, false);

   // Register BeanPostProcessorChecker that logs an info message when
   // a bean is created during BeanPostProcessor instantiation, i.e. when
   // a bean is not eligible for getting processed by all BeanPostProcessors.
   int beanProcessorTargetCount = beanFactory.getBeanPostProcessorCount() + 1 + postProcessorNames.length;
   beanFactory.addBeanPostProcessor(new BeanPostProcessorChecker(beanFactory, beanProcessorTargetCount));

   // Separate between BeanPostProcessors that implement PriorityOrdered,
   // Ordered, and the rest.
   List<BeanPostProcessor> priorityOrderedPostProcessors = new ArrayList<>();
   List<BeanPostProcessor> internalPostProcessors = new ArrayList<>();
   List<String> orderedPostProcessorNames = new ArrayList<>();
   List<String> nonOrderedPostProcessorNames = new ArrayList<>();
   for (String ppName : postProcessorNames) {
      if (beanFactory.isTypeMatch(ppName, PriorityOrdered.class)) {
         BeanPostProcessor pp = beanFactory.getBean(ppName, BeanPostProcessor.class);
         priorityOrderedPostProcessors.add(pp);
         if (pp instanceof MergedBeanDefinitionPostProcessor) {
            internalPostProcessors.add(pp);
         }
      }
      else if (beanFactory.isTypeMatch(ppName, Ordered.class)) {
         orderedPostProcessorNames.add(ppName);
      }
      else {
         nonOrderedPostProcessorNames.add(ppName);
      }
   }

   // First, register the BeanPostProcessors that implement PriorityOrdered.
   sortPostProcessors(priorityOrderedPostProcessors, beanFactory);
   registerBeanPostProcessors(beanFactory, priorityOrderedPostProcessors);

   // Next, register the BeanPostProcessors that implement Ordered.
   List<BeanPostProcessor> orderedPostProcessors = new ArrayList<>();
   for (String ppName : orderedPostProcessorNames) {
      BeanPostProcessor pp = beanFactory.getBean(ppName, BeanPostProcessor.class);
      orderedPostProcessors.add(pp);
      if (pp instanceof MergedBeanDefinitionPostProcessor) {
         internalPostProcessors.add(pp);
      }
   }
   sortPostProcessors(orderedPostProcessors, beanFactory);
   registerBeanPostProcessors(beanFactory, orderedPostProcessors);

   // Now, register all regular BeanPostProcessors.
   List<BeanPostProcessor> nonOrderedPostProcessors = new ArrayList<>();
   for (String ppName : nonOrderedPostProcessorNames) {
      BeanPostProcessor pp = beanFactory.getBean(ppName, BeanPostProcessor.class);
      nonOrderedPostProcessors.add(pp);
      if (pp instanceof MergedBeanDefinitionPostProcessor) {
         internalPostProcessors.add(pp);
      }
   }
   registerBeanPostProcessors(beanFactory, nonOrderedPostProcessors);

   // Finally, re-register all internal BeanPostProcessors.
   sortPostProcessors(internalPostProcessors, beanFactory);
   registerBeanPostProcessors(beanFactory, internalPostProcessors);

   // Re-register post-processor for detecting inner beans as ApplicationListeners,
   // moving it to the end of the processor chain (for picking up proxies etc).
   beanFactory.addBeanPostProcessor(new ApplicationListenerDetector(applicationContext));
}
通过beanFactory.getBeanNamesForType来获取所有BeanPostProcessor。
BeanPostProcessor按优先级分为PriorityOrdered,Ordered和其他的,对他们分别进行操作。
- 先beanFactory.getBean进性实例化,
- 再使用sortPostProcessors() 进行排序,
- 最后registerBeanPostProcessors()进行注册。
BeanFactory.getBean()(注册Bean)
protected <T> T doGetBean(final String name, @Nullable final Class<T> requiredType,
     @Nullable final Object[] args, boolean typeCheckOnly) throws BeansException {

   final String beanName = transformedBeanName(name);
   Object bean;
   //缓存
   // Eagerly check singleton cache for manually registered singletons.
   Object sharedInstance = getSingleton(beanName);
   if (sharedInstance != null && args == null) {
     bean = getObjectForBeanInstance(sharedInstance, name, beanName, null);
   }

   else {
     // Fail if we're already creating this bean instance:
     // We're assumably within a circular reference.
     //判断循环引用,抛异常
     if (isPrototypeCurrentlyInCreation(beanName)) {
        throw new BeanCurrentlyInCreationException(beanName);
     }

     // Check if bean definition exists in this factory.
     BeanFactory parentBeanFactory = getParentBeanFactory();
     // this.beanDefinitionMap.containsKey(beanName); 就是判断有没有BeanDefinition
     if (parentBeanFactory != null && !containsBeanDefinition(beanName)) {
        // Not found -> check parent.
        String nameToLookup = originalBeanName(name);
        if (parentBeanFactory instanceof AbstractBeanFactory) {
           return ((AbstractBeanFactory) parentBeanFactory).doGetBean(
                nameToLookup, requiredType, args, typeCheckOnly);
        }
        else if (args != null) {
           // Delegation to parent with explicit args.
           return (T) parentBeanFactory.getBean(nameToLookup, args);
        }
        else {
           // No args -> delegate to standard getBean method.
           return parentBeanFactory.getBean(nameToLookup, requiredType);
        }
     }

     if (!typeCheckOnly) {
        markBeanAsCreated(beanName);
     }

     try {
        final RootBeanDefinition mbd = getMergedLocalBeanDefinition(beanName);
        checkMergedBeanDefinition(mbd, beanName, args);

        // Guarantee initialization of beans that the current bean depends on.
        // 获取bean的依赖,实例化bean前先实例化依赖。
        String[] dependsOn = mbd.getDependsOn();
        if (dependsOn != null) {
           for (String dep : dependsOn) {
              if (isDependent(beanName, dep)) {
                throw new BeanCreationException(mbd.getResourceDescription(), beanName,
                      "Circular depends-on relationship between '" + beanName + "' and '" + dep + "'");
              }
              registerDependentBean(dep, beanName);
              try {
                getBean(dep);
              }
              catch (NoSuchBeanDefinitionException ex) {
                throw new BeanCreationException(mbd.getResourceDescription(), beanName,
                      "'" + beanName + "' depends on missing bean '" + dep + "'", ex);
              }
           }
        }
        //创建实例
        // Create bean instance.
        if (mbd.isSingleton()) {
           sharedInstance = getSingleton(beanName, () -> {
              try {
                return createBean(beanName, mbd, args);
              }
              catch (BeansException ex) {
                // Explicitly remove instance from singleton cache: It might have been put there
                // eagerly by the creation process, to allow for circular reference resolution.
                // Also remove any beans that received a temporary reference to the bean.
                destroySingleton(beanName);
                throw ex;
              }
           });
           bean = getObjectForBeanInstance(sharedInstance, name, beanName, mbd);
        }

        else if (mbd.isPrototype()) {
           // It's a prototype -> create a new instance.
           Object prototypeInstance = null;
           try {
              beforePrototypeCreation(beanName);
              prototypeInstance = createBean(beanName, mbd, args);
           }
           finally {
              afterPrototypeCreation(beanName);
           }
           bean = getObjectForBeanInstance(prototypeInstance, name, beanName, mbd);
        }

        else {
           String scopeName = mbd.getScope();
           final Scope scope = this.scopes.get(scopeName);
           if (scope == null) {
              throw new IllegalStateException("No Scope registered for scope name '" + scopeName + "'");
           }
           try {
              Object scopedInstance = scope.get(beanName, () -> {
                beforePrototypeCreation(beanName);
                try {
                   return createBean(beanName, mbd, args);
                }
                finally {
                   afterPrototypeCreation(beanName);
                }
              });
              bean = getObjectForBeanInstance(scopedInstance, name, beanName, mbd);
           }
        }
     }
   }

   // Check if required type matches the type of the actual bean instance.
   if (requiredType != null && !requiredType.isInstance(bean)) {
     try {
        T convertedBean = getTypeConverter().convertIfNecessary(bean, requiredType);
        if (convertedBean == null) {
           throw new BeanNotOfRequiredTypeException(name, requiredType, bean.getClass());
        }
        return convertedBean;
     }
   }
   return (T) bean;
}- 先getSingleton()从缓存中获取Bean,如果没有则创建。
- 创建过程先检查有无循环依赖,有则抛出异常。
- 实例化bean前先实例化所依赖的对象。
createBean()
@Override
protected Object createBean(String beanName, RootBeanDefinition mbd, @Nullable Object[] args)
      throws BeanCreationException {
   RootBeanDefinition mbdToUse = mbd;

   // Make sure bean class is actually resolved at this point, and
   // clone the bean definition in case of a dynamically resolved Class
   // which cannot be stored in the shared merged bean definition.
   Class<?> resolvedClass = resolveBeanClass(mbd, beanName);
   if (resolvedClass != null && !mbd.hasBeanClass() && mbd.getBeanClassName() != null) {
      mbdToUse = new RootBeanDefinition(mbd);
      mbdToUse.setBeanClass(resolvedClass);
   }

   // Prepare method overrides.
   try {
      mbdToUse.prepareMethodOverrides();
   }
...

   try {
      // Give BeanPostProcessors a chance to return a proxy instead of the target bean instance.
      // 处理InstantiationAwareBeanPostProcessor
      Object bean = resolveBeforeInstantiation(beanName, mbdToUse);
      if (bean != null) {
         return bean;
      }
   }
...

   try {
       //创建对象
      Object beanInstance = doCreateBean(beanName, mbdToUse, args);
      if (logger.isDebugEnabled()) {
         logger.debug("Finished creating instance of bean '" + beanName + "'");
      }
      return beanInstance;
   }
	...
}
resolveBeforeInstantiation() 在doCreateBean() 之前调用,使用InstantiationAwareBeanPostProcessor,在Bean被创建之前处理。
resolveBeforeInstantiation
protected Object resolveBeforeInstantiation(String beanName, RootBeanDefinition mbd) {
   Object bean = null;
   if (!Boolean.FALSE.equals(mbd.beforeInstantiationResolved)) {
      // Make sure bean class is actually resolved at this point.
      if (!mbd.isSynthetic() && hasInstantiationAwareBeanPostProcessors()) {
         Class<?> targetType = determineTargetType(beanName, mbd);
         if (targetType != null) {
            // 调用InstantiationAwareBeanPostProcessor.postProcessBeforeInstantiation()
            bean = applyBeanPostProcessorsBeforeInstantiation(targetType, beanName);
            if (bean != null) {
               bean = applyBeanPostProcessorsAfterInitialization(bean, beanName);
            }
         }
      }
      mbd.beforeInstantiationResolved = (bean != null);
   }
   return bean;
}
InstantiationAwareBeanPostProcessor.postProcessBeforeInstantiation()
protected Object applyBeanPostProcessorsBeforeInstantiation(Class<?> beanClass, String beanName) {
   for (BeanPostProcessor bp : getBeanPostProcessors()) {
      if (bp instanceof InstantiationAwareBeanPostProcessor) {
         InstantiationAwareBeanPostProcessor ibp = (InstantiationAwareBeanPostProcessor) bp;
          // 执行所有InstantiationAwareBeanPostProcessor的postProcessBeforeInstantiation
         Object result = ibp.postProcessBeforeInstantiation(beanClass, beanName);
         if (result != null) {
            return result;
         }
      }
   }
   return null;
}
BeanPostProcessor.postProcessAfterInitialization()
这里调用postProcessAfterInitialization 有啥用??
此处调用postProcessAfterInitialization是因为由于Bean是用InstantiationAwareBeanPostProcessor来创建的对象,而没有通过常规的doCreateBean()来常见对象,所以不会执行doCreateBean()中的postProcessAfterInitialization、postProcessBeforeInitialization。此处作为补偿调用postProcessAfterInitialization。(但好像通过InstantiationAwareBeanPostProcessor来创建的对象没有执行postProcessBeforeInitialization)
public Object applyBeanPostProcessorsAfterInitialization(Object existingBean, String beanName)
      throws BeansException {

   Object result = existingBean;
   for (BeanPostProcessor beanProcessor : getBeanPostProcessors()) {
       // 执行所有beanProcessor.postProcessAfterInitialization
      Object current = beanProcessor.postProcessAfterInitialization(result, beanName);
      if (current == null) {
         return result;
      }
      result = current;
   }
   return result;
}
doCreateBean() 创建bean
protected Object doCreateBean(final String beanName, final RootBeanDefinition mbd, final @Nullable Object[] args)
      throws BeanCreationException {

   // Instantiate the bean.
   BeanWrapper instanceWrapper = null;
   if (mbd.isSingleton()) {
      instanceWrapper = this.factoryBeanInstanceCache.remove(beanName);
   }
   if (instanceWrapper == null) {
       // 创建实例
      instanceWrapper = createBeanInstance(beanName, mbd, args);
   }
   final Object bean = instanceWrapper.getWrappedInstance();
   Class<?> beanType = instanceWrapper.getWrappedClass();
   if (beanType != NullBean.class) {
      mbd.resolvedTargetType = beanType;
   }

   // Allow post-processors to modify the merged bean definition.
   synchronized (mbd.postProcessingLock) {
      if (!mbd.postProcessed) {
         try {
            applyMergedBeanDefinitionPostProcessors(mbd, beanType, beanName);
         }
         mbd.postProcessed = true;
      }
   }

   // Eagerly cache singletons to be able to resolve circular references
   // even when triggered by lifecycle interfaces like BeanFactoryAware.
   boolean earlySingletonExposure = (mbd.isSingleton() && this.allowCircularReferences &&
         isSingletonCurrentlyInCreation(beanName));
   if (earlySingletonExposure) {
      if (logger.isDebugEnabled()) {
         logger.debug("Eagerly caching bean '" + beanName +
               "' to allow for resolving potential circular references");
      }
      addSingletonFactory(beanName, () -> getEarlyBeanReference(beanName, mbd, bean));
   }

   // Initialize the bean instance.
   Object exposedObject = bean;
   try {
      populateBean(beanName, mbd, instanceWrapper);
      exposedObject = initializeBean(beanName, exposedObject, mbd);
   }


   if (earlySingletonExposure) {
      Object earlySingletonReference = getSingleton(beanName, false);
      if (earlySingletonReference != null) {
         if (exposedObject == bean) {
            exposedObject = earlySingletonReference;
         }
         else if (!this.allowRawInjectionDespiteWrapping && hasDependentBean(beanName)) {
            String[] dependentBeans = getDependentBeans(beanName);
            Set<String> actualDependentBeans = new LinkedHashSet<>(dependentBeans.length);
            for (String dependentBean : dependentBeans) {
               if (!removeSingletonIfCreatedForTypeCheckOnly(dependentBean)) {
                  actualDependentBeans.add(dependentBean);
               }
            }
            if (!actualDependentBeans.isEmpty()) {
               throw new BeanCurrentlyInCreationException
         }
      }
   }

   // Register bean as disposable.
   try {
      registerDisposableBeanIfNecessary(beanName, bean, mbd);
   }


   return exposedObject;
}
createBeanInstance 创建实例
populateBean 设置Bean属性
protected void populateBean(String beanName, RootBeanDefinition mbd, @Nullable BeanWrapper bw) {
   if (bw == null) {
      if (mbd.hasPropertyValues()) {
         throw new BeanCreationException(
               mbd.getResourceDescription(), beanName, "Cannot apply property values to null instance");
      }
      else {
         // Skip property population phase for null instance.
         return;
      }
   }

   // Give any InstantiationAwareBeanPostProcessors the opportunity to modify the
   // state of the bean before properties are set. This can be used, for example,
   // to support styles of field injection.
   boolean continueWithPropertyPopulation = true;

   if (!mbd.isSynthetic() && hasInstantiationAwareBeanPostProcessors()) {
      for (BeanPostProcessor bp : getBeanPostProcessors()) {
         if (bp instanceof InstantiationAwareBeanPostProcessor) {
            InstantiationAwareBeanPostProcessor ibp = (InstantiationAwareBeanPostProcessor) bp;
             //#### postProcessAfterInstantiation ####
            if (!ibp.postProcessAfterInstantiation(bw.getWrappedInstance(), beanName)) {
               continueWithPropertyPopulation = false;
               break;
            }
         }
      }
   }

   if (!continueWithPropertyPopulation) {
      return;
   }

   PropertyValues pvs = (mbd.hasPropertyValues() ? mbd.getPropertyValues() : null);

   if (mbd.getResolvedAutowireMode() == RootBeanDefinition.AUTOWIRE_BY_NAME ||
         mbd.getResolvedAutowireMode() == RootBeanDefinition.AUTOWIRE_BY_TYPE) {
      MutablePropertyValues newPvs = new MutablePropertyValues(pvs);

      // Add property values based on autowire by name if applicable.
      if (mbd.getResolvedAutowireMode() == RootBeanDefinition.AUTOWIRE_BY_NAME) {
         autowireByName(beanName, mbd, bw, newPvs);
      }

      // Add property values based on autowire by type if applicable.
      if (mbd.getResolvedAutowireMode() == RootBeanDefinition.AUTOWIRE_BY_TYPE) {
         autowireByType(beanName, mbd, bw, newPvs);
      }

      pvs = newPvs;
   }

   boolean hasInstAwareBpps = hasInstantiationAwareBeanPostProcessors();
   boolean needsDepCheck = (mbd.getDependencyCheck() != RootBeanDefinition.DEPENDENCY_CHECK_NONE);

   if (hasInstAwareBpps || needsDepCheck) {
      if (pvs == null) {
         pvs = mbd.getPropertyValues();
      }
      PropertyDescriptor[] filteredPds = filterPropertyDescriptorsForDependencyCheck(bw, mbd.allowCaching);
      if (hasInstAwareBpps) {
         for (BeanPostProcessor bp : getBeanPostProcessors()) {
            if (bp instanceof InstantiationAwareBeanPostProcessor) {
               InstantiationAwareBeanPostProcessor ibp = (InstantiationAwareBeanPostProcessor) bp;
               pvs = ibp.postProcessPropertyValues(pvs, filteredPds, bw.getWrappedInstance(), beanName);
               if (pvs == null) {
                  return;
               }
            }
         }
      }
      if (needsDepCheck) {
         checkDependencies(beanName, mbd, filteredPds, pvs);
      }
   }

   if (pvs != null) {
      applyPropertyValues(beanName, mbd, bw, pvs);
   }
}
InstantiationAwareBeanPostProcessor.postProcessAfterInstantiation
initializeBean 初始化方法
protected Object initializeBean(final String beanName, final Object bean, @Nullable RootBeanDefinition mbd) {
   if (System.getSecurityManager() != null) {
     AccessController.doPrivileged((PrivilegedAction<Object>) () -> {
        invokeAwareMethods(beanName, bean);
        return null;
     }, getAccessControlContext());
   }
   else {
     //处理BeanNameAware、BeanClassLoaderAware、BeanFactoryAware
     invokeAwareMethods(beanName, bean);
   }

   Object wrappedBean = bean;
   if (mbd == null || !mbd.isSynthetic()) {
     //获取所有BeanPostProcessor,挨个执行postProcessBeforeInitialization方法
     //如果有一个返回null,则不继续执行余下的BeanPostProcessor
     wrappedBean = applyBeanPostProcessorsBeforeInitialization(wrappedBean, beanName);
   }

   try {
     invokeInitMethods(beanName, wrappedBean, mbd);
   }
   catch (Throwable ex) {
     throw new BeanCreationException(
           (mbd != null ? mbd.getResourceDescription() : null),
           beanName, "Invocation of init method failed", ex);
   }
   if (mbd == null || !mbd.isSynthetic()) {
     wrappedBean = applyBeanPostProcessorsAfterInitialization(wrappedBean, beanName);
   }

   return wrappedBean;
}
处理BeanNameAware、BeanClassLoaderAware、BeanFactoryAware
applyBeanPostProcessorsBeforeInitialization
invokeInitMethods
applyBeanPostProcessorsAfterInitialization
getSingleton(String beanName, ObjectFactory<?> singletonFactory)
注册创建的bean
##registerBeanPostProcessors
private static void registerBeanPostProcessors(
      ConfigurableListableBeanFactory beanFactory, List<BeanPostProcessor> postProcessors) {

   for (BeanPostProcessor postProcessor : postProcessors) {
      // 注册进beanFactory
      beanFactory.addBeanPostProcessor(postProcessor);
   }
}
ApplicationContextAware 在哪被调用?
上面整个流程好像没有ApplicationContextAware的调用,查看相关源码ApplicationContextAware也是通过BeanPostProcessor来实现的。
在ApplicationContextAwareProcessor.postProcessBeforeInitialization() 中设置,另外还包括其他各种aware
private void invokeAwareInterfaces(Object bean) {
   if (bean instanceof Aware) {
      if (bean instanceof EnvironmentAware) {
         ((EnvironmentAware) bean).setEnvironment(this.applicationContext.getEnvironment());
      }
      if (bean instanceof EmbeddedValueResolverAware) {
         ((EmbeddedValueResolverAware) bean).setEmbeddedValueResolver(this.embeddedValueResolver);
      }
      if (bean instanceof ResourceLoaderAware) {
         ((ResourceLoaderAware) bean).setResourceLoader(this.applicationContext);
      }
      if (bean instanceof ApplicationEventPublisherAware) {
         ((ApplicationEventPublisherAware) bean).setApplicationEventPublisher(this.applicationContext);
      }
      if (bean instanceof MessageSourceAware) {
         ((MessageSourceAware) bean).setMessageSource(this.applicationContext);
      }
      if (bean instanceof ApplicationContextAware) {
         ((ApplicationContextAware) bean).setApplicationContext(this.applicationContext);
      }
   }
}
多个BeanPostProcessor,先注册的会不会对后面注册的BeanPostProcessor起作用?
在registerBeanPostProcessors()中,可以看到
BeanPostProcessor按优先级分为PriorityOrdered,Ordered和其他的,对他们分别进行操作。
- 先beanFactory.getBean进性实例化,
- 再使用sortPostProcessors() 进行排序,
- 最后registerBeanPostProcessors()进行注册。
BeanPostProcessor是按优先级,一批一批实例化后通过registerBeanPostProcessors()注册的。
所以,优先级高的BeanPostProcessor对优先级低的有作用,相同优先级的BeanPostProcessor没作用(和实例化顺序无关)。
InstantiationAwareBeanPostProcessor应用——AOP
aop的原理
最基本的原理就是通过动态代理(jdk,cglib)来构造出一个代理对象,在容器创建bean的时候替换原来的bean。
是谁来创建这个代理对象呢?AnnotationAwareAspectJAutoProxyCreator

创建AOP
@EnableAspectJAutoProxy
使用@import(AspectJAutoProxyRegistrar.class) 导入 AspectJAutoProxyRegistrar
@Target(ElementType.TYPE)
@Retention(RetentionPolicy.RUNTIME)
@Documented
//引入AspectJAutoProxyRegistrar
@Import(AspectJAutoProxyRegistrar.class)
public @interface EnableAspectJAutoProxy {

   /**
    * Indicate whether subclass-based (CGLIB) proxies are to be created as opposed
    * to standard Java interface-based proxies. The default is {@code false}.
    */
   boolean proxyTargetClass() default false;

   /**
    * Indicate that the proxy should be exposed by the AOP framework as a {@code ThreadLocal}
    * for retrieval via the {@link org.springframework.aop.framework.AopContext} class.
    * Off by default, i.e. no guarantees that {@code AopContext} access will work.
    * @since 4.3.1
    */
   boolean exposeProxy() default false;

}
AspectJAutoProxyRegistrar 是一个ImportBeanDefinitionRegistrar。
ImportBeanDefinitionRegistrar 是@import 导入组件的一种方式
@import导入bean的三种方式:1. 普通bean,2. ImportSelector,3. ImportBeanDefinitionRegistrar
注册了AnnotationAwareAspectJAutoProxyCreator类的定义信息(bean definition)。
class AspectJAutoProxyRegistrar implements ImportBeanDefinitionRegistrar {

   /**
    * Register, escalate, and configure the AspectJ auto proxy creator based on the value
    * of the @{@link EnableAspectJAutoProxy#proxyTargetClass()} attribute on the importing
    * {@code @Configuration} class.
    */
   @Override
   public void registerBeanDefinitions(
         AnnotationMetadata importingClassMetadata, BeanDefinitionRegistry registry) {

       // 注册AspectJAnnotationAutoProxyCreator,注册类的定义信息(不是对象,还没有实例化)
      AopConfigUtils.registerAspectJAnnotationAutoProxyCreatorIfNecessary(registry);

      AnnotationAttributes enableAspectJAutoProxy =
            AnnotationConfigUtils.attributesFor(importingClassMetadata, EnableAspectJAutoProxy.class);
      if (enableAspectJAutoProxy != null) {
         if (enableAspectJAutoProxy.getBoolean("proxyTargetClass")) {
            AopConfigUtils.forceAutoProxyCreatorToUseClassProxying(registry);
         }
         if (enableAspectJAutoProxy.getBoolean("exposeProxy")) {
            AopConfigUtils.forceAutoProxyCreatorToExposeProxy(registry);
         }
      }
   }

}
AnnotationAwareAspectJAutoProxyCreator

AnnotationAwareAspectJAutoProxyCreator既实现了SmartInstantiationAwareBeanPostProcessor 又实现了BeanFactoryAware。就可以对容器做一些事情。
AnnotationAwareAspectJAutoProxyCreator 实现了Order接口,所以先于普通的BeanPostProcessor注册,并对普通BeanPostProcessor也能起作用。
AnnotationAwareAspectJAutoProxyCreator 是InstantiationAwareBeanPostProcessor,会在Bean被创建之前,在resolveBeforeInstantiation中被调用
InstantiationAwareBeanPostProcessor.postProcessBeforeInstantiation
//org.springframework.aop.framework.autoproxy.AbstractAutoProxyCreator#postProcessBeforeInstantiation
public Object postProcessBeforeInstantiation(Class<?> beanClass, String beanName) throws BeansException {
   Object cacheKey = getCacheKey(beanClass, beanName);

   if (!StringUtils.hasLength(beanName) || !this.targetSourcedBeans.contains(beanName)) {
      //advisedBeans保存所有需要增强的bean,
     if (this.advisedBeans.containsKey(cacheKey)) {
        return null;
     }
      //是否是Advice、Pointcut、Advisor、AopInfrastructureBean
      //判断是否是切面(判断是否有aspect注解)
     if (isInfrastructureClass(beanClass) || shouldSkip(beanClass, beanName)) {
        this.advisedBeans.put(cacheKey, Boolean.FALSE);
        return null;
     }
   }

   // Create proxy here if we have a custom TargetSource.
   // Suppresses unnecessary default instantiation of the target bean:
   // The TargetSource will handle target instances in a custom fashion.
   TargetSource targetSource = getCustomTargetSource(beanClass, beanName);
   if (targetSource != null) {
     if (StringUtils.hasLength(beanName)) {
        this.targetSourcedBeans.add(beanName);
     }
     Object[] specificInterceptors = getAdvicesAndAdvisorsForBean(beanClass, beanName, targetSource);
     Object proxy = createProxy(beanClass, beanName, specificInterceptors, targetSource);
     this.proxyTypes.put(cacheKey, proxy.getClass());
     return proxy;
   }

   return null;
}
对AOP来说有啥用?
创建目标对象
- createBeanInstance()创建对象
- populateBean()设置属性
InstantiationAwareBeanPostProcessor.postProcessAfterInitialization(initializeBean()中的)
//org.springframework.aop.framework.autoproxy.AbstractAutoProxyCreator#postProcessAfterInitialization
public Object postProcessAfterInitialization(@Nullable Object bean, String beanName) throws BeansException {
   if (bean != null) {
      Object cacheKey = getCacheKey(bean.getClass(), beanName);
      if (!this.earlyProxyReferences.contains(cacheKey)) {
         return wrapIfNecessary(bean, beanName, cacheKey);
      }
   }
   return bean;
}
wrapIfNecessary()包装Bean
protected Object wrapIfNecessary(Object bean, String beanName, Object cacheKey) {
   if (StringUtils.hasLength(beanName) && this.targetSourcedBeans.contains(beanName)) {
      return bean;
   }
   if (Boolean.FALSE.equals(this.advisedBeans.get(cacheKey))) {
      return bean;
   }
    //和前面一样
   if (isInfrastructureClass(bean.getClass()) || shouldSkip(bean.getClass(), beanName)) {
      this.advisedBeans.put(cacheKey, Boolean.FALSE);
      return bean;
   }

   // Create proxy if we have advice.
    //创建代理对象
    //获取所有可用增强器,并排序
   Object[] specificInterceptors = getAdvicesAndAdvisorsForBean(bean.getClass(), beanName, null);
   if (specificInterceptors != DO_NOT_PROXY) {
      this.advisedBeans.put(cacheKey, Boolean.TRUE);
      Object proxy = createProxy(
            bean.getClass(), beanName, specificInterceptors, new SingletonTargetSource(bean));
      this.proxyTypes.put(cacheKey, proxy.getClass());
      return proxy;
   }

   this.advisedBeans.put(cacheKey, Boolean.FALSE);
   return bean;
}
创建代理对象
获取增强器是从BeanFactoryAspectJAdvisorsBuilder.advisorsCache中获取。
什么时候注册的增强器??

是在AbstractAutoProxyCreator#postProcessBeforeInstantiation 中
//org.springframework.aop.aspectj.annotation.BeanFactoryAspectJAdvisorsBuilder#buildAspectJAdvisors
// 根据beanName来构造Advisor
MetadataAwareAspectInstanceFactory factory =
      new BeanFactoryAspectInstanceFactory(this.beanFactory, beanName);
List<Advisor> classAdvisors = this.advisorFactory.getAdvisors(factory);
public List<Advisor> getAdvisors(MetadataAwareAspectInstanceFactory aspectInstanceFactory) {
Class<?> aspectClass = aspectInstanceFactory.getAspectMetadata().getAspectClass();
String aspectName = aspectInstanceFactory.getAspectMetadata().getAspectName();
validate(aspectClass);
// We need to wrap the MetadataAwareAspectInstanceFactory with a decorator
// so that it will only instantiate once.
MetadataAwareAspectInstanceFactory lazySingletonAspectInstanceFactory =
new LazySingletonAspectInstanceFactoryDecorator(aspectInstanceFactory);
List<Advisor> advisors = new LinkedList<>();
// 获取aspectClass的Method
for (Method method : getAdvisorMethods(aspectClass)) {
// 构造InstantiationModelAwarePointcutAdvisorImpl
Advisor advisor = getAdvisor(method, lazySingletonAspectInstanceFactory, advisors.size(), aspectName);
if (advisor != null) {
advisors.add(advisor);
}
}
// If it's a per target aspect, emit the dummy instantiating aspect.
if (!advisors.isEmpty() && lazySingletonAspectInstanceFactory.getAspectMetadata().isLazilyInstantiated()) {
Advisor instantiationAdvisor = new SyntheticInstantiationAdvisor(lazySingletonAspectInstanceFactory);
advisors.add(0, instantiationAdvisor);
}
// Find introduction fields.
for (Field field : aspectClass.getDeclaredFields()) {
Advisor advisor = getDeclareParentsAdvisor(field);
if (advisor != null) {
advisors.add(advisor);
}
}
return advisors;
}创建的advisor是 InstantiationModelAwarePointcutAdvisorImpl 类型

在shouldSkip中还判断另外一种Advisor,AspectJPointcutAdvisor。
protected boolean shouldSkip(Class<?> beanClass, String beanName) {
   // TODO: Consider optimization by caching the list of the aspect names
    // 创建 InstantiationModelAwarePointcutAdvisorImpl
   List<Advisor> candidateAdvisors = findCandidateAdvisors();
   for (Advisor advisor : candidateAdvisors) {
      if (advisor instanceof AspectJPointcutAdvisor &&
            ((AspectJPointcutAdvisor) advisor).getAspectName().equals(beanName)) {
         return true;
      }
   }
   return super.shouldSkip(beanClass, beanName);
}
AspectJPointcutAdvisor 是干什么的??
执行AOP目标方法
//org.springframework.aop.framework.CglibAopProxy.DynamicAdvisedInterceptor#intercept
public Object intercept(Object proxy, Method method, Object[] args, MethodProxy methodProxy) throws Throwable {
   Object oldProxy = null;
   boolean setProxyContext = false;
   Object target = null;
   TargetSource targetSource = this.advised.getTargetSource();
   try {
      if (this.advised.exposeProxy) {
         // Make invocation available if necessary.
         oldProxy = AopContext.setCurrentProxy(proxy);
         setProxyContext = true;
      }
      // Get as late as possible to minimize the time we "own" the target, in case it comes from a pool...
      target = targetSource.getTarget();
      Class<?> targetClass = (target != null ? target.getClass() : null);
       //获取拦截器链
      List<Object> chain = this.advised.getInterceptorsAndDynamicInterceptionAdvice(method, targetClass);
      Object retVal;
      // Check whether we only have one InvokerInterceptor: that is,
      // no real advice, but just reflective invocation of the target.
      if (chain.isEmpty() && Modifier.isPublic(method.getModifiers())) {
         // We can skip creating a MethodInvocation: just invoke the target directly.
         // Note that the final invoker must be an InvokerInterceptor, so we know
         // it does nothing but a reflective operation on the target, and no hot
         // swapping or fancy proxying.
         Object[] argsToUse = AopProxyUtils.adaptArgumentsIfNecessary(method, args);
         retVal = methodProxy.invoke(target, argsToUse);
      }
      else {
         // We need to create a method invocation...
         retVal = new CglibMethodInvocation(proxy, target, method, args, targetClass, chain, methodProxy).proceed();
      }
      retVal = processReturnType(proxy, target, method, retVal);
      return retVal;
   }
   finally {
      if (target != null && !targetSource.isStatic()) {
         targetSource.releaseTarget(target);
      }
      if (setProxyContext) {
         // Restore old proxy.
         AopContext.setCurrentProxy(oldProxy);
      }
   }
}- 获取拦截器链
- 没有拦截器链则直接执行目标方法
- 有拦截器链,构造CglibMethodInvocation对象,调用proceed方法。
获取拦截器链
//org.springframework.aop.framework.DefaultAdvisorChainFactory#getInterceptorsAndDynamicInterceptionAdvice
public List<Object> getInterceptorsAndDynamicInterceptionAdvice(
      Advised config, Method method, @Nullable Class<?> targetClass) {

   // This is somewhat tricky... We have to process introductions first,
   // but we need to preserve order in the ultimate list.
   List<Object> interceptorList = new ArrayList<>(config.getAdvisors().length);
   Class<?> actualClass = (targetClass != null ? targetClass : method.getDeclaringClass());
   boolean hasIntroductions = hasMatchingIntroductions(config, actualClass);
   AdvisorAdapterRegistry registry = GlobalAdvisorAdapterRegistry.getInstance();

   for (Advisor advisor : config.getAdvisors()) {
      if (advisor instanceof PointcutAdvisor) {
         // Add it conditionally.
         PointcutAdvisor pointcutAdvisor = (PointcutAdvisor) advisor;
         if (config.isPreFiltered() || pointcutAdvisor.getPointcut().getClassFilter().matches(actualClass)) {
             // 将advisor转为MethodInterceptor
            MethodInterceptor[] interceptors = registry.getInterceptors(advisor);
            MethodMatcher mm = pointcutAdvisor.getPointcut().getMethodMatcher();
            if (MethodMatchers.matches(mm, method, actualClass, hasIntroductions)) {
               if (mm.isRuntime()) {
                  // Creating a new object instance in the getInterceptors() method
                  // isn't a problem as we normally cache created chains.
                  for (MethodInterceptor interceptor : interceptors) {
                     interceptorList.add(new InterceptorAndDynamicMethodMatcher(interceptor, mm));
                  }
               }
               else {
                  interceptorList.addAll(Arrays.asList(interceptors));
               }
            }
         }
      }
      else if (advisor instanceof IntroductionAdvisor) {
         IntroductionAdvisor ia = (IntroductionAdvisor) advisor;
         if (config.isPreFiltered() || ia.getClassFilter().matches(actualClass)) {
            Interceptor[] interceptors = registry.getInterceptors(advisor);
            interceptorList.addAll(Arrays.asList(interceptors));
         }
      }
      else {
         Interceptor[] interceptors = registry.getInterceptors(advisor);
         interceptorList.addAll(Arrays.asList(interceptors));
      }
   }

   return interceptorList;
}- 遍历所有增强器advisor,将其转为MethodInterceptor
递归调用拦截器

(引自:http://lgbolgger.iteye.com/blog/2116164)
public Object proceed() throws Throwable {
   // We start with an index of -1 and increment early.
   if (this.currentInterceptorIndex == this.interceptorsAndDynamicMethodMatchers.size() - 1) {
       //执行目标方法
      return invokeJoinpoint();
   }
	//每递归调用一次,currentInterceptorIndex加一。
   Object interceptorOrInterceptionAdvice =
         this.interceptorsAndDynamicMethodMatchers.get(++this.currentInterceptorIndex);
   if (interceptorOrInterceptionAdvice instanceof InterceptorAndDynamicMethodMatcher) {
      // Evaluate dynamic method matcher here: static part will already have
      // been evaluated and found to match.
      InterceptorAndDynamicMethodMatcher dm =
            (InterceptorAndDynamicMethodMatcher) interceptorOrInterceptionAdvice;
      if (dm.methodMatcher.matches(this.method, this.targetClass, this.arguments)) {
          //递归调用
         return dm.interceptor.invoke(this);
      }
      else {
         // Dynamic matching failed.
         // Skip this interceptor and invoke the next in the chain.
         return proceed();
      }
   }
   else {
      // It's an interceptor, so we just invoke it: The pointcut will have
      // been evaluated statically before this object was constructed.
      return ((MethodInterceptor) interceptorOrInterceptionAdvice).invoke(this);
   }
}- MethodBeforeAdviceInterceptor 前置通知
- AspectJAfterAdvice 后置通知
- AfterReturningAdviceInterceptor 返回通知
- AspectJAfterThrowingAdvice 异常通知
以上拦截器方法都在invoke()方法中执行
总结
- @EnableAspectJAutoProxy 会注册一个AnnotationAwareAspectJAutoProxyCreator
- AnnotationAwareAspectJAutoProxyCreator是一个InstantiationAwareBeanPostProcessor
- 创建流程
- registerBeanPostProcessors() 注册后置处理器,创建AnnotationAwareAspectJAutoProxyCreator
- finishBeanFactoryInitialization 初始化剩下的单实例Bean
- 创建Bean和切面
- AnnotationAwareAspectJAutoProxyCreator拦截创建过程
- 创建完Bean判断是否需要增强。通过BeanPostProcessorsAfterInitialization,wrapIfNecessary() 包装代理对象
- 执行目标方法
- 获取拦截器链(advisor包装为Interceptor)
- 递归调用拦截器链
- 前置通知、目标方法、后置通知、返回通知、异常通知
SpringBoot 自动化装配
SpringBoot 自动化装配
目录
@EnableAutoConfiguration
@EnableAutoConfiguration -> 使用 Spring Facotories Loader 装载 spring.factories文件中org.springframework.boot.autoconfigure.EnableAutoConfiguration 属性对应的xxxAutoConfiguration类。
# 自动装配
org.springframework.boot.autoconfigure.EnableAutoConfiguration=\
com.imooc.diveinspringboot.configuration.HelloWorldAutoConfiguration
xxxAutoConfiguration类
//@Configuration // Spring 模式注解装配
@EnableHelloWorld // Spring @Enable 模块装配,间接地方式引入需要的bean。
@ConditionalOnSystemProperty(name = "user.name", value = "Arnold") // 条件装配,装配的条件
public class HelloWorldAutoConfiguration {
}
xxxAutoConfiguration类引入@EnableXXX和@ConditionalXXX
@Retention(RetentionPolicy.RUNTIME)
@Target(ElementType.TYPE)
@Documented
//@Import(HelloWorldConfiguration.class)
@Import(HelloWorldImportSelector.class)
public @interface EnableHelloWorld {
}
@EnableXXX
@EnableXXX通过@import方式引入需要的Bean。
@import引入Bean的方式
- 导入一个类(或配置类)
- ImportSelector,可以获取类上注解信息。将返回值注册到容器
- ImportBeanDefinitionRegister,给你BeanDefinitionRegistry,自己注入
@ConditionalXXX
@ConditionalXXX通过@conditional来决定是否加载Bean->HelloWorldAutoConfiguration。
@Retention(RetentionPolicy.RUNTIME)
@Target({ ElementType.TYPE, ElementType.METHOD })
@Documented
@Conditional(OnSystemPropertyCondition.class)
public @interface ConditionalOnSystemProperty {

    /**
     * Java 系统属性名称
     * @return
     */
    String name();

    /**
     * Java 系统属性值
     * @return
     */
    String value();
}
Condition接口
根据注解属性AnnotatedTypeMetadata,判断是否加载bean。
public class OnSystemPropertyCondition implements Condition {

    @Override
    public boolean matches(ConditionContext context, AnnotatedTypeMetadata metadata) {

        Map<String, Object> attributes = metadata.getAnnotationAttributes(ConditionalOnSystemProperty.class.getName());

        String propertyName = String.valueOf(attributes.get("name"));

        String propertyValue = String.valueOf(attributes.get("value"));

        String javaPropertyValue = System.getProperty(propertyName);

        return propertyValue.equals(javaPropertyValue);
    }
}
并发容器总结
并发容器
List
vector
Collections.synchronizedList
和上面一样,也是通过synchronized来确保线程安全。
CopyOnWriteArrayList
使用ReentrantLock,同一时刻只能有一个线程来写操作。
- 原理:首先将当前容器复制一份,然后在新副本上执行写操作,结束之后再将原容器的引用指向新容器。
- 优点:读性能高,遍历不抛异常
- 缺点:1. 占内存 2. 无法保证实时性(取决于迭代器生成时间)
- CopyOnWriteArrayList实现原理及源码分析 - dreamcatcher-cx - 博客园
Queue
ArrayBlockingQueue 阻塞队列
要指定容量,可以设置fair(等待最长的先处理),先block的先take
- put、 take(阻塞)
- add、remove\element 满了抛异常
- offer poll(取出删除) peek(只是取出) 返回bool值
LinkedBlockingQueue阻塞队列
- 以上两个是BlockingQueue,要阻塞的。
LinkedBlockingQueue有两个锁 (头尾采用两把锁,存取并行),ArrayBlockingQueue只有一个锁(锁全部),LinkedBlockingQueue效率高。
ConcurrentLinkedQueue 非阻塞队列
- 实现了无锁的 poll() 和 offer() 【cas】
- 元素更新与 size 变量更新无法做到原子
LinkedBlockingQueue 和 ConcurrentLinkedQueue 也就是有锁和无锁的区别。【一个是ReentrantLock,一个是compareAndSet】
- ArrayBlockingQueue, LinkedBlockingQueue, ConcurrentLinkedQueue, RingBuffer - ZimZz - 博客园
- 自己总结 :并发队列ConcurrentLinkedQueue、阻塞队列AraayBlockingQueue、阻塞队列LinkedBlockingQueue 区别 和 使用场景总结 - wzhanke - 博客园
ConcurrentLinkedQueue的cas如果多个线程则会有锁争夺。适合小量并发。
LinkedBlockingQueue与ConcurrentLinkedQueue的区别_未知的风fly-CSDN博客_concurrentlinkedqueuelinkedblockingqueue
PriorityBlockingQueue:优先队列(阻塞队列)
SynchronousQueue:同步队列(阻塞队列)【当面交换】
它是一个没有容量的“队列”
当面交换
LinkedTransferQueue:链表同步队列【当面交换中心,多个线程阻塞队列(每个节点都是一个阻塞线程)】
它即可以像其他的BlockingQueue一样有容量又可以像SynchronousQueue一样不会锁住整个队列呢。
LinkedTransferQueue是 SynchronousQueue 和 LinkedBlockingQueue 的合体,性能比 LinkedBlockingQueue 更高(没有锁操作),比 SynchronousQueue能存储更多的元素。
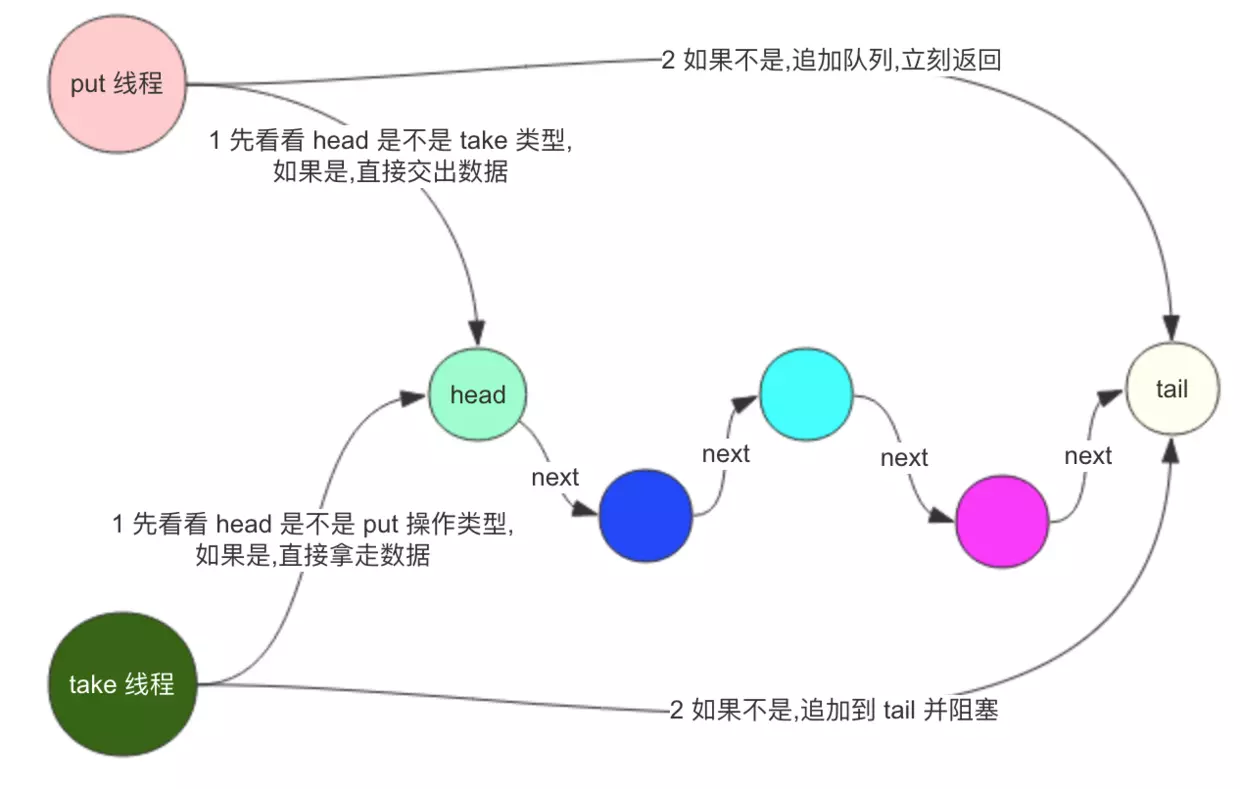
LinkedBlockingDeque【双端队列】
Map
HashTable
ConcurrentHashMap
jdk1.7 :分段segment,分段加锁
jdk1.8:
- 结构改变:链表 + 红黑树(阈值8)
- 无冲突cas + 有冲突synchronized锁定链表
这个f一定是链表的头结点,即该元素在Node数组中。所以这里锁住的是hash冲突那条链表。
size() 和 mappingCount()
ConcurrentHashMap#transfer() 扩容【不同于redis是渐进式hash】
并发编程——ConcurrentHashMap#transfer() 扩容逐行分析 - 掘金
ConcurrentSkipListMap:结果排序(跳表)
相比于ConcurrentHashMap。ConcurrentHashMap是红黑树。
红黑树不善于高并发,因为涉及到树结构调整,加锁影响面积大
所以,基于跳表的数据结构也只在并发容器中存在。
ConcurrentSkipListMap是通过跳表实现的,而TreeMap是通过红黑树实现的。
《Spring源码深度解析》第十一章 SpringMVC
目录
ContextLoaderListener
<!-- Context ConfigLocation -->
<context-param>
    <param-name>contextConfigLocation</param-name>
    <param-value>classpath*:/spring-context*.xml</param-value>
</context-param>
<listener>
    <listener-class> org.springframework.web.context.ContextLoaderListener</listener-class>
</listener>
在web.xml中需要配置ContextLoaderListener
public class ContextLoaderListener extends ContextLoader implements ServletContextListener {ContextLoaderListener是ServletContextListener实现类
ServletContextListener
是一个监听器,当web应用启动时会调用listener的方法。
public interface ServletContextListener extends EventListener {
   /**
    ** Notification that the web application initialization
    ** process is starting.
    ** All ServletContextListeners are notified of context
    ** initialization before any filter or servlet in the web
    ** application is initialized.
    */
	//从ServletContextEvent中我们可以获取到ServletContext
    public void contextInitialized ( ServletContextEvent sce );

   /**
    ** Notification that the servlet context is about to be shut down.
    ** All servlets and filters have been destroy()ed before any
    ** ServletContextListeners are notified of context
    ** destruction.
    */
    public void contextDestroyed ( ServletContextEvent sce );
}
ContextLoaderListener.contextInitialized
public WebApplicationContext initWebApplicationContext(ServletContext servletContext) {
    //1. 已经存在ROOT_WEB_APPLICATION_CONTEXT_ATTRIBUTE抛异常
   if (servletContext.getAttribute(WebApplicationContext.ROOT_WEB_APPLICATION_CONTEXT_ATTRIBUTE) != null) {
      throw new IllegalStateException(
            "Cannot initialize context because there is already a root application context present - " +
            "check whether you have multiple ContextLoader* definitions in your web.xml!");
   }

   Log logger = LogFactory.getLog(ContextLoader.class);
   servletContext.log("Initializing Spring root WebApplicationContext");
   if (logger.isInfoEnabled()) {
      logger.info("Root WebApplicationContext: initialization started");
   }
   long startTime = System.currentTimeMillis();

   try {
      // Store context in local instance variable, to guarantee that
      // it is available on ServletContext shutdown.
      if (this.context == null) {
          //2. 创建WebApplicationContext
         this.context = createWebApplicationContext(servletContext);
      }
      if (this.context instanceof ConfigurableWebApplicationContext) {
         ConfigurableWebApplicationContext cwac = (ConfigurableWebApplicationContext) this.context;
         if (!cwac.isActive()) {
            // The context has not yet been refreshed -> provide services such as
            // setting the parent context, setting the application context id, etc
            if (cwac.getParent() == null) {
               // The context instance was injected without an explicit parent ->
               // determine parent for root web application context, if any.
               ApplicationContext parent = loadParentContext(servletContext);
               cwac.setParent(parent);
            }
            configureAndRefreshWebApplicationContext(cwac, servletContext);
         }
      }
       //3. 设置到到servletContext中
      servletContext.setAttribute(WebApplicationContext.ROOT_WEB_APPLICATION_CONTEXT_ATTRIBUTE, this.context);

      ClassLoader ccl = Thread.currentThread().getContextClassLoader();
      if (ccl == ContextLoader.class.getClassLoader()) {
         currentContext = this.context;
      }
      else if (ccl != null) {
          //4. 保存<类加载器,applicationContext>
         currentContextPerThread.put(ccl, this.context);
      }

      if (logger.isDebugEnabled()) {
         logger.debug("Published root WebApplicationContext as ServletContext attribute with name [" +
               WebApplicationContext.ROOT_WEB_APPLICATION_CONTEXT_ATTRIBUTE + "]");
      }
      if (logger.isInfoEnabled()) {
         long elapsedTime = System.currentTimeMillis() - startTime;
         logger.info("Root WebApplicationContext: initialization completed in " + elapsedTime + " ms");
      }

      return this.context;
   }

}
createWebApplicationContext() 创建applicationContext。
问题:创建什么类型的applicationContext呢?
//org.springframework.web.context.ContextLoader#determineContextClass
protected Class<?> determineContextClass(ServletContext servletContext) {
   String contextClassName = servletContext.getInitParameter(CONTEXT_CLASS_PARAM);
   if (contextClassName != null) {
      try {
         return ClassUtils.forName(contextClassName, ClassUtils.getDefaultClassLoader());
      }
      catch (ClassNotFoundException ex) {
         throw new ApplicationContextException(
               "Failed to load custom context class [" + contextClassName + "]", ex);
      }
   }
   else {
       //从defaultStrategies中获取属性,返回contextClassName
      contextClassName = defaultStrategies.getProperty(WebApplicationContext.class.getName());
      try {
         return ClassUtils.forName(contextClassName, ContextLoader.class.getClassLoader());
      }
      catch (ClassNotFoundException ex) {
         throw new ApplicationContextException(
               "Failed to load default context class [" + contextClassName + "]", ex);
      }
   }
}
问题:defaultStrategies是从哪来的?
//org.springframework.web.context.ContextLoader 静态代码块
private static final String DEFAULT_STRATEGIES_PATH = "ContextLoader.properties";

static {
   // Load default strategy implementations from properties file.
   // This is currently strictly internal and not meant to be customized
   // by application developers.
   try {
      ClassPathResource resource = new ClassPathResource(DEFAULT_STRATEGIES_PATH, ContextLoader.class);
      defaultStrategies = PropertiesLoaderUtils.loadProperties(resource);
   }
   catch (IOException ex) {
      throw new IllegalStateException("Could not load 'ContextLoader.properties': " + ex.getMessage());
   }
}
在静态代码块中,通过ClassPathResource,从ContextLoader.properties文件中获取默认的ApplicationContext类型。

org.springframework.web.context.WebApplicationContext=org.springframework.web.context.support.XmlWebApplicationContextDispatcherServlet
首先初始化会调用init() 方法
//org.springframework.web.servlet.HttpServletBean#init
public final void init() throws ServletException {
   if (logger.isDebugEnabled()) {
      logger.debug("Initializing servlet '" + getServletName() + "'");
   }

   // Set bean properties from init parameters.
    //解析
   PropertyValues pvs = new ServletConfigPropertyValues(getServletConfig(), this.requiredProperties);
   if (!pvs.isEmpty()) {
      try {
          //将当前Servlet包装为BeanWrapper
         BeanWrapper bw = PropertyAccessorFactory.forBeanPropertyAccess(this);
         ResourceLoader resourceLoader = new ServletContextResourceLoader(getServletContext());
         //注册ResourceEditor
          bw.registerCustomEditor(Resource.class, new ResourceEditor(resourceLoader, getEnvironment()));
         initBeanWrapper(bw);
          //设置属性
         bw.setPropertyValues(pvs, true);
      }
      catch (BeansException ex) {
         if (logger.isErrorEnabled()) {
            logger.error("Failed to set bean properties on servlet '" + getServletName() + "'", ex);
         }
         throw ex;
      }
   }

   // Let subclasses do whatever initialization they like.、
    //主要是初始化webApplicationContext
   //this.webApplicationContext = initWebApplicationContext();
	//initFrameworkServlet();
   initServletBean();

   if (logger.isDebugEnabled()) {
      logger.debug("Servlet '" + getServletName() + "' configured successfully");
   }
}
问题:为什么要使用BeanWrapper来包装servlet呢?
这个HttpServletBean是父类公用方法,子类有哪些属性父类并不知道。
例如,FrameworkServlet中的namespace、contextConfigLocation、contextAttribute等。HttpServletBean并不知道。使用BeanWrapper,只用从web.xml中获取配置参数,然后通过属性名,反射设置到对象中就可以了。
initWebApplicationContext()
1. 寻找或创建webApplicationContext
protected WebApplicationContext initWebApplicationContext() {
   WebApplicationContext rootContext =
         WebApplicationContextUtils.getWebApplicationContext(getServletContext());
   WebApplicationContext wac = null;

    //如果this.webApplicationContext!=null,说明webApplicationContext已经使用构造函数初始化
    //也就是如果是contextLoaderListener创建的话 this.webApplicationContex ==null
   if (this.webApplicationContext != null) {
      // A context instance was injected at construction time -> use it
      wac = this.webApplicationContext;
      if (wac instanceof ConfigurableWebApplicationContext) {
         ConfigurableWebApplicationContext cwac = (ConfigurableWebApplicationContext) wac;
         if (!cwac.isActive()) {
            // The context has not yet been refreshed -> provide services such as
            // setting the parent context, setting the application context id, etc
            if (cwac.getParent() == null) {
               // The context instance was injected without an explicit parent -> set
               // the root application context (if any; may be null) as the parent
               cwac.setParent(rootContext);
            }
            configureAndRefreshWebApplicationContext(cwac);
         }
      }
   }
   if (wac == null) {
      // No context instance was injected at construction time -> see if one
      // has been registered in the servlet context. If one exists, it is assumed
      // that the parent context (if any) has already been set and that the
      // user has performed any initialization such as setting the context id
       //通过contextAttribute初始化,通过contextAttribute配置的属性,从ServletContext中查找WebApplicationContext实例。默认contextAttribute=WebApplicationContext.class.getName() + ".ROOT"
       // 这是在ContextLoaderListener中创建的。								 //servletContext.setAttribute(WebApplicationContext.ROOT_WEB_APPLICATION_CONTEXT_ATTRIBUTE, this.context);
      wac = findWebApplicationContext();
   }
   if (wac == null) {
      // No context instance is defined for this servlet -> create a local one
       //不是构造函数创建的,不是contextLoaderListener中创建的
      wac = createWebApplicationContext(rootContext);
   }

   if (!this.refreshEventReceived) {
      // Either the context is not a ConfigurableApplicationContext with refresh
      // support or the context injected at construction time had already been
      // refreshed -> trigger initial onRefresh manually here.
      onRefresh(wac);
   }

   if (this.publishContext) {
      // Publish the context as a servlet context attribute.
      String attrName = getServletContextAttributeName();
      getServletContext().setAttribute(attrName, wac);
      if (this.logger.isDebugEnabled()) {
         this.logger.debug("Published WebApplicationContext of servlet '" + getServletName() +
               "' as ServletContext attribute with name [" + attrName + "]");
      }
   }

   return wac;
}
刷新
protected void onRefresh(ApplicationContext context) {
   initStrategies(context);
}

/**
 * Initialize the strategy objects that this servlet uses.
 * <p>May be overridden in subclasses in order to initialize further strategy objects.
 */
protected void initStrategies(ApplicationContext context) {
   initMultipartResolver(context);
   initLocaleResolver(context);
   initThemeResolver(context);
    //默认加载所有HandlerMapping.class类型的bean
   initHandlerMappings(context);
   initHandlerAdapters(context);
   initHandlerExceptionResolvers(context);
   initRequestToViewNameTranslator(context);
   initViewResolvers(context);
   initFlashMapManager(context);
}
初始化方法默认都有一个保底参数,如果找不到对应的bean就加载这些bean,记录在DispatcherServlet.properties文件中中。
private static final Properties defaultStrategies;

static {
   // Load default strategy implementations from properties file.
   // This is currently strictly internal and not meant to be customized
   // by application developers.
   try {
       //DispatcherServlet.properties
      ClassPathResource resource = new ClassPathResource(DEFAULT_STRATEGIES_PATH, DispatcherServlet.class);
      defaultStrategies = PropertiesLoaderUtils.loadProperties(resource);
   }
   catch (IOException ex) {
      throw new IllegalStateException("Could not load '" + DEFAULT_STRATEGIES_PATH + "': " + ex.getMessage());
   }
}
DispatcherServlet 逻辑处理
doGet()、doPost() -> processRequest()
processRequest
protected final void processRequest(HttpServletRequest request, HttpServletResponse response)
      throws ServletException, IOException {

   long startTime = System.currentTimeMillis();
   Throwable failureCause = null;

    //1. 保存之前的LocaleContext & previousAttributes , 以便以后恢复
   LocaleContext previousLocaleContext = LocaleContextHolder.getLocaleContext();
   LocaleContext localeContext = buildLocaleContext(request);

   RequestAttributes previousAttributes = RequestContextHolder.getRequestAttributes();
   ServletRequestAttributes requestAttributes = buildRequestAttributes(request, response, previousAttributes);

   WebAsyncManager asyncManager = WebAsyncUtils.getAsyncManager(request);
   asyncManager.registerCallableInterceptor(FrameworkServlet.class.getName(), new RequestBindingInterceptor());

    //2. localeContext, requestAttributes 绑定到当前线程
   initContextHolders(request, localeContext, requestAttributes);

   try {
       //3. 处理请求
      doService(request, response);
   }
   catch (ServletException | IOException ex) {
      failureCause = ex;
      throw ex;
   }
   catch (Throwable ex) {
      failureCause = ex;
      throw new NestedServletException("Request processing failed", ex);
   }

   finally {
       //4. 恢复
      resetContextHolders(request, previousLocaleContext, previousAttributes);
      if (requestAttributes != null) {
         requestAttributes.requestCompleted();
      }

      if (logger.isDebugEnabled()) {
         if (failureCause != null) {
            this.logger.debug("Could not complete request", failureCause);
         }
         else {
            if (asyncManager.isConcurrentHandlingStarted()) {
               logger.debug("Leaving response open for concurrent processing");
            }
            else {
               this.logger.debug("Successfully completed request");
            }
         }
      }

       //5. 发布事件,通过this.webApplicationContext.publishEvent()
      publishRequestHandledEvent(request, response, startTime, failureCause);
   }
}
doService
protected void doService(HttpServletRequest request, HttpServletResponse response) throws Exception {
   if (logger.isDebugEnabled()) {
      String resumed = WebAsyncUtils.getAsyncManager(request).hasConcurrentResult() ? " resumed" : "";
      logger.debug("DispatcherServlet with name '" + getServletName() + "'" + resumed +
            " processing " + request.getMethod() + " request for [" + getRequestUri(request) + "]");
   }

   // Keep a snapshot of the request attributes in case of an include,
   // to be able to restore the original attributes after the include.
   Map<String, Object> attributesSnapshot = null;
   if (WebUtils.isIncludeRequest(request)) {
      attributesSnapshot = new HashMap<>();
      Enumeration<?> attrNames = request.getAttributeNames();
      while (attrNames.hasMoreElements()) {
         String attrName = (String) attrNames.nextElement();
         if (this.cleanupAfterInclude || attrName.startsWith(DEFAULT_STRATEGIES_PREFIX)) {
            attributesSnapshot.put(attrName, request.getAttribute(attrName));
         }
      }
   }

   // Make framework objects available to handlers and view objects.
   request.setAttribute(WEB_APPLICATION_CONTEXT_ATTRIBUTE, getWebApplicationContext());
   request.setAttribute(LOCALE_RESOLVER_ATTRIBUTE, this.localeResolver);
   request.setAttribute(THEME_RESOLVER_ATTRIBUTE, this.themeResolver);
   request.setAttribute(THEME_SOURCE_ATTRIBUTE, getThemeSource());

   if (this.flashMapManager != null) {
      FlashMap inputFlashMap = this.flashMapManager.retrieveAndUpdate(request, response);
      if (inputFlashMap != null) {
         request.setAttribute(INPUT_FLASH_MAP_ATTRIBUTE, Collections.unmodifiableMap(inputFlashMap));
      }
      request.setAttribute(OUTPUT_FLASH_MAP_ATTRIBUTE, new FlashMap());
      request.setAttribute(FLASH_MAP_MANAGER_ATTRIBUTE, this.flashMapManager);
   }

   try {
      doDispatch(request, response);
   }
   finally {
      if (!WebAsyncUtils.getAsyncManager(request).isConcurrentHandlingStarted()) {
         // Restore the original attribute snapshot, in case of an include.
         if (attributesSnapshot != null) {
            restoreAttributesAfterInclude(request, attributesSnapshot);
         }
      }
   }
}
doDispatch
protected void doDispatch(HttpServletRequest request, HttpServletResponse response) throws Exception {
   HttpServletRequest processedRequest = request;
   HandlerExecutionChain mappedHandler = null;
   boolean multipartRequestParsed = false;

   WebAsyncManager asyncManager = WebAsyncUtils.getAsyncManager(request);

   try {
      ModelAndView mv = null;
      Exception dispatchException = null;

      try {
          //1. 如果是Multipart类型,转换request类型为MultipartHttpServletRequest
         processedRequest = checkMultipart(request);
         multipartRequestParsed = (processedRequest != request);

         // Determine handler for the current request.
          //2. 根据HandlerMapping来getHandler
         mappedHandler = getHandler(processedRequest);
         if (mappedHandler == null) {
            noHandlerFound(processedRequest, response);
            return;
         }

         // Determine handler adapter for the current request.
          //3. 根据handler找handlerAdapter
         HandlerAdapter ha = getHandlerAdapter(mappedHandler.getHandler());

         // Process last-modified header, if supported by the handler.
          //4. lastModified 处理
          // 只适用一个Controller中只支持一个请求的HandlerMapping。例如:AbstractController子类。
          //注解方式的controller不支持。
         String method = request.getMethod();
         boolean isGet = "GET".equals(method);
         if (isGet || "HEAD".equals(method)) {
            long lastModified = ha.getLastModified(request, mappedHandler.getHandler());
            if (logger.isDebugEnabled()) {
               logger.debug("Last-Modified value for [" + getRequestUri(request) + "] is: " + lastModified);
            }
            if (new ServletWebRequest(request, response).checkNotModified(lastModified) && isGet) {
               return;
            }
         }

          //5. interceptor.PreHandle
         if (!mappedHandler.applyPreHandle(processedRequest, response)) {
            return;
         }

         // Actually invoke the handler.
          //6. HandlerAdapter调用Handler
         mv = ha.handle(processedRequest, response, mappedHandler.getHandler());

         if (asyncManager.isConcurrentHandlingStarted()) {
            return;
         }

         applyDefaultViewName(processedRequest, mv);
          //7. interceptor.postHandle
         mappedHandler.applyPostHandle(processedRequest, response, mv);
      }
      catch (Exception ex) {
         dispatchException = ex;
      }
      catch (Throwable err) {
         // As of 4.3, we're processing Errors thrown from handler methods as well,
         // making them available for @ExceptionHandler methods and other scenarios.
         dispatchException = new NestedServletException("Handler dispatch failed", err);
      }
       //处理结果
      processDispatchResult(processedRequest, response, mappedHandler, mv, dispatchException);
   }
   catch (Exception ex) {
      triggerAfterCompletion(processedRequest, response, mappedHandler, ex);
   }
   catch (Throwable err) {
      triggerAfterCompletion(processedRequest, response, mappedHandler,
            new NestedServletException("Handler processing failed", err));
   }
   finally {
      if (asyncManager.isConcurrentHandlingStarted()) {
         // Instead of postHandle and afterCompletion
         if (mappedHandler != null) {
            mappedHandler.applyAfterConcurrentHandlingStarted(processedRequest, response);
         }
      }
      else {
         // Clean up any resources used by a multipart request.
         if (multipartRequestParsed) {
            cleanupMultipart(processedRequest);
         }
      }
   }
}
getHandler()
遍历调用handlerMapping.getHandler()
//org.springframework.web.servlet.handler.AbstractHandlerMapping#getHandler
public final HandlerExecutionChain getHandler(HttpServletRequest request) throws Exception {
    //1. 根据request找到对应的Handler(HandlerExecutionChain)
   Object handler = getHandlerInternal(request);
   if (handler == null) {
      handler = getDefaultHandler();
   }
   if (handler == null) {
      return null;
   }
   // Bean name or resolved handler?
   if (handler instanceof String) {
      String handlerName = (String) handler;
      handler = obtainApplicationContext().getBean(handlerName);
   }

    //2. 加入拦截器到HandlerExecutionChain执行链
   HandlerExecutionChain executionChain = getHandlerExecutionChain(handler, request);
   if (CorsUtils.isCorsRequest(request)) {
      CorsConfiguration globalConfig = this.globalCorsConfigSource.getCorsConfiguration(request);
      CorsConfiguration handlerConfig = getCorsConfiguration(handler, request);
      CorsConfiguration config = (globalConfig != null ? globalConfig.combine(handlerConfig) : handlerConfig);
      executionChain = getCorsHandlerExecutionChain(request, executionChain, config);
   }
   return executionChain;
}
//org.springframework.web.servlet.handler.AbstractHandlerMapping#getHandlerExecutionChain
protected HandlerExecutionChain getHandlerExecutionChain(Object handler, HttpServletRequest request) {
HandlerExecutionChain chain = (handler instanceof HandlerExecutionChain ?
(HandlerExecutionChain) handler : new HandlerExecutionChain(handler));
String lookupPath = this.urlPathHelper.getLookupPathForRequest(request);
for (HandlerInterceptor interceptor : this.adaptedInterceptors) {
if (interceptor instanceof MappedInterceptor) {
MappedInterceptor mappedInterceptor = (MappedInterceptor) interceptor;
if (mappedInterceptor.matches(lookupPath, this.pathMatcher)) {
chain.addInterceptor(mappedInterceptor.getInterceptor());
}
}
else {
chain.addInterceptor(interceptor);
}
}
return chain;
}AbstractUrlHandlerMapping
//org.springframework.web.servlet.handler.AbstractUrlHandlerMapping#getHandlerInternal
protected Object getHandlerInternal(HttpServletRequest request) throws Exception {
    //获取路径
   String lookupPath = getUrlPathHelper().getLookupPathForRequest(request);
    //寻找handler,返回的是HandlerExecutionChain类型
    //通过 1.直接匹配 2.通配符
   Object handler = lookupHandler(lookupPath, request);
   if (handler == null) {
      // We need to care for the default handler directly, since we need to
      // expose the PATH_WITHIN_HANDLER_MAPPING_ATTRIBUTE for it as well.
      Object rawHandler = null;
      if ("/".equals(lookupPath)) {
         rawHandler = getRootHandler();
      }
      if (rawHandler == null) {
         rawHandler = getDefaultHandler();
      }
      if (rawHandler != null) {
         // Bean name or resolved handler?
         if (rawHandler instanceof String) {
            String handlerName = (String) rawHandler;
             //根据名字handlerName获取Handler,handlerName就是Bean的名字
            rawHandler = obtainApplicationContext().getBean(handlerName);
         }
         validateHandler(rawHandler, request);
          //构造HandlerExecutionChain
          // 先加了两个拦截器PathExposingHandlerInterceptor、UriTemplateVariablesHandlerInterceptor
         handler = buildPathExposingHandler(rawHandler, lookupPath, lookupPath, null);
      }
   }
   if (handler != null && logger.isDebugEnabled()) {
      logger.debug("Mapping [" + lookupPath + "] to " + handler);
   }
   else if (handler == null && logger.isTraceEnabled()) {
      logger.trace("No handler mapping found for [" + lookupPath + "]");
   }
   return handler;
}
HandlerExecutionChain中持有handler,以及interceptors
public class HandlerExecutionChain {

   private static final Log logger = LogFactory.getLog(HandlerExecutionChain.class);

   private final Object handler;

   @Nullable
   private HandlerInterceptor[] interceptors;

   @Nullable
   private List<HandlerInterceptor> interceptorList;
getHandlerAdapter()
protected HandlerAdapter getHandlerAdapter(Object handler) throws ServletException {
   if (this.handlerAdapters != null) {
      for (HandlerAdapter ha : this.handlerAdapters) {
         if (logger.isTraceEnabled()) {
            logger.trace("Testing handler adapter [" + ha + "]");
         }
         if (ha.supports(handler)) {
            return ha;
         }
      }
   }
   throw new ServletException("No adapter for handler [" + handler +
         "]: The DispatcherServlet configuration needs to include a HandlerAdapter that supports this handler");
}
HandlerInterceptor
略
视图
protected void render(ModelAndView mv, HttpServletRequest request, HttpServletResponse response) throws Exception {
   // Determine locale for request and apply it to the response.
   Locale locale =
         (this.localeResolver != null ? this.localeResolver.resolveLocale(request) : request.getLocale());
   response.setLocale(locale);

   View view;
   String viewName = mv.getViewName();
   if (viewName != null) {
      // We need to resolve the view name.
       //通过viewResolver解析视图名
      view = resolveViewName(viewName, mv.getModelInternal(), locale, request);
      if (view == null) {
         throw new ServletException("Could not resolve view with name '" + mv.getViewName() +
               "' in servlet with name '" + getServletName() + "'");
      }
   }
   else {
      // No need to lookup: the ModelAndView object contains the actual View object.
      view = mv.getView();
      if (view == null) {
         throw new ServletException("ModelAndView [" + mv + "] neither contains a view name nor a " +
               "View object in servlet with name '" + getServletName() + "'");
      }
   }

   // Delegate to the View object for rendering.
   if (logger.isDebugEnabled()) {
      logger.debug("Rendering view [" + view + "] in DispatcherServlet with name '" + getServletName() + "'");
   }
   try {
      if (mv.getStatus() != null) {
         response.setStatus(mv.getStatus().value());
      }
      view.render(mv.getModelInternal(), request, response);
   }
   catch (Exception ex) {
      if (logger.isDebugEnabled()) {
         logger.debug("Error rendering view [" + view + "] in DispatcherServlet with name '" +
               getServletName() + "'", ex);
      }
      throw ex;
   }
}
protected View resolveViewName(String viewName, @Nullable Map<String, Object> model,
Locale locale, HttpServletRequest request) throws Exception {
if (this.viewResolvers != null) {
//使用ViewResolver解析视图,第一次创建,之后从缓存加载
for (ViewResolver viewResolver : this.viewResolvers) {
View view = viewResolver.resolveViewName(viewName, locale);
if (view != null) {
return view;
}
}
}
return null;
}//org.springframework.web.servlet.view.AbstractCachingViewResolver#resolveViewName
public View resolveViewName(String viewName, Locale locale) throws Exception {
if (!isCache()) {
//处理前缀redirect:和forward:情况
//为view添加前缀后缀,以及设置一些属性例如contentType,Attribute等
return createView(viewName, locale);
}
else {
//缓存操作
Object cacheKey = getCacheKey(viewName, locale);
View view = this.viewAccessCache.get(cacheKey);
if (view == null) {
synchronized (this.viewCreationCache) {
view = this.viewCreationCache.get(cacheKey);
if (view == null) {
// Ask the subclass to create the View object.
view = createView(viewName, locale);
if (view == null && this.cacheUnresolved) {
view = UNRESOLVED_VIEW;
}
if (view != null) {
this.viewAccessCache.put(cacheKey, view);
this.viewCreationCache.put(cacheKey, view);
if (logger.isTraceEnabled()) {
logger.trace("Cached view [" + cacheKey + "]");
}
}
}
}
}
return (view != UNRESOLVED_VIEW ? view : null);
}
}缓存这里有必要说一下
/** The maximum number of entries in the cache */
private volatile int cacheLimit = DEFAULT_CACHE_LIMIT;

/** Whether we should refrain from resolving views again if unresolved once */
private boolean cacheUnresolved = true;

/** Fast access cache for Views, returning already cached instances without a global lock */
private final Map<Object, View> viewAccessCache = new ConcurrentHashMap<>(DEFAULT_CACHE_LIMIT);

/** Map from view key to View instance, synchronized for View creation */
@SuppressWarnings("serial")
private final Map<Object, View> viewCreationCache =
      new LinkedHashMap<Object, View>(DEFAULT_CACHE_LIMIT, 0.75f, true) {
         @Override
    	//removeEldestEntry 返回true则删除LinkedHashMap中最老的元素
    	//在removeEldestEntry中,不但返回true删除了viewCreationCache最老的元素,而且删除了viewAccessCache对应的key的元素。
    	//这里两个缓存,viewAccessCache用来高并发,viewCreationCache用来控制缓存大小。
         protected boolean removeEldestEntry(Map.Entry<Object, View> eldest) {
            if (size() > getCacheLimit()) {
               viewAccessCache.remove(eldest.getKey());
               return true;
            }
            else {
               return false;
            }
         }
      };
页面跳转
public void render(@Nullable Map<String, ?> model, HttpServletRequest request,
      HttpServletResponse response) throws Exception {

   if (logger.isTraceEnabled()) {
      logger.trace("Rendering view with name '" + this.beanName + "' with model " + model +
         " and static attributes " + this.staticAttributes);
   }
	//model、pathVariables等都放入一个map中。
   Map<String, Object> mergedModel = createMergedOutputModel(model, request, response);
   prepareResponse(request, response);
   renderMergedOutputModel(mergedModel, getRequestToExpose(request), response);
}
//org.springframework.web.servlet.view.InternalResourceView#renderMergedOutputModel
protected void renderMergedOutputModel(
Map<String, Object> model, HttpServletRequest request, HttpServletResponse response) throws Exception {
// Expose the model object as request attributes.
//将map中的数据,设置到request中
exposeModelAsRequestAttributes(model, request);
// Expose helpers as request attributes, if any.
exposeHelpers(request);
// Determine the path for the request dispatcher.
String dispatcherPath = prepareForRendering(request, response);
// Obtain a RequestDispatcher for the target resource (typically a JSP).
RequestDispatcher rd = getRequestDispatcher(request, dispatcherPath);
if (rd == null) {
throw new ServletException("Could not get RequestDispatcher for [" + getUrl() +
"]: Check that the corresponding file exists within your web application archive!");
}
// If already included or response already committed, perform include, else forward.
if (useInclude(request, response)) {
response.setContentType(getContentType());
if (logger.isDebugEnabled()) {
logger.debug("Including resource [" + getUrl() + "] in InternalResourceView '" + getBeanName() + "'");
}
rd.include(request, response);
}
else {
// Note: The forwarded resource is supposed to determine the content type itself.
if (logger.isDebugEnabled()) {
logger.debug("Forwarding to resource [" + getUrl() + "] in InternalResourceView '" + getBeanName() + "'");
}
rd.forward(request, response);
}
}《Spring源码深度解析》第十章 事务
目录
事务自定义标签
像其他自定义标签一样
<tx:annotation-driven />来处理此标签的Handler,TxNamespaceHandler
//org.springframework.transaction.config.TxNamespaceHandler#init
public void init() {
   registerBeanDefinitionParser("advice", new TxAdviceBeanDefinitionParser());
   registerBeanDefinitionParser("annotation-driven", new AnnotationDrivenBeanDefinitionParser());
   registerBeanDefinitionParser("jta-transaction-manager", new JtaTransactionManagerBeanDefinitionParser());
}
创建了AnnotationDrivenBeanDefinitionParser,来解析标签。
//org.springframework.transaction.config.AnnotationDrivenBeanDefinitionParser#parse
public BeanDefinition parse(Element element, ParserContext parserContext) {
   registerTransactionalEventListenerFactory(parserContext);
   String mode = element.getAttribute("mode");
   if ("aspectj".equals(mode)) {
      // mode="aspectj"
      registerTransactionAspect(element, parserContext);
   }
   else {
      // mode="proxy"
      //注册了InfrastructureAdvisorAutoProxyCreator & 注册了三个bean
       //其中包括 BeanFactoryTransactionAttributeSourceAdvisor
      AopAutoProxyConfigurer.configureAutoProxyCreator(element, parserContext);
   }
   return null;
}
可以看出,如果要使用aspectj来进行事务切入,则需要配置 mode=aspectj
public static void configureAutoProxyCreator(Element element, ParserContext parserContext) {
    //注册了InfrastructureAdvisorAutoProxyCreator
   AopNamespaceUtils.registerAutoProxyCreatorIfNecessary(parserContext, element);

   String txAdvisorBeanName = TransactionManagementConfigUtils.TRANSACTION_ADVISOR_BEAN_NAME;
   if (!parserContext.getRegistry().containsBeanDefinition(txAdvisorBeanName)) {
      Object eleSource = parserContext.extractSource(element);

      // Create the TransactionAttributeSource definition.
      RootBeanDefinition sourceDef = new RootBeanDefinition(
            "org.springframework.transaction.annotation.AnnotationTransactionAttributeSource");
      sourceDef.setSource(eleSource);
      sourceDef.setRole(BeanDefinition.ROLE_INFRASTRUCTURE);
       //注册
      String sourceName = parserContext.getReaderContext().registerWithGeneratedName(sourceDef);

      // Create the TransactionInterceptor definition.
      RootBeanDefinition interceptorDef = new RootBeanDefinition(TransactionInterceptor.class);
      interceptorDef.setSource(eleSource);
      interceptorDef.setRole(BeanDefinition.ROLE_INFRASTRUCTURE);
      registerTransactionManager(element, interceptorDef);
      interceptorDef.getPropertyValues().add("transactionAttributeSource", new RuntimeBeanReference(sourceName));
       //注册
      String interceptorName = parserContext.getReaderContext().registerWithGeneratedName(interceptorDef);

      // Create the TransactionAttributeSourceAdvisor definition.
      RootBeanDefinition advisorDef = new RootBeanDefinition(BeanFactoryTransactionAttributeSourceAdvisor.class);
      advisorDef.setSource(eleSource);
      advisorDef.setRole(BeanDefinition.ROLE_INFRASTRUCTURE);
       //关联AnnotationTransactionAttributeSource 和 TransactionInterceptor
      advisorDef.getPropertyValues().add("transactionAttributeSource", new RuntimeBeanReference(sourceName));
      advisorDef.getPropertyValues().add("adviceBeanName", interceptorName);
      if (element.hasAttribute("order")) {
         advisorDef.getPropertyValues().add("order", element.getAttribute("order"));
      }
      parserContext.getRegistry().registerBeanDefinition(txAdvisorBeanName, advisorDef);

      CompositeComponentDefinition compositeDef = new CompositeComponentDefinition(element.getTagName(), eleSource);
      compositeDef.addNestedComponent(new BeanComponentDefinition(sourceDef, sourceName));
      compositeDef.addNestedComponent(new BeanComponentDefinition(interceptorDef, interceptorName));
      compositeDef.addNestedComponent(new BeanComponentDefinition(advisorDef, txAdvisorBeanName));
      parserContext.registerComponent(compositeDef);
   }
}
使用RootBeanDefinition装配并注册BeanDefinition。
分别注册了
-
InfrastructureAdvisorAutoProxyCreator是一个beanPostProcessor,用来拦截Bean。
-
AnnotationTransactionAttributeSource ,TransactionAttributeSourcePointcut会包装AnnotationTransactionAttributeSource
//org.springframework.transaction.interceptor.BeanFactoryTransactionAttributeSourceAdvisor#pointcut
private final TransactionAttributeSourcePointcut pointcut = new TransactionAttributeSourcePointcut() {
   @Override
   @Nullable
   protected TransactionAttributeSource getTransactionAttributeSource() {
      return transactionAttributeSource;
   }
};
TransactionAttributeSource其中有cache来存放@transaction注解内容。
-
TransactionInterceptor 相当于Advice
-
BeanFactoryTransactionAttributeSourceAdvisor 相当于Advisor

在BeanFactoryTransactionAttributeSourceAdvisor 中持有adviceBeanName 和 TransactionAttributeSource
InfrastructureAdvisorAutoProxyCreator
InfrastructureAdvisorAutoProxyCreator 和 之前的 AOP 中的AnnotationAwareAspectAutoProxyCreator一样,都是AbstractAutoProxyCreator的子类
InfrastructureAdvisorAutoProxyCreator 实现了SmartInstantiationAwareBeanPostProcessor(InstantiationAwareBeanPostProcessor)。
bean实例化都会去执行InfrastructureAdvisorAutoProxyCreator.postProcessAfterInitialization方法。
疑问:InfrastructureAdvisorAutoProxyCreator.postProcessBeforeInstantiation 是啥作用?
//org.springframework.aop.framework.autoproxy.AbstractAutoProxyCreator#postProcessAfterInitialization
public Object postProcessAfterInitialization(@Nullable Object bean, String beanName) throws BeansException {
   if (bean != null) {
      Object cacheKey = getCacheKey(bean.getClass(), beanName);
      if (!this.earlyProxyReferences.contains(cacheKey)) {
         return wrapIfNecessary(bean, beanName, cacheKey);
      }
   }
   return bean;
}
protected Object wrapIfNecessary(Object bean, String beanName, Object cacheKey) {
if (StringUtils.hasLength(beanName) && this.targetSourcedBeans.contains(beanName)) {
return bean;
}
if (Boolean.FALSE.equals(this.advisedBeans.get(cacheKey))) {
return bean;
}
if (isInfrastructureClass(bean.getClass()) || shouldSkip(bean.getClass(), beanName)) {
this.advisedBeans.put(cacheKey, Boolean.FALSE);
return bean;
}
// Create proxy if we have advice.
//找到对应的Interceptor,分两步
//1. 找到候选增强器
//2. 从候选中找到匹配的增强器
Object[] specificInterceptors = getAdvicesAndAdvisorsForBean(bean.getClass(), beanName, null);
if (specificInterceptors != DO_NOT_PROXY) {
this.advisedBeans.put(cacheKey, Boolean.TRUE);
//创建代理
Object proxy = createProxy(
bean.getClass(), beanName, specificInterceptors, new SingletonTargetSource(bean));
this.proxyTypes.put(cacheKey, proxy.getClass());
return proxy;
}
this.advisedBeans.put(cacheKey, Boolean.FALSE);
return bean;
}1. 找到对应的增强器
findCandidateAdvisors 这里和AOP的AnnotationAwareAspectJAutoProxyCreator 不同了,AnnotationAwareAspectJAutoProxyCreator重写了findCandidateAdvisors 方法。而这里使用的是AbstractAutoProxyCreator原来的方法。
protected List<Advisor> findCandidateAdvisors() {
   Assert.state(this.advisorRetrievalHelper != null, "No BeanFactoryAdvisorRetrievalHelper available");
    //获取所有AdvisorBean
   return this.advisorRetrievalHelper.findAdvisorBeans();
}
2. 找到匹配的增强器
//org.springframework.aop.support.AopUtils#findAdvisorsThatCanApply
public static List<Advisor> findAdvisorsThatCanApply(List<Advisor> candidateAdvisors, Class<?> clazz) {
    if (candidateAdvisors.isEmpty()) {
        return candidateAdvisors;
    }
    List<Advisor> eligibleAdvisors = new ArrayList<>();
    //先处理引介增强IntroductionAdvisor
    for (Advisor candidate : candidateAdvisors) {
        if (candidate instanceof IntroductionAdvisor && canApply(candidate, clazz)) {
            eligibleAdvisors.add(candidate);
        }
    }
    boolean hasIntroductions = !eligibleAdvisors.isEmpty();
    for (Advisor candidate : candidateAdvisors) {
        if (candidate instanceof IntroductionAdvisor) {
            // already processed
            continue;
        }
        // 处理普通bean
        if (canApply(candidate, clazz, hasIntroductions)) {
            eligibleAdvisors.add(candidate);
        }
    }
    return eligibleAdvisors;
}
之前在解析配置文件时注册的BeanFactoryTransactionAttributeSourceAdvisor,也作为一个Advisor被调用。
TransactionAttributeSourcePointcut被传入到canApply()方法中
//org.springframework.aop.support.AopUtils#canApply(org.springframework.aop.Pointcut, java.lang.Class<?>, boolean)
public static boolean canApply(Pointcut pc, Class<?> targetClass, boolean hasIntroductions) {
    Assert.notNull(pc, "Pointcut must not be null");
    if (!pc.getClassFilter().matches(targetClass)) {
        return false;
    }

    MethodMatcher methodMatcher = pc.getMethodMatcher();
    if (methodMatcher == MethodMatcher.TRUE) {
        // No need to iterate the methods if we're matching any method anyway...
        return true;
    }

    IntroductionAwareMethodMatcher introductionAwareMethodMatcher = null;
    if (methodMatcher instanceof IntroductionAwareMethodMatcher) {
        introductionAwareMethodMatcher = (IntroductionAwareMethodMatcher) methodMatcher;
    }

    Set<Class<?>> classes = new LinkedHashSet<>();
    if (!Proxy.isProxyClass(targetClass)) {
        classes.add(ClassUtils.getUserClass(targetClass));
    }
    classes.addAll(ClassUtils.getAllInterfacesForClassAsSet(targetClass));

    //遍历每一个方法
    for (Class<?> clazz : classes) {
        Method[] methods = ReflectionUtils.getAllDeclaredMethods(clazz);
        for (Method method : methods) {
            if (introductionAwareMethodMatcher != null ?
                introductionAwareMethodMatcher.matches(method, targetClass, hasIntroductions) :
                methodMatcher.matches(method, targetClass)) {
                return true;
            }
        }
    }

    return false;
}
使用TransactionAttributeSourcePointcut.matches() 方法做匹配。
public boolean matches(Method method, @Nullable Class<?> targetClass) {
   if (targetClass != null && TransactionalProxy.class.isAssignableFrom(targetClass)) {
      return false;
   }
   TransactionAttributeSource tas = getTransactionAttributeSource();
   return (tas == null || tas.getTransactionAttribute(method, targetClass) != null);
}
使用TransactionAttributeSource-> AbstractFallbackTransactionAttributeSource.getTransactionAttribute() -> AnnotationTransactionAttributeSource
public TransactionAttribute getTransactionAttribute(Method method, @Nullable Class<?> targetClass) {
   if (method.getDeclaringClass() == Object.class) {
      return null;
   }

   // First, see if we have a cached value.
   Object cacheKey = getCacheKey(method, targetClass);
   Object cached = this.attributeCache.get(cacheKey);
   if (cached != null) {
      // Value will either be canonical value indicating there is no transaction attribute,
      // or an actual transaction attribute.
      if (cached == NULL_TRANSACTION_ATTRIBUTE) {
         return null;
      }
      else {
         return (TransactionAttribute) cached;
      }
   }
   else {
      // We need to work it out.
       //事务标签提取
      TransactionAttribute txAttr = computeTransactionAttribute(method, targetClass);
      // Put it in the cache.
      if (txAttr == null) {
         this.attributeCache.put(cacheKey, NULL_TRANSACTION_ATTRIBUTE);
      }
      else {
         String methodIdentification = ClassUtils.getQualifiedMethodName(method, targetClass);
         if (txAttr instanceof DefaultTransactionAttribute) {
            ((DefaultTransactionAttribute) txAttr).setDescriptor(methodIdentification);
         }
         if (logger.isDebugEnabled()) {
            logger.debug("Adding transactional method '" + methodIdentification + "' with attribute: " + txAttr);
         }
         this.attributeCache.put(cacheKey, txAttr);
      }
      return txAttr;
   }
}
3. 提取事务标签
protected TransactionAttribute computeTransactionAttribute(Method method, @Nullable Class<?> targetClass) {
   // Don't allow no-public methods as required.
   if (allowPublicMethodsOnly() && !Modifier.isPublic(method.getModifiers())) {
      return null;
   }

   // The method may be on an interface, but we need attributes from the target class.
   // If the target class is null, the method will be unchanged.
   Method specificMethod = AopUtils.getMostSpecificMethod(method, targetClass);

   // First try is the method in the target class.
    //方法上
   TransactionAttribute txAttr = findTransactionAttribute(specificMethod);
   if (txAttr != null) {
      return txAttr;
   }

   // Second try is the transaction attribute on the target class.
    //目标类上
   txAttr = findTransactionAttribute(specificMethod.getDeclaringClass());
   if (txAttr != null && ClassUtils.isUserLevelMethod(method)) {
      return txAttr;
   }

   if (specificMethod != method) {
      // Fallback is to look at the original method.
       //接口方法
      txAttr = findTransactionAttribute(method);
      if (txAttr != null) {
         return txAttr;
      }
      // Last fallback is the class of the original method.
       //接口类上
      txAttr = findTransactionAttribute(method.getDeclaringClass());
      if (txAttr != null && ClassUtils.isUserLevelMethod(method)) {
         return txAttr;
      }
   }

   return null;
}
解析事务属性
//org.springframework.transaction.annotation.AnnotationTransactionAttributeSource#determineTransactionAttribute
protected TransactionAttribute determineTransactionAttribute(AnnotatedElement ae) {
   for (TransactionAnnotationParser annotationParser : this.annotationParsers) {
      TransactionAttribute attr = annotationParser.parseTransactionAnnotation(ae);
      if (attr != null) {
         return attr;
      }
   }
   return null;
}
this.annotationParsers是SpringTransactionAnnotationParser
//org.springframework.transaction.annotation.SpringTransactionAnnotationParser#parseTransactionAnnotation(org.springframework.core.annotation.AnnotationAttributes)
protected TransactionAttribute parseTransactionAnnotation(AnnotationAttributes attributes) {
   RuleBasedTransactionAttribute rbta = new RuleBasedTransactionAttribute();
   Propagation propagation = attributes.getEnum("propagation");
   rbta.setPropagationBehavior(propagation.value());
   Isolation isolation = attributes.getEnum("isolation");
   rbta.setIsolationLevel(isolation.value());
   rbta.setTimeout(attributes.getNumber("timeout").intValue());
   rbta.setReadOnly(attributes.getBoolean("readOnly"));
   rbta.setQualifier(attributes.getString("value"));
   ArrayList<RollbackRuleAttribute> rollBackRules = new ArrayList<>();
   Class<?>[] rbf = attributes.getClassArray("rollbackFor");
   for (Class<?> rbRule : rbf) {
      RollbackRuleAttribute rule = new RollbackRuleAttribute(rbRule);
      rollBackRules.add(rule);
   }
   String[] rbfc = attributes.getStringArray("rollbackForClassName");
   for (String rbRule : rbfc) {
      RollbackRuleAttribute rule = new RollbackRuleAttribute(rbRule);
      rollBackRules.add(rule);
   }
   Class<?>[] nrbf = attributes.getClassArray("noRollbackFor");
   for (Class<?> rbRule : nrbf) {
      NoRollbackRuleAttribute rule = new NoRollbackRuleAttribute(rbRule);
      rollBackRules.add(rule);
   }
   String[] nrbfc = attributes.getStringArray("noRollbackForClassName");
   for (String rbRule : nrbfc) {
      NoRollbackRuleAttribute rule = new NoRollbackRuleAttribute(rbRule);
      rollBackRules.add(rule);
   }
   rbta.getRollbackRules().addAll(rollBackRules);
   return rbta;
}
解析各种属性。
事务增强器
TransactionInterceptor中作为Advice的处理方法invoke() 方法中调用TransactionAspectSupport#invokeWithinTransaction
//org.springframework.transaction.interceptor.TransactionAspectSupport#invokeWithinTransaction
protected Object invokeWithinTransaction(Method method, @Nullable Class<?> targetClass,
		final InvocationCallback invocation) throws Throwable {

	// If the transaction attribute is null, the method is non-transactional.
    //获取事务属性,AnnotationTransactionAttributeSource
	TransactionAttributeSource tas = getTransactionAttributeSource();
	final TransactionAttribute txAttr = (tas != null ? tas.getTransactionAttribute(method, targetClass) : null);
	final PlatformTransactionManager tm = determineTransactionManager(txAttr);
	final String joinpointIdentification = methodIdentification(method, targetClass, txAttr);

    //声明式事务处理
	if (txAttr == null || !(tm instanceof CallbackPreferringPlatformTransactionManager)) {
		// Standard transaction demarcation with getTransaction and commit/rollback calls.
        //创建事务,构建事务信息
		TransactionInfo txInfo = createTransactionIfNecessary(tm, txAttr, joinpointIdentification);
		Object retVal = null;
		try {
			// This is an around advice: Invoke the next interceptor in the chain.
			// This will normally result in a target object being invoked.
            //执行目标方法
			retVal = invocation.proceedWithInvocation();
		}
		catch (Throwable ex) {
			// target invocation exception
            //异常回滚
            //RuntimeException 或 Error 才回滚,Exception不回滚
            //https://blog.csdn.net/gnail_oug/article/details/46931709
			completeTransactionAfterThrowing(txInfo, ex);
			throw ex;
		}
		finally {
            //清除信息
			cleanupTransactionInfo(txInfo);
		}
        //提交事务
		commitTransactionAfterReturning(txInfo);
		return retVal;
	}

	else {
		final ThrowableHolder throwableHolder = new ThrowableHolder();

		// It's a CallbackPreferringPlatformTransactionManager: pass a TransactionCallback in.
		try {
			Object result = ((CallbackPreferringPlatformTransactionManager) tm).execute(txAttr, status -> {
				TransactionInfo txInfo = prepareTransactionInfo(tm, txAttr, joinpointIdentification, status);
				try {
					return invocation.proceedWithInvocation();
				}
				catch (Throwable ex) {
					if (txAttr.rollbackOn(ex)) {
						// A RuntimeException: will lead to a rollback.
						if (ex instanceof RuntimeException) {
							throw (RuntimeException) ex;
						}
						else {
							throw new ThrowableHolderException(ex);
						}
					}
					else {
						// A normal return value: will lead to a commit.
						throwableHolder.throwable = ex;
						return null;
					}
				}
				finally {
					cleanupTransactionInfo(txInfo);
				}
			});

			// Check result state: It might indicate a Throwable to rethrow.
			if (throwableHolder.throwable != null) {
				throw throwableHolder.throwable;
			}
			return result;
		}
		catch (ThrowableHolderException ex) {
			throw ex.getCause();
		}
		catch (TransactionSystemException ex2) {
			if (throwableHolder.throwable != null) {
				logger.error("Application exception overridden by commit exception", throwableHolder.throwable);
				ex2.initApplicationException(throwableHolder.throwable);
			}
			throw ex2;
		}
		catch (Throwable ex2) {
			if (throwableHolder.throwable != null) {
				logger.error("Application exception overridden by commit exception", throwableHolder.throwable);
			}
			throw ex2;
		}
	}
}
创建事务&构建事务信息
1. 获取事务
public final TransactionStatus getTransaction(@Nullable TransactionDefinition definition) throws TransactionException {
   Object transaction = doGetTransaction();

   // Cache debug flag to avoid repeated checks.
   boolean debugEnabled = logger.isDebugEnabled();

   if (definition == null) {
      // Use defaults if no transaction definition given.
      definition = new DefaultTransactionDefinition();
   }
	//是否存在事务
   if (isExistingTransaction(transaction)) {
      // Existing transaction found -> check propagation behavior to find out how to behave.
       //当前存在事务
      return handleExistingTransaction(definition, transaction, debugEnabled);
   }

   // Check definition settings for new transaction.
   if (definition.getTimeout() < TransactionDefinition.TIMEOUT_DEFAULT) {
      throw new InvalidTimeoutException("Invalid transaction timeout", definition.getTimeout());
   }

   // No existing transaction found -> check propagation behavior to find out how to proceed.
    //PROPAGATION_MANDATORY 当前线程不存在事务,抛异常
   if (definition.getPropagationBehavior() == TransactionDefinition.PROPAGATION_MANDATORY) {
      throw new IllegalTransactionStateException(
            "No existing transaction found for transaction marked with propagation 'mandatory'");
   }
    //当前不存在事务,这些传播属性,需要新建事务
   else if (definition.getPropagationBehavior() == TransactionDefinition.PROPAGATION_REQUIRED ||
         definition.getPropagationBehavior() == TransactionDefinition.PROPAGATION_REQUIRES_NEW ||
         definition.getPropagationBehavior() == TransactionDefinition.PROPAGATION_NESTED) {
      SuspendedResourcesHolder suspendedResources = suspend(null);
      if (debugEnabled) {
         logger.debug("Creating new transaction with name [" + definition.getName() + "]: " + definition);
      }
      try {
         boolean newSynchronization = (getTransactionSynchronization() != SYNCHRONIZATION_NEVER);
         DefaultTransactionStatus status = newTransactionStatus(
               definition, transaction, true, newSynchronization, debugEnabled, suspendedResources);
          //构造transaction,绑定到当前线程
         doBegin(transaction, definition);
          //同步事务设置
         prepareSynchronization(status, definition);
         return status;
      }
      catch (RuntimeException | Error ex) {
         resume(null, suspendedResources);
         throw ex;
      }
   }
   else {
      // Create "empty" transaction: no actual transaction, but potentially synchronization.
      if (definition.getIsolationLevel() != TransactionDefinition.ISOLATION_DEFAULT && logger.isWarnEnabled()) {
         logger.warn("Custom isolation level specified but no actual transaction initiated; " +
               "isolation level will effectively be ignored: " + definition);
      }
      boolean newSynchronization = (getTransactionSynchronization() == SYNCHRONIZATION_ALWAYS);
      return prepareTransactionStatus(definition, null, true, newSynchronization, debugEnabled, null);
   }
}
protected void doBegin(Object transaction, TransactionDefinition definition) {
DataSourceTransactionObject txObject = (DataSourceTransactionObject) transaction;
Connection con = null;
try {
if (!txObject.hasConnectionHolder() ||
txObject.getConnectionHolder().isSynchronizedWithTransaction()) {
Connection newCon = obtainDataSource().getConnection();
if (logger.isDebugEnabled()) {
logger.debug("Acquired Connection [" + newCon + "] for JDBC transaction");
}
txObject.setConnectionHolder(new ConnectionHolder(newCon), true);
}
txObject.getConnectionHolder().setSynchronizedWithTransaction(true);
//获取连接,下面都是对连接的设置
con = txObject.getConnectionHolder().getConnection();
Integer previousIsolationLevel = DataSourceUtils.prepareConnectionForTransaction(con, definition);
//设置隔离级别
txObject.setPreviousIsolationLevel(previousIsolationLevel);
// Switch to manual commit if necessary. This is very expensive in some JDBC drivers,
// so we don't want to do it unnecessarily (for example if we've explicitly
// configured the connection pool to set it already).
//设置自动提交
if (con.getAutoCommit()) {
txObject.setMustRestoreAutoCommit(true);
if (logger.isDebugEnabled()) {
logger.debug("Switching JDBC Connection [" + con + "] to manual commit");
}
con.setAutoCommit(false);
}
prepareTransactionalConnection(con, definition);
//设置当前线程是否存在事务的标志
txObject.getConnectionHolder().setTransactionActive(true);
int timeout = determineTimeout(definition);
if (timeout != TransactionDefinition.TIMEOUT_DEFAULT) {
txObject.getConnectionHolder().setTimeoutInSeconds(timeout);
}
// Bind the connection holder to the thread.
//绑定Connection到线程
if (txObject.isNewConnectionHolder()) {
TransactionSynchronizationManager.bindResource(obtainDataSource(), txObject.getConnectionHolder());
}
}
catch (Throwable ex) {
if (txObject.isNewConnectionHolder()) {
DataSourceUtils.releaseConnection(con, obtainDataSource());
txObject.setConnectionHolder(null, false);
}
throw new CannotCreateTransactionException("Could not open JDBC Connection for transaction", ex);
}
}怎么绑定线程和Connection的呢?
public abstract class TransactionSynchronizationManager {

   private static final Log logger = LogFactory.getLog(TransactionSynchronizationManager.class);

   private static final ThreadLocal<Map<Object, Object>> resources =
         new NamedThreadLocal<>("Transactional resources");
通过TransactionSynchronizationManager中的ThreadLocal,key=dataSource,value=Connection
2. 处理已存在事务
略
3. 准备事务信息
TransactionInfo 中保存事务状态,用来回滚等操作。
回滚操作
1. 回滚条件
默认回滚依据是RuntimeException 或 Error,Exception不回滚。
参考:spring事务不回滚throw的Exception异常的解决方法
2. 回滚处理
private void processRollback(DefaultTransactionStatus status, boolean unexpected) {
   try {
      boolean unexpectedRollback = unexpected;

      try {
         triggerBeforeCompletion(status);

         if (status.hasSavepoint()) {
            if (status.isDebug()) {
               logger.debug("Rolling back transaction to savepoint");
            }
            status.rollbackToHeldSavepoint();
         }
         else if (status.isNewTransaction()) {
            if (status.isDebug()) {
               logger.debug("Initiating transaction rollback");
            }
            doRollback(status);
         }
         else {
            // Participating in larger transaction
            if (status.hasTransaction()) {
               if (status.isLocalRollbackOnly() || isGlobalRollbackOnParticipationFailure()) {
                  if (status.isDebug()) {
                     logger.debug("Participating transaction failed - marking existing transaction as rollback-only");
                  }
                  doSetRollbackOnly(status);
               }
               else {
                  if (status.isDebug()) {
                     logger.debug("Participating transaction failed - letting transaction originator decide on rollback");
                  }
               }
            }
            else {
               logger.debug("Should roll back transaction but cannot - no transaction available");
            }
            // Unexpected rollback only matters here if we're asked to fail early
            if (!isFailEarlyOnGlobalRollbackOnly()) {
               unexpectedRollback = false;
            }
         }
      }
      catch (RuntimeException | Error ex) {
         triggerAfterCompletion(status, TransactionSynchronization.STATUS_UNKNOWN);
         throw ex;
      }

      triggerAfterCompletion(status, TransactionSynchronization.STATUS_ROLLED_BACK);

      // Raise UnexpectedRollbackException if we had a global rollback-only marker
      if (unexpectedRollback) {
         throw new UnexpectedRollbackException(
               "Transaction rolled back because it has been marked as rollback-only");
      }
   }
   finally {
      cleanupAfterCompletion(status);
   }
}
回滚逻辑:
-
如果有保存点(savepoint),使用savepoint进行回滚。
一般是嵌套事务
-
新事务,直接回滚。
-
存在事务,又没有savepoint
通常是JTA,标识回滚,提交时统一处理。
-
激活触发器,调用TransactionSynchronization.afterCompletion()
3. 回滚后信息清除
略
事务提交
首先要处理回滚中“存在事务,又没有savepoint”的情况
public final void commit(TransactionStatus status) throws TransactionException {
   if (status.isCompleted()) {
      throw new IllegalTransactionStateException(
            "Transaction is already completed - do not call commit or rollback more than once per transaction");
   }
   DefaultTransactionStatus defStatus = (DefaultTransactionStatus) status;
    //在Rollback中的doSetRollbackOnly(status); 这里读取,回滚
   if (defStatus.isLocalRollbackOnly()) {
      if (defStatus.isDebug()) {
         logger.debug("Transactional code has requested rollback");
      }
      processRollback(defStatus, false);
      return;
   }

   if (!shouldCommitOnGlobalRollbackOnly() && defStatus.isGlobalRollbackOnly()) {
      if (defStatus.isDebug()) {
         logger.debug("Global transaction is marked as rollback-only but transactional code requested commit");
      }
      processRollback(defStatus, true);
      return;
   }

    //提交
   processCommit(defStatus);
}
提交条件
- 有savepoint不提交,清除savepoint。
- 不是新事务(NewTransaction),也不提交。
HandlerMapping源码分析
目录
- HandlerMapping
HandlerMapping
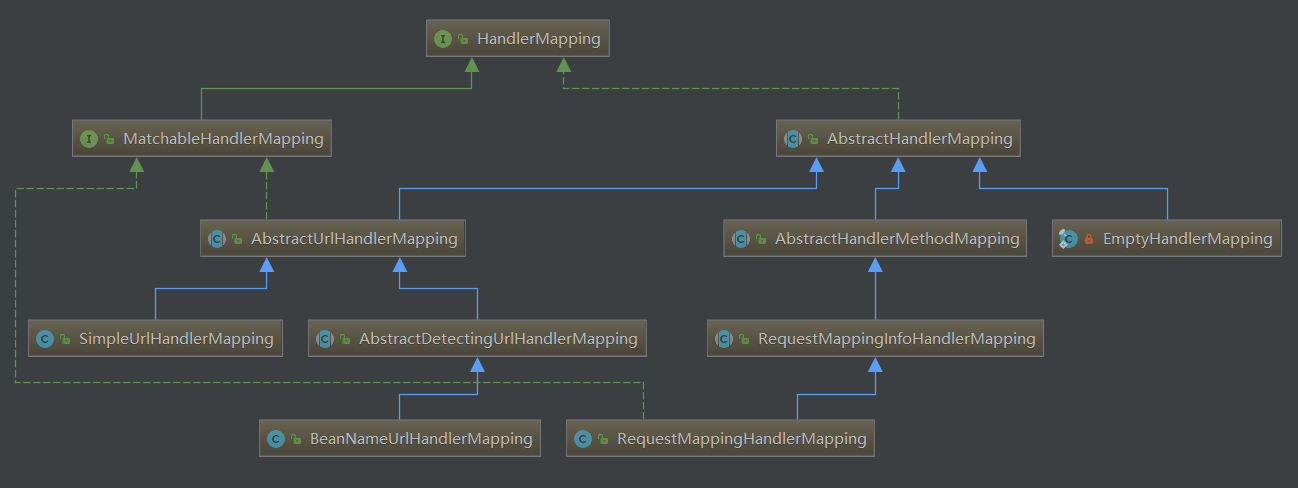
AbstractHandlerMapping
创建AbstractHandlerMapping
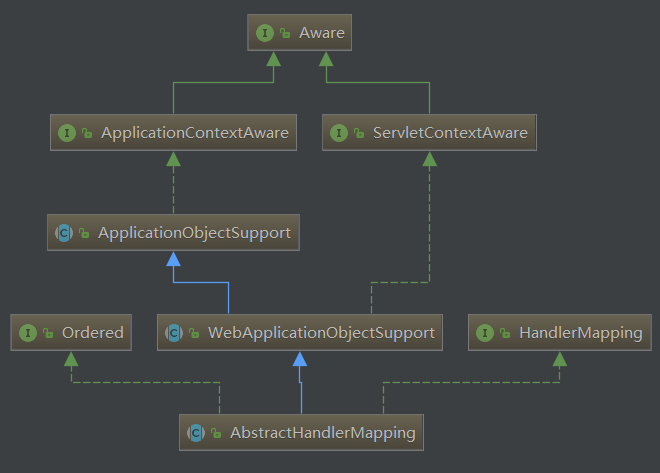
ApplicationContextAware
ApplicationContextAware 是个接口。bean实例化时候会被ApplicationContextAwareProcessor处理。
//被ApplicationContextAwareProcessor调用
((ApplicationContextAware) bean).setApplicationContext(this.applicationContext);
ApplicationObjectSupport
为使用ApplicationContextAware 提供方便。
- 内部定义了ApplicationContext,不用为了使用ApplicationContextAware,在自己的类中再定义ApplicationContext。
- 暴漏initApplicationContext();方法用来初始化。(问题和定义@InitMethod 或 initializingBean接口 顺序有啥区别?)
WebApplicationObjectSupport
之前都是Spring相关的,这里需要针对web再进一步定义一个类。
持有一个ServletContext对象,从ApplicationContext中获取。
private ServletContext servletContext;
protected void initApplicationContext(ApplicationContext context) {
//initApplicationContext(context) -> initApplicationContext();
super.initApplicationContext(context);
if (this.servletContext == null && context instanceof WebApplicationContext) {
this.servletContext = ((WebApplicationContext) context).getServletContext();
if (this.servletContext != null) {
//模版方法
initServletContext(this.servletContext);
}
}
}AbstractHandlerMapping
protected void initApplicationContext() throws BeansException {
//模版方法,可以向this.interceptors中添加拦截器(目前没用)
//this.interceptors原本可能通过HandlerMapping注册时通过属性设置的。
extendInterceptors(this.interceptors);
//查找&添加MappedInterceptors,-> this.adaptedInterceptors
detectMappedInterceptors(this.adaptedInterceptors);
//this.interceptors添加到this.adaptedInterceptors
initInterceptors();
}以上完成AbstractHandlerMapping构建。
使用AbstractHandlerMapping
HandlerMapping的作用就是通过request获取Hanlder(HandlerExecutionChain)。
public final HandlerExecutionChain getHandler(HttpServletRequest request) throws Exception {
//模版方法
Object handler = getHandlerInternal(request);
if (handler == null) {
handler = getDefaultHandler();
}
if (handler == null) {
return null;
}
// Bean name or resolved handler?
if (handler instanceof String) {
String handlerName = (String) handler;
handler = obtainApplicationContext().getBean(handlerName);
}
//以上,找handler
//为Handler添加拦截器
//遍历this.adaptedInterceptors拦截器,看是否matches Handler。如果match,将interceptor添加到HandlerExecutionChain
HandlerExecutionChain executionChain = getHandlerExecutionChain(handler, request);
if (CorsUtils.isCorsRequest(request)) {
CorsConfiguration globalConfig = this.globalCorsConfigSource.getCorsConfiguration(request);
CorsConfiguration handlerConfig = getCorsConfiguration(handler, request);
CorsConfiguration config = (globalConfig != null ? globalConfig.combine(handlerConfig) : handlerConfig);
executionChain = getCorsHandlerExecutionChain(request, executionChain, config);
}
return executionChain;
}AbstractUrlHandlerMapping
使用AbstractUrlHandlerMapping
AbstractHandlerMapping子类,就是根据url从map中获取Handler的一个过程。
private final Map<String, Object> handlerMap = new LinkedHashMap<>();重写模版方法。
protected Object getHandlerInternal(HttpServletRequest request) throws Exception {
String lookupPath = getUrlPathHelper().getLookupPathForRequest(request);
//根据url获取handler
//涉及到Pattern url的模式匹配,以及选择最优,模版参数提取。
//注册了两个Interceptor:PathExposingHandlerInterceptor、UriTemplateVariablesHandlerInterceptor
Object handler = lookupHandler(lookupPath, request);
if (handler == null) {
// We need to care for the default handler directly, since we need to
// expose the PATH_WITHIN_HANDLER_MAPPING_ATTRIBUTE for it as well.
Object rawHandler = null;
if ("/".equals(lookupPath)) {
rawHandler = getRootHandler();
}
if (rawHandler == null) {
rawHandler = getDefaultHandler();
}
if (rawHandler != null) {
// Bean name or resolved handler?
if (rawHandler instanceof String) {
String handlerName = (String) rawHandler;
rawHandler = obtainApplicationContext().getBean(handlerName);
}
validateHandler(rawHandler, request);
handler = buildPathExposingHandler(rawHandler, lookupPath, lookupPath, null);
}
}
if (handler != null && logger.isDebugEnabled()) {
logger.debug("Mapping [" + lookupPath + "] to " + handler);
}
else if (handler == null && logger.isTraceEnabled()) {
logger.trace("No handler mapping found for [" + lookupPath + "]");
}
return handler;
}PathExposingHandlerInterceptor
//org.springframework.web.servlet.handler.AbstractUrlHandlerMapping.PathExposingHandlerInterceptor#preHandle
public boolean preHandle(HttpServletRequest request, HttpServletResponse response, Object handler) {
//最佳匹配Pattern
//request.setAttribute(BEST_MATCHING_PATTERN_ATTRIBUTE, bestMatchingPattern);
//匹配条件
//request.setAttribute(PATH_WITHIN_HANDLER_MAPPING_ATTRIBUTE, pathWithinMapping);
exposePathWithinMapping(this.bestMatchingPattern, this.pathWithinMapping, request);
request.setAttribute(INTROSPECT_TYPE_LEVEL_MAPPING, supportsTypeLevelMappings());
return true;
}UriTemplateVariablesHandlerInterceptor
//url模版参数,方便直接取
request.setAttribute(URI_TEMPLATE_VARIABLES_ATTRIBUTE, uriTemplateVariables);初始化AbstractUrlHandlerMapping
protected void registerHandler(String urlPath, Object handler) throws BeansException, IllegalStateException {
Assert.notNull(urlPath, "URL path must not be null");
Assert.notNull(handler, "Handler object must not be null");
Object resolvedHandler = handler;
// Eagerly resolve handler if referencing singleton via name.
if (!this.lazyInitHandlers && handler instanceof String) {
String handlerName = (String) handler;
ApplicationContext applicationContext = obtainApplicationContext();
if (applicationContext.isSingleton(handlerName)) {
resolvedHandler = applicationContext.getBean(handlerName);
}
}
Object mappedHandler = this.handlerMap.get(urlPath);
if (mappedHandler != null) {
if (mappedHandler != resolvedHandler) {
throw new IllegalStateException(
"Cannot map " + getHandlerDescription(handler) + " to URL path [" + urlPath +
"]: There is already " + getHandlerDescription(mappedHandler) + " mapped.");
}
}
else {
//RootHandler
if (urlPath.equals("/")) {
if (logger.isInfoEnabled()) {
logger.info("Root mapping to " + getHandlerDescription(handler));
}
setRootHandler(resolvedHandler);
}
//DefaultHandler
else if (urlPath.equals("/*")) {
if (logger.isInfoEnabled()) {
logger.info("Default mapping to " + getHandlerDescription(handler));
}
setDefaultHandler(resolvedHandler);
}
else {
//添加handlerMap
this.handlerMap.put(urlPath, resolvedHandler);
if (logger.isInfoEnabled()) {
logger.info("Mapped URL path [" + urlPath + "] onto " + getHandlerDescription(handler));
}
}
}
}SimpleUrlHandlerMapping
public class SimpleUrlHandlerMapping extends AbstractUrlHandlerMapping {
//AbstractUrlHandlerMapping已经定义了map,这里定义urlMap有两个作用
//1. 方便配置
//2. 预处理,例如确保url都以“/”开头
private final Map<String, Object> urlMap = new LinkedHashMap<>();
//重写initApplicationContext
public void initApplicationContext() throws BeansException {
super.initApplicationContext();
registerHandlers(this.urlMap);
}
protected void registerHandlers(Map<String, Object> urlMap) throws BeansException {
if (urlMap.isEmpty()) {
logger.warn("Neither 'urlMap' nor 'mappings' set on SimpleUrlHandlerMapping");
}
else {
urlMap.forEach((url, handler) -> {
// Prepend with slash if not already present.
if (!url.startsWith("/")) {
url = "/" + url;
}
// Remove whitespace from handler bean name.
if (handler instanceof String) {
handler = ((String) handler).trim();
}
//AbstractUrlHandlerMapping中的registerHandler
registerHandler(url, handler);
});
}
}AbstractDetectingUrlHandlerMapping
根据BeanName解析url,如果解析到则将 <url,BeanName> 注册到handlerMap中。
public void initApplicationContext() throws ApplicationContextException {
super.initApplicationContext();
detectHandlers();
}protected void detectHandlers() throws BeansException {
ApplicationContext applicationContext = obtainApplicationContext();
if (logger.isDebugEnabled()) {
logger.debug("Looking for URL mappings in application context: " + applicationContext);
}
//获取所有beanNames
String[] beanNames = (this.detectHandlersInAncestorContexts ?
BeanFactoryUtils.beanNamesForTypeIncludingAncestors(applicationContext, Object.class) :
applicationContext.getBeanNamesForType(Object.class));
// Take any bean name that we can determine URLs for.
for (String beanName : beanNames) {
//模版方法
String[] urls = determineUrlsForHandler(beanName);
if (!ObjectUtils.isEmpty(urls)) {
// URL paths found: Let's consider it a handler.
registerHandler(urls, beanName);
}
else {
if (logger.isDebugEnabled()) {
logger.debug("Rejected bean name '" + beanName + "': no URL paths identified");
}
}
}
}BeanNameUrlHandlerMapping
protected String[] determineUrlsForHandler(String beanName) {
List<String> urls = new ArrayList<>();
//是否“/”开头
if (beanName.startsWith("/")) {
urls.add(beanName);
}
String[] aliases = obtainApplicationContext().getAliases(beanName);
for (String alias : aliases) {
if (alias.startsWith("/")) {
urls.add(alias);
}
}
return StringUtils.toStringArray(urls);
}AbstractHandlerMethodMapping
AbstractHandlerMethodMapping系列是将Method作为Hanlder来使用。
public abstract class AbstractHandlerMethodMapping<T> extends AbstractHandlerMapping implements InitializingBean {创建AbstractHandlerMethodMapping
三个map,记录映射关系
//org.springframework.web.servlet.handler.AbstractHandlerMethodMapping.MappingRegistry
//内部类
class MappingRegistry {
private final Map<T, MappingRegistration<T>> registry = new HashMap<>();
//T 默认情况是RequestMappingInfo -> 因为只有一个子类RequestMappingInfoHandlerMapping
//匹配条件(RequestMappingInfo) -> HandlerMethod
private final Map<T, HandlerMethod> mappingLookup = new LinkedHashMap<>();
//url(pattern) -> RequestMappingInfo
//一个url可能对应多个T,所以使用LinkedMultiValueMap
private final MultiValueMap<String, T> urlLookup = new LinkedMultiValueMap<>();
//类名大写字母组合 + “#” + 方法名 ——> List<HandlerMethod>
private final Map<String, List<HandlerMethod>> nameLookup = new ConcurrentHashMap<>();
private final Map<HandlerMethod, CorsConfiguration> corsLookup = new ConcurrentHashMap<>();
private final ReentrantReadWriteLock readWriteLock = new ReentrantReadWriteLock();初始化
无非就是初始化哪些map,以便之后调用
public void afterPropertiesSet() {
//为什么要放在afterPropertiesSet中,而不是像之前一样重写initApplicationContext()??
initHandlerMethods();
}protected void initHandlerMethods() {
if (logger.isDebugEnabled()) {
logger.debug("Looking for request mappings in application context: " + getApplicationContext());
}
//所有beanName
String[] beanNames = (this.detectHandlerMethodsInAncestorContexts ?
BeanFactoryUtils.beanNamesForTypeIncludingAncestors(obtainApplicationContext(), Object.class) :
obtainApplicationContext().getBeanNamesForType(Object.class));
for (String beanName : beanNames) {
//SCOPED_TARGET_NAME_PREFIX = scopedTarget.
if (!beanName.startsWith(SCOPED_TARGET_NAME_PREFIX)) {
Class<?> beanType = null;
try {
beanType = obtainApplicationContext().getType(beanName);
}
catch (Throwable ex) {
// An unresolvable bean type, probably from a lazy bean - let's ignore it.
if (logger.isDebugEnabled()) {
logger.debug("Could not resolve target class for bean with name '" + beanName + "'", ex);
}
}
//是Handler?
//模版方法
if (beanType != null && isHandler(beanType)) {
detectHandlerMethods(beanName);
}
}
}
handlerMethodsInitialized(getHandlerMethods());
}RequestMappingHandlerMapping中的实现
//org.springframework.web.servlet.mvc.method.annotation.RequestMappingHandlerMapping#isHandler
protected boolean isHandler(Class<?> beanType) {
//@Controller @RequestMapping
return (AnnotatedElementUtils.hasAnnotation(beanType, Controller.class) ||
AnnotatedElementUtils.hasAnnotation(beanType, RequestMapping.class));
}检测HandlerMethod
//org.springframework.web.servlet.handler.AbstractHandlerMethodMapping#detectHandlerMethods
protected void detectHandlerMethods(final Object handler) {
//获取handler类型,这里handler相当于controller
Class<?> handlerType = (handler instanceof String ?
obtainApplicationContext().getType((String) handler) : handler.getClass());
if (handlerType != null) {
//cglib代理的子对象类型,则返回父类型(也就是原始类型)
final Class<?> userType = ClassUtils.getUserClass(handlerType);
//查找满足要求的Method
Map<Method, T> methods = MethodIntrospector.selectMethods(userType,
(MethodIntrospector.MetadataLookup<T>) method -> {
try {
return getMappingForMethod(method, userType);
}
catch (Throwable ex) {
throw new IllegalStateException("Invalid mapping on handler class [" +
userType.getName() + "]: " + method, ex);
}
});
if (logger.isDebugEnabled()) {
logger.debug(methods.size() + " request handler methods found on " + userType + ": " + methods);
}
//将满足要求的method注册起来,也就是保存到三个Map中。
methods.forEach((method, mapping) -> {
Method invocableMethod = AopUtils.selectInvocableMethod(method, userType);
registerHandlerMethod(handler, invocableMethod, mapping);
});
}
}RequestMappingHandlerMapping 中的实现
//org.springframework.web.servlet.mvc.method.annotation.RequestMappingHandlerMapping#getMappingForMethod
protected RequestMappingInfo getMappingForMethod(Method method, Class<?> handlerType) {
//如果存在@RequestMapping注解,则创建RequestMappingInfo
RequestMappingInfo info = createRequestMappingInfo(method);
//如果method 找到了@RequestMapping,要和controller上的@RequestMapping合并才行。
if (info != null) {
RequestMappingInfo typeInfo = createRequestMappingInfo(handlerType);
if (typeInfo != null) {
//合并
info = typeInfo.combine(info);
}
}
return info;
}private RequestMappingInfo createRequestMappingInfo(AnnotatedElement element) {
RequestMapping requestMapping = AnnotatedElementUtils.findMergedAnnotation(element, RequestMapping.class);
RequestCondition<?> condition = (element instanceof Class ?
getCustomTypeCondition((Class<?>) element) : getCustomMethodCondition((Method) element));
return (requestMapping != null ? createRequestMappingInfo(requestMapping, condition) : null);
}注册
protected void registerHandlerMethod(Object handler, Method method, T mapping) {
this.mappingRegistry.register(mapping, handler, method);
}public void register(T mapping, Object handler, Method method) {
//加锁
this.readWriteLock.writeLock().lock();
try {
HandlerMethod handlerMethod = createHandlerMethod(handler, method);
assertUniqueMethodMapping(handlerMethod, mapping);
if (logger.isInfoEnabled()) {
logger.info("Mapped \"" + mapping + "\" onto " + handlerMethod);
}
//RequestMappingInfo -> HandlerMethod
this.mappingLookup.put(mapping, handlerMethod);
//url(pattern?)-> RequestMappingInfo
List<String> directUrls = getDirectUrls(mapping);
for (String url : directUrls) {
this.urlLookup.add(url, mapping);
}
String name = null;
//类名大写字母组合 + “#” + 方法名 ——> List<HandlerMethod>
if (getNamingStrategy() != null) {
name = getNamingStrategy().getName(handlerMethod, mapping);
addMappingName(name, handlerMethod);
}
CorsConfiguration corsConfig = initCorsConfiguration(handler, method, mapping);
if (corsConfig != null) {
this.corsLookup.put(handlerMethod, corsConfig);
}
this.registry.put(mapping, new MappingRegistration<>(mapping, handlerMethod, directUrls, name));
}
finally {
this.readWriteLock.writeLock().unlock();
}
}使用AbstractHandlerMethodMapping
如何获取handler的
protected HandlerMethod getHandlerInternal(HttpServletRequest request) throws Exception {
String lookupPath = getUrlPathHelper().getLookupPathForRequest(request);
if (logger.isDebugEnabled()) {
logger.debug("Looking up handler method for path " + lookupPath);
}
this.mappingRegistry.acquireReadLock();
try {
//根据request & lookupPath获取 HandlerMethod
HandlerMethod handlerMethod = lookupHandlerMethod(lookupPath, request);
if (logger.isDebugEnabled()) {
if (handlerMethod != null) {
logger.debug("Returning handler method [" + handlerMethod + "]");
}
else {
logger.debug("Did not find handler method for [" + lookupPath + "]");
}
}
//如果handlerMethod.bean是String,则从容器中获取对应的bean。
return (handlerMethod != null ? handlerMethod.createWithResolvedBean() : null);
}
finally {
this.mappingRegistry.releaseReadLock();
}
}protected HandlerMethod lookupHandlerMethod(String lookupPath, HttpServletRequest request) throws Exception {
List<Match> matches = new ArrayList<>();
//先根据url,从urlLookup中找(url(pattern?)-> RequestMappingInfo)
List<T> directPathMatches = this.mappingRegistry.getMappingsByUrl(lookupPath);
if (directPathMatches != null) {
//从mappingLookup查找,RequestMappingInfo -> HandlerMethod
//构造new Match-> RequestMappingInfo,HandlerMethod,
//添加到matches
addMatchingMappings(directPathMatches, matches, request);
}
if (matches.isEmpty()) {
// No choice but to go through all mappings...
addMatchingMappings(this.mappingRegistry.getMappings().keySet(), matches, request);
}
if (!matches.isEmpty()) {
Comparator<Match> comparator = new MatchComparator(getMappingComparator(request));
matches.sort(comparator);
if (logger.isTraceEnabled()) {
logger.trace("Found " + matches.size() + " matching mapping(s) for [" + lookupPath + "] : " + matches);
}
Match bestMatch = matches.get(0);
if (matches.size() > 1) {
if (CorsUtils.isPreFlightRequest(request)) {
return PREFLIGHT_AMBIGUOUS_MATCH;
}
Match secondBestMatch = matches.get(1);
if (comparator.compare(bestMatch, secondBestMatch) == 0) {
Method m1 = bestMatch.handlerMethod.getMethod();
Method m2 = secondBestMatch.handlerMethod.getMethod();
throw new IllegalStateException("Ambiguous handler methods mapped for HTTP path '" +
request.getRequestURL() + "': {" + m1 + ", " + m2 + "}");
}
}
//返回前做一些处理
//lookupPath、bestPattern、matrixVars、decodedUriVariables、mediaTypes 设置到Request
handleMatch(bestMatch.mapping, lookupPath, request);
return bestMatch.handlerMethod;
}
else {
return handleNoMatch(this.mappingRegistry.getMappings().keySet(), lookupPath, request);
}
}//org.springframework.web.servlet.handler.AbstractHandlerMethodMapping.Match
//内部类
//RequestMappingInfo,HandlerMethod 映射关系
private class Match {
//RequestMappingInfo
private final T mapping;
private final HandlerMethod handlerMethod;
public Match(T mapping, HandlerMethod handlerMethod) {
this.mapping = mapping;
this.handlerMethod = handlerMethod;
}
@Override
public String toString() {
return this.mapping.toString();
}
}《Redis深度历险》基础及应用
目录
- Redis基础数据结构
- 应用 1:千帆竞发 —— 分布式锁
- 应用 2:缓兵之计 —— 延时队列
- 应用 3:节衣缩食 —— 位图
- 应用 4:四两拨千斤 —— HyperLogLog
- 应用 5:层峦叠嶂 —— 布隆过滤器rebloom
- 应用 6:断尾求生 —— 简单限流
- 应用 7:一毛不拔 —— 漏斗限流Redis-Cell
- 应用 8:近水楼台 —— GeoHash
- 应用 9:大海捞针 —— Scan
Redis基础数据结构
字符串
可修改字符串,内部类似Java中ArrayList,采用预分配冗余空间的方式来减少内存的频繁分配。
键值对
set get del exists
批量键值对
mset mget
过期和set命令扩展
- expire
- setex(set+expire)
- setnx : 没有才创建
计数
incr incrby
自增是有范围的,它的范围是 signed long 的最大最小值。
list列表
相当于Java中LinkedList
右边进左边出:队列
- rpush
- llen
- lpop
右边进右边出:栈
- rpop
慢操作
- lindex books 1 # O(n) 慎用,因为是链表所以get(Index)慢
- lrange books 0 -1 # 获取所有元素,O(n) 慎用
- ltrim books 1 -1 # O(n) 慎用
快速列表
Redis 底层存储的还不是一个简单的 linkedlist,而是称之为快速链表 quicklist 的一个结构。

- 元素较少的时候就使用ziplist
- 元素多就使用将链表和ziplist组合起来,形成quickList。双向指针满足快速插入删除。
ziplist能节省指针空间。所以省内存。
Hash
内部实现结构上同 Java 的 HashMap 也是一致的。

rehash方式不同。
字典很大时一次全部rehash操作耗时。redis采用渐进式rehash。
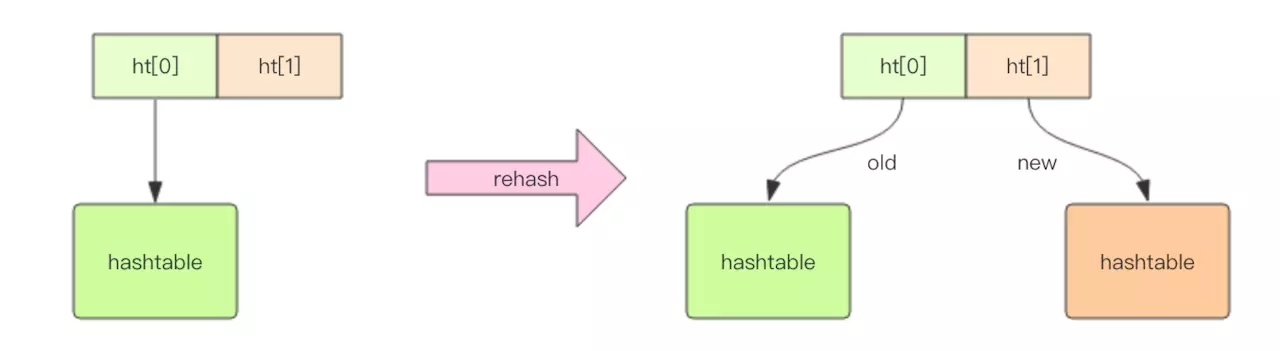
渐进式 rehash 会在 rehash 的同时,保留新旧两个 hash 结构,查询时会同时查询两个 hash 结构,然后在后续的定时任务中以及 hash 操作指令中,循序渐进地将旧 hash 的内容一点点迁移到新的 hash 结构中。当搬迁完成了,就会使用新的hash结构取而代之。
- hset
- hgetall
- hlen
- hget
- hmset
- hincrby
set
- sadd :重复返回零
- smembers :查询
- sismember :判断是否存在
- scard :获取长度
- spop :弹出一个
zset
类似于 Java 的 SortedSet 和 HashMap 的结合体。内部实现用的是一种叫做「跳跃列表」的数据结构。
唯一,有序。
zset 可以用来存粉丝列表,value 值是粉丝的用户 ID,score 是关注时间。我们可以对粉丝列表按关注时间进行排序。
- zadd
- zrange :按排名返回查找
- zrevrange :逆序
- zcard :count()
- zscore:获取value的score
- zrank :获取排名
- zrangebyscore
- zrem :删除
跳跃列表
因为要排序,要方便插入,所以不能用数组来存。如何来查找插入位置呢?二分法查找对象必须是数组。
后面详解。
应用 1:千帆竞发 —— 分布式锁
分布式锁就是占坑。谁占到坑谁做事情。
占坑使用setnx
// 这里的冒号:就是一个普通的字符,没特别含义,它可以是任意其它字符,不要误解
> setnx lock:codehole true
OK
... do something critical ...
> del lock:codehole
(integer) 1如果任务出现异常,则不能保证释放锁。造成死锁。del写在finally中不就行了。
使用setnx + expire,通过expire定时释放锁?
不行,这不是原子操作。setnx没抢到锁,expire也不应该执行。
Redis 2.8 版本中作者加入了 set 指令的扩展参数,使得 setnx 和 expire 指令可以一起执行
> set lock:codehole true ex 5 nx
OK
... do something critical ...
> del lock:codeholeRedis 分布式锁不要用于较长时间的任务,任务还没执行完,锁自动释放了,怎么办??
貌似没办法,只能尽量将时间设置的合理。
防止被错误解锁
任务A超时,任务B获取锁,这时任务A释放锁,误将任务B的锁释放了。
为了解决这个问题,需要给锁设置一个版本号。
获取锁
public class RedisTool {
private static final String LOCK_SUCCESS = "OK";
private static final String SET_IF_NOT_EXIST = "NX";
private static final String SET_WITH_EXPIRE_TIME = "PX";
/**
* 尝试获取分布式锁
* @param jedis Redis客户端
* @param lockKey 锁
* @param requestId 请求标识
* @param expireTime 超期时间
* @return 是否获取成功
*/
public static boolean tryGetDistributedLock(Jedis jedis, String lockKey, String requestId, int expireTime) {
//主要就是requestId来作为锁的版本号。获取锁之前先试用UUID.randomUUID().toString()。
//原子操作。
String result = jedis.set(lockKey, requestId, SET_IF_NOT_EXIST, SET_WITH_EXPIRE_TIME, expireTime);
if (LOCK_SUCCESS.equals(result)) {
return true;
}
return false;
}
}释放锁
public class RedisTool {
private static final Long RELEASE_SUCCESS = 1L;
/**
* 释放分布式锁
* @param jedis Redis客户端
* @param lockKey 锁
* @param requestId 请求标识
* @return 是否释放成功
*/
public static boolean releaseDistributedLock(Jedis jedis, String lockKey, String requestId) {
//一段lua脚本。保证执行原子性。
//首先获取锁对应的value值,检查是否与requestId相等,如果相等则删除锁(解锁)
String script = "if redis.call('get', KEYS[1]) == ARGV[1] then return redis.call('del', KEYS[1]) else return 0 end";
Object result = jedis.eval(script, Collections.singletonList(lockKey), Collections.singletonList(requestId));
if (RELEASE_SUCCESS.equals(result)) {
return true;
}
return false;
}
}可重入性
public class RedisWithReentrantLock {
// Threadlocal 变量存储当前持有锁的计数
private ThreadLocal<Map<String, Integer>> lockers = new ThreadLocal<>();
private Jedis jedis;
public RedisWithReentrantLock(Jedis jedis) {
this.jedis = jedis;
}
private Boolean _lock(String key) {
return jedis.set(key, "", "nx", "ex", 5L) != null;
}
private void _unlock(String key) {
jedis.del(key);
}
private Map<String, Integer> currentLockers() {
Map<String, Integer> refs = lockers.get();
if (refs != null) {
return refs;
}
lockers.set(new HashMap<>());
return lockers.get();
}
public Boolean lock(String key) {
Map<String, Integer> refs = currentLockers();
Integer refCnt = refs.get(key);
if (refCnt != null) {
refs.put(key, refCnt + 1);
return true;
}
Boolean ok = this._lock(key);
if (!ok) {
return false;
}
refs.put(key, 1);
return true;
}
public Boolean unlock(String key) {
Map<String, Integer> refs = currentLockers();
Integer refCnt = refs.get(key);
if (refCnt == null) {
return false;
}
//可重入计数-1
refCnt -= 1;
if (refCnt > 0) {
refs.put(key, refCnt);
} else {
//当可重入计数<=0时才unlock。
refs.remove(key);
this._unlock(key);
}
return true;
}
public static void main(String[] args) {
Jedis jedis = new Jedis();
RedisWithReentrantLock redis = new RedisWithReentrantLock(jedis);
System.out.println(redis.lock("codehole"));
System.out.println(redis.lock("codehole"));
System.out.println(redis.unlock("codehole"));
System.out.println(redis.unlock("codehole"));
}
}RedLock
针对redis集群的分布式锁。
- 安全性(Safety):在任意时刻,只有一个客户端可以获得锁(排他性)。
- 避免死锁:客户端最终一定可以获得锁,即使锁住某个资源的客户端在释放锁之前崩溃或者网络不可达。
- 容错性:只要Redis集群中的大部分节点存活,client就可以进行加锁解锁操作。
操作如下:
- 获取当前时间(单位是毫秒)。
- 轮流用相同的key和随机值在N个节点上请求锁,在这一步里,客户端在每个master上请求锁时,会有一个和总的锁释放时间相比小的多的超时时间。比如如果锁自动释放时间是10秒钟,那每个节点锁请求的超时时间可能是5-50毫秒的范围,这个可以防止一个客户端在某个宕掉的master节点上阻塞过长时间,如果一个master节点不可用了,我们应该尽快尝试下一个master节点。
- 客户端计算第二步中获取锁所花的时间,只有当客户端在大多数master节点上成功获取了锁(在这里是3个),而且总共消耗的时间不超过锁释放时间,这个锁就认为是获取成功了。
- 如果锁获取成功了,那现在锁自动释放时间就是最初的锁释放时间减去之前获取锁所消耗的时间。
- 如果锁获取失败了,不管是因为获取成功的锁不超过一半(N/2+1)还是因为总消耗时间超过了锁释放时间,客户端都会到每个master节点上释放锁,即便是那些他认为没有获取成功的锁。
简单说就是,获得半数redis节点以上的锁,就算获取成功。
应用 2:缓兵之计 —— 延时队列
Redis 的消息队列不是专业的消息队列,它没有非常多的高级特性,没有 ack 保证。
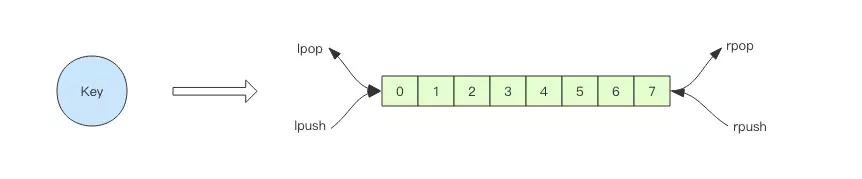
无非就是使用redis 的list。
当队列为空
可是如果队列空了,客户端就会陷入 pop 的死循环,不停地 pop,没有数据,接着再 pop,又没有数据。
可以使用Thread.sleep(1000) # java 睡 1s 来缓解。
队列延迟问题
Thread.sleep 会产生延迟。
用blpop/brpop(阻塞方法)替代前面的lpop/rpop,就完美解决延迟问题。
空闲连接自动断开
如果线程一直阻塞在哪里,Redis 的客户端连接就成了闲置连接,闲置过久,服务器一般会主动断开连接,减少闲置资源占用。这个时候blpop/brpop会抛出异常来。
注意捕获异常,还要重试。
锁冲突处理
对于分布式锁如何处理加锁失败?
直接抛出异常、sleep、将请求放入延时队列。
延时队列的实现
通过zset来实现延时队列。
我们将消息序列化成一个字符串作为 zset 的value,这个消息的到期处理时间作为score,然后用多个线程轮询 zset 获取到期的任务进行处理,多个线程是为了保障可用性,万一挂了一个线程还有其它线程可以继续处理。通过 zrem 来决定唯一的属主。
实现:
import java.lang.reflect.Type;
import java.util.Set;
import java.util.UUID;
import com.alibaba.fastjson.JSON;
import com.alibaba.fastjson.TypeReference;
import redis.clients.jedis.Jedis;
public class RedisDelayingQueue<T> {
static class TaskItem<T> {
public String id;
public T msg;
}
// fastjson 序列化对象中存在 generic 类型时,需要使用 TypeReference
private Type TaskType = new TypeReference<TaskItem<T>>() {}.getType();
private Jedis jedis;
private String queueKey;
public RedisDelayingQueue(Jedis jedis, String queueKey) {
this.jedis = jedis;
this.queueKey = queueKey;
}
public void delay(T msg) {
TaskItem<T> task = new TaskItem<T>();
task.id = UUID.randomUUID().toString();
// 分配唯一的 uuid
task.msg = msg;
String s = JSON.toJSONString(task);
// fastjson 序列化
jedis.zadd(queueKey, System.currentTimeMillis() + 5000, s);
// 塞入延时队列 ,5s 后再试
}
public void loop() {
while (!Thread.interrupted()) {
// 只取一条
//为什么用zrangeByScore而不用zrange??
//zrange通过索引值范围来取数据,zrangeByScore取score的范围。
//获取小于System.currentTimeMillis()的所有值。
//zrangeByScore(String key,double min,double max,int offset,int count)
Set<String> values = jedis.zrangeByScore(queueKey, 0, System.currentTimeMillis(), 0, 1);
if (values.isEmpty()) {
try {
Thread.sleep(500);
// 歇会继续
}
catch (InterruptedException e) {
break;
}
continue;
}
String s = values.iterator().next();
//zrem,删除成功了,就说明抢到了。
if (jedis.zrem(queueKey, s) > 0) {
// 抢到了
TaskItem<T> task = JSON.parseObject(s, TaskType);
// fastjson 反序列化
this.handleMsg(task.msg);
}
}
}
public void handleMsg(T msg) {
System.out.println(msg);
}
public static void main(String[] args) {
Jedis jedis = new Jedis();
RedisDelayingQueue<String> queue = new RedisDelayingQueue<>(jedis, "q-demo");
Thread producer = new Thread() {
public void run() {
for (int i = 0; i < 10; i++) {
//添加延迟队列
queue.delay("codehole" + i);
}
}
}
;
Thread consumer = new Thread() {
public void run() {
queue.loop();
}
}
;
producer.start();
consumer.start();
try {
producer.join();
Thread.sleep(6000);
consumer.interrupt();
consumer.join();
}
catch (InterruptedException e) {
}
}
}使用lua进一步优化延时队列
可以考虑使用lua scripting来优化一下这个逻辑,将zrangebyscore和zrem一同挪到服务器端进行原子化操作,这样多个进程之间争抢任务时就不会出现这种浪费了。
Redis 作为消息队列为什么不能保证百分百的可靠性?
数据可靠性无法保障,如果消息丢失、Redis宕机部分数据没有持久化甚至突然的网络抖动都可能带来数据的丢失,应该是无法容忍的。
这种方案消息的状态过于简单,没有ack机制,消息取出后消费失败依赖于client记录日志或者重新push到队列里面。
还是不推荐使用redis最为消息队列
应用 3:节衣缩食 —— 位图
位图可以保持一些状态,或者作为开关使用
位数组的顺序和字符的位顺序是相反的。

127.0.0.1:6379> setbit s 1 1
(integer) 0
127.0.0.1:6379> setbit s 2 1
(integer) 0
127.0.0.1:6379> setbit s 4 1
(integer) 0
127.0.0.1:6379> setbit s 9 1
(integer) 0
127.0.0.1:6379> setbit s 10 1
(integer) 0
127.0.0.1:6379> setbit s 13 1
(integer) 0
127.0.0.1:6379> setbit s 15 1
(integer) 0
127.0.0.1:6379> get s
"he"
127.0.0.1:6379> set w h # 整存
(integer) 0
127.0.0.1:6379> getbit w 1
(integer) 1统计和查找
bitcount 用来统计指定位置范围内 1 的个数,bitpos 用来查找指定范围内出现的第一个 0 或 1。
遗憾的是, start 和 end 参数是字节索引,也就是说指定的位范围必须是 8 的倍数,而不能任意指定。这很奇怪,我表示不是很能理解 Antirez 为什么要这样设计。因为这个设计,我们无法直接计算某个月内用户签到了多少天,而必须要将这个月所覆盖的字节内容全部取出来 (getrange 可以取出字符串的子串) 然后在内存里进行统计,这个非常繁琐。
魔术指令bitfield
bitfield 有三个子指令,分别是 get/set/incrby,它们都可以对指定位片段进行读写,但是最多只能处理 64 个连续的位
127.0.0.1:6379> set w hello
OK
127.0.0.1:6379> bitfield w get u4 0 # 从第一个位开始取 4 个位,结果是无符号数 (u)
(integer) 6
127.0.0.1:6379> bitfield w get u3 2 # 从第三个位开始取 3 个位,结果是无符号数 (u)
(integer) 5
127.0.0.1:6379> bitfield w get i4 0 # 从第一个位开始取 4 个位,结果是有符号数 (i)
1) (integer) 6
127.0.0.1:6379> bitfield w get i3 2 # 从第三个位开始取 3 个位,结果是有符号数 (i)
1) (integer) -3一下执行多个子指令
127.0.0.1:6379> bitfield w get u4 0 get u3 2 get i4 0 get i3 2
1) (integer) 6
2) (integer) 5
3) (integer) 6
4) (integer) -3使用 set 子指令将第二个字符 e 改成 a,a 的 ASCII 码是 97。
127.0.0.1:6379> bitfield w set u8 8 97 # 从第 8 个位开始,将接下来的 8 个位用无符号数 97 替换
1) (integer) 101
127.0.0.1:6379> get w
"hallo"bitfield 指令提供了溢出策略子指令 overflow,用户可以选择溢出行为,默认是折返 (wrap),还可以选择失败 (fail) 报错不执行,以及饱和截断 (sat),超过了范围就停留在最大最小值。overflow 指令只影响接下来的第一条指令,这条指令执行完后溢出策略会变成默认值折返 (wrap)。
127.0.0.1:6379> bitfield w overflow sat incrby u4 2 1 # 保持最大值
1) (integer) 15
127.0.0.1:6379> bitfield w overflow fail incrby u4 2 1 # 不执行
1) (nil)bitfield 怎么应用??
应用 4:四两拨千斤 —— HyperLogLog
如果你的页面访问量非常大,比如一个爆款页面几千万的 UV,你需要一个很大的 set 集合来统计,这就非常浪费空间。
HyperLogLog 提供不精确的去重计数方案,虽然不精确但是也不是非常不精确,标准误差是 0.81%,这样的精确度已经可以满足上面的 UV 统计需求了。
HyperLogLog 提供了三个个指令 pfadd (加)和 pfcount(统计),pfmerge用于将多个 pf 计数值累加在一起形成一个新的 pf 值。
127.0.0.1:6379> pfadd codehole user1
(integer) 1
127.0.0.1:6379> pfcount codehole
(integer) 1HyperLogLog 实现原理
通过概率统计,估算样本大小。
应用 5:层峦叠嶂 —— 布隆过滤器rebloom
布隆过滤器可以理解为一个不怎么精确的 set 结构

Redis 中的布隆过滤器
Redis 4.0 才有布隆过滤器
127.0.0.1:6379> bf.add codehole user1
(integer) 1
127.0.0.1:6379> bf.add codehole user2
(integer) 1
127.0.0.1:6379> bf.add codehole user3
(integer) 1
127.0.0.1:6379> bf.exists codehole user1
(integer) 1
127.0.0.1:6379> bf.exists codehole user4
(integer) 0
127.0.0.1:6379> bf.madd codehole user4 user5 user6
1) (integer) 1
2) (integer) 1
3) (integer) 1
127.0.0.1:6379> bf.mexists codehole user4 user5 user6 user7
1) (integer) 1
2) (integer) 1
3) (integer) 1
4) (integer) 0自定义创建
Redis 其实还提供了自定义参数的布隆过滤器,需要我们在 add 之前使用bf.reserve指令显式创建。如果对应的 key 已经存在,bf.reserve会报错。bf.reserve有三个参数,分别是 key, error_rate和initial_size。错误率越低,需要的空间越大。initial_size参数表示预计放入的元素数量,当实际数量超出这个数值时,误判率会上升。
布隆过滤器的initial_size估计的过大,会浪费存储空间,估计的过小,就会影响准确率。
布隆过滤器的原理
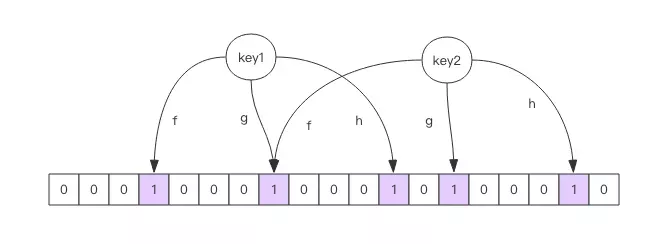
向布隆过滤器中添加 key 时,会使用多个 hash 函数对 key 进行 hash 算得一个整数索引值然后对位数组长度进行取模运算得到一个位置,每个 hash 函数都会算得一个不同的位置。再把位数组的这几个位置都置为 1 就完成了 add 操作。
空间占用估算
在线计算器:Bloom Filter Calculator
实际元素超出时,误判率会怎样变化
引入参数 t 表示实际元素和预计元素的倍数 t。f是错误率。
f=(1-0.5^t)^k # 极限近似,k 是 hash 函数的最佳数量
应用
在爬虫系统中,我们需要对 URL 进行去重
应用 6:断尾求生 —— 简单限流
限流需求中存在一个滑动时间窗口
public class SimpleRateLimiter {
private Jedis jedis;
public SimpleRateLimiter(Jedis jedis) {
this.jedis = jedis;
}
public Boolean isActionAllowed(String userId, String actionKey, int period, int maxCount) {
String key = String.format("hist:%s:%s", userId, actionKey);
long nowTs = System.currentTimeMillis();
//pipeline就可以充当这种“批处理”的工具,主要是TCP连接中减少了“交互往返”的时间。
Pipeline pipe = jedis.pipelined();
pipe.multi();
pipe.zadd(key, nowTs, "" + nowTs);
//删除过期
//设置过期 还用删除么?
pipe.zremrangeByScore(key, 0, nowTs - period * 1000);
//删除之后统计数量
Response<long> count = pipe.zcard(key);
//设置过期时间
pipe.expire(key, period + 1);
pipe.exec();
pipe.close();
return count.get() <= maxCount;
}
public static void main(String[] args) {
Jedis jedis = new Jedis();
SimpleRateLimiter limiter = new SimpleRateLimiter(jedis);
for (int i=0;i<20;i++) {
System.out.println(limiter.isActionAllowed("laoqian", "reply", 60, 5));
}
}
}应用 7:一毛不拔 —— 漏斗限流Redis-Cell
之前的限流是根据时间来的。
public class FunnelRateLimiter {
static class Funnel {
int capacity;
float leakingRate;
//可用空位
int leftQuota;
//上次漏的时间?
long leakingTs;
public Funnel(int capacity, float leakingRate) {
this.capacity = capacity;
this.leakingRate = leakingRate;
this.leftQuota = capacity;
this.leakingTs = System.currentTimeMillis();
}
void makeSpace() {
long nowTs = System.currentTimeMillis();
long deltaTs = nowTs - leakingTs;
//距离上次漏的时间过去deltaTs,乘以漏出率 = 可以漏出的个数(可用空位)。
int deltaQuota = (int) (deltaTs * leakingRate);
if (deltaQuota < 0) {
// 间隔时间太长,整数数字过大溢出
this.leftQuota = capacity;
this.leakingTs = nowTs;
return;
}
if (deltaQuota < 1) {
// 腾出空间太小,最小单位是1
return;
}
this.leftQuota += deltaQuota;
this.leakingTs = nowTs;
if (this.leftQuota > this.capacity) {
this.leftQuota = this.capacity;
}
}
Boolean watering(int quota) {
//每次灌水前都会被调用以触发漏水,给漏斗腾出空间来
makeSpace();
if (this.leftQuota >= quota) {
this.leftQuota -= quota;
return true;
}
return false;
}
}
private Map<String, Funnel> funnels = new HashMap<>();
public Boolean isActionAllowed(String userId, String actionKey, int capacity, float leakingRate) {
String key = String.format("%s:%s", userId, actionKey);
Funnel funnel = funnels.get(key);
if (funnel == null) {
funnel = new Funnel(capacity, leakingRate);
funnels.put(key, funnel);
}
return funnel.watering(1);
// 需要1个quota
}
}怎么使用redis呢?
灌水的时候将 hash 结构的字段取出来进行逻辑运算后,再将新值回填到 hash 结构中就完成了一次行为频度的检测。
从 hash 结构中取值,然后在内存里运算,再回填到 hash 结构,这三个过程无法原子化。
Redis-Cell
Redis 4.0 提供了一个限流 Redis 模块,它叫 redis-cell。
https://github.com/brandur/redis-cell
CL.THROTTLE user123 15 30 60 1
▲ ▲ ▲ ▲ ▲
| | | | └───── apply 1 token (default if omitted)
| | └──┴─────── 30 tokens / 60 seconds
| └───────────── 15 max_burst
└─────────────────── key "user123"> cl.throttle laoqian:reply 15 30 60
1) (integer) 0 # 0 表示允许,1表示拒绝
2) (integer) 15 # 漏斗容量capacity
3) (integer) 14 # 漏斗剩余空间left_quota
4) (integer) -1 # 如果拒绝了,需要多长时间后再试(漏斗有空间了,单位秒)
5) (integer) 2 # 多长时间后,漏斗完全空出来(left_quota==capacity,单位秒)127.0.0.1:6379> CL.THROTTLE test1 10 5 60 3
1) (integer) 0
2) (integer) 11
3) (integer) 8
4) (integer) -1
5) (integer) 36
127.0.0.1:6379> CL.THROTTLE test1 10 5 60 3
1) (integer) 0
2) (integer) 11
3) (integer) 5
4) (integer) -1
5) (integer) 71
127.0.0.1:6379> CL.THROTTLE test1 10 5 60 3
1) (integer) 0
2) (integer) 11
3) (integer) 2
4) (integer) -1
5) (integer) 106
127.0.0.1:6379> CL.THROTTLE test1 10 5 60 3
1) (integer) 1
2) (integer) 11
3) (integer) 2
4) (integer) 10
5) (integer) 106
作者:AngryApe
链接:https://www.jianshu.com/p/1b026b874c40
來源:简书
简书著作权归作者所有,任何形式的转载都请联系作者获得授权并注明出处。应用 8:近水楼台 —— GeoHash
Redis 在 3.2 版本以后增加了地理位置 GEO 模块。

select id from positions where x0-r < x < x0+r and y0-r < y < y0+r为了满足高性能的矩形区域算法,数据表需要在经纬度坐标加上双向复合索引 (x, y),这样可以最大优化查询性能。
但这不是一个好方案。
GeoHash 算法
GeoHash 算法将二维的经纬度数据映射到一维的整数。
在使用 Redis 进行 Geo 查询时,我们要时刻想到它的内部结构实际上只是一个 zset(skiplist)。通过 zset 的 score 排序就可以得到坐标附近的其它元素 (实际情况要复杂一些,不过这样理解足够了),通过将 score 还原成坐标值就可以得到元素的原始坐标。
添加-geoadd
geoadd 指令
127.0.0.1:6379> geoadd company 116.48105 39.996794 juejin
(integer) 1
127.0.0.1:6379> geoadd company 116.562108 39.787602 jd 116.334255 40.027400 xiaomi
(integer) 2geo没有删除命令,但因为底层是zset,所以可以通过zrem来删除。
距离-geodist
127.0.0.1:6379> geodist company juejin ireader km
"10.5501"获取元素位置-geopos
127.0.0.1:6379> geopos company juejin
1) 1) "116.48104995489120483"
2) "39.99679348858259686"获取元素的 hash 值-geohash
127.0.0.1:6379> geohash company ireader
1) "wx4g52e1ce0"附近的公司-georadiusbymember
# 范围 20 公里以内最多 3 个元素按距离倒排
127.0.0.1:6379> georadiusbymember company ireader 20 km count 3 desc
1) "jd"
2) "meituan"
3) "juejin"
# 三个可选参数 withcoord withdist withhash 用来携带附加参数
# withdist 很有用,它可以用来显示距离
127.0.0.1:6379> georadiusbymember company ireader 20 km withcoord withdist withhash count 3 asc
1) 1) "ireader"
2) "0.0000"
3) (integer) 4069886008361398
4) 1) "116.5142020583152771"
2) "39.90540918662494363"
2) 1) "juejin"
2) "10.5501"
3) (integer) 4069887154388167
4) 1) "116.48104995489120483"
2) "39.99679348858259686"
3) 1) "meituan"
2) "11.5748"
3) (integer) 4069887179083478
4) 1) "116.48903220891952515"
2) "40.00766997707732031"根据坐标值来查询附近的元素-georadius
这里建议 Geo 的数据使用单独的 Redis 实例部署,不使用集群环境。
如果数据量过亿甚至更大,就需要对 Geo 数据进行拆分,按国家拆分、按省拆分,按市拆分,在人口特大城市甚至可以按区拆分。这样就可以显著降低单个 zset 集合的大小。
应用 9:大海捞针 —— Scan
如何从海量的 key 中找出满足特定前缀的 key 列表来?
Redis 提供了一个简单暴力的指令 keys 用来列出所有满足特定正则字符串规则的 key。
127.0.0.1:6379> set codehole1 a
OK
127.0.0.1:6379> set codehole2 b
OK
127.0.0.1:6379> set codehole3 c
OK
127.0.0.1:6379> set code1hole a
OK
127.0.0.1:6379> set code2hole b
OK
127.0.0.1:6379> set code3hole b
OK
127.0.0.1:6379> keys *
1) "codehole1"
2) "code3hole"
3) "codehole3"
4) "code2hole"
5) "codehole2"
6) "code1hole"
127.0.0.1:6379> keys codehole*
1) "codehole1"
2) "codehole3"
3) "codehole2"
127.0.0.1:6379> keys code*hole
1) "code3hole"
2) "code2hole"
3) "code1hole"keys缺点:
- 没有 offset、limit 参数,一次性吐出所有满足条件的 key
- keys 算法是遍历算法,复杂度是 O(n),如果实例中有千万级以上的 key,这个指令就会导致 Redis 服务卡顿,因为 Redis 是单线程程序,顺序执行所有指令,其它指令必须等到当前的 keys 指令执行完了才可以继续。
Redis 为了解决这个问题,它在 2.8 版本中加入了大海捞针的指令——scan。scan 相比 keys 具备有以下特点:
- 通过游标分步进行的,不会阻塞线程
- 提供 limit 参数
- 返回的结果可能会有重复,需要客户端去重复,这点非常重要;
- 数据修改不一定能遍历到。
- 单次返回的结果是空的并不意味着遍历结束,而要看返回的游标值是否为零。
scan 基础使用
scan 参数提供了三个参数,第一个是 cursor 整数值,第二个是 key 的正则模式,第三个是遍历的 limit hint。第一次遍历时,cursor 值为 0,然后将返回结果中第一个整数值作为下一次遍历的 cursor。
127.0.0.1:6379> scan 0 match key99* count 1000
1) "13976"
2) 1) "key9911"
2) "key9974"
3) "key9994"
4) "key9910"
5) "key9907"
6) "key9989"
7) "key9971"
8) "key99"
9) "key9966"
10) "key992"
11) "key9903"
12) "key9905"
127.0.0.1:6379> scan 13976 match key99* count 1000
1) "1996" # 作为下次遍历的cursor
2) 1) "key9982"
2) "key9997"
3) "key9963"
4) "key996"
5) "key9912"
6) "key9999"
7) "key9921"
8) "key994"
9) "key9956"
10) "key9919"
127.0.0.1:6379> scan 1996 match key99* count 1000
1) "12594"
2) 1) "key9939"
2) "key9941"
3) "key9967"
4) "key9938"
5) "key9906"
6) "key999"
7) "key9909"
8) "key9933"
9) "key9992"
......
127.0.0.1:6379> scan 11687 match key99* count 1000
1) "0"
2) 1) "key9969"
2) "key998"
3) "key9986"
4) "key9968"
5) "key9965"
6) "key9990"
7) "key9915"
8) "key9928"
9) "key9908"
10) "key9929"
11) "key9944"这个 limit 不是限定返回结果的数量,而是限定服务器单词遍历的字典槽位数量。
字典的结构
scan 指令返回的游标就是第一维数组的位置索引,我们将这个位置索引称为槽 (slot)。如果不考虑字典的扩容缩容,直接按数组下标挨个遍历就行了。limit 参数就表示需要遍历的槽位数,之所以返回的结果可能多可能少,是因为不是所有的槽位上都会挂接链表,有些槽位可能是空的,还有些槽位上挂接的链表上的元素可能会有多个。每一次遍历都会将 limit 数量的槽位上挂接的所有链表元素进行模式匹配过滤后,一次性返回给客户端。
scan 遍历顺序
采用了高位进位加法来遍历
字典扩容
rehash
对比扩容缩容前后的遍历顺序
观察这张图,我们发现采用高位进位加法的遍历顺序,rehash 后的槽位在遍历顺序上是相邻的。
假设当前要即将遍历 110 这个位置 (橙色),那么扩容后,当前槽位上所有的元素对应的新槽位是 0110 和 1110(深绿色),也就是在槽位的二进制数增加一个高位 0 或 1。这时我们可以直接从 0110 这个槽位开始往后继续遍历,0110 槽位之前的所有槽位都是已经遍历过的,这样就可以避免扩容后对已经遍历过的槽位进行重复遍历。
渐进式 rehash
操作处于 rehash 中的字典,需要同时访问新旧两个数组结构。如果在旧数组下面找不到元素,还需要去新数组下面去寻找。
scan 也需要考虑这个问题,对与 rehash 中的字典,它需要同时扫描新旧槽位,然后将结果融合后返回给客户端。
大 key 扫描
避免使用大key
定位大key
redis-cli -h 127.0.0.1 -p 7001 –bigkeys
redis-cli -h 127.0.0.1 -p 7001 –bigkeys -i 0.1 #当心这个指令会大幅抬升 Redis 的 ops 导致线上报警,还可以增加一个休眠参数BeanPostProcessor总结
- 各种BeanPostProcessor
各种BeanPostProcessor
MergedBeanDefinitionPostProcessor
SmartInstantiationAwareBeanPostProcessor
InstantiationAwareBeanPostProcessor
BeanPostProcessor
MergedBeanDefinitionPostProcessor
SmartInstantiationAwareBeanPostProcessor
这两个一般都内部使用的。

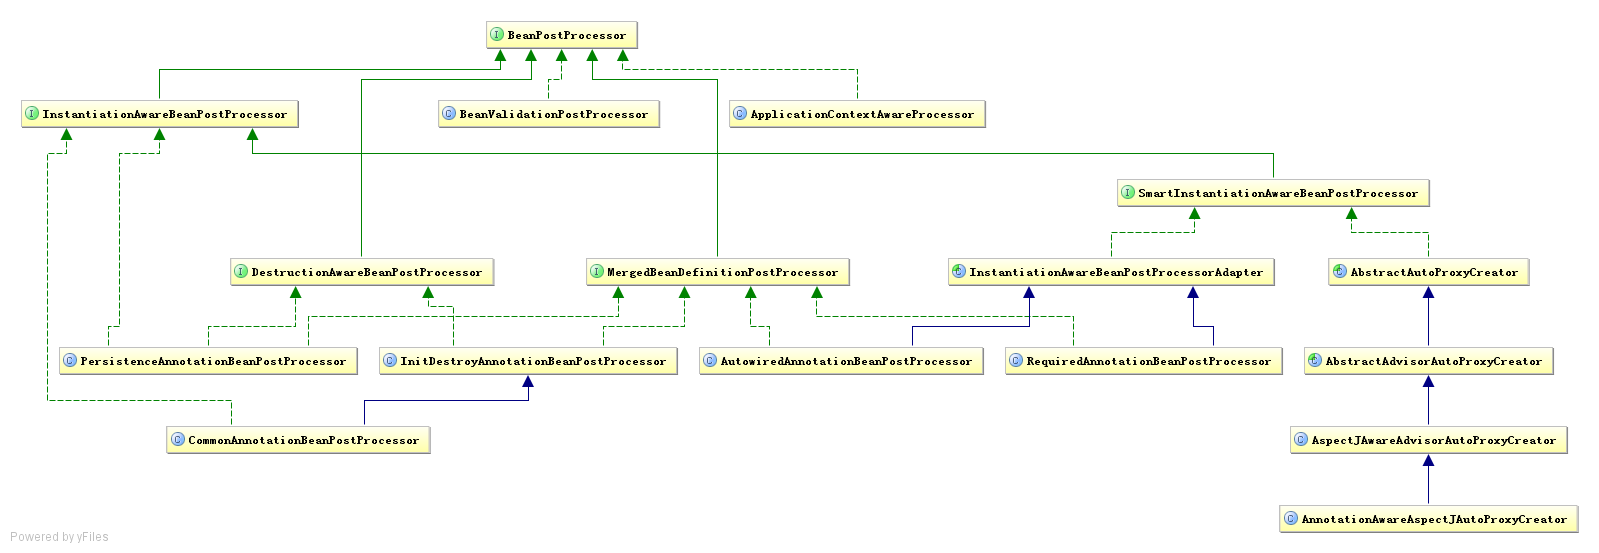
InstantiationAwareBeanPostProcessor
postProcessBeforeInstantiation()
AbstractAutoProxyCreator创建代理类?
实例化目标对象之前执行
可以返回一个代理对象,aop使用
创建代理对象并中断默认Spring创建流程。
public abstract class AbstractAutoProxyCreator extends ProxyProcessorSupport
implements SmartInstantiationAwareBeanPostProcessor, BeanFactoryAware {postProcessAfterInstantiation()
Bean实例化完毕后执行的后处理操作,所有初始化逻辑、装配逻辑之前执行
postProcessPropertyValues()
完成其他定制的一些依赖注入和依赖检查等,如
AutowiredAnnotationBeanPostProcessor处理@Autowired
RequiredAnnotationBeanPostProcessor执行@required注解的检查等等
CommonAnnotationBeanPostProcessor处理@resource
提供对JSR-250规范注解的支持@javax.annotation.Resource、@javax.annotation.PostConstruct和@javax.annotation.PreDestroy等的支持。
PersistenceAnnotationBeanPostProcessor执行@PersistenceContext等JPA注解的注入,
BeanPostProcessor
postProcessBeforeInitialization()
实例化(new)、依赖注入完毕(set),初始化之前(init-method)
CommonAnnotationBeanPostProcessor处理@PostConstruct
BeanValidationPostProcessor处理@Valid注解Bean验证
根据afterInitialization是false/true决定调用postProcessBeforeInitialization或postProcessAfterInitialization来通过JSR-303规范验证Bean,默认false。
ApplicationContextAwareProcessor一些Aware接口的注入
注入那些实现ApplicationContextAware、MessageSourceAware、ResourceLoaderAware、EnvironmentAware、EmbeddedValueResolverAware、ApplicationEventPublisherAware标识接口的Bean需要的相应实例
ServletContextAwareProcessor处理ServletContextAware、ServletConfigAware
postProcessAfterInitialization()
初始化完毕
AbstractAutoProxyCreator 给代理类包装增强?
如果有增强就执行包装目标对象到代理对象
-
AspectJAwareAdvisorAutoProxyCreator处理xml风格的AOP
< aop:config> -
AnnotationAwareAspectJAutoProxyCreator处理@AspectJ注解风格
< aop:aspectj-autoproxy> @aspect
ScheduledAnnotationBeanPostProcessor
通过查找Bean对象类上的@scheduled注解来创建ScheduledMethodRunnable对象并注册任务调度方法
AbstractAdvisingBeanPostProcessor
- MethodValidationPostProcessor
- AsyncAnnotationBeanPostProcessor
- PersistenceExceptionTranslationPostProcessor
DestructionAwareBeanPostProcessor
postProcessBeforeDestruction()
CommonAnnotationBeanPostProcessor处理@PreDestroy
SpringBoot错误处理
SpringBoot错误处理
对于SpringBoot的错误处理,一般用HandlerExceptionResolver或@ExceptionHandler接收异常信息,做进一步处理。
对于没有处理的则直接返回错误页面。
HandlerExceptionResolver
可以捕获Handler中的异常,做自定义处理
@ExceptionHandler
配合@ControllerAdvice使用
ErrorPage
ErrorPageFilter BasicErrorController 什么关系
产生处理错误流程
ResourceHttpRequestHandler 拦截 /** 所有路径
在ResourceHttpRequestHandler.handleRequest 处理时 如果获取不到resource就设置responseStatus为404。
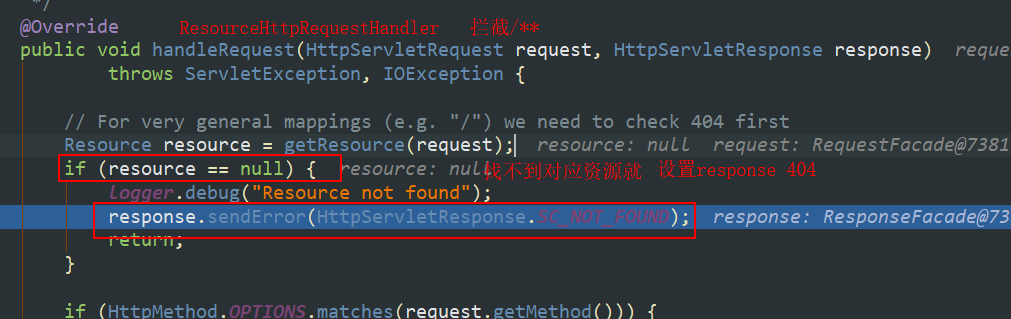
tomcat收到response为404,dispatch到/error页面。
通常有以下几种错误页面
- 自定义的错误页面

- SpringBoot的错误页面
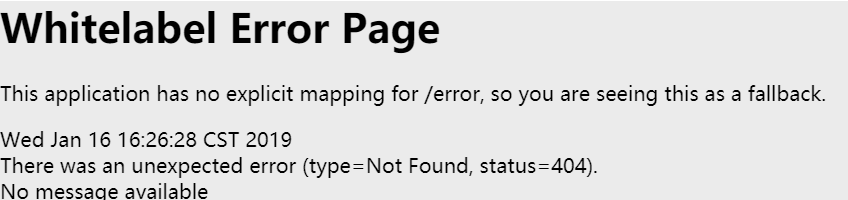
- Tomcat的错误页面

ErrorPage原理
ErrorPage从哪来的呢?
/error 在Tomcat中定义
1. ErrorPageCustomizer中定义"/error" ErrorPage
private static class ErrorPageCustomizer implements ErrorPageRegistrar, Ordered { private final ServerProperties properties; protected ErrorPageCustomizer(ServerProperties properties) { this.properties = properties; } @Override public void registerErrorPages(ErrorPageRegistry errorPageRegistry) { ErrorPage errorPage = new ErrorPage(this.properties.getServletPrefix() + this.properties.getError().getPath());//这里就是“/error” errorPageRegistry.addErrorPages(errorPage); } @Override public int getOrder() { return 0; } }2. ErrorMvcAutoConfiguration配置ErrorPageRegistrar(ErrorPageCustomizer)
ErrorMvcAutoConfiguration 中配置ErrorPageCustomizer
@Bean public ErrorPageCustomizer errorPageCustomizer() { return new ErrorPageCustomizer(this.serverProperties); }3. ErrorPageRegistrarBeanPostProcessor 处理ErrorPageRegistry?
registerErrorPages 在ErrorPageRegistrarBeanPostProcessor 中被调用,注册给ErrorPageRegistry。
ErrorPageFilter是针对非嵌入容器的。4. WebApplicationContext.onRefresh()中createWebServer()注册ErrorPage
最终在WebApplicationContext.onRefresh() 方法中要createWebServer(),创建内嵌的Tomcat。
通过TomcatEmbeddedServletContainerFactory(SpringBoot1.5有),将ErrorPage注册到context中(StandardContext)。for (ErrorPage errorPage : getErrorPages()) { new TomcatErrorPage(errorPage).addToContext(context); }
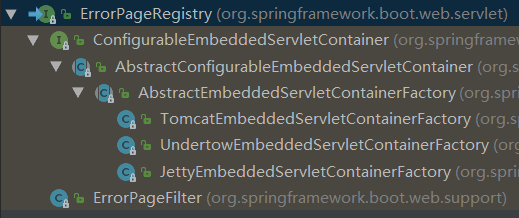
tomcat转到/error页面
上面文章介绍的很清楚。
先从StandardContext中获取到ErrorPage。
ErrorPage errorPage = context.findErrorPage(statusCode);
if (errorPage == null) {
// Look for a default error page
errorPage = context.findErrorPage(0);
}根据errorPage获取到Dispatcher,然后forward到地址("/error")
RequestDispatcher rd = servletContext.getRequestDispatcher(errorPage.getLocation());
...
rd.forward(request.getRequest(), response.getResponse());如果没有配置errorPage就是下面这样子。
/error页面SpringBoot处理
产生错误,交给tomcat,tomcat dispatcher到 /error页面
response.sendError(HttpServletResponse.SC_NOT_FOUND); 只是设置状态,Exception为null,ExceptionResolver不处理。
最后被tomcat处理,转到“/error”页面。
SpringBoot自带的 /error页面
就是第二种错误页面
在ErrorMvcAutoConfiguration 中会自动配置BasicErrorController,BasicErrorController处理/error页面。BasicErrorController配置view为“error”。
@Controller
@RequestMapping("${server.error.path:${error.path:/error}}")
public class BasicErrorController extends AbstractErrorController {
@RequestMapping(produces = "text/html")
public ModelAndView errorHtml(HttpServletRequest request,
HttpServletResponse response) {
HttpStatus status = getStatus(request);
Map<String, Object> model = Collections.unmodifiableMap(getErrorAttributes(
request, isIncludeStackTrace(request, MediaType.TEXT_HTML)));
response.setStatus(status.value());
ModelAndView modelAndView = resolveErrorView(request, response, status, model);
return (modelAndView == null ? new ModelAndView("error", model) : modelAndView);
}
}同样在ErrorMvcAutoConfiguration中配置了name = error的view。
resolveErrorView 用到了ErrorViewResolver,也可以自定义ErrorViewResolver。
@Configuration
@ConditionalOnProperty(prefix = "server.error.whitelabel", name = "enabled", matchIfMissing = true)
@Conditional(ErrorTemplateMissingCondition.class)
protected static class WhitelabelErrorViewConfiguration {
private final SpelView defaultErrorView = new SpelView(
"<html><body><h1>Whitelabel Error Page</h1>"
+ "<p>This application has no explicit mapping for /error, so you are seeing this as a fallback.</p>"
+ "<div id='created'>${timestamp}</div>"
+ "<div>There was an unexpected error (type=${error}, status=${status}).</div>"
+ "<div>${message}</div></body></html>");
@Bean(name = "error")
@ConditionalOnMissingBean(name = "error")
public View defaultErrorView() {
return this.defaultErrorView;
}
}如果不想使用Springboot自带的Error可以不去加载ErrorMvcAutoConfiguration
@EnableAutoConfiguration(exclude = {ErrorMvcAutoConfiguration.class})自定义ErrorPage的配置方式
SpringBoot自带的错误页面太丑了。可以自定义。
方式一:添加ErrorPage
老:
@Configuration
public class ErrorPageConfig {
@Bean
public EmbeddedServletContainerCustomizer containerCustomizer() {
return new EmbeddedServletContainerCustomizer() {
public void customize(ConfigurableEmbeddedServletContainer container) {
ErrorPage error404Page = new ErrorPage(HttpStatus.NOT_FOUND, "/static/html/500.html");
ErrorPage error500Page = new ErrorPage(HttpStatus.INTERNAL_SERVER_ERROR, "/static/html/500.html");
container.addErrorPages(error404Page, error500Page);
}
};
}
}新:
@Configuration
public class ContainerConfig implements ErrorPageRegistrar {
@Override
public void registerErrorPages(ErrorPageRegistry registry) {
ErrorPage[] errorPages = new ErrorPage[2];
errorPages[0] = new ErrorPage(HttpStatus.INTERNAL_SERVER_ERROR, "/error/500");
errorPages[1] = new ErrorPage(HttpStatus.NOT_FOUND, "/error/404");
registry.addErrorPages(errorPages);
}
}方式二:重写名字为Error的View
定义view
public class GunsErrorView implements View {
@Override
public String getContentType() {
return "text/html";
}
@Override
public void render(Map<String, ?> map, HttpServletRequest httpServletRequest, HttpServletResponse httpServletResponse) throws Exception {
httpServletRequest.getRequestDispatcher("/global/error").forward(httpServletRequest, httpServletResponse);
}
}配置error view
@Bean("error")
public GunsErrorView error() {
return new GunsErrorView();
}方式三:自定义ErrorViewResolver
ErrorViewResolver在BasicErrorController中被使用。返回ModelAndView。
...
SpringMVC部分组件源码分析
目录
- RequestToViewNameTranslator
- HandlerExceptionResolver
- MultipartResolver
- LocalResolver
- ThemeResolver
- FlashMapManager
RequestToViewNameTranslator
ModelAndView中view 不存在或者ModelAndView本身为null时,从request获取viewName。
private void applyDefaultViewName(HttpServletRequest request, ModelAndView mv) throws Exception {
if (mv != null && !mv.hasView()) {
mv.setViewName(getDefaultViewName(request));
}
}/**
* Translate the supplied request into a default view name.
* @param request current HTTP servlet request
* @return the view name (or {@code null} if no default found)
* @throws Exception if view name translation failed
*/
protected String getDefaultViewName(HttpServletRequest request) throws Exception {
return this.viewNameTranslator.getViewName(request);
}获取ViewName
/**
* Translates the request URI of the incoming {@link HttpServletRequest}
* into the view name based on the configured parameters.
* @see org.springframework.web.util.UrlPathHelper#getLookupPathForRequest
* @see #transformPath
*/
@Override
public String getViewName(HttpServletRequest request) {
String lookupPath = this.urlPathHelper.getLookupPathForRequest(request);
return (this.prefix + transformPath(lookupPath) + this.suffix);
}
/**
* Transform the request URI (in the context of the webapp) stripping
* slashes and extensions, and replacing the separator as required.
* @param lookupPath the lookup path for the current request,
* as determined by the UrlPathHelper
* @return the transformed path, with slashes and extensions stripped
* if desired
*/
//掐头去尾换分隔符
protected String transformPath(String lookupPath) {
String path = lookupPath;
//前后“/”是否去掉
if (this.stripLeadingSlash && path.startsWith(SLASH)) {
path = path.substring(1);
}
if (this.stripTrailingSlash && path.endsWith(SLASH)) {
path = path.substring(0, path.length() - 1);
}
//去掉扩展名
if (this.stripExtension) {
path = StringUtils.stripFilenameExtension(path);
}
//分隔符不是“/”,替换
if (!SLASH.equals(this.separator)) {
path = StringUtils.replace(path, SLASH, this.separator);
}
return path;
}HandlerExceptionResolver
解析处理过程产生的异常。
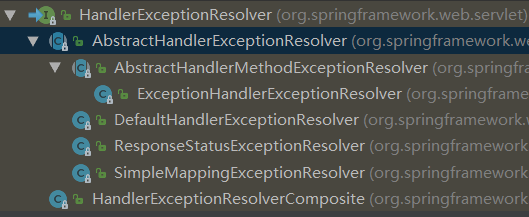
AbstractHandlerExceptionResolver
public ModelAndView resolveException(
HttpServletRequest request, HttpServletResponse response, @Nullable Object handler, Exception ex) {
//判断是否能处理这个handler
//涉及两个属性:
//- mappedHandlers 配置的具体类
//- mappedHandlerClasses 配置的处理的类型
//都没有配置则全部处理
if (shouldApplyTo(request, handler)) {
if (this.logger.isDebugEnabled()) {
this.logger.debug("Resolving exception from handler [" + handler + "]: " + ex);
}
//是否需要防止缓存?设置http缓存头禁止缓存。
prepareResponse(ex, response);
//模版方法
ModelAndView result = doResolveException(request, response, handler, ex);
if (result != null) {
logException(ex, request);
}
return result;
}
else {
return null;
}
}AbstractHandlerMethodExceptionResolver
protected boolean shouldApplyTo(HttpServletRequest request, @Nullable Object handler) {
if (handler == null) {
return super.shouldApplyTo(request, null);
}
else if (handler instanceof HandlerMethod) {
//如果是HandlerMethod,将handler设置为HandlerMethod所在的类。
HandlerMethod handlerMethod = (HandlerMethod) handler;
handler = handlerMethod.getBean();
return super.shouldApplyTo(request, handler);
}
else {
return false;
}
}protected final ModelAndView doResolveException(
HttpServletRequest request, HttpServletResponse response, @Nullable Object handler, Exception ex) {
//doResolveException 转到 doResolveHandlerMethodException
return doResolveHandlerMethodException(request, response, (HandlerMethod) handler, ex);
}ExceptionHandlerExceptionResolver
protected ModelAndView doResolveHandlerMethodException(HttpServletRequest request,
HttpServletResponse response, @Nullable HandlerMethod handlerMethod, Exception exception) {
//创建ServletInvocableHandlerMethod
ServletInvocableHandlerMethod exceptionHandlerMethod = getExceptionHandlerMethod(handlerMethod, exception);
if (exceptionHandlerMethod == null) {
return null;
}
//设置argumentResolvers、returnValueHandlers
if (this.argumentResolvers != null) {
exceptionHandlerMethod.setHandlerMethodArgumentResolvers(this.argumentResolvers);
}
if (this.returnValueHandlers != null) {
exceptionHandlerMethod.setHandlerMethodReturnValueHandlers(this.returnValueHandlers);
}
ServletWebRequest webRequest = new ServletWebRequest(request, response);
ModelAndViewContainer mavContainer = new ModelAndViewContainer();
try {
if (logger.isDebugEnabled()) {
logger.debug("Invoking @ExceptionHandler method: " + exceptionHandlerMethod);
}
Throwable cause = exception.getCause();
//执行
if (cause != null) {
// Expose cause as provided argument as well
exceptionHandlerMethod.invokeAndHandle(webRequest, mavContainer, exception, cause, handlerMethod);
}
else {
// Otherwise, just the given exception as-is
exceptionHandlerMethod.invokeAndHandle(webRequest, mavContainer, exception, handlerMethod);
}
}
catch (Throwable invocationEx) {
// Any other than the original exception is unintended here,
// probably an accident (e.g. failed assertion or the like).
if (invocationEx != exception && logger.isWarnEnabled()) {
logger.warn("Failed to invoke @ExceptionHandler method: " + exceptionHandlerMethod, invocationEx);
}
// Continue with default processing of the original exception...
return null;
}
//RequestHandled表示处理已经处理完,不进行视图渲染。
//构建mav
if (mavContainer.isRequestHandled()) {
return new ModelAndView();
}
else {
ModelMap model = mavContainer.getModel();
HttpStatus status = mavContainer.getStatus();
ModelAndView mav = new ModelAndView(mavContainer.getViewName(), model, status);
mav.setViewName(mavContainer.getViewName());
if (!mavContainer.isViewReference()) {
mav.setView((View) mavContainer.getView());
}
//处理RedirectAttributes
if (model instanceof RedirectAttributes) {
Map<String, ?> flashAttributes = ((RedirectAttributes) model).getFlashAttributes();
RequestContextUtils.getOutputFlashMap(request).putAll(flashAttributes);
}
return mav;
}
}DefaultHandlerExceptionResolver
根据不同的Exception使用不同的方法。大概都是根据Exception设置response不同的错误码。返回空的mav。
protected ModelAndView doResolveException(
HttpServletRequest request, HttpServletResponse response, @Nullable Object handler, Exception ex) {
try {
if (ex instanceof HttpRequestMethodNotSupportedException) {
return handleHttpRequestMethodNotSupported(
(HttpRequestMethodNotSupportedException) ex, request, response, handler);
}
else if (ex instanceof HttpMediaTypeNotSupportedException) {
return handleHttpMediaTypeNotSupported(
(HttpMediaTypeNotSupportedException) ex, request, response, handler);
}
else if (ex instanceof HttpMediaTypeNotAcceptableException) {
return handleHttpMediaTypeNotAcceptable(
(HttpMediaTypeNotAcceptableException) ex, request, response, handler);
}
else if (ex instanceof MissingPathVariableException) {
return handleMissingPathVariable(
(MissingPathVariableException) ex, request, response, handler);
}
else if (ex instanceof MissingServletRequestParameterException) {
return handleMissingServletRequestParameter(
(MissingServletRequestParameterException) ex, request, response, handler);
}
else if (ex instanceof ServletRequestBindingException) {
return handleServletRequestBindingException(
(ServletRequestBindingException) ex, request, response, handler);
}
else if (ex instanceof ConversionNotSupportedException) {
return handleConversionNotSupported(
(ConversionNotSupportedException) ex, request, response, handler);
}
else if (ex instanceof TypeMismatchException) {
return handleTypeMismatch(
(TypeMismatchException) ex, request, response, handler);
}
else if (ex instanceof HttpMessageNotReadableException) {
return handleHttpMessageNotReadable(
(HttpMessageNotReadableException) ex, request, response, handler);
}
else if (ex instanceof HttpMessageNotWritableException) {
return handleHttpMessageNotWritable(
(HttpMessageNotWritableException) ex, request, response, handler);
}
else if (ex instanceof MethodArgumentNotValidException) {
return handleMethodArgumentNotValidException(
(MethodArgumentNotValidException) ex, request, response, handler);
}
else if (ex instanceof MissingServletRequestPartException) {
return handleMissingServletRequestPartException(
(MissingServletRequestPartException) ex, request, response, handler);
}
else if (ex instanceof BindException) {
return handleBindException((BindException) ex, request, response, handler);
}
else if (ex instanceof NoHandlerFoundException) {
return handleNoHandlerFoundException(
(NoHandlerFoundException) ex, request, response, handler);
}
else if (ex instanceof AsyncRequestTimeoutException) {
return handleAsyncRequestTimeoutException(
(AsyncRequestTimeoutException) ex, request, response, handler);
}
}
catch (Exception handlerException) {
if (logger.isWarnEnabled()) {
logger.warn("Handling of [" + ex.getClass().getName() + "] resulted in exception", handlerException);
}
}
return null;
}ResponseStatusExceptionResolver
用来解析@ResponseStatus的异常。
也就是根据@ResponseStatus的异常来设置response statusCode,返回空mav
protected ModelAndView doResolveException(
HttpServletRequest request, HttpServletResponse response, @Nullable Object handler, Exception ex) {
try {
if (ex instanceof ResponseStatusException) {
return resolveResponseStatusException((ResponseStatusException) ex, request, response, handler);
}
ResponseStatus status = AnnotatedElementUtils.findMergedAnnotation(ex.getClass(), ResponseStatus.class);
if (status != null) {
return resolveResponseStatus(status, request, response, handler, ex);
}
if (ex.getCause() instanceof Exception) {
ex = (Exception) ex.getCause();
return doResolveException(request, response, handler, ex);
}
}
catch (Exception resolveEx) {
logger.warn("ResponseStatus handling resulted in exception", resolveEx);
}
return null;
}SimpleMappingExceptionResolver
需要配置异常类和view的关系。
需要配置:
//配置异常类和view的关系
@Nullable
private Properties exceptionMappings;
//不处理的异常
@Nullable
private Class<?>[] excludedExceptions;
//默认view
@Nullable
private String defaultErrorView;
//默认code
@Nullable
private Integer defaultStatusCode;
//view 和 code的关系
private Map<String, Integer> statusCodes = new HashMap<>();
//异常在Model中保存的参数名。默认exception。
@Nullable
private String exceptionAttribute = DEFAULT_EXCEPTION_ATTRIBUTE;protected ModelAndView doResolveException(
HttpServletRequest request, HttpServletResponse response, @Nullable Object handler, Exception ex) {
// Expose ModelAndView for chosen error view.
//根据ex查找viewname
String viewName = determineViewName(ex, request);
if (viewName != null) {
// Apply HTTP status code for error views, if specified.
// Only apply it if we're processing a top-level request.
//检查viewName是否有对应的statusCode
Integer statusCode = determineStatusCode(request, viewName);
if (statusCode != null) {
//有code,将code设置到response。
applyStatusCodeIfPossible(request, response, statusCode);
}
return getModelAndView(viewName, ex, request);
}
else {
return null;
}
}MultipartResolver
处理上传请求。
- CommonsMultipartResolver 使用Apachecommon-fileupload
- StandardServletMultipartResolver 使用Servlet3.0 标准上传方式
StandardServletMultipartResolver
使用方法:SpringMVC中使用StandardServletMultipartResolver上传文件实例
需要在web.xml中配置DispatcherServlet。
//判断上传请求,“multipart/”开头。
public boolean isMultipart(HttpServletRequest request) {
// Same check as in Commons FileUpload...
if (!"post".equalsIgnoreCase(request.getMethod())) {
return false;
}
return StringUtils.startsWithIgnoreCase(request.getContentType(), "multipart/");
}
public MultipartHttpServletRequest resolveMultipart(HttpServletRequest request) throws MultipartException {
return new StandardMultipartHttpServletRequest(request, this.resolveLazily);
}StandardMultipartHttpServletRequest
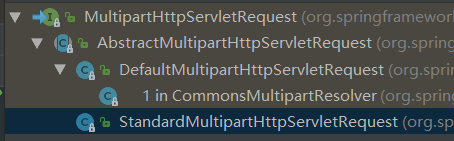
//org.springframework.web.multipart.support.StandardMultipartHttpServletRequest#parseRequest
private void parseRequest(HttpServletRequest request) {
try {
//使用request.getParts(),来获取文件。
Collection<Part> parts = request.getParts();
this.multipartParameterNames = new LinkedHashSet<>(parts.size());
MultiValueMap<String, MultipartFile> files = new LinkedMultiValueMap<>(parts.size());
for (Part part : parts) {
String headerValue = part.getHeader(HttpHeaders.CONTENT_DISPOSITION);
ContentDisposition disposition = ContentDisposition.parse(headerValue);
String filename = disposition.getFilename();
if (filename != null) {
if (filename.startsWith("=?") && filename.endsWith("?=")) {
filename = MimeDelegate.decode(filename);
}
files.add(part.getName(), new StandardMultipartFile(part, filename));
}
else {
this.multipartParameterNames.add(part.getName());
}
}
//设置到this.multipartFiles,
//然后controller中的MultipartHttpServletRequest.getFile() 就从this.multipartFiles中获取文件。
setMultipartFiles(files);
}
catch (Throwable ex) {
handleParseFailure(ex);
}
}CommonsMultipartResolver
判断是否上传,同样先判断post请求,再判断multipart/开头
public boolean isMultipart(HttpServletRequest request) {
return ServletFileUpload.isMultipartContent(request);
}public MultipartHttpServletRequest resolveMultipart(final HttpServletRequest request) throws MultipartException {
Assert.notNull(request, "Request must not be null");
//懒加载
if (this.resolveLazily) {
return new DefaultMultipartHttpServletRequest(request) {
@Override
protected void initializeMultipart() {
MultipartParsingResult parsingResult = parseRequest(request);
setMultipartFiles(parsingResult.getMultipartFiles());
setMultipartParameters(parsingResult.getMultipartParameters());
setMultipartParameterContentTypes(parsingResult.getMultipartParameterContentTypes());
}
};
}
else {
MultipartParsingResult parsingResult = parseRequest(request);
//这里返回的是DefaultMultipartHttpServletRequest
//common-fileupload的解析结果,解析结果中的三个map
//parsingResult.getMultipartFiles() 保存文件
//parsingResult.getMultipartParameters() 保存参数
//parsingResult.getMultipartParameterContentTypes() 参数ContentType
return new DefaultMultipartHttpServletRequest(request, parsingResult.getMultipartFiles(),
parsingResult.getMultipartParameters(), parsingResult.getMultipartParameterContentTypes());
}
}protected MultipartParsingResult parseRequest(HttpServletRequest request) throws MultipartException {
String encoding = determineEncoding(request);
//使用common-fileupload,解析上传文件。
FileUpload fileUpload = prepareFileUpload(encoding);
try {
List<FileItem> fileItems = ((ServletFileUpload) fileUpload).parseRequest(request);
return parseFileItems(fileItems, encoding);
}
catch (FileUploadBase.SizeLimitExceededException ex) {
throw new MaxUploadSizeExceededException(fileUpload.getSizeMax(), ex);
}
catch (FileUploadBase.FileSizeLimitExceededException ex) {
throw new MaxUploadSizeExceededException(fileUpload.getFileSizeMax(), ex);
}
catch (FileUploadException ex) {
throw new MultipartException("Failed to parse multipart servlet request", ex);
}
}public DefaultMultipartHttpServletRequest(HttpServletRequest request, MultiValueMap<String, MultipartFile> mpFiles,
Map<String, String[]> mpParams, Map<String, String> mpParamContentTypes) {
super(request);
setMultipartFiles(mpFiles);
setMultipartParameters(mpParams);
setMultipartParameterContentTypes(mpParamContentTypes);
}LocalResolver
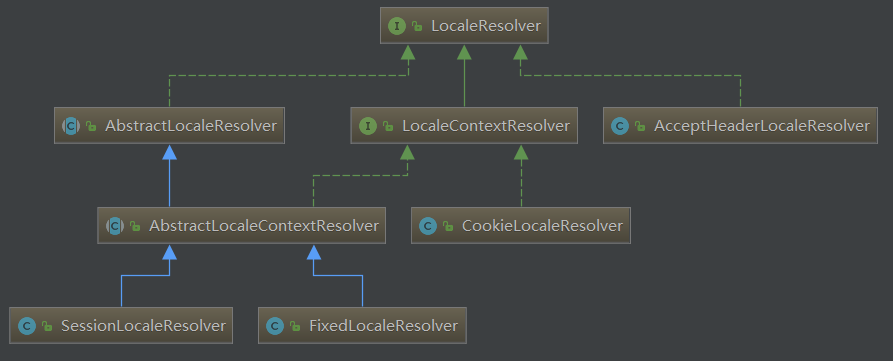
作用:根据request解析出Locale
-
AcceptHeaderLocaleResolver 直接使用Header中的“Accept-Language”
-
FixedLocaleResolver 使用配置的固定locale
-
SessionLocaleResolver 将Locale保存在session中
//session中locale的属性名 public static final String LOCALE_SESSION_ATTRIBUTE_NAME = SessionLocaleResolver.class.getName() + ".LOCALE";
-
CookieLocaleResolver
AbstractLocaleResolver & AbstractLocaleContextResolver
AbstractLocaleResolver 添加默认Locale属性。
AbstractLocaleContextResolver 添加默认TimeZone属性。
LocaleContext
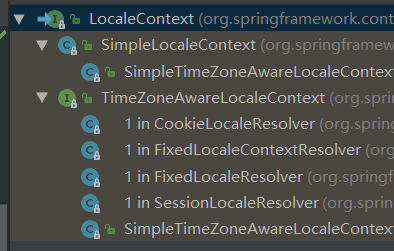
//org.springframework.web.servlet.i18n.FixedLocaleResolver#resolveLocaleContext
public LocaleContext resolveLocaleContext(HttpServletRequest request) {
return new TimeZoneAwareLocaleContext() {
@Override
@Nullable
public Locale getLocale() {
return getDefaultLocale();
}
@Override
public TimeZone getTimeZone() {
return getDefaultTimeZone();
}
};
}ThemeResolver
从request解析Theme
FlashMapManager
提交表单重定向,防止重复提交。
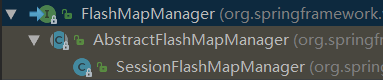
Session中保存的FlashMap是List ,一个session保存多个FlashMap。
一个FlashMap保存一套Redirect转发所传递的参数。
public final class FlashMap extends HashMap<String, Object> implements Comparable<FlashMap> {
@Nullable
//redirect后的路径
private String targetRequestPath;
//保存参数
private final MultiValueMap<String, String> targetRequestParams = new LinkedMultiValueMap<>(4);AbstractFlashMapManager
//org.springframework.web.servlet.support.AbstractFlashMapManager#saveOutputFlashMap
//保存FlashMap
public final void saveOutputFlashMap(FlashMap flashMap, HttpServletRequest request, HttpServletResponse response) {
if (CollectionUtils.isEmpty(flashMap)) {
return;
}
//path编码
String path = decodeAndNormalizePath(flashMap.getTargetRequestPath(), request);
flashMap.setTargetRequestPath(path);
if (logger.isDebugEnabled()) {
logger.debug("Saving FlashMap=" + flashMap);
}
//设置有效期,默认180秒
flashMap.startExpirationPeriod(getFlashMapTimeout());
//是否需要同步执行?mutex!=null就同步执行。
Object mutex = getFlashMapsMutex(request);
if (mutex != null) {
synchronized (mutex) {
//从request.session中获取原来的List<FlashMap>
List<FlashMap> allFlashMaps = retrieveFlashMaps(request);
allFlashMaps = (allFlashMaps != null ? allFlashMaps : new CopyOnWriteArrayList<>());
//添加当前flashMap
allFlashMaps.add(flashMap);
//更新到request
updateFlashMaps(allFlashMaps, request, response);
}
}
else {
List<FlashMap> allFlashMaps = retrieveFlashMaps(request);
allFlashMaps = (allFlashMaps != null ? allFlashMaps : new LinkedList<>());
allFlashMaps.add(flashMap);
updateFlashMaps(allFlashMaps, request, response);
}
}protected List<FlashMap> retrieveFlashMaps(HttpServletRequest request) {
HttpSession session = request.getSession(false);
return (session != null ? (List<FlashMap>) session.getAttribute(FLASH_MAPS_SESSION_ATTRIBUTE) : null);
}retrieveAndUpdate() 是在doDispatcher() 中调用的方法。
public final FlashMap retrieveAndUpdate(HttpServletRequest request, HttpServletResponse response) {
//取出
List<FlashMap> allFlashMaps = retrieveFlashMaps(request);
if (CollectionUtils.isEmpty(allFlashMaps)) {
return null;
}
if (logger.isDebugEnabled()) {
logger.debug("Retrieved FlashMap(s): " + allFlashMaps);
}
//检查过期
List<FlashMap> mapsToRemove = getExpiredFlashMaps(allFlashMaps);
//获取与当前request匹配的FlashMap,作为匹配结果返回
//同时添加到mapsToRemove准备从session中删除。
FlashMap match = getMatchingFlashMap(allFlashMaps, request);
if (match != null) {
mapsToRemove.add(match);
}
if (!mapsToRemove.isEmpty()) {
if (logger.isDebugEnabled()) {
logger.debug("Removing FlashMap(s): " + mapsToRemove);
}
Object mutex = getFlashMapsMutex(request);
if (mutex != null) {
synchronized (mutex) {
allFlashMaps = retrieveFlashMaps(request);
if (allFlashMaps != null) {
allFlashMaps.removeAll(mapsToRemove);
updateFlashMaps(allFlashMaps, request, response);
}
}
}
else {
allFlashMaps.removeAll(mapsToRemove);
updateFlashMaps(allFlashMaps, request, response);
}
}
return match;
}private FlashMap getMatchingFlashMap(List<FlashMap> allMaps, HttpServletRequest request) {
List<FlashMap> result = new LinkedList<>();
for (FlashMap flashMap : allMaps) {
if (isFlashMapForRequest(flashMap, request)) {
result.add(flashMap);
}
}
if (!result.isEmpty()) {
Collections.sort(result);
if (logger.isDebugEnabled()) {
logger.debug("Found matching FlashMap(s): " + result);
}
return result.get(0);
}
return null;
}如何匹配FlashMap和request的
protected boolean isFlashMapForRequest(FlashMap flashMap, HttpServletRequest request) {
String expectedPath = flashMap.getTargetRequestPath();
if (expectedPath != null) {
String requestUri = getUrlPathHelper().getOriginatingRequestUri(request);
//比较FlashMap中的url和request中的url
if (!requestUri.equals(expectedPath) && !requestUri.equals(expectedPath + "/")) {
return false;
}
}
MultiValueMap<String, String> actualParams = getOriginatingRequestParams(request);
MultiValueMap<String, String> expectedParams = flashMap.getTargetRequestParams();
//比较FlashMap中的param和request中的param
//这里的param是,url参数?
for (String expectedName : expectedParams.keySet()) {
List<String> actualValues = actualParams.get(expectedName);
if (actualValues == null) {
return false;
}
for (String expectedValue : expectedParams.get(expectedName)) {
if (!actualValues.contains(expectedValue)) {
return false;
}
}
}
return true;
}Http缓存总结
Pragma & Expires
http1.0遗留产物
Pragma控制缓存开关
Expires控制过期时间(服务器时间),但是本机时间和服务器时间不一致问题,如果本机时间已经超过了Expires则不会从cache中取值。
Cache-Control
针对Expires问题,http1.1新增。定义缓存时间。
优先级从高到低分别是 Pragma -> Cache-Control -> Expires
常用:Cache-Control: max-age=3600,使用秒数来代替具体时间。
以上参数只是让浏览器知道什么时候该向服务器发送新的请求
问题:如果所请求的资源没有变是否要再发一遍呢?明显是不需要。所以引入Last-Modified和Etag。
Last-Modified & If-Modified-Since
response 中携带 Last-Modified 服务器上次修改时间
request中带If-Modified-Since 将Last-Modified 发送到服务端,服务端判断,不需重发则返回http 304.
如果一个资源虽然修改了,但改来改去又改回原来的状态了。资源内容其实是没变的。这种最好也不要重发。就有了Etag。
springmvc就自带有 Last-Modified功能
Etag & If-None-Match
服务端计算出资源唯一标识符(如MD5),Etag发送给客户端。
request If-None-Match发送给服务端,如果一样返回304
综上
Pragma & Expires & Cache-Control 控制浏览器发不发请求。不发就from cache
Last-Modified & If-Modified-Since & Etag & If-None-Match 控制服务端返回全数据,还是返回304.
输入url回车看是否from cache,
F5一定会发送请求,加上Cache-Control: max-age=0
ctrl+F5 彻底从server拿一份新数据。去掉If-Modified-Since/If-None-Match 加上Cache-Control: no-cache、Pragma: no-cache

Reference
MySQL中的redo_log、undo_log、binlog
MySQL中的redo_log、undo_log、binlog
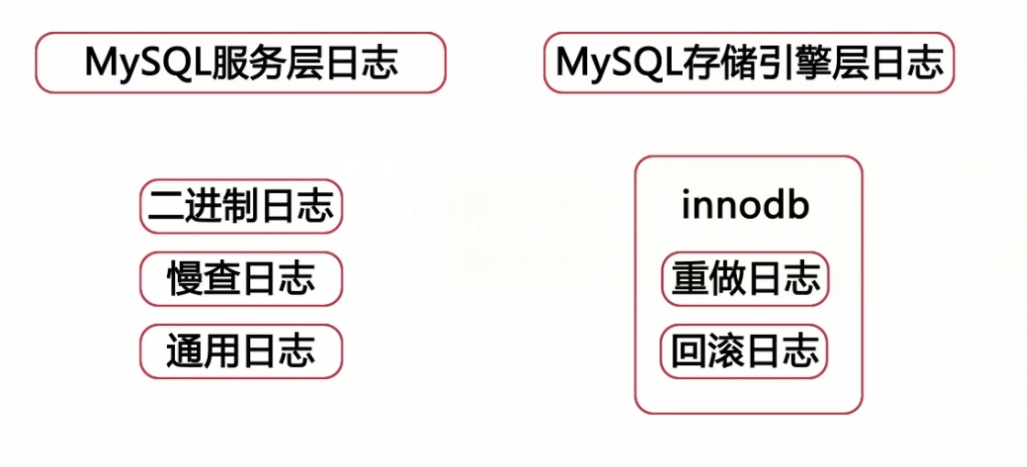
redo 和 undo 都属于 innodb 的日志。
redo_log
redolog发明的原因是这样的:
- 直接写数据到磁盘(太慢)
- 使用内存,先写到内存,形成脏页,再换到硬盘。(内存中的数据宕机就丢了)
- 又要写入到磁盘,又要速度快。-> 那就先写redo log 文件作为持久化,防止宕机内存丢失。redo log 顺序写性能好过 直接写数据库。
- 等内存中的脏页写回到磁盘,那redo log中的数据就没用了。
redo_log是循环写入 大小:innodb_log_files_in_group * innodb_log_file_size。
在重启mysql服务的时候,根据redo log进行重做,从而达到事务的持久性这一特性。(InnoDB先写到redo log中,之后再写到磁盘。)
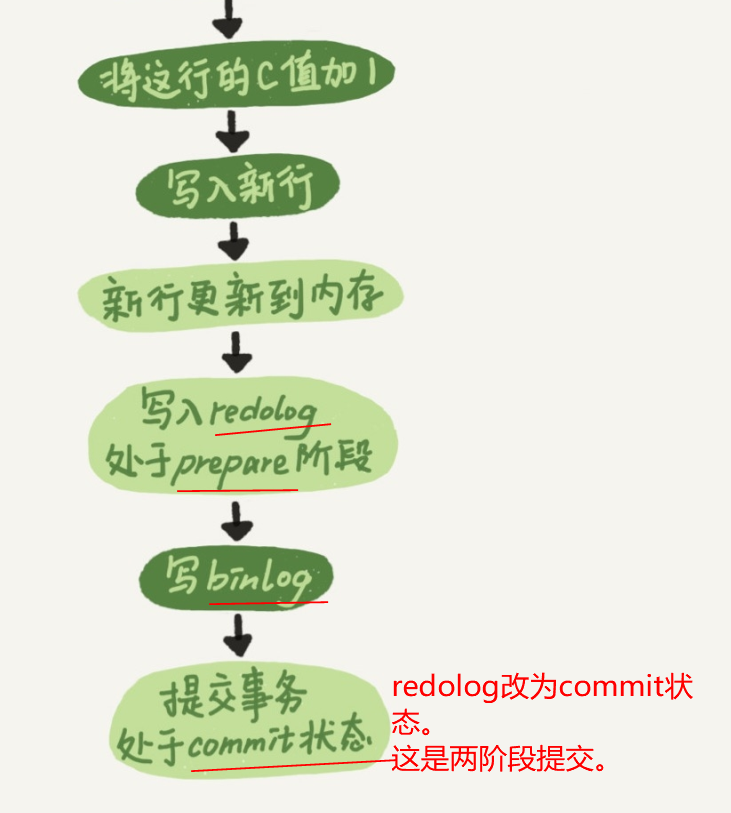
innodb_flush_log_at_trx_commit:redo_log写入磁盘机制
这个参数建议设置为1.每次redolog都直接持久化到磁盘。
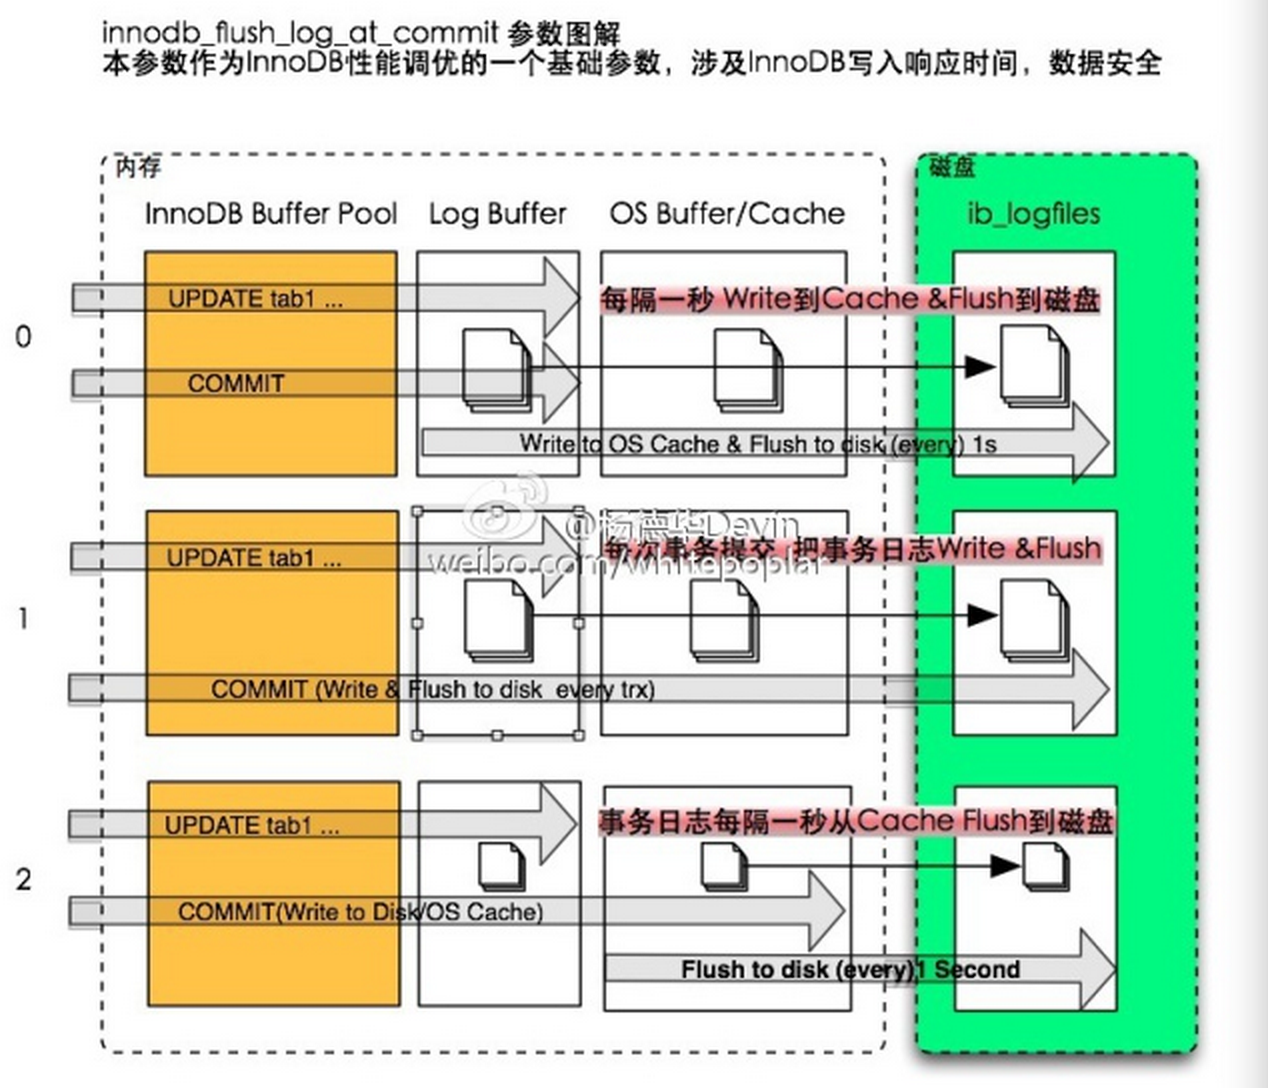
写入先写到log buffer中,再写redo log,再同步磁盘
写redo log,也是先写到log buffer中,再写redo log(顺序写,比写数据库磁盘快)
对于log buffer中未来得及同步到日志文件的变更数据就无法再找回了
innodb_flush_log_at_trx_commit 控制事物日志刷新到磁盘的策略(和数据表中数据没关系)。(log buffer -> redo log -> 磁盘)
将buffer中的数据写入磁盘分两个操作。
write os cache & flush
innodb_flush_log_at_trx_commit:
0 的情况先不交给操作系统。(mysql崩溃就没了)
1 直接write 加 flush (最安全)
2 的情况先交给操作系统,不flush。(操作系统崩溃才没)
undo_log
可用于回滚,以及MVCC多版本控制
存放被修改之前的值。
binlog
用于主从复制
MySQL中的重做日志(redo log),回滚日志(undo log),以及二进制日志(binlog)的简单总结
sync_binlog:binlog写入磁盘机制
先【write】写入binlog cache,再【fsync】写入文件。
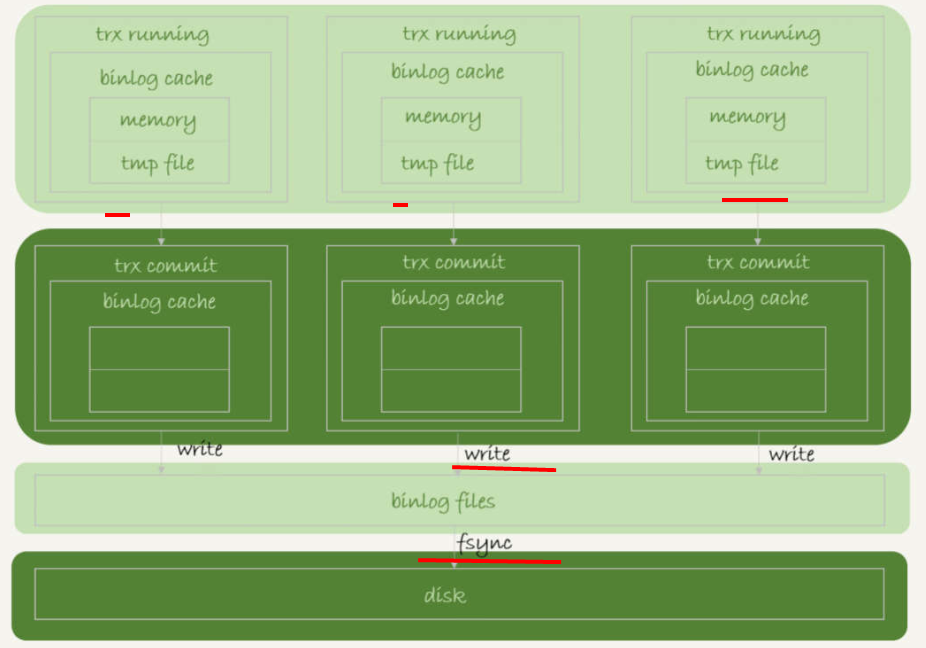
write和fsync的时机:
- sync_binlog=0,每次提交事务,只write,不fsync;
- sync_binlog=1,每次都fsync;
- sync_binlog=N,每次提交事务都write,累计N个后fsync;
常见设置是100~1000.
binlog日志格式
- ① STATEMENT模式(SBR)
每一条会修改数据的sql语句会记录到binlog中。优点是并不需要记录每一条sql语句和每一行的数据变化,减少了binlog日志量,节约IO,提高性能。缺点是在某些情况下会导致master-slave中的数据不一致(如sleep()函数, last_insert_id(),以及user-defined functions(udf)等会出现问题)- ② ROW模式(RBR)【默认】
不记录每条sql语句的上下文信息,仅需记录哪条数据被修改了,修改成什么样了。而且不会出现某些特定情况下的存储过程、或function、或trigger的调用和触发无法被正确复制的问题。缺点是会产生大量的日志,尤其是alter table的时候会让日志暴涨。
复制高效。- ③ MIXED模式(MBR)
以上两种模式的混合使用,一般的复制使用STATEMENT模式保存binlog,对于STATEMENT模式无法复制的操作使用ROW模式保存binlog,MySQL会根据执行的SQL语句选择日志保存方式。
binlog与redo log 区别
1
redo log是innodb特有的
binlog是都有的(mysql server层的日志)
2
字段a做了+1操作
- redo log 是物理日志,记录a变为2(记录结果)
- binlog 是逻辑日志,记录a+1,(sql语句)
3
记录方式
- redo log 循环写
- binlog 追加写
sync_binlog 设置为1,每次事务提交都刷新binlog。最安全。
双1配置
sync_binlog、 innodb_flush_log_at_trx_commit 都设置成1。
一个事务提交,需要两次刷盘。
一次redo_log prepare阶段。
一次binlog 刷盘。
线程状态与wait 、block、sleep
- wait 和 block、sleep有啥区别
- wait() 和 suspend() 和sleep()
- yield 和 sleep(0) 貌似效果一样?
- LockSupport.parkNanos与Sleep的区别是什么
- notify & notifyAll区别
wait 和 block、sleep有啥区别
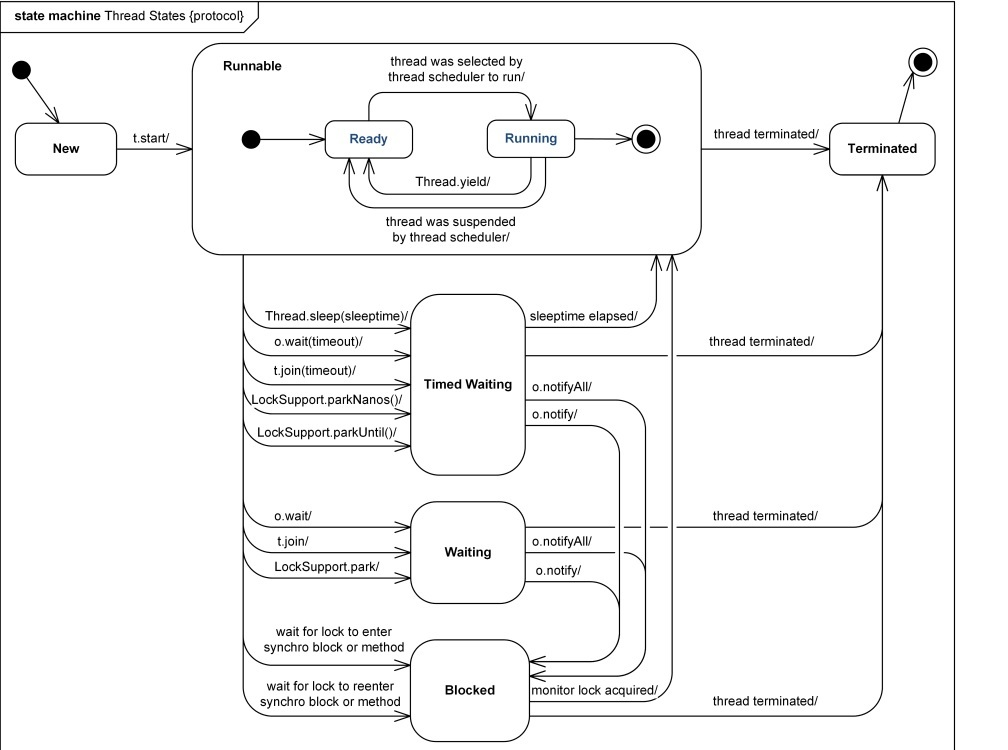
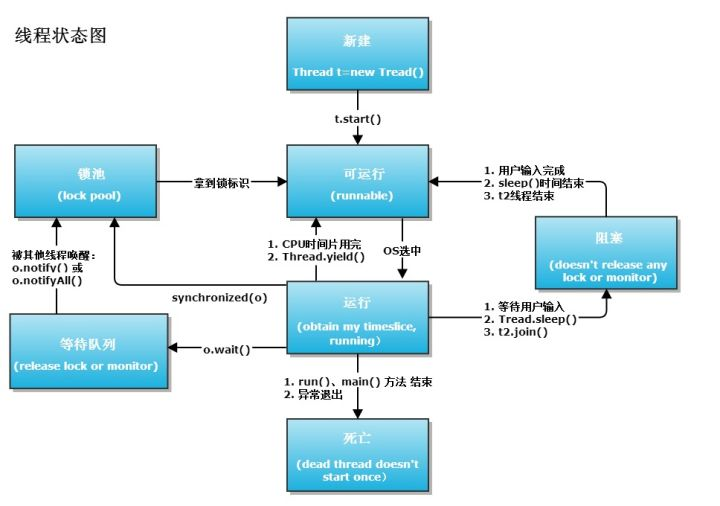
- Thread.State (Java 2 Platform SE 5.0)
看图,wait状态想要恢复running状态,必然要经过blocked状态。在wait后拿到锁后继续之前的执行。
争夺cpu就像一场跑步比赛
-
wait是自己主动wait不去比赛,主动表示你现在不应该去比赛。 (主动wait)
-
blocked是没跑赢就block,下次继续跑。 (被动block)
sleep 保持对象锁,wait释放对象锁。
sleep 醒后直接进入runnable,因为没有释放锁,持有资源。
Block和Ready的区别就是是否持有除cpu以外的所有资源。
wait() 和 suspend() 和sleep()
resume和suspend已经被Java遗弃,因为他们天生会引起线程的死锁。
- suspend占有锁,必须resume线程菜继续运行,否则一直占有锁。
- wait不占有锁,notify重新去抢锁,进入Blocked
- sleep 占有锁,时间到了直接进入runnable
yield 和 sleep(0) 貌似效果一样?
The most obvious difference is that sleep() throws the (checked) InterruptedException
LockSupport.parkNanos与Sleep的区别是什么
LockSupport不会抛异常,需要对线程中断的原因做人工的检查。
LockSupport.parkNanos(1000 * 1000000);
if (Thread.interrupted()) // ignore interrupts while waiting
wasInterrupted = true;notify & notifyAll区别
notify 和 notifyAll的区别**
notify就是将线程从wait状态 变为 block状态,如果获取锁就变为run状态*
notifyAll就是全部都进入到Block状态,去争抢锁资源。
Java Service Provider Interface
- 之前
- Service Provider Interface
- Spring 集成 ServiceLoader
- Spring Facotories Loader
- Service Provider Interface的应用
之前
maven 的runtime作用范围

其中JDBC驱动通常使用Class.forName("com.mysql.jdbc.Driver");来引入所需要的驱动。在编译期间不用引入具体jdbc的具体实现类(不管mysql还是oracle等)。所以JDBC包的scope应该设置为runtime。
<dependency>
<groupId>mysql</groupId>
<artifactId>mysql-connector-java</artifactId>
<version>${mysql.driver.version}</version>
<scope>runtime</scope>
</dependency>JDBC4之后使用SPI技术 也不用写Class.forName了
Service Provider Interface
Java API提供的使用ServiceLoader来实现的控制反转工具类。用于从classpath中找到接口的实现类。
先定义一个接口
package ch.frankel.blog.serviceloader;
public interface Foo {
}再定义两个实现类(实现类可能是其他工程中定义的)
package ch.frankel.blog.serviceloader;
public class FooImpl1 implements Foo {
}
public class FooImpl2 implements Foo {
}然后在Resources/META-INF下的service中新建一个与接口名对应的文件ch.frankel.blog.serviceloader.Foo
ch.frankel.blog.serviceloader.FooImpl1
ch.frankel.blog.serviceloader.FooImpl2
serviceLoader会从该文件中找到要加载的类。
public class JavaServiceLoaderTest {
@Test
public void java_service_loader_should_load_correct_implementations() {
//Service.load会从ch.frankel.blog.serviceloader.Foo中找到要加载的类,然后加载。
ServiceLoader<Foo> loader = ServiceLoader.load(Foo.class);
List<Foo> foos = new ArrayList<>();
loader.iterator().forEachRemaining(foos::add);
assertThat(foos)
.isNotNull()
.isNotEmpty()
.hasSize(2);
}
}Spring 集成 ServiceLoader
首先需要配置对应的factoryBean
@Configuration
public class ServiceConfiguration {
@Bean
public ServiceListFactoryBean serviceListFactoryBean() {
ServiceListFactoryBean serviceListFactoryBean = new ServiceListFactoryBean();
serviceListFactoryBean.setServiceType(Foo.class);
return serviceListFactoryBean;
}
}然后通过ServiceListFactoryBean就可以找到接口对应的实现类。
@ContextConfiguration(classes = ServiceConfiguration.class)
public class ServiceLoaderWithSpringTest extends AbstractTestNGSpringContextTests {
@Autowired
private ServiceListFactoryBean serviceListFactoryBean;
@Test
public void spring_service_loader_integration_should_load_correct_implementations() throws Exception {
Object object = serviceListFactoryBean.getObject();
Assertions.assertThat(object)
.isNotNull()
.asList()
.isNotEmpty()
.hasSize(2);
}
}Spring Facotories Loader
spring 自己也提供了类似的工具类。使用起来更方便。
首先在META-INF下建立一个spring.factories文件。
ch.frankel.blog.serviceloader.Foo=ch.frankel.blog.serviceloader.FooImpl1,ch.frankel.blog.serviceloader.FooImpl2
直接指定接口对应的实现类。
然后通过Spring提供的静态方法SpringFactoriesLoader就可以直接使用了。
public class SpringFactoriesTest {
@Test
public void spring_factories_should_load_correct_implementations() {
List<Foo> foos = SpringFactoriesLoader.loadFactories(Foo.class, null);
assertThat(foos)
.isNotNull()
.isNotEmpty()
.hasSize(2);
}
}Service Provider Interface的应用
JDBC SPI
查看jdbc的代码
//java.sql.DriverManager
public class DriverManager {
/**
* Load the initial JDBC drivers by checking the System property
* jdbc.properties and then use the {@code ServiceLoader} mechanism
*/
static {
loadInitialDrivers();
println("JDBC DriverManager initialized");
}
private static void loadInitialDrivers() {
String drivers;
try {
drivers = AccessController.doPrivileged(new PrivilegedAction<String>() {
public String run() {
//从系统变量中获取jdbc.drivers
//System.getProperty 可以在vm arguments中设置。java -Djdbc.drivers=xxxx
return System.getProperty("jdbc.drivers");
}
});
} catch (Exception ex) {
drivers = null;
}
// If the driver is packaged as a Service Provider, load it.
// Get all the drivers through the classloader
// exposed as a java.sql.Driver.class service.
// ServiceLoader.load() replaces the sun.misc.Providers()
AccessController.doPrivileged(new PrivilegedAction<Void>() {
public Void run() {
ServiceLoader<Driver> loadedDrivers = ServiceLoader.load(Driver.class);
Iterator<Driver> driversIterator = loadedDrivers.iterator();
/* Load these drivers, so that they can be instantiated.
* It may be the case that the driver class may not be there
* i.e. there may be a packaged driver with the service class
* as implementation of java.sql.Driver but the actual class
* may be missing. In that case a java.util.ServiceConfigurationError
* will be thrown at runtime by the VM trying to locate
* and load the service.
*
* Adding a try catch block to catch those runtime errors
* if driver not available in classpath but it's
* packaged as service and that service is there in classpath.
*/
try{
while(driversIterator.hasNext()) {
driversIterator.next();
}
} catch(Throwable t) {
// Do nothing
}
return null;
}
});
println("DriverManager.initialize: jdbc.drivers = " + drivers);
if (drivers == null || drivers.equals("")) {
return;
}
//多个drivers?
String[] driversList = drivers.split(":");
println("number of Drivers:" + driversList.length);
for (String aDriver : driversList) {
try {
println("DriverManager.Initialize: loading " + aDriver);
//还是使用Class.forName来加载驱动
Class.forName(aDriver, true,
ClassLoader.getSystemClassLoader());
} catch (Exception ex) {
println("DriverManager.Initialize: load failed: " + ex);
}
}
}
}在jdbc的实现包中META-INF下有java.sql.Driver文件。

com.mysql.jdbc.Driver
com.mysql.fabric.jdbc.FabricMySQLDriver
文件中有两个驱动名。
其实jdbc可以同时管理多个驱动,(jdbc详解:2、DriverManager管理多个数据库驱动)
Commons-Logging
//org.apache.commons.logging.LogFactory#getFactory
public static LogFactory getFactory() throws LogConfigurationException {
...
// Second, try to find a service by using the JDK1.3 class
// discovery mechanism, which involves putting a file with the name
// of an interface class in the META-INF/services directory, where the
// contents of the file is a single line specifying a concrete class
// that implements the desired interface.
if (factory == null) {
if (isDiagnosticsEnabled()) {
logDiagnostic(
"[LOOKUP] Looking for a resource file of name [" + SERVICE_ID
+ "] to define the LogFactory subclass to use...");
}
try {
InputStream is = getResourceAsStream(contextClassLoader,
SERVICE_ID);
if( is != null ) {
// This code is needed by EBCDIC and other strange systems.
// It's a fix for bugs reported in xerces
BufferedReader rd;
try {
rd = new BufferedReader(new InputStreamReader(is, "UTF-8"));
} catch (java.io.UnsupportedEncodingException e) {
rd = new BufferedReader(new InputStreamReader(is));
}
String factoryClassName = rd.readLine();
rd.close();
if (factoryClassName != null &&
! "".equals(factoryClassName)) {
if (isDiagnosticsEnabled()) {
logDiagnostic(
"[LOOKUP] Creating an instance of LogFactory class " + factoryClassName
+ " as specified by file '" + SERVICE_ID
+ "' which was present in the path of the context"
+ " classloader.");
}
factory = newFactory(factoryClassName, baseClassLoader, contextClassLoader );
}
} else {
// is == null
if (isDiagnosticsEnabled()) {
logDiagnostic(
"[LOOKUP] No resource file with name '" + SERVICE_ID
+ "' found.");
}
}
} catch( Exception ex ) {
// note: if the specified LogFactory class wasn't compatible with LogFactory
// for some reason, a ClassCastException will be caught here, and attempts will
// continue to find a compatible class.
if (isDiagnosticsEnabled()) {
logDiagnostic(
"[LOOKUP] A security exception occurred while trying to create an"
+ " instance of the custom factory class"
+ ": [" + ex.getMessage().trim()
+ "]. Trying alternative implementations...");
}
; // ignore
}
}
...
}其中也使用到SPI。从 META-INF/services/org.apache.commons.logging.LogFactory中找要加载的实现类(Apache Commons Logging 是如何决定使用哪个日志实现类的)。
slf4j
而slf4j不是通过SPI来找实现类的。slf4j 1.7是通过找一个固定包下的固定类StaticLoggerBinder类(而SPI是找固定文件下的内容)。这个类定义在各个实现包中。
貌似slf4j 1.8 开始使用SPI了,如下图。

context:annotation-config&context:component-scan base-package=""&mvc:annotation-driven
目录
对应的解析类
<context:annotation-config /> -> AnnotationConfigBeanDefinitionParser
<context:component-scan base-package=""/> -> ComponentScanBeanDefinitionParser
<mvc:annotation-driven /> -> AnnotationDrivenBeanDefinitionParser
作用
<context:annotation-config />
- AutowiredAnnotationBeanPostProcessor:@Autowired
- CommonAnnotationBeanPostProcessor:@resource、@ PostConstruct、@ PreDestroy等注解
- PersistenceAnnotationBeanPostProcessor:@PersistenceContext
- RequiredAnnotationBeanPostProcessor:@required
<context:component-scan base-package="com.xx.xx" />
除了具有<context:annotation-config>的功能之外,<context:component-scan>还可以在指定的package下扫描以及注册javabean。@repository, @service and @controller are @component
<context:component-scan /> 默认启用 <context:annotation-config/>
也可以手动设置为不启用annotation-config<context:component-scan base-package="..." annotation-config="false"/>
<mvc:annotation-driven />
自动注入以下bean:
- RequestMappingHandlerMapping:处理 @RequestMapping 注解
- BeanNameUrlHandlerMapping:将controller类的名字映射为请求url
- RequestMappingHandlerAdapter:处理 @controller 注解的处理器
- HttpRequestHandlerAdapter:处理继承 HttpRequestHandler的处理器
- SimpleControllerHandlerAdapter:处理继承自 Controller接口的处理器
- ExceptionHandlerExceptionResolver
- ResponseStatusExceptionResolver
- DefaultHandlerExceptionResolver
<mvc:annotation-driven /> is a tag added in Spring 3.0 which does the following:
- Configures the Spring 3 Type ConversionService (alternative to PropertyEditors)
- Adds support for formatting Number fields with @numberformat
- Adds support for formatting Date, Calendar, and Joda Time fields with @DateTimeFormat, if Joda Time is on the classpath
- Adds support for validating @controller inputs with @Valid, if a JSR-303 Provider is on the classpath
- Adds support for support for reading and writing XML, if JAXB is on the classpath (HTTP message conversion with @RequestBody/@responsebody)
- Adds support for reading and writing JSON, if Jackson is on the classpath (along the same lines as #5)
会注册一些HttpMessageConverter
- ByteArrayHttpMessageConverter
- StringHttpMessageConverter
- ResourceHttpMessageConverter
- SourceHttpMessageConverter
- AllEncompassingFormHttpMessageConverter
However others like the ones mentioned below are registered only when the respective libraries are present in the classpath –
- Jaxb2RootElementHttpMessageConverter – To convert Java objects to/from XML
- MappingJackson2HttpMessageConverter – To convert JSON
- MappingJacksonHttpMessageConverter – To convert JSON
- AtomFeedHttpMessageConverter – To convert Atom feeds
- RssChannelHttpMessageConverter – To convert RSS feeds
Reference
ExecutorCompletionService原理
目录
ExecutorService
使用ExecutorService提交多个任务时,需要保存Callable对应的Future。
需要反复循环判断future是否完成。
@Test
public void test() throws InterruptedException {
LinkedBlockingQueue<Future<String>> futures = new LinkedBlockingQueue<>();
Random random = new Random();
ExecutorService pool = Executors.newFixedThreadPool(5);
Thread producerThread = new Thread(){
@Override
public void run() {
for (int i = 0; i < 10; i++) {
int finalI = i;
Future<String> future = pool.submit(new Callable<String>() {
@Override
public String call() throws Exception {
int time = random.nextInt(10000);
Thread.sleep(time);
return "task_" + finalI;
}
});
System.out.println("submit_" + i);
futures.add(future);
}
}
};
producerThread.start();
Thread consumerThread = new Thread(){
@Override
public void run() {
while (true) {
for (Future<String> future : futures) {
if (future.isDone()) {
try {
System.out.println(future.get());
futures.remove(future);
} catch (InterruptedException e) {
e.printStackTrace();
} catch (ExecutionException e) {
e.printStackTrace();
}
}
}
}
}
};
consumerThread.start();
producerThread.join();
consumerThread.join();
}CompletionService 获取结果
使用CompletionService可以简化操作。
@Test
public void test2() throws InterruptedException {
//LinkedBlockingQueue<Future<String>> futures = new LinkedBlockingQueue<>();
Random random = new Random();
ExecutorService pool = Executors.newFixedThreadPool(5);
//使用ExecutorCompletionService包装ExecutorService
ExecutorCompletionService<String> completionService = new ExecutorCompletionService<String>(pool);
Thread producerThread = new Thread(){
@Override
public void run() {
for (int i = 0; i < 10; i++) {
int finalI = i;
//Future<String> future = pool.submit(new Callable<String>() {
completionService.submit(new Callable<String>() {
@Override
public String call() throws Exception {
int time = random.nextInt(10000);
Thread.sleep(time);
return "task_" + finalI;
}
});
System.out.println("submit_" + i);
//futures.add(future);
}
}
};
producerThread.start();
Thread consumerThread = new Thread(){
@Override
public void run() {
while (true) {
try {
Future<String> take = completionService.take();
System.out.println(take.get());
} catch (InterruptedException e) {
e.printStackTrace();
} catch (ExecutionException e) {
e.printStackTrace();
}
}
/*while (true) {
for (Future<String> future : futures) {
if (future.isDone()) {
try {
System.out.println(future.get());
futures.remove(future);
} catch (InterruptedException e) {
e.printStackTrace();
} catch (ExecutionException e) {
e.printStackTrace();
}
}
}
}*/
}
};
consumerThread.start();
producerThread.join();
consumerThread.join();
}CompletionService 原理
构造方法
//构造方法
public ExecutorCompletionService(Executor executor) {
if (executor == null)
throw new NullPointerException();
this.executor = executor;
this.aes = (executor instanceof AbstractExecutorService) ?
(AbstractExecutorService) executor : null;
this.completionQueue = new LinkedBlockingQueue<Future<V>>();
}初始化自身属性:
- this.executor 真正的线程池
- this.completionQueue 保存执行完成的future执行结果的阻塞队列
submit
public Future<V> submit(Callable<V> task) {
if (task == null) throw new NullPointerException();
RunnableFuture<V> f = newTaskFor(task);
//包装成QueueingFuture,传递给executor
executor.execute(new QueueingFuture(f));
return f;
}QueueingFuture
ExecutorCompletionService中的内部类
private class QueueingFuture extends FutureTask<Void> {
QueueingFuture(RunnableFuture<V> task) {
super(task, null);
this.task = task;
}
protected void done() { completionQueue.add(task); }
private final Future<V> task;
}重写done方法,将task添加到completionQueue。completionQueue是ExecutorCompletionService中的属性。所以,执行完一个任务,就将执行完的RunnableFuture添加到ExecutorCompletionService的阻塞队列completionQueue中。
take
public Future<V> take() throws InterruptedException {
return completionQueue.take();
}而take操作就是从阻塞队列中取出,已经完成的任务结果(RunnableFuture)。
MySQL锁
Mysql锁
全局锁
Flush tables with read lock(FTWRL)
全局加读锁
用 unlock tables 释放锁
FTWRL 与 MVCC
在有MVCC事务支持的引擎下,不需要使用FTWRL。
备份数据启动一个事务就可以了(事务隔离级别:可重复读)
- mysqldump --single-transaction 也是启动一个事务(此选项会将隔离级别设置为:REPEATABLE READ。并且随后再执行一条START TRANSACTION语句)
但MyISAM没有事务支持就要用
FTWRL 和 set global readonly = true
- set global readonly 可能用了做其他逻辑判断
- FTWRL退出会自动释放锁
表级锁
- 表锁
- 元数据锁(Meta Data Lock,MDL)
表锁
lock tables ... read/write
unlock tables 释放锁
lock table 会加MDL锁。
lock tables和unlock tables,这都是在服务器层(MySQL Server层)实现的,和存储引擎无关
一般支持行锁的情况不需要使用表锁。
innodb也可以使用lock tables
MyISAM 在执行查询语句(SELECT)前,会自动给涉及的表加读锁,在执行更新操作(UPDATE、DELETE、INSERT 等)前,会自动给涉及的表加写锁,这个过程并不需要用户干预,因此,用户一般不需要直接用 LOCK TABLE 命令给 MyISAM 表显式加锁。
innodb 使用表锁的方法
SET AUTOCOMMIT=0; # 对 InnoDB 表加锁时要注意,要将 AUTOCOMMIT 设为 0,否则MySQL 不会给表加锁;
LOCK TABLES t1 WRITE, t2 READ, ...;
[do something with tables t1 and t2 here];
COMMIT; #不要用 UNLOCK TABLES 释放表锁,因为 UNLOCK TABLES会隐含地提交事务;
UNLOCK TABLES;#COMMIT 或 ROLLBACK 并不能释放用 LOCK TABLES 加的表级锁,必须用UNLOCK TABLES 释放表锁。元数据锁(Meta Data Lock,MDL)
- 增删改查 加 MDL 读锁
- 修改表结构 加 MDL写锁
在加MDL写锁后,之后的增删改查也阻塞。
例如, - A事务增删改查 没有结束
- B修改表结构,被阻塞
- c增删改查,都被阻塞
如何安全的给线上小表加字段?
- information_schema.innodb_trx表查看当前长事务(kill掉长事务)
对于请求频繁的表
- alter table 语句设定等待时间(MariaDB有相关命令)
行锁
innodb有行锁,myisam只有表锁
- 共享锁(S)
- 排它锁(X)
InnoDB行锁是通过给索引上的索引项加锁来实现!
InnoDB行锁是通过给索引上的索引项加锁来实现!
InnoDB行锁是通过给索引上的索引项加锁来实现!
只有通过索引条件检索数据,InnoDB 才使用行级锁,否则,InnoDB 将使用表锁!
只有通过索引条件检索数据,InnoDB 才使用行级锁,否则,InnoDB 将使用表锁!
只有通过索引条件检索数据,InnoDB 才使用行级锁,否则,InnoDB 将使用表锁!
虽然多个session是访问不同行的记录, 但是如果是使用相同的索引键, 是会出现锁冲突的
意向锁
InnoDB内部的表锁:
- 意向共享锁(IS)
- 意向排它锁(IX)
innodb在加行锁的时候都会先加相对应的意向锁(表锁)。
可以看出意向锁之间不互相影响(都放过让他们去行锁竞争),只影响表锁。
百度上那些文章,没头没尾的来个冲突兼容表格出来,mysql官方文档上给出这个表格,表格上面有这么一句“Table-level lock type compatibility is summarized in the following matrix.”即“表级锁定类型的兼容性总结在下面的矩阵表格中。”,注意,是表级锁定类型,也就是说其中的X,IX,S,IS都是指表级锁类型,不是想当然的X和S就是行级锁定。
InnoDB 的意向锁有什么作用? - 大王叫我来巡山的回答 - 知乎 https://www.zhihu.com/question/51513268/answer/147733422
也就是说在innodb 行的读写操作在意向锁这个级别,是不互斥的。
互斥的是和lock tables ... read/write 加的表锁 互斥。
也就是说在innodb 行的读写操作在意向锁这个级别,是不互斥的。
互斥的是和lock tables ... read/write 加的表锁 互斥。
也就是说在innodb 行的读写操作在意向锁这个级别,是不互斥的。
互斥的是和lock tables ... read/write 加的表锁 互斥。
也就是说在innodb 行的读写操作在意向锁这个级别,是不互斥的。
互斥的是和lock tables ... read/write 加的表锁 互斥。
为什么要意向锁?直接加表锁不就行了?
理解:意向锁是innodb自己的表锁。意向锁的作用
- 阻塞其他加表锁(阻塞:lock tables..write)。
- innodb自己的读写操作在表这个级别的锁,不互相阻塞(MVCC)
START TRANSACTION WITH consistent snapshot
执行 start transaction 同时建立本事务一致性读的 snapshot . 而不是等到执行第一条语句时
你想要达到将 start transaction 作为事务开始的时间点,那么我们必须使用:START TRANSACTION WITH consistent snapshot
WITH CONSISTENT SNAPSHOT修饰符不会更改当前事务隔离级别,因此只有在当前隔离级别允许一致性读取的情况下,它才会提供一致的快照。 允许一致读取的唯一隔离级别是REPEATABLE READ
SELECT ... LOCK IN SHARE MODE和SELECT ... FOR UPDATE
普通的innodb读,都是快照读。
快照读不加锁,当前读加读锁
SELECT ... LOCK IN SHARE MODE和SELECT ... FOR UPDATE 都是当前读,不会阻塞快照读
SELECT ... LOCK IN SHARE MODE加的IS锁(意向共享锁)
SELECT ... FOR UPDATE 加的IX锁(意向排他锁),更严格,阻塞了select...lock in share mode的查询方式
也就是SHARE MODE、FOR UPDATE不但加了各自的意向锁,还加了行读锁?
间隙锁
只对扫描到的所有行加锁,只能保证update安全,不能保证insert安全。所以引入间隙锁。
间隙锁是读锁,防止在间隙中插入新值。
间隙锁在可重复读隔离级别下才会生效。
幻读
幻读是读到新insert的行。
快照读不会有幻读,当前读才有幻读。
间隙锁是用来防止幻读的么?
解决幻读分两种
- 当前读:通过间隙锁(next-key)来解决幻读
- 快照读:通过mvcc来解决幻读
Innodb 中 RR 隔离级别能否防止幻读? · Issue #42 · Yhzhtk/note
next-key lock
间隙锁 + 行锁 = next-key lock
左开右闭区间。
next-key lock是加锁的基本单元。
间隙锁会引入死锁的问题
会引入死锁:

解决死锁问题(不少公司在用):
- 将隔离级别设为读已提交
- 解决数据日志不一致问题:把binlog设置为row。??
解决办法:避免更新或者删除不存在的记录,虽然更新存在的记录也会产生间隙锁,但是间隙锁锁住的范围会更小;更新不存在的记录会锁住意想不到的区间范围,极其容易导致死锁问题
加锁逻辑
- 在有个可能插入的地方加锁
- 加锁是加在索引上,没有索引加全表。
- 覆盖索引查询中:share mode 只锁覆盖索引,for update 会锁主键索引
innodb mvcc 如何保证read commit的
读都是快照读,如何能读到最新提交的数据?
新插入的可以读到,新修改的可以读到。
那应该读最新的版本。?
所以执行多条语句时,都需要建立新的ReadView
锁的判定案例
update 被行锁阻塞
SHOW ENGINE INNODB STATUS
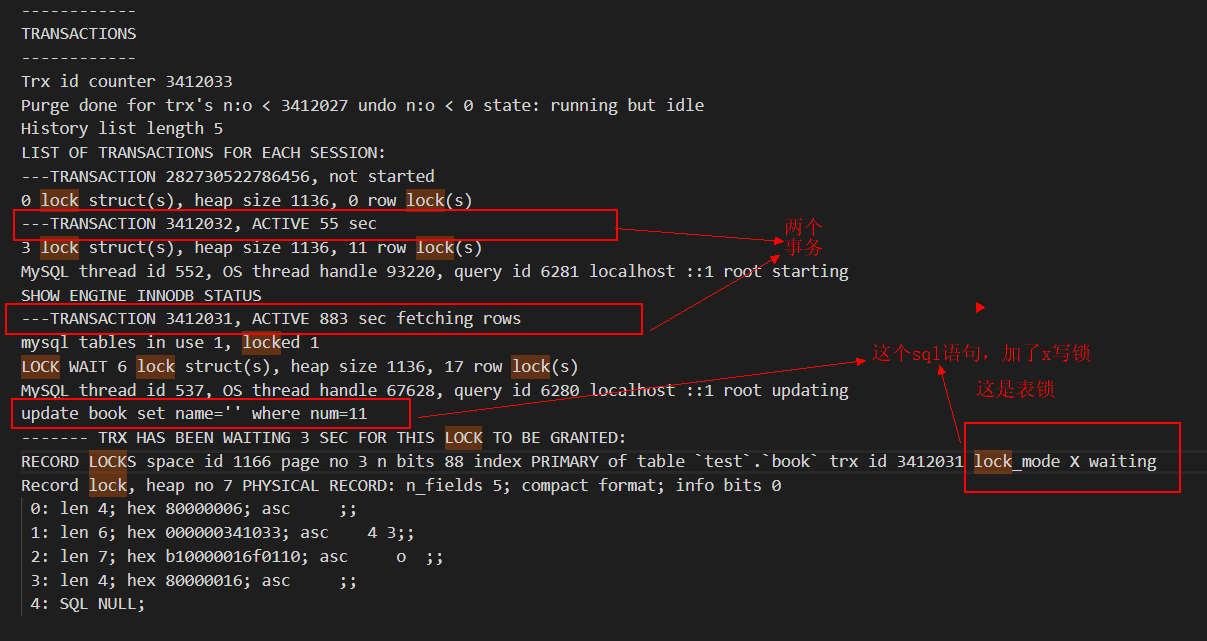
MYSQL Innodb 锁行还是锁表问题探讨_数据库_零度的博客专栏-CSDN博客
UPDATE book SET NAME='' WHERE num=11;
阻塞,显示使用primary主键,实际因为没有索引可用,所以升级为表锁。表锁和seesion2的意向锁阻塞。
UPDATE book FORCE INDEX(asd) SET NAME='' WHERE num=11;
强制使用行锁所在的主键,不会阻塞。
**SpringBoot自动配置@EnableWebMvc&@EnableAutoConfiguration**
目录
@EnableWebMvc
EnableWebMvc属于SpringMVC中的注解
@Retention(RetentionPolicy.RUNTIME)
@Target(ElementType.TYPE)
@Documented
@Import(DelegatingWebMvcConfiguration.class)
public @interface EnableWebMvc {
}引入WebMvcConfigurationSupport
DelegatingWebMvcConfiguration extends WebMvcConfigurationSupport
@Configuration
public class DelegatingWebMvcConfiguration extends WebMvcConfigurationSupport {
private final WebMvcConfigurerComposite configurers = new WebMvcConfigurerComposite();
//自动注入所有WebMvcConfigurer类型的
@Autowired(required = false)
public void setConfigurers(List<WebMvcConfigurer> configurers) {
if (!CollectionUtils.isEmpty(configurers)) {
this.configurers.addWebMvcConfigurers(configurers);
}
}WebMvcConfigurationSupport默认注册了 HandlerAdapters 、HandlerMappings 等等。
DelegatingWebMvcConfiguration 持有WebMvcConfigurerComposite(WebMvcConfigurer)
WebMvcConfigurerComposite implements WebMvcConfigurer
class WebMvcConfigurerComposite implements WebMvcConfigurer {
private final List<WebMvcConfigurer> delegates = new ArrayList<>();@EnableAutoConfiguration
SpringBoot中的自动配置注解。
@EnableAutoConfiguration -> 使用 Spring Facotories Loader 装载 spring.factories文件中org.springframework.boot.autoconfigure.EnableAutoConfiguration 属性对应的xxxAutoConfiguration类。
org.springframework.boot.autoconfigure.EnableAutoConfiguration=\
org.springframework.boot.autoconfigure.web.WebMvcAutoConfiguration,\ # 自动配置类
WebMvcAutoConfiguration
@Configuration
@ConditionalOnWebApplication(type = Type.SERVLET)
@ConditionalOnClass({ Servlet.class, DispatcherServlet.class, WebMvcConfigurer.class })
//当WebMvcConfigurationSupport类不存在的时候,该自动装配类才会创建出来,也就是说,如果我们使用@EnableWebMvc,@EnableWebMvc就相当于导入了WebMvcConfigurationSupport类,这个时候,spring boot的自动装配就不会发生了
@ConditionalOnMissingBean(WebMvcConfigurationSupport.class)
@AutoConfigureOrder(Ordered.HIGHEST_PRECEDENCE + 10)
@AutoConfigureAfter({ DispatcherServletAutoConfiguration.class,
ValidationAutoConfiguration.class })
public class WebMvcAutoConfiguration {WebMvcAutoConfiguration 自动配置了各种 HandlerMapping、HandlerAdaptor等等。
EnableWebMvcConfiguration extends DelegatingWebMvcConfiguration
/**
* Configuration equivalent to {@code @EnableWebMvc}.
*/
@Configuration
public static class EnableWebMvcConfiguration extends DelegatingWebMvcConfiguration {总结
-
因为,WebMvcAutoConfiguration上的注解:@ConditionalOnMissingBean(WebMvcConfigurationSupport.class)
所以,无论是使用
@EnableWebMvc还是扩展WebMvcConfigurationSupport类,spring都会创建一个WebMvcConfigurationSupport的类,进而屏蔽掉自动装配类WebMvcAutoConfiguration -
WebMvcAutoConfiguration内部,创建了一个继承了DelegatingWebMvcConfiguration的内部类EnableWebMvcConfiguration,这个类,一方面,提供了缺失的WebMvcConfigurationSupport的功能,另一方面,就起到了收集所有WebMvcConfigurer
Reference
《Java并发编程实战》第二章~第八章
目录
- 第二章 线程的安全性
- 第三章 对象的共享
- 第四章对象的组合
- 第五章 基础构建模块
- 第六章 任务执行
- 第七章 取消与关闭
- 第八章 线程池的使用
- 8.1.1 线程饥饿死锁
- 8.1.2 运行时间较长的任务
第二章 线程的安全性
2.3 加锁机制
2.3.1 内置锁
静态synchronized方法以Class作为锁。Class对象不是this。
2.3.2重入
为每个锁关联一个获取计数值和一个所有者线程。同一个线程再次获取这个锁,计数值加一,退出时减一。计数为0,这个锁被释放。
执行时间较长的计算操作(如网络io)一定不要持有锁。
第三章 对象的共享
3.1可见性问题
可见性就是多线程情况下,读的问题。
public class NoVisibility {
private static boolean ready;
private static int number;
private static class ReaderThread extends Thread {
public void run() {
while (!ready)
Thread.yield();
System.out.println(number);
}
}
public static void main(String[] args) {
new ReaderThread().start();
//number 和 ready的赋值顺序可能产生重排序。
//有可能线程中看到ready=true,number = 0的情况。
number = 42;
ready = true;
}
}3.1.1 失效数据
NoVisibility程序是缺乏同步情况产生错误的一种情况:失效数据。
解决失效数据的方式就是使操作数据的方法同步。如下。
@ThreadSafe
public class SynchronizedInteger {
@GuardedBy("this") private int value;
public synchronized int get() {
return value;
}
public synchronized void set(int value) {
this.value = value;
}
}3.1.2 非原子的64位操作
最低安全性,也就是说对一个变量来说,他的值都是有来历的。不是乱码随机值。但对于非volatile类型的64位值变量,使用多线程操作时,可能产生混乱。有可能读到新值得高32位+旧值得低32位。
3.1.3 加锁与可见性
对于顺序执行的加锁的两段程序AB,是能保证可见性的,B读A的操作结果,不会产生可见性问题。
加锁不仅仅是互斥,还包括内存可见性。
3.1.4 Volatile变量
Volatile变量不会被缓存在寄存器。读取Volatile变量总返回最新写入的值。
volatile常作为标志位来使用。
volatile boolean asleep;
while(!asleep){
countSomeSheep();
}但volatile int a; a++; 就不能保证原子性。
加锁机制既可以保证可见性,又可以保证原子性。volatile只能保证可见性。
3.2 发布与逸出问题
发布就是通过static 或者 get方法,将原本类中的成员暴漏出去。还有更高级的this引用逸出。
下面这篇讲的明白:
public class ThisEscape {
//构造函数还没执行完,this.doSomething()就执行了。
public ThisEscape(EventSource source) {
source.registerListener(new EventListener() {
public void onEvent(Event e) {
doSomething(e);// -> this.doSomething(e);
}
});
}
void doSomething(Event e) {
}
interface EventSource {
void registerListener(EventListener e);
}
interface EventListener {
void onEvent(Event e);
}
interface Event {
}
}使用工厂方法可以防止this引用逸出
public class SafeListener {
private final EventListener listener;
private SafeListener() {
listener = new EventListener() {
public void onEvent(Event e) {
doSomething(e);
}
};
}
public static SafeListener newInstance(EventSource source) {
//先构造好
SafeListener safe = new SafeListener();
//再发布
source.registerListener(safe.listener);
return safe;
}
void doSomething(Event e) {
}
interface EventSource {
void registerListener(EventListener e);
}
interface EventListener {
void onEvent(Event e);
}
interface Event {
}
}3.3 线程封闭
仅在单线程内访问数据,就是线程封闭。
JDBC中的Connection,就每次分配给一个线程,而不是被多线程共享。
3.3.1 Ad-hoc线程封闭
指维护线程封闭性的职责完全由程序实现来承担??反正不推荐。
3.3.2 栈封闭
使用线程局部变量,避免逸出。
3.3.3 ThreadLocal类
3.4 不变性
3.4.1 Final域
3.4.2 示例:使用Volatile类型来发布不可变对象
3.5 安全发布
3.5.1 不正确的发布:正确的对象被破坏
public Holder hoder;
public void initialize() {
holder = new Holder(42);
}
public class Holder {
//将n声明为final,避免出现不正确的发布问题。???
private int n;
public Holder(int n) {
this.n = n;
}
public void assertSanity() {
//就在读取n来做判断时,可能在取第一个n和第二个n之间被其他线程更新了n的值,导致第一个n取到的是无效值,第二个n是更新值
if(n != n) {
throw new AssertionError("This statement is false");
}
}
}本来Holder是正确的,但是因为不正确的发布,就会产生问题。怎么就不正确的发布了?(没有使用同步来确保Holder对象对其他线程的可见性。???答案见3.5.2)
参考:https://stackoverflow.com/questions/1621435/not-thread-safe-object-publishing
如果n设置为final,Holder就是不可变的,即使没有正确发布Holder,也不会抛异常。
3.5.2 不可变对象与初始化安全性
上段代码,就是将Holder中的n变为final,就没有问题。
任何线程都可以不需要额外同步的情况下安全的访问不可变对象(final)。
3.5.3 安全发布的常用模式
安全地发布方式:
- 静态初始化函数中初始化(jvm在类的初始化阶段执行,jvm内部存在同步机制)
- 对象的引用保存到volatile或AtomicReferance
- 对象的引用保存到final类型域中
- 对象的引用保存到由锁保护的域中(Vector、synchronizedList)
3.5.4 事实不可变对象
3.5.5 可变对象
- 不可变对象可以任意机制发布
- 事实不可变,通过安全方式来发布
- 可变对象必须通过安全方式,并且必须是线程安全或由锁保护起来
3.5.6 安全的共享对象
第四章对象的组合
4.1 设计线程安全的类
4.2 实例封装
4.2.1 Java监视器模式
public class PrivateLock {
private final Object myLock = new Object();
//所有访问变量的方法都需要同步。
@GuardedBy("myLock") Widget widget;
void someMethod() {
synchronized (myLock) {
// Access or modify the state of widget
}
}
}4.2.2 示例:车辆追踪
@ThreadSafe
public class MonitorVehicleTracker {
@GuardedBy("this") private final Map<String, MutablePoint> locations;
public MonitorVehicleTracker(Map<String, MutablePoint> locations) {
this.locations = deepCopy(locations);
}
public synchronized Map<String, MutablePoint> getLocations() {
return deepCopy(locations);
}
//要new MutablePoint返回,否则属于不安全发布,而且多线程情况下位置信息不是实时的。因为get时set方法被阻塞在外面。
public synchronized MutablePoint getLocation(String id) {
MutablePoint loc = locations.get(id);
return loc == null ? null : new MutablePoint(loc);
}
public synchronized void setLocation(String id, int x, int y) {
MutablePoint loc = locations.get(id);
if (loc == null)
throw new IllegalArgumentException("No such ID: " + id);
loc.x = x;
loc.y = y;
}
private static Map<String, MutablePoint> deepCopy(Map<String, MutablePoint> m) {
Map<String, MutablePoint> result = new HashMap<String, MutablePoint>();
for (String id : m.keySet())
result.put(id, new MutablePoint(m.get(id)));
return Collections.unmodifiableMap(result);
}
}4.3 线程安全性的委托
4.3.1 示例:基于委托的车辆追踪器
解决4.2.2 程序的弊病。
public class Point {
public final int x, y;
public Point(int x, int y) {
this.x = x;
this.y = y;
}
}
public class DelegatingVehicleTracker {
private final ConcurrentMap<String, Point> locations;
private final Map<String, Point> unmodifiableMap;
//这里使用Collections.unmodifiableMap来包装一下原来的ConcurrentHashMap,因为getLocations()要返回ConcurrentHashMap的话会导致逸出。
//get、set还是操作ConcurrentHashMap。
//不定义unmodifiableMap的话,也可以使用getLocationsAsStatic(),在返回时再临时包装。
public DelegatingVehicleTracker(Map<String, Point> points) {
locations = new ConcurrentHashMap<String, Point>(points);
unmodifiableMap = Collections.unmodifiableMap(locations);
}
public Map<String, Point> getLocations() {
return unmodifiableMap;
}
public Point getLocation(String id) {
return locations.get(id);
}
public void setLocation(String id, int x, int y) {
if (locations.replace(id, new Point(x, y)) == null)
throw new IllegalArgumentException("invalid vehicle name: " + id);
}
// Alternate version of getLocations (Listing 4.8)
public Map<String, Point> getLocationsAsStatic() {
return Collections.unmodifiableMap(
new HashMap<String, Point>(locations));
}
}4.3.2 独立的状态变量
独立的变量使用独立的线程安全列表。
4.3.3 当委托失效时
当变量不再独立,而是相互之间有关系时。咋办呢?
4.3.4 发布底层的状态变量
4.3.5 示例:发布状态的车辆追踪器
4.4 在现有的线程安全类中添加功能
@ThreadSafe
//扩展类,添加synchronized方法
public class BetterVector <E> extends Vector<E> {
// When extending a serializable class, you should redefine serialVersionUID
static final long serialVersionUID = -3963416950630760754L;
public synchronized boolean putIfAbsent(E x) {
boolean absent = !contains(x);
if (absent)
add(x);
return absent;
}
}如果父类中不使用
4.4.1 客户端加锁机制
@ThreadSafe
class GoodListHelper <E> {
public List<E> list = Collections.synchronizedList(new ArrayList<E>());
public boolean putIfAbsent(E x) {
synchronized (list) {
boolean absent = !list.contains(x);
if (absent)
list.add(x);
return absent;
}
}
}4.4.2 组合
@ThreadSafe
public class ImprovedList<T> implements List<T> {
//相当于代理模式,代理了List,封装成线程安全
private final List<T> list;
/**
* PRE: list argument is thread-safe.
*/
public ImprovedList(List<T> list) { this.list = list; }
public synchronized boolean putIfAbsent(T x) {
boolean contains = list.contains(x);
if (contains)
list.add(x);
return !contains;
}
// Plain vanilla delegation for List methods.
// Mutative methods must be synchronized to ensure atomicity of putIfAbsent.
public synchronized boolean add(T e) {
return list.add(e);
}
public int size() {
return list.size();
}
...
}4.5 同步策略文档化
第五章 基础构建模块
5.1 同步容器类
5.1.1 同步容器类的问题
复合操作需要加锁。
5.1.2 迭代器与ConcurrentModificationException
不希望在迭代期间加锁,就克隆容器,在副本上进行迭代。
5.1.3 隐藏迭代器
调用普通方法内部可能会调用迭代操作。
5.2 并发容器
并发容器代替同步容器。
queue不会阻塞,通过LinkedList来实现的,去掉list的随机访问需求,实现高效并发。
ConcurrentSkipListMap 代替 TreeMap
5.2.1 ConcurrentHashMap
使用细粒度的加锁机制,称为分段锁。单线程环境下损失小的性能。
返回的迭代去具有弱一致性,弱一致性迭代器容忍并发修改。
size()、isEmpty()只是一个估计值,不是精确值。
5.2.2 额外的原子Map操作
虽然ConcurrentHashMap不能像vector一样,由我们自己扩展添加原子操作。但是一些操作ConcurrentHashMap中都有了
- putIfAbsent
- remove
- replace
5.2.3 CopyOnWriteArrayList
代替同步List
Copy-On-Write,也能看出,每次修改都创建并重新发布一个新的容器副本(修改容器时都会复制底层数组,需要一定开销)。
迭代操作远多于修改操作,才使用Copy-On-Write容器。
5.3 阻塞队列和生产者消费者模式
- LinkedBlockingQueue
- ArrayBlockingQueue
- PriorityBlockingQueue
- SynchronousQueue,同步队列,没有存储功能。直接交付任务给线程。
5.3.1 示例:桌面搜索
5.3.2 串行线程封闭
5.3.3 双端队列与工作密取
Deque双端队列。在生产者消费者中,可以使用Deque来实现工作密取。当一个消费者完成自己的工作,可以从其他消费者双端队列队尾取任务执行。
5.4 阻塞方法与中断方法
阻塞状态:Blocked,Waiting,Timed_Waiting(限时等待)
BlockingQueue的put take 会抛出InterruptedException(CheckedException)
Thread提供interrupt方法,用于中断线程或者查询线程是否已经中断。
一个线程不能强制中止其他线程。(只能设置中断标志位)
public class TaskRunnable implements Runnable {
BlockingQueue<Task> queue;
public void run() {
try {
processTask(queue.take());
} catch (InterruptedException e) {
// restore interrupted status
//恢复中断状态,因为java中可响应中断的阻塞方法在向上抛出异常的同时均清除了中断状态
Thread.currentThread().interrupt();
}
}
void processTask(Task task) {
// Handle the task
}
interface Task {
}
}示例:
public class InterruptedSleepingThread extends Thread {
@Override
public void run() {
doAPseudoHeavyWeightJob();
}
private void doAPseudoHeavyWeightJob() {
for (int i = 0; i < Integer.MAX_VALUE; i++) {
//You are kidding me
System.out.println(i + " " + i * 2);
//Let me sleep <evil grin>
if (Thread.currentThread().isInterrupted()) {
System.out.println("Thread interrupted\n Exiting...");
break;
} else {
sleepBabySleep();
}
}
}
/**
*
*/
protected void sleepBabySleep() {
try {
//sleep过程中外部使用thread.interrupt();被InterruptedException catch后,
Thread.sleep(1000);
} catch (InterruptedException e) {
e.printStackTrace();
//Thread.currentThread().interrupt();
}
}
}public class InterruptedSleepingThreadMain {
/**
* @param args
* @throws InterruptedException
*/
public static void main(String[] args) throws InterruptedException {
InterruptedSleepingThread thread = new InterruptedSleepingThread();
thread.start();
//Giving 10 seconds to finish the job.
Thread.sleep(2000);
//Let me interrupt
thread.interrupt();
}
}如果sleepBabySleep中的catch不写Thread.currentThread().interrupt(); 结果有以下两种情况:
一种情况
0 0
1 2
2 4
Thread interrupted
Exiting...
另一种情况
0 0
1 2
2 4
java.lang.InterruptedException: sleep interrupted
3 6
...打印异常后继续执行。
第一种情况是当线程不在sleeping时,正好thread.interrupt();设置线程中断状态,被if (Thread.currentThread().isInterrupted()) 判断。中断线程。
第二种情况,线程sleeping中,thread.interrupt();会诱发InterruptedException,捕获异常后会清除线程的中断状态。所以if (Thread.currentThread().isInterrupted()) 不能获取到中断消息。线程程序继续执行。
5.5 同步工具类
5.5.1 闭锁CountDownLatch
CountDownLatch是一种闭锁的实现。
public class TestHarness {
public long timeTasks(int nThreads, final Runnable task)
throws InterruptedException {
final CountDownLatch startGate = new CountDownLatch(1);
final CountDownLatch endGate = new CountDownLatch(nThreads);
for (int i = 0; i < nThreads; i++) {
Thread t = new Thread() {
public void run() {
try {
//等待开始命令
startGate.await();
try {
task.run();
} finally {
//执行完-1
endGate.countDown();
}
} catch (InterruptedException ignored) {
}
}
};
t.start();
}
long start = System.nanoTime();
//startGate控制子线程任务开始执行。
startGate.countDown();
//等子线程执行完
endGate.await();
long end = System.nanoTime();
return end - start;
}
}5.5.2 FutureTask
通过Callable来执行。
Future.get任务没有完成则阻塞。
public class Preloader {
ProductInfo loadProductInfo() throws DataLoadException {
return null;
}
//FutureTask中包装Callable
private final FutureTask<ProductInfo> future =
new FutureTask<ProductInfo>(new Callable<ProductInfo>() {
public ProductInfo call() throws DataLoadException {
return loadProductInfo();
}
});
private final Thread thread = new Thread(future);
public void start() { thread.start(); }
public ProductInfo get()
throws DataLoadException, InterruptedException {
try {
//获取执行结果,阻塞
return future.get();
} catch (ExecutionException e) {
//Callable的异常被封装到ExecutionException
Throwable cause = e.getCause();
//获取具体异常
if (cause instanceof DataLoadException)
throw (DataLoadException) cause;
else
throw LaunderThrowable.launderThrowable(cause);
}
}
interface ProductInfo {
}
}
class DataLoadException extends Exception { }5.5.3 信号量Semaphore
public class BoundedHashSet <T> {
private final Set<T> set;
private final Semaphore sem;
public BoundedHashSet(int bound) {
this.set = Collections.synchronizedSet(new HashSet<T>());
sem = new Semaphore(bound);
}
public boolean add(T o) throws InterruptedException {
//+1
sem.acquire();
boolean wasAdded = false;
try {
wasAdded = set.add(o);
return wasAdded;
} finally {
if (!wasAdded)
//-1
sem.release();
}
}
public boolean remove(Object o) {
boolean wasRemoved = set.remove(o);
if (wasRemoved)
sem.release();
return wasRemoved;
}
}5.5.4 栅栏 CyclicBarrier & Exchanger
闭锁用于等待事件,栅栏用于等待线程
public class CellularAutomata {
private final Board mainBoard;
private final CyclicBarrier barrier;
private final Worker[] workers;
public CellularAutomata(Board board) {
this.mainBoard = board;
int count = Runtime.getRuntime().availableProcessors();
this.barrier = new CyclicBarrier(count,
new Runnable() {
public void run() {
mainBoard.commitNewValues();
}});
this.workers = new Worker[count];
for (int i = 0; i < count; i++)
workers[i] = new Worker(mainBoard.getSubBoard(count, i));
}
private class Worker implements Runnable {
private final Board board;
public Worker(Board board) { this.board = board; }
public void run() {
while (!board.hasConverged()) {
for (int x = 0; x < board.getMaxX(); x++)
for (int y = 0; y < board.getMaxY(); y++)
board.setNewValue(x, y, computeValue(x, y));
try {
barrier.await();
} catch (InterruptedException ex) {
return;
} catch (BrokenBarrierException ex) {
return;
}
}
}
private int computeValue(int x, int y) {
// Compute the new value that goes in (x,y)
return 0;
}
}
public void start() {
for (int i = 0; i < workers.length; i++)
new Thread(workers[i]).start();
mainBoard.waitForConvergence();
}
interface Board {
int getMaxX();
int getMaxY();
int getValue(int x, int y);
int setNewValue(int x, int y, int value);
void commitNewValues();
boolean hasConverged();
void waitForConvergence();
Board getSubBoard(int numPartitions, int index);
}
}5.6 *构建高效且可伸缩的结果缓存
-
使用HashMap做缓存,然后读存缓存方法使用synchronized
并发不足,太慢
-
使用ConcurrentHashMap
会有并发问题,重复计算,重复存放。(虽然结果可能没啥影响,但就是重复执行了不必要的操作)
-
使用new ConcurrentHashMap<A, Future>(),
还是会产生2中的不必须要重复计算问题,但是会减轻。【因为future不用执行完就返回,返回的快】
-
正确的做法:
使用ConcurrentHashMap.putIfAbsent,保证原子操作,将future放入map中。
public class Memoizer <A, V> implements Computable<A, V> {
private final ConcurrentMap<A, Future<V>> cache
= new ConcurrentHashMap<A, Future<V>>();
private final Computable<A, V> c;
public Memoizer(Computable<A, V> c) {
this.c = c;
}
public V compute(final A arg) throws InterruptedException {
while (true) {
Future<V> f = cache.get(arg);
if (f == null) {
Callable<V> eval = new Callable<V>() {
public V call() throws InterruptedException {
return c.compute(arg);
}
};
FutureTask<V> ft = new FutureTask<V>(eval);
f = cache.putIfAbsent(arg, ft);
if (f == null) {
f = ft;
ft.run();
}
}
try {
return f.get();
} catch (CancellationException e) {
cache.remove(arg, f);
} catch (ExecutionException e) {
throw LaunderThrowable.launderThrowable(e.getCause());
}
}
}
}第六章 任务执行
6.1 在线程中执行任务
6.1.1 串行的执行任务
6.1.2 显式的为任务创建线程
6.1.3 无限创建线程的不足
- 线程生命周期的开销(新建 销毁)
- 资源消耗
- 稳定性
6.2 Executor框架
线程池
6.2.1 示例:基于Executor的Web服务器
public class TaskExecutionWebServer {
private static final int NTHREADS = 100;
private static final Executor exec
= Executors.newFixedThreadPool(NTHREADS);
public static void main(String[] args) throws IOException {
ServerSocket socket = new ServerSocket(80);
while (true) {
final Socket connection = socket.accept();
Runnable task = new Runnable() {
public void run() {
handleRequest(connection);
}
};
exec.execute(task);
}
}
private static void handleRequest(Socket connection) {
// request-handling logic here
}
}对于Executor 我们更换实现也方便。自己实现Executor接口,重写execute() 方法,实现自己的逻辑。可以实现同步的Executor。
6.2.2 执行策略
6.2.3 线程池
newFixedThreadPool 等等
参考:深入浅出Java线程池
6.2.4 Executor的生命周期
public interface ExecutorService extends Executor {
List<Runnable> shutdownNow();
boolean isShutdown();
boolean isTerminated();
boolean awaitTermination(long var1, TimeUnit var3) throws InterruptedException;ExecutorService扩展了Executor接口。实现了一些生命周期管理方法。
ExecutorService生命周期:运行->关闭->已终止
ExecutorService关闭后由Rejected Execution Handler来处理(直接抛弃,或者抛出异常)。
6.2.5 延迟任务与周期任务
ScheduledThreadPoolExecutor 或 newScheduledThreadPool工厂方法来创建该类对象。
不推荐使用Timer。
构建自己的调度服务,可以使用DelayQueue。
6.3 找出可利用的并行性
6.3.1 示例:串行的页面渲染器
6.3.2 携带结果的任务Callable与Future
6.3.3 示例:使用Future实现页面渲染器
6.3.4 在异构任务并行化中存在的局限
就是不同任务执行时间不一样,如果任务A执行时间很长,将任务AB并行,提高的性能也有限。
6.3.5 CompletionService
ExecutorCompletionService的实现,在构造函数中创建一个BlockingQueue。
6.3.6 示例:使用CompletionService实现页面渲染器
public abstract class Renderer {
private final ExecutorService executor;
Renderer(ExecutorService executor) {
this.executor = executor;
}
void renderPage(CharSequence source) {
final List<ImageInfo> info = scanForImageInfo(source);
CompletionService<ImageData> completionService =
new ExecutorCompletionService<ImageData>(executor);
for (final ImageInfo imageInfo : info)
completionService.submit(new Callable<ImageData>() {
public ImageData call() {
return imageInfo.downloadImage();
}
});
renderText(source);
try {
for (int t = 0, n = info.size(); t < n; t++) {
//获取完成的任务
Future<ImageData> f = completionService.take();
ImageData imageData = f.get();
//完成一个渲染一个
renderImage(imageData);
}
} catch (InterruptedException e) {
//恢复中断状态
Thread.currentThread().interrupt();
} catch (ExecutionException e) {
throw launderThrowable(e.getCause());
}
}
interface ImageData {
}
interface ImageInfo {
ImageData downloadImage();
}
abstract void renderText(CharSequence s);
abstract List<ImageInfo> scanForImageInfo(CharSequence s);
abstract void renderImage(ImageData i);
}6.5.7 为任务设置时限
future.get支持这种需求,如果在限定时间内没有返回则抛出TimeoutException。
6.3.8 示例:旅行预订门户网站
第七章 取消与关闭
7.1 任务取消
设置标志位,volatile类型。
public class PrimeGenerator implements Runnable {
private static ExecutorService exec = Executors.newCachedThreadPool();
@GuardedBy("this") private final List<BigInteger> primes
= new ArrayList<BigInteger>();
private volatile boolean cancelled;
public void run() {
BigInteger p = BigInteger.ONE;
while (!cancelled) {
p = p.nextProbablePrime();
synchronized (this) {
primes.add(p);
}
}
}
public void cancel() {
cancelled = true;
}
public synchronized List<BigInteger> get() {
return new ArrayList<BigInteger>(primes);
}
static List<BigInteger> aSecondOfPrimes() throws InterruptedException {
PrimeGenerator generator = new PrimeGenerator();
//执行生成器线程
exec.execute(generator);
try {
//主线程等一秒
SECONDS.sleep(1);
} finally {
//主线程来设置子线程的取消标志位
generator.cancel();
}
return generator.get();
}
}7.1.1 中断
使用标志位有弊端,如果线程阻塞,永远不去判断标志位,则线程永远不会结束。
每个线程都有一个中断状态(boolean)。
public class Thread {
//中断目标线程
public void interrupt() {}
//返回目标线程中断状态
public boolean isInterrupted() {}
//清除中断状态,返回之前的值。
public static boolean interrupted() {}
}Thread.sleep 和 Object.wait 都会检查线程中断状态,发现中断提前返回。响应中断时,他们会清除中断状态,抛出interruptedException。
通过中断来取消任务:
public class PrimeProducer extends Thread {
private final BlockingQueue<BigInteger> queue;
PrimeProducer(BlockingQueue<BigInteger> queue) {
this.queue = queue;
}
public void run() {
try {
BigInteger p = BigInteger.ONE;
while (!Thread.currentThread().isInterrupted())
queue.put(p = p.nextProbablePrime());
} catch (InterruptedException consumed) {
/* Allow thread to exit */
}
}
//不用标志位了,就用线程的中断状态做标志位。
public void cancel() {
interrupt();
}
}7.1.2 中断策略
7.1.3 响应中断
对于处理InterruptedException,有两种处理方式:
- 传递异常
- 恢复中断状态
7.1.4 示例:计时运行
目的:想知道程序运行过程是否产生异常
线程代码不能抛出任何checked异常。所有的线程中的checked异常都只能被线程本身消化掉。只能抛出RuntimeException。
当线程代码抛出RuntimeException之后,线程会中断。
主线程不受这个影响,不会处理这个RuntimeException,而且根本不能catch到这个异常。会继续执行自己的代码 :)
public class TimedRun1 {
private static final ScheduledExecutorService cancelExec = Executors.newScheduledThreadPool(1);
public static void timedRun(Runnable r,
long timeout, TimeUnit unit) {
//使用这个线程来执行r.run()
final Thread taskThread = Thread.currentThread();
//启动一个定时线程,用来中断当前线程,也就是r.run()
cancelExec.schedule(new Runnable() {
public void run() {
taskThread.interrupt();
}
}, timeout, unit);
r.run();
}
}外部线程中安排中断。有什么问题?Why should we not Schedule an interrupt on a borrowed thread?
-
如果Thread.currentThread();是来自一个线程池,当前线程已经执行完了返回了,线程池将该线程分配给其他任务,这时候ScheduledExecutorService执行了该线程的taskThread.interrupt();方法。GG。
new Thread 不就行了?不用Thread.currentThread(); 不行,正是因为独立线程运行不会处理异常,所以才使用Thread.currentThread();,然后对TimedRun1.timedRun()的调用者进行try catch 捕获异常(因为是同一个线程,所以可以catch)。
-
即便是线程被中断退出了,也不能保证是超时timeout引起的interrupt。可能在taskThread.interrupt();之前,线程的状态就已经是interrupt,只不过还没有运行到检测中断状态的代码。
既然,使用Thread.currentThread() + try catch 不行,怎么样才行呢?
public class TimedRun2 {
private static final ScheduledExecutorService cancelExec = newScheduledThreadPool(1);
public static void timedRun(final Runnable r,
long timeout, TimeUnit unit)
throws InterruptedException {
class RethrowableTask implements Runnable {
//使用t来记录线程运行过程产生的异常
private volatile Throwable t;
public void run() {
try {
r.run();
} catch (Throwable t) {
this.t = t;
}
}
void rethrow() {
if (t != null)
throw launderThrowable(t);
}
}
RethrowableTask task = new RethrowableTask();
final Thread taskThread = new Thread(task);
taskThread.start();
cancelExec.schedule(new Runnable() {
public void run() {
taskThread.interrupt();
}
}, timeout, unit);
//限时join,不知道是执行完了返回,还是到时间了返回。
taskThread.join(unit.toMillis(timeout));
//检查任务中是否有异常
task.rethrow();
}
}7.1.5 通过Future来实现取消
public class TimedRun {
private static final ExecutorService taskExec = Executors.newCachedThreadPool();
public static void timedRun(Runnable r,
long timeout, TimeUnit unit)
throws InterruptedException {
Future<?> task = taskExec.submit(r);
try {
task.get(timeout, unit);
} catch (TimeoutException e) {
// task will be cancelled below
} catch (ExecutionException e) {
// exception thrown in task; rethrow
throw launderThrowable(e.getCause());
} finally {
// Harmless if task already completed
task.cancel(true); // interrupt if running
}
}
}如果要通过 Future 的 cancel 方法取消正在运行的任务,那么该任务必定是可以 对线程中断做出响应 的任务。
cancel(false) 与 cancel(true)的区别在于,cancel(false) 只 取消已经提交但还没有被运行的任务(即任务就不会被安排运行);而 cancel(true) 会取消所有已经提交的任务,包括 正在等待的 和 正在运行的 任务
7.1.6 处理不可中断的阻塞
如果一个线程由于执行同步Socket IO或等待获得内置锁而阻塞。中断请求也只是设置线程状态。
针对这些不响应中断请求的操作,停止线程需要根据具体阻塞原因采取不同方法。
线程阻塞的原因:
- 同步Socket IO:可以关闭socket,会抛出SocketException
- 同步 IO:中断InterruptibleChannel上等待的线程,抛出ClosedByInterruptException。关闭InterruptibleChannel,导致所有链路上的阻塞的线程都抛出AsynchronousCloseException
- Selector 的异步IO:如果线程在Selector.select方法阻塞,那么调用close或wakeup方法会使线程抛出ClosedSelectorException并提前返回
- 获取某个锁:Lock类中提供了lockInterruptibly方法,该方法允许在等待一个锁时仍能响应中断。
public class ReaderThread extends Thread {
private static final int BUFSZ = 512;
private final Socket socket;
private final InputStream in;
public ReaderThread(Socket socket) throws IOException {
this.socket = socket;
this.in = socket.getInputStream();
}
public void interrupt() {
try {
//不同Interrupt不被响应,需要关闭socket。关闭socket后,线程抛出IOException,运行结束。
socket.close();
} catch (IOException ignored) {
} finally {
super.interrupt();
}
}
public void run() {
try {
byte[] buf = new byte[BUFSZ];
while (true) {
//阻塞
int count = in.read(buf);
if (count < 0)
break;
else if (count > 0)
processBuffer(buf, count);
}
} catch (IOException e) { /* Allow thread to exit */
}
}
public void processBuffer(byte[] buf, int count) {
}
}7.1.7 采用newTaskFor来封装非标准的取消
public abstract class SocketUsingTask <T> implements CancellableTask<T> {
@GuardedBy("this") private Socket socket;
protected synchronized void setSocket(Socket s) {
socket = s;
}
public synchronized void cancel() {
try {
if (socket != null)
socket.close();
} catch (IOException ignored) {
}
}
public RunnableFuture<T> newTask() {
return new FutureTask<T>(this) {
public boolean cancel(boolean mayInterruptIfRunning) {
try {
SocketUsingTask.this.cancel();
} finally {
return super.cancel(mayInterruptIfRunning);
}
}
};
}
}
interface CancellableTask <T> extends Callable<T> {
void cancel();
RunnableFuture<T> newTask();
}
@ThreadSafe
//自定义CancellingExecutor,执行CancellableTask自定义类型
//CancellableTask.newTask() 返回FutureTask,重写FutureTask.cancel方法。
//针对SocketUsingTask,自然cancel方法中就要关闭socket呀。
class CancellingExecutor extends ThreadPoolExecutor {
public CancellingExecutor(int corePoolSize, int maximumPoolSize, long keepAliveTime, TimeUnit unit, BlockingQueue<Runnable> workQueue) {
super(corePoolSize, maximumPoolSize, keepAliveTime, unit, workQueue);
}
public CancellingExecutor(int corePoolSize, int maximumPoolSize, long keepAliveTime, TimeUnit unit, BlockingQueue<Runnable> workQueue, ThreadFactory threadFactory) {
super(corePoolSize, maximumPoolSize, keepAliveTime, unit, workQueue, threadFactory);
}
public CancellingExecutor(int corePoolSize, int maximumPoolSize, long keepAliveTime, TimeUnit unit, BlockingQueue<Runnable> workQueue, RejectedExecutionHandler handler) {
super(corePoolSize, maximumPoolSize, keepAliveTime, unit, workQueue, handler);
}
public CancellingExecutor(int corePoolSize, int maximumPoolSize, long keepAliveTime, TimeUnit unit, BlockingQueue<Runnable> workQueue, ThreadFactory threadFactory, RejectedExecutionHandler handler) {
super(corePoolSize, maximumPoolSize, keepAliveTime, unit, workQueue, threadFactory, handler);
}
protected <T> RunnableFuture<T> newTaskFor(Callable<T> callable) {
if (callable instanceof CancellableTask)
return ((CancellableTask<T>) callable).newTask();
else
return super.newTaskFor(callable);
}
}7.2 停止基于线程的服务
7.2.1 示例:日志服务
将日志消息放入某个队列中,由其他线程来处理。
public class LogWriter {
private final BlockingQueue<String> queue;
private final LoggerThread logger;
private static final int CAPACITY = 1000;
public LogWriter(Writer writer) {
this.queue = new LinkedBlockingQueue<String>(CAPACITY);
this.logger = new LoggerThread(writer);
}
public void start() {
logger.start();
}
public void log(String msg) throws InterruptedException {
queue.put(msg);
}
private class LoggerThread extends Thread {
private final PrintWriter writer;
public LoggerThread(Writer writer) {
this.writer = new PrintWriter(writer, true); // autoflush
}
public void run() {
try {
while (true)
writer.println(queue.take());
} catch (InterruptedException ignored) {
} finally {
writer.close();
}
}
}
}终止日志线程怎么写?
终止线程要注意两个问题:1. 停止接收新数据,2. 将旧数据写完
-
直接catch InterruptedException
直接结束会丢失queue中的日志信息(队列中的数据没有写完)。如果queue是满的,调用log方法的线程会被阻塞。
取消生产者消费者时,需要同时取消生产者和消费者。
-
设置某个关闭标志位,增加isShutdown和reservations标志位
对于标志位需要设置synchronized同步,不然就是,即便消费者已经调用了stop方法,生产者还能向queue中添加msg。虽然某些情况不算太严重。
-
增加静态条件
public class LogService {
private final BlockingQueue<String> queue;
private final LoggerThread loggerThread;
private final PrintWriter writer;
@GuardedBy("this") private boolean isShutdown;
@GuardedBy("this") private int reservations;
public LogService(Writer writer) {
this.queue = new LinkedBlockingQueue<String>();
this.loggerThread = new LoggerThread();
this.writer = new PrintWriter(writer);
}
public void start() {
loggerThread.start();
}
public void stop() {
synchronized (this) {
isShutdown = true;
}
loggerThread.interrupt();
}
public void log(String msg) throws InterruptedException {
synchronized (this) {
if (isShutdown)
throw new IllegalStateException(/*...*/);
++reservations;
}
queue.put(msg);
}
private class LoggerThread extends Thread {
public void run() {
try {
while (true) {
try {
synchronized (LogService.this) {
if (isShutdown && reservations == 0)
break;
}
String msg = queue.take();
synchronized (LogService.this) {
--reservations;
}
writer.println(msg);
} catch (InterruptedException e) { /* retry */
}
}
} finally {
writer.close();
}
}
}
}7.2.2 关闭ExecutorService
- shutdown:一直等到队列中所有任务都执行完毕才关闭
- shutdownNow:立即关闭,关闭当前正在执行的任务,然后返回所有尚未启动的任务清单。
封装ExecutorService,成一个service。
7.2.3 毒丸对象
public class IndexingService {
private static final int CAPACITY = 1000;
private static final File POISON = new File("");
private final IndexerThread consumer = new IndexerThread();
private final CrawlerThread producer = new CrawlerThread();
private final BlockingQueue<File> queue;
private final FileFilter fileFilter;
private final File root;
public IndexingService(File root, final FileFilter fileFilter) {
this.root = root;
this.queue = new LinkedBlockingQueue<File>(CAPACITY);
this.fileFilter = new FileFilter() {
public boolean accept(File f) {
return f.isDirectory() || fileFilter.accept(f);
}
};
}
private boolean alreadyIndexed(File f) {
return false;
}
//生产者
class CrawlerThread extends Thread {
public void run() {
try {
crawl(root);
} catch (InterruptedException e) { /* fall through */
} finally {
while (true) {
try {
//当遇到中断请求,就放置一个POISON对象。
//使用while (true)避免,put(POISON)时候被中断,导致POISON对象放置失败。
queue.put(POISON);
break;
} catch (InterruptedException e1) { /* retry */
}
}
}
}
private void crawl(File root) throws InterruptedException {
File[] entries = root.listFiles(fileFilter);
if (entries != null) {
for (File entry : entries) {
if (entry.isDirectory())
crawl(entry);
else if (!alreadyIndexed(entry))
queue.put(entry);
}
}
}
}
//消费者
class IndexerThread extends Thread {
public void run() {
try {
while (true) {
File file = queue.take();
//如果遇到POISON,则停止执行。
if (file == POISON)
break;
else
indexFile(file);
}
} catch (InterruptedException consumed) {
}
}
public void indexFile(File file) {
/*...*/
};
}
public void start() {
producer.start();
consumer.start();
}
public void stop() {
//直接中断,会被catch,放置POISON对象,并且停止生产
producer.interrupt();
}
public void awaitTermination() throws InterruptedException {
consumer.join();
}
}7.2.4 示例:只执行一次的服务
public class CheckForMail {
public boolean checkMail(Set<String> hosts, long timeout, TimeUnit unit)
throws InterruptedException {
ExecutorService exec = Executors.newCachedThreadPool();
final AtomicBoolean hasNewMail = new AtomicBoolean(false);
try {
for (final String host : hosts)
exec.execute(new Runnable() {
public void run() {
if (checkMail(host))
hasNewMail.set(true);
}
});
} finally {
exec.shutdown();
//等待所有任务都执行完成。
exec.awaitTermination(timeout, unit);
}
return hasNewMail.get();
}
private boolean checkMail(String host) {
// Check for mail
return false;
}
}7.2.5 shutdownNow的局限性
如何知道Executor关闭时哪些任务正在执行?
public class TrackingExecutor extends AbstractExecutorService {
private final ExecutorService exec;
//记录哪些任务,在关闭时,正在执行,被被取消的。
private final Set<Runnable> tasksCancelledAtShutdown =
Collections.synchronizedSet(new HashSet<Runnable>());
public TrackingExecutor(ExecutorService exec) {
this.exec = exec;
}
public void shutdown() {
exec.shutdown();
}
public List<Runnable> shutdownNow() {
return exec.shutdownNow();
}
public boolean isShutdown() {
return exec.isShutdown();
}
public boolean isTerminated() {
return exec.isTerminated();
}
public boolean awaitTermination(long timeout, TimeUnit unit)
throws InterruptedException {
return exec.awaitTermination(timeout, unit);
}
public List<Runnable> getCancelledTasks() {
if (!exec.isTerminated())
throw new IllegalStateException(/*...*/);
return new ArrayList<Runnable>(tasksCancelledAtShutdown);
}
public void execute(final Runnable runnable) {
exec.execute(new Runnable() {
public void run() {
try {
runnable.run();
} finally {
if (isShutdown()
&& Thread.currentThread().isInterrupted())
//保存
tasksCancelledAtShutdown.add(runnable);
}
}
});
}
}但可是有可能产生的问题:
如果正在执行的程序主体已经执行完,就差最后一条指令。而这时被中断,这条实际已经执行的任务会被添加到tasksCancelledAtShutdown中。
7.3 处理非正常的线程终止
未捕获异常的处理
Thread API中提供UncaughtExceptionHandler,用来检测某个线程由于未捕获的异常而终结的情况。
Thread.currentThread().setUncaughtExceptionHandler(currentHandler);//实例方法
Thread.setDefaultUncaughtExceptionHandler(defaultHandler);//静态方法
jvm会把线程由于未捕获异常退出这个事报告给UncaughtExceptionHandler。如果没有提供UncaughtExceptionHandler,默认是将栈追踪信息输出到System.err。
//自定义,将信息输出到log
public class UEHLogger implements Thread.UncaughtExceptionHandler {
public void uncaughtException(Thread t, Throwable e) {
Logger logger = Logger.getAnonymousLogger();
logger.log(Level.SEVERE, "Thread terminated with exception: " + t.getName(), e);
}
}UncaughtExceptionHandler是不是必要的呢??? 百度好像大部分都是处理Android问题的。
只有通过execute提交的任务,抛出的未捕获异常才交给UncaughtExceptionHandler。submit提交的任务抛出的异常都封装在Future.get抛出的ExecutionException中。
7.4 JVM关闭
7.4.1 关闭钩子HOOK
JVM关闭 -> shutdown hook -> finalizers(终结器)
JVM关闭会调用shutdown hook,hook是通过Runtime.addShutdownhook 注册并且没有运行的线程。
JVM不会停止或中断任何在关闭时仍然在执行的应用程序线程。
参考:利用 java.lang.Runtime.addShutdownHook() 钩子程序,保证java程序安全退出
注册hook程序,保证线程能够完整执行。
7.4.2 守护线程
7.4.3 终结器finalizer
finalizer中的代码被多个线程访问需要同步,finalizer中的代码不保证能被运行。
避免使用finalizer
第八章 线程池的使用
8.1.1 线程饥饿死锁
线程池中的线程,提交新任务到线程池。死锁。
8.1.2 运行时间较长的任务
缓解方法,一些阻塞方法都定义了限时方法。可以避免长时间占用线程,适当让出。
8.2 设置线程池的大小
8.3 配置ThreadPoolExecutor
public ThreadPoolExecutor(int corePoolSize,
int maximumPoolSize,
long keepAliveTime,
TimeUnit unit,
BlockingQueue<Runnable> workQueue,
ThreadFactory threadFactory,
RejectedExecutionHandler handler) 
参考:
8.3.1 线程的创建与销毁
8.3.2 管理队列任务
基本任务队列:无界队列(耗尽资源)、有界队列(限制吞吐量)、同步移交
8.3.3 饱和策略
使用Semaphore来控制任务提交速度。
public class BoundedExecutor {
private final Executor exec;
private final Semaphore semaphore;
public BoundedExecutor(Executor exec, int bound) {
this.exec = exec;
this.semaphore = new Semaphore(bound);
}
public void submitTask(final Runnable command)
throws InterruptedException {
semaphore.acquire();
try {
exec.execute(new Runnable() {
public void run() {
try {
command.run();
} finally {
semaphore.release();
}
}
});
} catch (RejectedExecutionException e) {
semaphore.release();
}
}
}8.3.4 线程工厂
线程池创建线程,通过工厂创建,例如为线程池中的线程指定UncaughtExceptionHandler。
public class MyThreadFactory implements ThreadFactory {
private final String poolName;
public MyThreadFactory(String poolName) {
this.poolName = poolName;
}
public Thread newThread(Runnable runnable) {
//创建MyAppThread
return new MyAppThread(runnable, poolName);
}
}public class MyAppThread extends Thread {
public static final String DEFAULT_NAME = "MyAppThread";
private static volatile boolean debugLifecycle = false;
//用来统计创建了几个MyAppThread
private static final AtomicInteger created = new AtomicInteger();
//用来统计,有几个线程正在执行
private static final AtomicInteger alive = new AtomicInteger();
private static final Logger log = Logger.getAnonymousLogger();
public MyAppThread(Runnable r) {
this(r, DEFAULT_NAME);
}
public MyAppThread(Runnable runnable, String name) {
//设置线程名字
super(runnable, name + "-" + created.incrementAndGet());
//设置UncaughtExceptionHandler
setUncaughtExceptionHandler(new UncaughtExceptionHandler() {
public void uncaughtException(Thread t,
Throwable e) {
log.log(Level.SEVERE,
"UNCAUGHT in thread " + t.getName(), e);
}
});
}
public void run() {
// Copy debug flag to ensure consistent value throughout.
boolean debug = debugLifecycle;
if (debug) log.log(Level.FINE, "Created " + getName());
try {
//统计
alive.incrementAndGet();
super.run();
} finally {
alive.decrementAndGet();
if (debug) log.log(Level.FINE, "Exiting " + getName());
}
}
public static int getThreadsCreated() {
return created.get();
}
public static int getThreadsAlive() {
return alive.get();
}
public static boolean getDebug() {
return debugLifecycle;
}
public static void setDebug(boolean b) {
debugLifecycle = b;
}
}8.3.5 在调用构造函数后再定制ThreadPoolExecutor
ThreadPoolExecutor可以通过set方法设置属性。如果不想被使用set方法,使用unconfigurableExecutorService,可以防止Executor被修改。
`public static ExecutorService unconfigurableExecutorService(ExecutorService executor) `8.4 扩展ThreadPoolExecutor
扩展方法有:beforeExecute、afterExecute。可以用来添加日志、计时、监视、统计信息收集。

线程池完成关闭操作时调用terminated。
示例:给线程池添加统计信息
public class TimingThreadPool extends ThreadPoolExecutor {
public TimingThreadPool() {
super(1, 1, 0L, TimeUnit.SECONDS, null);
}
private final ThreadLocal<Long> startTime = new ThreadLocal<Long>();
private final Logger log = Logger.getLogger("TimingThreadPool");
private final AtomicLong numTasks = new AtomicLong();
private final AtomicLong totalTime = new AtomicLong();
protected void beforeExecute(Thread t, Runnable r) {
super.beforeExecute(t, r);
log.fine(String.format("Thread %s: start %s", t, r));
startTime.set(System.nanoTime());
}
protected void afterExecute(Runnable r, Throwable t) {
try {
long endTime = System.nanoTime();
long taskTime = endTime - startTime.get();
numTasks.incrementAndGet();
totalTime.addAndGet(taskTime);
log.fine(String.format("Thread %s: end %s, time=%dns",
t, r, taskTime));
} finally {
super.afterExecute(r, t);
}
}
protected void terminated() {
try {
log.info(String.format("Terminated: avg time=%dns",
totalTime.get() / numTasks.get()));
} finally {
super.terminated();
}
}
}之前自定义Thread,也可以做一些监控。
8.5 递归算法的并行化
示例:谜题框架
MySQL中utf8字符集、排序规则及utf8mb4_bin列大小写不敏感方法
目录
utf8mb4 和 utf8 比较
utf8mb4: A UTF-8 encoding of the Unicode character set using one to four bytes per character.
utf8mb3: A UTF-8 encoding of the Unicode character set using one to three bytes per character.
utf8: An alias forutfmb3.(https://dev.mysql.com/doc/refman/8.0/en/charset-unicode-sets.html)
UTF-8是使用1~4个字节,一种变长的编码格式。(字符编码 )
mb4即 most bytes 4,使用4个字节来表示完整的UTF-8。而MySQL中的utf8是utfmb3,只有三个字节,节省空间但不能表达全部的UTF-8,只能支持“基本多文种平面”(Basic Multilingual Plane,BMP)。
推荐使用utf8mb4。
utf8mb4_unicode_ci 和 utf8mb4_general_ci 比较
general_ci 更快,unicode_ci 更准确
in German and some other languages
ßis equal toss.
这种情况unicode_ci能准确判断。
具体有什么差别呢?参见下面的连接。
http://mysql.rjweb.org/utf8mb4_collations.html
utf8mb4_general_ci P=p Q=q R=r=Ř=ř S=s=ß=Ś=ś=Ş=ş=Š=š sh ss sz
utf8mb4_unicode_ci P=p Q=q R=r=Ř=ř S=s=Ś=ś=Ş=ş=Š=š sh ss=ß sz
可以看到utf8mb4_general_ci中S=ß,而utf8mb4_unicode_ci中ss=ß 。
使用utf8mb4_bin可以将上面的字符区分开来。
貌似general_ci 也快不了多少,所以更推荐unicode_ci。
大小写敏感
utf8mb4_general_cs 大小写敏感
utf8mb4_bin 大小写敏感
但貌似不存在utf8_unicode_cs ,可能是算法决定的吧?
utf8mb4_bin 列大小写不敏感方法
需求
- 插入的时候
Uman和Umān和uman看做不同的单词。 - 查询的时候
Uman和Umān和uman都能同时查出来。
解决方案
使用MySQL虚拟生成列。MYSQL UTF8_bin case insensitive unique index
create table test_utf8_bin_ci
( u8 varchar(50) charset utf8mb4 collate utf8mb4_unicode_ci,
u8_bin_ci varchar(50) charset utf8mb4 collate utf8mb4_bin as (lower(u8)) unique
);
insert into test_utf8_bin_ci (u8)
values ('A'),('Ä'),('Å'),('Â'),('Á'),('À');
根据需求,插入数据时:
-
Uman和Umān看做不同的单词,所以要utf8_bin. -
Uman和uman看做相同的单词,所以添加unique约束,在utf8_bin区分大小写的情况下,使用low() 函数使其不区分大小写。

查询时:
- 查询u8列,utf8mb4_unicode_ci不区分大小写、不区分a和ā。都能查出来。

如何正确的逐字符遍历字符串
如何正确的逐字符遍历字符串
通常遍历一个字符串
public static void main(String[] args) {
//𤭢,复制到idea后自动就变为utf16编码了
String a = "\uD852\uDF62";
System.out.println("String:" + a);
System.out.println("String length:" + a.length());
char[] chars1 = a.toCharArray();
for (int i = 0; i < chars1.length; i++) {
System.out.println(chars1[i]);
}
}输出:
String:𤭢
String length:2
?
?
为什么 String lenght是2呢?
因为java String中存储是通过Char[] 来存储(Java 9 是通过Byte[])。存储的编码是utf16。(为什么是utf16)
附上unicode到utf16的转换关系:

属于“基本平面字符”的unicode和utf16二进制是一样的占用16位(一个char可以表示)。
但𤭢字属于“增补平面字符”,转为utf16需要32为(两个char)。
如何才能正确按字符遍历字符串呢?
public static void main(String[] args) {
String a = "\uD852\uDF62";
System.out.println("String:" + a);
System.out.println("String length:" + a.length());
for (int offset = 0; offset < a.length();) {
//从offset开始获取字符,返回字符对应的unicode
int ch_unicode = a.codePointAt(offset);
//查看字符unicode对应的二进制
System.out.println("ch_unicode:" + Integer.toBinaryString(ch_unicode));
//根据unicode编码 转为char[]存储(utf16格式)。
char[] chars_utf16 = Character.toChars(ch_unicode);
//遍历输出string中的char[]对应的二进制
for (int i = 0; i < chars_utf16.length; i++) {
System.out.println("utf16_char " + i + ":" + Integer.toBinaryString(chars_utf16[i]));
}
//将chars转为String
String s = String.valueOf(chars_utf16);
System.out.println("完整字符:" + s);
//增加offset
offset += Character.charCount(ch_unicode);
}
}输出:
String:𤭢
String length:2
ch_unicode:100100101101100010 -> 对应 𤭢 的unicode值U+24B62
utf16_char 0:1101100001010010 -> 对应 String a = "\uD852\uDF62"; 中的D852
utf16_char 1:1101111101100010 -> 对应DF62
完整字符:𤭢
Reference
MySQL并发控制
目录
概述
三种并发控制:
- 悲观并发控制
- 乐观并发控制
- 多版本并发控制(MVCC)
悲观并发控制
读写锁
- 共享锁,也叫读锁
- 互斥锁,也叫写锁
两阶段协议
在增长阶段,一个事务可以获得锁但是不能释放锁;而在缩减阶段事务只可以释放锁,并不能获得新的锁
两阶段锁的使用却引入了另一个 严重的问题,死锁;
死锁的处理
- 预防死锁
- 产生死锁后,发现和恢复
预防死锁
-
一种是保证事务之间的等待不会出现环,所有的资源要么被锁定要么都不被锁定。(问题:事务一开始时很难判断哪些资源是需要锁定的)
-
另一种预防死锁的方法就是使用抢占加事务回滚的方式预防死锁。
-
wait-die
当进程Pi请求的资源正被进程Pj占有时,只有当Pi的时间戳比进程Pj的时间戳小时,即Pi来得早,Pi才能等待。否则Pi被卷回(roll-back),即死亡。
-
wound-wait
它和 wait-die 机制的结果完全相反。来的早的获取资源。
-
死锁检查和恢复
如果在有向图中出现了环,就说明当前数据库进入了死锁的状态。
死锁恢复就是打破环,恢复时需要考虑最小代价和防止某一事物产生饥饿
锁的粒度
有行锁也有表锁。
在加行锁之前,先在表上加 意向锁。使一事务的行锁与另一事务的表锁互斥。
意向锁还分为:意向共享锁、意向互斥锁。
InnoDB 的意向锁有什么作用? - 尹发条地精的回答 - 知乎
https://www.zhihu.com/question/51513268/answer/127777478
乐观并发控制
只是一种并发控制的**
基于时间戳的协议
按照不同事务对同一数据项请求的时间依次执行。
每一个数据项都有两个时间戳,读时间戳和写时间戳。如果事务的时间戳小于数据项的时间戳,就被拒绝并回滚。重新执行事务。
基于验证的协议
没看懂、
多版本并发控制

每一个写操作都会创建一个新版本的数据,读操作会从有限多个版本的数据中挑选一个最合适的结果直接返回。
MVCC 并不是一个与乐观和悲观并发控制对立的东西,它能够与两者很好的结合以增加事务的并发量。
用来解决读-写冲突的无锁并发控制。
MySQL 与 MVCC
-
读
每一个版本的数据行都具有一个唯一的时间戳,当有读事务请求时,数据库程序会直接从多个版本的数据项中具有最大时间戳的返回。
-
更新
事务会先读取最新版本的数据计算出数据更新后的结果,然后创建一个新版本的数据,新数据的时间戳是目前数据行的最大版本
+1 -
数据版本删除
MySQL 会将版本最低的数据定时从数据库中清除
MySQL中的锁
RC级别
- 有索引:行锁
- 无索引:表的所有行加锁
MySQL优化:将不满足条件的记录释放锁。
RR级别
不能读到新增数据。
不可重复读重点在于update和delete,而幻读的重点在于insert。
第一次读到数据,就加锁。保障数据可重复读。
InnoDB中的MVCC
只是针对读
MVCC中的读
- 快照读:就是select
- select * from table ....;
- 当前读:特殊的读操作,插入/更新/删除操作,属于当前读,处理的都是当前的数据,需要加锁。
- select * from table where ? lock in share mode;
- select * from table where ? for update;
- insert;
- update ;
- delete;
RR,看不到更新,也看不到新增。(正常应该可以看到新增的)
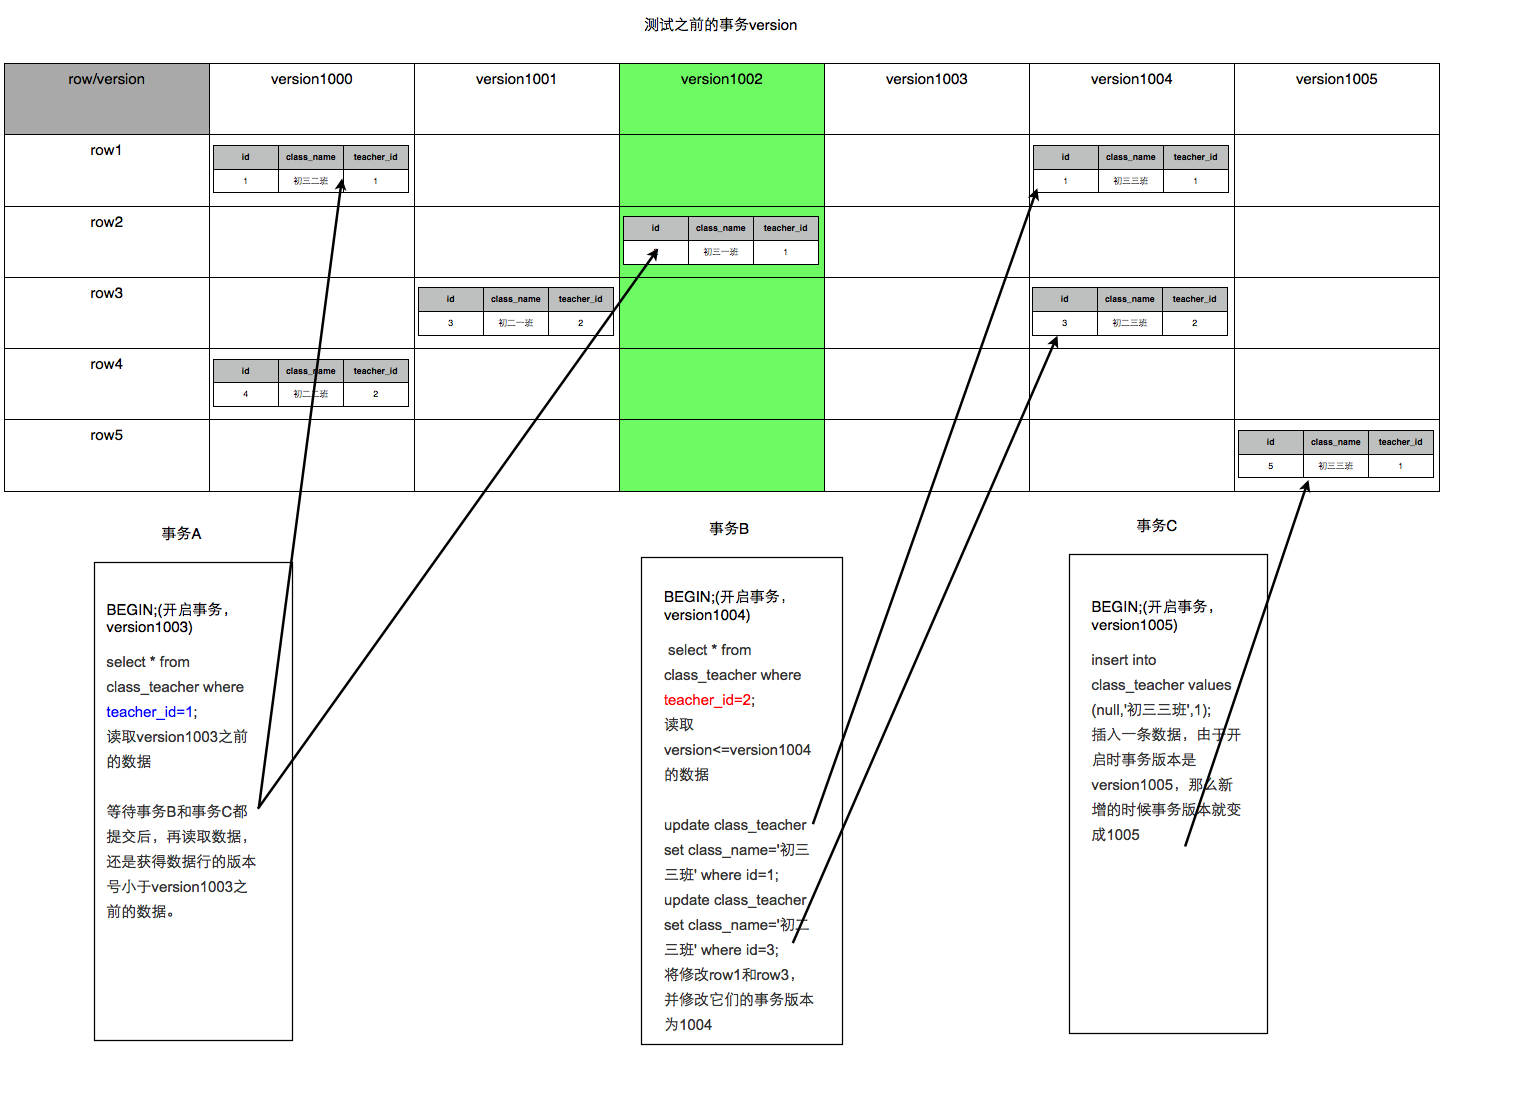
Next-Key锁
Next-Key锁是行锁和GAP(间隙锁)的合并。
RR级别中,事务A在update后加锁,事务B无法插入新数据,这样事务A在update前后读的数据保持一致,避免了幻读。这个锁,就是Gap锁。
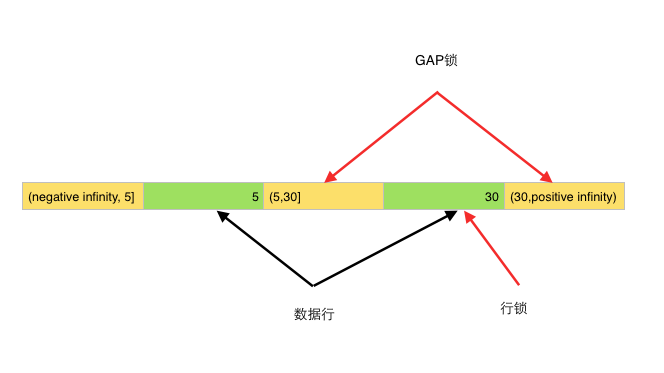
update class_teacher set class_name='初三四班' where teacher_id=30;不仅用行锁,锁住了相应的数据行;同时也在两边的区间,(5,30]和(30,positive infinity),都加入了gap锁。这样事务B就无法在这个两个区间insert进新数据。
如果没有索引,则update全表加gap锁。
Serializable 级别
读加共享锁,写加排它锁。
Reference
JVM
JVM的构成
jdk1.8 之前有方法区

jdk1.8之后:最终PermGen的方法区移至 Metaspace;字符串常量池移至 Java Heap
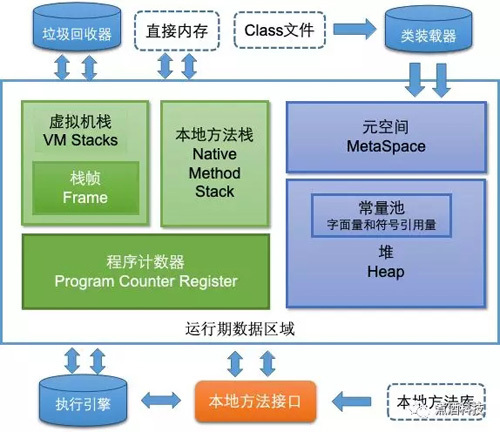
绿色是线程内部空间。
程序计数器
普通Java方法和由其他语言实现的native方法。如果当前执行的是普通Java方法,则程序计数器记录的是虚拟机字节码指令的地址。如果当前执行的是native方法,则计数器的值为空(Undefined)。
本地方法栈
Java虚拟机栈是为了Java方法服务的,而本地方法栈是为了native方法服务的
栈
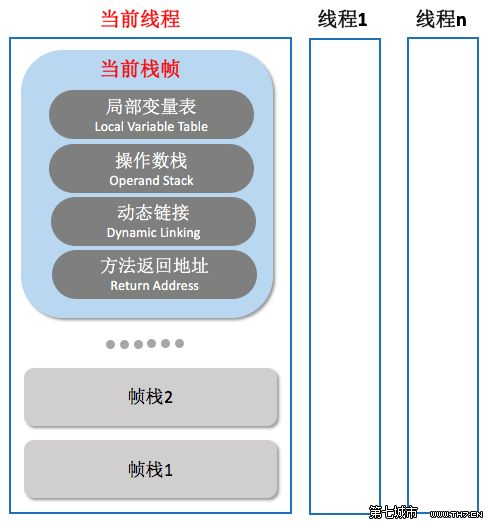
- 局部变量表
- 用于存放方法参数和方法内部定义的局部变量。
- 操作数栈
- 动态连接
- 字节码文件中有很多符号引用。这些符号引用一部分会在类加载的解析阶段或者第一次使用的时候转化为直接引用,这种转化称为静态解析。另一部分会在运行期间转化为直接引用,这部分称为动态连接
- 返回地址
堆
对象,GC算法都是针对堆的
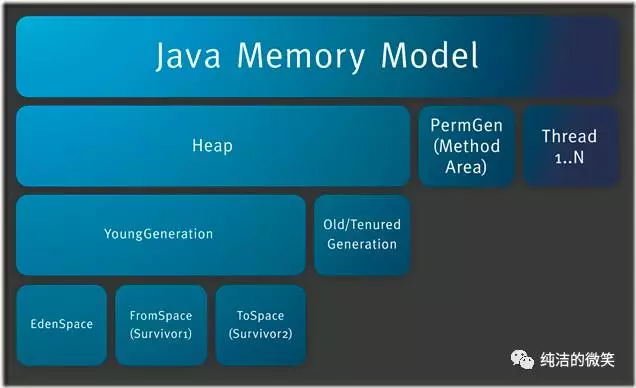
方法区(永久代)&元空间(Metaspace)
Java虚拟机规范将方法区描述为堆的一个逻辑部分,但是它却有个别名叫做Non-Heap(非堆),目的就是和Java堆区分开来。
java8 之前 方法区就是永久代Permanent Generation。由GC管理。
java8之后,变为Metaspace,使用native memory 不受GC管理。原来方法区中的常量池继续属于堆管理。
-
方法区(method area) 只是JVM规范中定义的一个概念,用于存储类信息、常量池、静态变量、JIT编译后的代码等数据,具体放在哪里,不同的实现可以放在不同的地方。
-
永久代是Hotspot虚拟机特有的概念,是方法区的一种实现,别的JVM都没有这个东西。
方法区的Class信息,又称为永久代,是否属于Java堆? - 知乎
MetaSpace是 堆外内存( Native Memory) 一部分。(NIO堆外内存:DirectByteBuffer分配)
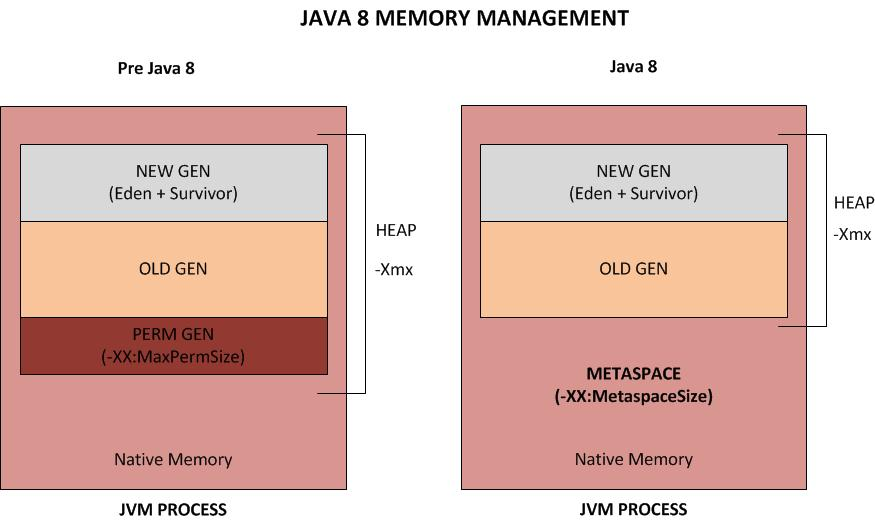
Metaspace中存放了什么东西??方法区存放了什么东西?
方法区:
类信息、常量、静态变量、即时编译器编译后的代码等数据
Java7中永久代中存储的部分数据已经开始转移到Java Heap或Native Memory中了。比如,
- 符号引用(Symbols)转移到了Native Memory;
- 字符串常量池(interned strings)转移到了Java Heap;
- 类的静态变量(class statics)转移到了Java Heap。
Metaspace 和永久区的区别
metaspace在 native memory(本地内存)中,也触发gc。
不被PermSize参数管理(不需要运维操心设置永久代大小),默认就无限空间了。
-XX:MetaspaceSize 达到会触发gc
-XX:MaxMetaspaceSize,可以为class metadata分配的最大空间。默认是没有限制的。
class文件常量池、运行时常量池、字符串常量池
Class Constant Pool:class常量池【编译后】
class字节码文件结构中的 一个常量池(Constant Pool Table)
class字节码文件结构中的 一个常量池(Constant Pool Table)
class字节码文件结构中的 一个常量池(Constant Pool Table)
class文件中除了包含类的版本、字段、方法、接口等描述信息外,还有一项信息就是 常量池(constant pool table) ,用于存放编译器生成的各种字面量(Literal)和符号引用(Symbolic References);
- 字面量包括:1.文本字符串 2.八种基本类型的值 3.被声明为final的常量等;
- 符号引用包括:1.类和方法的全限定名 2.字段的名称和描述符 3.方法的名称和描述符。
注意:class常量池是编译后就有了,这时还没有加载到内存中。
注意:class常量池是编译后就有了,这时还没有加载到内存中。
注意:class常量池是编译后就有了,这时还没有加载到内存中。
使用javap -v test.class可以查看class文件的常量池。
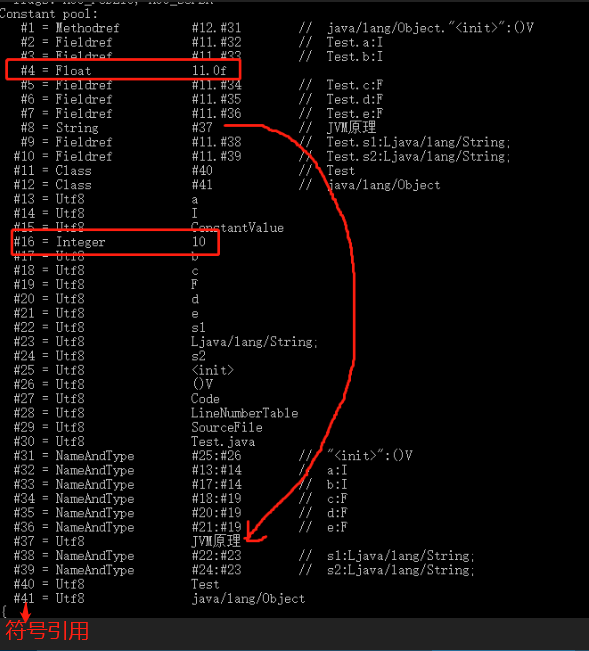
Runtime Constant Pool:运行时常量池【运行时】
运行时常量池存在于内存中,也就是class常量池被加载到内存之后的版本
运行时常量池中的字符串字面量若是成员的,则在类加载初始化阶段就使用到了字符串常量池
将class的常量变为 字符串常量池中的引用。
String Constant Pool:字符串常量池
参见:
字符串常量池 & String.intern() · Issue #42 · 4rnold/Blog
JVM堆外内存(off-heap memory)
优点:
能够在一定程度上减少垃圾回收对应用程序造成的影响。
缺点:
堆外内存的缺点就是内存难以控制
作为JAVA开发者我们经常用java.nio.DirectByteBuffer对象进行堆外内存的管理和使用
Direct ByteBuffer分配出去的内存其实也是由GC负责回收的,而不像Unsafe是完全自行管理的,Hotspot在GC时会扫描Direct ByteBuffer对象是否有引用,如没有则同时也会回收其占用的堆外内存。
堆外内存开源框架
关于堆外缓存的开源实现。查询了一些资料后了解到的主要有:
- Ehcache 3.0:3.0基于其商业公司一个非开源的堆外组件的实现。
- Chronical Map:OpenHFT包括很多类库,使用这些类库很少产生垃圾,并且应用程序使用这些类库后也很少发生Minor GC。类库主要包括:Chronicle Map,Chronicle Queue等等。
- OHC:来源于Cassandra 3.0, Apache v2。
- Ignite: 一个规模宏大的内存计算框架,属于Apache项目。
JVM参数图解
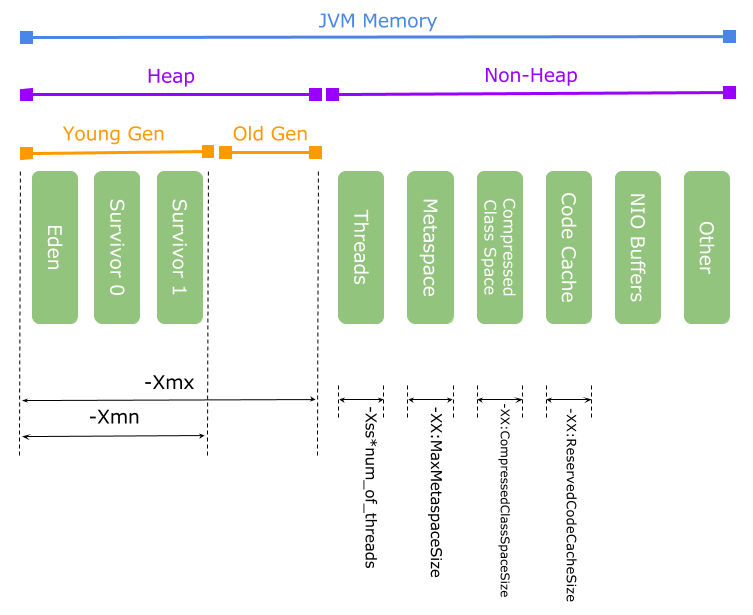
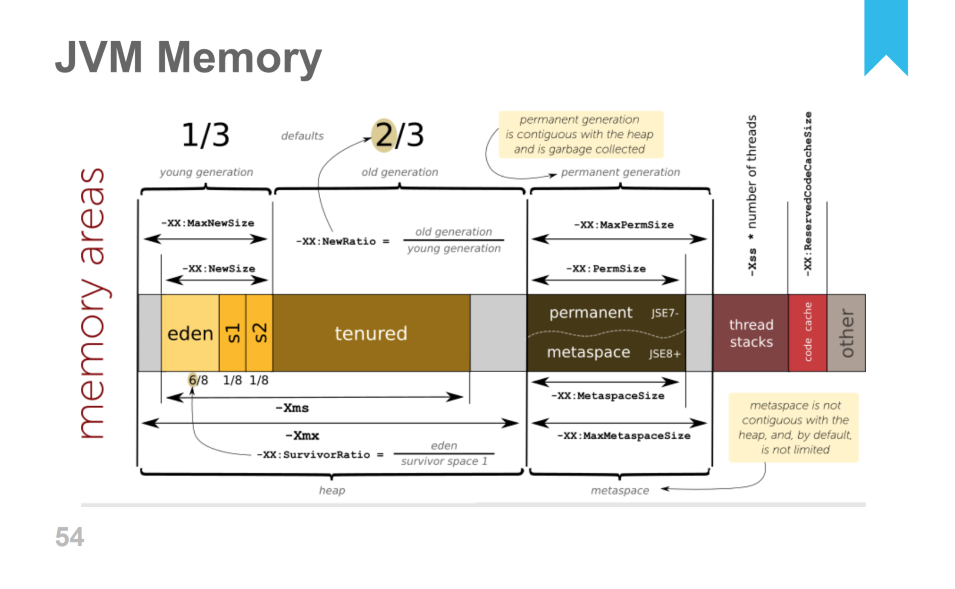
The -Xmx option is equivalent to -XX:MaxHeapSize.
- -Xms 和 -Xmx 等价于(-XX:InitialHeapSize 和 -XX:MaxHeapSize)
- -XX:NewSize 和 -Xmn(-XX:MaxNewSize)
- -XX:SurvivorRatio:eden/survivor space
- -XX:NewRatio:指定老年代/新生代的堆内存比例。在设置了-XX:MaxNewSize的情况下,-XX:NewRatio的值会被忽略,老年代的内存=堆内存 - 新生代内存。老年代的最大内存 = 堆内存 - 新生代 最大内存。
- -XX:OldSize:设置JVM启动分配的老年代内存大小,类似于新生代内存的初始大小-XX:NewSize。【还会增大】
JVM堆内存相关的启动参数:年轻代、老年代和永久代的内存分配 - 大葱拌豆腐 - 博客园
--XX:+HeapDumponOutOfMemeoryError,oom时导出堆文件
垃圾收集器有哪些?
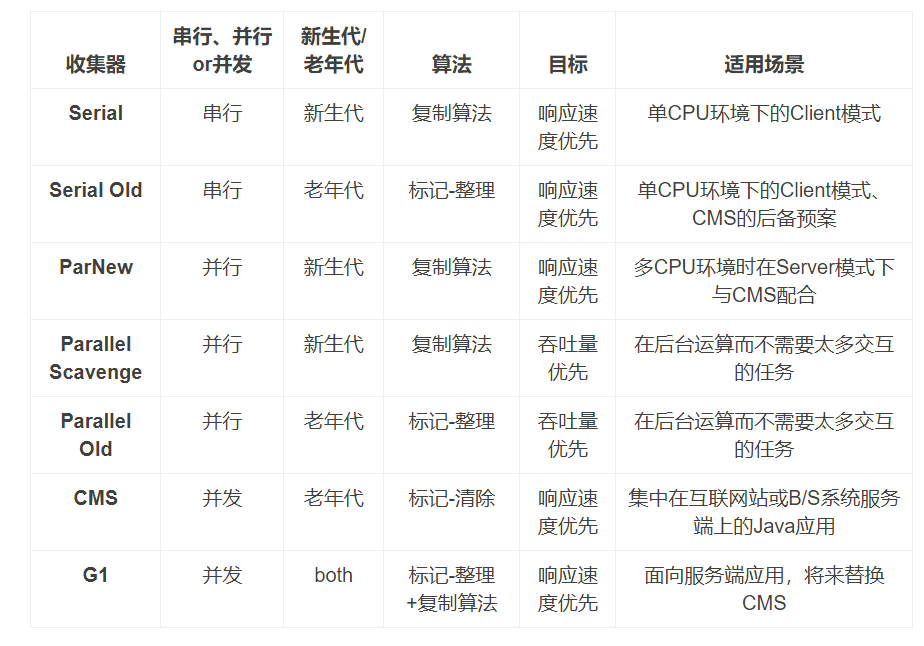
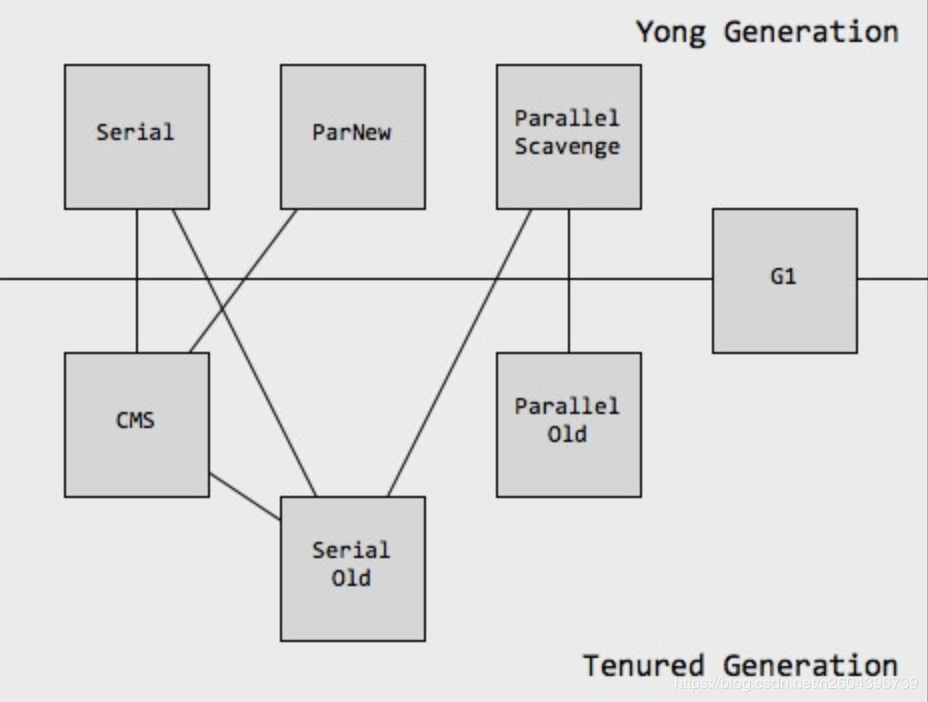
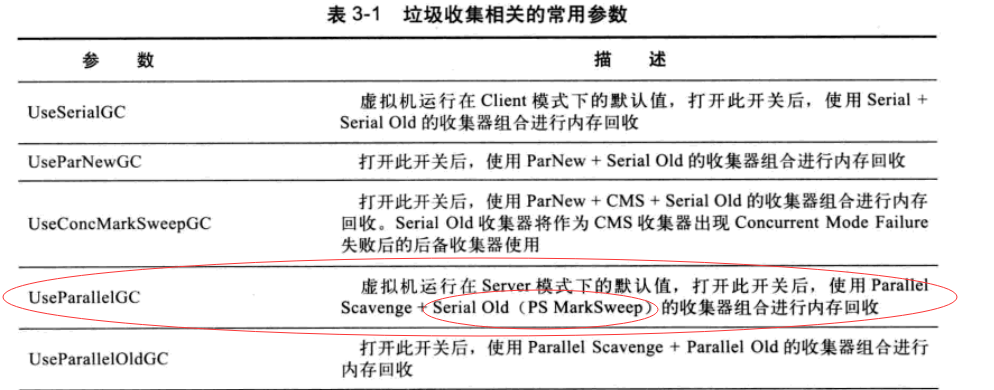
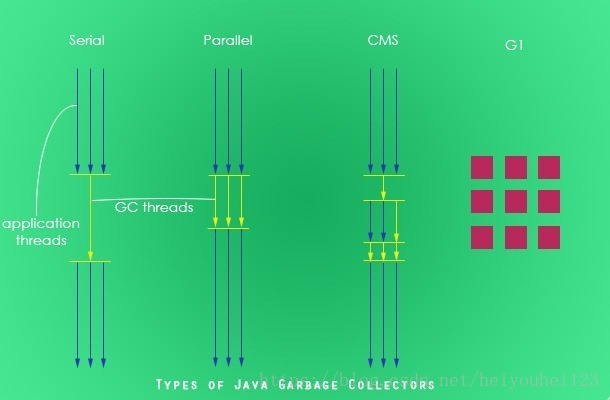
串行收集器:暂停用户线程执行。
默认GC收集器
Default garbage collectors:
- Java 7 - Parallel GC 【新生代用 parallel scavenge 老年代用parallel old】【-XX:+UseParallelGC】
- Java 8 - Parallel GC
- Java 9 - G1 GC 【新老都用G1】
- Java 10 - G1 GC
Default garbage collector for Java 8 - Stack Overflow

parallel scavenge 与parnew 区别
两者都是复制算法,都是并行处理,但是不同的是,paralel scavenge 可以设置最大gc停顿时间(-XX:MaxGCPauseMills)以及gc时间占比(-XX:GCTimeRatio),
Parallel Scavenge收集器为何无法与CMS同时使用?
重点就是Parallel Scavenge没有使用原本HotSpot其它GC通用的那个GC框架,所以不能跟使用了那个框架的CMS搭配使用。
Parallel Scavenge收集器为何无法与CMS同时使用? - 知乎
Minor GC、Young GC、Full GC、Old GC、Major GC、Mixed GC
Full GC 和 Minor GC,傻傻分不清楚 - 简书
针对HotSpot VM的实现,它里面的GC其实准确分类只有两大种:
- Partial GC:并不收集整个GC堆的模式
- Young GC:只收集young gen的GC
- Old GC:只收集old gen的GC。只有CMS的concurrent collection是这个模式
- Mixed GC:收集整个young gen以及部分old gen的GC。只有G1有这个模式
- Full GC:收集整个堆,包括young gen、old gen、perm gen(如果存在的话)等所有部分的模式。
Minor GC ,Full GC 触发条件
Minor GC触发条件:当Eden区满时,触发Minor GC。
Full GC触发条件:
(1)调用System.gc时,系统建议执行Full GC,但是不必然执行
(2)老年代空间不足
(3)方法去空间不足
(4)通过Minor GC后进入老年代的平均大小大于老年代的可用内存
(5)由Eden区、From Space区向To Space区复制时,对象大小大于To Space可用内存,则把该对象转存到老年代,且老年代的可用内存小于该对象大小
CMS
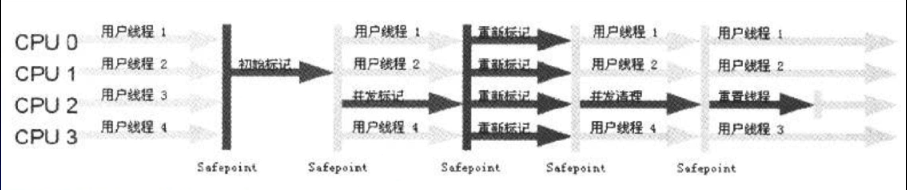
5个阶段,两次stop-the-world
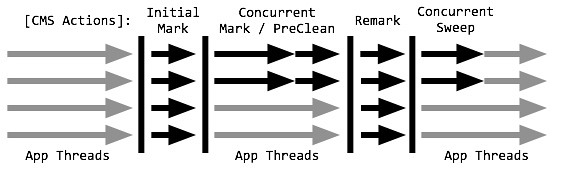
两次stop the word
其中,初始标记、重新标记这两个步骤仍然需要Stop-the-world。
- 初始标记仅仅只是标记一下GC Roots能直接关联到的对象,速度很快,
- 并发标记阶段就是进行GC Roots Tracing的过程,
- 而重新标记阶段则是为了修正并发标记期间因用户程序继续运作而导致标记产生变动的那一部分对象的标记记录,这个阶段的停顿时间一般会比初始阶段稍长一些,但远比并发标记的时间短。
作者:猿人谷
链接:https://juejin.im/post/5dad5621f265da5bab5bda33
来源:掘金
著作权归作者所有。商业转载请联系作者获得授权,非商业转载请注明出处。
图解 CMS 垃圾回收机制原理,-阿里面试题 - aspirant - 博客园
CMS优缺点
优点:stw时间短
缺点:会产生空间碎片。大对象分配会因无法找到连续内存空间而触发FGC
G1
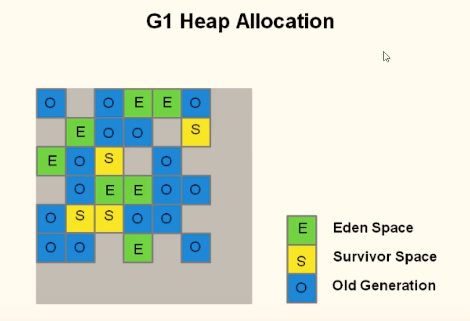

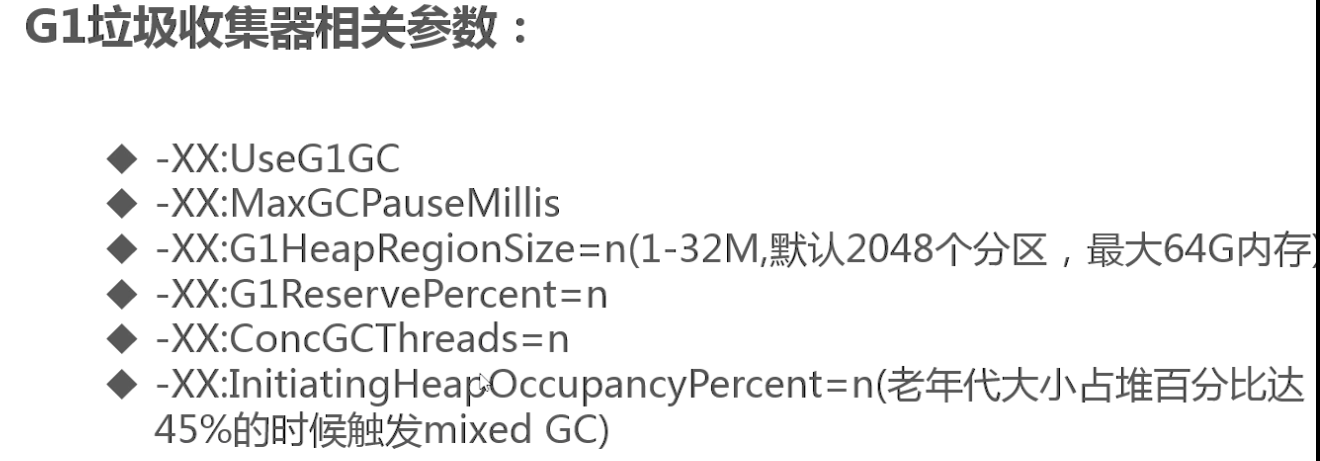
G1 和 CMS比较
-
G1 优点:
- 停顿时间短;
- 用户可以指定最大停顿时间;
- 不会产生内存碎片:G1 的内存布局并不是固定大小以及固定数量的分代区域划分,而是把连续的Java堆划分为多个大小相等的独立区域 (Region),G1 从整体来看是基于“标记-整理”算法实现的收集器,但从局部 (两个Region 之间)上看又是基于“标记-复制”算法实现,不会像 **CMS (“标记-清除”算法) **那样产生内存碎片。
-
G1 缺点:
G1 需要记忆集 (具体来说是卡表)来
记录新生代和老年代之间的引用关系,这种数据结构在 G1 中需要占用大量的内存,可能达到整个堆内存容量的 20% 甚至更多。而且 G1 中维护记忆集的成本较高,带来了更高的执行负载,影响效率。
按照《深入理解Java虚拟机》作者的说法,CMS 在小内存应用上的表现要优于 G1,而大内存应用上 G1 更有优势,大小内存的界限是6GB到8GB。
java - jvm G1垃圾收集器有什么缺点? - SegmentFault 思否
垃圾收集器参数
- -XX:ParallelGCThreads控制GC线程数。
- -XX:MaxTenringThreadhold=5 新生代进入老年代的迭代次数,这个值是上限。CMS默认值6,G1默认值15
GC日志
YoungGC
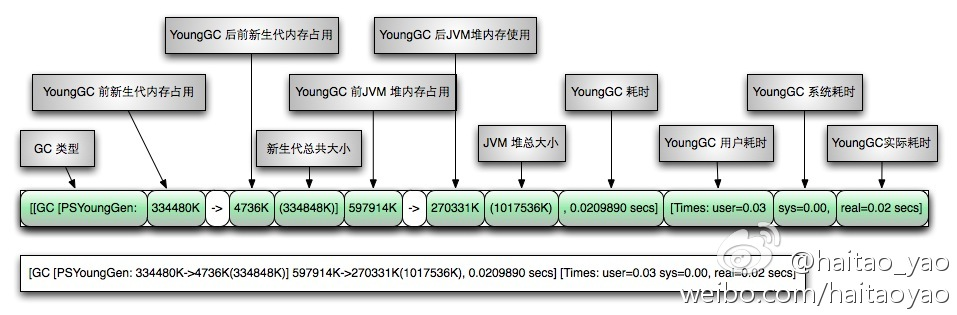
FullGC
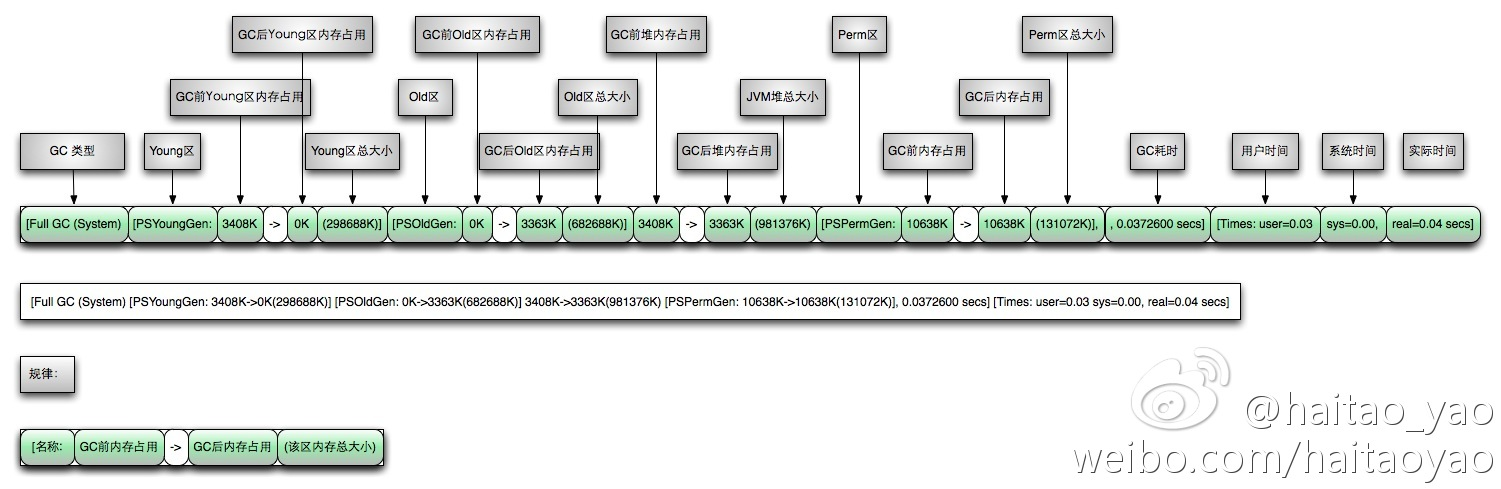
Java8 将永久代溢出HotSpot JVM,
PermGen 最终被移除,方法区移至 Metaspace,字符串常量移至 Java Heap。
本地内存剩余多少,理论上Metaspace就可以有多大
- -XX:MetaspaceSize 是分配给类元数据空间(以字节计)的初始大小(Oracle逻辑存储上的初始高水位,the initial high-water-mark ),此值为估计值。MetaspaceSize的值设置的过大会延长垃圾回收时间。垃圾回收过后,引起下一次垃圾回收的类元数据空间的大小可能会变大。
- -XX:MaxMetaspaceSize 是分配给类元数据空间的最大值,超过此值就会触发Full GC,此值默认没有限制,但应取决于系统内存的大小。JVM会动态地改变此值。
- -XX:MinMetaspaceFreeRatio 表示一次GC以后,为了避免增加元数据空间的大小,空闲的类元数据的容量的最小比例,不够就会导致垃圾回收。
- -XX:MaxMetaspaceFreeRatio 表示一次GC以后,为了避免增加元数据空间的大小,空闲的类元数据的容量的最大比例,不够就会导致垃圾回收。
JVM GC日志 参数
-XX:+PrintGC
-XX:+PrintGCDetails
-XX:+PrintGCDateStamps
-Xloggc:C:\Users\ligj\Downloads\gc.log
-XX:+PrintGC 与 -verbose:gc 是一样的,可以认为-verbose:gc 是 -XX:+PrintGC的别名.-XX:+PrintGCDetails 在启动脚本可以自动开启-XX:+PrintGC , 如果在命令行使用jinfo开启的话,不会自动开启-XX:+PrintGC
jvm 堆日志信息
打印堆日志
-Xlog:gc+heap=debug
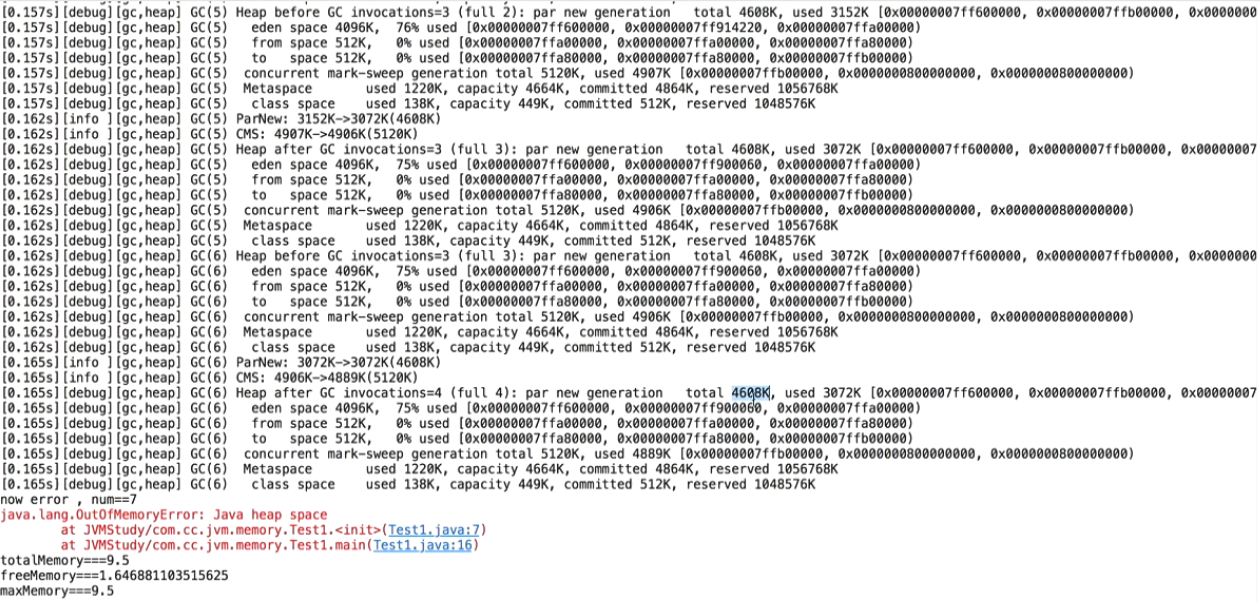
Metaspace中的used,capacity,committed,reserved
【好文】GC日志中,Metaspace的committed和reserved含义_G-CSDN博客_metaspace committed
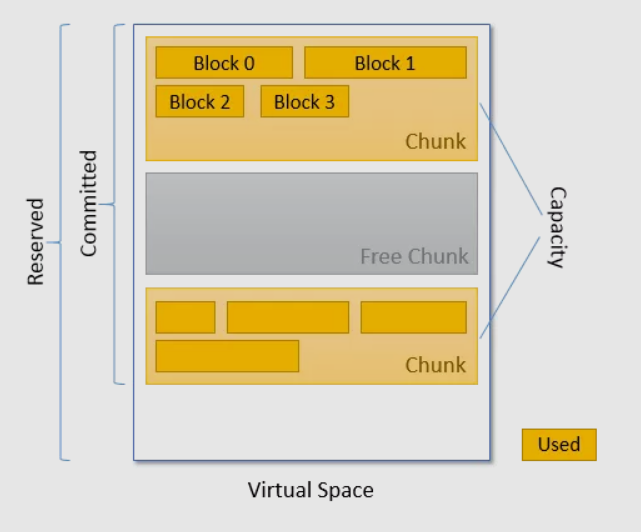
reserved:元数据的保留空间
committed:提交过的空间,以前分配过的空间
capacity:按chunk计算的空间。
used:因为chunk不会100%使用,chunk中实际使用的空间。
SpringBoot参数绑定异常总结
.png)
ModelAttributeMethodProcessor
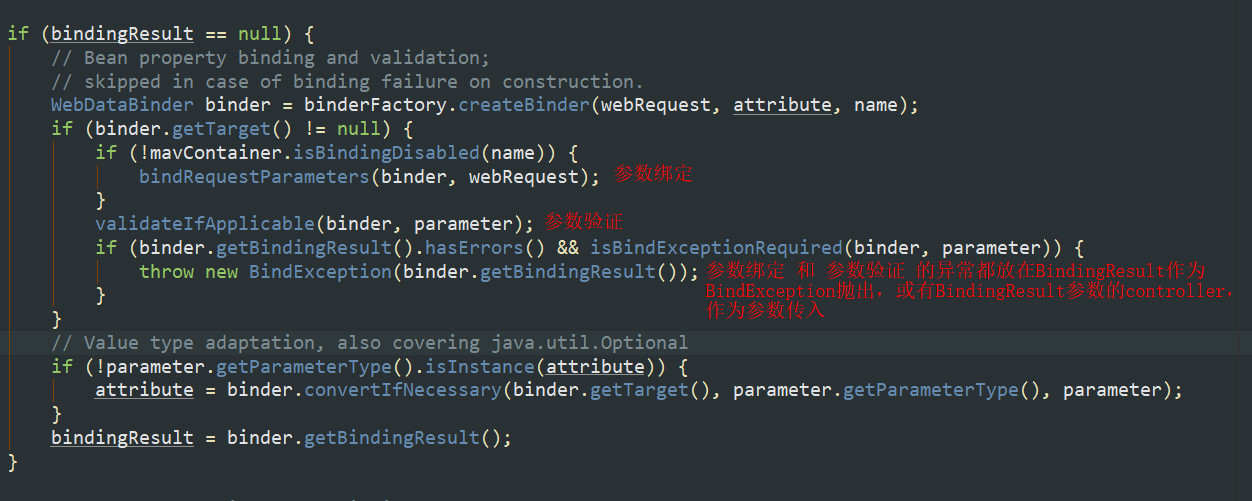
RequestResponseBodyMethodProcessor
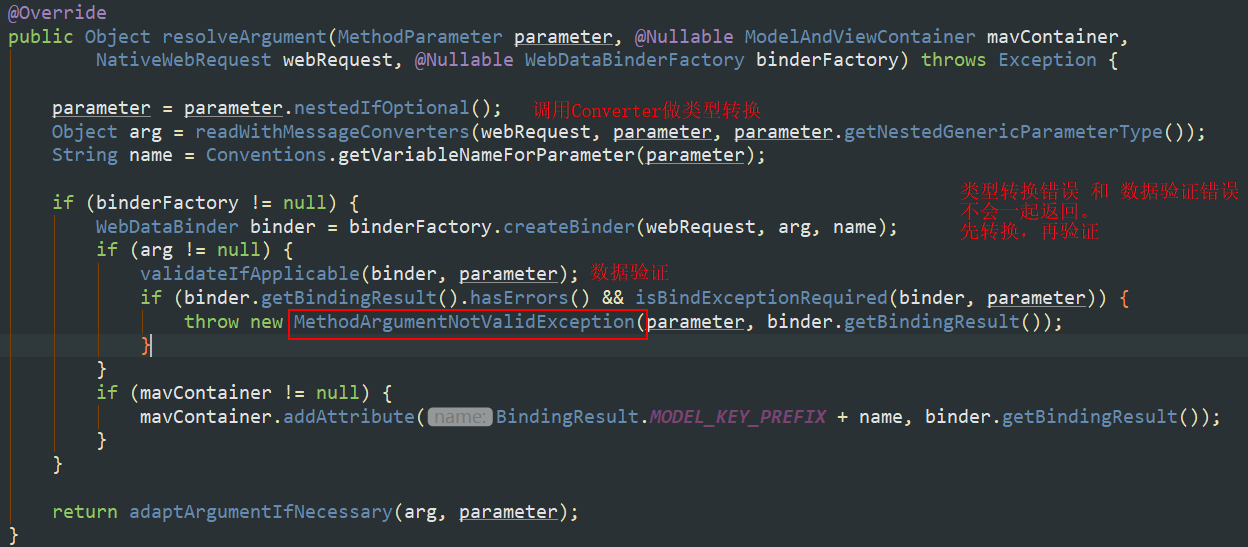
synchronized原理
synchronized原理
Jvm中对象实例布局
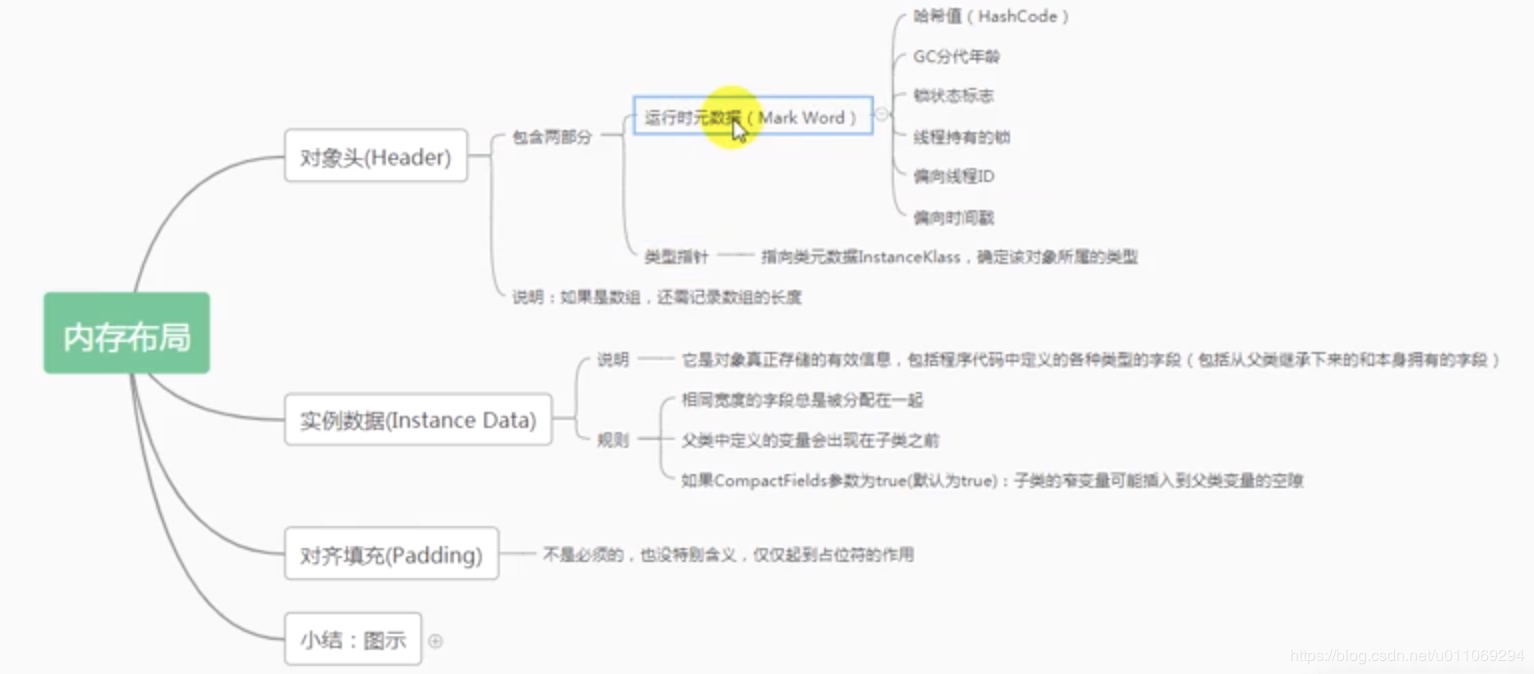

46.对象的内存布局(对象头、实例数据、对齐填充)和对象的访问定位(句柄访问和直接指针)_simpleGq的专栏-CSDN博客_对象头实例数据和对象填充
java 对象头
- Mark word
- 指向类的指针
- 数组长度
MarkWord 64位:
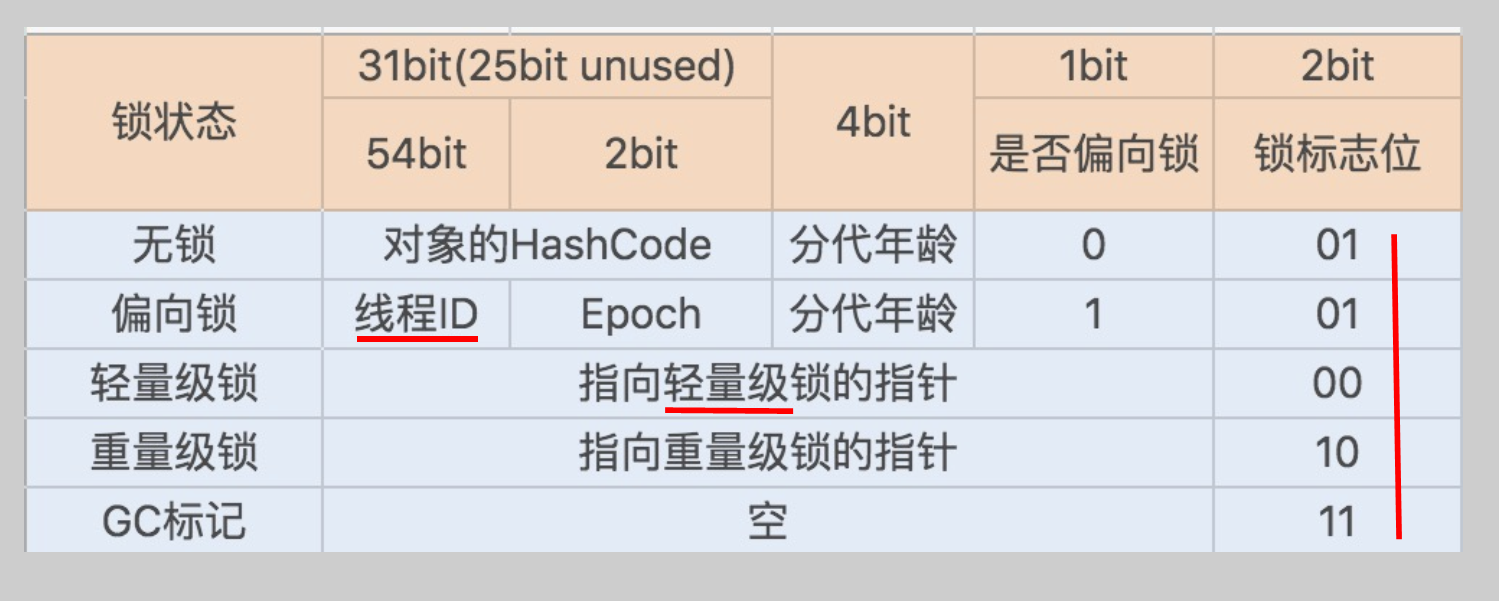
重量级锁指针指向的就是monitor对象。
偏向锁
解决无竞争下锁的效率。
说白了就是置个变量【检查mark word】,如果发现为true则无需再走各种加锁/解锁流程
通过-XX:-UseBiasedLocking来禁用偏向锁(默认打开)

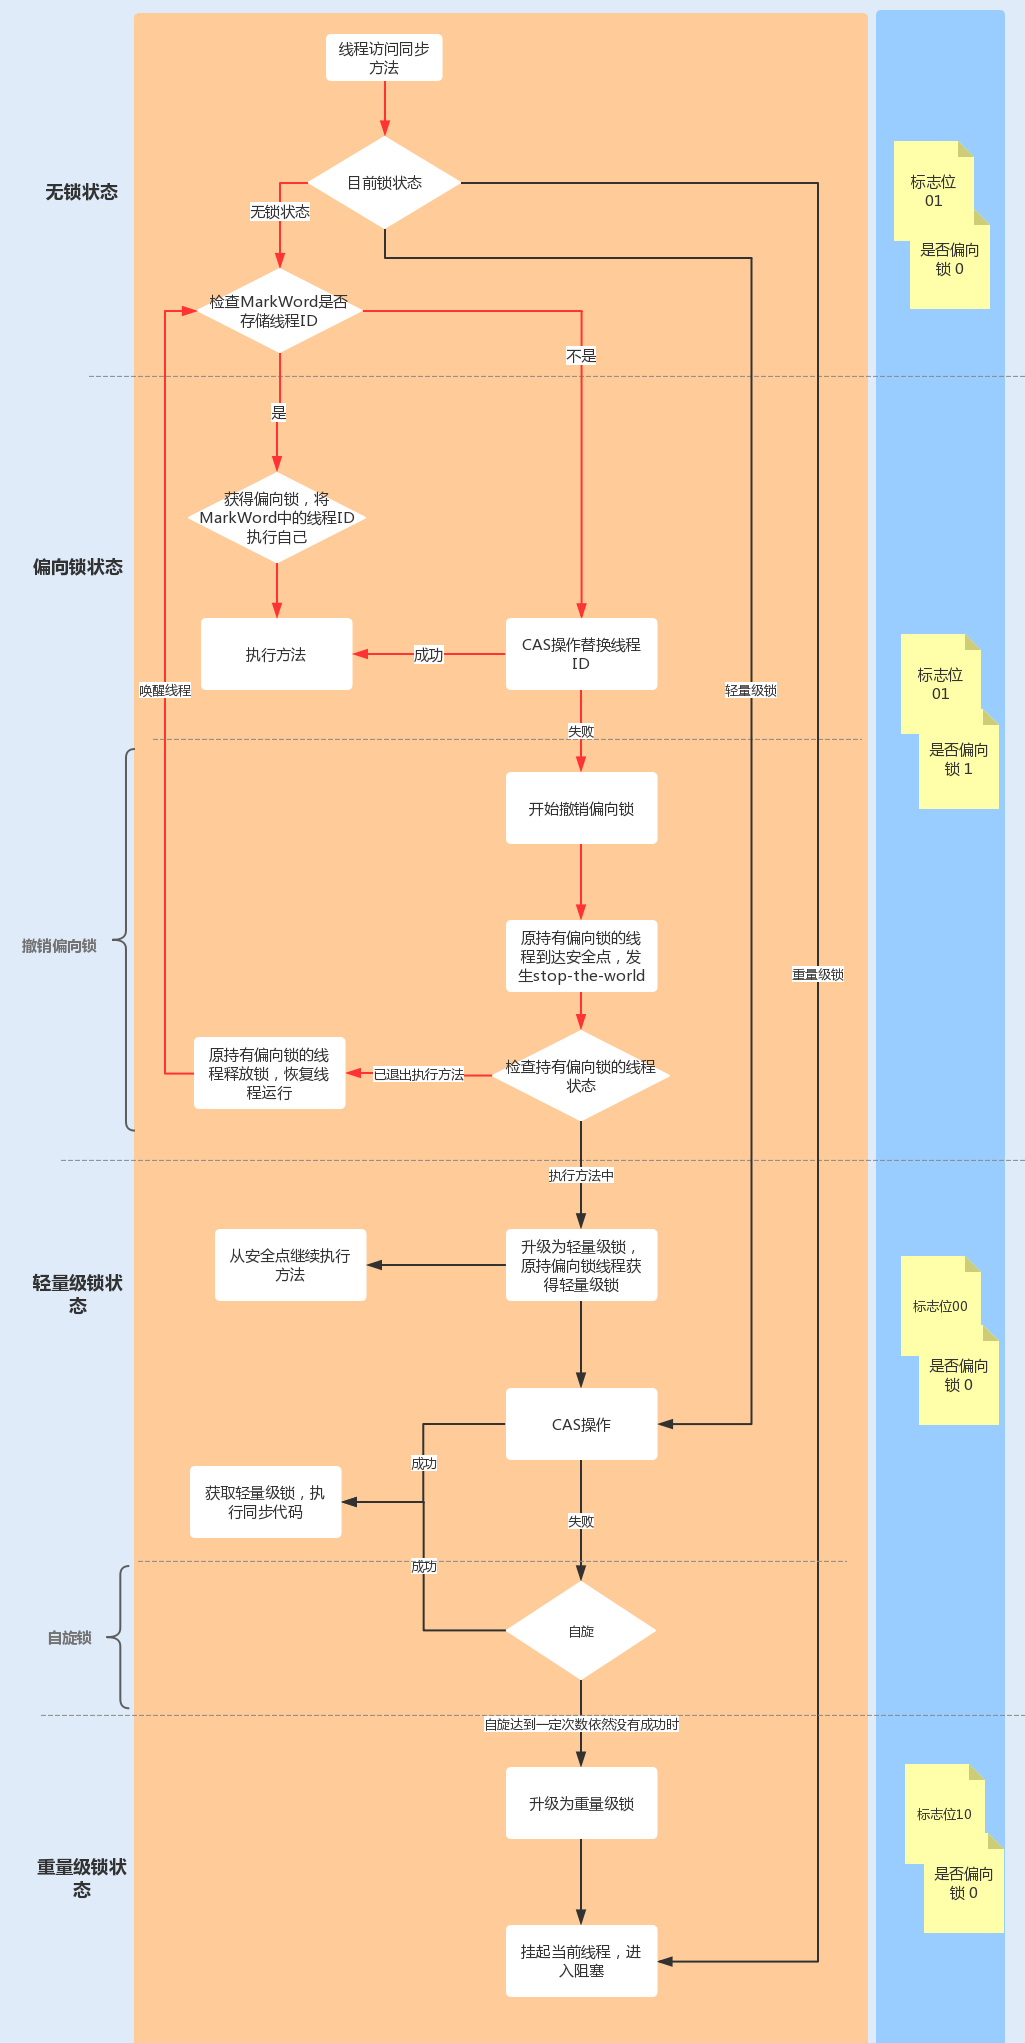
轻量级锁
当有竞争,jvm将对象偏向锁升级为轻量级锁,原来持有偏向锁的对象继续持有轻量级锁。
这里的轻量级锁就是一种自旋锁。
短时间的忙等,换取线程在用户态和内核态之间切换的开销。
-XX:-UseSpinning //关闭自旋锁
-XX:PreBlockSpin //修改默认自旋次数,jdk1.7之后没有了。
重量级锁
如果锁竞争情况严重,某个达到最大自旋次数的线程,会将轻量级锁升级为重量级锁
当后续线程尝试获取锁时,发现被占用的锁是重量级锁,则直接将自己挂起(而不是忙等)
Monitor对象
重量级锁指针指向的就是monitor对象。
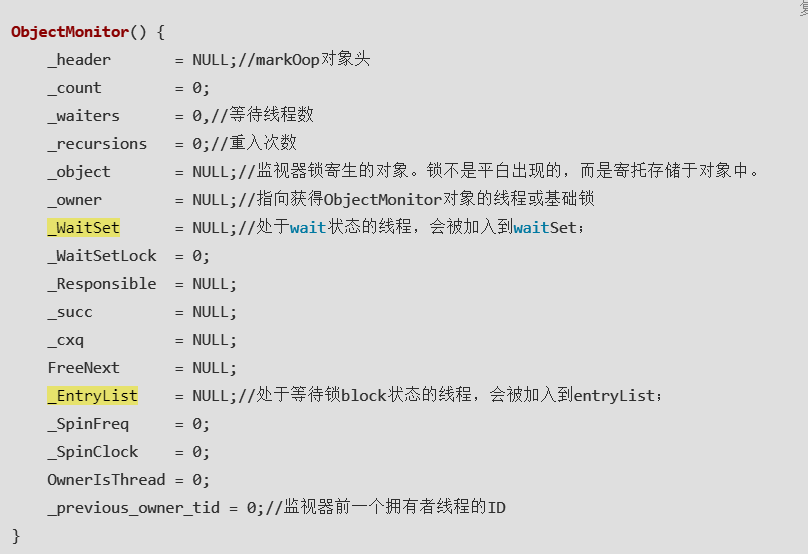
阻塞线程先进入 EntryList。
获取锁后,修改owner。
调用obj.wait()后,进入WaitSet。
synchronized 和 lock的区别
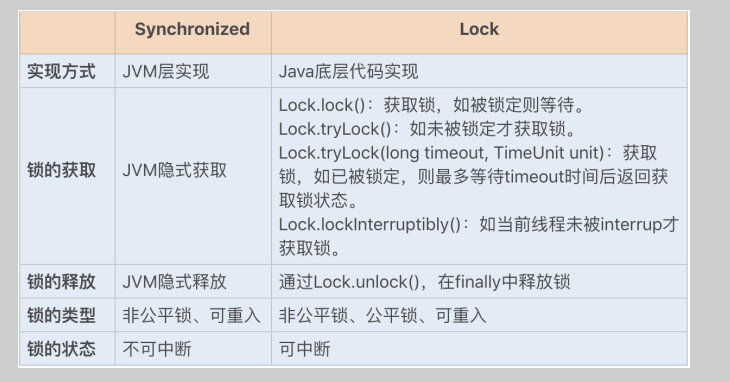
synchronized效率高
lock功能多:读写锁,可相应中断,可以trylock,公平锁(因为aqs中的chl队列)
MySQL数据库索引结构&文件结构
MySQL数据库索引结构&文件结构
MyISAM 索引实现
MyISAM的数据库文件分为一个索引文件、一个数据文件
-
.frm文件存储表定义;
-
·MYD (MYData)文件存储表的数据;
-
.MYI (MYIndex)文件存储表的索引。
注意每行记录的大小是不一定的,每行起始地址也是没有规律的。
Innodb索引实现
Innodb索引在数据文件中。
叶节点data域保存了完整的数据记录,这种索引叫做聚集索引。
所以Innodb必须有主键,MyISAM索引和数据不在一起,所以不必须有主键。
Innodb文件:.frm,.ibd文件 (独立表空间)或者ibdata1文件【这不是后缀,是文件名】(共享表空间,虽然独立表空间也存在该文件)
辅助索引需要检索两遍索引:首先检索辅助索引获得主键,然后用主键到主索引中检索获得记录。
独立表空间 & 共享表空间
ibdata1里保存了哪些东西,为什么会变得越来越大呢,ibdata1是InnoDB的共有表空间,默认情况下会把表空间存放在一个文件ibdata1中,会造成这个文件越来越大。发现问题所在之后,解决方法就是,使用独享表空间,将表空间分别单独存放。MySQL开启独享表空间的参数是Innodb_file_per_table,会为每个Innodb表创建一个.ibd的文件。
开启独享表空间后,并不是说就不需要ibdata1了,因为在ibdata1中还保存着下面这些数据。
- InnoDB表的元数据
- Buffer
- UNDO日志
解决方法就是,使用独享表空间,将表空间分别单独存放。MySQL开启独享表空间的参数是Innodb_file_per_table,会为每个Innodb表创建一个.ibd的文件。
show variables like `innodb_file_per_table`;
独立表空间可以
optimize table两种表空间的优点缺点
推荐使用独立表空间。因为可以回收表空间。
MySQL 5.6.6 之后默认 innodb_file_per_table = on
delete 命令 删除整个表。所有数据页都标记为可复用。磁盘文件大小不变。
插入数据,也会产生空洞。
如何收缩表空间?
innodb按页为单位存储。
delete 命令是不能回收表空间的,磁盘占用大小不变,但“空洞”可以复用。
alter table A engine =InnoDB 命令重建表
MySQL 5.6 引入 Online DDL
推荐使用 开源的gh-ost来做在线表重建。
字符串常量池 & String.intern()
字符串常量池 & String.intern()
问:下面程序的输出是什么?
public static void main(String[] args) {
String s = new String("1");
s.intern();
String s2 = "1";
System.out.println(s == s2);
String s3 = new String("1") + new String("1");
s3.intern();
String s4 = "11";
System.out.println(s3 == s4);
}答案:
jdk1.6 : false false
jdk1.6+: false true
String s = new Stirng(“a”);
s.intern();
- JDK6:当调用intern()方法时,如果字符串常量池先前已创建出该字符串对象,则返回池中的该字符串的引用。否则,将此字符串对象添加到字符串常量池中,并且返回该字符串的引用。
- JDK6+:当调用intern()方法时,如果字符串常量池先前已创建出该字符串对象,则返回池中的该字符串的引用。否则,如果该字符串对象已经存在于Java堆中,则将堆中此对象的引用添加到字符串常量池中,并且返回该引用;如果堆中不存在,则在池中创建该字符串并返回其引用。
注:在JDK1.6的时候,字符串常量池是存放在Perm Space中的(Perm Space和堆是相隔而开的),在1.6+的时候,移到了堆内存中
jdk6+ 和 jdk6的区别就是当s已经在堆中创建了,当常量池中没有字符串时,intern()方法不会再在运行时常量池中创建新的字符串对象,而是直接借用s对象的引用。
public static void main(String[] args) {
//步骤解析,
// 1. 先根据"1"在常量池中创建String(1)字符串对象,
// 2. 再根据new String在堆中创建String(1)。
// 创建了两个对象,一个在堆中,一个在常量池中(虽然java6之后常量池也在堆中)。
String s = new String("1");
//intern 如果常量池中没有s则放s到常量池,返回s引用。如果有则返回常量池中对象的引用。
String s_pool = s.intern();
//“1”回去常量池中取
String s2_pool = "1";
System.out.println(s == s2_pool); //一个在堆中,一个在常量池中,false
System.out.println(s_pool == s2_pool); //两个都是池中对象,true
//往池中放“1”
String s3 = new String("1") + new String("1");
//因为池中没有“11”,往池中放“11”->s3的引用。从池中获取"11"对象就返回堆中11的对象。
String s3_pool = s3.intern();
//获取池中11
String s4_pool = "11";
//池中堆中都是一个对象
System.out.println(s3 == s4_pool); //true
System.out.println(s3_pool == s3); //true
}字符串常量池 和 运行时常量池 的关系
在JDK1.7之前运行时常量池逻辑包含字符串常量池存放在方法区, 此时hotspot虚拟机对方法区的实现为永久代
在JDK1.7 字符串常量池被从方法区拿到了堆中, 这里没有提到运行时常量池,也就是说字符串常量池被单独拿到堆,运行时常量池剩下的东西还在方法区, 也就是hotspot中的永久代
在JDK1.8 hotspot移除了永久代用元空间(Metaspace)取而代之, 这时候字符串常量池还在堆, 运行时常量池还在方法区, 只不过方法区的实现从永久代变成了元空间(Metaspace)
运行时常量池时在方法区的
运行时常量池内容:
其中的字符串还要引用 字符串常量池中对象。
ThreadPoolExecutor执行过程分析
目录
ThreadPoolExecutor
public ThreadPoolExecutor(int corePoolSize,
int maximumPoolSize,
long keepAliveTime,
TimeUnit unit,
BlockingQueue<Runnable> workQueue,
ThreadFactory threadFactory,
RejectedExecutionHandler handler)- corePoolSize:线程池核心线程数(平时保留的线程数)
- maximumPoolSize:线程池最大线程数(当workQueue都放不下时,启动新线程,最大线程数)
- keepAliveTime:超出corePoolSize数量的线程的保留时间。
- unit:keepAliveTime单位
- workQueue:阻塞队列,存放来不及执行的线程
- ArrayBlockingQueue:构造函数一定要传大小
- LinkedBlockingQueue:构造函数不传大小会默认为65536(Integer.MAX_VALUE ),当大量请求任务时,容易造成 内存耗尽。
- SynchronousQueue:同步队列,一个没有存储空间的阻塞队列 ,将任务同步交付给工作线程。
- PriorityBlockingQueue : 优先队列
- threadFactory:线程工厂
- handler:饱和策略
- AbortPolicy(默认):直接抛弃
- CallerRunsPolicy:用调用者的线程执行任务
- DiscardOldestPolicy:抛弃队列中最久的任务
- DiscardPolicy:抛弃当前任务
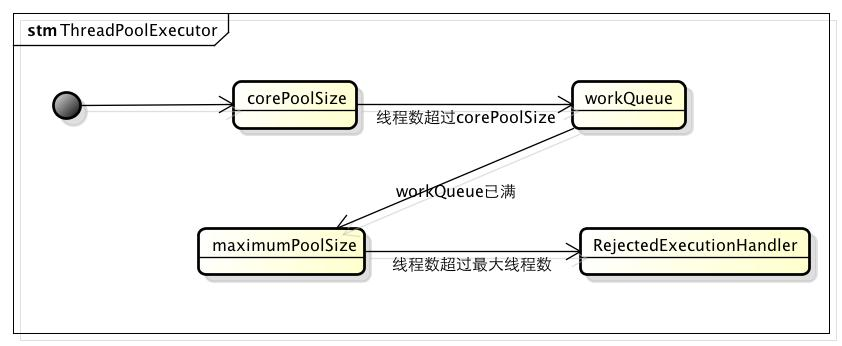
ThreadPoolExecutor 测试代码
//test.java
volatile int finishState = 0;
@Test
public void test4() throws InterruptedException, ExecutionException {
ThreadPoolExecutor threadPoolExecutor = new ThreadPoolExecutor(3, 7, 10, TimeUnit.SECONDS, new LinkedBlockingDeque<>(10));
ExecutorCompletionService<String> executorCompletionService = new ExecutorCompletionService(threadPoolExecutor);
Runnable runnable = new Runnable() {
@Override
public void run() {
for (int i = 0; i < 50; i++) {
String name = "name_" + i;
TestCallable testCallable = new TestCallable(name);
try {
executorCompletionService.submit(testCallable);
synchronized (lock) {
System.out.print("+++添加任务 name: " + name);
System.out.print(" ActiveCount: " + threadPoolExecutor.getActiveCount());
System.out.print(" poolSize: " + threadPoolExecutor.getPoolSize());
System.out.print(" queueSize: " + threadPoolExecutor.getQueue().size());
System.out.println(" taskCount: " + threadPoolExecutor.getTaskCount());
}
} catch (RejectedExecutionException e) {
synchronized (lock) {
System.out.println("拒绝:" + name);
}
}
try {
Thread.sleep(200);
} catch (InterruptedException e) {
e.printStackTrace();
}
}
finishState = 1;
}
};
Thread addThread = new Thread(runnable);
addThread.start();
//System.out.println(" taskCount: " + threadPoolExecutor.getTaskCount());
//添加的任务有被抛弃的。taskCount不一定等于添加的任务。
int completeCount = 0;
while (!(completeCount == threadPoolExecutor.getTaskCount() && finishState == 1)) {
Future<String> take = executorCompletionService.take();
String taskName = take.get();
synchronized (lock) {
System.out.print("---完成任务 name: " + taskName);
System.out.print(" ActiveCount: " + threadPoolExecutor.getActiveCount());
System.out.print(" poolSize: " + threadPoolExecutor.getPoolSize());
System.out.print(" queueSize: " + threadPoolExecutor.getQueue().size());
System.out.print(" taskCount: " + threadPoolExecutor.getTaskCount());
System.out.println(" finishTask:" + (++completeCount));
}
}
addThread.join();
while (threadPoolExecutor.getPoolSize() > 0) {
Thread.sleep(1000);
synchronized (lock) {
SimpleDateFormat simpleDateFormat = new SimpleDateFormat("HH:mm:ss");
System.out.print(simpleDateFormat.format(new Date()));
//System.out.print("name: " + taskName);
System.out.print(" ActiveCount: " + threadPoolExecutor.getActiveCount());
System.out.print(" poolSize: " + threadPoolExecutor.getPoolSize());
System.out.print(" queueSize: " + threadPoolExecutor.getQueue().size());
System.out.println(" taskCount: " + threadPoolExecutor.getTaskCount());
}
}
// Tell threads to finish off.
threadPoolExecutor.shutdown();
// Wait for everything to finish.
while (!threadPoolExecutor.awaitTermination(10, TimeUnit.SECONDS)) {
System.out.println("complete");
}
}//TestCallable.java
public class TestCallable implements Callable<String>{
private String name;
public TestCallable(String name) {
this.name = name;
}
@Override
public String call() throws Exception {
try {
Thread.sleep(2000);
} catch (InterruptedException e) {
e.printStackTrace();
}
return this.name;
}
}执行结果分析
+++添加任务 name: name_0 ActiveCount: 1 poolSize: 1 queueSize: 0 taskCount: 1
+++添加任务 name: name_1 ActiveCount: 2 poolSize: 2 queueSize: 0 taskCount: 2
+++添加任务 name: name_2 ActiveCount: 3 poolSize: 3 queueSize: 0 taskCount: 3
//corePoolSize=3,所以poolSize逐渐加到3.
+++添加任务 name: name_3 ActiveCount: 3 poolSize: 3 queueSize: 1 taskCount: 4
+++添加任务 name: name_4 ActiveCount: 3 poolSize: 3 queueSize: 2 taskCount: 5
+++添加任务 name: name_5 ActiveCount: 3 poolSize: 3 queueSize: 3 taskCount: 6
+++添加任务 name: name_6 ActiveCount: 3 poolSize: 3 queueSize: 4 taskCount: 7
+++添加任务 name: name_7 ActiveCount: 3 poolSize: 3 queueSize: 5 taskCount: 8
+++添加任务 name: name_8 ActiveCount: 3 poolSize: 3 queueSize: 6 taskCount: 9
+++添加任务 name: name_9 ActiveCount: 3 poolSize: 3 queueSize: 7 taskCount: 10
---完成任务 name: name_0 ActiveCount: 3 poolSize: 3 queueSize: 6 taskCount: 10 finishTask:1
+++添加任务 name: name_10 ActiveCount: 3 poolSize: 3 queueSize: 7 taskCount: 11
---完成任务 name: name_1 ActiveCount: 3 poolSize: 3 queueSize: 6 taskCount: 11 finishTask:2
+++添加任务 name: name_11 ActiveCount: 3 poolSize: 3 queueSize: 7 taskCount: 12
---完成任务 name: name_2 ActiveCount: 3 poolSize: 3 queueSize: 6 taskCount: 12 finishTask:3
+++添加任务 name: name_12 ActiveCount: 3 poolSize: 3 queueSize: 7 taskCount: 13
+++添加任务 name: name_13 ActiveCount: 3 poolSize: 3 queueSize: 8 taskCount: 14
+++添加任务 name: name_14 ActiveCount: 3 poolSize: 3 queueSize: 9 taskCount: 15
+++添加任务 name: name_15 ActiveCount: 3 poolSize: 3 queueSize: 10 taskCount: 16
//因为任务队列为:new LinkedBlockingDeque<>(10),core线程不够用时,将任务添加到队列中。
//queueSize到10,队列已满。开始增加poolSize,加到maximumPoolSize=7
+++添加任务 name: name_16 ActiveCount: 4 poolSize: 4 queueSize: 10 taskCount: 17
+++添加任务 name: name_17 ActiveCount: 5 poolSize: 5 queueSize: 10 taskCount: 18
+++添加任务 name: name_18 ActiveCount: 6 poolSize: 6 queueSize: 10 taskCount: 19
+++添加任务 name: name_19 ActiveCount: 7 poolSize: 7 queueSize: 10 taskCount: 20
---完成任务 name: name_3 ActiveCount: 7 poolSize: 7 queueSize: 9 taskCount: 20 finishTask:4
+++添加任务 name: name_20 ActiveCount: 7 poolSize: 7 queueSize: 10 taskCount: 21
---完成任务 name: name_4 ActiveCount: 7 poolSize: 7 queueSize: 9 taskCount: 21 finishTask:5
+++添加任务 name: name_21 ActiveCount: 7 poolSize: 7 queueSize: 10 taskCount: 22
---完成任务 name: name_5 ActiveCount: 7 poolSize: 7 queueSize: 9 taskCount: 22 finishTask:6
+++添加任务 name: name_22 ActiveCount: 7 poolSize: 7 queueSize: 10 taskCount: 23
//poolSize=maximumPoolSize,queueSize=10,都满了。执行饱和策略。默认AbortPolicy抛弃新任务。
拒绝:name_23
拒绝:name_24
拒绝:name_25
---完成任务 name: name_16 ActiveCount: 7 poolSize: 7 queueSize: 10 taskCount: 23 finishTask:7
+++添加任务 name: name_26 ActiveCount: 7 poolSize: 7 queueSize: 10 taskCount: 24
---完成任务 name: name_17 ActiveCount: 7 poolSize: 7 queueSize: 9 taskCount: 24 finishTask:8
+++添加任务 name: name_27 ActiveCount: 7 poolSize: 7 queueSize: 10 taskCount: 25
---完成任务 name: name_18 ActiveCount: 7 poolSize: 7 queueSize: 9 taskCount: 25 finishTask:9
+++添加任务 name: name_28 ActiveCount: 7 poolSize: 7 queueSize: 10 taskCount: 26
---完成任务 name: name_19 ActiveCount: 7 poolSize: 7 queueSize: 9 taskCount: 26 finishTask:10
+++添加任务 name: name_29 ActiveCount: 7 poolSize: 7 queueSize: 10 taskCount: 27
---完成任务 name: name_6 ActiveCount: 7 poolSize: 7 queueSize: 9 taskCount: 27 finishTask:11
+++添加任务 name: name_30 ActiveCount: 7 poolSize: 7 queueSize: 10 taskCount: 28
---完成任务 name: name_7 ActiveCount: 7 poolSize: 7 queueSize: 9 taskCount: 28 finishTask:12
+++添加任务 name: name_31 ActiveCount: 7 poolSize: 7 queueSize: 10 taskCount: 29
---完成任务 name: name_8 ActiveCount: 7 poolSize: 7 queueSize: 9 taskCount: 29 finishTask:13
+++添加任务 name: name_32 ActiveCount: 7 poolSize: 7 queueSize: 10 taskCount: 30
拒绝:name_33
拒绝:name_34
拒绝:name_35
---完成任务 name: name_9 ActiveCount: 7 poolSize: 7 queueSize: 9 taskCount: 30 finishTask:14
+++添加任务 name: name_36 ActiveCount: 7 poolSize: 7 queueSize: 10 taskCount: 31
---完成任务 name: name_10 ActiveCount: 7 poolSize: 7 queueSize: 9 taskCount: 31 finishTask:15
+++添加任务 name: name_37 ActiveCount: 7 poolSize: 7 queueSize: 10 taskCount: 32
---完成任务 name: name_11 ActiveCount: 7 poolSize: 7 queueSize: 9 taskCount: 32 finishTask:16
+++添加任务 name: name_38 ActiveCount: 7 poolSize: 7 queueSize: 10 taskCount: 33
---完成任务 name: name_12 ActiveCount: 7 poolSize: 7 queueSize: 9 taskCount: 33 finishTask:17
+++添加任务 name: name_39 ActiveCount: 7 poolSize: 7 queueSize: 10 taskCount: 34
---完成任务 name: name_13 ActiveCount: 7 poolSize: 7 queueSize: 9 taskCount: 34 finishTask:18
+++添加任务 name: name_40 ActiveCount: 7 poolSize: 7 queueSize: 10 taskCount: 35
---完成任务 name: name_14 ActiveCount: 7 poolSize: 7 queueSize: 9 taskCount: 35 finishTask:19
+++添加任务 name: name_41 ActiveCount: 7 poolSize: 7 queueSize: 10 taskCount: 36
---完成任务 name: name_15 ActiveCount: 7 poolSize: 7 queueSize: 9 taskCount: 36 finishTask:20
+++添加任务 name: name_42 ActiveCount: 7 poolSize: 7 queueSize: 10 taskCount: 37
拒绝:name_43
拒绝:name_44
拒绝:name_45
---完成任务 name: name_20 ActiveCount: 7 poolSize: 7 queueSize: 9 taskCount: 37 finishTask:21
+++添加任务 name: name_46 ActiveCount: 7 poolSize: 7 queueSize: 10 taskCount: 38
---完成任务 name: name_21 ActiveCount: 7 poolSize: 7 queueSize: 9 taskCount: 38 finishTask:22
+++添加任务 name: name_47 ActiveCount: 7 poolSize: 7 queueSize: 10 taskCount: 39
---完成任务 name: name_22 ActiveCount: 7 poolSize: 7 queueSize: 9 taskCount: 39 finishTask:23
//消费速度大于添加速度,poolSize并不减少,先把queue中的任务逐一执行完成。
+++添加任务 name: name_48 ActiveCount: 7 poolSize: 7 queueSize: 10 taskCount: 40
---完成任务 name: name_26 ActiveCount: 7 poolSize: 7 queueSize: 9 taskCount: 40 finishTask:24
---完成任务 name: name_27 ActiveCount: 7 poolSize: 7 queueSize: 8 taskCount: 40 finishTask:25
+++添加任务 name: name_49 ActiveCount: 7 poolSize: 7 queueSize: 9 taskCount: 41
---完成任务 name: name_28 ActiveCount: 7 poolSize: 7 queueSize: 8 taskCount: 41 finishTask:26
---完成任务 name: name_29 ActiveCount: 7 poolSize: 7 queueSize: 7 taskCount: 41 finishTask:27
---完成任务 name: name_30 ActiveCount: 7 poolSize: 7 queueSize: 6 taskCount: 41 finishTask:28
---完成任务 name: name_31 ActiveCount: 7 poolSize: 7 queueSize: 5 taskCount: 41 finishTask:29
---完成任务 name: name_32 ActiveCount: 7 poolSize: 7 queueSize: 4 taskCount: 41 finishTask:30
---完成任务 name: name_36 ActiveCount: 7 poolSize: 7 queueSize: 3 taskCount: 41 finishTask:31
---完成任务 name: name_37 ActiveCount: 7 poolSize: 7 queueSize: 2 taskCount: 41 finishTask:32
---完成任务 name: name_38 ActiveCount: 7 poolSize: 7 queueSize: 1 taskCount: 41 finishTask:33
---完成任务 name: name_39 ActiveCount: 7 poolSize: 7 queueSize: 0 taskCount: 41 finishTask:34
//ActiveCount开始减少。
---完成任务 name: name_40 ActiveCount: 6 poolSize: 7 queueSize: 0 taskCount: 41 finishTask:35
---完成任务 name: name_41 ActiveCount: 5 poolSize: 7 queueSize: 0 taskCount: 41 finishTask:36
---完成任务 name: name_42 ActiveCount: 4 poolSize: 7 queueSize: 0 taskCount: 41 finishTask:37
---完成任务 name: name_46 ActiveCount: 3 poolSize: 7 queueSize: 0 taskCount: 41 finishTask:38
---完成任务 name: name_47 ActiveCount: 2 poolSize: 7 queueSize: 0 taskCount: 41 finishTask:39
---完成任务 name: name_48 ActiveCount: 1 poolSize: 7 queueSize: 0 taskCount: 41 finishTask:40
---完成任务 name: name_49 ActiveCount: 0 poolSize: 7 queueSize: 0 taskCount: 41 finishTask:41
22:47:49 ActiveCount: 0 poolSize: 7 queueSize: 0 taskCount: 41
22:47:50 ActiveCount: 0 poolSize: 7 queueSize: 0 taskCount: 41
22:47:51 ActiveCount: 0 poolSize: 7 queueSize: 0 taskCount: 41
22:47:52 ActiveCount: 0 poolSize: 7 queueSize: 0 taskCount: 41
22:47:53 ActiveCount: 0 poolSize: 7 queueSize: 0 taskCount: 41
22:47:54 ActiveCount: 0 poolSize: 7 queueSize: 0 taskCount: 41
22:47:55 ActiveCount: 0 poolSize: 7 queueSize: 0 taskCount: 41
22:47:56 ActiveCount: 0 poolSize: 7 queueSize: 0 taskCount: 41
22:47:57 ActiveCount: 0 poolSize: 5 queueSize: 0 taskCount: 41
//由于keepAliveTime=10,大概10s后poolSize恢复为corePoolSize。
22:47:58 ActiveCount: 0 poolSize: 3 queueSize: 0 taskCount: 41
22:47:59 ActiveCount: 0 poolSize: 3 queueSize: 0 taskCount: 41
22:48:00 ActiveCount: 0 poolSize: 3 queueSize: 0 taskCount: 41注意
《阿里巴巴java开发手册》
线程池不使用 Executors 去创建,而是通过 ThreadPoolExecutor 的方式,这样 的处理方式让写的同学更加明确线程池的运行规则,规避资源耗尽的风险。
说明: Executors 返回的线程池对象的弊端如下:
- FixedThreadPool 和 SingleThreadPool : 允许的请求队列长度为 Integer.MAX_VALUE ,可能会堆积大量的请求,从而导致 OOM 。
- CachedThreadPool 和 ScheduledThreadPool : 允许的创建线程数量为 Integer.MAX_VALUE ,可能会创建大量的线程,从而导致 OOM 。
Reference
拦截器中处理@ResponseBody返回的response对象?
拦截器中处理@responsebody返回的response对象?
如果是@responsebody handler返回的response,在interceptor中无法再对response进行操作。
其response.isCommitted() == true
因为@responsebody是由HttpMessageConverter处理请求,写出到response,并设置为committed。
Specifically, the
@ResponseBodyis written and committed byServletHandlerMethodInvokerbeforeHandlerInterceptor.postHandleis called. I would have expected the order to be similar to if I had omitted the@ResponseBodyand used aMarshallingViewinstead, i.e.
HandlerInterceptor.preHandle- (handler is invoked)
HandlerInterceptor.postHandle- (response is written)
HandlerInterceptor.afterCompletionWith
@ResponseBody, the 3rd and 4th steps are reversed.
源码解析
返回值被HandlerMethodReturnValueHandler(RequestResponseBodyMethodProcessor)处理
RequestResponseBodyMethodProcessor#handleReturnValue
然后交给HttpMessageConverter处理
((HttpMessageConverter) converter).write(outputValue, selectedMediaType, outputMessage);在HttpMessageConverter中
AbstractHttpMessageConverter#write
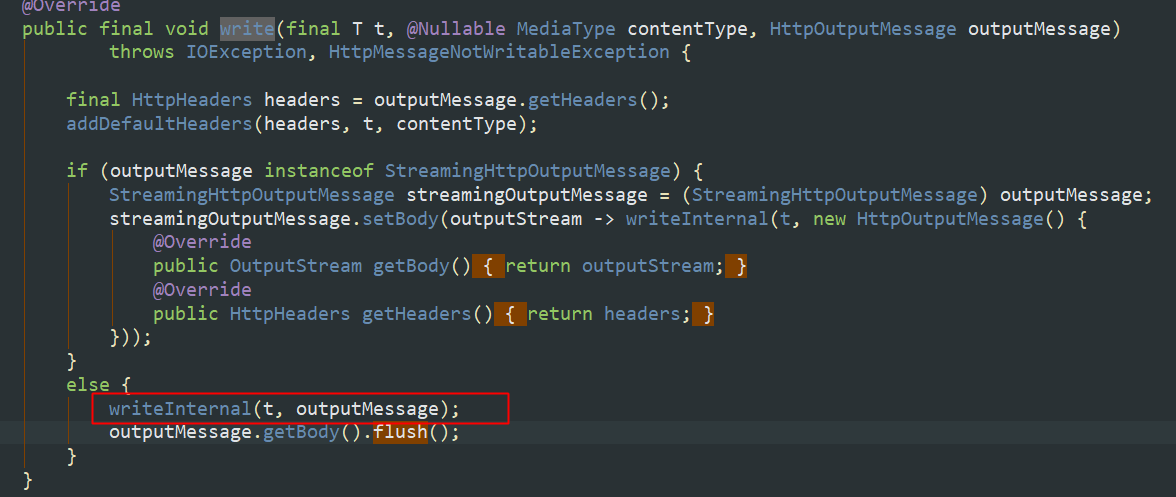
在writeInternal中,将HttpMessageConverter将response设置为了isCommitted。
跨域总结
跨域总结
参考 -> CORS 简单请求+预检请求(彻底理解跨域) · Issue #62 · amandakelake/blog
为什么要限制跨域?
为了防止恶意网站获取用户在其他网站上的信息。
如果不限制,恶意网站通过ajax访问银行余额页面。解析返回的html就能拿到用户余额。
没有限制请求,限制的是获取信息。
所以form表单可以跨域,而ajax不能跨域。
form只是提交不获取返回结果,ajax要获取结果。
发生跨域的条件
- 浏览器限制
- 发出的请求跨域
- XHR请求
解决方法
针对上面三个条件的解决方法
-
浏览器限制
可以修改浏览器设置,但是无意义,不能修改所有用户的浏览器设置。
-
发出的请求跨域
- 修改被调用方(返回头,让浏览器支持跨域)
- 修改调用方(代理服务器转发?)
-
XHR请求
JSON
1. JSONP
返回js代码,发出的请求时script
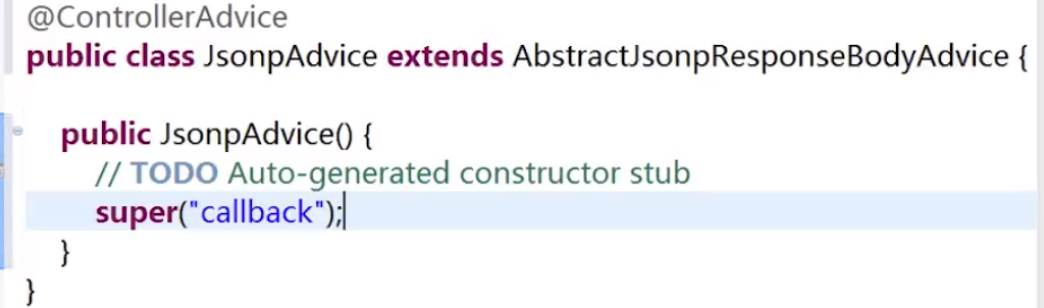
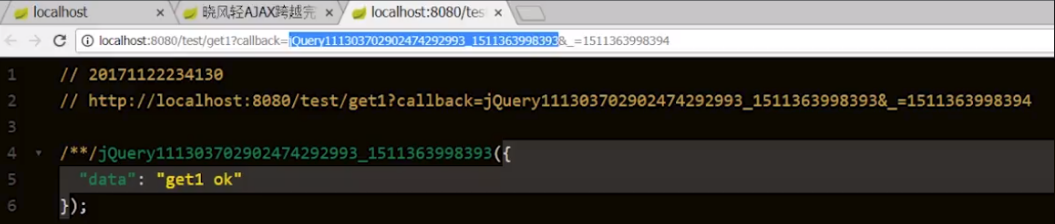
AbstractJsonpResponseBodyAdvice 已经过期,推荐使用CORS
Will be removed as of Spring Framework 5.1, use CORS instead.
将callback值作为函数名返回。"_"参数防止被缓存。
jsonp只支持get请求。
2. 被调用方解决
响应头增加字段,告诉浏览器允许跨域。
2.1 服务器端实现
2.1.1 Filter 解决方案
跨域请求,请求头增加了origin 字段
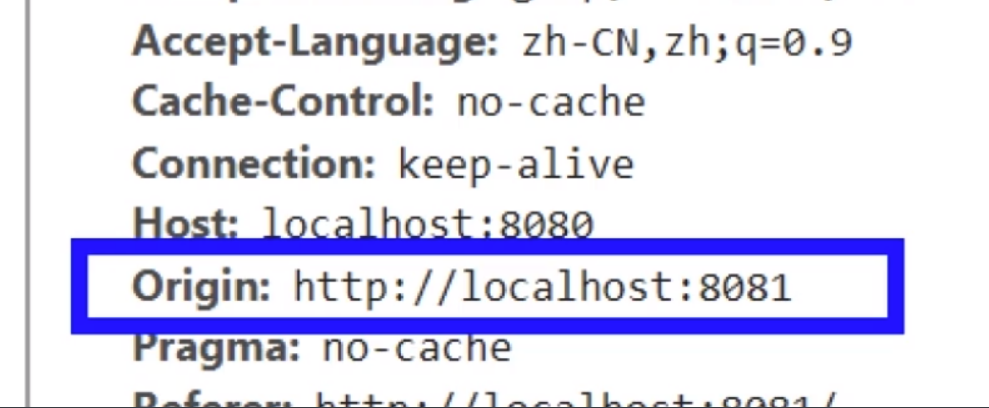
编写filter 增加response 字段

2.1.1.1 简单请求&非简单请求
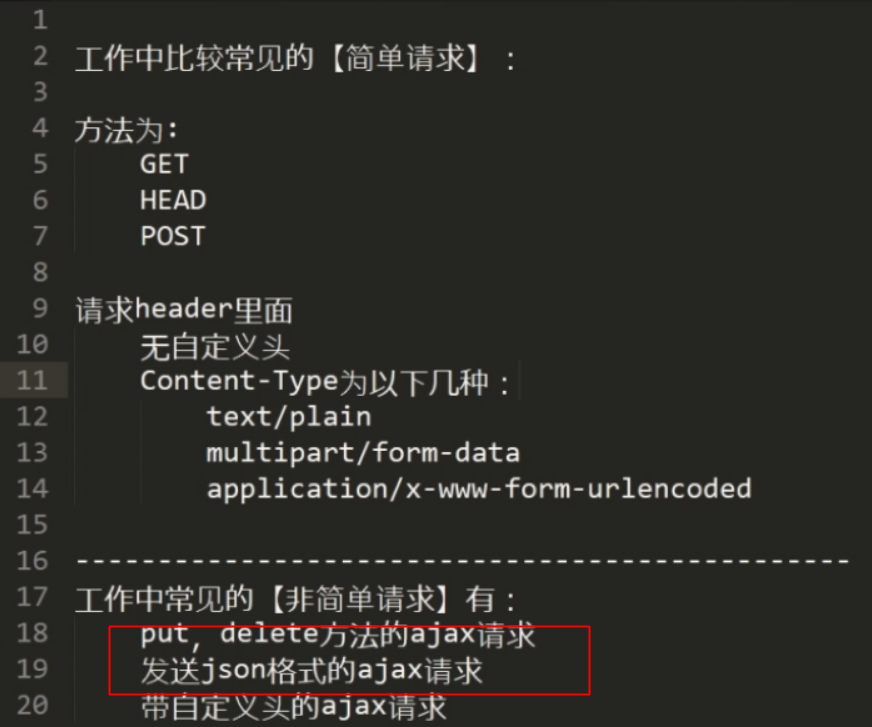
非简单请求的预检命令
非简单请求,会有“预检命令”

预检命令会发送 content-type method,看服务器是否支持此类型跨域。
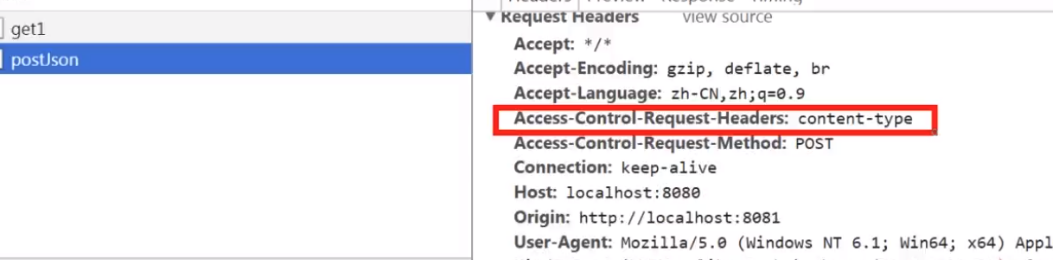
预检命令缓存
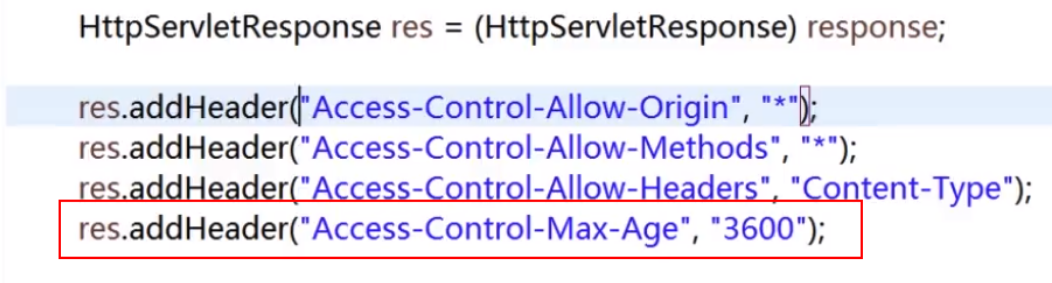
2.1.1.2带cookie的跨域
- 当代cookie 时,Acces-Control-Allow-Origin 不能为* 号
- 增加Access-Control-Allow-Credentials:3600
问题:Acces-Control-Allow-Origin 不能为* 那其他跨域怎么办呢?
可以在filter中 获取request的origin字段,然后设置到response的Acces-Control-Allow-Origin 。
2.2 nginx配置
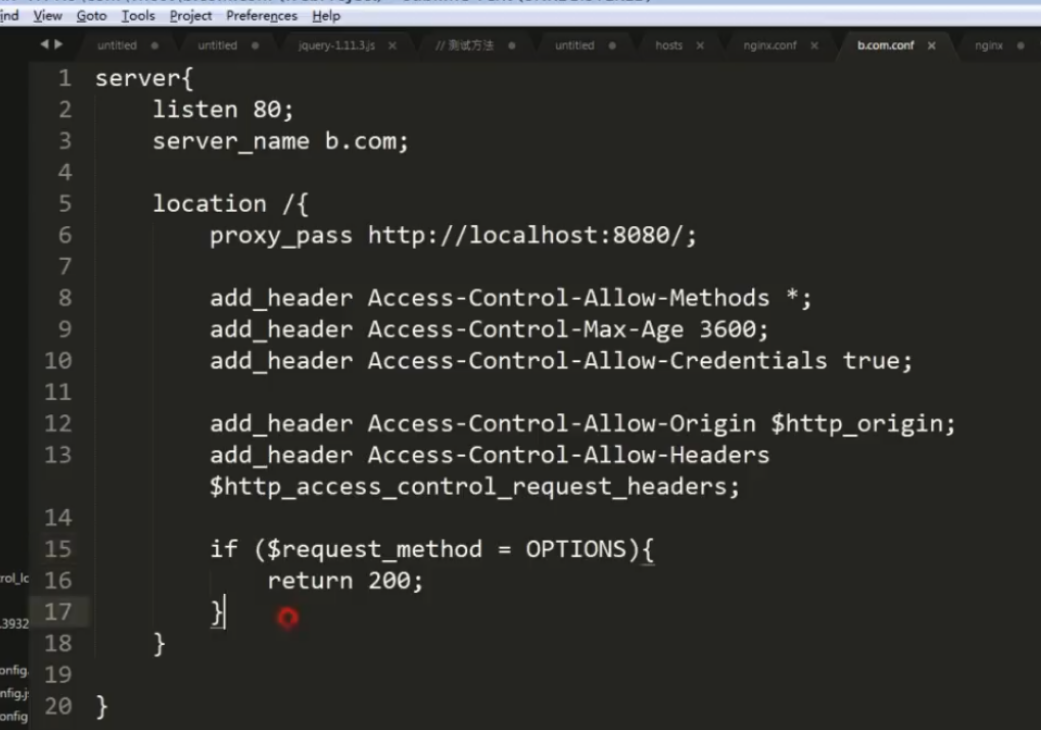
- 包括增加 响应头、
- 将origin和自定义header返回
- 处理预检命令OPTIONS
2.3 apache配置
略
2.4 spring 框架解决方案
@crossorigin
@crossorigin(origins = "http://domain2.com", maxAge = 3600)
3 调用方 解决方案
代理服务器
浏览器有跨域限制,服务器没有跨域一说。
浏览器请求到同域名的自己的nginx,ng转发到远程服务器。
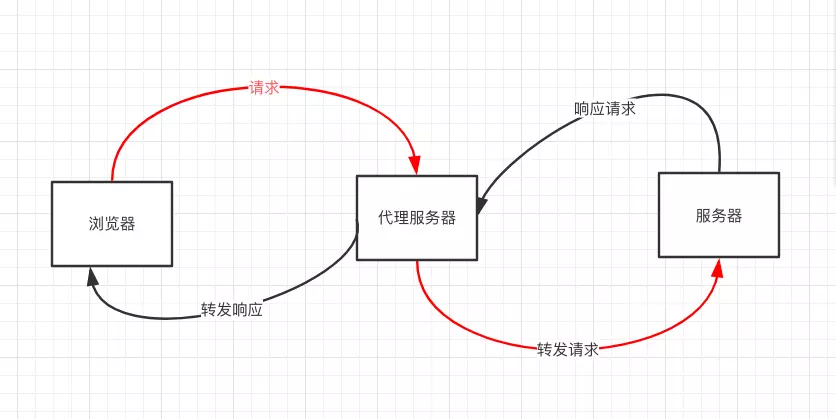
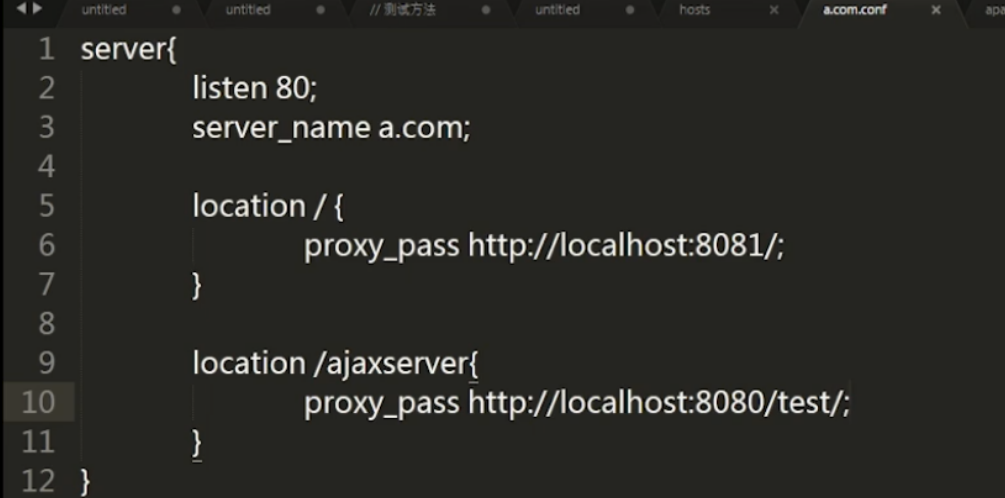
SpringBoot自动配置总结:实例理解SpringBoot如何自定义配置的
概览
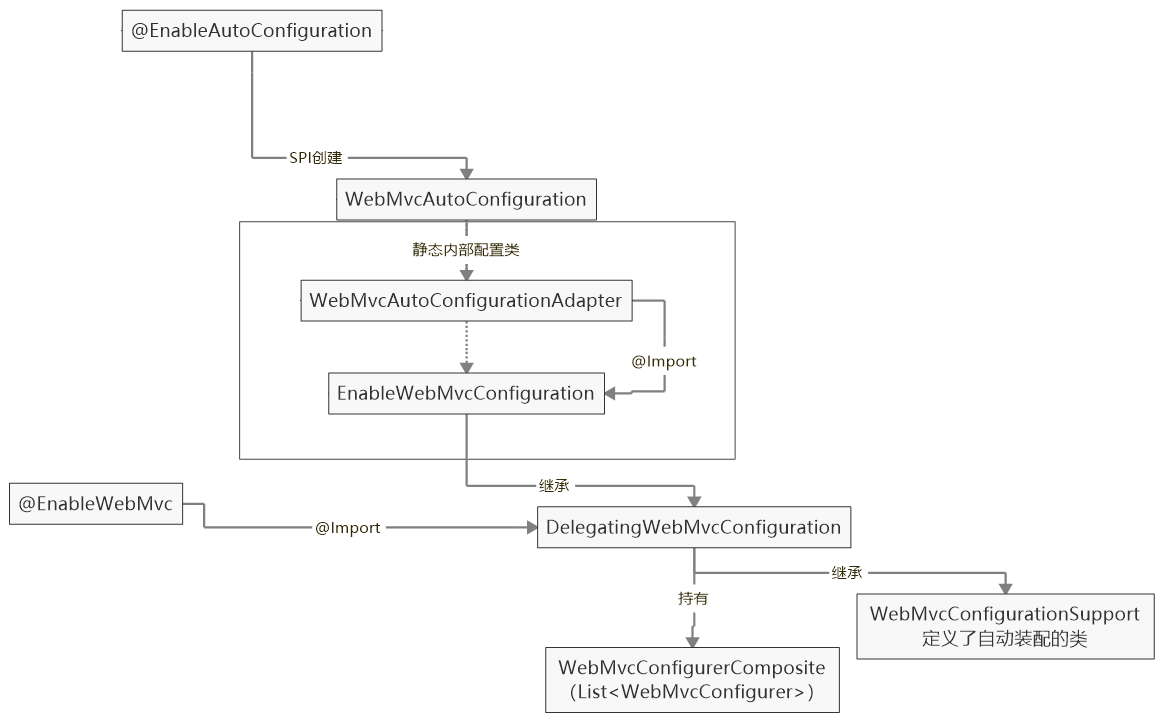
@EnableAutoConfiguration
WebMvcAutoConfiguration
@Configuration
@ConditionalOnWebApplication(type = Type.SERVLET)
@ConditionalOnClass({ Servlet.class, DispatcherServlet.class, WebMvcConfigurer.class })
@ConditionalOnMissingBean(WebMvcConfigurationSupport.class)
@AutoConfigureOrder(Ordered.HIGHEST_PRECEDENCE + 10)
@AutoConfigureAfter({ DispatcherServletAutoConfiguration.class,
ValidationAutoConfiguration.class })
public class WebMvcAutoConfiguration {如果已经定义了WebMvcConfigurationSupport,那就不启用自动配置了。
无论是使用@EnableWebMvc还是扩展WebMvcConfigurationSupport类,spring都会创建一个WebMvcConfigurationSupport的类,进而屏蔽掉自动装配类WebMvcAutoConfiguration。
两个静态内部类
- WebMvcAutoConfigurationAdapter
- EnableWebMvcConfiguration
为什么要分开??
WebMvcAutoConfigurationAdapter
是WebMvcAutoConfiguration的静态内部配置类
WebMvcAutoConfigurationAdapter 通过 @import(EnableWebMvcConfiguration.class)
加载了EnableWebMvcConfiguration
EnableWebMvcConfiguration
是静态内部配置类WebMvcAutoConfigurationAdapter的注解加载类@import(EnableWebMvcConfiguration.class)
class EnableWebMvcConfiguration extends DelegatingWebMvcConfiguration
DelegatingWebMvcConfiguration extends WebMvcConfigurationSupport
WebMvcConfigurationSupport
WebMvcConfigurationSupport 自动为我们定义了常用的webMvc组件。
配置了
- RequestMappingHandlerMapping
- RequestMappingHandlerAdapter
- FormattingConversionService
- Validator
- HandlerExceptionResolver
- 等等
DelegatingWebMvcConfiguration
@Configuration
public class DelegatingWebMvcConfiguration extends WebMvcConfigurationSupport {
private final WebMvcConfigurerComposite configurers = new WebMvcConfigurerComposite();
//使用@Autowired,在构造时,自动将容器中定义的WebMvcConfigurer都囊括进来。
@Autowired(required = false)
public void setConfigurers(List < WebMvcConfigurer > configurers) {
if (!CollectionUtils.isEmpty(configurers)) {
this.configurers.addWebMvcConfigurers(configurers);
}
}
@Override
protected void addInterceptors(InterceptorRegistry registry) {
this.configurers.addInterceptors(registry);
}
}DelegatingWebMvcConfiguration 中有一个容器,其中包含List delegates。为什么要包含多个WebMvcConfigurer呢?
因为WebMvcConfigurer就是为了方便我们自己配置组件,而不去破坏WebMvcConfigurationSupport中系统定义的组件。(如果我们配置的不生效,还有系统配置的兜底)。
针对不同应用配置不同的组件。就像当初将各个类别(Mysql,dubbo,MQ)配置到不同的xml中一样。
WebMvcConfigurer
原来是 extends WebMvcConfigurerAdapter
WebMvcConfigurerAdapter implements WebMvcConfigurer
现在是 implements WebMvcConfigurer
因为接口有了default方法,不需要Adapter了。
WebMvcConfigurerAdapter
@EnableWebMvc
@Import(DelegatingWebMvcConfiguration.class)
public @interface EnableWebMvc {}和EnableWebMvcConfiguration的功能相同,自动添加了一些组件。所以有了@EnableAutoConfiguration就不需要@EnableWebMvc了。可看做是@EnableAutoConfiguration的一个子集?
实例理解SpringBoot如何自定义配置的
我们怎么添加组件的呢?
以添加Interceptor为例
首先我们自定义配置类
//@component
@Configuration
public class CustomConfig implements WebMvcConfigurer {
//实现方法
/**
* 增加对rest api鉴权的spring mvc拦截器
*/
@Override
public void addInterceptors(InterceptorRegistry registry) {
registry.addInterceptor(new RestApiInteceptor()).addPathPatterns("/gunsApi/**");
}
}我们定义的CustomConfig作为一个 WebMvcConfigurer在DelegatingWebMvcConfiguration类创建的时候通过@Autowired纳入configurers中。
我们使用了@EnableAutoConfiguration。
@EnableAutoConfiguration 通过@import(AutoConfigurationImportSelector.class),加载AutoConfigurationImportSelector。
AutoConfigurationImportSelector.selectImports()中通过SPI(SpringFactoriesLoader)从配置文件spring.factories中获取要加载的类。
其中有WebMvcAutoConfiguration。
WebMvcAutoConfiguration是个配置类,其中还有其静态内部类EnableWebMvcConfiguration。
EnableWebMvcConfiguration extends DelegatingWebMvcConfiguration
DelegatingWebMvcConfiguration extends WebMvcConfigurationSupport
在EnableWebMvcConfiguration中有配置Bean,RequestMappingHandlerMapping。
@Bean
@Primary
@Override
public RequestMappingHandlerMapping requestMappingHandlerMapping() {
// Must be @Primary for MvcUriComponentsBuilder to work
return super.requestMappingHandlerMapping();
}调用父类WebMvcConfigurationSupport的方法
在WebMvcConfigurationSupport中:
@Bean
public RequestMappingHandlerMapping requestMappingHandlerMapping() {
RequestMappingHandlerMapping mapping = createRequestMappingHandlerMapping();
mapping.setOrder(0);
//获取配置的Interceptor
mapping.setInterceptors(getInterceptors());
mapping.setContentNegotiationManager(mvcContentNegotiationManager());
mapping.setCorsConfigurations(getCorsConfigurations());
...
return mapping;
}
protected final Object[] getInterceptors() {
if (this.interceptors == null) {
InterceptorRegistry registry = new InterceptorRegistry();
//模版方法,在DelegatingWebMvcConfiguration中实现。
addInterceptors(registry);
registry.addInterceptor(new ConversionServiceExposingInterceptor(mvcConversionService()));
registry.addInterceptor(new ResourceUrlProviderExposingInterceptor(mvcResourceUrlProvider()));
this.interceptors = registry.getInterceptors();
}
return this.interceptors.toArray();
}DelegatingWebMvcConfiguration中,将registry传递给每个自定义注册的WebMvcConfigurer。回到开头,我们自定义的CustomConfig将Interceptor赋值到registry中。
@Override
protected void addInterceptors(InterceptorRegistry registry) {
this.configurers.addInterceptors(registry);
}如果想替换掉自带的组件,直接extends WebMvcConfigurationSupport 或 DelegatingWebMvcConfiguration
@Configuration
@ComponentScan(basePackageClasses = { MyConfiguration.class })
public class MyConfiguration extends WebMvcConfigurationSupport {
@Override
public void addFormatters(FormatterRegistry formatterRegistry) {
formatterRegistry.addConverter(new MyConverter());
}
@Bean
public RequestMappingHandlerAdapter requestMappingHandlerAdapter() {
// Create or delegate to "super" to create and
// customize properties of RequestMappingHandlerAdapter
}
}字符编码
目录
ASCII 编码
ASCII占用8位(bit)。8个bit可以表示256个字符。
ASCII码只规定了128个字符的编码。
ASCII码的问题是字符太少,不能满足世界各国的需要。所以各国其他编码利用剩余的128个字符定义各自不同的编码。
GB2312 & GBK
汉字GB2312 使用两个字节(16位),最多表示65536个字符。
一个小于127的字符的意义与原来相同,但两个大于127的字符连在一起时,就表示一个汉字,前面的一个字节(他称之为高字节)从0xA1用到0xF7,后面一个字节(低字节)从0xA1到0xFE
gb2312中两个字符组成的编码的字符叫做“全角”字符,而原来在127号以下的那些就叫”半角”字符了
对GB2312扩展就得到了GBK,再扩展得到GB18030(少数民族文字)。
所以,一个字节小于127的编码都按照ASCII码查,大于127的字节+之后的字节(一共两个字节16位)组成汉字的编码。
所以,“一个汉字两个英文字符”就是这么来的。
Unicode
为了统一一种编码,Unicode出现了。
Unicode 目前规划的总空间是17个平面(平面0至16),0x0000 至 0x10FFFF。最前面的65536个字符位,称为基本平面(缩写BMP) 。每个平面有 65536 个码点。
Unicode只规定了每个字符的码点,到底用什么样的字节序表示这个码点,就涉及到编码方法。
最直观的编码方案就是 UTF-32
The characters “U+” are an ASCIIfied version of the MULTISET UNION “⊎” U+228E character (the U-like union symbol with a plus sign inside it), which was meant to symbolize Unicode as the union of character sets. See Kenneth Whistler’s explanation in the Unicode mailing list. (https://stackoverflow.com/questions/1273693/why-is-u-used-to-designate-a-unicode-code-point)
UTF-32
由于Unicode是0x0000 至 0x10FFFF,直接用定长的4个字节来表示对应的字符
U+0000 = 0x0000 0000
U+597D = 0x0000 597D
这样好处是直观,但是太浪费空间了。
为什么不用utf-24呢?都用3个字节表示。
UTF-8
UTF-8是一种变长的编码,从1字节到4字节。
英文字母为1个字节,汉字为3个字节。
Unicode符号范围 | UTF-8编码方式
(十六进制) | (二进制)
—————————————————————–
0000 0000-0000 007F | 0xxxxxxx
0000 0080-0000 07FF | 110xxxxx 10xxxxxx
0000 0800-0000 FFFF | 1110xxxx 10xxxxxx 10xxxxxx
0001 0000-0010 FFFF | 11110xxx 10xxxxxx 10xxxxxx 10xxxxxx
Reference
《Redis深度历险》——原理
目录
- 原理 1:鞭辟入里 —— 线程 IO 模型
- 原理 2:交头接耳 —— 通信协议
- 原理 3:未雨绸缪 —— 持久化
- 原理 4:雷厉风行 —— 管道
- 原理 5:同舟共济 —— 事务
- 原理 6:小道消息 —— PubSub
- 原理 7:开源节流 —— 小对象压缩
- 原理 8:有备无患 —— 主从同步
原理 1:鞭辟入里 —— 线程 IO 模型
Redis 是个单线程程序,除了 Redis 之外,Node.js 也是单线程,Nginx 也是单线程,但是它们都是服务器高性能的典范。
Redis 单线程如何处理那么多的并发客户端连接?
非阻塞IO
非阻塞 IO
事件轮询 (多路复用)
现代操作系统的多路复用 API 已经不再使用select系统调用,而改用epoll(linux)和kqueue(freebsd & macosx),因为 select 系统调用的性能在描述符特别多时性能会非常差。它们使用起来可能在形式上略有差异,但是本质上都是差不多的,都可以使用上面的伪代码逻辑进行理解。
指令队列
客户端的指令通过队列来排队进行顺序处理,先到先服务。
响应队列
Redis 服务器通过响应队列来将指令的返回结果回复给客户端
定时任务
Redis 的定时任务会记录在一个称为最小堆的数据结构中。
Nginx 和 Node 的事件处理原理和 Redis 也是一样的
原理 2:交头接耳 —— 通信协议
Redis 的作者认为数据库系统的瓶颈一般不在于网络流量,而是数据库自身内部逻辑处理上。所以即使 Redis 使用了浪费流量的文本协议,依然可以取得极高的访问性能。Redis 将所有数据都放在内存,用一个单线程对外提供服务,单个节点在跑满一个 CPU 核心的情况下可以达到了 10w/s 的超高 QPS。
RESP(Redis Serialization Protocol)
RESP 是 Redis 序列化协议的简写。它是一种直观的文本协议,优势在于实现异常简单,解析性能极好。
比如一个简单的 set 指令set author codehole会被序列化成下面的字符串。
*3\r\n$3\r\nset\r\n$6\r\nauthor\r\n$8\r\ncodehole\r\n原理 3:未雨绸缪 —— 持久化
Redis 的持久化机制有两种,第一种是快照,第二种是 AOF 日志。快照是一次全量备份,AOF 日志是连续的增量备份。快照是内存数据的二进制序列化形式,在存储上非常紧凑,而 AOF 日志记录的是内存数据修改的指令记录文本。
RDB快照原理
Redis 使用操作系统的多进程 COW(Copy On Write) 机制来实现快照持久化。保存的是dump.rdb文件。
fork多进程
Redis 在持久化时会调用 glibc 的函数fork产生一个子进程,快照持久化完全交给子进程来处理,父进程继续处理客户端请求。
AOF原理
AOF 日志存储的是 Redis 服务器的顺序指令序列,AOF 日志只记录对内存进行修改的指令记录。
AOF 重写
fsync
AOF 日志内容可能还没有来得及完全刷到磁盘中,这个时候就会出现日志丢失。那该怎么办?
Linux 的glibc提供了fsync(int fd)函数可以将指定文件的内容强制从内核缓存刷到磁盘。只要 Redis 进程实时调用 fsync 函数就可以保证 aof 日志不丢失。但是 fsync 是一个磁盘 IO 操作,它很慢!如果 Redis 执行一条指令就要 fsync 一次,那么 Redis 高性能的地位就不保了。
所以在生产环境的服务器中,Redis 通常是每隔 1s 左右执行一次 fsync 操作,周期 1s 是可以配置的。这是在数据安全性和性能之间做了一个折中,在保持高性能的同时,尽可能使得数据少丢失。
运维
通常 Redis 的主节点是不会进行持久化操作,持久化操作主要在从节点进行。
Redis 4.0 混合持久化
- rdb 来恢复,会丢失大量数据
- AOF日志重放,重放 AOF 日志性能相对 rdb 来说要慢很多
Redis 4.0 为了解决这个问题,带来了一个新的持久化选项——混合持久化。将 rdb 文件的内容和增量的 AOF 日志文件存在一起。这里的 AOF 日志不再是全量的日志,而是自持久化开始到持久化结束的这段时间发生的增量 AOF 日志,通常这部分 AOF 日志很小。
原理 4:雷厉风行 —— 管道
Redis 的消息交互
两个连续的写操作和两个连续的读操作总共只会花费一次网络来回。
深入理解管道本质
write 操作只负责将数据写到本地操作系统内核的发送缓冲然后就返回了。剩下的事交给操作系统内核异步将数据送到目标机器。但是如果发送缓冲满了,那么就需要等待缓冲空出空闲空间来,这个就是写操作 IO 操作的真正耗时。
原理 5:同舟共济 —— 事务
Redis 事务的基本使用
略
因为 Redis 的单线程特性,它不用担心自己在执行队列的时候被其它指令打搅,可以保证他们能得到的「原子性」执行。
事务在遇到指令执行失败后,后面的指令还继续执行??那还要事务干嘛。
discard(丢弃)
> get books
(nil)
> multi
OK
> incr books
QUEUED
> incr books
QUEUED
> discard #丢弃事务中的命令,就是事务回滚
OK
> get books
(nil)优化 结合pipeline
通常 Redis 的客户端在执行事务时都会结合 pipeline
Watch
我们可以通过 Redis 的分布式锁来避免冲突,这是一个很好的解决方案。分布式锁是一种悲观锁,那是不是可以使用乐观锁的方式来解决冲突呢?
Redis 提供了这种 watch 的机制,它就是一种乐观锁。有了 watch 我们又多了一种可以用来解决并发修改的方法。
watch 会在事务开始之前盯住 1 个或多个关键变量,当事务执行时,也就是服务器收到了 exec 指令要顺序执行缓存的事务队列时,Redis 会检查关键变量自 watch 之后,是否被修改了 (包括当前事务所在的客户端)。如果关键变量被人动过了,exec 指令就会返回 null 回复告知客户端事务执行失败,这个时候客户端一般会选择重试。
> watch books
OK
> incr books # 被修改了
(integer) 1
> multi
OK
> incr books
QUEUED
> exec # 事务执行失败
(nil)import java.util.List;
import redis.clients.jedis.Jedis;
import redis.clients.jedis.Transaction;
public class TransactionDemo {
public static void main(String[] args) {
Jedis jedis = new Jedis();
String userId = "abc";
String key = keyFor(userId);
jedis.setnx(key, String.valueOf(5));// setnx 做初始化
System.out.println(doubleAccount(jedis, userId));
jedis.close();
}
public static int doubleAccount(Jedis jedis, String userId) {
String key = keyFor(userId);
//客户端事务重试
while (true) {
jedis.watch(key);
int value = Integer.parseint(jedis.get(key));
value *= 2;
// 加倍
Transaction tx = jedis.multi();
tx.set(key, String.valueOf(value));
List<Object> res = tx.exec();
if (res != null) {
break;
// 成功了
}
}
return Integer.parseint(jedis.get(key));
// 重新获取余额
}
public static String keyFor(String userId) {
return String.format("account_{}", userId);
}
}原理 6:小道消息 —— PubSub
Redis 消息队列的不足之处,那就是它不支持消息的多播机制。
Redis5.0 新增了 Stream 数据结构,这个功能给 Redis 带来了持久化消息队列,从此 PubSub 可以消失了,Disqueue 估计也永远发不出它的 Release 版本了。
消息多播
PubSub
为了支持消息多播,Redis 不能再依赖于那 5 种基本数据类型了。它单独使用了一个模块来支持消息多播,这个模块的名字叫着 PubSub,也就是 PublisherSubscriber,发布者订阅者模型。
生产者消费者
消费者
# -*- coding: utf-8 -*-
import time
import redis
client = redis.StrictRedis()
p = client.pubsub()
p.subscribe("codehole")
# 通过不断循环 + sleep 来获取队列中的消息。
while True:
msg = p.get_message()
if not msg:
time.sleep(1)
continue
print msg生产者
# -*- coding: utf-8 -*-
import redis
client = redis.StrictRedis()
client.publish("codehole", "python comes")
client.publish("codehole", "java comes")
client.publish("codehole", "golang comes")休眠的方式来轮询消息,也会遭遇消息处理不及时的问题。我们可以使用 listen 来阻塞监听消息来进行处理。如下。
阻塞消费者
# -*- coding: utf-8 -*-
import time
import redis
client = redis.StrictRedis()
p = client.pubsub()
p.subscribe("codehole")
# 使用listen 阻塞
for msg in p.listen():
print msgPubSub 缺点
- 如果 Redis 停机重启,PubSub 的消息是不会持久化的
Redis 的作者单独开启了一个项目 Disque 专门用来做多播消息队列。该项目目前没有成熟,一直长期处于 Beta 版本。
原理 7:开源节流 —— 小对象压缩
如果你对 Redis 使用内存不超过 4G,可以考虑使用 32bit 进行编译,可以节约大量内存。
小对象压缩存储 (ziplist)
数据量小的时候使用ziplist
- 如果它存储的是 hash 结构,那么 key 和 value 会作为两个 entry 相邻存在一起。
- 如果它存储的是 zset,那么 value 和 score 会作为两个 entry 相邻存在一起。
intset 是一个紧凑的整数数组结构,它用于存放元素都是整数的并且元素个数较少的 set 集合。如果 set 里存储的是字符串,那么 sadd 立即升级为 hashtable 结构。
存储界限
hash-max-zipmap-entries 512 # hash 的元素个数超过 512 就必须用标准结构存储
hash-max-zipmap-value 64 # hash 的任意元素的 key/value 的长度超过 64 就必须用标准结构存储
list-max-ziplist-entries 512 # list 的元素个数超过 512 就必须用标准结构存储
list-max-ziplist-value 64 # list 的任意元素的长度超过 64 就必须用标准结构存储
zset-max-ziplist-entries 128 # zset 的元素个数超过 128 就必须用标准结构存储
zset-max-ziplist-value 64 # zset 的任意元素的长度超过 64 就必须用标准结构存储
set-max-intset-entries 512 # set 的整数元素个数超过 512 就必须用标准结构存储内存回收机制
删除key不会回收内存,只会腾出位置。原因是操作系统回收内存是以页为单位,如果这个页上只要有一个 key 还在使用,那么它就不能被回收。
Redis Flushdb 命令用于清空当前数据库中的所有 key。这样就能看到内存被回收了。因为一个页上所有都被删除了。
内存分配算法
目前 Redis 可以使用 jemalloc(facebook) 库来管理内存,也可以切换到tcmalloc(google)。因为 jemalloc 相比 tcmalloc的性能要稍好一些,所以Redis默认使用了jemalloc。
原理 8:有备无患 —— 主从同步
CAP 原理
- C - Consistent ,一致性(数据同步,写后读,读不到。写到了g1,去读了g2)
- A - Availability ,可用性(是只要收到用户的请求,服务器就必须给出回应。)
- P - Partition tolerance ,分区容忍性(容错性)(分区容错无法避免,因此可以认为 CAP 的 P 总是成立。CAP 定理告诉我们,剩下的 C 和 A 无法同时做到。)
这三个指标不可能同时做到。这个结论就叫做 CAP 定理。
参考:谈谈分布式系统的CAP理论(说的很明白)
最终一致
Redis 的主从数据是异步同步的,所以分布式的 Redis 系统并不满足「一致性」要求。
主从同步
增量同步
因为内存的 buffer 是有限的,所以 Redis 主库不能将所有的指令都记录在内存 buffer 中。Redis 的复制内存 buffer 是一个定长的环形数组,如果数组内容满了,就会从头开始覆盖前面的内容。
如果因为网络状况不好,从节点在短时间内无法和主节点进行同步,那么当网络状况恢复时,Redis 的主节点中那些没有同步的指令在 buffer 中有可能已经被后续的指令覆盖掉了,从节点将无法直接通过指令流来进行同步,这个时候就需要用到更加复杂的同步机制 —— 快照同步。
快照同步
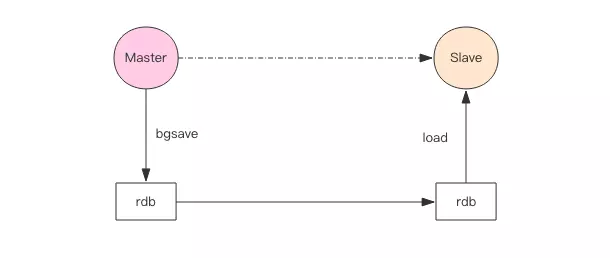
首先需要在主库上进行一次 bgsave 将当前内存的数据全部快照到磁盘文件中,然后再将快照文件的内容全部传送到从节点。从节点将快照文件接受完毕后,立即执行一次全量加载,加载之前先要将当前内存的数据清空。加载完毕后通知主节点继续进行增量同步。
无盘复制
从 Redis 2.8.18 版开始支持无盘复制。所谓无盘复制是指主服务器直接通过套接字将快照内容发送到从节点,生成快照是一个遍历的过程,主节点会一边遍历内存,一遍将序列化的内容发送到从节点,从节点还是跟之前一样,先将接收到的内容存储到磁盘文件中,再进行一次性加载。
SpringBoot如何跑起来的?
- SpringBoot如何跑起来的?
- Jar部署
- War部署
- SpringBoot打war包部署方法
- 为什么要 extends SpringBootServletInitializer
- SpringBootServletInitializer.onStartup() 是怎么被调用的呢?
- SpringServletContainerInitializer implements ServletContainerInitializer【Servlet3.0的接口】
- 全部ServletContainerInitializer是如何被找到的?
- @HandlesTypes标注的ServletContainerInitializer.onStartup(class)方法参数是如何找到指定类的?
- SpringBootServletInitializer implement WebApplicationInitializer【war包部署需要】
- SpringBootServletInitializer做了什么?
- 在哪加载的Servlet?
- war启动简单总结
SpringBoot如何跑起来的?
- Spring Boot与Spring MVC集成启动过程源码分析 - 知乎
- Spring boot-嵌入式web server启动过程分析(2)
- SpringBoot中的SpringMVC的自动配置 - 掘金
Jar部署
启动jar
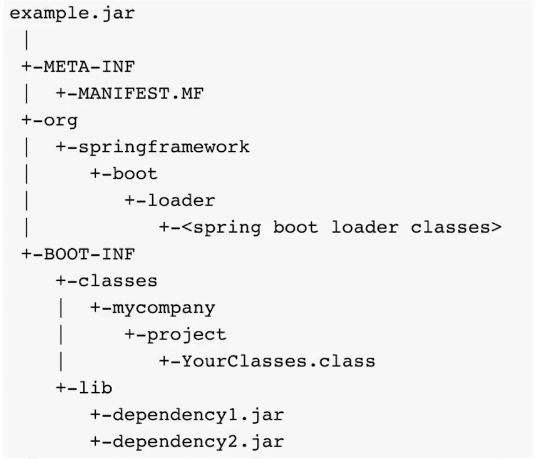
- java -jar 执行 MAINFEST.MF 中的 Main-Class 方法。这里的Main-Class是org.springframework.boot.loader.JarLauncher中的main()。
- JarLauncher执行
- 创建LaunchedURLClassLoader
- 启动一个线程
- ClassLoader加载MAINFEST.MF中Start-Class 属性的类(也就是SpringBoot的启动类)
- 执行这个类
到此开始执行SpringBoot
启动WEB容器
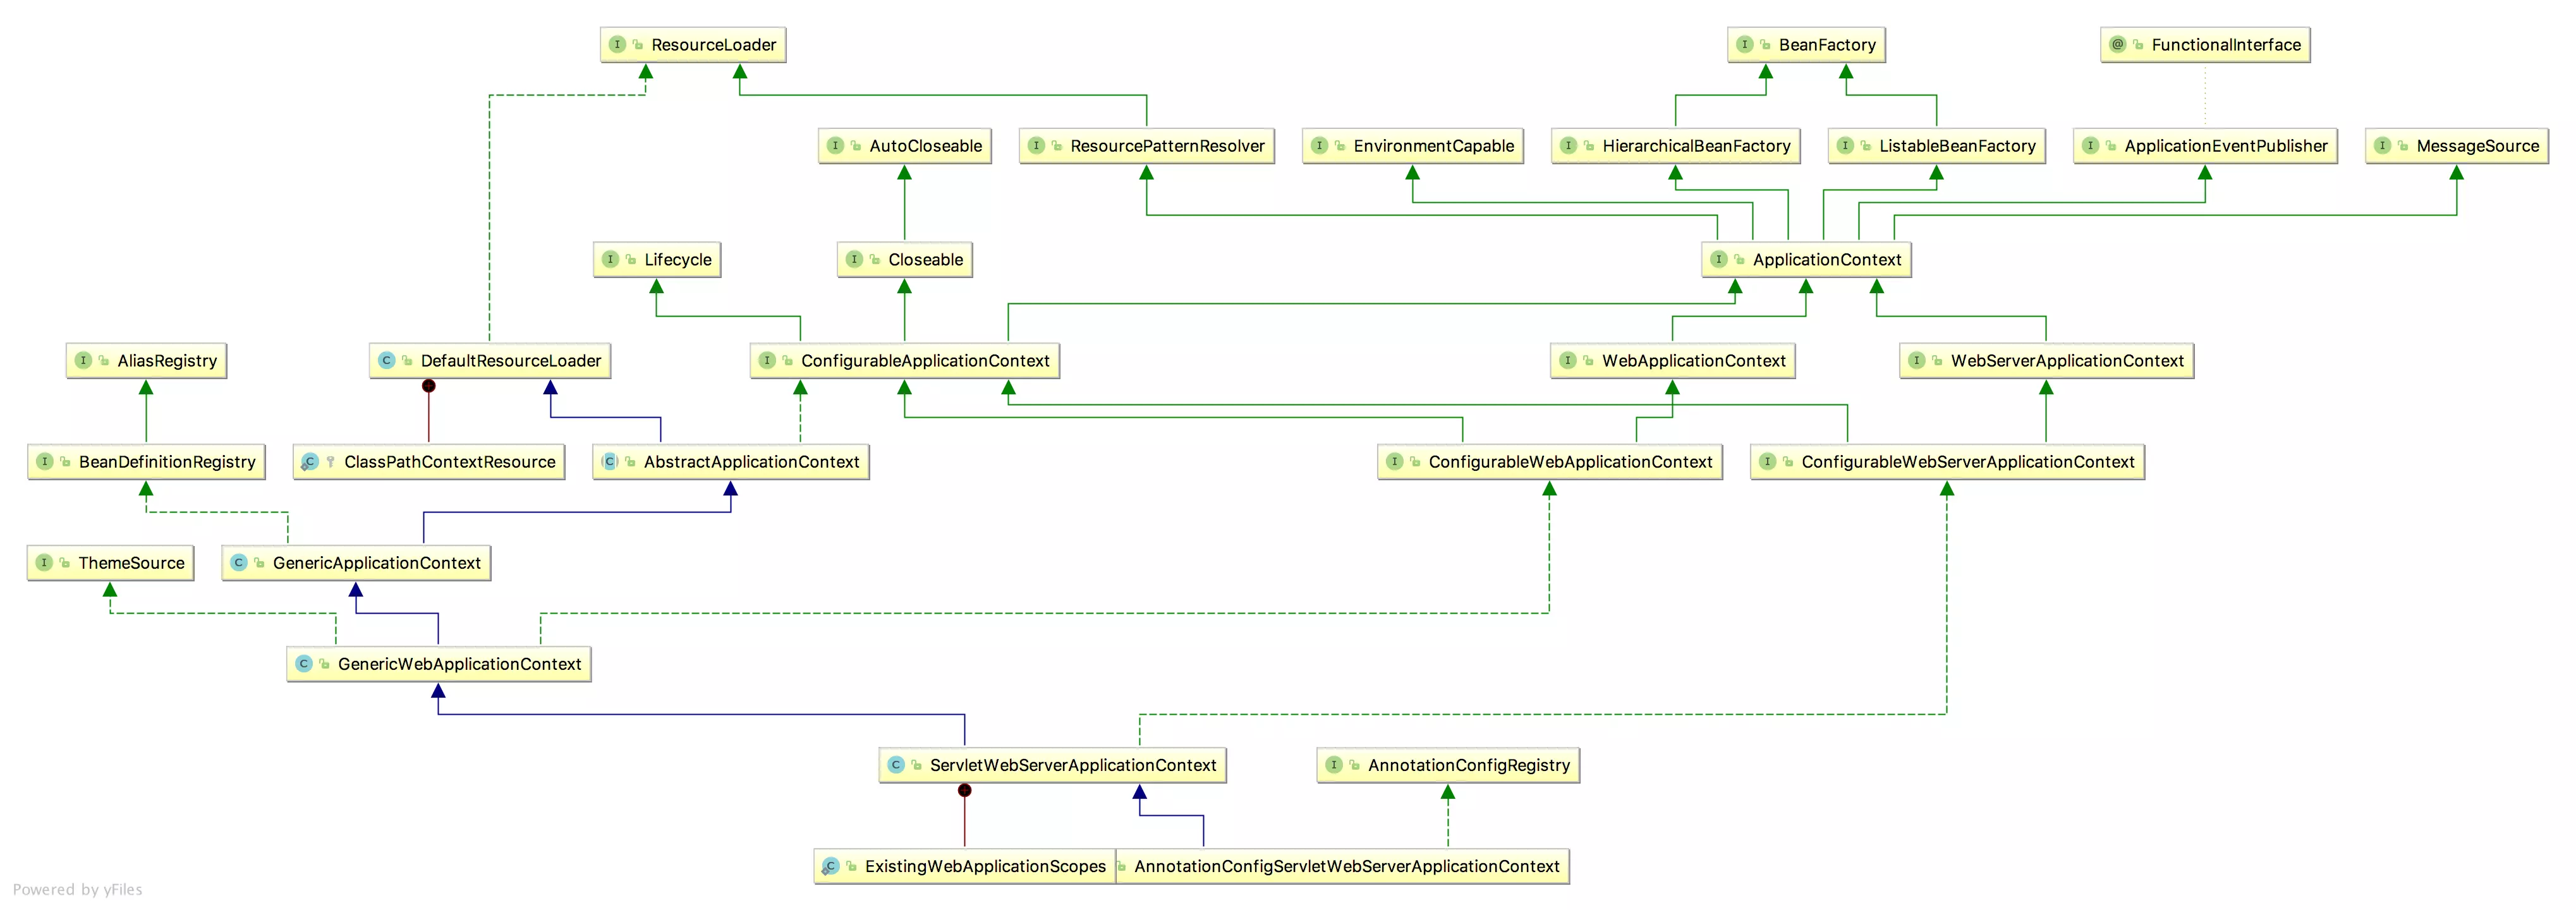
- 执行SpringApplication.run()
- 其中refreshContext() 一步会调用 AbstractApplicationContext#refresh()
- ServletWebServerApplicationContext#onRefresh 中的createWebServer() 创建
- 其中refreshContext() 一步会调用 AbstractApplicationContext#refresh()
private void createWebServer() {
WebServer webServer = this.webServer;
ServletContext servletContext = getServletContext();
//没有外部容器情况
if (webServer == null && servletContext == null) {
ServletWebServerFactory factory = getWebServerFactory();
this.webServer = factory.getWebServer(getSelfInitializer());
}
//war包,外部tomcat已经启动,ServletContext是SpringBootServletInitializer中创建ApplicationContext并传递进来ServletContext
else if (servletContext != null) {
try {
getSelfInitializer().onStartup(servletContext);
}
catch(ServletException ex) {
throw new ApplicationContextException("Cannot initialize servlet context", ex);
}
}
initPropertySources();
} - 其中最后一步 ServletWebServerApplicationContext#finishRefresh() 中的startWebServer()会启动tomcat容器。
这样web容器就启动了
容器怎么获取到Servlet 和 Spring容器呢?
- container 先做一些操作,
- 将context(TomcatEmbeddedContext)加入host作为host的子容器
- 所有initializers都被添加到TomcatStarter中(composite模式)。(TomcatStarter负责调用所有initializer.onStartup())
- TomcatStarter设置到TomcatEmbeddedContext的starter属性
- 然后使用线程池启动了 StandardHost、TomcatEmbeddedContext
都作为StartChild 调用这些container的start()方法 - 调用TomcatEmbeddedContext(LifecycleBase)的模版方法start()
- start() 内部调用 startInternal()StandardContext(TomcatEmbeddedContext)#startInternal
- 通过TomcatStarter调用所有initializer.onStartup()
- 调用ServletWebServerApplicationContext#getSelfInitializer 返回的ServletContextInitializer对象
- 通过TomcatStarter调用所有initializer.onStartup()
- start() 内部调用 startInternal()StandardContext(TomcatEmbeddedContext)#startInternal
TomcatStarter中的ServletContextInitializer【和下面的ServletContextInitializer有区别】

ServletWebServerApplicationContext 通过一下两个方法,可以返回一个ServletContextInitializer类的对象, 作为构造WebServer的参数,最后也是存入TomcatStarter中。
为什么要这么做呢?这样写法等效于内部类?ServletContextInitializer要操作的函数都是ServletWebServerApplicationContext自己内部的方法。
//org.springframework.boot.web.servlet.context.ServletWebServerApplicationContext#getSelfInitializer
private org.springframework.boot.web.servlet.ServletContextInitializer getSelfInitializer() {
return this::selfInitialize;
}
private void selfInitialize(ServletContext servletContext) throws ServletException {
//设置ServletWebServerApplicationContext 到 ServletContext【绑定ApplicationContext】
prepareWebApplicationContext(servletContext);
registerApplicationScope(servletContext);
WebApplicationContextUtils.registerEnvironmentBeans(getBeanFactory(), servletContext);
//调用ServletContextInitializer.onStartup()【注册Servlet】
for (ServletContextInitializer beans: getServletContextInitializerBeans()) {
beans.onStartup(servletContext);
}
}getServletContextInitializerBeans() 包含哪些呢?
从beanFactory中获取所有ServletContextInitializer(这里的ServletContextInitializer就不包含ServletWebServerApplicationContext#getSelfInitializer)

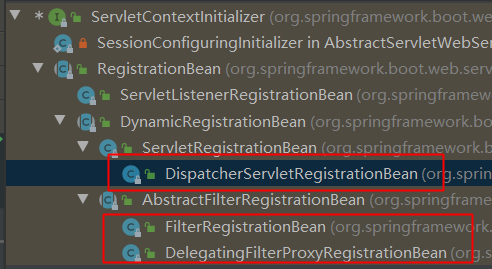
ServletRegistrationBean的onStartup方法,最终会调用到servletContext.addServlet的Servlet3.0的标准将DispatchServlet注入到servlet容器中拦截所有的请求。
War部署
SpringBoot打war包部署方法
步骤:
- 修改pom.xml文件将默认的jar方式改为war
- 继承org.springframework.boot.web.servlet.support.SpringBootServletInitializer
@SpringBootApplication
public class Application extends SpringBootServletInitializer {
public static void main(String[] args) {
SpringApplication.run(Application.class, args);
}
// @Override
// protected SpringApplicationBuilder configure(SpringApplicationBuilder application) {
// return application.sources(TestwarApplication.class);
// }
}通常需要重写configure方法
当使用Application类继承的时候就不用,因为当判断source为空,会添加自身。
application.addPrimarySources(Collections.singleton(getClass()));
为什么要 extends SpringBootServletInitializer
SpringBootServletInitializer 是一个抽象类,不能实例化。
我们需要使用SpringServletContainerInitializer(ServletContainerInitializer)来调用SpringBootServletInitializer(WebApplicationInitializer)中的onStartup() 方法。
在SpringBootServletInitializer.onStartup() 方法中会创建ApplicationContext等操作。
SpringBootServletInitializer.onStartup() 是怎么被调用的呢?
通过下面的Servlet3.0 接口 ServletContainerInitializer
SpringServletContainerInitializer implements ServletContainerInitializer【Servlet3.0的接口】
Tomcat为我们提供了ServletContainerInitializer接口 供WEB容器之外的组件(Spring,logback)在启动容器时初始化用。
@HandlesTypes(WebApplicationInitializer.class)//所有WebApplicationInitializer.class作为onStartup参数
public class SpringServletContainerInitializer implements ServletContainerInitializer {
@Override
public void onStartup(@Nullable Set<Class<?>> webAppInitializerClasses, ServletContext servletContext) throws ServletException {
...
//1. 汇总各个jar包中的WebApplicationInitializer
//2. 根据@Priority或@Order注解排序
//3. 执行各个WebApplicationInitializer.onStartup(servletContext);
}
}实现了ServletContainerInitializer的类可以通过@HandlesTypes来将指定的class作为参数传递到onStartup()方法的参数中。
全部ServletContainerInitializer是如何被找到的?
加载ServletContainerInitializer类通过SPI:

@HandlesTypes标注的ServletContainerInitializer.onStartup(class)方法参数是如何找到指定类的?
答案是Byte Code Engineering Library (BCEL),这是Apache Software Foundation 的Jakarta 项目的一部分,作用同ASM类似,是字节码操纵框架。webConfig() 在调用processServletContainerInitializers()时记录下注解的类名,然后在Step 4和Step 5中都来到processAnnotationsStream这个方法,使用BCEL的ClassParser在字节码层面读取了/WEB-INF/classes和某些jar(应该可以在叫做fragments的概念中指定)中class文件的超类名和实现的接口名,判断是否与记录的注解类名相同,若相同再通过org.apache.catalina.util.Introspection类load为Class对象,最后保存起来,于Step 11中交给org.apache.catalina.core.StandardContext,也就是tomcat实际调用ServletContainerInitializer.onStartup()的地方。
SpringBootServletInitializer implement WebApplicationInitializer【war包部署需要】
只应用在打war包的情况
Note that a WebApplicationInitializer is only needed if you are
building a war file and* deploying it. If you prefer to run an embedded web server then you won't need this at all.
SpringBootServletInitializer做了什么?
//SpringBootServletInitializer#onStartup
@Override
public void onStartup(ServletContext servletContext) throws ServletException {
// Logger initialization is deferred in case an ordered
// LogServletContextInitializer is being used
this.logger = LogFactory.getLog(getClass());
WebApplicationContext rootAppContext = createRootApplicationContext(servletContext);
if (rootAppContext != null) {
servletContext.addListener(new ContextLoaderListener(rootAppContext) {@Override
public void contextInitialized(ServletContextEvent event) {
// no-op because the application context is already initialized
}
});
}
else {
this.logger.debug("No ContextLoaderListener registered, as createRootApplicationContext() did not " + "return an application context");
}
}- 创建了RootApplicationContext
- 创建ContextLoaderListener,添加到ServletContext中。
这里ContextLoaderListener.contextInitialized是空实现,因为ApplicationContext已经初始化。
在哪加载的Servlet?
- AbstractApplicationContext#refresh()
- ServletWebServerApplicationContext#createWebServer
- getSelfInitializer().onStartup(servletContext);
- ServletWebServerApplicationContext#createWebServer
这里getSelfInitializer()就是ServletWebServerApplicationContext中通过lambda构造的ServletContextInitializer。
下面就和和jar启动一样
负责绑定ServletContext,调用所有其他的ServletContextInitializer(从BeanFactory中获得)
其中DispatcherServletRegistrationBean就是用来注册Servlet。
war启动简单总结
- SpringBootServletInitializer implement WebApplicationInitializer 作为参数传入到了
SpringServletContainerInitializer implements ServletContainerInitializer - SpringBootServletInitializer 启动了
ServletWebServerApplicationContext - ServletWebServerApplicationContext.onRefresh() 执行了ServletWebServerApplicationContext#ServletContextInitializer
- ServletWebServerApplicationContext#ServletContextInitializer 执行了一系列ServletContextInitializer(从BeanFactory中获得)
- DispatcherServletRegistrationBean(ServletContextInitializer)被执行注册Servlet
EventListener原理
目录
- 目录
- 流程
- initApplicationEventMulticaster()
- registerListeners()
- finishRefresh()
- publishEvent()
- @EventListener处理
流程
容器的刷新流程如下:
public void refresh() throws BeansException, IllegalStateException {
synchronized (this.startupShutdownMonitor) {
// Prepare this context for refreshing.
prepareRefresh();
// Tell the subclass to refresh the internal bean factory.
ConfigurableListableBeanFactory beanFactory = obtainFreshBeanFactory();
// Prepare the bean factory for use in this context.
prepareBeanFactory(beanFactory);
try {
// Allows post-processing of the bean factory in context subclasses.
postProcessBeanFactory(beanFactory);
// Invoke factory processors registered as beans in the context.
invokeBeanFactoryPostProcessors(beanFactory);
// Register bean processors that intercept bean creation.
registerBeanPostProcessors(beanFactory);
// Initialize message source for this context.
initMessageSource();
// Initialize event multicaster for this context.
initApplicationEventMulticaster();
// Initialize other special beans in specific context subclasses.
onRefresh();
// Check for listener beans and register them.
registerListeners();
// Instantiate all remaining (non-lazy-init) singletons.
finishBeanFactoryInitialization(beanFactory);
// Last step: publish corresponding event.
finishRefresh();
}
finally {
// Reset common introspection caches in Spring's core, since we
// might not ever need metadata for singleton beans anymore...
resetCommonCaches();
}
}
}其中与EventListener有关联的步骤
- initApplicationEventMulticaster(); 初始化事件多播器
- registerListeners(); 注册Listener到多播器
- finishBeanFactoryInitialization(beanFactory); 涉及将@eventlistener转为普通Listener
- finishRefresh(); 发布容器刷新完成事件ContextRefreshedEvent
initApplicationEventMulticaster()
protected void initApplicationEventMulticaster() {
ConfigurableListableBeanFactory beanFactory = getBeanFactory();
//找applicationEventMulticaster的组件
if (beanFactory.containsLocalBean(APPLICATION_EVENT_MULTICASTER_BEAN_NAME)) {
this.applicationEventMulticaster =
beanFactory.getBean(APPLICATION_EVENT_MULTICASTER_BEAN_NAME, ApplicationEventMulticaster.class);
if (logger.isDebugEnabled()) {
logger.debug("Using ApplicationEventMulticaster [" + this.applicationEventMulticaster + "]");
}
}
else {
//没有就创建一个
this.applicationEventMulticaster = new SimpleApplicationEventMulticaster(beanFactory);
//注册到beanFactory
beanFactory.registerSingleton(APPLICATION_EVENT_MULTICASTER_BEAN_NAME, this.applicationEventMulticaster);
if (logger.isDebugEnabled()) {
logger.debug("Unable to locate ApplicationEventMulticaster with name '" +
APPLICATION_EVENT_MULTICASTER_BEAN_NAME +
"': using default [" + this.applicationEventMulticaster + "]");
}
}
}registerListeners()
protected void registerListeners() {
// Register statically specified listeners first.
for (ApplicationListener<?> listener : getApplicationListeners()) {
getApplicationEventMulticaster().addApplicationListener(listener);
}
// Do not initialize FactoryBeans here: We need to leave all regular beans
// uninitialized to let post-processors apply to them!
String[] listenerBeanNames = getBeanNamesForType(ApplicationListener.class, true, false);
for (String listenerBeanName : listenerBeanNames) {
getApplicationEventMulticaster().addApplicationListenerBean(listenerBeanName);
}
// Publish early application events now that we finally have a multicaster...
Set<ApplicationEvent> earlyEventsToProcess = this.earlyApplicationEvents;
this.earlyApplicationEvents = null;
if (earlyEventsToProcess != null) {
for (ApplicationEvent earlyEvent : earlyEventsToProcess) {
getApplicationEventMulticaster().multicastEvent(earlyEvent);
}
}
}finishRefresh()
protected void finishRefresh() {
// Clear context-level resource caches (such as ASM metadata from scanning).
clearResourceCaches();
// Initialize lifecycle processor for this context.
initLifecycleProcessor();
// Propagate refresh to lifecycle processor first.
getLifecycleProcessor().onRefresh();
// Publish the final event.
//发布事件
publishEvent(new ContextRefreshedEvent(this));
// Participate in LiveBeansView MBean, if active.
LiveBeansView.registerApplicationContext(this);
}publishEvent() 发布事件,我们也可以手动调用容器的publishEvent() 方法来发布事件
ApplicationContext.publishEvent(new MyEvent("test"));publishEvent()
protected void publishEvent(Object event, @Nullable ResolvableType eventType) {
// Decorate event as an ApplicationEvent if necessary
ApplicationEvent applicationEvent;
if (event instanceof ApplicationEvent) {
applicationEvent = (ApplicationEvent) event;
}
else {
applicationEvent = new PayloadApplicationEvent<>(this, event);
if (eventType == null) {
eventType = ((PayloadApplicationEvent) applicationEvent).getResolvableType();
}
}
// Multicast right now if possible - or lazily once the multicaster is initialized
if (this.earlyApplicationEvents != null) {
this.earlyApplicationEvents.add(applicationEvent);
}
else {
//获取多播器
getApplicationEventMulticaster().multicastEvent(applicationEvent, eventType);
}
// Publish event via parent context as well...
//父容器发布事件
if (this.parent != null) {
if (this.parent instanceof AbstractApplicationContext) {
((AbstractApplicationContext) this.parent).publishEvent(event, eventType);
}
else {
this.parent.publishEvent(event);
}
}
}@eventlistener处理
原理:通过EventListenerMethodProcessor来处理@Eventlstener
public class EventListenerMethodProcessor implements SmartInitializingSingleton, ApplicationContextAware EventListenerMethodProcessor 是一个 SmartInitializingSingleton。
SmartInitializingSingleton什么时候执行呢?
在Refresh()
-> finishBeanFactoryInitialization(beanFactory);
-> DefaultListableBeanFactory#preInstantiateSingletons
public void preInstantiateSingletons() throws BeansException {
// Iterate over a copy to allow for init methods which in turn register new bean definitions.
// While this may not be part of the regular factory bootstrap, it does otherwise work fine.
List<String> beanNames = new ArrayList<>(this.beanDefinitionNames);
// Trigger initialization of all non-lazy singleton beans...
for (String beanName : beanNames) {
RootBeanDefinition bd = getMergedLocalBeanDefinition(beanName);
if (!bd.isAbstract() && bd.isSingleton() && !bd.isLazyInit()) {
if (isFactoryBean(beanName)) {
Object bean = getBean(FACTORY_BEAN_PREFIX + beanName);
if (bean instanceof FactoryBean) {
final FactoryBean<?> factory = (FactoryBean<?>) bean;
boolean isEagerInit;
if (System.getSecurityManager() != null && factory instanceof SmartFactoryBean) {
isEagerInit = AccessController.doPrivileged((PrivilegedAction<Boolean>)
((SmartFactoryBean<?>) factory)::isEagerInit,
getAccessControlContext());
}
else {
isEagerInit = (factory instanceof SmartFactoryBean &&
((SmartFactoryBean<?>) factory).isEagerInit());
}
if (isEagerInit) {
getBean(beanName);
}
}
}
else {
// 创建bean
getBean(beanName);
}
}
}
// Trigger post-initialization callback for all applicable beans...
for (String beanName : beanNames) {
Object singletonInstance = getSingleton(beanName);
if (singletonInstance instanceof SmartInitializingSingleton) {
final SmartInitializingSingleton smartSingleton = (SmartInitializingSingleton) singletonInstance;
if (System.getSecurityManager() != null) {
AccessController.doPrivileged((PrivilegedAction<Object>) () -> {
smartSingleton.afterSingletonsInstantiated();
return null;
}, getAccessControlContext());
}
else {
smartSingleton.afterSingletonsInstantiated();
}
}
}
}preInstantiateSingletons 前半部分主要是遍历beanNames 创建Bean。创建完bean后判断各bean是不是SmartInitializingSingleton,如果是则执行 smartSingleton.afterSingletonsInstantiated()方法。
//org.springframework.context.event.EventListenerMethodProcessor#afterSingletonsInstantiated
public void afterSingletonsInstantiated() {
List<EventListenerFactory> factories = getEventListenerFactories();
ConfigurableApplicationContext context = getApplicationContext();
String[] beanNames = context.getBeanNamesForType(Object.class);
for (String beanName : beanNames) {
if (!ScopedProxyUtils.isScopedTarget(beanName)) {
Class<?> type = null;
try {
type = AutoProxyUtils.determineTargetClass(context.getBeanFactory(), beanName);
}
if (type != null) {
if (ScopedObject.class.isAssignableFrom(type)) {
try {
Class<?> targetClass = AutoProxyUtils.determineTargetClass(
context.getBeanFactory(), ScopedProxyUtils.getTargetBeanName(beanName));
if (targetClass != null) {
type = targetClass;
}
}
}
try {
//处理bean
processBean(factories, beanName, type);
}
}
}
}
}protected void processBean(
final List<EventListenerFactory> factories, final String beanName, final Class<?> targetType) {
//没有注解的class
if (!this.nonAnnotatedClasses.contains(targetType)) {
Map<Method, EventListener> annotatedMethods = null;
try {
//查找被注解EventListener的方法
annotatedMethods = MethodIntrospector.selectMethods(targetType,
(MethodIntrospector.MetadataLookup<EventListener>) method ->
AnnotatedElementUtils.findMergedAnnotation(method, EventListener.class));
}
catch (Throwable ex) {
// An unresolvable type in a method signature, probably from a lazy bean - let's ignore it.
if (logger.isDebugEnabled()) {
logger.debug("Could not resolve methods for bean with name '" + beanName + "'", ex);
}
}
if (CollectionUtils.isEmpty(annotatedMethods)) {
//添加到没有注解的集合
this.nonAnnotatedClasses.add(targetType);
if (logger.isTraceEnabled()) {
logger.trace("No @EventListener annotations found on bean class: " + targetType.getName());
}
}
else {
// Non-empty set of methods
ConfigurableApplicationContext context = getApplicationContext();
for (Method method : annotatedMethods.keySet()) {
for (EventListenerFactory factory : factories) {
if (factory.supportsMethod(method)) {
Method methodToUse = AopUtils.selectInvocableMethod(method, context.getType(beanName));
//创建applicationListener,通过Adapter将注解形式的listener转换为普通的listener
ApplicationListener<?> applicationListener =
factory.createApplicationListener(beanName, targetType, methodToUse);
if (applicationListener instanceof ApplicationListenerMethodAdapter) {
((ApplicationListenerMethodAdapter) applicationListener).init(context, this.evaluator);
}
//添加listner到applicationContext
context.addApplicationListener(applicationListener);
break;
}
}
}
if (logger.isDebugEnabled()) {
logger.debug(annotatedMethods.size() + " @EventListener methods processed on bean '" +
beanName + "': " + annotatedMethods);
}
}
}
}- 查找类中标注@eventlistener的方法
- EventListenerFactory.createApplicationListener(beanName, targetType, methodToUse) 构造listener
- 添加listener到Context中
- 如果有applicationEventMulticaster,添加到ApplicationContext.applicationEventMulticaster中
- 如果没有applicationEventMulticaster,添加到ApplicationContext.applicationListeners中。
Recommend Projects
-
 React
React
A declarative, efficient, and flexible JavaScript library for building user interfaces.
-
Vue.js
🖖 Vue.js is a progressive, incrementally-adoptable JavaScript framework for building UI on the web.
-
 Typescript
TypeScript is a superset of JavaScript that compiles to clean JavaScript output.
-
TensorFlow
An Open Source Machine Learning Framework for Everyone
-
Django
The Web framework for perfectionists with deadlines.
-
 Laravel
A PHP framework for web artisans
-
D3
Bring data to life with SVG, Canvas and HTML. 📊📈🎉
-
Recommend Topics
-
javascript
JavaScript (JS) is a lightweight interpreted programming language with first-class functions.
-
web
Some thing interesting about web. New door for the world.
-
server
A server is a program made to process requests and deliver data to clients.
-
Machine learning
Machine learning is a way of modeling and interpreting data that allows a piece of software to respond intelligently.
-
Visualization
Some thing interesting about visualization, use data art
-
Game
Some thing interesting about game, make everyone happy.
Recommend Org
-
Facebook
We are working to build community through open source technology. NB: members must have two-factor auth.
-
Microsoft
Open source projects and samples from Microsoft.
-
Google
Google ❤️ Open Source for everyone.
-
Alibaba
Alibaba Open Source for everyone
-
D3
Data-Driven Documents codes.
-
Tencent
China tencent open source team.