This project ties together the CSS features that you've learned so far: positioning, hover effects, transitions, and overflow. When you're done, you should have a nice Whack-a-Mole game that you can play and share with your friends!

That starter repository contains the following files:
- mole-head.png which contains the image of the mole's head.
- mole-hill.png which contains the image of the dirt pile.
- mole.css which is the file in which you will write your CSS.
- mole.html which is the file in which you will write your HTML.
- mole.js which is the file which contains the JavaScript that controls the game.
Note: In these files, you will add your own HTML and CSS code, and you will also be given some code. It is important to leave any commented-out code as-is until you are directed to un-comment the code in the instructions.
That's not true. There are no mountains in this game.
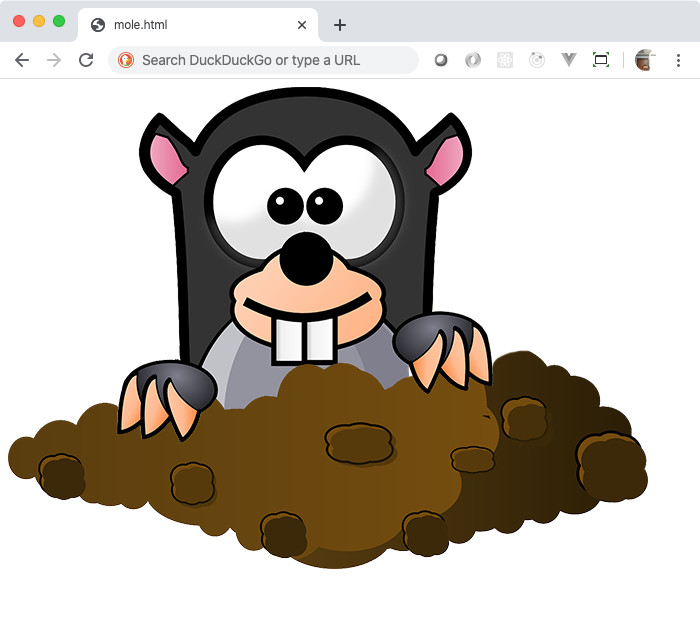
The first challenge is to get the layout of an individual mole and its hill correctly. You can see from the screenshot above that the dirt pile seems to be in front of the mole image. That means that there needs to be some kind of layering that needs to occur.
You may remember from the positioning reading, that when you absolutely position an element, it removes it from the normal flow and puts it in a stack above the other elements. Here is the screen shot that you previously saw where the pink and blue boxes are absolutely positioned, taken out of the normal layout flow, and stacked on top of one another.

That's what you'd like to do with the mole head and the dirt pile. Here's an orthogonal view of how the layers would look if you could look at the screen from the side with the sizes of each of the elements shown.
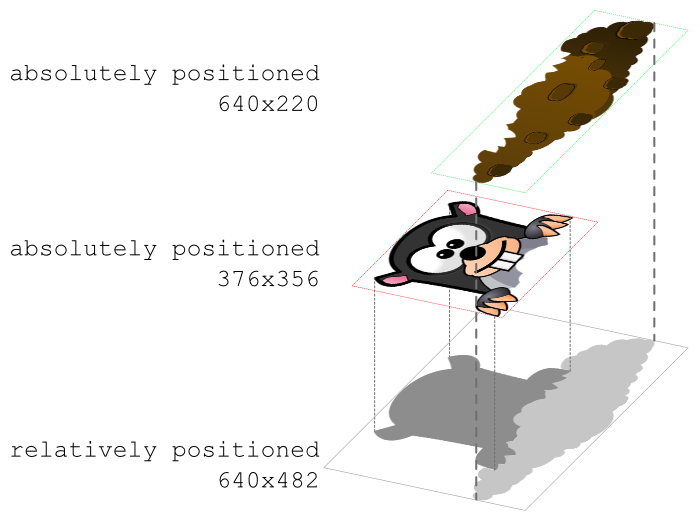
Similarly to what you experienced in the positioning of the blue and pink boxes, you want to create some kind of HTML element that contains the head and hill. The parent element needs to have relative positioning. The elements that have the head and hill need to be absolutely positioned.
Open up mole.html in VS Code. In the body, add a div element. Inside the
div element, create two image elements, one that uses mole-head.png as its
source and the other that uses mole-hill.png as its source. The image that
needs to be "on top" has to be the second one, so order matters here: first the
head image, then the hill image. (In case you forgot how to create an image
element, here's the img documentation.)
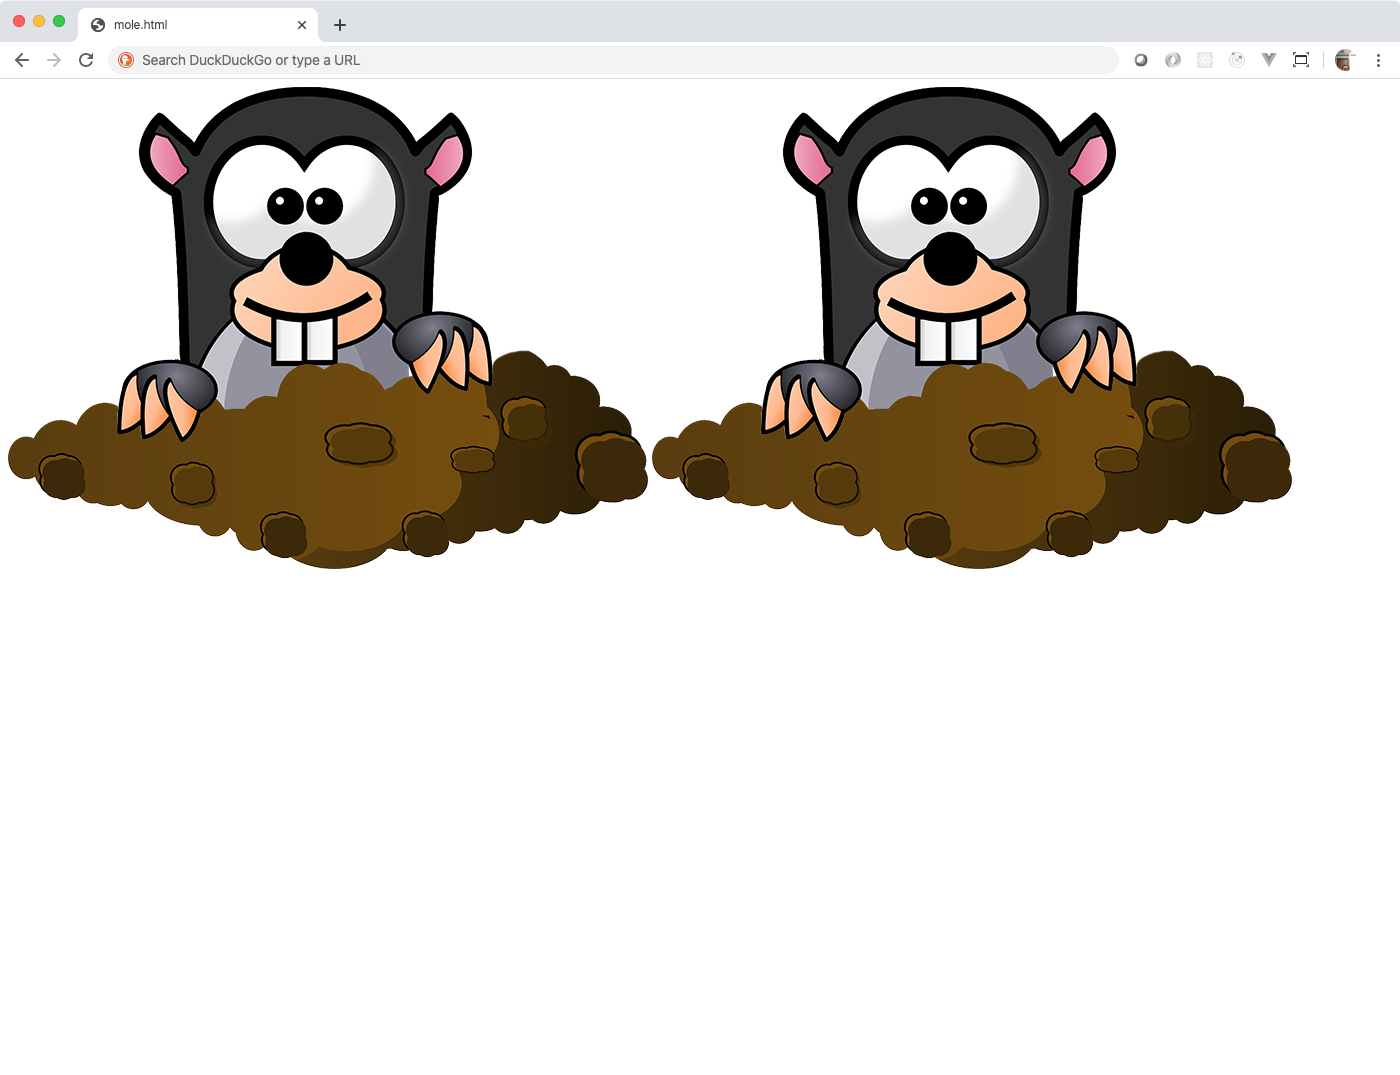
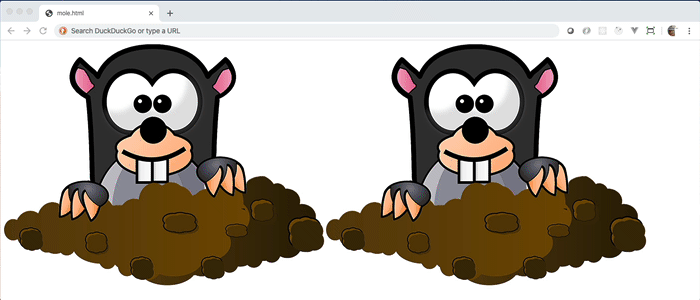
Open up the mole.html file in your browser. If you did things right, your page should look like this, right now. Just two images hanging out next to each other.

Now, it's time to get them properly "layered". After that, you will get them positioned correctly so everything's properly lined up. To do this, you need some CSS classes.
Following good maintainability standards, you need to come up with a name for this Block that you're creating. It is meant to represent a whackable game space. It contains a mole head and a dirt pile. The mole head and the dirt pile have no standalone meaning, they exist inside this game space for a reason. If they were outside the game space, then their existence would have another meaning altogether. That means the mole head and dirt pile are Elements of the Block. So, using BEM, you could create the following class names to represent these HTML elements.
Note: BEM stands for Block-Element-Modifier, and is a common convention for creating and using meaningful class names in your CSS. You will learn more about this convention during the course.
| Class name | BEM type | Reason for existing |
|---|---|---|
| wgs (short for "whackable game space") | Block | Used to encapsulate all of the things that are needed to whack a mole |
| wgs__mole-head | Element | Used to target the mole head |
| wgs__dirt-pile | Element | Used to target the dirt pile |
Using those (or whatever you dreamed up), add those classes to the appropriate
targets, the div and the two img elements.
Open up the mole.css file. Create three CSS rules, one for each of the classes that you added to the elements. (Remember that a CSS rule is the selector , the curly braces, and the properties to set.) Add "height", "position", and "width" properties to each of the three rules setting them to the indicated values in that layer diagram from above.
If you got that set up, it should look like this, now.

That's great! There's some real layering going on, here! Now you need to do some positioning. The following diagram shows you how things should be moved around to fit properly into the space.

It's important to note that when you move absolutely-positioned elements
horizontally within their parent elements, you don't have to specify both the
right and left unless you want to do some weird stretching. The same goes for
vertically. You don't have to specify both the top and the bottom. For the
dirt pile, for example, you can specify bottom: 0; which means you want the
image zero pixels away from the bottom or you can specify top: 262px;
because you want the top to be 262 pixels from the top of the wgs div. Either
works. Once you have the top, left, bottom, OR right values set for the mole
head and the dirt pile, you should end up with it looking like the image above.
If for some reason your images don't align like that with the numbers provided, try adjusting the value that you used for the mole head to make it look correct in your browser.
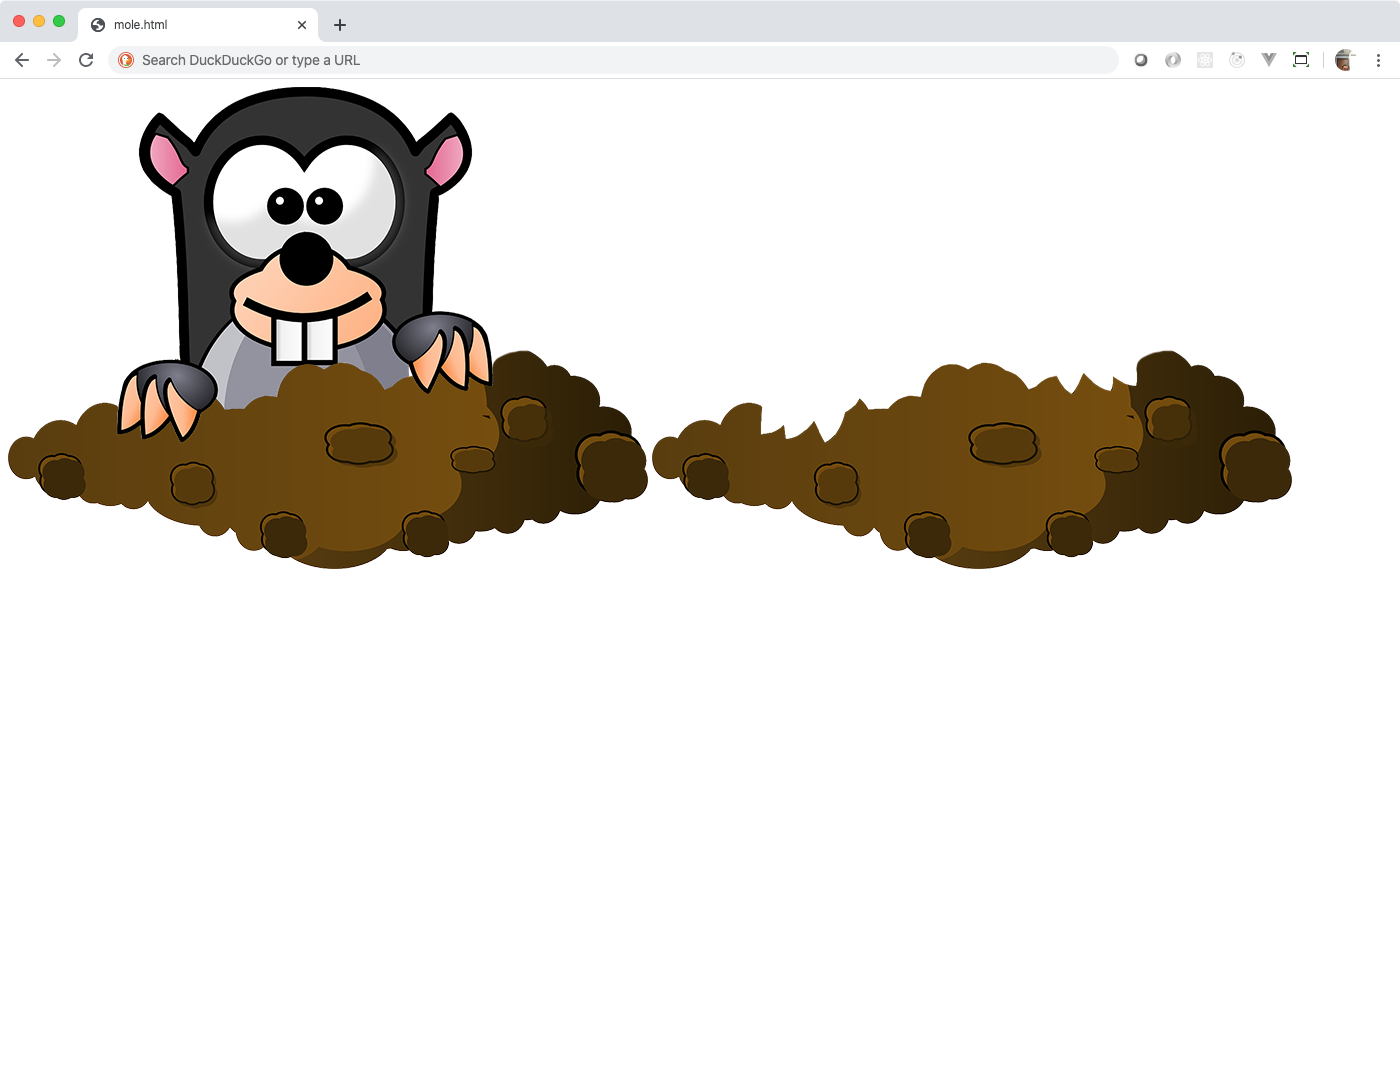
Now that you have the mole aligned properly, you need to get it so the mole can
go down into its hole to hide from your whacker. In the mole.html, copy and
paste the div and its images so you have two moles and dirt piles on your Web
page. Because those div elements are "block" elements by default, they end up
on top of each other. Just to make it easier for now, set the display
property of the Block CSS class to "inline-block";
You are going to make it so the mole head of the right image is hidden. You want to hide it by moving it down so that it is visually vertically beneath the pile of dirt. That is a perfect example of a BEM Modifier. Recall that a Modifier is used to change appearance, behavior, or state. In this case, it changes the state of the mole head by moving it "down into the ground".
You will want to animate this, eventually, so you can't just set the top
property, if you recall. The top and other placement specifiers cannot be
animated using CSS. Instead, you'll want to use the margin-top property to
"move" the image down by increasing the margin above the element.
Create a new CSS class named wgs__mole-head--hidden which indicates that this
is the "hidden state" Modifier for the "mole-head" Element of the "wgs" Block.
Add that class to the second mole head in your HTML. Then, create a CSS rule for
that CSS class. You want to move the top of the mole head all the way to the
bottom of the div, visually beneath the dirt pile. To do that, set the
margin-top property of the rule for wgs__mole-head--hidden to the height of
the Block. Once you do that and refresh your HTML page in the browser, it should
look like this.

That looks good. It's now beneath the pile of dirt. But, because the overflow of
HTML elements is visible by default, you need to clip that overflow so that you
will only see the content when its inside the rectangle described by the div
and not outside of it. This is where the overflow property comes into play.
Add the overflow property to your Block CSS class and hide the overflow
content. Once you do that, it should now look like this.
The mole head is still there. It's just that you've hidden anything outside of the boundaries of the Block element. Because of that, it is now hidden.
Now that you have that set up, it's time to add some animation to get that mole
head out of the way with some panache. All you have to do is set the
transition property of the Element CSS class for the mole head. Set it to
"margin-top" and give it a transition duration of 0.25 seconds. If you refresh
your screen, nothing will have seemed to change. That's because transitions only
affect when CSS property values change.
In previous examples, the values of CSS properties changed because you hovered over an element or something cool like that. Changes to CSS property values can also be triggered when JavaScript adds or removes a CSS class from an element. That's what you'll do to see if everything is working.
To test it, remove the Modifier CSS class from the mole head image in the HTML. Refresh the browser and make sure you can see both of the mole heads, now. Then add the following JavaScript block to bottom of the mole.js file, underneath all of the other code. If you used different CSS class names in your code, adjust the code below to target the CSS class names that you used.
window.addEventListener('DOMContentLoaded', () => {

  setInterval(() => {
    const moleHeads = document.querySelectorAll('.wgs__mole-head');
    for (let moleHead of moleHeads) {
      moleHead.classList.toggle('wgs__mole-head--hidden');
    }
  }, 1000);

});
If everything worked correctly, you should now see this!
When you get tired of looking at that, delete the JavaScript and continue.
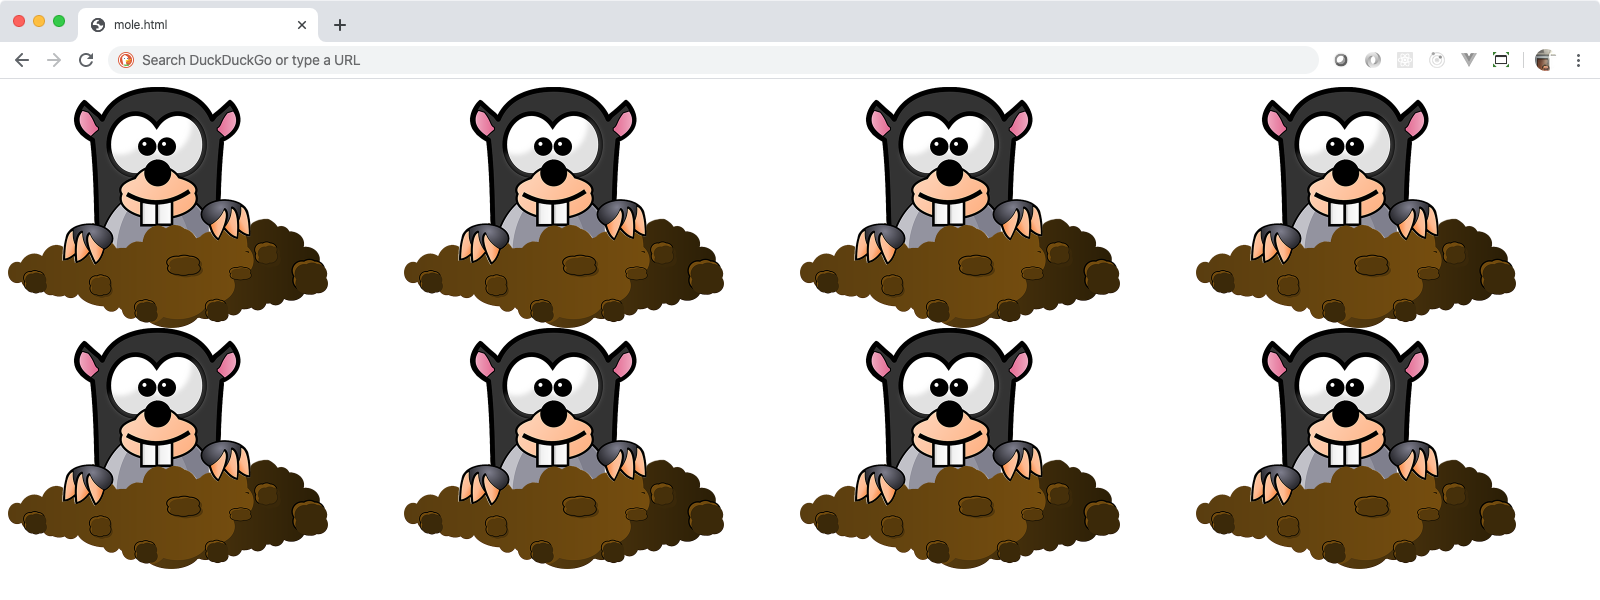
The original screen shot had eight mole heads in two rows of four. Two rows. Four columns. That sounds like a job for a specific kind of layout.
The playing field is another Block. Go ahead and put a div element around
the two div elements that you already have. Add a Block CSS class name to that
outer div element. (For the sake of this article, the BEM class used for it
will be "pf", short for "playing field".) Then, copy and paste six more of the
wgs Blocks in that outer div. When you refresh the page, you should now see
eight mole heads and dirt piles. You may have to scroll around to see them
because those images are kind of large.
You can fix that by going into your mole.css file and dividing all of the
widths, heights, lefts, bottoms, tops, rights, and margin tops by 2. For
example, the width property of the wgs__dirt-pile is set to 640 pixels. Just
divide that value by two (640 / 2 = 320), and set the width to that value. If
you have an odd number, when you divide it by two, just round it either way and
use that. When you refresh the screen, all of the visuals should just be half as big.

Even though on your screen it may look like they're in two rows of four columns each they're not. If you adjust the size of the window, the images will reflow and end up in different places. Now, use CSS Grid Layout to make it so the eight game spaces are appropriately laid out.
Set the display property of that outer div element's Block CSS Class to
"grid". (In this article, the name of that class is pf, short for "playing
field".) Because you're not doing any tricky spans in this layout, just define
the Grid Layout to have two rows and four columns.
Note: If you're working on a smaller screen and can't see all of the moles, then cheat a little bit and add this to your CSS file. It'll zoom out the page and make the moles smaller for you.
/* Only add this if you have a hard time seeing
   all of the moles or you just want to try it
   out. */
body {
  zoom: 0.75;
}Now that everything seems to be properly positioned and have the ability to animate, it's time to get the game a working. You will do this by un-commenting some of the provided code in the starter files.
Go through the HTML and add to the mole head img elements the Modifier CSS
class that you created earlier.

You will also need to un-comment out the following line of JavaScript in
mole.js:
event.target.classList.add('wgs__mole-head--hidden');
Finally, you will need to set up a scoreboard. Un-comment the code at the top of the mole.html file. Then, un-comment the provided code in the mole.css file.
Now, when you save your files and refresh the browser, you should start seeing the moles popping up and down. When you successfully click on a mole, you should see your score increase.
The provided JavaScript code directs the game to popup a random mole 30 times. The scoreboard keeps track of how many moles you are able to whack out of the 30 times they pop up. Play with your friends - the player with the highest score wins!
If you're up for it, try to improve the game by creating some kind of visual effect when a popped-up mole is "whacked".
Start by un-commenting the following line of code in the mole.js file:
event.target.classList.add('wgs__mole-head--whacked');
Then, add the class wgs__mole-head--whacked to all of the mole heads.
Finally, apply some CSS rules to the mole.css file to make something cool happen when a mole is whacked. What CSS properties could be useful here? Look at the example below, and then come up with your own ideas.

![aa-assessment-project-manager[bot] avatar](https://avatars.githubusercontent.com/u/2138704?v=4 "aa-assessment-project-manager[bot]")
