Keen to join a Make Session? Go to: https://www.offerzen.com/nl/make
- Preparing for the event
- At the event
- After the event
- Project extensions
- Community Contributions
- Useful resources
- Troubleshooting
Welcome to the community, we're excited to have you join us!
- The Make event is all about making cool things and meeting even cooler people.
- It serves as an onboarding into the OfferZen Make Community.
- It should help you get started on your journey of becoming a Maker or,
- if you are already an advanced Maker, it puts you in contact with other devs that you can help along their journeys.
- You can read a bit more in-depth into our philosophy here: Make Manifesto.
.png?raw=true)
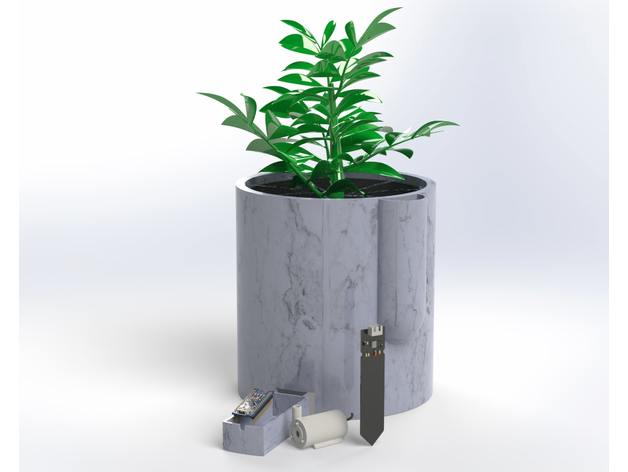
You'll be working with plants, Arduino boards, moisture sensors and watering systems. The aim of Make Days is to explore and learn new things - you should be challenging yourself and leaning on the community for support.
👉 Before the event, complete the Make Preparation Manual to get your LED blinking and ensure you are setup for the event.
Please see Troubleshooting if you run into issues.
For the event you will need to ensure you have:
- Tall glass or container with water to test the sensor and water pump
- Laptop/PC with USB-A port or adaptor
- Optional: small pair of pliers for crimping wire connectors

In the diagram
- ESP8266 module - how it works
- Dupont f-f wires (x10)
- Moisture sensor
- Watering pump
- TIP31C Transistor
Additionally
- Micro usb to usb A cable
- PVC tube + cable tie
- Connector
Add 300 ml water to the bag with pressed soil, forming ~1 liter of compost. Make a few small (1cm deep) holes in the soil and place the basil seeds in them, covering with a bit of loose soil.
Pro tip: drill some holes in the bottom of your pot to drain water coming in otherwise the roots might rot.
- Fill your pot most of the way with soil
- Sprinkle your seeds on top
- Cover with ±1 cm soil
Connect the moisture sensor with the LM393 chip that comes in the same pack. The sensor has both an analog (0 for wet and 1023 for dry) and a digital (LOW for wet and HIGH for dry) output. Check the pinout for the sensor above and see where it would connect to the ESP8266 board (tip: it has an analog, digital, GND, and needs a voltage).
Connect the ESP8266 with your PC and start up the Arduino IDE. Sometimes the ESP8266 does not show in your IDE. If so, look for the right USB-port (Tools > Port).

Try writing a little programme to print the sensor's moisture values (analog is more interesting here as it gives you a value from a wetness-range). If coding isn't your strong suit, you can use the code provided in this repo for the Moisture Sensor.
Upload your code to your system, wait untill the upload is done - the terminal should read: "Leaving... Hard resetting via RTS pin..." - and open the monitor (Tools > Serial Monitor) to see your printed values. Make sure that the Baud rate in the program and your serial monitor window are the same. If you used the code from the repo above, select the 115200 BAUD option for upload speed, otherwise your readings are not printed.
Put your sensor (only the two large exposed pads) in the compost of your plant, or simply put it in a glass of water, to do some readings!
Side mission! If you want to calibrate your moisture sensor, check out Renaldo Meere's moisture sensor calibration utility.
The pump is water submersible, sucks in water from the hole on the opposite end of the wires, and pumps it through the little outlet. In order to switch the pump on and off, it needs to be connected to the ESP8266 with the TIP31C Transistor. The two wires of the pump go in one side, the other side takes your Dupont wires.
🇳🇱 Netherlands Community: use the connector - white block with four inlets - to do so. By lifting the plastic clip (see below) off one side of the Dupont wire, exposing the metal, you can put it in the other side of the connector.
🇿🇦 South African Community: break the silver metal crimps off the tab they come on, strip the pump wires and crimp them onto the pump wires.


The pump has a GND output to be connected to the ESP8266 and receives power from the emitter pin of the transistor. The transistor gets its power through its collector pin from the ESP8266's 3V3 pin. Finally, connect the base to the D6 pin to be able to control the pump.
Write some code (or check the code from the complete watering system in this repo) to get the pump up and running. Before uploading the code, make sure to submerse the pump in your tall glass/container filled with water, as you do not want to overheat its motor - and please watch out for water spills ;)
Your self-watering plant is set up! You can now simply plug it directly into the mains using a usb adaptor / cellphone charger with a 5v output and it will keep your plant watered.
Additional learning: Watch - "What's the point of the three wires on the transistor, relays and pulse width modulation?"
Now that the basics of your system are up and running, it's time to play around a bit! You can put your moisture sensor in your plant and attach the PVC tubing to the water pump (potentially use the cable tie to prevent leaking) with one end, and lay the other end in the plant.
See what analog value would be a good threshhold of dryness. Implement this in your code to start activating your pump as soon as this threshold is reached. Also try to implement some delays in your code to stop the pump after a few seconds, as it takes some time for the soil to get moist and the sensor to pick this up.
If you are confident that your very own automated watering system is fully working, you can check out the repos below for some inspiration on how to communicate with your system via your phone :)

After the event we only ask one further thing: please help us keep these going and growing by giving us feedback and inviting friends using the forms below 🙏
🎁 We want to give you the gift of giving! please refer people that you think would love to attend one of our next sessions and get the Make @ Home Box delivered to their door. You can do so via the same form! 🎁
These are the steps to contribute to a project:
- Fork the main project 👉 https://github.com/OfferZen-Make/plant_tech_ams
- Edit the forked version. Example: https://github.com/benblaine/plant_tech_ams
- Create a “Pull Request” from your fork back into the main project. Example: OfferZen-Community#38
You can find extensions for the project here.
Connect your ESP8266 with your Wi-Fi
Let your system update you, and feed it commands, via text/slack/whatsapp with the MessageBird API
Send messages on slack or telegram.
Telling your plant to water itself - by speech! Blogpost + code
Important: if you want to use the ESP8266 WEB Server in this example you will need to downloand the following two libraries. These libraries are not available in the library manager.
The ESPAsyncWebServer library is not available to install in the Arduino IDE Library Manager. So, you need to install it manually.
Follow the next steps to install the ESPAsyncWebServer library:
https://github.com/me-no-dev/ESPAsyncWebServer/archive/master.zip
Unzip the .zip folder and you should get ESPAsyncWebServer-master folder Rename your folder from ESPAsyncWebServer-master to ESPAsyncWebServer Move the ESPAsyncWebServer folder to your Arduino IDE installation libraries folder
The ESPAsyncWebServer library requires the ESPAsyncTCP library to work. Follow the next steps to install that library:
https://github.com/me-no-dev/ESPAsyncTCP/archive/master.zip
Unzip the .zip folder and you should get ESPAsyncTCP-master folder Rename your folder from ESPAsyncTCP-master to ESPAsyncTCP Move the ESPAsyncTCP folder to your Arduino IDE installation libraries folder Finally, re-open your Arduino IDE
Extend your project with an RGB LED to indicate moisture levels with colors.
You can find code and projects and advice submitted by the community here. Please submit your code for inclusion :)
| Repo | Description | Author |
|---|---|---|
| Mobile app to monitor moisture | Connecting ESP device with the Blynk mobile application to remotely retrieve sensor values in real-time. | @sid-zip |
| Prometheus exporter | Connect to your WiFi and have a small webserver running there. Here is my prometheus exporter. | @gilgamezh |
| deep sleep data logger | This script will enable deep sleep and turns your plant into a data logger. This means that it will significantly use less power and saves the analogue value in a google sheet. | by SamLoys |
| Add multiple sensors and pumps to your make kit | The circuit works by converting the output from 3 digital output pins to binary through the 3-8 converter and using that to switch on each sensor or pump one by one. Readings are taken from the sensors one at a time through the analog pin. The NAND gate is used to determine if the sensors or the pumps must be switched on. In theory, this can be expanded to connect up to 24 sensors and pumps to one ESP8266 NodeMCU board | by GoosenA |
| OfferZenSelfWateringPlant | basic implimentation from the event evening. It reads the sensor values, then if greater than 400 it turns the pump on for 2 seconds, then off again for 10 seconds to give the water chance to absorb. It then reads again. If the water is reading is <= 400 then it just blinks the light on for 2 seconds and the off for 2 seconds before taking another reading. It just keeps looping like this forever. | by TLCoetzer |
| Automatic pid water portion control | This project uses 2 humidity levels one for the night/morning and one for the afternoon/midday. You can set your timezone-offset and humidity levels in the web interface. I'm in the process of testing it on a live plant though so I won't take any blame for drowned plants. It does have a watchdog timer for safety. | by @ikilledmypc. |
| Playing withb Arduino setup | First attempt playing with the arduino enviroment working with embedded c++ | by @ronaldf2000. |
| OfferZen Plantfeeder | Has a web interface for MQTT configuration as well as WIFI configuration. | by @ries. |
| Self watering plant | Code for Connecting to local wifi, Creating a web server, Managing MQTT connection, Managing sensors. | by @semih çokçeken |
| Self watering plant using MicroPython | MicroPython based plant irrigation system running on an esp8266 with Slack and Ubidots support. | by @mmphego |
| Self-watering plant code | checkout the GitHub actions workflow if you wish to test if your Arduino code actually compiles before pushing it to your plant 🌱 | @Roald Nefs |
| JSON MQTT WIFI | Simple realtime mqtt + json controller so you can remotely control and monitor the smartplant device. | by @rvdende |
| Plantspy | Quick and dirty python web app to record and chart smartplant moisture and pump state over time | by @ahoydave |
| Teach your plant to Tweet! | Introduce your lovely plant to the cute blue little bird! | by @JacksonIsaac |
- Proper IDE with code completion, refactoring, syntax highlighting
- GitHub integration
Download the product, unpack and play!
Micropython = Python 3.4. No need to recompile your code. Run your code by pressing F5 (in Thonny) to run. Runs on ESP8266, ESP32-platforms. Has a filesystem so you can copy files to it from Mac/Win/Linux. Interfaces with a huuuuuuge number of sensors. CircuitPython is a fork of Micropython. Go check out Micropython. Lotsa tutorials online available, otherwise let me know if/how I can help (@MIchiel Erasmus on OfferZen Community Slack). Use https://thonny.org as editor.
@lee penrose was kind enough to submit his Python code for his self watering plant project so you can check it out to here - try write your own!
Pieter Linde modified an existing plant enclosure with "OfferZen" :) You can access the printer file here.


You can find instructions on building this here.


- 17 Cool Arduino Projects for DIY Enthusiasts
- ESP8266 mini projects that you can use to enhance your self watering planter
- Arduino IDE for Visual Studio (Visual Micro) - Visual Studio Marketplace
- Node-RED - Node-RED is a programming tool for wiring together hardware devices, APIs and online services in new and interesting ways.
- Flash code to other devices
To shop for equipment see suppliers lists in your country:
Here's a list of equipment that has come up as ideas for extending the project further.
| Item | Description |
|---|---|
| I2C Soil Moisture Sensor | add description... |
| Capacitive analog moisture sensor | No metal parts touching the water so no corrosion problems causing inaccuracy in the long run |
| Linear Voltage Regulator | add description... |
| JOY-IT DPS 5005 DPS | This programmable module for controlling voltage with a constant voltage and constant current. |
| Adafruit STEMMA Soil Sensor - I2C Capacitive Moisture Sensor | Alternative moisture sensor, multiple can be connected if using ESP2866. |
| ELEGOO Elektronische Fun Kit | An electronics starter kit for exploring further. |
| Raspberry Pi 4B – Ultimate starter kit | Starter kit for expanding further. |
| AZDelivery 16 in 1 Kit | Expanded sensors kit |
- If your USB port does not show up in Tools > Port, you may need the driver.
- If your board has a square chip next to the USB port then use this driver for the usb-uart. (CP2102 Chipset)
- If your board has a rectangular chip next to the USB port then use this driver for the usb-uart. (CH340 Chipset)
- When that doesn't solve the problem, (this seems to happen when using a MacBook with an USB-C adapter) check this forum.
- If you're still stuck, let us know in the Slack Channel so we can help you get it to work!
If you see a Fatal Error Failed to connect to ESP8266: Timed out waiting for packet header (this might not happen on the first time but in subsequent uploads): disconnect the external board and upload again, connecting the wires after this.
If this doesn't work you may need to reset your board following these steps.
- Ensure serial monitor is closed.
- While uploading your script, reset board in flash mode by holding down FLASH button, pressing RST button and releasing FLASH.
- Hit upload and accept that it will fail the first time.
- Hit upload again and it works.

Most laptop USB ports can only supply limited current, generally 500mA (USB-3 is 2.5A) - so when the pump is connected and drawing power it overloads the circuitry and trips the power.
Fixes.
- Use USB hub with external power
- Use a USB power supply
- Power the pump separately
The Arduino's Wifi antenna is very small and not very strong, so you might need to move it closer to the Wifi.
You can use this program to find SSID's and check signal strength.
Solution submitted by Alex Siega
- Under Tools > Board, make sure to select "Generic ESP8266 Module." Mine defaults to "Arduino Uno" without actively selecting the right board.
- Install the drivers from the OfferZen Prep page. Make sure to give the drivers the correct permissions in the Security & Privacy area in System Preferences; it's at the end of the "General" tab.
- In Tools > Port, select /dev/cu.usbserial-1420 at the port. (No mention of "right" USB port, but hey, it works! 😄)
- Last step -- when you go to upload blinkESP.ino, you may get a 'D4' was not declared in this scope error. Change D4 to 2 , making the first line # define LED 2
This results in a blue light flashing every second, which I believe is the "hello world" described in the prep document!
Paolo Brizzolari > @Alex Siega it’s cool that you got it working. Just a couple of points:
Using the generic 8266 doesn’t guarantee that all the pins will have the right numbers so I’d advise choosing the NodeMCU board once you’ve added the json url to the boards manager The alias D4 that disappeared was because of the above. For each board there is an import happening in the background If you check the esp8266 libraries you can go into variants/nodemcu/pins_arduino.h and see the following.
If you get the following error while trying to upload a sketch to your board:
pyserial or esptool directories not found next to this upload.py tool.
Then try the steps below:
- Open Users/?????/Library/Arduino15/packages/esp8266/hardware/esp8266/2.7.4/tools/pyserial/serial/tools/list_ports_osx.py
- Comment out lines 29 and 30 and append these lines:
iokit = ctypes.cdll.LoadLibrary('/System/Library/Frameworks/IOKit.framework/IOKit')
cf = ctypes.cdll.LoadLibrary('/System/Library/Frameworks/CoreFoundation.framework/CoreFoundation')
If the error is still occurring.
- Edit ~/Library/Arduino15/packages/esp8266/hardware/esp8266/2.7.4/tools/esptool/esptool.py
- Find the block of code below and comment it out by adding # to the start of each line:
#try:
#    import serial.tools.list_ports as list_ports
#except ImportError:
#    print("The installed version (%s) of pyserial appears to be too old for esptool.py (Python interpreter %s). "
#          "Check the README for installation instructions." % (sys.VERSION, sys.executable))
#    raise
Problem Can’t seem to find any that work for me. The ones recommended on the guide don’t help and the “port” option stays grayed out in the arduino ide.
Solution - Adam Hillier I had the same issue. I installed the driver from here: https://sparks.gogo.co.nz/ch340.html. It worked for me.
- Strip some of the provided wires and press them directly onto a 3v+ battery. We've had instances where people didn't the strip wires enough.
- You might need to hit it quite hard on the table - sometimes the lubricant dries up so it gets stuck.
- If you're using the transistor then try switching the wires around - if it's connected the wrong way around it won't work. The metal part must be flat on your desk and facing away from you on the desk and it will match the diagram.