


A project for you to learn to work a flask REST api with docker and the mysql database manager!
Table of Contents
Problema Gustavo quiere iniciar un negocio de envíos por paquetería y le gustaría contar con la información de Estados, Municipios, Colonias ligados a SEPOMEX.
- Obten una copia de la información expuesta en el sitio de SEPOMEX
- Modela las tablas para la información de SEPOMEX. a. Separa la información en, por lo menos, 3 tablas: Estado, Municipio, Colonia b. Relaciona tus tablas por medio de sus identificadores diseñados por SEPOMEX
- Desarrolla una técnica de carga de los datos a partir de la información de SEPOMEX que pueda ejecutarse a demanda (seed script).
- Crea un API para obtener los datos del registro de cada recurso modelado. a. El intercambio de datos se debe dar por medio de la estructura JSON.
- Permita a tu API por lo menos: a. Búsqueda de colonias por CP b. Búsqueda de colonias, municipios, estados por nombre c. Adición de nuevos registros a los recursos.
- Agrega el manejo de errores.
- Agrega una capa de seguridad a tu API (Basic Auth, Token, APIkey, etc.)
- Muestra tu proyecto live en alguna plataforma en la nube.
- Empaqueta tu aplicación en un contenedor de Docker
- Diseña un sitio web, full responsive para interactuar con tu API.
This project is made with the intention of teaching how to use Docker with the backend technologies Flask and Mysql in the project we are going to take into account the following points:
- Create the dockerfile that will have the necessary instructions to create a Python image that will later be converted into a single application.
- Docker Compose allows you through YAML files to instruct the Docker Engine to perform tasks, programmatically. Here we will install the mysql image, declare the environment variables for both mysql and Flask, and also declare the volumes.
- We will add the list of requirements in a requirements.txt file that will be executed automatically within the Dockerfile
This section should list any major frameworks that you built your project using. Leave any add-ons/plugins for the acknowledgements section. Here are a few examples.
The Python SQL Toolkit and Object Relational Mapper SQLAlchemy is the Python SQL toolkit and Object Relational Mapper that gives application developers the full power and flexibility of SQL.
Flask-Marshmallow is a thin integration layer for Flask (a Python web framework) and marshmallow (an object serialization/deserialization library) that adds additional features to marshmallow, including URL and Hyperlinks fields for HATEOAS-ready APIs. It also (optionally) integrates with Flask-SQLAlchemy.
Flask-SQLAlchemy is an extension for Flask that adds support for SQLAlchemy to your application. It aims to simplify using SQLAlchemy with Flask by providing useful defaults and extra helpers that make it easier to accomplish common tasks.
JSON Web Tokens (or JWTs) provide a means of transmitting information from the client to the server in a stateless, secure way. On the server, JWTs are generated by signing user information via a secret key, which are then securely stored on the client. This form of auth works well with modern, single page applications.
With their streamlined API client, you can quickly and easily send REST, SOAP, GraphQL, and GRPC requests directly within Insomnia. Link to visit insomnia website: - Link
Postman is a collaboration platform for API development. Postman's features simplify each step of building an API and streamline collaboration so you can create better APIs—faster. Link to visit postman website: - Link
For this project you need to have Docker and Docker compose installed
- Link to install Docker engine: Linux - Windows or Mac
- After installing docker engine install docker compose Linux Windows Mac
- To obtain my repository you must create a folder in a desired directory and within this folder open a terminal or use cmd in the case of windows.
- Clone the repo
git remote add origin [email protected]:aldomatus/python_rest_api_mysql_docker.git - Make the pull request from a branch called main
git pull origin main --allow-unrelated-histories -
In the folder where docker-compose.yml is located, open a terminal (the same address where you ran the previous line) and write the following command to build the image.
docker-compose build -
Once the previous execution is finished, you must run the services made in the build.
docker-compose up -
Inside the project folder open another command terminal and type the following to enter interactive mode and enter mysql
docker-compose exec db bash -
Then we enter mysql from the command console, it will ask you for a password, type root
mysql -h localhost -u root -p -
We create our database
CREATE DATABASE flask; -
We enter the database
USE flask; -
We do a query, and if the script has not given you problems you can see something like this:
 mysql> SELECT * FROM address limit 5;
+----+-------------+--------+--------------+----------------------------+--------------------------------+
| id | postal_code | state  | municipality | city                       | colony                         |
+----+-------------+--------+--------------+----------------------------+--------------------------------+
|  1 | 72000       | Puebla | Puebla       | Heroica Puebla de Zaragoza | Centro                         |
|  2 | 72000       | Puebla | Puebla       | Heroica Puebla de Zaragoza | San Francisco                  |
|  3 | 72010       | Puebla | Puebla       | Heroica Puebla de Zaragoza | Santa Mar�a la Rivera          |
|  4 | 72010       | Puebla | Puebla       | Heroica Puebla de Zaragoza | INFONAVIT Bosques 5 de Febrero |
|  5 | 72010       | Puebla | Puebla       | Heroica Puebla de Zaragoza | Residencial Santa Mar�a        |
+----+-------------+--------+--------------+----------------------------+--------------------------------+
-
Now we are ready to work and query from sql alchemy
-
If all goes well, our application should already be executing the app.py file with python using the mysql database, now we just have to check by entering the following link in our browser:
- You should have a response like this:
{"message": 'Welcome to Cura Deuda ® API'} - We load the csv data
- We read it with csv.reader
- This file is delimited by commas
- We started a counter to avoid the title line
- We save the data in each extraction in its corresponding variable
- We use sqlalchemy to send the data to mysql with the model
- we add our environment variables from flask
- We run the requirements file so that our libraries are installed
- We expose the port to use which is 5000
- With CMD we start Flask
- we download the image
- volumes
- Environment Variables
- ports
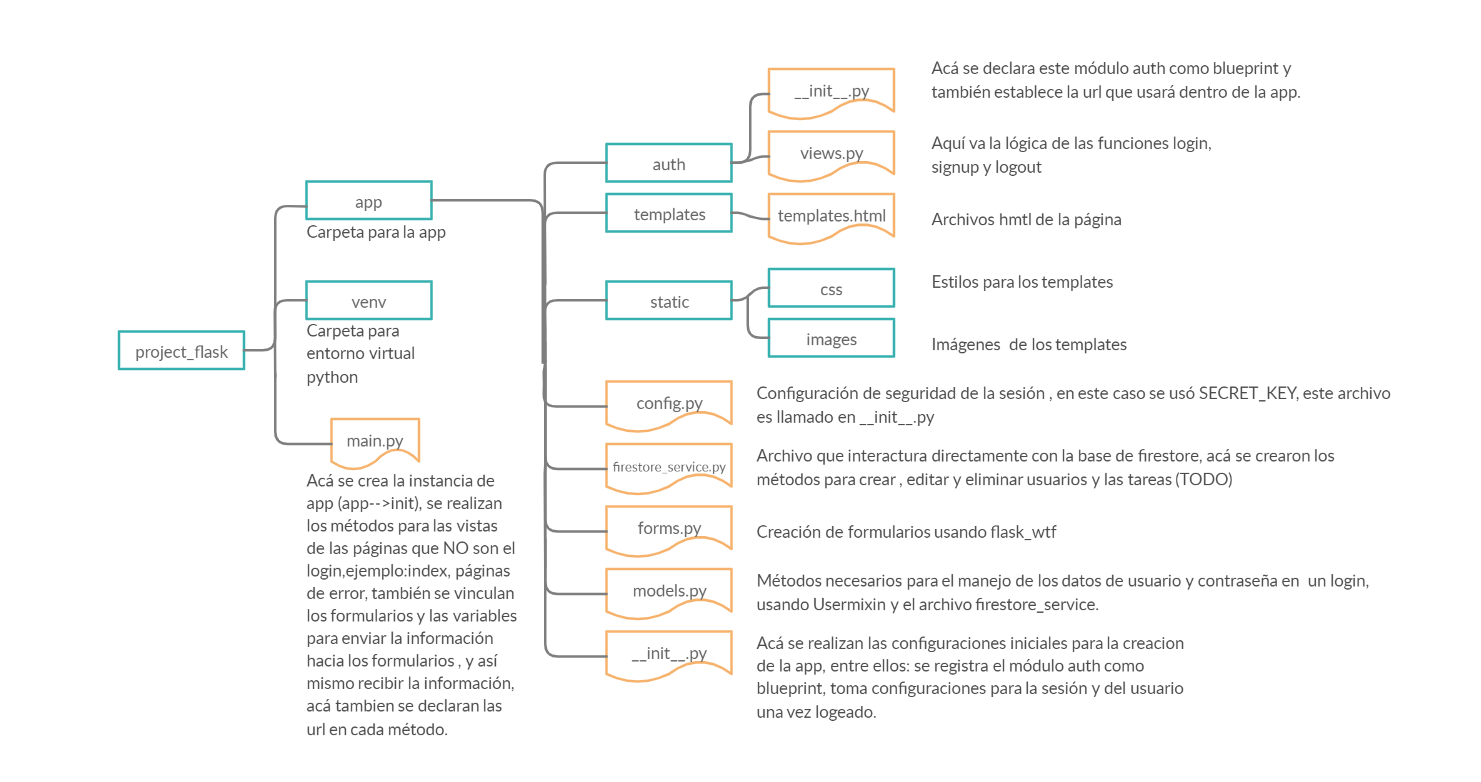
- The blue squares represent folders and the yellow figures are the files
- To obtain the colonies by zip code, you only have to obtain the zip code in the url and use a filter that brings us those colonies with the same zipcode, in the example we sent http: // localhost: 5000 / address / 72000 and it did not bring the json with the colonies with code 72000
- Fork the Project
- Create your Feature Branch (
git checkout -b feature/AmazingFeature) - Commit your Changes (
git commit -m 'Add some AmazingFeature') - Push to the Branch (
git push origin feature/AmazingFeature) - Open a Pull Request
First we analyze the SEPOMEX data to select the data that is important to us for the process of creating our application
The Mexican Postal Service, Correos de México has the function of keeping the population communicated by offering accessible, reliable and quality correspondence, messaging and parcel services, with the mission of being a factor of inclusion of the population, facilitator of economic activity and guarantor of interpersonal communications.

The columns selected for the project were colored blue, these are the data that will serve us for our application 🔵

For the construction of the database, the relationship entity model was made with which the relationships between each table were deduced.

git branch -m main is the command to rename the branch
http://localhost:5000/
I built a script to load the data with the help of the csv and sqlalchemy library as follows:
#-----------------Upload the SEPOMEX files to the database---------------
# Seed script
def import_data(file):
    """
    Seed script to import SEPOMEX data to MySQL database
    """
    with open(str(file)) as csv_file:
        csv_reader = csv.reader(csv_file, delimiter=',')
        line_counter = 0
        for row in csv_reader:
            if line_counter != 0:
                if line_counter == 100:
                    print('hola')
                postal_code=row[0]
                colony=row[1]
                municipality=row[3],
                state=row[4]
                city=row[5]

                new_address= Address(postal_code, state, municipality, city, colony)
                db.session.add(new_address)
                db.session.commit()
            line_counter += 1

import_data('puebla.csv')flask
Flask-SQLAlchemy==2.4.4
SQLAlchemy==1.3.20
pymysql
marshmallow-sqlalchemy
Flask-Migrate==2.5.3
Flask-Script==2.0.6
Flask-Cors==3.0.9
requests==2.25.0
flask-marshmallow
pika==1.1.0In our requirements file we write the flask libraries, the connection libraries for msql and with which we are going to manage the SQL data
flask
Flask-SQLAlchemy==2.4.4
SQLAlchemy==1.3.20
pymysql
marshmallow-sqlalchemy
Flask-Migrate==2.5.3
Flask-Script==2.0.6
Flask-Cors==3.0.9
requests==2.25.0
flask-marshmallow
pika==1.1.0Create the dockerfile that will have the necessary instructions to create a Python image that will later be converted into a single application.
FROM python:3.7-alpine
ENV PYTHONUNBUFFERED 1
RUN mkdir /code
WORKDIR /code
ENV FLASK_APP=app.py
ENV FLASK_RUN_HOST=0.0.0.0
RUN apk add --no-cache gcc musl-dev linux-headers
COPY requirements.txt requirements.txt
RUN pip install -r requirements.txt
EXPOSE 5000
COPY . .
CMD ["flask", "run"]
Docker Compose allows you through YAML files to instruct the Docker Engine to perform tasks, programmatically. Here we will install the mysql image, declare the environment variables for both mysql and Flask, and also declare the volumes.
version: "3.8"

services:
  db:
    image: mysql:5.7
    volumes:
      - .dbdata:/var/lib/mysql
    restart: always
    environment:
      MYSQL_ROOT_PASSWORD: root
      MYSQL_DATABASE: shipping_01
      MYSQL_PASSWORD: root
    ports:
      - 3307:3306

  backend:
    build:
      context: .
      dockerfile: Dockerfile
    ports:
      - "5000:5000"

    volumes:
      - .:/code
    depends_on:
      - db

    env_file: .env
This file contains our environment variables that will be read by the dockerfile.
FLASK_DEBUG=True
FLASK_APP=src/app.py
FLASK_RUN_HOST=0.0.0.0
ALLOWED_HOSTS=127.0.0.1,localhost
To make the modularization of our project we can make use of blueprints
Blueprints: they are a series of routes that we can integrate into our application but in another directory that is, it will allow me to modulate the application into small applications that do specific things such as authentication or the welcome part, or if we have a task dashboard for Example we would also create a blueprint for the specific tasks and it is easier to handle.
With this base you can make any flask code, modify the API and adapt it to your projects. It is important that you study the docker code to understand what is behind each file in both the Docker and the docker-compose.yml.
# Search for colonies by zip code
@app.route('/address/cp/<string:postal_code>', methods=['GET'])
def get_colonies(postal_code):
    colonies = Address.query.filter_by(postal_code=postal_code).all()
    result = addresses_schema.dump(colonies)
    return jsonify(result)

# search for colonies, municipalities and states by name
@app.route('/address/nameplaces/<string:place>', methods=['GET'])
def get_places(place):
    colonies = Address.query.filter_by(colony=place).all()
    result = addresses_schema.dump(colonies)
    return jsonify(result)

we create our json to send, and we send it with the POST method, the api responds with the data that was saved in the database we create our json to send
{
"postal_code": "45672",
"state": "Yucatán",
"municipality": "Guadalupe",
"city": "Mérida",
"colony": "Centro"
}
# To create news addresses
@app.route('/address', methods=['POST'])
def create_address():
# Receive requests
if request.method == 'POST':
postal_code = request.json['postal_code']
state = request.json['state']
municipality = request.json['municipality']
city = request.json['city']
colony = request.json['colony']
new_address= RemitentAddress(postal_code, state, municipality, city, colony)
db.session.add(new_address)
db.session.commit()
return address_schema.jsonify(new_address)

To add a parcel delivery record We use the post method to receive the data from the front-end, then we save the data sent by request in variables which with SQLALchemy we can put into the database, at the end we commit so that our data is registered in mysql and that's it! we have a shipment saved.
I have a fake log file for testing 🧪🧪🧪
{
"_comment": "shipping--------------------------",
"contents": "Books",
"product_value": 1000,
"description": "artificial intelligence and math books",
"delivered": 1,
"shipping_price": 20,
"__comment2__": "Remitent address--------------",
"postal_code_r": "68000",
"state_r": "Oaxaca",
"municipality_r": "Huajuapan",
"city_r": "Huajuapan",
"colony_r": "Reforma",
"__comment3__": "Remitent info-----------------",
"name_r": "Pedro",
"last_name_r": "Lopez",
"address_r": "Merida Yucatan",
"phone_r": "955768952",
"postal_code_r": "72000",
"__comment4__": "Destinatary address-----------",
"postal_code_d": "68000",
"state_d": "Oaxaca",
"municipality_d": "Huajuapan",
"city_d": "Huajuapan",
"colony_d": "Reforma",
"__comment5__": "Destinatary info--------------",
"name_d": "Pedro",
"last_name_d": "Lopez",
"address_model_d": "Merida Yucatan",
"phone_d": "955744982",
"postal_code_d": "72000"
}
Save parcel service records
@app.route('/shippings', methods=['POST', 'GET'])
def create_shipping():

    # Receive requests
    if request.method == 'POST':

        # shipping information
        contents = request.json['contents']
        product_value = request.json['product_value']
        description = request.json['description']
        delivered = request.json['delivered']
        shipping_price = request.json['shipping_price']
        shipping_date = datetime.today()

        new_shipping= Shipping(contents, product_value, description, delivered, shipping_price, shipping_date)
        db.session.add(new_shipping)


        # Remitent information
        name_r = request.json['name_r']
        last_name_r = request.json['last_name_r']
        phone_r = request.json['phone_r']

        postal_code_r = request.json['postal_code_r']
        state_r = request.json['state_r']
        municipality_r = request.json['municipality_r']
        city_r = request.json['city_r']
        colony_r = request.json['colony_r']

        new_address_r= RemitentAddress(postal_code_r, state_r, municipality_r, city_r, colony_r)
        db.session.add(new_address_r)

        new_remitent = Remitent(name_r, last_name_r, phone_r)
        db.session.add(new_remitent)

        # Destinatary information
        name_d = request.json['name_d']
        last_name_d = request.json['last_name_d']
        address_model_d = request.json['address_model_d']
        phone_d = request.json['phone_d']
        postal_code_d = request.json['postal_code_d']

        postal_code_d = request.json['postal_code_d']
        state_d = request.json['state_d']
        municipality_d = request.json['municipality_d']
        city_d = request.json['city_d']
        colony_d = request.json['colony_d']

        new_address_d= DestinataryAddress(postal_code_d, state_d, municipality_d, city_d, colony_d)
        db.session.add(new_address_d)

        new_destinatary= Destinatary(name_d, last_name_d, address_model_d, phone_d, postal_code_d)
        db.session.add(new_destinatary)

        db.session.commit()
        return destinatary_schema.jsonify(new_destinatary)


    return jsonify({'message': 'Data stored successfully!'})

See the open issues for a list of proposed features (and known issues).
Contributions are what make the open source community such an amazing place to be learn, inspire, and create. Any contributions you make are greatly appreciated.
Distributed under the MIT License. See LICENSE for more information.
Aldo Matus - Linkedin Facebook
Project Link: Repository
