Giter Site home page Giter Site logo

esp-360-remote's Introduction

ESP-360-REMOTE

An all-in-one remote based on the ESP32-WROOM-32E

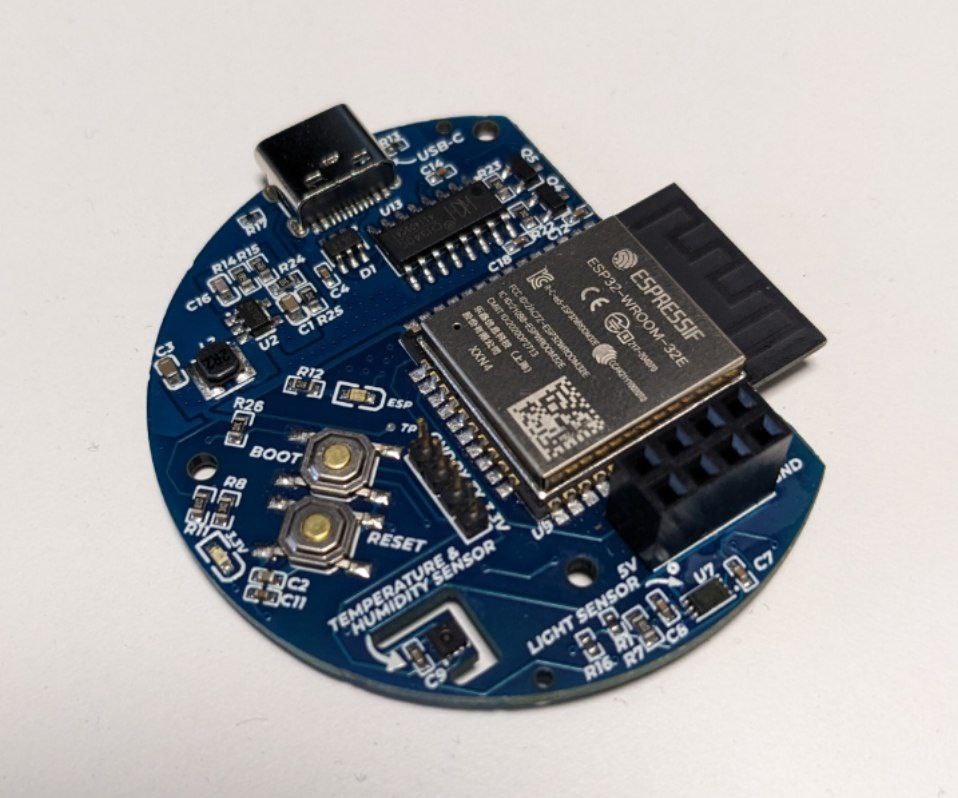
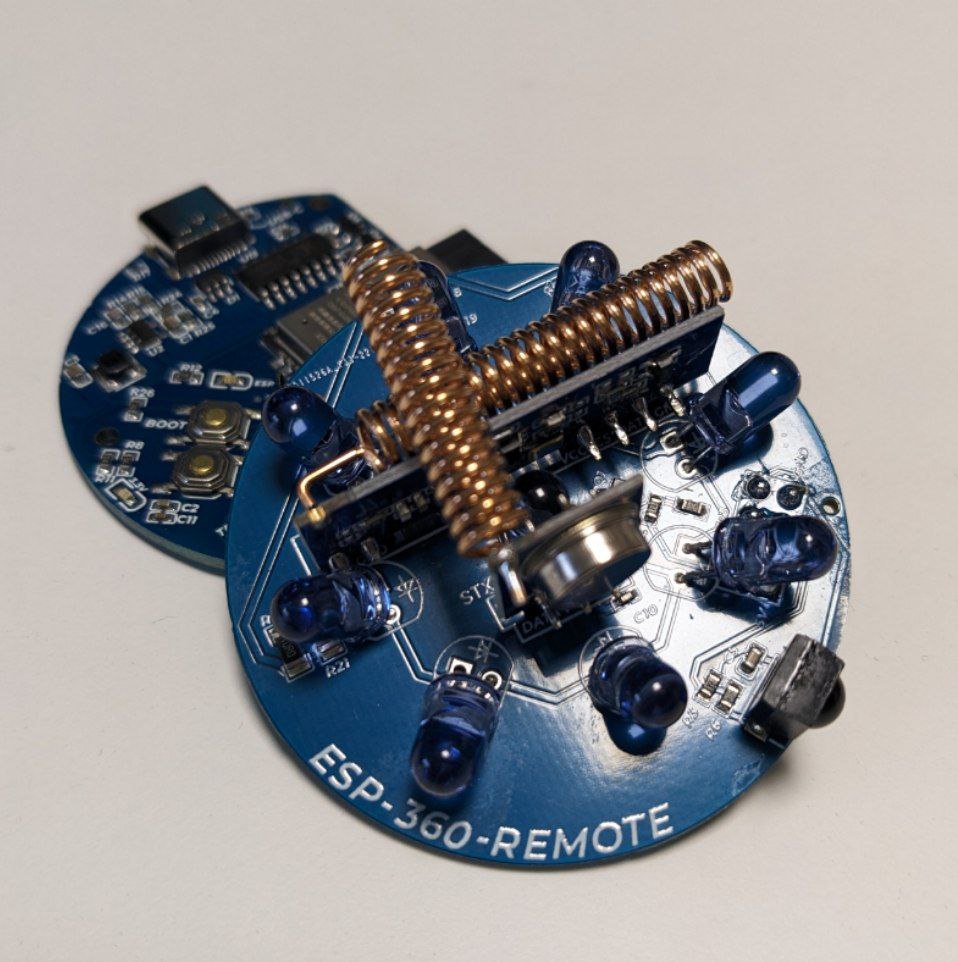
This board boasts a RF transmitter and receiver, while IR LEDs are arranged in a circle to provide omnidirectional coverage. Additionally, it comes equipped with a temperature and humidity sensor, as well as an ambient light sensor. To top it off, the board can be powered and programmed through a USB Type-C port, which is ESD protected. Based on the ESP32-WROOM-32E, this board can be effortlessly configured with ESPHome, allowing for seamless control via Home Assistant. You can swap the 433MHz modules with 315MHz ones because the SRX/STX882 modules come in both version with the same pinout, so you can choose which one fit your needs the best

I think the form factor it's nice because there are two round stackable layers.

The first layer of the board includes the ESP32, the two sensors, the buck converter and the USB circuitry.

The second layer of the board features the IR leds and receiver and the RF modules.

Inside the enclosure just stack the two layers using the x8 female header near the ESP:

Then screw the top part and turn the board on!

Now you can also program the board with the USB-C. I suggest to use ESPHOME beacuse it's super easy to setup and to integrate with Home Assistant

Installation

Once you receive the ESP 360 Remote, if you don't have a running server of Home Assistant, you will need to follow the instructions in INSTALL.md to use the board as a "standalone" product, otherwise just follow the quick start guide.

Home Assistant Integration

ESP 360 REMOTE is designed to be fully integrated into Home Assistant and leverage the capabilities provided by ESPHome. If you decide to use the configuration file provided in this repo, you will see these exposed entities:

Transmitting signals

Thanks to the ease of use of ESPHome, you can create custom switches or integrate existing components (see https://esphome.io/components/climate/climate_ir.html) by directly modifying the yaml file, and all of this will be immediately visible on Home Assistant. Alternatively, if you want to take an even simpler route, you can use two integrated services to send raw IR and RF signals:

This way you won't need to tinker with the ESPHome configuration and you'll be able to send signals directly from your automations!

Receiving signals

When the board receives an RF signal, the esphome.rf_code_received event will be triggered in Home Assistant. From there, you can directly see the protocol and code of the received signal. The same feature will soon be available for the infrared receiver as well.

In this case, I received the code 721136 (10110000000011110000 in binary) and protocol 2

SmartIR Integration

ESPHome ensures compatibility with the widely-used SmartIR custom component for Home Assistant, thanks to its built-in support for transmitting raw signals. If you already have a SmartIR configuration in place, all you need to do is specify the appropriate service for transmitting signals and a code that is compatible with ESPHome. Here's an example of what your configuration.yaml file could look like:

smartir:

climate:
  - platform: smartir
    name: Livingroom AC
    unique_id: livingroom_ac
    device_code: 7065
    controller_data: esp360remote_send_ir_raw
    temperature_sensor: sensor.living_room_temperature

For more information, check out the SmartIR repo.

Dimensions

The board is remarkably compact, measuring just 5cm in diameter and 3.5cm in height without the enclosure. This small form factor makes it a perfect fit for any space. To put its size into perspective, it's smaller than the Broadlink RM3 Mini, which is the only device I have available for comparison.

Enclosure

Within this repository, you can also access the two STL files for the enclosure, which enables you to print it in your preferred color to match its intended location. The pre-designed enclosure includes openings near the USB-C port and two built-in sensors to optimize airflow and cool down the temperature sensor. The top part of the enclosure can be screwed on, so there's no need for additional screws or components. I've only tested printing with light-colored PLA, and the IR transmission was not impacted at all. However, I can't make any claims about other materials or dark colors.

OSHWA Certification

In the end, the project also has the OSHWA certification with UID IT000012, so it's completely open source!

License:

oshw_facts

esp-360-remote's People

Contributors

ale1800 avatar askpatrickw avatar nathmo avatar

Stargazers

 avatar  avatar  avatar  avatar  avatar  avatar  avatar  avatar  avatar  avatar  avatar  avatar  avatar  avatar  avatar  avatar  avatar  avatar  avatar  avatar  avatar  avatar  avatar  avatar  avatar  avatar  avatar  avatar  avatar  avatar  avatar  avatar  avatar  avatar  avatar  avatar  avatar  avatar  avatar  avatar  avatar  avatar  avatar  avatar  avatar  avatar  avatar  avatar  avatar  avatar  avatar  avatar  avatar  avatar  avatar  avatar  avatar  avatar  avatar  avatar  avatar  avatar  avatar  avatar  avatar  avatar  avatar  avatar  avatar  avatar  avatar  avatar  avatar  avatar  avatar  avatar  avatar  avatar  avatar  avatar  avatar  avatar  avatar  avatar  avatar  avatar  avatar  avatar  avatar  avatar  avatar  avatar  avatar  avatar  avatar  avatar  avatar  avatar  avatar  avatar

Watchers

 avatar  avatar  avatar  avatar  avatar  avatar  avatar  avatar  avatar

esp-360-remote's Issues

Print Setting?

Can you add the print settings you are using to the STL file folder please

RF Events not triggering

Before I buy one of these awesome products I decided to slap a DIY version together to confirm I can get my devices working as required before spending the money (I have most parts readily available).

I am not able to receive any RF codes using the home assistant event developer tool. Just wanted to check I am not doing anything wrong.

substitutions:
  name: "esp-remote"
  room: "Lounge"
  friendly_name: "ESP Remote"
  project_name: "kaneo.esp_remote"
  project_version: "0.0.1"

esphome:
  name: "${name}"
  name_add_mac_suffix: false
  friendly_name: "${friendly_name}"
  project:
    name: "${project_name}"
    version: "${project_version}"

esp32:
  board: esp32dev

logger:

api:

  services:
    - service: send_rf_raw
      variables:
        protocol_number: int
        raw_data: string
      then:
        - remote_transmitter.transmit_rc_switch_raw:
            transmitter_id: RF_TX
            protocol: !lambda 'return  esphome::remote_base::RC_SWITCH_PROTOCOLS[protocol_number];'
            code: !lambda 'return raw_data;'

ota:

web_server:

ethernet:
  type: LAN8720
  mdc_pin: GPIO23
  mdio_pin: GPIO18
  clk_mode: GPIO17_OUT
  phy_addr: 0
  power_pin: GPIO12
  domain: ".lan"

remote_receiver:
  - id: RF_RX
    pin: 
      number: GPIO5
      inverted: True
    dump: 
      - rc_switch
    tolerance: 35%
    filter: 200us
    idle: 4ms
    buffer_size: 10kb
    on_rc_switch:
      - homeassistant.event:
          event: esphome.rf_code_received
          data:
            protocol: !lambda 'return x.protocol;'
            code: !lambda 'return x.code;'

#Setting up IR and RF transmitters
remote_transmitter:
  - id: RF_TX
    pin: GPIO14
    carrier_duty_percent: 100%

Everything is connected up as per the config above.
I then go the developer tool events section and listen for esphome.rf_code_received:
image

I point my blinds RF (433MHz) remote and click some buttons but nothing pops up.

Obviously can't attest for the quality but these are the receivers/transmitters I bought and am using:
https://www.aliexpress.com/item/32735811163.html?spm=a2g0o.new_account_index.0.0.286725b9MZf6XG

I am using the Climax ESP32 POE board:
https://www.olimex.com/Products/IoT/ESP32/ESP32-POE/open-source-hardware

Thanks in advance!!

Bottom enclosure thickness

When I tried to have JLPCB 3D print the enclosure in 9000R resin, they complained that the bottom piece wall thickness was too thin. They suggested it be at least 0.8mm, or even better 1.5mm.

bottom

commit: dfe3e82

Do not hardcode locations into configuration YAML

In the configuration YAMLs, the "Living Room" location is hardcoded into the files. Location is usually part of the home automation configuration. Sensor 1 is in RoomA. Identical Sensor 2 is in RoomB.

Happy to submit a PR if that makes sense to you.

Recommend Projects

  • React photo React

    A declarative, efficient, and flexible JavaScript library for building user interfaces.

  • Vue.js photo Vue.js

    ๐Ÿ–– Vue.js is a progressive, incrementally-adoptable JavaScript framework for building UI on the web.

  • Typescript photo Typescript

    TypeScript is a superset of JavaScript that compiles to clean JavaScript output.

  • TensorFlow photo TensorFlow

    An Open Source Machine Learning Framework for Everyone

  • Django photo Django

    The Web framework for perfectionists with deadlines.

  • D3 photo D3

    Bring data to life with SVG, Canvas and HTML. ๐Ÿ“Š๐Ÿ“ˆ๐ŸŽ‰

Recommend Topics

  • javascript

    JavaScript (JS) is a lightweight interpreted programming language with first-class functions.

  • web

    Some thing interesting about web. New door for the world.

  • server

    A server is a program made to process requests and deliver data to clients.

  • Machine learning

    Machine learning is a way of modeling and interpreting data that allows a piece of software to respond intelligently.

  • Game

    Some thing interesting about game, make everyone happy.

Recommend Org

  • Facebook photo Facebook

    We are working to build community through open source technology. NB: members must have two-factor auth.

  • Microsoft photo Microsoft

    Open source projects and samples from Microsoft.

  • Google photo Google

    Google โค๏ธ Open Source for everyone.

  • D3 photo D3

    Data-Driven Documents codes.