This project is the final project of term 3 of the Udacity Self-Driving Car Engineer Nanodegree. Utilizing ROS nodes to implement waypoint tracking, control and classification of traffic lights, the final code will be implemented on a real-life autonomous vehichle, named Carla. The vehicle will be driven around a test track with the team's code.
| Name | Slack | |
|---|---|---|
| Zeng Yang [Team Lead] | [email protected] | @zeyang |
| Allen Lau | [email protected] | @allen8r |
| Barend van Graan (a.k.a Bennie) | [email protected] | @g4udevil |
| Swapnil Devikar | [email protected] | @swap_1712 |
| Praveen Sukumaran | [email protected] | @praveen |
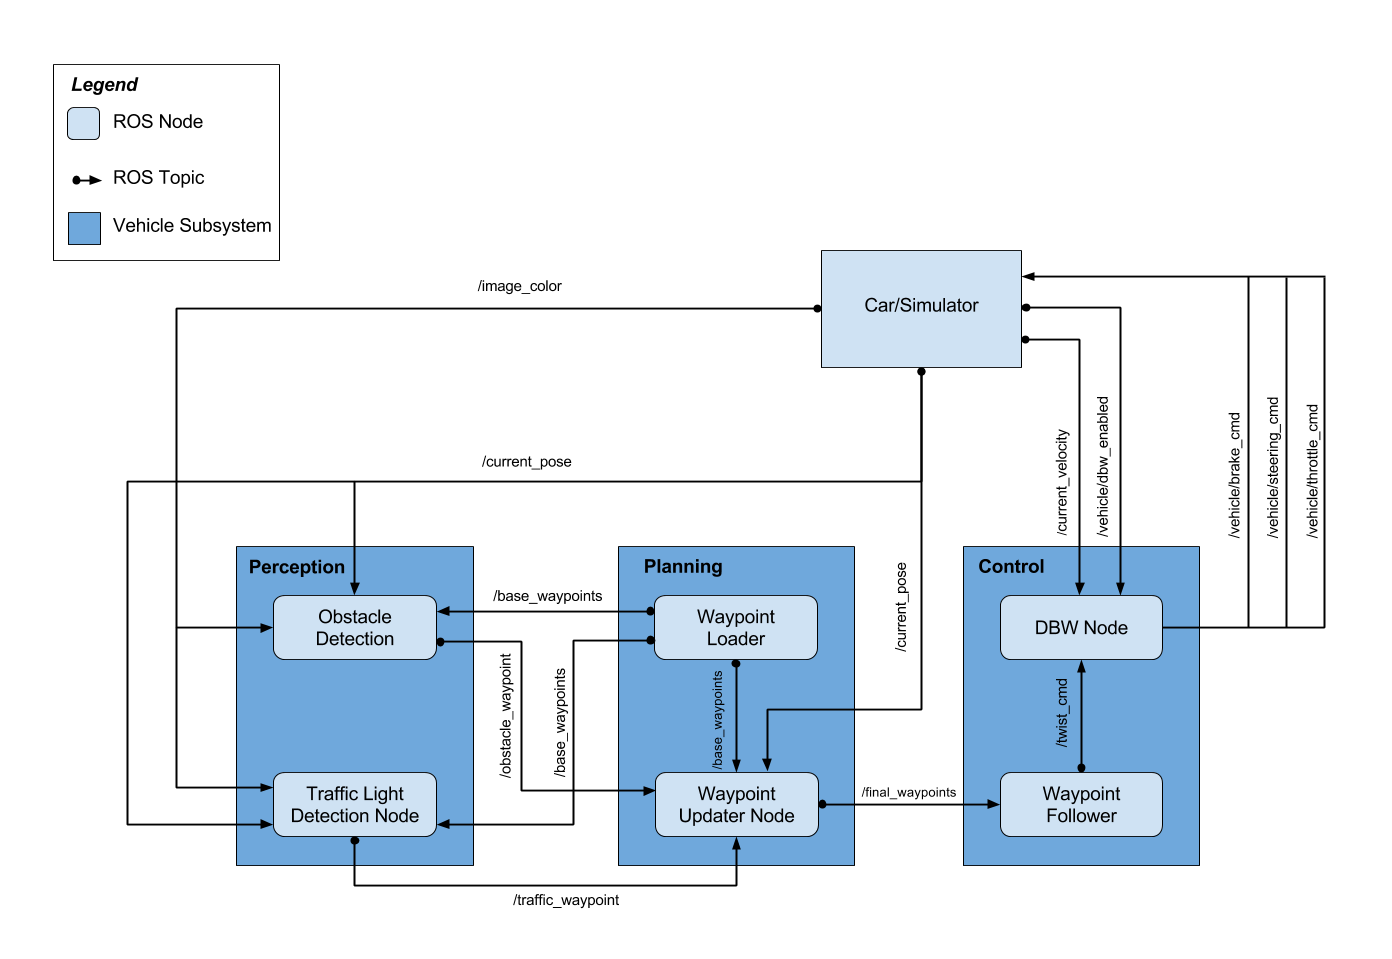
The following system architecture diagram shows the ROS nodes and topics used in the project.
Waypoint Updated node is a part of path planning block, along with the Waypoint Loader node. We have implemented Waypoint Updater node as a part of this project. Waypoint Loader node implementation is already provided. The purpose of this node is to update the target velocity property of each waypoint based on traffic light and obstacle detection data. A waypoint in this case is a data structure that embeds position information along the driving track. These positions serve as target positions for the car. The car will eventually plan its trajectory along the subset of these waypoints.
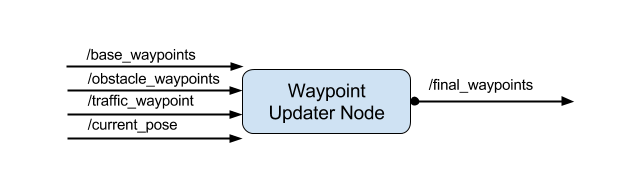
The inputs to the Waypoint Updater node are following topics:
-
/base_waypoints: Base waypoints is a list of all the waypoints along the driving track. These are published to the car only once at the beginning. The car is responsible for figuring out, what waypoints are ahead of its current position. Waypoint Updater gets this input from the Waypoint Loader node.
-
/traffic_waypoint: Waypoint updater receives this waypoint information from the Traffic light detection node. Traffic waypoint is the waypoint at which the car is expected to come to a complete stop. Waypoint Updater node is responsible for planning the velocities for waypoints leading up to the traffic waypoint, so that the car smoothly decelerates and eventually stops at traffic waypoint.
-
/current_pose: This is the current position of the car as reported by the simulator used for testing. Waypoint Updater will use this information to estimate Car's current position relative to the base waypoints
-
/obstacle_waypoints: Waypoint updater can subscribe to this waypoints information from Obstacle Detection node and determine the obstacle positions in terms of their waypoint positions. For the purpose of this project, we are not using this information since the testing is going to be performed in a controlled environment where there will be no obstacles. So the car only has to respect the traffic light states
As an output, the Waypoint Updater node will publish a fixed number of waypoints ahead of the vehicle with the correct target velocities, depending on traffic lights How many waypoints to publish ahead of car's current position depends on various factors such as visibility horizon, driving speed of the car as well as the processing power. In our testing environment we determined that the final waypoints count in the range of 75-100 leads to an acceptable performance. The environment configuration was as follows:
- Host machine: Windows 10 Desktop, 16 Gb RAM, 6Gb NVDIA 1060 GTX graphics card, Intel i7 8700k Processor
- Guest machine: Udacity provided VM running on VirtualBox
- Simulator running on HOST machine
- ROS running on GUEST machine
- Waypoint updater has subscribed to the following topics:
rospy.Subscriber('/current_pose', PoseStamped, self.pose_cb)
rospy.Subscriber('/base_waypoints', Lane, self.waypoints_cb)
rospy.Subscriber('/traffic_waypoint', Int32, self.traffic_cb)
- The waypoint updater will change waypoints according to the status of the traffic lights and
waypoints will be published using
publish_waypointsAPI usingfinal_waypoints_pubpublisher:
self.final_waypoints_pub = rospy.Publisher('final_waypoints', Lane, queue_size=1)
- Final waypoints are generated from base waypoints in the
generate_lanemethod, that is responsible for returningLaneobject to the final waypoints publisher.- This method makes use of
get_closest_waypoint_idxhelper method, which in turn uses KDTree to determine the closest waypoint index. - Based on the input from Traffic Light Detection node, this method also determines
the target velocities for each waypoint using
decelerate_waypointshelper method
- This method makes use of
While driving on the simulator, when the car reaches at the end of the track, it will stop driving.
The reason for this is that, there is no roll-over of waypoints. Once the car has used all the waypoints, there are no further waypoints to process.
Additional logic can be implemented to keep the car driving around the track for indifinite period of time/loops. This logic is implemented in tl_detection_debug branch
and the behavior is controlled with KEEP_LOOPING flag.
Test vehicle will be controlled with drive by wire system, which electronically controls throttle, brake and steering. DBW node implements logic to accept target linear and angular velocities and publish throttle, brake, and steering commands to respective topics. In addition, DBW node outputs can also be turned off and the control can be transferred to the driver using a dedicated flag.
This "drive-by-wire" node subscribes to /twist_cmd message which provides the proposed linear and angular velocities.
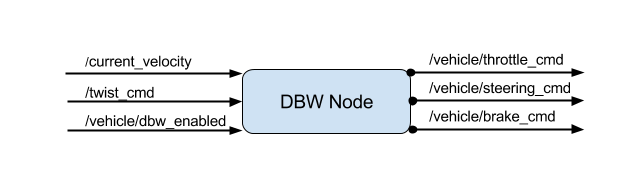
The inputs to the DBW node are following topics:
-
/twist_cmd: Twist commands are published by the waypoint follower node. DBW node subscribes to this topic and produces the required output in terms of throttle, brake, and steering commands.
-
/current_velocity: This is published by the simulator in our case and used by DBW node to determine the linear velocity of the car and provide it to the controller
-
/vehicle/dbw_enabled: This is a status of DBW electronic system that is also published by the simulator in our case. DBW node will use this status to determine whether the brake, throttle and steering are to be published to respective topics or not
Outputs from the DBW node are the throttle, brake and steering commands published to the throttle_cmd, brake_cmd and steering_cmd topics.
Implementation of DBW node is fairly straightforward.
DBW node subscribes to the required topics. In our case, we have subscribed to twist_cmd, current_velocity and /vehicle/dbw_enabled topics:
rospy.Subscriber('/vehicle/dbw_enabled', Bool, self.dbw_enabled_cb)
rospy.Subscriber('/twist_cmd',TwistStamped, self.twist_cb)
rospy.Subscriber('/current_velocity', TwistStamped, self.velocity_cb)
The internal logic in DBW node extracts the necessary information from the twist command and current velocity messages. Such as linear and angular velocity. And publishes to respective topic using publish method as follows:
self.steer_pub = rospy.Publisher('/vehicle/steering_cmd',SteeringCmd, queue_size=1)
self.throttle_pub = rospy.Publisher('/vehicle/throttle_cmd',ThrottleCmd, queue_size=1)
self.brake_pub = rospy.Publisher('/vehicle/brake_cmd',BrakeCmd, queue_size=1)
The perception block consists of Obstacle Detection and Traffic Light Detection node. For the purpose of this project, we're only considering traffic lights as obstacles.
Traffic Light Detection node takes in data from the /image_color, /current_pose, and /base_waypoints topics and publishes the locations to stop for red traffic lights to the /traffic_waypoint topic. As mentioned earlier, Waypoint Updater node will make use of this information to determine vehicle velocity for given waypoints.
The traffic light classifier node is implemented separately and is independent of the Traffic light Detection node, which implements the logic to publish information regarding where the vehicle should come to a stop.
The inputs and outputs to Traffic Light Detection node are shown below:
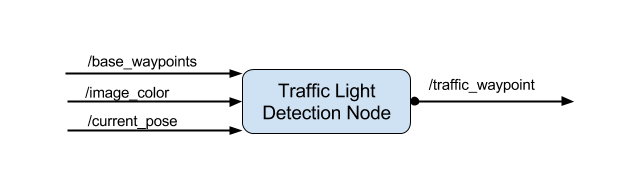
The inputs to Traffic Light Detection node are:
-
/base_waypoints: Provides the complete list of waypoints for the course. This is the same list as the list used by Waypoint Updater node and is sent only once at initialization.
-
/image_color: This topic provides an image stream from the car's camera. These images are used to determine the color of upcoming traffic lights by traffic light classifier node.
-
/current_pose: Traffic Light Detection node will receive this information from the simulator (or car's localization block in real world scenario) to determine the current position of the car.
The output of Traffic Light Detection node is:
- /traffic_waypoint: This is the topic to which Traffic Light detection node will publish the index of the waypoint for nearest upcoming red light's stop line. This will be used as an input by waypoint updater node.
There are two tasks that are performed by traffic light detection node:
-
Use the vehicle's location and the
(x, y)coordinates for traffic lights to find the nearest visible traffic light ahead of the vehicle. This takes place in theprocess_traffic_lightsmethod oftl_detector.py. To find the closest waypoints to the vehicle and lights,get_closest_waypointmethod is used. Using these waypoint indices, we determine which light is ahead of the vehicle along the list of waypoints. -
Use the camera image data to classify the color of the traffic light. The core functionality of this step takes place in the
get_light_statemethod oftl_detector.py. In order to train the classifier we have utilized Tensorflow Object Detection API. Detailed information about setup, training method is provided by @allen8r here:<project path>/src/master/ros/src/tl_detector/docs/training_the_classifiers.mdA python notebook with proof of concept for the classifier is provided by @allen8r here:<project path>/src/master/ros/src/tl_detector/poc/obj_traffic_light_hybrid_detector.ipynb
This is the project repo for the final project of the Udacity Self-Driving Car Nanodegree: Programming a Real Self-Driving Car. For more information about the project, see the project introduction here.
Please use one of the two installation options, either native or docker installation.
-
Be sure that your workstation is running Ubuntu 16.04 Xenial Xerus or Ubuntu 14.04 Trusty Tahir. Ubuntu downloads can be found here.
-
If using a Virtual Machine to install Ubuntu, use the following configuration as minimum:
- 2 CPU
- 2 GB system memory
- 25 GB of free hard drive space
The Udacity provided virtual machine has ROS and Dataspeed DBW already installed, so you can skip the next two steps if you are using this.
-
Follow these instructions to install ROS
- ROS Kinetic if you have Ubuntu 16.04.
- ROS Indigo if you have Ubuntu 14.04.
-
- Use this option to install the SDK on a workstation that already has ROS installed: One Line SDK Install (binary)
-
Download the Udacity Simulator.
Build the docker container
docker build . -t capstoneRun the docker file
docker run -p 4567:4567 -v $PWD:/capstone -v /tmp/log:/root/.ros/ --rm -it capstoneTo set up port forwarding, please refer to the instructions from term 2
- Clone the project repository
git clone https://github.com/udacity/CarND-Capstone.git- Install python dependencies
cd CarND-Capstone
pip install -r requirements.txt- Make and run styx
cd ros
catkin_make
source devel/setup.sh
roslaunch launch/styx.launch- Run the simulator
- Download training bag that was recorded on the Udacity self-driving car.
- Unzip the file
unzip traffic_light_bag_file.zip- Play the bag file
rosbag play -l traffic_light_bag_file/traffic_light_training.bag- Launch your project in site mode
cd CarND-Capstone/ros
roslaunch launch/site.launch- Confirm that traffic light detection works on real life images


