start-from-zero-vue's People
Contributors

Stargazers
Watchers

start-from-zero-vue's Issues
初始化之Vue - 3
初始化之Vue - 3
// src/core/instance/index.js
import { initMixin } from './init'
import { stateMixin } from './state'
import { renderMixin } from './render'
import { eventsMixin } from './events'
import { lifecycleMixin } from './lifecycle'

function Vue (options) {
  this._init(options)
}

initMixin(Vue)
stateMixin(Vue)
eventsMixin(Vue)
lifecycleMixin(Vue)
renderMixin(Vue)

export default Vue
这里分为 2 部分,
- Vue构造函数阶段
- Mixin混入阶段
这里会直接执行的是 Mixin混入阶段,那我们先从这里入手
Mixin混入阶段
initMixin
// src/core/instance/init.js
export function initMixin (Vue: Class<Component>) {
  Vue.prototype._init = function (options?: Object) {
    // 省略代码
  }
}
这里作用即为 Vue的原型链绑定了个_init 方法。(PS:留到构造函数执行阶段再来分析)
stateMixin
// src/core/instance/state.js
export function stateMixin (Vue: Class<Component>) {
  // flow 对于直接声明的定义对象存在不知原因的问题
  // 因此在使用Object.defineProperty时,我们必须在程序上进行构建这里的对象。
  const dataDef = {}
  dataDef.get = function () { return this._data }
  const propsDef = {}
  propsDef.get = function () { return this._props }

  // 代理$data 为 this._data
  Object.defineProperty(Vue.prototype, '$data', dataDef)
  // 代理$props 为 this._props
  Object.defineProperty(Vue.prototype, '$props', propsDef)

  // 给 Vue 原型链绑定实例方法$set,$delete,$watch
  // 具体实现后续再分析
  Vue.prototype.$set = set
  Vue.prototype.$delete = del
  Vue.prototype.$watch = function (
    expOrFn: string | Function,
    cb: any,
    options?: Object
  ): Function {
    // 省略代码
  }
}-
代理实例property
$data与$props
-
暴露实例方法/数据
$watch, $set, $delete
eventsMixin
// src/core/instance/events.js
export function eventsMixin (Vue: Class<Component>) {
	const hookRE = /^hook:/

	Vue.prototype.$on = function (event: string | Array<string>, fn: Function): Component {
    // 省略代码
  }

	Vue.prototype.$once = function (event: string, fn: Function): Component {
    // 省略代码
  }
  Vue.prototype.$off = function (event?: string | Array<string>, fn?: Function): Component {
    // 省略代码
  }
  Vue.prototype.$emit = function (event: string): Component {
    // 省略代码
  }
}-
暴露实例方法/事件
$on, $once, $off, $emit
lifecycleMixin
// src/core/instance/lifecycle.js
export function lifecycleMixin (Vue: Class<Component>) {
  Vue.prototype._update = function (vnode: VNode, hydrating?: boolean) {
    // 省略代码
  }
  Vue.prototype.$forceUpdate = function () {
    // 省略代码
  }
  Vue.prototype.$destroy = function () {
    // 省略代码
  }
}-
绑定原型链方法**_update**
-
暴露实例方法/生命周期
$forceUpdate 与$destroy
renderMixin
// src/core/instance/render.js
export function renderMixin (Vue: Class<Component>) {
  // 安装运行时工具
  installRenderHelpers(Vue.prototype)
	Vue.prototype.$nextTick = function (fn: Function) {
    // 省略代码
  }
  Vue.prototype._render = function (): VNode {
    // 省略代码
  }
}-
执行
installRenderHelpers(Vue.prototype) -
暴露实例方法/生命周期
$nextTick
-
绑定原型链方法**_render**
installRenderHelpers
// src/core/instance/render-helpers/index.js
export function installRenderHelpers (target: any) {
  target._o = markOnce
  target._n = toNumber
  target._s = toString
  target._l = renderList
  target._t = renderSlot
  target._q = looseEqual
  target._i = looseIndexOf
  target._m = renderStatic
  target._f = resolveFilter
  target._k = checkKeyCodes
  target._b = bindObjectProps
  target._v = createTextVNode
  target._e = createEmptyVNode
  target._u = resolveScopedSlots
  target._g = bindObjectListeners
  target._d = bindDynamicKeys
  target._p = prependModifier
}
给 **target(Vue.prototype)**绑定一些方法,用于渲染时使用,具体实现后续分析
Vue构造函数阶段
当我们执行new Vue(options),即触发 this._init(options).
initMixin阶段给 Vue.prototype 绑定了**_init** 方法。
// src/core/instance/init.js
let uid = 0

Vue.prototype._init = function (options?: Object) {
    const vm: Component = this
    // 一个 uid --> 性能标记时使用
    vm._uid = uid++

    // 设一个标识-->避免被观察到
    vm._isVue = true
    // 合并属性
    if (options && options._isComponent) {
      // 实例是组件时
      // 优化内部组件实例化
      // 因为动态选项合并非常慢,而且没有内部组件选项需要特殊处理。
      initInternalComponent(vm, options)
    } else {
      // 合并options
      vm.$options = mergeOptions(
        resolveConstructorOptions(vm.constructor),
        options || {},
        vm
      )
    }
    /* istanbul ignore else */
    if (process.env.NODE_ENV !== 'production') {
      // 忽略此处,非生产环境时执行
      // 后续分析
      initProxy(vm)
    } else {
      // 把 vm指向 vm._renderProxy
      vm._renderProxy = vm
    }
    // 保存真实的this 指向
    vm._self = vm

  	// 下文分析
    initLifecycle(vm)
    initEvents(vm)
    initRender(vm)
    callHook(vm, 'beforeCreate')
    initInjections(vm) // resolve injections before data/props
    initState(vm)
    initProvide(vm) // resolve provide after data/props
    callHook(vm, 'created')

  	// 如果 options 设置了 el,则直接触发vm.$mount(vm.$options.el)
    if (vm.$options.el) {
      vm.$mount(vm.$options.el)
    }
  }
设立 uid
// src/core/instance/init.js
let uid = 0;

Vue.prototype._init = function (options?: Object) {
  // 省略部分代码

  // 一个 uid --> 性能标记时使用
 	vm._uid = uid++

  // 省略部分代码
}
设立_isVue 标识
// src/core/instance/init.js
// 设一个标识-->避免被观察到
vm._isVue = true
合并属性
// src/core/instance/init.js
// 合并属性
if (options && options._isComponent) {
  // 实例是组件时
  // 优化内部组件实例化
  // 因为动态选项合并非常慢,而且没有内部组件选项需要特殊处理。
  initInternalComponent(vm, options)
} else {
  // 合并options
  vm.$options = mergeOptions(
    resolveConstructorOptions(vm.constructor),
    options || {},
    vm
  )
}
initInternalComponent(组件时)
// src/core/instance/init.js
export function initInternalComponent (vm: Component, options: InternalComponentOptions) {
  // 用Object.create这个函数,把组件构造函数的options挂载到vm.$options的__proto__上。
  const opts = vm.$options = Object.create(vm.constructor.options)
  // 如此比动态枚举快
  const parentVnode = options._parentVnode
  opts.parent = options.parent
  opts._parentVnode = parentVnode

  // 把组件依赖于父组件的props、listeners等挂载到options上,方便子组件调用
  const vnodeComponentOptions = parentVnode.componentOptions
  opts.propsData = vnodeComponentOptions.propsData
  opts._parentListeners = vnodeComponentOptions.listeners
  opts._renderChildren = vnodeComponentOptions.children
  opts._componentTag = vnodeComponentOptions.tag

  // 如果 options 上有 render,把 render 也挂载到$options 上
  if (options.render) {
    opts.render = options.render
    // 赋值静态 render 函数,用于静态节点性能优化用
    opts.staticRenderFns = options.staticRenderFns
  }
}
动态选项合并时,这时其实存在3个属性合并: Vue全局属性,父组件属性与当前组件属性三者合并
如果使用动态枚举法,如下:
// 伪代码
let opts = {}

for(let key in Vue全局属性){
  opts[key] = value
}

for(let key in 父组件属性) {
  opts[key] = value
}

for(let key in 当前组件属性) {
  opts[key] = value
}
而 vue 采用的方案
-
通过 Object.create 实现了合并Vue全局属性
-
然后通过“赋值操作”把父组件的一些属性挂载到opts上,从而实现了父组件属性合并
相比较动态枚举法,这里缺少了枚举的过程,节约了性能,当需要某些属性时,可以直接从中获取。
mergeOptions(非组件时)
// src/core/instance/init.js
vm.$options = mergeOptions(
  resolveConstructorOptions(vm.constructor),
  options || {},
  vm
)

export function resolveConstructorOptions (Ctor: Class<Component>) {
  let options = Ctor.options
  // 是否存在父类,
  // initExtend阶段注入了 super 属性
  if (Ctor.super) {
    // 通过 Ctor.super 获取父类的option和当前组件缓存的父类option
    const superOptions = resolveConstructorOptions(Ctor.super)
    const cachedSuperOptions = Ctor.superOptions
    if (superOptions !== cachedSuperOptions) {
      // superOptions 发生改变
      Ctor.superOptions = superOptions
      // 检查是否有任何后期修改/附加的选项
      const modifiedOptions = resolveModifiedOptions(Ctor)
      // 更新基本的 extendOptions
      // initExtend 阶段设置了 extendOptions
      // extendOptions ---> Vue.extend(extendOptions) 即组件自身选项
      if (modifiedOptions) {
        extend(Ctor.extendOptions, modifiedOptions)
      }
      // 把组件自身选项更新父类选项
      options = Ctor.options = mergeOptions(superOptions, Ctor.extendOptions)
      // 给 options.components绑定 Ctor
      if (options.name) {
        options.components[options.name] = Ctor
      }
    }
  }
  return options
}

function resolveModifiedOptions (Ctor: Class<Component>): ?Object {
  let modified
  const latest = Ctor.options
  const sealed = Ctor.sealedOptions
  for (const key in latest) {
    if (latest[key] !== sealed[key]) {
      if (!modified) modified = {}
      modified[key] = latest[key]
    }
  }
  return modified
}
保存render代理
// src/core/instance/init.js
/* istanbul ignore else */
if (process.env.NODE_ENV !== 'production') {
  // 忽略此处,非生产环境时执行
  // 后续分析
  initProxy(vm)
} else {
  // 把 vm指向 vm._renderProxy
  vm._renderProxy = vm
}
保存this指向
// src/core/instance/init.js
// 保存真实的this 指向
vm._self = vm
initLifecycle
// src/core/instance/lifecycle.js
export function initLifecycle (vm: Component) {
  const options = vm.$options

  // 找到第一个非抽象父级
  // keep-alive, transition 是抽象组件
  let parent = options.parent
  if (parent && !options.abstract) {
    while (parent.$options.abstract && parent.$parent) {
      parent = parent.$parent
    }
    parent.$children.push(vm)
  }

  vm.$parent = parent
  vm.$root = parent ? parent.$root : vm

  vm.$children = []
  vm.$refs = {}

  vm._watcher = null
  vm._inactive = null
  vm._directInactive = false
  vm._isMounted = false
  vm._isDestroyed = false
  vm._isBeingDestroyed = false
}
initEvent
// src/core/instance/events.js
export function initEvents (vm: Component) {
  vm._events = Object.create(null)
  vm._hasHookEvent = false
  // 更新父类监听事件
  const listeners = vm.$options._parentListeners
  if (listeners) {
    updateComponentListeners(vm, listeners)
  }
}

let target: any

export function updateComponentListeners (
  vm: Component,
  listeners: Object,
  oldListeners: ?Object
) {
  target = vm
  updateListeners(listeners, oldListeners || {}, add, remove, createOnceHandler, vm)
  target = undefined
}_hasHookEvent: 程序化的事件监听器
updateComponentListeners(vm, listeners)中用target保留对vm实例的引用,在执行updateListeners方法时能访问到实例对象,并执行add和remove方法。
// src/core/vdom/helpers/update-listeners.js
export function updateListeners (
  on: Object,
  oldOn: Object,
  add: Function,
  remove: Function,
  createOnceHandler: Function,
  vm: Component
) {
  let name, def, cur, old, event
  for (name in on) {
    def = cur = on[name]
    old = oldOn[name]
    // 判断事件是否存在按键修饰符!,~,&
    event = normalizeEvent(name)

    if (isUndef(cur)) {
      // 生产环境无任务
    } else if (isUndef(old)) {
      if (isUndef(cur.fns)) {
        // 初始阶段cur无fns,执行此处
        cur = on[name] = createFnInvoker(cur, vm)
      }
      if (isTrue(event.once)) {
        // 返回函数--> 执行一次则卸载事件
        cur = on[name] = createOnceHandler(event.name, cur, event.capture)
      }
      // 把处理函数到vm._events[事件名]上
      add(event.name, cur, event.capture, event.passive, event.params)
    } else if (cur !== old) {
      old.fns = cur
      on[name] = old
    }
  }
  // 如果存在老的事件,把老的事件卸载
  for (name in oldOn) {
    if (isUndef(on[name])) {
      event = normalizeEvent(name)
      remove(event.name, oldOn[name], event.capture)
    }
  }
}createFnInvoker
// src/core/vdom/helpers/update-listeners.js
export function createFnInvoker (fns: Function | Array<Function>, vm: ?Component): Function {
  function invoker () {
    const fns = invoker.fns
    if (Array.isArray(fns)) {
      const cloned = fns.slice()
      for (let i = 0; i < cloned.length; i++) {
        invokeWithErrorHandling(cloned[i], null, arguments, vm, `v-on handler`)
      }
    } else {
      // 返回处理程序-返回单个处理程序的值
      return invokeWithErrorHandling(fns, null, arguments, vm, `v-on handler`)
    }
  }
  invoker.fns = fns
  return invoker
}
createOnceHandler
// src/core/instance/events.js
function createOnceHandler (event, fn) {
  const _target = target
  return function onceHandler () {
    const res = fn.apply(null, arguments)
    if (res !== null) {
      _target.$off(event, onceHandler)
    }
  }
}
add
// src/core/instance/events.js
function add (event, fn) {
  target.$on(event, fn)
}$on在eventsMixin阶段被绑定到原型链上
// src/core/instance/events.js
Vue.prototype.$on = function (event: string | Array<string>, fn: Function): Component {
  const vm: Component = this
  if (Array.isArray(event)) {
    for (let i = 0, l = event.length; i < l; i++) {
      vm.$on(event[i], fn)
    }
  } else {
    (vm._events[event] || (vm._events[event] = [])).push(fn)
    //通过使用注册时标记的布尔flag来优化hook:event的开销
    //而不是哈希查询
    if (hookRE.test(event)) {
      vm._hasHookEvent = true
    }
  }
  return vm
}这里将函数fn绑定到vm._events[事件名]
_hasHookEvent: 程序化的事件监听器
remove
// src/core/instance/events.js
function remove (event, fn) {
  target.$off(event, fn)
}$off在eventsMixin阶段被绑定到原型链上
// src/core/instance/events.js
Vue.prototype.$off = function (event?: string | Array<string>, fn?: Function): Component {
  const vm: Component = this
  // 如果参数不存在,初始化vm._events
  if (!arguments.length) {
    vm._events = Object.create(null)
    return vm
  }
  // 事件数组 ---> 分别卸载
  if (Array.isArray(event)) {
    for (let i = 0, l = event.length; i < l; i++) {
      vm.$off(event[i], fn)
    }
    return vm
  }
  // 特殊事件 ---> 清除事件
  const cbs = vm._events[event]
  if (!cbs) {
    return vm
  }
  if (!fn) {
    vm._events[event] = null
    return vm
  }
  // 特殊处理器 ---> 删除_events[事件名]中的fn
  let cb
  let i = cbs.length
  while (i--) {
    cb = cbs[i]
    if (cb === fn || cb.fn === fn) {
      cbs.splice(i, 1)
      break
    }
  }
  return vm
}
initRender
// src/core/instance/render.js
export function initRender (vm: Component) {
  vm._vnode = null // 子节点的根节点
  vm._staticTrees = null // v-once 缓存静态树
  const options = vm.$options
  const parentVnode = vm.$vnode = options._parentVnode // 父树中的占位符节点
  const renderContext = parentVnode && parentVnode.context
  // options._renderChildren来自 initInternalComponent 中的 父节点的children
  vm.$slots = resolveSlots(options._renderChildren, renderContext)
  vm.$scopedSlots = emptyObject
  // 将 createElement 绑定到此实例上,以便在其中获得适当的渲染上下文
  // 参数顺序: tag, data, children, normalizationType, alwaysNormalize
  // 内部版本由模板编译的渲染函数使用
  // createElement ---> 包装函数,提供更加灵活的接口
  vm._c = (a, b, c, d) => createElement(vm, a, b, c, d, false)
  //规范化始终应用于公开版本,用于用户编写的渲染函数。
  vm.$createElement = (a, b, c, d) => createElement(vm, a, b, c, d, true)

  //公开$attrs和$listeners以便于创建HOC。
  //它们必须是响应式的,以便始终更新使用它们的HOC
  const parentData = parentVnode && parentVnode.data

  // 定义为响应式的,具体后续分析
  defineReactive(vm, '$attrs', parentData && parentData.attrs || emptyObject, null, true)
  defineReactive(vm, '$listeners', options._parentListeners || emptyObject, null, true)
}
resolveSlots
// src/core/instance/render-helpers/resolve-slots.js
export function resolveSlots (
  children: ?Array<VNode>,
  context: ?Component
): { [key: string]: Array<VNode> } {
  if (!children || !children.length) {
    return {}
  }
  const slots = {}
  for (let i = 0, l = children.length; i < l; i++) {
    const child = children[i]
    const data = child.data
    // 如果将节点解析为Vue slot节点,则删除slot属性
    if (data && data.attrs && data.attrs.slot) {
      delete data.attrs.slot
    }
    // 仅当在相同上下文中呈现vnode时,才应遵守命名插槽。
    // fnContext ---> 函数式节点上下文
    if ((child.context === context || child.fnContext === context) &&
      data && data.slot != null
    ) {
      const name = data.slot
      const slot = (slots[name] || (slots[name] = []))
      if (child.tag === 'template') {
        slot.push.apply(slot, child.children || [])
      } else {
        slot.push(child)
      }
    } else {
      (slots.default || (slots.default = [])).push(child)
    }
  }
  // 忽略仅包含空格的slots
  for (const name in slots) {
    if (slots[name].every(isWhitespace)) {
      delete slots[name]
    }
  }
  return slots
}
callHook
// src/core/instance/lifecycle.js
export function callHook (vm: Component, hook: string) {
  // #7573 disable dep collection when invoking lifecycle hooks
  // 调用生命周期时,禁用依赖收集
  // 添加到 target 里,保证当前 target 唯一
  pushTarget()
  const handlers = vm.$options[hook]
  const info = `${hook} hook`
  // 处理程序存在即执行
  if (handlers) {
    for (let i = 0, j = handlers.length; i < j; i++) {
      invokeWithErrorHandling(handlers[i], vm, null, vm, info)
    }
  }
  if (vm._hasHookEvent) {
    vm.$emit('hook:' + hook)
  }
  popTarget()
}hasHookEvent: 程序化的事件监听器
initInjections
// src/core/instance/inject.js
export function initInjections (vm: Component) {
  const result = resolveInject(vm.$options.inject, vm)
  // 获取 inject
  // 关闭观察 -> 把数据定义成响应式 -> 启用观察
  if (result) {
    toggleObserving(false)
    Object.keys(result).forEach(key => {
      defineReactive(vm, key, result[key])
    })
    toggleObserving(true)
  }
}
resolveInject
// src/core/instance/inject.js
export function resolveInject (inject: any, vm: Component): ?Object {
  if (inject) {
    const result = Object.create(null)
    const keys = hasSymbol
      ? Reflect.ownKeys(inject)
      : Object.keys(inject)

    for (let i = 0; i < keys.length; i++) {
      const key = keys[i]
      // 如果inject对象是被观察的,跳过
      if (key === '__ob__') continue
      // provideKey ---> 源inject
      const provideKey = inject[key].from
      let source = vm
      // 给 result[inject值] 赋值 父级(递归) provided的值
      while (source) {
        if (source._provided && hasOwn(source._provided, provideKey)) {
          result[key] = source._provided[provideKey]
          break
        }
        source = source.$parent
      }
      // 不存在父级,则设置为 inject 的 'default'值
      if (!source) {
        if ('default' in inject[key]) {
          const provideDefault = inject[key].default
          result[key] = typeof provideDefault === 'function'
            ? provideDefault.call(vm)
            : provideDefault
        }
      }
    }
    return result
  }
}
initState
// src/core/instance/state.js
export function initState (vm: Component) {
  vm._watchers = []
  const opts = vm.$options
  // props 存在,则初始化 props(具体后续分析)
  if (opts.props) initProps(vm, opts.props)
  // methods 存在,则初始化 methods
  if (opts.methods) initMethods(vm, opts.methods)
  // data 存在,则初始化 data,否则观察vm._data = {}
  if (opts.data) {
    initData(vm)
  } else {
    observe(vm._data = {}, true /* asRootData */)
  }
  // computed 存在,则初始化 computed
  if (opts.computed) initComputed(vm, opts.computed)
  // watch 存在,且watch不是 对象prototype 上的函数(Firefox 定义的) ---> 初始化 watch
  if (opts.watch && opts.watch !== nativeWatch) {
    initWatch(vm, opts.watch)
  }
}
initProvide
// src/core/instance/inject.js
export function initProvide (vm: Component) {
  const provide = vm.$options.provide
  // provide存在则绑定到 vm._provided
  if (provide) {
    vm._provided = typeof provide === 'function'
      ? provide.call(vm)
      : provide
  }
}
el
// src/core/instance/init.js
if (vm.$options.el) {
  vm.$mount(vm.$options.el)
}
如果 options 中存在el,则执行vm.$mount
响应式之defineReactive - 6
响应式之defineReactive - 6
export function defineReactive (
  obj: Object,
  key: string,
  val: any,
  customSetter?: ?Function,
  shallow?: boolean
) {
  // 新建 dep 实例
  const dep = new Dep()

  // 获取 obj 自身属性,而非原型链上的
  // 属性如果不可配置,则返回
  const property = Object.getOwnPropertyDescriptor(obj, key)
  if (property && property.configurable === false) {
    return
  }

  // 缓存 getter 与 setter
  // 防止后续通过 Object.defineProperty 时被重写
  const getter = property && property.get
  const setter = property && property.set
  // 补充: val存在(shallow 为 false),则会深度监听 --> 下文childOb
  // !getter --> 当属性存在 get,初始化的时候不做触发,当真正需要值的时候,再触发 getter 获取
  // setter -> 如果属性不存在 set, 则触发深度监听val(即 val=obj[key]),
  //           那开始不深度监听,下文会创建 get,从而又变成深度监听, 这造成了定义响应式数据时行为的不一致
  if ((!getter || setter) && arguments.length === 2) {
    val = obj[key]
  }

  // shallow 为 false 时监听 val(对象的值),即深度监听
  let childOb = !shallow && observe(val)
  // Object.defineProperty 定义 get 与 set
  Object.defineProperty(obj, key, {
    enumerable: true,
    configurable: true,
    get: function reactiveGetter () {
      // 触发缓存的 getter 获取值
      const value = getter ? getter.call(obj) : val
      // Dep.target 存在的时候
      if (Dep.target) {
        // dep收集依赖
        dep.depend()
        // 如果子类观察者存在
        if (childOb) {
          // 子类依赖收集
          childOb.dep.depend()
          // 如果是数组,遍历每个元素来收集依赖
          if (Array.isArray(value)) {
            dependArray(value)
          }
        }
      }
      return value
    },
    set: function reactiveSetter (newVal) {
      const value = getter ? getter.call(obj) : val

      // 后一部分指代 NaN -> 值与自身都不全等的, 新旧值都是 NaN, 直接 return
      if (newVal === value || (newVal !== newVal && value !== value)) {
        return
      }
      // #7981: 用于不带 setter 的访问器属性
      // 当 property 为 undefined 时,getter 和 setter 是 undefined
      // 这样可以保证程序正常执行
      if (getter && !setter) return
      if (setter) {
        setter.call(obj, newVal)
      } else {
        val = newVal
      }
      // 设置 newVal 后重新深度监听新值
      childOb = !shallow && observe(newVal)
      // 通知依赖更新
      dep.notify()
    }
  })
}
parseHTML之v-once解析 - 18
parseHTML之v-once解析 - 18
前言
v-once 解析用在 start 函数里,源码如下
processOnce(element)这里调用了 processOnce 来处理v-once,接下来我们就来看看 processOnce
processOnce
function processOnce (el) {
  //获取el上的v-once属性并删除el.attrsList上的属性
  const once = getAndRemoveAttr(el, 'v-once')
  if (once != null) {
    el.once = true
  }
}
parseHTML之v-pre解析 - 15
parseHTML之v-pre解析 - 15
前言
v-pre: 跳过这个元素和它的子元素的编译过程。
v-pre 解析用在 start 函数里,源码如下
if (!inVPre) {
  processPre(element)
  if (element.pre) {
    inVPre = true
  }
}
这里调用了 processPre 来处理v-pre,接下来我们就来看看 processPre
processPre
function processPre (el) {
  if (getAndRemoveAttr(el, 'v-pre') != null) {
    el.pre = true
  }
}
这里通过调用 getAndRemoveAttr 来获取 el 上的 v-pre 属性并删除 el.attrsList 上的属性,接下来看看 getAndRemoveAttr 函数
export function getAndRemoveAttr (
  el: ASTElement,
  name: string,
  removeFromMap?: boolean
): ?string {
  let val
  if ((val = el.attrsMap[name]) != null) {
    const list = el.attrsList
    for (let i = 0, l = list.length; i < l; i++) {
      if (list[i].name === name) {
        list.splice(i, 1)
        break
      }
    }
  }
  if (removeFromMap) {
    delete el.attrsMap[name]
  }
  return val
}
响应式之Dep - 7
响应式之Dep - 7
前言
前文中常常会出现Dep相关的属性,但究竟何为 Dep?本文让我们好好来分析分析.
Dep
// src/core/observer/dep.js
let uid = 0

export default class Dep {
  // 静态属性 target -> 当前观测的目标
  static target: ?Watcher;
  id: number; // 依赖id
  subs: Array<Watcher>; // 订阅者数组

  constructor () {
    this.id = uid++
    this.subs = []
  }

	// 增加订阅者
  addSub (sub: Watcher) {
    this.subs.push(sub)
  }

  // 移除订阅者
  removeSub (sub: Watcher) {
    remove(this.subs, sub)
  }

	// 收集依赖
  depend () {
    if (Dep.target) {
      Dep.target.addDep(this)
    }
  }

  notify () {
    // 首先固定依赖数组
    const subs = this.subs.slice()

    // 遍历依赖数组,通知更新
    for (let i = 0, l = subs.length; i < l; i++) {
      subs[i].update()
    }
  }
}这里逻辑其实很简单,添加订阅者(addSub)、移除依赖(removeSub)、收集依赖(depend)、通知更新(notify)
唯一的观察者
// 给 Dep 添加一个属性 target,用来确保唯一性
Dep.target = null
const targetStack = [] // 存储目标栈

export function pushTarget (target: ?Watcher) {
  // 目标栈新增模板
  targetStack.push(target)
  // 把当前的观察者改为target
  Dep.target = target
}

export function popTarget () {
  // 模板删除最后一个目标
  targetStack.pop()
  // 把当前的观察者改为上一个target
  Dep.target = targetStack[targetStack.length - 1]
}
除此这外,还有个问题,就是 Watcher 到底是什么,详见下文分析
编译之optimize - 19
编译之optimize - 19
export function optimize (root: ?ASTElement, options: CompilerOptions) {
  if (!root) return
  // 获取静态属性
  isStaticKey = genStaticKeysCached(options.staticKeys || '')
  // 是否保留标签,html或 svg
  isPlatformReservedTag = options.isReservedTag || no
  // first pass: mark all non-static nodes.
  // 标记所有静态子节点
  markStatic(root)
  // second pass: mark static roots.
  // 标记静态根节点
  markStaticRoots(root, false)
}
markStatic
function markStatic (node: ASTNode) {
  node.static = isStatic(node)
  // type
  // 1 普通
  // 2 模板字符串模式 <p>{{foo}}</p>
  // 3 普通字符串 <p>foo</p>
  if (node.type === 1) {
		//不要将组件插槽的内容设为静态。 这样可以避免
    // 1.无法更改插槽节点的组件
    // 2.静态插槽内容无法进行热重装
    if (
      !isPlatformReservedTag(node.tag) &&
      node.tag !== 'slot' &&
      node.attrsMap['inline-template'] == null
    ) {
      return
    }
    // 遍历 child,分别标记静态节点,如果子节点static为 false,自身 static 也设为 false
    for (let i = 0, l = node.children.length; i < l; i++) {
      const child = node.children[i]
      markStatic(child)
      if (!child.static) {
        node.static = false
      }
    }
    // 标记 v-else(-if) 中的节点,
    if (node.ifConditions) {
      for (let i = 1, l = node.ifConditions.length; i < l; i++) {
        const block = node.ifConditions[i].block
        markStatic(block)
        if (!block.static) {
          node.static = false
        }
      }
    }
  }
}
markStaticRoots
function markStaticRoots (node: ASTNode, isInFor: boolean) {
  if (node.type === 1) {
    if (node.static || node.once) {
      node.staticInFor = isInFor
    }
    // 节点静态,且存在子节点,且非单一纯文本节点,标记为 true,否则标记该节点的成本过大。
    if (node.static && node.children.length && !(
      node.children.length === 1 &&
      node.children[0].type === 3
    )) {
      node.staticRoot = true
      return
    } else {
      node.staticRoot = false
    }

    // 遍历 children,标记静态根节点
    if (node.children) {
      for (let i = 0, l = node.children.length; i < l; i++) {
        markStaticRoots(node.children[i], isInFor || !!node.for)
      }
    }
    // 处理 v-else(-if) 中的节点
    if (node.ifConditions) {
      for (let i = 1, l = node.ifConditions.length; i < l; i++) {
        markStaticRoots(node.ifConditions[i].block, isInFor)
      }
    }
  }
}
初始化之 initGloabl - 2
初始化之 initGloabl
首先我们来看入口代码,代码位于src/core/index.js
import Vue from './instance/index'
import { initGlobalAPI } from './global-api/index'

initGlobal(Vue)

export default Vue缩减一下,核心代码就这么一句,initGlobal(Vue)。
当我们引入 Vue (如:import Vue from Vue)时,则会执行这段代码。
因此,分为两部分来讲,首先我们来说initGlobal
代码位于 src/core/global-api/index.js
设置config(全局配置)
用于全局配置
  const configDef = {}
  configDef.get = () => config
  Object.defineProperty(Vue, 'config', configDef)
暴露公共方法
  // 暴露公共方法
  // NOTE: 这些不被视为公共API的一部分-避免依赖它们,除非您知道风险。
  Vue.util = {
    warn,
    extend,
    mergeOptions,
    defineReactive
  }

  Vue.set = set
  Vue.delete = del
  Vue.nextTick = nextTick

  // 2.6 显式可观察的API
  Vue.observable = <T>(obj: T): T => {
    observe(obj)
    return obj
  }

  Vue.options = Object.create(null)
	// ASSET_TYPES = ['component', 'directive', 'filter']
  ASSET_TYPES.forEach(type => {
    Vue.options[type + 's'] = Object.create(null)
  })
标识“基本”构造函数
Vue.options._base = Vue拓展公共组件
extend(Vue.options.components, builtInComponents) // 如 keep-alive初始化 API
 initUse(Vue)
 initMixin(Vue)
 initExtend(Vue)
 initAssetRegisters(Vue)
initUse
export function initUse (Vue: GlobalAPI) {
  // 给 vue 绑定 use方法,在构造函数内部添加的属性,只能作为构造函数的属性,即对象属性,不会添加的对象身上(①)
  Vue.use = function (plugin: Function | Object) {
    // 赋值/新建个 installedPlugins(下载的插件)
    const installedPlugins = (this._installedPlugins || (this._installedPlugins = []))
    // 查找到这个插件,就返回它
    if (installedPlugins.indexOf(plugin) > -1) {
      return this
    }

    // 附加参数
    const args = toArray(arguments, 1)
    args.unshift(this) // 将 Vue构造函数(类①)作为第一个参数传入 install 函数中。
    // 即 MyPlugin.install = function(Vue, options) {}
    if (typeof plugin.install === 'function') {
      plugin.install.apply(plugin, args)
    } else if (typeof plugin === 'function') {
      plugin.apply(null, args)
    }
    installedPlugins.push(plugin)
    return this
  }
}
initMixin
export function initMixin (Vue: GlobalAPI) {
  Vue.mixin = function (mixin: Object) {
    // 合并参数
    this.options = mergeOptions(this.options, mixin)
    return this
  }
}
initExtend
export function initExtend (Vue: GlobalAPI) {
  // 每个实例构造函数(包括Vue)都有一个唯一的cid。 这使我们能够创建包装的“子级”并对其进行原型继承和缓存它。
  Vue.cid = 0
  let cid = 1

  /**
   * 类继承
   */
  Vue.extend = function (extendOptions: Object): Function {
    extendOptions = extendOptions || {}

    // 保存父类和 父类cID
    const Super = this
    const SuperId = Super.cid
    // 赋值/新建子类的_Ctor
    const cachedCtors = extendOptions._Ctor || (extendOptions._Ctor = {})
    // 如果存在父类 cId,直接返回它
    if (cachedCtors[SuperId]) {
      return cachedCtors[SuperId]
    }


    const name = extendOptions.name || Super.options.name

    // 继承过程
    // 新建构造函数,内部调用_init 方法创建具体组件
    const Sub = function VueComponent (options) {
      this._init(options)
    }
    Sub.prototype = Object.create(Super.prototype)
    Sub.prototype.constructor = Sub
    // 保证 cid 唯一
    Sub.cid = cid++
    // 合并 can你熟
    Sub.options = mergeOptions(
      Super.options,
      extendOptions
    )
    // 指定父类
    Sub['super'] = Super

    // 对于 pros 和 computed 属性,在 Vue 实例继承的原型上定义代理 getter, 这个可以避免为每个创建的实例调用 Object.defineProperty.
    if (Sub.options.props) {
      initProps(Sub)
    }
    if (Sub.options.computed) {
      initComputed(Sub)
    }

    // 允许进一步 extension/mixin/plugin 使用
    Sub.extend = Super.extend
    Sub.mixin = Super.mixin
    Sub.use = Super.use

    // 创建asset登记册,以便扩展的类,也可以拥有自己的私人asset
    ASSET_TYPES.forEach(function (type) {
      Sub[type] = Super[type]
    })
    // 启用递归自查找 -> 绑定组件信息
    if (name) {
      Sub.options.components[name] = Sub
    }

    // 继承时保留对于父类的引用,以便实例化后,我们可以检测父类是否已经更新
    Sub.superOptions = Super.options
    Sub.extendOptions = extendOptions
    Sub.sealedOptions = extend({}, Sub.options)

    // 缓存构造函数
    cachedCtors[SuperId] = Sub
    return Sub
  }
}
initProps
initProps 实现了在原型上解耦props属性
如组件内想使用 props.value, 只需要 this.value即可,而不需要 this.props.value
// src/core/global-api/extend.js
function initProps (Comp) {
  const props = Comp.options.props
  // 假设key 为 value
  for (const key in props) {
    proxy(Comp.prototype, `_props`, key)
  }
}

// src/core/instance/state.js
const sharedPropertyDefinition = {
  enumerable: true,
  configurable: true,
  get: noop,
  set: noop
}

// target: Comp.prototype, sourceKey: '_props', key: 'value'
export function proxy (target: Object, sourceKey: string, key: string) {
  sharedPropertyDefinition.get = function proxyGetter () {
    // return this._props.value
    return this[sourceKey][key]
  }
  sharedPropertyDefinition.set = function proxySetter (val) {
    this[sourceKey][key] = val
  }
  // Comp.prototype, value, sharedPropertyDefinition
  Object.defineProperty(target, key, sharedPropertyDefinition)
}

// 组件调用 this.value使用,组件内不存在 value,查找原型链,组件的prototype(Comp.prototype)上有。
// Comp.prototype.value 时,即触发 sharedPropertyDefinition.get, 即this._props.value
initComputed
initComputed应该也类似, 在原型上解耦computed属性
// src/core/global-api/extend.js
function initComputed (Comp) {
  const computed = Comp.options.computed
  for (const key in computed) {
    defineComputed(Comp.prototype, key, computed[key])
  }
}

// src/core/instance/state.js
export function defineComputed (
  target: any,
  key: string,
  userDef: Object | Function
) {
  // isServerRendering ---> isSSR
  // 通过都应该为 false,故 shouledCache 为 true
  const shouldCache = !isServerRendering()
  if (typeof userDef === 'function') {
    // `{[key:string]: Function}`
    sharedPropertyDefinition.get = shouldCache
      ? createComputedGetter(key)
      : createGetterInvoker(userDef)
    sharedPropertyDefinition.set = noop
  } else {
    // {get: Function, set: Function}
    sharedPropertyDefinition.get = userDef.get
      ? shouldCache && userDef.cache !== false
        ? createComputedGetter(key)
        : createGetterInvoker(userDef.get)
      : noop
    sharedPropertyDefinition.set = userDef.set || noop
  }

  Object.defineProperty(target, key, sharedPropertyDefinition)
}

function createComputedGetter (key) {
  return function computedGetter () {
    const watcher = this._computedWatchers && this._computedWatchers[key]
    if (watcher) {
      if (watcher.dirty) {
        watcher.evaluate()
      }
      if (Dep.target) {
        watcher.depend()
      }
      return watcher.value
    }
  }
}
// 定义阶段
// sharePropertyDefinition.get = computedGetter
// 调用this.computed.value 时,触发 get,即触发 computedGetter,则返回内部 watcher.value
initAssetRegisters
export function initAssetRegisters (Vue: GlobalAPI) {
  /**
   * Create asset registration methods.
   */
  // ASSET_TYPES = ['component', 'directive', 'filter']
  ASSET_TYPES.forEach(type => {
    Vue[type] = function (
      id: string,
      definition: Function | Object
    ): Function | Object | void {
      // 不存在 definition,则返回它。
      // 如 获取注册的组件 Vue.component('my-component')
      if (!definition) {
        return this.options[type + 's'][id]
      } else {
      	// Vue.component('my-component', { /* ... */ })
        if (type === 'component' && isPlainObject(definition)) {
          definition.name = definition.name || id
          // 调用下 extend 生成子类构造函数
          definition = this.options._base.extend(definition)
        }
    		/**
    		 * // 注册 (指令函数)
         * Vue.directive('my-directive', function () {
         *   // 这里将会被 `bind` 和 `update` 调用
         * })
    		 */
        if (type === 'directive' && typeof definition === 'function') {
          definition = { bind: definition, update: definition }
        }
        this.options[type + 's'][id] = definition
        return definition
      }
    }
  })
}
parseHTML之v-if解析 - 17
parseHTML之v-if解析 - 17
前言
v-if 解析用在 start 函数里,源码如下
processIf(element)这里调用了 processIf 来处理v-if,接下来我们就来看看 processIf
processIf
function processIf (el) {
  // 获取el上的v-if属性并删除el.attrsList上的属性
  const exp = getAndRemoveAttr(el, 'v-if')
  if (exp) {
    // 把结果赋给 el.if
    el.if = exp
    addIfCondition(el, {
      exp: exp,
      block: el
    })
  } else {
    // 获取el上的v-else属性并删除el.attrsList上的属性
    if (getAndRemoveAttr(el, 'v-else') != null) {
      el.else = true
    }
    // 获取el上的v-else-if属性并删除el.attrsList上的属性
    const elseif = getAndRemoveAttr(el, 'v-else-if')
    if (elseif) {
      el.elseif = elseif
    }
  }
}
addIfCondition
export function addIfCondition (el: ASTElement, condition: ASTIfCondition) {
  if (!el.ifConditions) {
    el.ifConditions = []
  }
  el.ifConditions.push(condition)
}
渲染之$mount - 9
渲染之$mount - 9
前言
在Vue.prototype._init的最后,有这下面这一段代码:
if (vm.$options.el) {
  vm.$mount(vm.$options.el)
}这里执行了vm.$mount来触发页面渲染,那接下来我们来看看$mount是怎么实现的
$mount
// src/platforms/web/entry-runtime-with-compiler.js
import Vue from './runtime/index'

const mount = Vue.prototype.$mount
Vue.prototype.$mount = function (
  el?: string | Element,
  hydrating?: boolean
): Component {
  el = el && query(el)

  /* istanbul ignore if */
  if (el === document.body || el === document.documentElement) {
    process.env.NODE_ENV !== 'production' && warn(
      `Do not mount Vue to <html> or <body> - mount to normal elements instead.`
    )
    return this
  }

  const options = this.$options
  // resolve template/el and convert to render function
  if (!options.render) {
		// 省略...
  }
  return mount.call(this, el, hydrating)
}
首先定义一个常量 mount, 用来保存从./runtime/index 中导出的 Vue 原始构造函数,用于下面触发该函数
$mount 里第一段代码是el = el && query(el),判断 el 是否存在,存在则查找 el 的 DOM 节点,并将其赋给 el
接下来是一个 if 语句块
// src/platforms/web/entry-runtime-with-compiler.js
if (el === document.body || el === document.documentElement) {
  process.env.NODE_ENV !== 'production' && warn(
    `Do not mount Vue to <html> or <body> - mount to normal elements instead.`
  )
  return this
}判断el是不是body 或者 document,如果是的话,在非生产环境会打印警告信息,并返回这个实例本身,即后续操作全部都不执行了。
再往下是这样一段代码
// src/platforms/web/entry-runtime-with-compiler.js
const options = this.$options
// resolve template/el and convert to render function
if (!options.render) {
  // 省略...
}定义一个常量options,用来保存 this.$options 的数据
然后判断 options 中是否存在 render, 如果不存在执行以下代码
// src/platforms/web/entry-runtime-with-compiler.js
if (!options.render) {
  let template = options.template
  if (template) {
		// 省略...
  } else if (el) {
    template = getOuterHTML(el)
  }
  if (template) {
    // 省略...
  }
}
首先定义一个变量 template,用来保存 options.template
接下来是一个 if 语句块
// src/platforms/web/entry-runtime-with-compiler.js
if (template) {
  if (typeof template === 'string') {
    if (template.charAt(0) === '#') {
      template = idToTemplate(template)
      /* istanbul ignore if */
      if (process.env.NODE_ENV !== 'production' && !template) {
        warn(
          `Template element not found or is empty: ${options.template}`,
          this
        )
      }
    }
  } else if (template.nodeType) {
    template = template.innerHTML
  } else {
    if (process.env.NODE_ENV !== 'production') {
      warn('invalid template option:' + template, this)
    }
    return this
  }
}
typeof template === 'string'判断 template 是否为字符串类型。
如果是的话,接着判断 template 的第一个字符是否为 '#'。如果值以 # 开始,调用 idToTemplate 函数
// src/platforms/web/entry-runtime-with-compiler.js
const idToTemplate = cached(id => {
  const el = query(id)
  return el && el.innerHTML
})
这里调用了 cached 函数,我们先看下 cached 的代码
// src/platforms/web/entry-runtime-with-compiler.js
export function cached<F: Function> (fn: F): F {
  const cache = Object.create(null)
  return (function cachedFn (str: string) {
    const hit = cache[str]
    return hit || (cache[str] = fn(str))
  }: any)
}
这里通过 Object.create(null)创建一个空对象,保存在常量 cache 里,然后返回一个回调函数 cachedFn。上面代码调用了 idToTemplate(template),template 就相当于传入 cachedFn 里。从 cache 里查找 template,然后将值保存在常量 hit 里。hit存在则返回 hit,hit 不存在则设置cache[str] = fn(str),然后返回这个cache[str]。这里的 fn指的是id => {const el = query(id); return el && el.innerHTML},所以调用 fn(str) 会得到 DOM元素 时,会得到DOM元素的innerHTML。
当处理完 template 后,接下来是这么一段代码
// src/platforms/web/entry-runtime-with-compiler.js
if (process.env.NODE_ENV !== 'production' && !template) {
  warn(
    `Template element not found or is empty: ${options.template}`,
    this
  )
}
如果 template 不存在且在非生产环境会打印警告信息。
到此我们看完了 template 是 string类型 的情况,接下来我们来看别的情况。
// src/platforms/web/entry-runtime-with-compiler.js
if (typeof template === 'string') {
  // 省略...
} else if (template.nodeType) {
  template = template.innerHTML
} else {
  if (process.env.NODE_ENV !== 'production') {
    warn('invalid template option:' + template, this)
  }
  return this
}
首先判断 template.nodeType 是否存在,存在的话,则表示template是一个元素节点,然后便将 template.innerHTML 赋值给 template。
如果既不是字符串类型也不是元素节点,直接返回 this, 在非生产环境会打印警告信息。
到此就说完了 template 存在的情况下,当 template 不存在时,执行的是以下代码
// src/platforms/web/entry-runtime-with-compiler.js
if (template) {
  // 省略...
} else if (el) {
  template = getOuterHTML(el)
}
当 template 不存在时,调用了 getOuterHTML(el),然后把值赋给 template。
// src/platforms/web/entry-runtime-with-compiler.js
function getOuterHTML (el: Element): string {
  if (el.outerHTML) {
    return el.outerHTML
  } else {
    const container = document.createElement('div')
    container.appendChild(el.cloneNode(true))
    return container.innerHTML
  }
}
首先判断 el.outerHTML 是否存在,存在的话直接返回el.outerHTML。而 else 就是 outHTML 不存在的情况,在 IE9-11 中 SVG 标签元素是没有 innerHTML 和 outerHTML 这两个属性的。当这种情况出现时,我们只需要新建一个 div 元素,然后把 SVG 的内容插入 div 元素中,然后返回这个 div 的 innerHTML 即可。
处理完上面的内容,接下来是这样一个 if 语句块
// src/platforms/web/entry-runtime-with-compiler.js
if (template) {
  const { render, staticRenderFns } = compileToFunctions(template, {
    outputSourceRange: process.env.NODE_ENV !== 'production',
    shouldDecodeNewlines,
    shouldDecodeNewlinesForHref,
    delimiters: options.delimiters,
    comments: options.comments
  }, this)
  options.render = render
  options.staticRenderFns = staticRenderFns
}
上面我们处理了 options.template之后,template变量存储着最终用来生成渲染函数的字符串,但 template 可能是一个空字符串,所以这里需要一个 if 语句块对 template 进行判断。
接下来是调用 compileToFunction 函数,得到 render 与 staticRenderFns 函数,然后把这两个函数分别赋给 options.render 与 options.staticRenderFns。对于 compileToFunctions 函数我们会在讲解 Vue 编译器的时候详细说明。
处理完这里,接下来就是调用原始 mount 触发函数。
// src/platforms/web/entry-runtime-with-compiler.js
return mount.call(this, el, hydrating)
这里的 mount 是上面定义好的常量,来自 Vue.prototype.$mount,这里的**$mount** 是在src/platforms/web/runtime/index.js里定义的。
// src/platforms/web/runtime/index.js
Vue.prototype.$mount = function (
  el?: string | Element,
  hydrating?: boolean
): Component {
  el = el && inBrowser ? query(el) : undefined
  return mountComponent(this, el, hydrating)
}
这里首先判断了下 el 是否存在,如果存在且属于浏览器环境的话,则通过 query 函数获取DOM节点,并把值赋给 el,否则把 undefined 赋给 el。然后调用 mountComponent函数,并返回它的值。
mountComponent
// src/core/instance/lifecycle.js
export function mountComponent (
  vm: Component,
  el: ?Element,
  hydrating?: boolean
): Component {
  vm.$el = el
  if (!vm.$options.render) {
   	// 省略...
  }
  callHook(vm, 'beforeMount')

  let updateComponent

  updateComponent = () => {
    vm._update(vm._render(), hydrating)
  }


  // we set this to vm._watcher inside the watcher's constructor
  // since the watcher's initial patch may call $forceUpdate (e.g. inside child
  // component's mounted hook), which relies on vm._watcher being already defined
  new Watcher(vm, updateComponent, noop, {
    before () {
      if (vm._isMounted && !vm._isDestroyed) {
        callHook(vm, 'beforeUpdate')
      }
    }
  }, true /* isRenderWatcher */)
  hydrating = false

  // manually mounted instance, call mounted on self
  // mounted is called for render-created child components in its inserted hook
  if (vm.$vnode == null) {
    vm._isMounted = true
    callHook(vm, 'mounted')
  }
  return vm
}
首先把 el 绑定到 vm.$el ,接着判断 vm.$option.render是否存在,如果不存在执行下面代码
// src/core/instance/lifecycle.js
if (!vm.$options.render) {
  vm.$options.render = createEmptyVNode
}
这里首先把 createEmptyVNode 赋值给 vm.$options.render,即把 创建空 VNode 节点的函数 赋值给 render 函数。
接下来是一段 callHook 代码
callHook(vm, 'beforeMount')调用 callHook 函数,触发 beforeMount 生命周期
接下来定义一个变量updateComponent, 然后给它赋值这样一个函数
updateComponent = () => {
  vm._update(vm._render(), hydrating)
}vm._render函数的作用是调用vm.$options.render函数并返回生成的虚拟节点(vnode)vm._update函数的作用是把vm._render函数生成的虚拟节点渲染成真正的 DOM
再往下,我们将遇到创建观察者(Watcher)实例的代码:
new Watcher(vm, updateComponent, noop, {
  before () {
    if (vm._isMounted && !vm._isDestroyed) {
      callHook(vm, 'beforeUpdate')
    }
  }
}, true /* isRenderWatcher */)
前文我们提到过,由于 watcher 对表达式的求值,从而触发 updateComponent。而 updateCompoent 会先生成虚拟节点,然后渲染成真正的 DOM。
然后执行hydrating = false,而 hydrating 是SSR相关知识,先不予考虑。
接下来是这样一段代码
if (vm.$vnode == null) {
  vm._isMounted = true
  callHook(vm, 'mounted')
}
return vm
首先判断 vm.$vnode 是否为 null, 如果为 null 的话,把 vm._isMounted 设为 true,然后调用 callHook(vm, 'mounted') 触发 mounted 事件。
这里存在一个知识,$vnode 为 null 的时候是**当前实例(vm)**为根节点,即 vm.$options._parentVnode 为 null 。而子节点的 mounted 位于编译阶段时触发,也就是上面的 updateComponent 阶段。这样便可保证父组件渲染时,先触发子组件的 mounted 事件,再触发父组件的 mounted 事件。
最后即返回这 vm 实例
parseHTML之v-for解析 - 16
parseHTML之v-for解析
前言
v-for 解析用在 start 函数里,源码如下
processFor(element)这里调用了 processFor 来处理v-for,接下来我们就来看看 processFor
processFor
export function processFor (el: ASTElement) {
  let exp
  // 获取el上的v-for属性并删除el.attrsList上的属性
  if ((exp = getAndRemoveAttr(el, 'v-for'))) {
    // 调用 parseFor 解析v-for
    const res = parseFor(exp)
    if (res) {
      // el 继承解析后数据
      extend(el, res)
    } else if (process.env.NODE_ENV !== 'production') {
      warn(
        `Invalid v-for expression: ${exp}`,
        el.rawAttrsMap['v-for']
      )
    }
  }
}
parseFor
export function parseFor (exp: string): ?ForParseResult {
  // 匹配 v-for 语句
  const inMatch = exp.match(forAliasRE)
  if (!inMatch) return
  const res = {}
  // for 的值是 集合
  res.for = inMatch[2].trim()
  // 去除"(" 与 ")"
  const alias = inMatch[1].trim().replace(stripParensRE, '')
  // 匹配,后的数据 -> (item, index)
  const iteratorMatch = alias.match(forIteratorRE)
  if (iteratorMatch) {
    // 两个值 -> (item, index) -> alias: item, iterator1: index
    res.alias = alias.replace(forIteratorRE, '').trim()
    res.iterator1 = iteratorMatch[1].trim()
    // 三个值(遍历对象) -> (item, name, index) --> alias: item, iterator1: name, iterator2: index
    if (iteratorMatch[2]) {
      res.iterator2 = iteratorMatch[2].trim()
    }
  } else {
    // 无, 即 item in list
    res.alias = alias
  }
  // 返回这个结果
  return res
}
编译之parseHTML - 14
编译之parseHTML - 14
前言
上文我们说完了 parse 的主要过程,其核心通过 parseHTML 来解析 template,本文从 parseHTML 入手,来讲解编译过程
parseHTML
parseHTML的代码位于src/compiler/parser/html-parser.js,源码如下
export function parseHTML (html, options) {
  const stack = []
  const expectHTML = options.expectHTML
  const isUnaryTag = options.isUnaryTag || no
  const canBeLeftOpenTag = options.canBeLeftOpenTag || no
  let index = 0
  let last, lastTag
  while (html) {
    // 省略...
  }

  // Clean up any remaining tags
  parseEndTag()

  function advance (n) {
    // 省略...
  }

  function parseStartTag () {
    // 省略...
  }

  function handleStartTag (match) {
    // 省略...
  }

  function parseEndTag (tagName, start, end) {
    // 省略...
  }
}
首先这里定义了很多常量和变量,并做了初始化操作
- 定义了一个常量 stack, 初始化值为**[]**
- 定义了一个常量 expectHTML,把 options.expectHTML 赋给它
- 定义了一个常量 isUnaryTag, 把 options.isUnaryTag 或 no 赋给它
- 定义了一个常量 canBeLeftOpenTag, 把 options.canBeLeftOpenTag 或 no 赋给它
- 定义了三个变量 index、last 与 lastTag
接着是一个很长的 while 语句,这个我们稍微等等,先放到后面分析。之后调用 parseEndTag 函数,parseEndTag 来自于后面定义的四个内部函数(advance、parseStartTag、handleStartTag 与 parseEndTag)中的一个。说完后面的定义,我们这里回到 while 语句来继续分析
while (html) {
  last = html
  // Make sure we're not in a plaintext content element like script/style
  if (!lastTag || !isPlainTextElement(lastTag)) {
    // 省略...
  } else {
    // 省略...
  }

  if (html === last) {
    // 省略...
  }
}
首先判断 html 是否存在,如果存在,执行内部代码。第一步把 html 赋值给变量 last,接着判断 lastTag 是否存在,或 lastTag 是否为纯文本元素(如:script 或 style)。如果条件为 true, 执行下面代码,否则执行 else 代码。
let textEnd = html.indexOf('<')
if (textEnd === 0) {
  // 省略...
}

let text, rest, next
if (textEnd >= 0) {
  // 省略...
}

if (textEnd < 0) {
 text = html
}

if (text) {
 advance(text.length)
}

if (options.chars && text) {
 options.chars(text, index - text.length, index)
}
首先定义一个变量 textEnd, 然后通过 html.indexOf 查找 <, 然后把值赋给 textEnd
let textEnd = html.indexOf('<')这里的意思就是查找元素标签的**<**,如<div></div>,接下来是判断 textEnd 的值是否等于 0,或者大于 0,或者小于 0。首先我们先看等于 0 的情况,源码如下:
if (textEnd === 0) {
  // Comment:
  if (comment.test(html)) {
    const commentEnd = html.indexOf('-->')

    if (commentEnd >= 0) {
      if (options.shouldKeepComment) {
        options.comment(html.substring(4, commentEnd), index, index + commentEnd + 3)
      }
      advance(commentEnd + 3)
      continue
    }
  }

  // http://en.wikipedia.org/wiki/Conditional_comment#Downlevel-revealed_conditional_comment
  if (conditionalComment.test(html)) {
    const conditionalEnd = html.indexOf(']>')

    if (conditionalEnd >= 0) {
      advance(conditionalEnd + 2)
      continue
    }
  }

  // Doctype:
  const doctypeMatch = html.match(doctype)
  if (doctypeMatch) {
    advance(doctypeMatch[0].length)
    continue
  }

  // End tag:
  const endTagMatch = html.match(endTag)
  if (endTagMatch) {
    const curIndex = index
    advance(endTagMatch[0].length)
    parseEndTag(endTagMatch[1], curIndex, index)
    continue
  }

  // Start tag:
  const startTagMatch = parseStartTag()
  if (startTagMatch) {
    handleStartTag(startTagMatch)
    if (shouldIgnoreFirstNewline(startTagMatch.tagName, html)) {
      advance(1)
    }
    continue
  }
}
comment
首先判断通过 comment.test(html), 判断 html 是否为注释节点, 如果是注释节点,执行下面代码
const commentEnd = html.indexOf('-->')

if (commentEnd >= 0) {
  if (options.shouldKeepComment) {
    options.comment(html.substring(4, commentEnd), index, index + commentEnd + 3)
  }
  advance(commentEnd + 3)
  continue
}
通过 indexOf 查找 "-->"的索引,然后把这个值赋给 常量 commentEnd,接着判断 commentEnd 是否大于等于 0,如果大于等于 0, 接着判断 options.shouldKeepComment,即 parseHTML 执行时传入的 options.comments,即传入的 comments 参数, 详见comments。如果为 true,则执行 options.comment 函数,options.comment 源码如下:
comment (text: string, start, end) {
  // adding anything as a sibling to the root node is forbidden
  // comments should still be allowed, but ignored
  if (currentParent) {
    const child: ASTText = {
      type: 3,
      text,
      isComment: true
    }
    if (process.env.NODE_ENV !== 'production' && options.outputSourceRange) {
      child.start = start
      child.end = end
    }
    currentParent.children.push(child)
  }
}我们先看看传入的参数,html.substring(4, commentEnd) 是获取<!-- 注释内容 -->中的注释内容,index 为 0,index + commentEnd + 3 为整个注释.
首先判断 currentParent 是否存在,这个是表示如果注释节点不存在父节点,应被忽略,至少存在一个根节点。如果存在父节点,先定义一个 ASTText 类型的 child 常量,接着如果属于非生产环境且 options.outputSourceRange 为 true 的话,child.start 设为 start, child.end 设为 end。最后把
currentParent.children 添加 chlid。
处理完 options.comment函数,接下来是个重点部分
advance(commentEnd + 3)
continue
advance 函数先将 index 加上 n , 接着通过字符串的 substring 方法直接移除注释部分 然后通过 continue 执行下次循环
function advance (n) {
  index += n
  html = html.substring(n)
}
conditionalComment
if (conditionalComment.test(html)) {
  const conditionalEnd = html.indexOf(']>')

  if (conditionalEnd >= 0) {
    advance(conditionalEnd + 2)
    continue
  }
}这里判断是否为条件注释, 如果是条件注释,获取注释最后面的索引。如果索引大于等于 0,通过 advance 函数移除注释部分,接着调用 continue 执行下次循环
doctype
const doctypeMatch = html.match(doctype)
if (doctypeMatch) {
  advance(doctypeMatch[0].length)
  continue
}
同理,匹配 doctype 的位置,执行 advance 与 continue
end tag
const endTagMatch = html.match(endTag)
if (endTagMatch) {
  const curIndex = index
  advance(endTagMatch[0].length)
  parseEndTag(endTagMatch[1], curIndex, index)
  continue
}
首先通过正则匹配结束标签字符串,如果匹配成功,用常量 curIndex 保存当前的索引,然后用函数 advance 移除结束标签字符串,然后调用 parseEndTag 来解析结束标签,先留作后面分析,最后调用 continue 执行下次循环.
start tag
const startTagMatch = parseStartTag()
if (startTagMatch) {
  // 省略...
}
这里调用 parseStartTag 函数来匹配开始标签字符串,源码如下:
function parseStartTag () {
  const start = html.match(startTagOpen)
  if (start) {
    const match = {
      tagName: start[1],
      attrs: [],
      start: index
    }
    advance(start[0].length)
    let end, attr
    while (!(end = html.match(startTagClose)) && (attr = html.match(dynamicArgAttribute) || html.match(attribute))) {
      attr.start = index
      advance(attr[0].length)
      attr.end = index
      match.attrs.push(attr)
    }
    if (end) {
      match.unarySlash = end[1]
      advance(end[0].length)
      match.end = index
      return match
    }
  }
}
先通过正则匹配开始标签字符串,并将结果赋给常量 start。如果 start 存在,则继续执行。定义一个常量 match 来保存数据,调用 advance 移除开始标签字符串,并修改 index,再定义两个变量end, attr
接着是一个 while 语句,这里有两个条件,第一个条件是:没有匹配到开始标签的结束部分,第二个条件是匹配到了属性,所以总的来说就是没有匹配到开始标签的结束部分,且匹配到了开始标签中属性。而且这个循环体会一直执行,知道遇到开始标签的结束部分为止,即将开始标签中的属性一一处理掉。
在循环体内,attr.start 定为 index,然后用 advance 移除字符串,并修改 index, 然后 attr.end 定为现在的 index ,然后 match.attr 增加这个 attr 。然后继续执行循环语句,直至处理完了所有属性。
while 语句更新了 end 的值,使其等于开始标签的结束位置。如果 end 存在,则用 match.unarySlash 保存 开始标签结束位置的 /, 如 <br />, 那 match.unarySlash 即为 /, 如 <div></div>,那 match.unarySlash 即为空字符串。接着用 advance 移除字符串,并修改 index, match.end 保存现在的 index, 最后返回 match。
处理完 parseStartTag 函数,接下来是这样一个 if 语句块
if (startTagMatch) {
  handleStartTag(startTagMatch)

  // 省略...
}
如果 startTagMatch 存在,即匹配到了开始标签,首先调用 handleStartTag 处理开始标签,源码如下
function handleStartTag (match) {
const tagName = match.tagName // 标签名
const unarySlash = match.unarySlash // 一元斜杠,如 <br /> 中的 '/'
// 来自与 baseOptions 里, 那这里就代表跨平台传入的 options, 浏览器为 true
if (expectHTML) {
if (lastTag === 'p' && isNonPhrasingTag(tagName)) {
// 如果p标签包含了段落标签,如div、h1、h2等
// 形如: <p><h1></h1></p>
// 与parseEndTag中tagName为p时相对应,处理</p>,添加<p>
// 处理结果: <p></p><h1></h1><p></p>
parseEndTag(lastTag) // 后续分析
}
if (canBeLeftOpenTag(tagName) && lastTag === tagName) {
// 如果标签闭合标签可以省略"/"
// 形如:<li><li>
// 处理结果: <li></li>
parseEndTag(tagName)
}
}
// 判断是不是自闭合标签,如<br>
const unary = isUnaryTag(tagName) || !!unarySlash
const l = match.attrs.length
const attrs = new Array(l)
for (let i = 0; i < l; i++) {
const args = match.attrs[i]
// 数组的第 4,5,6 项可能包含属性值,如果都没有,则设置为空字符串
const value = args[3] || args[4] || args[5] || ''
// 浏览器 a 标签的 href 内容里的换行符和制表符会被转换成
 和 	 ,故做此兼容处理
const shouldDecodeNewlines = tagName === 'a' && args[1] === 'href'
? options.shouldDecodeNewlinesForHref
: options.shouldDecodeNewlines
attrs[i] = {
name: args[1],
// decodeAttr 函数的作用是对属性值中所包含的 html 实体进行解码,将其转换为实体对应的字符
value: decodeAttr(value, shouldDecodeNewlines)
}
if (process.env.NODE_ENV !== 'production' && options.outputSourceRange) {
attrs[i].start = args.start + args[0].match(/^\s*/).length
attrs[i].end = args.end
}
}
if (!unary) {
stack.push({ tag: tagName, lowerCasedTag: tagName.toLowerCase(), attrs: attrs, start: match.start, end: match.end })
lastTag = tagName
}
if (options.start) {
// 触发 options.start 函数, start 来自调用 parseHTML 里的参数
options.start(tagName, attrs, unary, match.start, match.end)
}
}start源码如下:
start (tag, attrs, unary, start, end) {
  // 检查命名空间
  // 如果存在,继承父级命名空间, 否则则获取自身命名空间
  const ns = (currentParent && currentParent.ns) || platformGetTagNamespace(tag)

  // 处理 IE svg bug
  /* istanbul ignore if */
  if (isIE && ns === 'svg') {
    attrs = guardIESVGBug(attrs)
  }

  let element: ASTElement = createASTElement(tag, attrs, currentParent)
  if (ns) {
    element.ns = ns
  }

  if (process.env.NODE_ENV !== 'production') {
    if (options.outputSourceRange) {
      element.start = start
      element.end = end
      // 保存原始属性
      element.rawAttrsMap = element.attrsList.reduce((cumulated, attr) => {
        cumulated[attr.name] = attr
        return cumulated
      }, {})
    }
    attrs.forEach(attr => {
      /// 属性检验,并打印报错位置
      if (invalidAttributeRE.test(attr.name)) {
        warn(
          `Invalid dynamic argument expression: attribute names cannot contain ` +
          `spaces, quotes, <, >, / or =.`,
          {
            start: attr.start + attr.name.indexOf(`[`),
            end: attr.start + attr.name.length
          }
        )
      }
    })
  }

  if (isForbiddenTag(element) && !isServerRendering()) {
    element.forbidden = true
    process.env.NODE_ENV !== 'production' && warn(
      'Templates should only be responsible for mapping the state to the ' +
      'UI. Avoid placing tags with side-effects in your templates, such as ' +
      `<${tag}>` + ', as they will not be parsed.',
      { start: element.start }
    )
  }

  // 预转换处理input中的v-model
  for (let i = 0; i < preTransforms.length; i++) {
    element = preTransforms[i](element, options) || element
  }

  // 处理 v-pre
  if (!inVPre) {
    processPre(element)
    if (element.pre) {
      inVPre = true
    }
  }
  if (platformIsPreTag(element.tag)) {
    inPre = true
  }
  if (inVPre) {
    processRawAttrs(element)
  } else if (!element.processed) {
    // structural directives
    // 处理 v-for, v-if, v-once,后面分析
    processFor(element)
    processIf(element)
    processOnce(element)
  }

  // 根节点不存在,补充
  if (!root) {
    root = element
    if (process.env.NODE_ENV !== 'production') {
      checkRootConstraints(root)
    }
  }

  // 非闭合标签,添加当前元素,并且元素入栈,否则闭合当前元素
  if (!unary) {
    currentParent = element
    stack.push(element)
  } else {
    closeElement(element)
  }
},
回归parseHTML,到这里我们已经讲完了 textEnd === 0 的情况,接下来看大于等于 0 的情况
if (textEnd >= 0) {
  // 取出< 后面的部分
  rest = html.slice(textEnd)
  // 如果匹配不到结束标签,没有开始标签结束部分,非注释,非条件注释
  while (
    !endTag.test(rest) &&
    !startTagOpen.test(rest) &&
    !comment.test(rest) &&
    !conditionalComment.test(rest)
  ) {
    // < 以纯文本形式显示,将其视为文本
    next = rest.indexOf('<', 1)
    if (next < 0) break
    textEnd += next
    rest = html.slice(textEnd)
  }
  text = html.substring(0, textEnd)
}
接着看小于 0 的情况
// 小于 0 时,应将其作为纯文本
if (textEnd < 0) {
  text = html
}
继续看后面代码
// 文本存在,则移除该文本,并修改 index
if (text) {
  advance(text.length)
}

// options.chars 和文本存在,调用options.chars 来处理文本函数,后续分析
if (options.chars && text) {
  options.chars(text, index - text.length, index)
}
到此则解决了满足 !lastTag || !isPlainTextElement(lastTag)的代码, 即内容在纯文本标签里,接下来我们来看下 else 语句,即内容在纯文本标签中**(script, style, textarea)**
let endTagLength = 0
const stackedTag = lastTag.toLowerCase()
// 缓存标签栈的正则匹配
const reStackedTag = reCache[stackedTag] || (reCache[stackedTag] = new RegExp('([\\s\\S]*?)(</' + stackedTag + '[^>]*>)', 'i'))
const rest = html.replace(reStackedTag, function (all, text, endTag) {
  endTagLength = endTag.length
  // 非纯文本标签,切标签不是 noscript
  if (!isPlainTextElement(stackedTag) && stackedTag !== 'noscript') {
    text = text
      .replace(/<!\--([\s\S]*?)-->/g, '$1') // #7298
      .replace(/<!\[CDATA\[([\s\S]*?)]]>/g, '$1')
  }
  // 用来检测是否应该忽略元素内容的第一个换行符
  if (shouldIgnoreFirstNewline(stackedTag, text)) {
    text = text.slice(1)
  }
  // 处理纯文本数据
  if (options.chars) {
    options.chars(text)
  }
  return ''
})
// 修改 index, 修改 html,解析结束标签
index += html.length - rest.length
html = rest
parseEndTag(stackedTag, index - endTagLength, index)
接下来是这样一段代码
// 将整个字符串作为文本对待
if (html === last) {
  options.chars && options.chars(html)
  if (process.env.NODE_ENV !== 'production' && !stack.length && options.warn) {
    options.warn(`Mal-formatted tag at end of template: "${html}"`, { start: index + html.length })
  }
  break
}
在下面就是再次调用 parseEndTag, 用于处理任何遗留的标签
parseEndTag()响应式之Watcher - 8
响应式之Watcher - 8
export default class Watcher {
  vm: Component;
  expression: string;
  cb: Function;
  id: number;
  deep: boolean;
  user: boolean;
  lazy: boolean;
  sync: boolean;
  dirty: boolean;
  active: boolean;
  deps: Array<Dep>;
  newDeps: Array<Dep>;
  depIds: SimpleSet;
  newDepIds: SimpleSet;
  before: ?Function;
  getter: Function;
  value: any;

  constructor (
    vm: Component,
    expOrFn: string | Function,
    cb: Function,
    options?: ?Object,
    isRenderWatcher?: boolean
  ) {
    this.vm = vm
   	// 渲染的订阅者
    if (isRenderWatcher) {
      vm._watcher = this
    }
    // 组件的_watchers 增加这个订阅者
    vm._watchers.push(this)
    // 参数
    if (options) {
      this.deep = !!options.deep // 深度监听
      this.user = !!options.user // user ---> $watch 创建的 用户监听
      this.lazy = !!options.lazy //
      this.sync = !!options.sync //
      this.before = options.before //
    } else {
      this.deep = this.user = this.lazy = this.sync = false
    }
    this.cb = cb // 回调函数
    this.id = ++uid // 处理 id
    this.active = true /
    this.dirty = this.lazy // lazy 观察者
    this.deps = [] // 依赖数组
    this.newDeps = [] // 新依赖数组
    this.depIds = new Set() // 依赖Id
    this.newDepIds = new Set() // 新依赖 Id
    this.expression = ''
    // 解析 getter 表达式
    if (typeof expOrFn === 'function') {
      this.getter = expOrFn
    } else {
      // 解析字符串, 如data = {a:{b:{c:2}}} --> parsePath('a.b.c')(data)
      this.getter = parsePath(expOrFn)
      if (!this.getter) {
        this.getter = noop
      }
    }
    // lazy--> value 设为 undefined / this.get()
    this.value = this.lazy
      ? undefined
      : this.get()
  }

  /**
   * 执行 getter,重新收集依赖
   */
  get () {
    // 将当前的观察者设为 target
    pushTarget(this)
    let value
    const vm = this.vm
    try {
      // 执行 getter 获取 value
      value = this.getter.call(vm, vm)
    } catch (e) {
      if (this.user) {
        // 通过$watch 的监听器,抛出异常
        handleError(e, vm, `getter for watcher "${this.expression}"`)
      } else {
        throw e
      }
    } finally {
      // "touch" every property so they are all tracked as
      // dependencies for deep watching
      // 查看每一个属性,以至于他们全部被跟踪为深度监视的依赖项
      if (this.deep) {
        traverse(value)
      }
      // 移除当前观察者
      popTarget()
      // 清除依赖收集
      this.cleanupDeps()
    }
    return value
  }

  /**
   * 给订阅者增加依赖
   */
  addDep (dep: Dep) {
    const id = dep.id
    // newDepIds 查看是否有 id
    // 没有 -> newDepIds添加 id,newDeps 添加依赖
    //     -> depIds 没有 新Id --> 依赖dep添加当前观察者
    if (!this.newDepIds.has(id)) {
      this.newDepIds.add(id)
      this.newDeps.push(dep)
      if (!this.depIds.has(id)) {
        dep.addSub(this)
      }
    }
  }

  /**
   * 清理依赖项收集
   */
  cleanupDeps () {
    // 移除依赖中绑定的订阅者
    let i = this.deps.length
    while (i--) {
      const dep = this.deps[i]
      if (!this.newDepIds.has(dep.id)) {
        dep.removeSub(this)
      }
    }
    // 重新绑定此 watcher 中的依赖
    let tmp = this.depIds
    this.depIds = this.newDepIds
    this.newDepIds = tmp
    this.newDepIds.clear()
    tmp = this.deps
    this.deps = this.newDeps
    this.newDeps = tmp
    this.newDeps.length = 0
  }

  /**
	 * 订阅者接口
   * 由依赖 dep 的 notify触发
   */
  update () {
    /* istanbul ignore else */
    if (this.lazy) {
      this.dirty = true
    } else if (this.sync) {
      this.run()
    } else {
      queueWatcher(this)
    }
  }

  /**
   * 调度器接口
   * 将会被调度器触发
   */
  run () {
    if (this.active) {
      const value = this.get()
      //
      if (
        value !== this.value ||
        // 即使值相同,对象或数组上的观察者应该被触发,因为对象的深层的值可能不一样了
        // 设定的深度监听器
        isObject(value) ||
        this.deep
      ) {
        // 设置新值
        const oldValue = this.value
        this.value = value
        if (this.user) {
          try {
            this.cb.call(this.vm, value, oldValue)
          } catch (e) {
            handleError(e, this.vm, `callback for watcher "${this.expression}"`)
          }
        } else {
          this.cb.call(this.vm, value, oldValue)
        }
      }
    }
  }

  /**
   * 获取观察者的值
   * 它仅仅被 lazy 观察者调用
   *
   */
  evaluate () {
    this.value = this.get()
    this.dirty = false
  }

  /**
   * 收集订阅者上所有的dep
   */
  depend () {
    let i = this.deps.length
    while (i--) {
      this.deps[i].depend()
    }
  }

  /**
   * 从所有依赖项的订阅者列表上移除当前依赖
   */
  teardown () {
    if (this.active) {
      // 从 vm 的watcher 列表中删除自身
      // 这是一个昂贵操作所以我们常常跳过它,仅在 vm 销毁时执行
      if (!this.vm._isBeingDestroyed) {
        remove(this.vm._watchers, this)
      }
      // 从依赖列表移除当前订阅者
      let i = this.deps.length
      while (i--) {
        this.deps[i].removeSub(this)
      }
      this.active = false
    }
  }
}
渲染之compiler - 11
渲染之compiler - 11
前言
上文我们探讨 render 的过程,render 函数来源于 Vue.prototype.$mount。
const { render, staticRenderFns } = compileToFunctions(template, {
  outputSourceRange: process.env.NODE_ENV !== 'production',
  shouldDecodeNewlines,
  shouldDecodeNewlinesForHref,
  delimiters: options.delimiters,
  comments: options.comments
}, this)这里调用了compileToFunctions函数,接下来我们来分析compileToFunctions函数的代码
compileToFunctions
const { compile, compileToFunctions } = createCompiler(baseOptions)调用了createCompiler,传入了 baseOptions,返回一个对象,内含 compile 和 compileToFunctions,接下来我们先看看 baseOptions。
export const baseOptions: CompilerOptions = {
  expectHTML: true,
  modules,
  directives,
  isPreTag,
  isUnaryTag,
  mustUseProp,
  canBeLeftOpenTag,
  isReservedTag,
  getTagNamespace,
  staticKeys: genStaticKeys(modules)
}
baseOptions 是一个对象,内含很多解析方法,具体方法我们后续分析。这里传入baseOptions来构造编译函数,通过传入编译函数来构建编译函数,可以轻松实现跨平台性。倘若我们需要支持某个新平台,只需要用去实现 baseOptions 里的方法即可。
而对于createCompiler, 它的代码来自src/compiler/index.js
export const createCompiler = createCompilerCreator(function baseCompile (
  template: string,
  options: CompilerOptions
): CompiledResult {
  const ast = parse(template.trim(), options)
  if (options.optimize !== false) {
    optimize(ast, options)
  }
  const code = generate(ast, options)
  return {
    ast,
    render: code.render,
    staticRenderFns: code.staticRenderFns
  }
})这里调用了函数createCompilerCreator,然后传入了 baseCompile 这个函数,结果赋给了 createCompiler。看起来可能有些混乱,那么先这么看, 把 baseCompile 看成一个函数变量,那这里就变成了
export const createCompiler = createCompilerCreator(baseCompile),那接下来我们先从 createCompilerCreator 入手
createCompilerCreator
export function createCompilerCreator (baseCompile: Function): Function {
  return function createCompiler (baseOptions: CompilerOptions) {
    function compile (
      template: string,
      options?: CompilerOptions
    ): CompiledResult {
			// 省略...
    }

    return {
      compile,
      compileToFunctions: createCompileToFunctionFn(compile)
    }
  }
}
调用 createCompilerCreator 函数,直接返回了一个新的函数 createCompiler。然后 createCompiler内部新建了一个 compile 函数,然后返回了一个对象,这个对象就包含了前文所需要的 compile 与 compileToFunction。
compile
compile 函数的源码如下:
function compile (
	template: string,
 	options?: CompilerOptions
): CompiledResult {
  const finalOptions = Object.create(baseOptions)
  const errors = []
  const tips = []

  let warn = (msg, range, tip) => {
    (tip ? tips : errors).push(msg)
  }

  if (options) {
    if (process.env.NODE_ENV !== 'production' && options.outputSourceRange) {
      // $flow-disable-line
      const leadingSpaceLength = template.match(/^\s*/)[0].length

      warn = (msg, range, tip) => {
        const data: WarningMessage = { msg }
        if (range) {
          if (range.start != null) {
            data.start = range.start + leadingSpaceLength
          }
          if (range.end != null) {
            data.end = range.end + leadingSpaceLength
          }
        }
        (tip ? tips : errors).push(data)
      }
    }
    // merge custom modules
    if (options.modules) {
      finalOptions.modules =
        (baseOptions.modules || []).concat(options.modules)
    }
    // merge custom directives
    if (options.directives) {
      finalOptions.directives = extend(
        Object.create(baseOptions.directives || null),
        options.directives
      )
    }
    // copy other options
    for (const key in options) {
      if (key !== 'modules' && key !== 'directives') {
        finalOptions[key] = options[key]
      }
    }
  }

  finalOptions.warn = warn

  const compiled = baseCompile(template.trim(), finalOptions)
  if (process.env.NODE_ENV !== 'production') {
    detectErrors(compiled.ast, warn)
  }
  compiled.errors = errors
  compiled.tips = tips
  return compiled
}首先这个函数包含两个参数,template 与 options,template 指的是模板字符串,而 options 指的编译时的选项。
接下来定义了3 个常量 finalOptions, errors, tips,分别做初始化操作
const finalOptions = Object.create(baseOptions)
const errors = []
const tips = []
然后定一个 warn 函数
let warn = (msg, range, tip) => {
  (tip ? tips : errors).push(msg)
}
接下来是 if 语句块,判断 options 是否存在,存在则执行下面代码。
if (options) {
  if (process.env.NODE_ENV !== 'production' && options.outputSourceRange) {
    // $flow-disable-line
    const leadingSpaceLength = template.match(/^\s*/)[0].length

    warn = (msg, range, tip) => {
      const data: WarningMessage = { msg }
      if (range) {
        if (range.start != null) {
          data.start = range.start + leadingSpaceLength
        }
        if (range.end != null) {
          data.end = range.end + leadingSpaceLength
        }
      }
      (tip ? tips : errors).push(data)
    }
  }
  // merge custom modules
  if (options.modules) {
    finalOptions.modules =
      (baseOptions.modules || []).concat(options.modules)
  }
  // merge custom directives
  if (options.directives) {
    finalOptions.directives = extend(
      Object.create(baseOptions.directives || null),
      options.directives
    )
  }
  // copy other options
  for (const key in options) {
    if (key !== 'modules' && key !== 'directives') {
      finalOptions[key] = options[key]
    }
  }
}
首先判断是否为非生产环境,且 outputSourceRange 被设为 true, 如果是的话,重新定义下 warn 函数。这里的作用在于如果解析出现了问题,可以告知错误的位置,详见Issue。
然后判断 options.modules 是否存在,存在则合并 modules
// merge custom modules
if (options.modules) {
  finalOptions.modules =
    (baseOptions.modules || []).concat(options.modules)
}
接着判断 options.directives 是否存在,存在则继承 directives
if (options.directives) {
  finalOptions.directives = extend(
    Object.create(baseOptions.directives || null),
    options.directives
  )
}
最后拷贝 options 上的其他属性
for (const key in options) {
  if (key !== 'modules' && key !== 'directives') {
    finalOptions[key] = options[key]
  }
}
处理完 if 语句块后,接下来把 warn 函数赋给最终的选项 finalOptions.
finalOptions.warn = warn所以总的来说,这一段就是对 options 的处理操作。
处理完 options 后,接下来是这样一段代码
const compiled = baseCompile(template.trim(), finalOptions)
if (process.env.NODE_ENV !== 'production') {
  detectErrors(compiled.ast, warn)
}
compiled.errors = errors
compiled.tips = tips
return compiled
首先调用 baseCompile 来生成编译后的结果,接着判断是否为非正式环境,如果不是,就检测错误并打印相应的警告。接着把 errors 和 tips 赋给 compiled, 并返回它。
到此,compile 函数的逻辑就说完了,而 **compileToFunctions **是 createCompileToFunctionFn(compile) 的结果,故接下来我们来看看 createCompileToFunctionFn。
createCompileToFunctionFn
export function createCompileToFunctionFn (compile: Function): Function {
  const cache = Object.create(null)

  return function compileToFunctions (
    template: string,
    options?: CompilerOptions,
    vm?: Component
  ): CompiledFunctionResult {
    // 省略...
  }
}
首先定义了一个常量 cache, 然后把 Object.create(null) 的值赋给它。接着返回 compileToFunctions 函数。对于 compileToFunctions, 首先我们来看它的参数,它的调用来自src/platforms/web/entry-runtime-with-compiler.js中的Vue.prototype.$mount。
const { render, staticRenderFns } = compileToFunctions(template, {
  outputSourceRange: process.env.NODE_ENV !== 'production',
  shouldDecodeNewlines,
  shouldDecodeNewlinesForHref,
  delimiters: options.delimiters,
  comments: options.comments
}, this)
故这里的 template 就是处理过的模板字符串,options 也就是这里的 options 对象, 而 vm 也就是这里的 this, 即Vue实例。说完参数,接下来就来看看具体的内部实现。
options = extend({}, options)
const warn = options.warn || baseWarn
delete options.warn
首先通过 extend 将选项参数混合到一个新的对象中,然后将值赋给 options. 接着定义一个常量 warn, 其值为 options.warn 或 baseWarn,如果 options.warn 不存在,则使用 baseWarn 。然后删除 options 上的 warn 。
接下来是检查缓存相关代码:
const key = options.delimiters
	? String(options.delimiters) + template
	: template
if (cache[key]) {
  return cache[key]
}
首先判断 options 中的 delimiters,如果存在,则使用 String 方法将其转成字符串并与template拼接来作为 key 的值,否则直接将 template 作为 key 的值。然后判断 cache[key] 是否存在,如果存在直接返回 cache[key]。这么做的目的是缓存字符串模板的编译结果,防止重复编译,提升性能。
delimiters作为纯文本插入分隔符,如
['${', '}'], 详见delimiters。
接下来是这里的重心代码:
// compile
const compiled = compile(template, options)
调用上面的 compile 函数生成编译后的结果,具体过程后续分析。
再往下是这样一段代码:
const res = {}
const fnGenErrors = []
res.render = createFunction(compiled.render, fnGenErrors)
res.staticRenderFns = compiled.staticRenderFns.map(code => {
  return createFunction(code, fnGenErrors)
})
首先定义两个常量 res 和 fnGenErrors, res 用于作为 compileToFunctions 的结果,fnGenErrors 用于保存生成渲染函数过程中的错误。
接下来是调用 createFunction 函数,代码如下:
function createFunction (code, errors) {
  try {
    return new Function(code)
  } catch (err) {
    errors.push({ err, code })
    return noop
  }
}
这里将调用 new Function ,将 compiled.render 形成一个新函数,然后用 fnGenErrors 保存渲染过程中的错误。最后将这个新函数赋给 res.render。同理处理下 res.staticRenderFns。
接着判断是否为非正式环境,如果是非正式环境且存在错误,则在控制台打印相应的错误信息。
最后执行这样一段代码。
return (cache[key] = res)这里把 res 赋值给cache[key], 用来缓存编译后的结果,下次如果重复编译,则直接返回来提高性能。
准备工作-1
准备工作
拉取项目
git clone https://github.com/vuejs/vue.git代码版本: 2.6.12
配置环境
设置搜索项
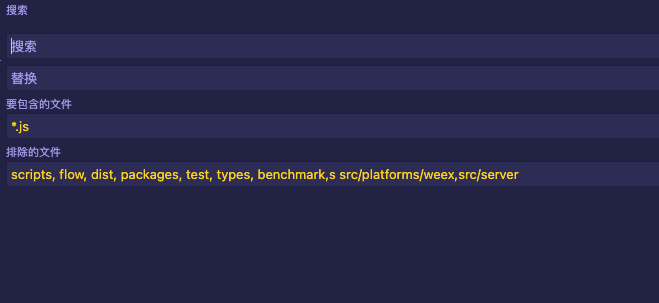
排除掉搜索其他文件夹干扰.
-
flow: 包含使用Flow(静态类型检查工具)声明的类型,供全局使用
JavaScript可以用类型检验的库,现大多项目已采用 TypeScript ,自带类型检验
-
packages: 含服务端渲染和模板编译器两种不同的NPM包,是提供给不同使用场景使用的
-
dist: 打包文件夹
-
test: 测试文件夹
-
types:类型文件夹
-
Benchmark: Benchmark性能测试相关文件
-
src/platforms/weex: weex(跨平台框架)环境下的实现
-
src/server: ssr 相关逻辑
禁用 flow 报错
VSCode 禁用 JavaScript 验证
建议不看源码时启用
编译之baseCompile - 12
编译之baseCompile - 12
前言
前文我们说完了 createCompilerCreator 相关的实现,createCompilerCreator 调用baseCompile函数实现真正的编译。那本文我们详细讨论下编译过程中的正式编译阶段。
baseCompile
baseCompile 的实现位于src/compiler/index.js,
function baseCompile (
  template: string,
  options: CompilerOptions
): CompiledResult {
  const ast = parse(template.trim(), options)
  if (options.optimize !== false) {
    optimize(ast, options)
  }
  const code = generate(ast, options)
  return {
    ast,
    render: code.render,
    staticRenderFns: code.staticRenderFns
  }
}这里分成三个部分,parse 阶段、optimize 阶段与 generate 阶段。由于篇幅过长,具体留作后文分析,这里只做大体介绍。
首先是调用 parse 函数,生成抽象语法树 AST。
const ast = parse(template.trim(), options)这里首先让模板字符串 template 调用自身的 trim 方法,移除头尾空格,接着与 options 一起传入 parse 函数里。
接着判断options.optimize 是否为 false, 如果不为 false, 调用 optimize 对抽象语法树 AST 进行优化操作。
if (options.optimize !== false) {
  optimize(ast, options)
}
最后调用 generate, 将抽象语法树 AST 转化为 render 函数字符串
const code = generate(ast, options)最后返回一个包含 ast、render 与 staticRenderFns 的对象
响应式之Observer - 5
响应式之Observer - 5
前言
前文我们知道,initData 阶段的最后,会调用 observe(data, true),新建观察者类。
接下来我们由此入手,逐步揭开 Observer 的面纱
observe
export function observe (value: any, asRootData: ?boolean): Observer | void {
  // value 必须得是对象
  // value 不能为 vnode 对象 --->
  if (!isObject(value) || value instanceof VNode) {
    return
  }
  let ob: Observer | void
  // 如果value 已经被观察了 ---> value.__ob__
  if (hasOwn(value, '__ob__') && value.__ob__ instanceof Observer) {
    ob = value.__ob__
  } else if (
    shouldObserve &&
    !isServerRendering() &&
    (Array.isArray(value) || isPlainObject(value)) &&
    Object.isExtensible(value) &&
    !value._isVue
  ) {
    // 允许更新、非SSR、value是数组/value是对象、value可拓展、非Vue构造的对象
    // ---> 观察 value
    ob = new Observer(value)
  }
	// 根数据对象时 ---> vmCount增加
  if (asRootData && ob) {
    ob.vmCount++
  }
  return ob
}
Observer
export class Observer {
  value: any;
  dep: Dep;
  vmCount: number; // 具有根数据对象的观察数量

  constructor (value: any) {
    this.value = value
    // 新建 dep 对象
    this.dep = new Dep()
    this.vmCount = 0
    // 给 被观察者 加一个__ob__的属性,表示已经被观察了
    def(value, '__ob__', this)
    if (Array.isArray(value)) {
      // 判断{}有__proto__
      if (hasProto) {
        // --> 给 value新增__proto__的属性
        protoAugment(value, arrayMethods)
      } else {
        // --> 给对象或数组的属性显示定义出来,以防隐藏属性
        copyAugment(value, arrayMethods, arrayKeys)
      }
      // 遍历值然后分别调用 observe
      this.observeArray(value)
    } else {
      // 遍历对象,然后将每一个属性定义为响应式属性
      this.walk(value)
    }
  }

	// 仅在value类型为对象时,才调用此方法---> 浏览所有属性并将其转换为getter / setter。
  walk (obj: Object) {
    const keys = Object.keys(obj)
    for (let i = 0; i < keys.length; i++) {
      defineReactive(obj, keys[i])
    }
  }

  /**
   * 观察数组的每一项
   */
  observeArray (items: Array<any>) {
    for (let i = 0, l = items.length; i < l; i++) {
      observe(items[i])
    }
  }
}
initState - 4
initState - 4
前言
// src/core/instance/state.js
export function initState (vm: Component) {
  vm._watchers = []
  const opts = vm.$options
  // props 存在,则初始化 props(具体后续分析)
  if (opts.props) initProps(vm, opts.props)
  // methods 存在,则初始化 methods
  if (opts.methods) initMethods(vm, opts.methods)
  // data 存在,则初始化 data,否则观察vm._data = {}
  if (opts.data) {
    initData(vm)
  } else {
    observe(vm._data = {}, true /* asRootData */)
  }
  // computed 存在,则初始化 computed
  if (opts.computed) initComputed(vm, opts.computed)
  // watch 存在,且watch不是 对象prototype 上的函数(Firefox 定义的) ---> 初始化 watch
  if (opts.watch && opts.watch !== nativeWatch) {
    initWatch(vm, opts.watch)
  }
}回归上文中的代码,我们从接下来initProps、initMethods、initData、initComputed、initWatch 5个部分来分析它。
initProps
// src/core/instance/state.js
function initProps (vm: Component, propsOptions: Object) {
  const propsData = vm.$options.propsData || {}
  const props = vm._props = {}
  // cache prop keys so that future props updates can iterate using Array
  // instead of dynamic object key enumeration.
  // 缓存 prop key 值以至于未来可以使用数组迭代更新 props 而不是动态枚举对象属性
  const keys = vm.$options._propKeys = []
  const isRoot = !vm.$parent
  // 根节点实例 props 应该被转化
  if (!isRoot) {
    // 停止观察
    toggleObserving(false)
  }
  for (const key in propsOptions) {
    keys.push(key)
    const value = validateProp(key, propsOptions, propsData, vm)

    // 把 props 定为响应式数据
    defineReactive(props, key, value)
    // 在Vue.extend() 期间, 静态props已经代理在组件的prototype上
    // 我们只需要代理定义在此处的实例化。
    // props 已在 Vue.extend() 期间被代理到组件的 prototype 上
    // 此处把未被代理的key代理到实例的_props ---> 正常来说不需要此处代理,但为防意外,补充代理
    if (!(key in vm)) {
      proxy(vm, `_props`, key)
    }
  }
  toggleObserving(true)
}
validateProp
// src/core/util/props.js
export function validateProp (
  key: string,
  propOptions: Object,
  propsData: Object,
  vm?: Component
): any {
  const prop = propOptions[key]
  // absent: 缺席的 ---> 父级调用子组件时是否未用了 [prop名]
  const absent = !hasOwn(propsData, key)
  let value = propsData[key]
  // 布尔值转换
 	// 查找 props 的 type中的 Boolean 的索引
  const booleanIndex = getTypeIndex(Boolean, prop.type)
  if (booleanIndex > -1) {
    // [prop名]缺席 且 子组件prop 没设置default --> value = false
    if (absent && !hasOwn(prop, 'default')) {
      value = false
      // 父组件设置 value 为 '', 如<component visible />
      // 或 value 为连字符式数据, 如<component nick-name="nick-name">
    } else if (value === '' || value === hyphenate(key)) {
 			//仅在以下情况下将空字符串/同名转换为布尔值
      //布尔值具有更高的优先级
      const stringIndex = getTypeIndex(String, prop.type)
      if (stringIndex < 0 || booleanIndex < stringIndex) {
        value = true
      }
    }
  }
  // 检查default值
  if (value === undefined) {
    value = getPropDefaultValue(vm, prop, key)
    //由于default值是新副本,
    //确保观察它。
    const prevShouldObserve = shouldObserve
    toggleObserving(true)
    observe(value)
    toggleObserving(prevShouldObserve)
  }

  return value
}
getPropDefaultValue
// src/core/util/props.js
function getPropDefaultValue (vm: ?Component, prop: PropOptions, key: string): any {
  if (!hasOwn(prop, 'default')) {
    return undefined
  }
  const def = prop.default

  // 原始属性值也未从之前的渲染中定义,
  // 返回先前的默认值,以避免不必要的观察者触发
  // ---> 子组件设置了 props,父组件未使用
  if (vm && vm.$options.propsData &&
    vm.$options.propsData[key] === undefined &&
    vm._props[key] !== undefined
  ) {
    return vm._props[key]
  }

  // ---> type 设置非函数,default 是函数
  // 如  prop: { type: Object, default: function () { return { message: 'hello' }}}
  return typeof def === 'function' && getType(prop.type) !== 'Function'
    ? def.call(vm)
    : def
}
initMethods
// src/core/instance/state.js
function initMethods (vm: Component, methods: Object) {
  for (const key in methods) {
    // 把 methods 绑定到 vm 上
    // 且通过 bind 把 vm 实例传入函数中,方便this 调用到实例
    vm[key] = typeof methods[key] !== 'function' ? noop : bind(methods[key], vm)
  }
}
initData
// src/core/instance/state.js
function initData (vm: Component) {
  let data = vm.$options.data
  data = vm._data = typeof data === 'function'
    ? getData(data, vm)
    : data || {}
  if (!isPlainObject(data)) {
    data = {}
  }
  // 在实例上代理 data
  const keys = Object.keys(data)
  const props = vm.$options.props
  const methods = vm.$options.methods
  let i = keys.length
  while (i--) {
    const key = keys[i]
    if (props && hasOwn(props, key)) {
			// 生产环境警告
    } else if (!isReserved(key)) {
      // 把 data 上的值代理到 vm._data 上
      proxy(vm, `_data`, key)
    }
  }
  // 观察数据
  observe(data, true /* asRootData */)
}
initComputed
// src/core/instance/state.js
function initComputed (vm: Component, computed: Object) {
  const watchers = vm._computedWatchers = Object.create(null)
  // SSR中,computed 属性仅仅是 getters
  const isSSR = isServerRendering()

  for (const key in computed) {
    const userDef = computed[key]
    const getter = typeof userDef === 'function' ? userDef : userDef.get

    if (!isSSR) {
      // 为 computed属性创建内部的 watcher
      watchers[key] = new Watcher(
        vm,
        getter || noop,
        noop,
        computedWatcherOptions
      )
    }

    // 组件定义的 computed 已经被定义到组件的 prototype,这里只需要把computed 属性代理到实例上
    // 避免不明原因的问题而遗漏,
    if (!(key in vm)) {
      defineComputed(vm, key, userDef)
    }
  }
}
defineComputed
// src/core/instance/state.js
export function defineComputed (
  target: any,
  key: string,
  userDef: Object | Function
) {
  // shouldCache ---> 非 SSR 为 true
  // 常规情况下,shouldCache 为 true
  const shouldCache = !isServerRendering()
  if (typeof userDef === 'function') {
    // computed 为函数模式时
    // createComputedGetter ---> 从 watcher 中获取对应 watcher.value
    // createGetterInvoker ---> 直接调用 fn
    sharedPropertyDefinition.get = shouldCache
      ? createComputedGetter(key)
      : createGetterInvoker(userDef)
    sharedPropertyDefinition.set = noop
  } else {
    // computed 为 get/set 模式
    // createComputedGetter ---> 从 watcher 中获取对应 watcher.value
    // createGetterInvoker ---> 直接调用 fn
    sharedPropertyDefinition.get = userDef.get
      ? shouldCache && userDef.cache !== false
        ? createComputedGetter(key)
        : createGetterInvoker(userDef.get)
      : noop
    sharedPropertyDefinition.set = userDef.set || noop
  }

  Object.defineProperty(target, key, sharedPropertyDefinition)
}
initWatch
// src/core/instance/state.js
function initWatch (vm: Component, watch: Object) {
  // 给每一个值调用 createWatcher,来创建 watcher
  // createWatcher 作用: 处理参数(options 和 handler),然后调用 vm.$watch绑定 watch 函数
  for (const key in watch) {
    const handler = watch[key]
    if (Array.isArray(handler)) {
      for (let i = 0; i < handler.length; i++) {
        createWatcher(vm, key, handler[i])
      }
    } else {
      createWatcher(vm, key, handler)
    }
  }
}
createWatcher
// src/core/instance/state.js
function createWatcher (
  vm: Component,
  expOrFn: string | Function,
  handler: any,
  options?: Object
) {
   // 对象情况下复制 options 和 handler
  if (isPlainObject(handler)) {
    options = handler
    handler = handler.handler
  }
  // 解构字符串模式 handler
  if (typeof handler === 'string') {
    handler = vm[handler]
  }
  // 返回 vm.$watch
  return vm.$watch(expOrFn, handler, options)
}
$watch
// src/core/instance/state.js
Vue.prototype.$watch = function (
expOrFn: string | Function,
 cb: any,
 options?: Object
): Function {
  const vm: Component = this
  // 对象的话,处理参数(options 和 handler),然后重新调用$watch
  if (isPlainObject(cb)) {
    return createWatcher(vm, expOrFn, cb, options)
  }
  // 初始化操作 options
  // 设 user 为 true,代表用户创建的 watcher
  options = options || {}
  options.user = true
  // 调用 new Watcher,具体后续分析
  const watcher = new Watcher(vm, expOrFn, cb, options)
  // 如果immediate 设为 true,则立即触发回调
  if (options.immediate) {
    try {
      cb.call(vm, watcher.value)
    } catch (error) {
      handleError(error, vm, `callback for immediate watcher "${watcher.expression}"`)
    }
  }
  // 返回 unwatch 函数,内部执行 watcher 的 teardown(拆除) 函数
  return function unwatchFn () {
    watcher.teardown()
  }
}
编译之parse - 13
编译之parse - 13
前言
上文我们说完了 baseCompile 的大概过程,接下来分为parse、optimize与 generate 三个部分来分别讲解具体过程,首先我们从 parse 入手
Parse
parse的代码位于src/compiler/parser/index.js,源码如下
export function parse (
  template: string,
  options: CompilerOptions
): ASTElement | void {
  warn = options.warn || baseWarn

  platformIsPreTag = options.isPreTag || no
  platformMustUseProp = options.mustUseProp || no
  platformGetTagNamespace = options.getTagNamespace || no
  const isReservedTag = options.isReservedTag || no
  maybeComponent = (el: ASTElement) => !!el.component || !isReservedTag(el.tag)

  transforms = pluckModuleFunction(options.modules, 'transformNode')
  preTransforms = pluckModuleFunction(options.modules, 'preTransformNode')
  postTransforms = pluckModuleFunction(options.modules, 'postTransformNode')

  delimiters = options.delimiters

  const stack = []
  const preserveWhitespace = options.preserveWhitespace !== false
  const whitespaceOption = options.whitespace
  let root
  let currentParent
  let inVPre = false
  let inPre = false
  let warned = false

  function warnOnce (msg, range) {
    // 省略...
  }

  function closeElement (element) {
 		// 省略...
  }

  function trimEndingWhitespace (el) {
    // 省略...
  }

  function checkRootConstraints (el) {
    // 省略...
  }

  parseHTML(template, {
    // 省略...
  })
  return root
}
首先把一些可配置的状态重新赋值
-
warn 重新赋值为 options.warn 或 baseWarn(调用
console.error打印错误信息)打印警告信息
-
platformIsPreTag 重新赋值为 options.isPreTag 或 no(返回 false 的函数)
通过给定的标签名字判断该标签是否是 pre 标签。
-
platformMustUseProp 重新赋值为 options.mustUseProp 或 no
检测一个属性在标签中是否要使用元素对象原生的 prop 进行绑定。
-
platformGetTagNamespace 重新赋值为 options.getTagNamespace 或 no
用来获取元素(标签)的命名空间。
接着定义一个常量isReservedTag, 把 options.isReservedTag 或 no 赋值给它
-
maybeComponent 赋值为一个返回
!!el.component || !isReservedTag(el.tag)的函数isReservedTag 是否是保留标签(html与svg),maybeComponent(el) 的意思是el可能是组件
transforms、preTransforms与postTransforms 三者通过 pluckModuleFunction 函数把对应的方法获取出来,并赋值给它们本身。这三者具体功能,后续分析。
-
delimiters 重新赋值为 options.delimiters
作为纯文本插入分隔符,如
['${', '}']
处理完这一系列重新赋值操作,接下来创建了一系列变量
const stack = []
const preserveWhitespace = options.preserveWhitespace !== false
const whitespaceOption = options.whitespace
let root
let currentParent
let inVPre = false
let inPre = false
let warned = false- 定义常量 stack,赋值为空数组
- 定义常量 preserveWhitespace,值为 options.preserveWhitespace 是否为 false
- 定义常量 whitespaceOption,值为 options.whitespace
- 定义变量 root 与 currentParent
- 定义 inVPre、inPre 与 warned, 分别赋值为 false
再下面定义了四个内部函数 warnOnce 、 closeElement 、 trimEndingWhitespace 与 checkRootConstraints, 这里留作后面分析
function warnOnce (msg, range) {
  // 省略...
}

function closeElement (element) {
  // 省略...
}

function trimEndingWhitespace (el) {
  // 省略...
}

function checkRootConstraints (el) {
  // 省略...
}
接着是 parse 的重点之处:
  parseHTML(template, {
    warn,
    expectHTML: options.expectHTML,
    isUnaryTag: options.isUnaryTag,
    canBeLeftOpenTag: options.canBeLeftOpenTag,
    shouldDecodeNewlines: options.shouldDecodeNewlines,
    shouldDecodeNewlinesForHref: options.shouldDecodeNewlinesForHref,
    shouldKeepComment: options.comments,
    outputSourceRange: options.outputSourceRange,
    start (tag, attrs, unary, start, end) {
      // 省略...
    },

    end (tag, start, end) {
      // 省略...
    },

    chars (text: string, start: number, end: number) {
      // 省略...
    },
    comment (text: string, start, end) {
     // 省略...
    }
  })
这里调用了 parseHTML 函数, 传入了模板字符串 template和一个包含很多属性的对象。由于 parseHTML 篇幅过长,拆分成下文讲解。
渲染之render - 10
渲染之render - 10
前言
前文我们说完了Vue.prototype.$mount的流程,内部调用了 Watcher 函数实现了页面首次渲染,当依赖更新,再次触发 updateComponent,接下来我们来看下 updateComponent 的具体逻辑
updateComponent
updateComponent = () => {
  vm._update(vm._render(), hydrating)
}
这里首先调用了 vm._render将模板转成虚拟DOM节点,然后调用 vm._update将虚拟DOM节点转成真实DOM节点,
接下来我们分成render和update两个部分,来讲解渲染过程
render
vm._render是 Vue.prototype 上的方法,来自src/core/instance/render.js
  Vue.prototype._render = function (): VNode {
    const vm: Component = this
    const { render, _parentVnode } = vm.$options

    if (_parentVnode) {
      vm.$scopedSlots = normalizeScopedSlots(
        _parentVnode.data.scopedSlots,
        vm.$slots,
        vm.$scopedSlots
      )
    }

    // set parent vnode. this allows render functions to have access
    // to the data on the placeholder node.
    vm.$vnode = _parentVnode
    // render self
    let vnode
    try {
      // There's no need to maintain a stack because all render fns are called
      // separately from one another. Nested component's render fns are called
      // when parent component is patched.
      currentRenderingInstance = vm
      vnode = render.call(vm._renderProxy, vm.$createElement)
    } catch (e) {
			// 省略...

    } finally {
      currentRenderingInstance = null
    }
    // if the returned array contains only a single node, allow it
    if (Array.isArray(vnode) && vnode.length === 1) {
      vnode = vnode[0]
    }
    // return empty vnode in case the render function errored out
    if (!(vnode instanceof VNode)) {
      // 省略...
    }
    // set parent
    vnode.parent = _parentVnode
    return vnode
  }
开头定义了常量 vm,保存了当前this实例, 接着通过解构赋值从 vm.$options 中取出render和**_parentVnode**。
然后是一个 if 语句块
if (_parentVnode) {
  // 省略...
}如果**_parentVnode不存在,则执行内部代码,从 Vue.prototype._init中我们知道_parentVnode** 代表的是父级的虚拟DOM。而对于根组件来说,_parentVnode是不存在的,故我们先不考虑后内部代码
接着把**_parentVnode**绑定到 vm.$vnode上面。
vm.$vnode = _parentVnode$mount阶段如果vm.$vnode为 null 时,会触发 mounted 生命周期,即父组件触发mounted生命周期。
接下来是这样一段代码
let vnode
try {
  // There's no need to maintain a stack because all render fns are called
  // separately from one another. Nested component's render fns are called
  // when parent component is patched.
  currentRenderingInstance = vm
  vnode = render.call(vm._renderProxy, vm.$createElement)
} catch (e) {
  handleError(e, vm, `render`)
  // return error render result,
  // or previous vnode to prevent render error causing blank component
  /* istanbul ignore else */
  if (process.env.NODE_ENV !== 'production' && vm.$options.renderError) {
    try {
      vnode = vm.$options.renderError.call(vm._renderProxy, vm.$createElement, e)
    } catch (e) {
      handleError(e, vm, `renderError`)
      vnode = vm._vnode
    }
  } else {
    vnode = vm._vnode
  }
} finally {
  currentRenderingInstance = null
}
首先定义一个变量 vnode,然后执行一个 try-catch-finally 语句块。首先修改当前的渲染实例currentRenderingInstance为 vm, currentRenderingInstance用作保证渲染具有唯一性,同一时间只存在一个渲染实例,防止渲染混乱。
接着调用 render 函数,并将结果传入 vnode 变量里。
vnode = render.call(vm._renderProxy, vm.$createElement)vm._renderProxy 来自于Vue.prototype._init里的代码
if (process.env.NODE_ENV !== 'production') {
  initProxy(vm)
} else {
  vm._renderProxy = vm
}
生产环境直接把 vm 赋值给 vm._renderProxy,而非生产环境会调用 initProxy 函数。initPrxoy 内部实现是调用了 Proxy对象 来代理 vm 对象,然后当获取 vm 上的一些属性时,会有一些异常处理,如获取组件上的一些不存在的属性,非生产环境会打印警告信息。
vm.$createElement 来自于 initRender 里的代码
vm.$createElement = (a, b, c, d) => createElement(vm, a, b, c, d, true)这里的参数分别为tag, data, children, normalizationType, alwaysNormalize。这里调用 createElement 的代码,具体实现留在后面分析。
结合上面 render 的执行,通过 call 传入 this 指向 vm,然后传入参数 vm.$createElement,得到 vnode节点。如果执行发送错误,则调用 renderError 方法来生成另一种渲染输出,如果还是报错,则将 vm._vnode 赋给 vnode,即在 initRender 中赋的 null, 最后 finally 阶段将 currentRenderingInstance 改为 null,恢复渲染流程。
Recommend Projects
-
 React
React
A declarative, efficient, and flexible JavaScript library for building user interfaces.
-
Vue.js
🖖 Vue.js is a progressive, incrementally-adoptable JavaScript framework for building UI on the web.
-
 Typescript
TypeScript is a superset of JavaScript that compiles to clean JavaScript output.
-
TensorFlow
An Open Source Machine Learning Framework for Everyone
-
Django
The Web framework for perfectionists with deadlines.
-
 Laravel
A PHP framework for web artisans
-
D3
Bring data to life with SVG, Canvas and HTML. 📊📈🎉
-
Recommend Topics
-
javascript
JavaScript (JS) is a lightweight interpreted programming language with first-class functions.
-
web
Some thing interesting about web. New door for the world.
-
server
A server is a program made to process requests and deliver data to clients.
-
Machine learning
Machine learning is a way of modeling and interpreting data that allows a piece of software to respond intelligently.
-
Visualization
Some thing interesting about visualization, use data art
-
Game
Some thing interesting about game, make everyone happy.
Recommend Org
-
Facebook
We are working to build community through open source technology. NB: members must have two-factor auth.
-
Microsoft
Open source projects and samples from Microsoft.
-
Google
Google ❤️ Open Source for everyone.
-
Alibaba
Alibaba Open Source for everyone
-
D3
Data-Driven Documents codes.
-
Tencent
China tencent open source team.