MQTT beerkeg sensor for integrating with Home Assistant, OpenHAB, Domoticz and anything else supporting MQTT.
Has remote tare function which you can issue over MQTT if your sensor suffers from drift which many load cells seem to. This saves having to re-start the device everytime you want to tare.
-
Alt. Wemos d1 mini
-
Phone charger and a micro usb cable
-
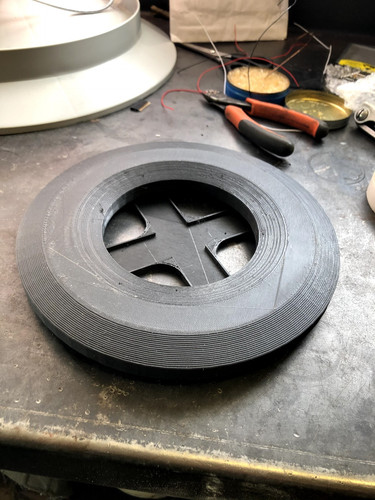
Some plywood or the stl files located in the 3d files folder
-
HX711library - available through Arduino IDE library manager
-
PubSubClientlibrary - available through Arduino IDE library manager
These load cells are essentially a series of resistors whose value changes when flexed, the resulting change in voltage can then be measured and transformed into scale readings.
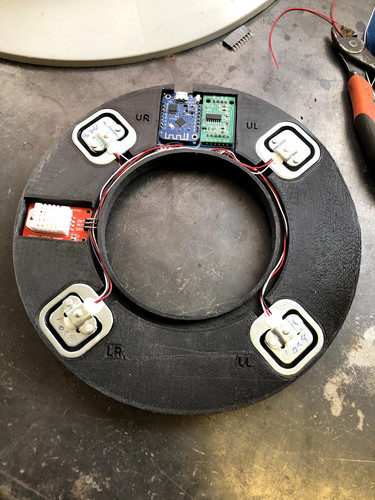
We are going to be connecting the load cells in a full wheatstone bridge in this guide which uses 4 load cells, however it is possible to use 2. The wiring for this can be a little confusing on first glance.
Firstly identify the following connections on your HX711 board, E+, E-, A+, A- (sometimes A is called S so interchange these).
The easiest way to start out is to lay all 4 load cells out into a square shape with one in each corner. You will have an Upper Left, Upper Right, Lower Left and Lower Right. In a very basic sense, the white wires join horizontally, the black wires join vertically and the red wires go to the HX711.
Upper left should go to E+, lower right should go to E-, upper right should go to A+, lower left should go to A-.
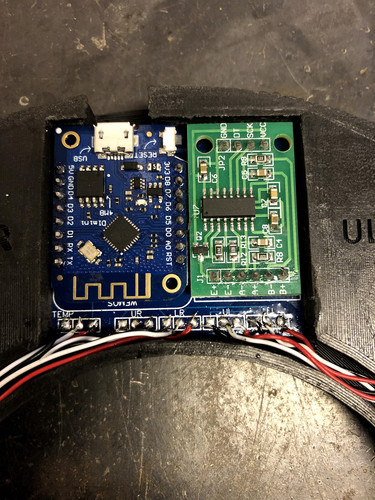
Once you have that, we need to wire the HX711 to the our Wemos D1 Mini (or whichever board you are using). Wire the 5v output of your board to the VCC pin on the HX711, do the same with the ground pins. Then we take the pin labelled D4 on our board and wire it to the DAT pin of the HX711. Finally, RX pin of our board goes to CLK of the HX711. We are using pins 2 and 3 in our code which corresponds to D4 and RX on our ESP board (GPIO 2 & 3).
It should look like this:
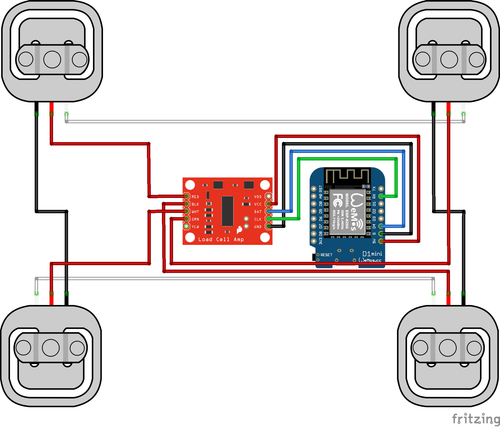
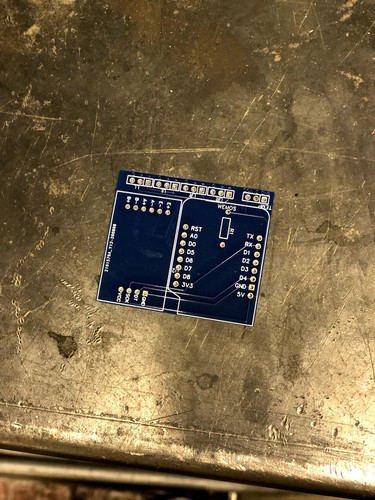
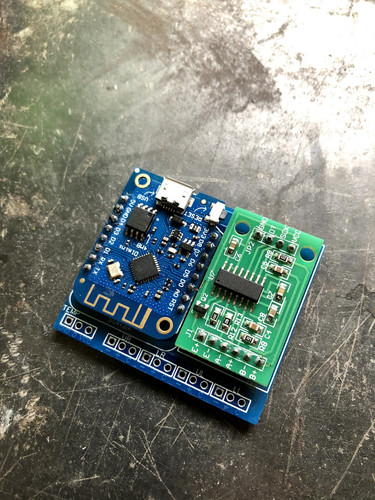
The custom PCB is basically a combinator board where you can connect the hx711 amplifier and the wemos d1 mini. It has connectors for the loadcells and a DHT22 if you want to monitor the temperature.
IMPORTANT FIRST STEP There are two ways you can connect the temperature sensor. If you get a board with the resistor already mounted:

The resistor is the little black square thing at the bottom, if your temperature sensor looks like this you can move on to the next part. On the other hand, if you have a "clean" DHT22 like this:

You need to add a 4.7k resistor on the board beneath the wemos, so make sure you do this first since you can't get to it after soldering the wemos in.
Solder some male headers on the wemos and on the hx711 board then connect them to the PCB making sure the orientations are correct. After soldering remove any excess pins sticking out on the bottom side.
tl:dr
Measure the resistance between the 3 wires, The pair with the highest resistance are your + and - on the board, the leftover wire is the C one
explanation
To determine how to hook up your single strain gauge load cells to the PCB, measure the resistance with a multimeter between the three wires. You should find a larger resistance (close to double) between a pair. In our example, the resistance between black and white was 1.9 kΩ (i.e. 1900Ω), and the resistance between white and red was 900 Ω. Therefore, the center tap to the strain gauge is the white wire. The center tap or center pin of your strain gauge connects to the "C" pin on the PCB. The larger resistance wires (white and black in this example) connect to the "+" and "-" pins on the combinator.
The PCB board hooks up the four load sensors in such a way that two resistors in the wheatstone bridge configuration are constant values and the other two are variable.
Go ahead and fire up Arduino IDE and set your board to esp8266 (or whichever you are using) – set your board speed to 74880.
Go to Sketch > Include Library > Manage Libraries and search for HX711 and install it.
Next download both of the sketches from my Github for this project.
Go ahead and upload the “mqtt_beer_load_cell_Calibration” sketch to your board and open the serial monitor at 74880. After a few seconds, you should see the monitor start to output something that resembles the following:
Initializing scale calibration.
Please remove all weight from scale.
Place known weights on scale one by one.
Reading: 0.00kg
Calibration Factor: 2400
Reading: 0.00kg
Calibration Factor: 2400
Reading: 0.01kg
Calibration Factor: 2400
Reading: 0.00kg
Calibration Factor: 2400
Reading 0.00kg
Calibration Factor: 2400
If you are getting readings from the monitor then this should mean your setup is working. If you are not, check your wiring.
Put some pressure on the inner part of one of the load cells with your finger, you should then start to see values change:
...
Reading: 0.01kg
Calibration Factor: 2400
Reading: 0.00kg
Calibration Factor: 2400
Reading 0.00kg
Calibration Factor: 2400
Reading: 4.58kg
Calibration Factor: 2400
Reading: 4.02kg
Calibration Factor: 2400
Reading 4.27kg
Calibration Factor: 2400
...
Don’t worry about the actual values, we will calibrate properly later.
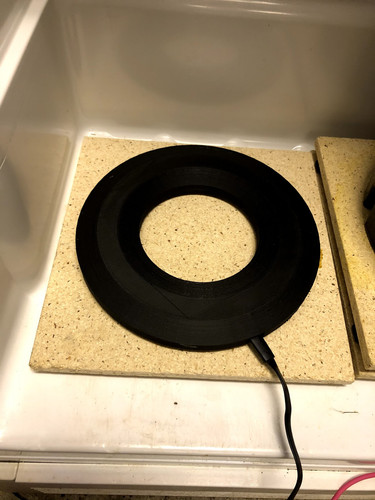
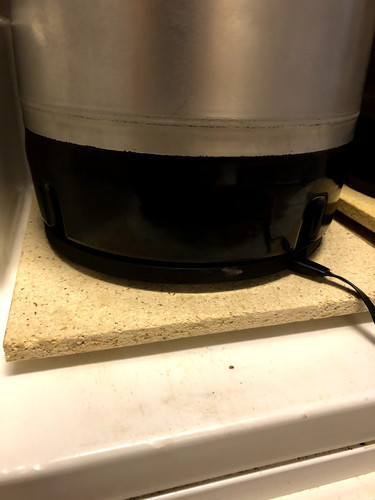
Assuming you got readings as above, you should be safe to mount the hardware in its final position.
This part is obviously very person dependant, but I’ll show you how I mounted mine.
To get the load cells calibrated for your setup, ensure there is no additional weight on the scales apart from what would normally be on there at a “zero weight”. We can fire up the calibration sketch again and open the monitor at 74880.
Allow the monitor to print the zero weight a couple of times, again this should be 0 kg or very close to it. Expect a little fluctuation, this is normal. Once this has settled, place a known weight on the scale, 5kg is a good weight to use. Observe the output on the monitor and see how close (or far!) it is from being correct. Adjust the “calibration_factor” variable in the code and re-upload – start by adjusting the factor with larger increments of say 500 till you start to get closer to the actual weight, then maybe 100 points then 10 points. Re-upload the code – don’t forget to take your known weight off each time. Keep repeating until you have an accurate reading. Once you are happy with the reading, take note of your calibration factor, we will need it for the next section!
We can now take a look at the final sketch, the Beer load cell sensor, which is the one that will integrate our beerkeg with Home Assistant.
Fire up the sketch, and open the change your view to the config.h file.
We need to change a few simple variables here:
-
SSID and Password – change these to your Wifi setup.
-
MQTT_Server – change this to the IP or hostname of your MQTT server.
-
mqtt_username and mqtt_password – change these if you have authentication enabled.
-
Calibration factor – change this to the value you obtained from the calibration steps in the last section.
You can optionally adjust the MQTT topics if you wish. These topics are for:
-
State topic: this is where the kg value will be published to, which will be picked up with Home Assistant.
-
State raw topic: I am also publishing the raw scale values to Home Assistant, these can be pretty useful for checking drift.
-
Availability topic: When the scale starts up, it will publish a message to this topic so Home Assistant knows it is online.
-
Tare Topic: The scale will subscribe to this topic, when it receives a message to this topic, it will tare (reset) the scale. Very useful for combating drift.
Upload the sketch to your board and open the monitor at 74880 speed. You should see it connect to your Wifi, connect to MQTT then it will tare the scale. Then it will start to output the weight and raw value every 3 seconds.
Once again, make sure that no additional weight is on the bed when powering on.
Place a weight on the bed again as a final test and make sure it is reading correctly.
Now we can finish integrating our beerkeg sensor setup in Home Assistant!
Open your configuration.yaml file and add a new entry:
  - platform: mqtt
    name: "Ölvåg 1"
    state_topic: "beer_1"
    unit_of_measurement: "L"
    availability_topic: "beer_1/available"

  - platform: mqtt
    name: "Ölvåg 1 raw"
    state_topic: "beer_1/raw"
    unit_of_measurement: "raw"
    availability_topic: "beer_1/available"
Reload Home Assistant and go into Dev Tools > States and see if you are getting information through:

Then just add a glancecard and put in your sensors:
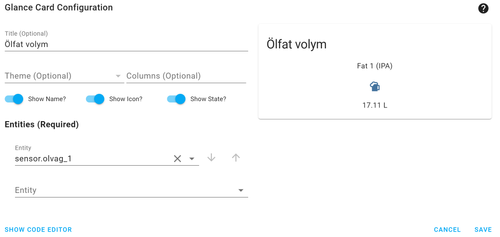
Use: mdi:glass-mug-variant for the icon.
If you want a "tare" button just insert a manualcard and put in this code:
type: button
tap_action:
  action: call-service
  service: mqtt.publish
  service_data:
    payload: tare
    topic: beer_1/tare
icon: 'mdi:scale'
name: 'Nollställ fat 1 '
icon_height: 35px