Authing SSO SDK


English | 简体中文
The Authing SSO SDK provides developers with simple and easy-to-use functions to achieve the SSO effect on the web side. You can integrate with Authing by calling the SDK to achieve the SSO effect in the browser for your multiple business software.
Install with NPM
$ npm install @authing/ssoInstall with Yarn
$ yarn add @authing/ssoUse script tag
<script src="https://cdn.authing.co/packages/authing-sso/2.1.2/umd/index.min.js"></script>
<script>
  var authingSSO = new AuthingSSO.AuthingSSO({
    appId: 'App ID',
    origin: 'https://{UserPool_Domain}.authing.cn',
    redirectUri: 'Login Callback URL',
  })
</script>
Configure the Authing console
Log in to the console to create a new user pool or use an existing user pool and create the corresponding application. As shown below:
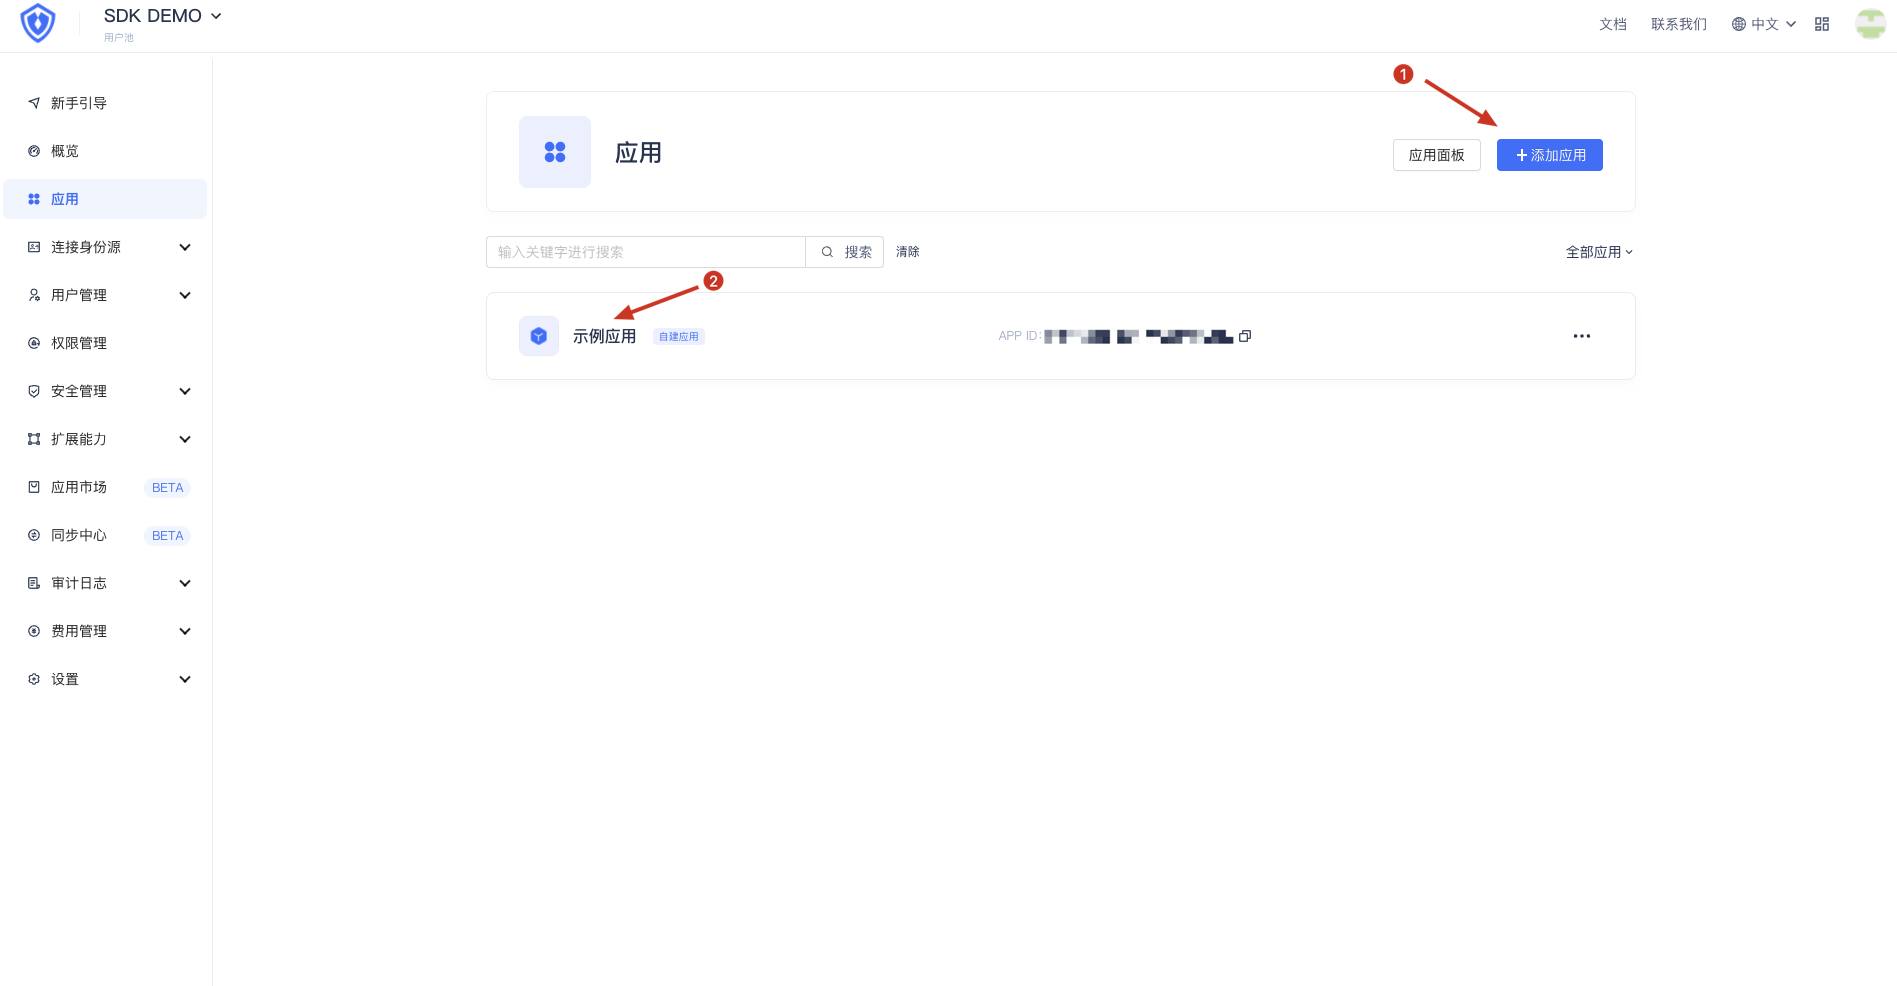
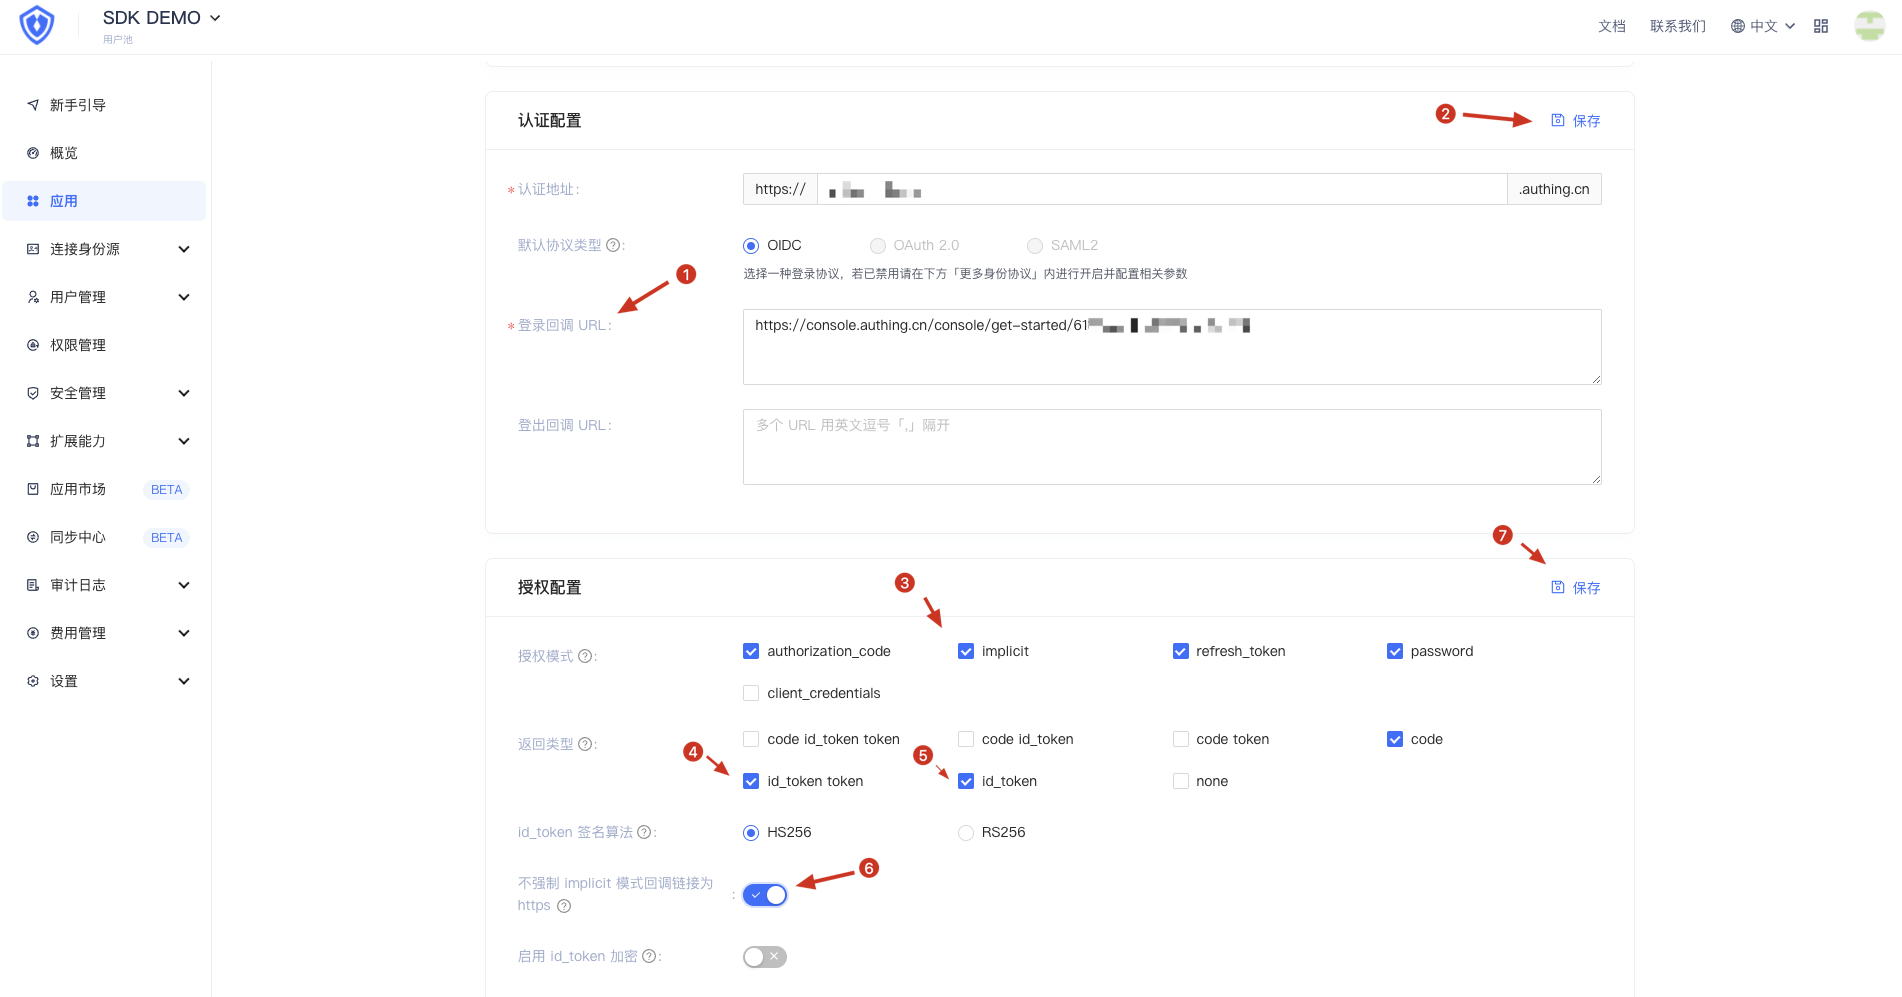
- Enter the app to find the authentication configuration, configure the login callback URL and save it
- In the authorization configuration, the authorization mode is enabled with
implicit - In the authorization configuration, the return type is enabled
id_token tokenandid_token - In the authorization configuration, the implicit mode callback link is not forced to be enabled by https
- Click Save to save the configuration
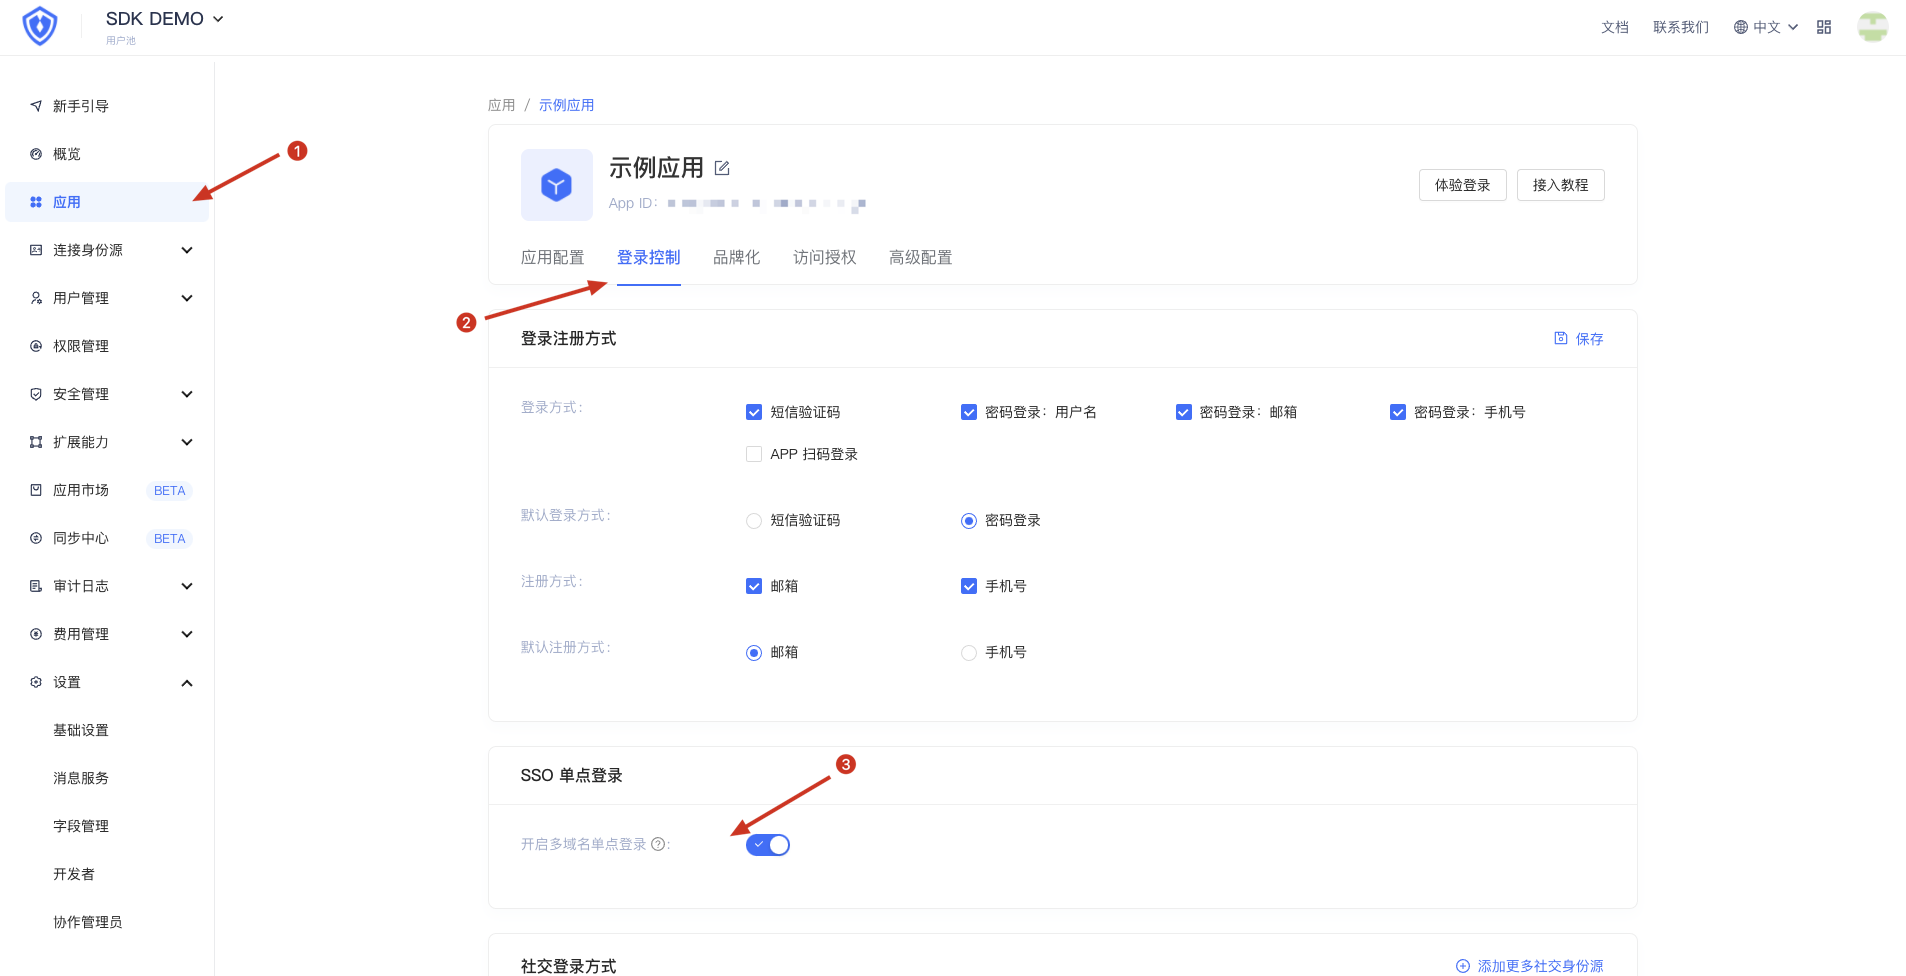
- Turn on SSO single sign-on
Initialize
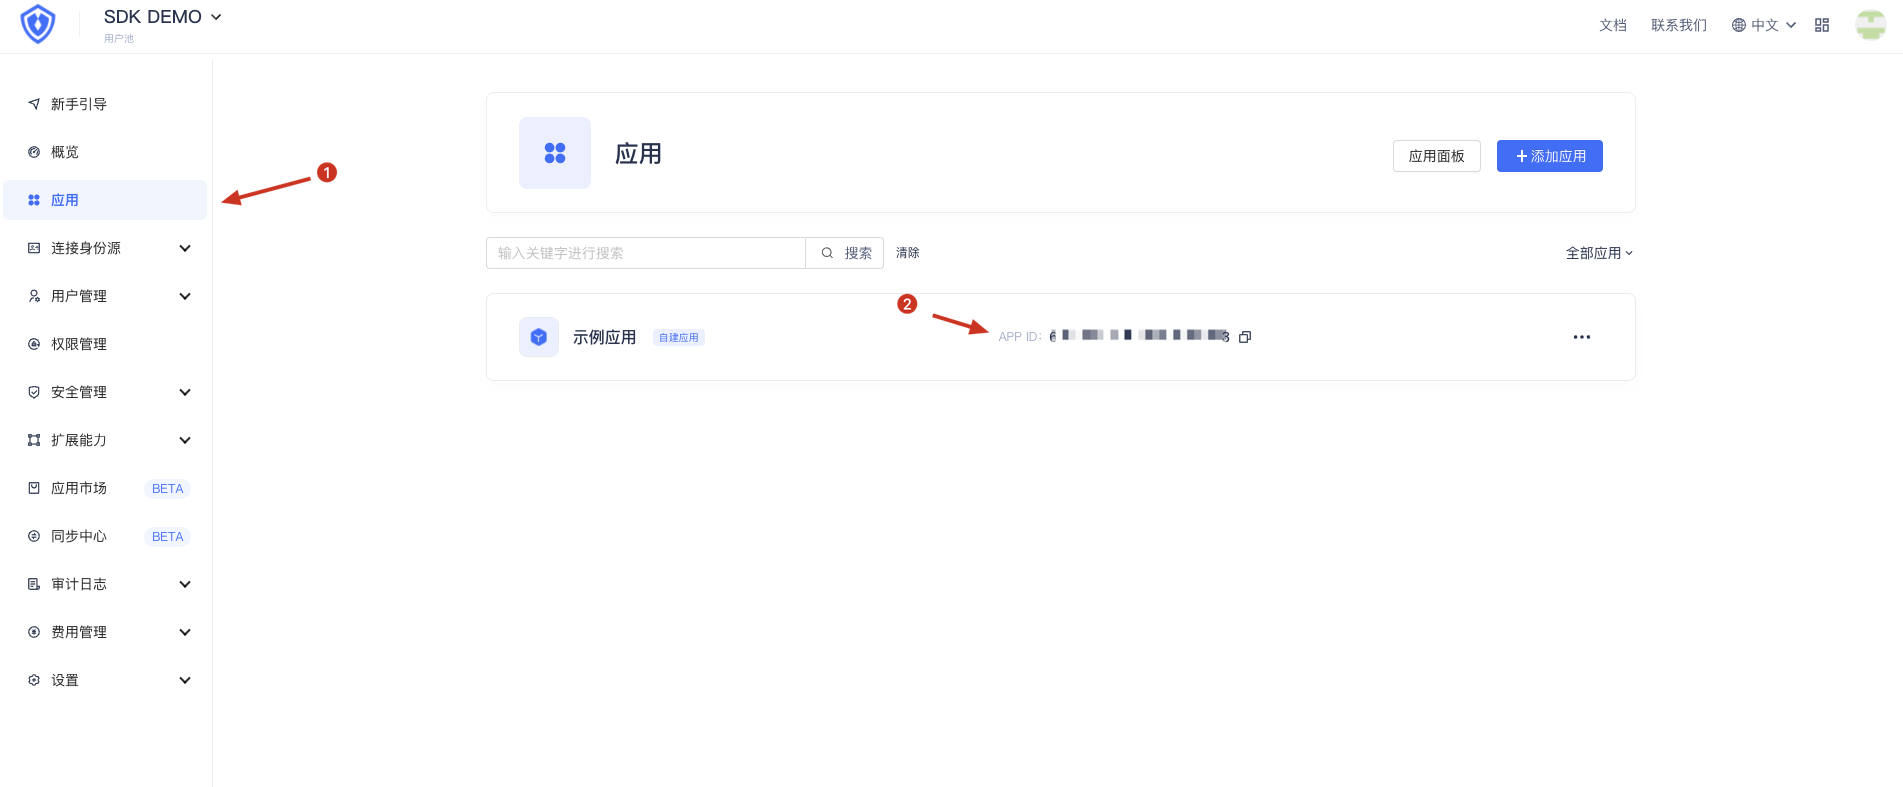
Application ID:
UserPool domain:
Callback URL, fill in the callback url according to your own business:

In order to use the Authing SSO SDK, you need to fill in the App ID, UserPool domain, callback url and other parameters, as shown in the following example:
import { AuthingSSO } from '@authing/sso'

const authing = new AuthingSSO({
  appId: 'App ID',
  origin: 'https://{UserPool_Domain}.authing.cn',
  redirectUri: 'Login Callback URL',
})
If you want to be compatible with lower version browsers, you can also
import { AuthingSSO } from '@authing/sso/es5'register
If you wish to present the Authing-hosted registration page to the user, you can call it as follows:
import { AuthingSSO } from '@authing/sso'

const authing = new AuthingSSO({
  appId: 'App ID',
  origin: 'https://{UserPool_Domain}.authing.cn',
  redirectUri: 'Login Callback URL',
})

authing.register()
Log in
The Authing SSO SDK can initiate authentication and authorization requests to Authing. Currently, two forms are supported:
- Go to the login page hosted by Authing in the current window;
- A window pops up and loads the login page hosted by Authing in the pop-up window.
Redirect login
Running the following code will redirect the browser to the login page hosted by Authing:
import { AuthingSSO } from '@authing/sso'

const authing = new AuthingSSO({
  appId: 'App ID',
  origin: 'https://{UserPool_Domain}.authing.cn',
  redirectUri: 'Login Callback URL',
})

authing.login()
If you want to customize the parameters, you can also customize the following parameters. If you do not pass the parameters, the default parameters will be used
authing.login({
  scope: 'openid profile email phone',
  responseMode: 'fragment',
  responseType: 'id_token token',
  state: Math.random().toString(),
  nonce: Math.random().toString(),
})
After the user completes the login, Authing will redirect the user to your business software callback address. Id Token and Access Token will be sent to the callback address in the form of URL hash. You can use the Authing SSO SDK method to extract them from the URL hash on the corresponding page of your business software front-end route:
import { AuthingSSO } from '@authing/sso'

const authing = new AuthingSSO({
  appId: 'App ID',
  origin: 'https://{UserPool_Domain}.authing.cn',
  redirectUri: 'Login Callback URL',
})

// authing.cn/#id_token=123123&access_token=547567
// return { id_token: 123123, access_token: 547567 }
const { access_token, id_token } = authing.getTokenSetFromUrlHash()

// You can then use the Access Token to get user information
const userInfo = await authing.getUserInfoByAccessToken(access_token)
Popup login
You can call the following method on your business software page to allow users to log in in a new window by popping up a new window:
import { AuthingSSO } from '@authing/sso'

const authing = new AuthingSSO({
  appId: 'App ID',
  origin: 'https://{UserPool_Domain}.authing.cn',
  redirectUri: 'Login Callback URL',
})

authing.popUpLogin()

// Login success callback
authing.onPopUpLoginSuccess(async ({ access_token, id_token }) => {
  // You can store tokens, and you can also use tokens to get user information
  const userInfo = await authing.getUserInfoByAccessToken(access_token)
})
// Login failure callback
authing.onPopUpLoginFail(async ({ error, error_description }) => {
  console.log(error, error_description)
})
// Login cancel callback
authing.onPopUpLoginCancel(async () => {
  // Can be processed according to business logic
})
Sign out
import { AuthingSSO, AuthenticationError } from '@authing/sso'

const authing = new AuthingSSO({
  appId: 'App ID',
  origin: 'https://{UserPool_Domain}.authing.cn',
  redirectUri: 'Login Callback URL',
})

await authing.logout()
// Requires business software to clear all locally saved tokens and user information
Advanced usage
The essence of each login is to access a URL address, which can carry many parameters. The AuthingSSO SDK uses default parameters by default. If you need fine-grained control over login request parameters, you can refer to this example.
import { AuthingSSO } from '@authing/sso'

const authing = new AuthingSSO({
  appId: 'App ID',
  origin: 'https://{UserPool_Domain}.authing.cn',
  redirectUri: 'Login Callback URL',
})

// initiate an authentication request
authing.login({
  scope: 'openid profile email phone',
  responseMode: 'fragment',
  responseType: 'id_token token',
  state: Math.random().toString(),
  nonce: Math.random().toString(),
})

// use the popup to log in
authing.popUpLogin({
  scope: 'openid email phone profile',
  responseMode: 'web_message',
  responseType: 'id_token token',
  state: Math.random().toString(),
  nonce: Math.random().toString(),
})
For more parameters, please refer to the documentation.
Check login status and get Token
If you want to check the user's login status and get the user's Access Token and Id Token, you can call it as follows. If the user is not logged in at Authing, this method will throw an error:
import {
  AuthingSSO,
  AuthenticationError,
  InvalidParamsError,
} from '@authing/sso'

const authing = new AuthingSSO({
  appId: 'App ID',
  origin: 'https://{UserPool_Domain}.authing.cn',
  redirectUri: 'Login Callback URL',
})

async function main() {
  try {
    const { id_token, access_token } = await authing.getAccessTokenSilently()
    // No need to verify the token on the front end, just verify it on the resource server uniformly
    // The token can be stored later
  } catch (err) {
    if (err instanceof AuthenticationError) {
      // The user is not logged in, guide the user to the login page
      authing.login()
    } else if (err instanceof InvalidParamsError) {
      // You can perform logic processing according to your own business
    } else {
      // An unknown error occurred
      throw err
    }
  }
}
main()
Get user information
You need to use the Access Token to get the user's personal information:
- When the user logs in successfully for the first time, they can get the user's Access Token in the callback function, and then use the Access Token to obtain user information;
- If the user is already logged in, you can first obtain the user's Access Token and then use the Access Token to obtain user information.
import {
  AuthingSSO,
  AuthenticationError,
  InvalidParamsError,
} from '@authing/sso'

const authing = new AuthingSSO({
  appId: 'App ID',
  origin: 'https://{UserPool_Domain}.authing.cn',
  redirectUri: 'Login Callback URL',
})

async function main() {
  try {
    // Get the user's token
    const { id_token, access_token } = await authing.getAccessTokenSilently()
    // You can use the token to get the user's information
    const userInfo = await authing.getUserInfoByAccessToken(access_token)
  } catch (err) {
    if (err instanceof AuthenticationError) {
      // do something
    } else if (err instanceof InvalidParamsError) {
      // do something
    } else {
      // An unknown error occurred
      throw err
    }
  }
}
main()
trackSession
Access the /cas/session endpoint with a cookie across domains to get the currently logged in user information
Example:
let res = await auth.trackSession()
/**
 * {
 *    session: { appId: 'xxx', type: 'oidc/oauth', userId: 'yyy'},
 *    userInfo: {
 *      "_id": "USER_ID",
 *      "email": "USER_EMAIL",
 *      "registerInClient": "CLIENT_ID",
 *      "token": "JTW_TOKEN",
 *      "tokenExpiredAt": "2019-10-28 10:15:32",
 *      "photo": "PICTURE",
 *      "company": "",
 *      "nickname": "NICKNAME",
 *      "username": "USERNAME",
 *   }
 * }
 *
 * If the session does not exist, return:
 *
 * {
 *   session: null
 * }
 * */
Demo
Demo Provides an example of using Authing SSO.
Changelog
Detailed changes for each release are documented in the documentation.
Contribution
- Fork it
- Create your feature branch (git checkout -b my-new-feature)
- Commit your changes (git commit -am 'Add some feature')
- Push to the branch (git push origin my-new-feature)
- Create new Pull Request
Get help
Join us on forum: #authing-chat
![dependabot[bot] avatar](https://avatars.githubusercontent.com/in/29110?v=4 "dependabot[bot]")


