
Overview
Automatic SSH Tunnel is a Python script which can be used to create a Reverse SSH Tunnel between multiple computers running Linux and a centralized server.
Licensed under the MIT License - https://opensource.org/licenses/MIT
Features
-
Automatically configures and runs openssh to set-up a reverse ssh connection during boot-up
-
Automatically generates ssh keys
-
No need to store the server's password
-
Works with Debian-based systems, including Ubuntu
-
3-step configuration wizard that requires less than 1 minute to set-up
System requirements
-
These instructions were tested on Ubuntu 15.10, Ubuntu 14.04.3, and Raspbian Jessie (Raspberry Pi)
-
The installation script automatically installs openssh-server with Apt
Animated Tutorial

Getting started
Download
Clone the latest repository version from Github (recommended):
$ git clone https://github.com/facerecog/auto-ssh-tunnel.git
Alternatively, download the .tar.gz file from the top of this page and unpack it:
$ wget https://github.com/facerecog/auto-ssh-tunnel/tarball/master -O - | tar -xz
Now cd into the newly extracted directory.
Installation
Additional instructions for Mac OS X Users
Go to:
System Preferences > Sharing. Turn on "Remote Login". Allow access for "All Users".
-
Run configuration.py to specify the port, username, and IP address of the SSH server:
$ python configure.py <port> <username> <ip address> -
Run the following command:
$ sudo python setup.py install
The installation will proceed automatically. If successful, the output of all the commands should roughly show:
Reading package lists... Done
Building dependency tree
Reading state information... Done
openssh-server is already the newest version.
0 upgraded, 0 newly installed, 0 to remove and 118 not upgraded.
[*] Installing autossh client...
[*] Installing autossh as startup application...
mkdir: cannot create directory ‘.ssh’: File exists
yes: standard output: Broken pipe
yes: write error
Generating public/private rsa key pair.
Enter file in which to save the key (/root/.ssh/id_rsa): priv_key already exists.
Overwrite (y/n)? [*] Copying SSH-Keys file over to server...
/usr/bin/ssh-copy-id: INFO: attempting to log in with the new key(s), to filter out any that are already installed
/usr/bin/ssh-copy-id: INFO: 1 key(s) remain to be installed -- if you are prompted now it is to install the new keys
"<username>@<ip address>" 's password:
Number of key(s) added: 1

Now try logging into the machine, with:   "ssh ' "<username>@<ip address>" '"
and check to make sure that only the key(s) you wanted were added.

[*] Installing private keys inside protected folder...
yes: standard output: Broken pipe
yes: write error
[*] Moving autossh client into the /usr/local/bin/ directory...
[*] Moving private key to /etc/auto-ssh-tunnel/
mkdir: cannot create directory ‘/etc/auto-ssh-tunnel’: File exists
yes: standard output: Broken pipe
yes: write error

[*] We are now finished with the installation! Restart the client to complete the installation. To run autossh, input connect.py on the terminal.
How the script works
During installation, the script will automatically append the following lines to /etc/ssh/ssh_config:
ServerAliveInterval 30
ServerAliveCountMax 4
It will also append the following to /etc/ssh/sshd_config
ClientAliveInterval 30
ClientAliveCountMax 4
Upon boot, the client will run connect.py, which sets up a reverse ssh tunnel. The server may now ssh into the client even if the client resides behind a NAT firewall.
Verify that it works
-
From the client, ssh into your server:
$ ssh <rootname>@<ip address> -
Once in, connect back to your client:
$ ssh <your username>@localhost -p <port number specified as above> -
If successful, you have just ssh-ed back into your client. Congratulations and enjoy!
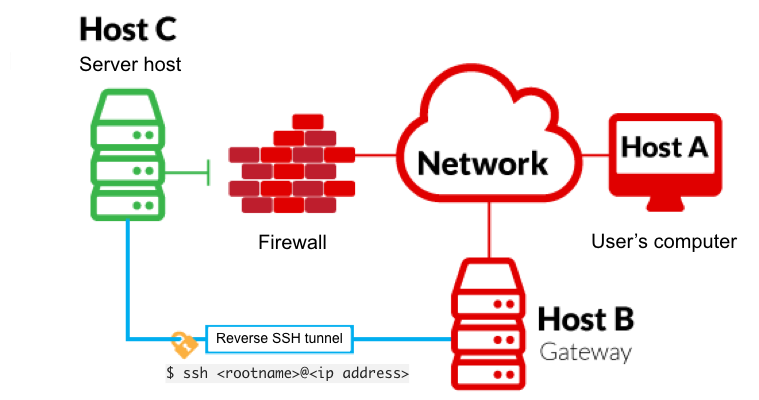
Reverse SSH Tunnel Diagram
Uninstall
To uninstall:
$ sudo rm -rf /etc/init.d/connect.py /etc/auto-ssh-tunnel /usr/local/bin/connect.py /System/Library/StartupItems/auto-ssh-tunnel/
Support
If you want to support this project, please consider reaching out to me via [email protected]
Property of Facerecog Asia Pte. Ltd. and 26 Factorial


