4me supports the creation of app offerings to provide custom integrations with external applications. Once an app offering is published it will become available in the 4me App Store of all 4me accounts with a trust to the provider account. In addition, when an app can be of interest to many 4me customers, you can ask 4me to publish your App to the public 4me App Store, so that it will become available to all 4me accounts on the Premium plan.
Building the actual app/integration is not trivial. This repository contains a couple of sample integrations based on a shared framework that can be used to jump-start the development.
This documentation explains the nitty-gritty details and is therefore intended for developers and software architects. It contains the following topics:
- Glossary
- App Building
- Technology stack
- Topology
- Framework
- Example integrations
- Running the examples
4me application tokenThe OAuth application (token) generated in the customer account to provide access to customer data using the 4me GraphQL API.4me domainThe 4me domain to install the integration in, e.g.4me.com,4me.qaor4me-demo.com.customerThe customer of the integration.customer accountThe 4me account of the customer.customer secretsSecret tokens for a single app instance, allowing access to the customer's data. See the secrets-lambda.external applicationThe external application that is being integrated with 4me.frameworkThis repository containing the document you are reading, all provisioning scripts and examples.app offeringThe 4me app offering record defined in the provider account.integration engineThe (serverless) engine managed by the provider that connects 4me and the external application(s) .app instanceThe installed 4me App in the customer account.lambdaA serverless compute service that lets you run code without provisioning or managing servers.providerThe provider of the app/integration.provider accountThe 4me account of the provider.provider secretsSecret tokens shared by all apps, allowing access to the provider's data. See the bootstrap.js script.SAMAWS Serverless Application Model (SAM) , used to provision the integration engine.scopeUsed to define which actions are allowed or denied in the customer account when using the 4me application token.webhookA function that sends awebhook messageto thewebhook endpointwhen a certain condition is met.webhook endpointInternet address (URI) where webhooks messages are received by the integration engine.webhook policyA policy used for cryptographic signing of webhook messages to ensure it is sent from a trusted source.webhook messageAutomated (signed) messages sent from 4me or the external application to the integration engine.
The 4me App Store makes it possible for customers to install integrations build by providers, called app offerings. When an App is installed by a customer the complete setup of the integration for that particular customer should be automated so that the functionality of the App is immediately exposed. To accomplish this the provider has to register the integration in their 4me account and they need to build, deploy and maintain an integration engine that reacts to 4me whenever an App is installed to ensure that the customer 4me account is connected to the external application.
This setup makes it very easy for 4me customers to add predefined integrations to their 4me account.
From the provider perspective it will take some effort to define the integration and related records in 4me and to build the integration engine. This App Builder framework is targeted at providers and showcases working examples to automatically deploy all components required to provide (integration) Apps to their customers in 4me.
Even though many modern applications use similar API technologies (such as GraphQL or Rest) some middleware is almost always required to connect two applications. In this document this middleware component is called the integration engine.
The example framework found in this repository uses Amazon Web Services to host the integration engine. Provisioning of the integration engine to AWS is automated using the AWS Serverless Application Model (SAM).
Of course 4me is always included in the mix. Automated provisioning and integration specific actions are performed using the 4me GraphQL API.
All provisioning scripts and serverless code found in this framework are written in NodeJS. To be able to use the correct NodeJS version we recommend using Node Version Manager.
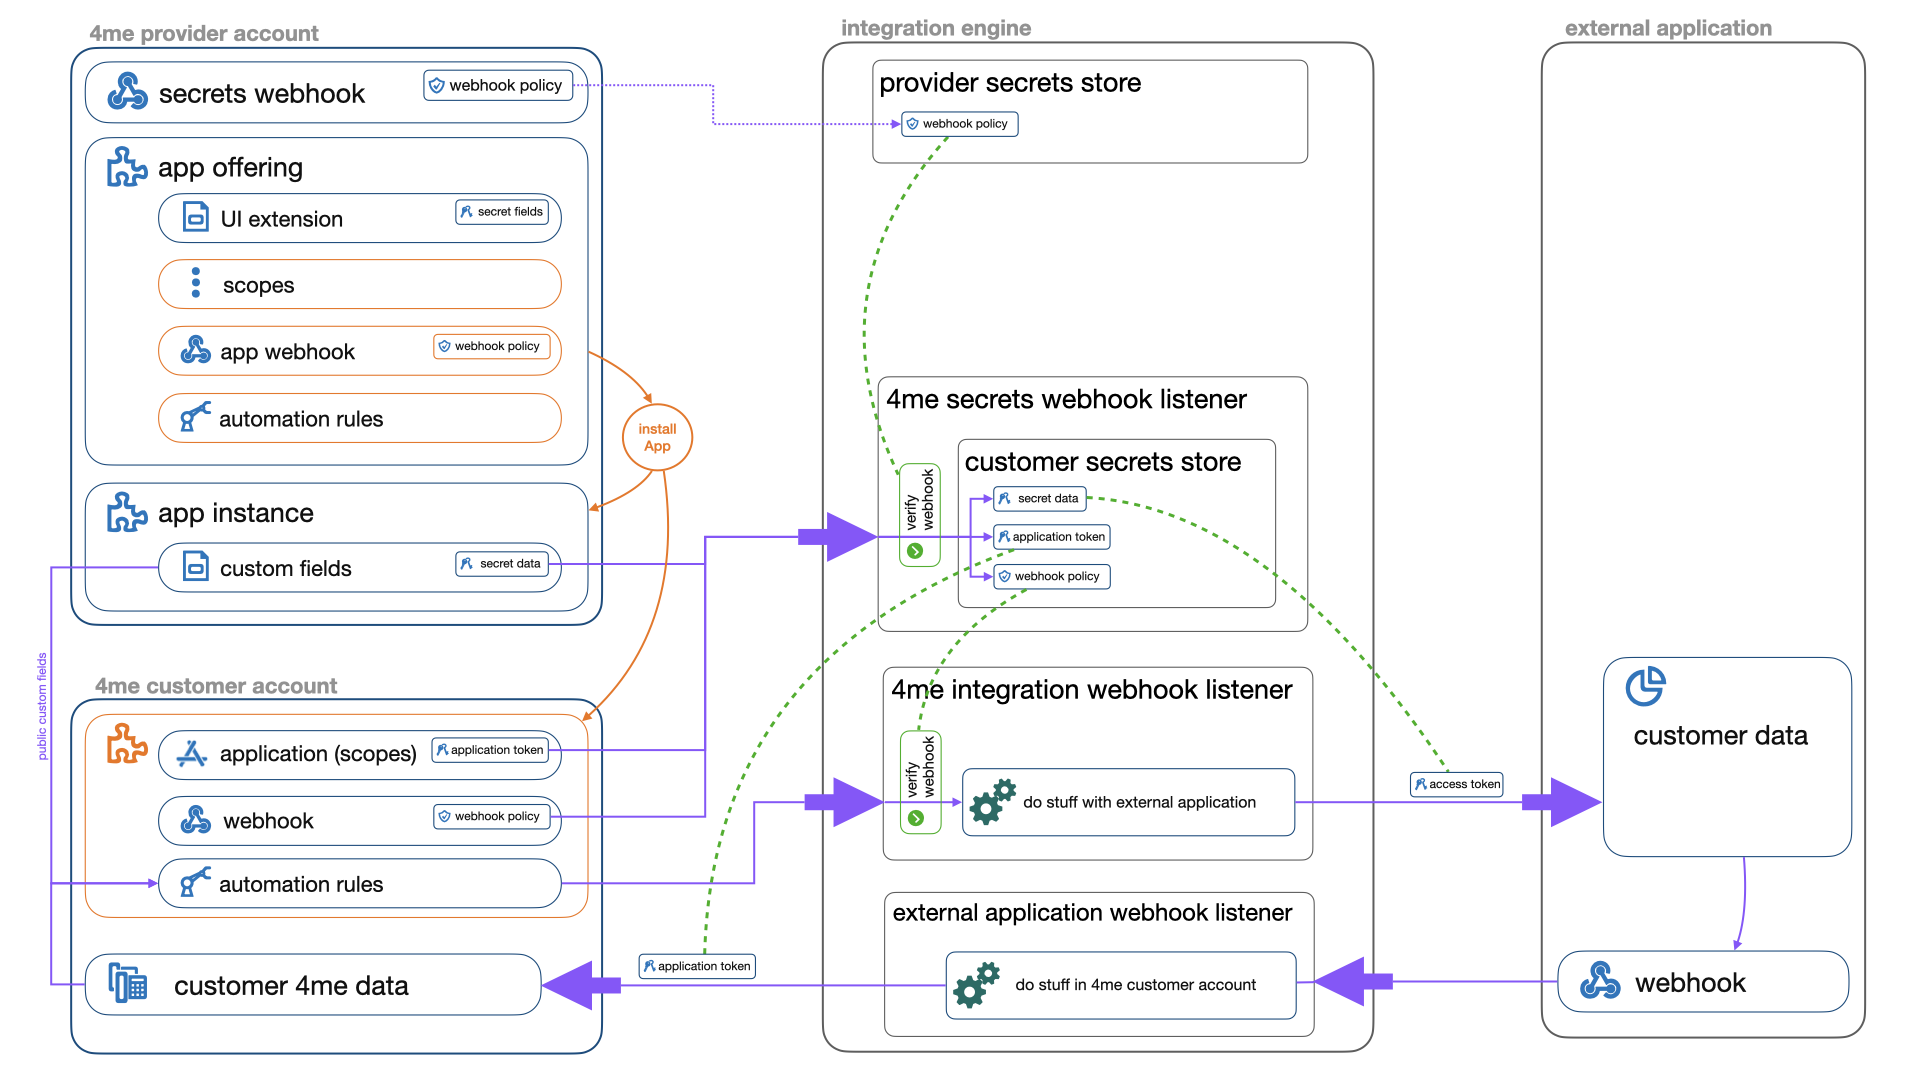
When building a secure integration between 4me and an external application several components are involved.
This section outlines these components, their connections and explains some details of each component.
From a high level point of view the following steps are taken:
- The provider creates an app_instance.secrets-update webhook
- The provider creates an App Offering record
- The provider builds and deploys the integration engine
- The provider installs the draft app offering in the provider account for testing purposes
- The provider publishes the app offering so that it becomes available to the customers
- The customer installs the app via the 4me App Store
- The integration engine does some initial provisioning for the specific customer
- Regular operations of the integration start: based on events, in either 4me or the external application, the integration engine performs actions
Over time when a new version of the app offering becomes available the provider can publish the new version and the customers have the opportunity to update the app to the latest version in the 4me App Store.
When the customer no longer wishes to use the integration they can disable or remove the app via the 4me App Store.
To ensure maximum security 4me will share customer secrets, required by the integration, using the
special app_instance.secrets-update webhook, and not keep these in the 4me
database.
A provider must define a single secrets 4me webhook that points to the integration engine. This webhook's URI should point to the 4me secrets webhook listener that is able to store all received customer secrets in a secrets store.
It is important to define a webhook policy, and use https, on the secrets webhook to ensure that the messages are encrypted and the provider can verify that the incoming messages originate from 4me.
The following customer secrets are passed using webhook messages from 4me to the integration engine through this webhook:
- The secret values provided by the customer in the UI Extension related to the integration.
- The webhook policy details of the app webhook related to the integration.
- The 4me application token required to access data in the 4me customer account.
- The 4me authorization grant token required to access data in the 4me customer account on behalf of the currently logged in user.
The framework provides a default implementation of the secrets webhook making use of the AWS Secrets Manager.
The 4me app offering record is defined by the provider and consists of the following data:
Name[required] Name shown to the customers in the 4me App Store.Reference[required] Unique and immutable reference.Service instance[required] The service instance supporting this integration.DescriptionShort description shown to the customers in the 4me App Store.FeaturesLonger description of the features of the app.ComplianceLonger description regarding security and compliance.UI extensionA custom form shown to the customer when installing an app.ScopesThe scopes required to interact with 4me GraphQL API in the customer account.WebhookThe endpoint, and associated policy, for webhook messages to relay 4me data from the customer account to the integration engine.Automation rulesAutomation rules created in the customer account on installation of the app.Configuration URIThe external URI where the app can be configured.
Depending on the type of integration the UI extension , scopes and tokens, and/or app webhook and automation rules need to be defined.
This framework provides several example integrations showing when and how to use them.
The UI extension is used to define custom fields that the customer needs to fill out when installing an app.
When a customer installs an integration an app_instance record will be created in the provider account. If a UI
extension was added to the app offering the data provided by the customer is accessible in the custom_fields value of
that app instance.
Besides the app_instance.secrets-update webhook it is possible to define app_instance.create, app_instance.update
and app_instance.delete webhook in the provider account to listen to changes made by the customer in the custom
fields.
Another option, used in the example integrations below, is to query the custom data of the integration instance from the integration engine using the 4me GraphQL API at the moment the data is required. This ensures the most recent data is always used without the need to keep a copy in sync.
Note that there is a special secret field type available in UI extension for app offerings. When such a field is
filled out by the customer a webhook message will be sent to the integration engine using
the app_instance.secrets-update webhook. 4me does not store the secrets so it is imperative to
process those messages in the integration engine and store the customer's secrets in a trusted secrets store.
The Framework already provides a full implementation for this functionality using the AWS services.
In case the integration needs to interact with the 4me GraphQL API in the customer account the integration has to define the access it requires. This can be done by defining scopes.
Scopes typically contain information like 'Allow: CI — Read, Update'.
The customer is able to review the scopes before installing the app.
When the app is installed a 4me application token and authorization grant token will be created in the customer account with the defined scopes. The application token will allow the integration access on its own behalf, not dependent on a user's session currently logged in the 4me UI. The authorization code grant token will allow access in context of a user currently using 4me (these will typically use the 'Me scope', allowing access to the current user's identity). The created tokens, required to access the 4me GraphQL API in the customer account, will be sent to the integration engine using the app_instance.secrets-update webhook.
4me does not store the secret 4me application token so it is imperative to process those messages in the integration engine and store the 4me application token in the secrets store.
The Framework already provides a full implementation for this functionality using the AWS services.
In case the app needs to be notified of updates to records in the 4me customer account the app offering should define a webhook and one or more automation rules.
When a customer installs the app a webhook policy and a webhook are created in the customer account based on the webhook details defined in the app offering. The public key of the generated webhook policy will be sent to the integration engine using the app_instance.secrets-update webhook. The key should be stored in the customer secrets store so the integration engine can validate incoming messages originate from 4me.
The next step is to define automation rules that need to be created in the customer account on installation of the app. Those automation rules can then be used to pass data from the customer account to the integration engine using actions that execute the webhook with specific data captured in the automation rule.
Please note: These automation rules are not limited to the scopes provided to the app offering, but have full access to the customer's data.
The Framework already provides a full implementation for this functionality using the AWS services.
When an application needs interaction with a third party at install time to be configured (e.g. for requesting authorization tokens through an Oauth authorization code flow), the app offering should define a configuration URI where a user will be redirect to upon installation.
When a user installs an app from the app store, first a (disabled) app instance is created. Then the user is redirected to the configuration URI, with the nodeID, account_id, confirmation_url and created_at of the app instance as query parameters. Additionally a query parameter X-4me-Signature will be provided when the Secrets Webhook has a policy configured (which is strongly recommended).
At the configuration URI, before doing any configuration, the app should validate the incoming request. First X-4me-Signature can be used to verify the nodeID, the signature contains a JWT token (with the nodeID value as its data) signed with the secret webhook's policy. If this token is valid the app should retrieve the app instance from 4me using the nodeID and compare the received account_id and created_at with those of the app instance. When the account_id and the created_at match, the app can continue with its configuration by interacting with the user.
After configuration, the user should be redirect back to 4me to confirm the configuration in 4me by enabling the app instance. To do this, the user should be redirect to the confirmation_url.
When a customer installs an app offering from the 4me App Store, an app_instance record is created in the provider
account.
It is possible to add a UI extension to the app offering to collect additional information from the customer on installation.
The integration engine glues 4me to the external application(s). It is where all the information comes together. This repository shows an example provider setup using a set of lambda functions: one shared between all integrations and then some specific to each integration.
The integration engine exposes a single serverless lambda function shared over all integrations served:
- A single 4me secrets webhook listener connected to the customer secrets store.
And it exposes some serverless lambda functions for each integration hosted by the integration engine:
- A 4me integration webhook listener to process incoming data from 4me.
- An external application webhook listener processing data coming in from the external application.
- An app added or updated listener to configure the external application when a customer installs the App.
This serverless function is responsible to accept and process the webhook messages containing secrets for all app offerings.
It is important to first validate the incoming message using the defined webhook policy to ensure they originate from 4me.
The listener typically stores each customer secret in the secrets manager grouped by the customer account so that they can be used by the 4me integration webhook listener and the external application webhook listener.
The framework provides a default implementation of the secrets webhook making use of the AWS Secrets Manager.
This listener receives webhook messages containing customer data based on the app webhook and automation rules.
It is important to first validate the incoming message using the webhook policy that was received by the 4me secrets webhook listener at the moment the customer installed the application. This ensures the message indeed comes from the automation webhook in the customer's 4me account.
Once this is verified the data sent (defined in the automation rule) can be used to perform some integration action.
The note dispatcher below automatically provisions an integration webhook listener.
This listener receives webhook messages from the external application.
The Typeform integration below provisions an external application webhook listener.
In most cases the webhooks can also be provisioned automatically in the external application. See the app added or updated listener for more information on this topic.
After a customer installs the app some initial steps are probably needed to configure the engine's connection to the external application for this customer.
Some use cases for this listener:
- To register a webhook in the external application, see Typeform installation changed handler
- Initial (bulk) upload of data from the external application into 4me, or vice-versa.
There are two ways to trigger this listener.
One is to define app_instance.create, app_instance.update and app_instance.delete webhooks in the provider
account. Then a single generic-installation-changed-lambda lambda function has to be provisioned that is available
to all integrations, similar to the secrets lambda triggered by
the app_instance.secrets-update webhook. This generic lambda should check which app is involved and
pass a message/event to the specific installation-changed-lambda to configure the
connection to the external application for this customer.
Another approach, used in the Typeform installation changed handler, is to trigger the installation-changed-lambda based on an event from the 4me secrets webhook listener. The advantage of this approach is that:
- The
installation changed handleris triggered after the customer's secrets for the integration have been stored in the AWS Secrets Manager (i.e. the engine is guaranteed that these are available). - There is no need for a
generic-installation-changed-lambdashared by all integrations.
The framework can be used to automatically provision all components described in the topology section in 4me and AWS.
This section describes how the code of the framework is structured.
Most components can be seen as boilerplate code all geared towards the lambdas defining the actual glue for each integration:
- The 4me integration lambda process incoming data from 4me.
- The external application lambda process incoming data from the external application.
The /library directory consists of a bootstrap.js script that helps provision the generic components used by all integrations.
Next to that it provides helpers that can be used by the actual integrations:
- secrets-lambda
- secrets_helper
- js_4me_webhook_lambda_handler
- js_4me_helper
- js_4me_installation_handler
- js_4me_deploy_helper
esbuild is used to include only the helpers that are actually used in the lambdas deployed to AWS.
Script location:/library/bootstrap.jsFunctionality: Provision the generic components used by all integrations.
The bootstrap usage section describes how to run the bootstrap script.
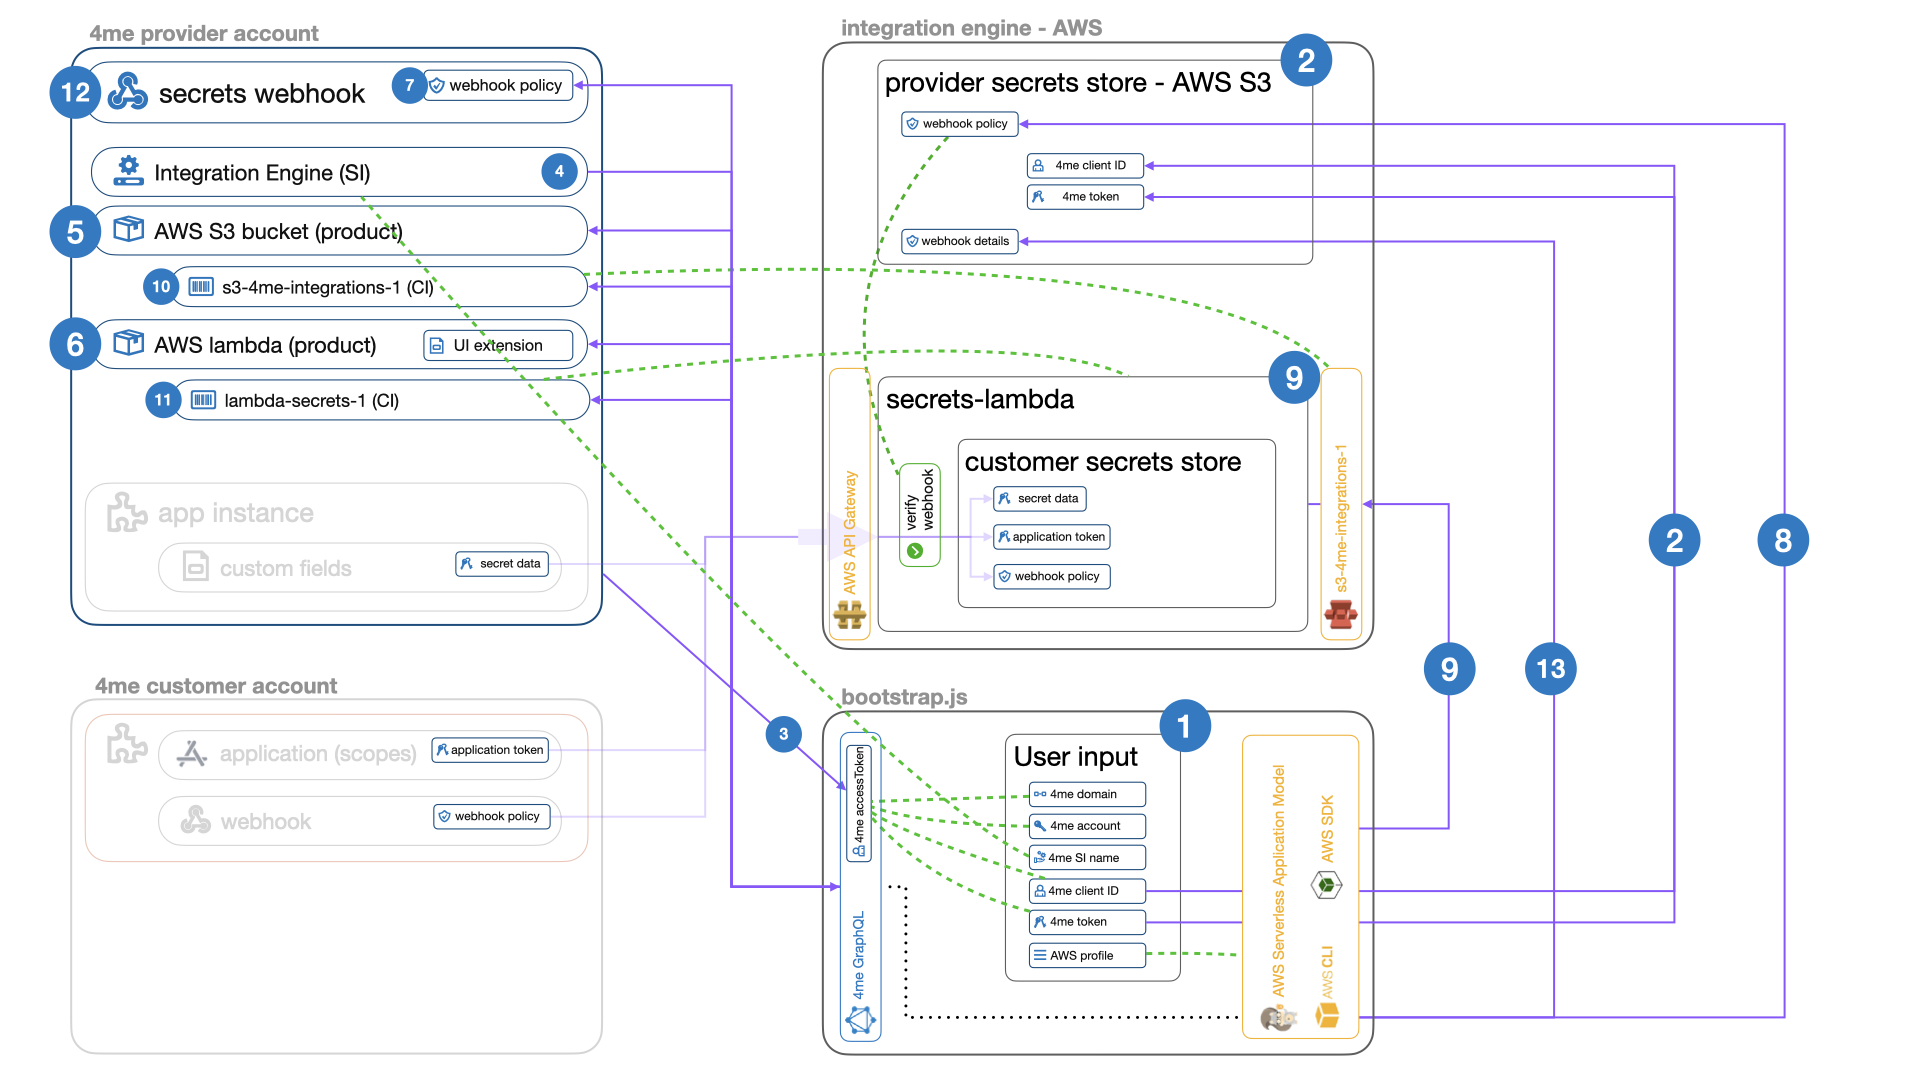
Step 1 Gathering user input
First the script will gather user input from the command prompt that informs the script how to access AWS and the 4me provider account.
Normally this script is only run once. In case it needs to be run more frequently, e.g. when testing enhancements to the script, the gatherInput function can be extended with default values.
Those default values will then used when pressing enter on the command prompt. The input gathered is:
4me domainThe 4me domain to install the integration in, e.g.4me.com,4me.qaor4me-demo.com.4me accountThe provider account, e.g.wdcin demo.service instanceThe name of the service instance representing the integration engine, e.g.Mainframe 1in demo.enabled offeringsThe references of the App Offerings for which the secrets-lambda should create new AWS secrets, leave the default*to allow any App Offering. (Limiting the enabled offerings can be useful in testing situations.)client IDThe client ID of the OAuth Application in 4me used to update the configuration in the 4me provider account and at runtime by the engine to access data in that account.application tokenThe secret token of the OAuth Application in 4me used to update the configuration in the 4me provider account and at runtime by the engine to access data in that account.AWS profileThe profile to be used to access AWS, should be defined in~/.aws/config, e.g.default.
Please note: The usage of the same provider token for both app offering deployment and runtime of all integrations is done here to keep the configuration of these examples a bit simpler. An actual provider is recommended to use separate tokens for deployment and integration runtime (e.g. a personal access token to setup the app offering and an application per lambda deployed).
All provider secrets will be stored in the AWS Secrets Manager using
the 4me-app-builder/<4me domain>/<provider account> key.
Step 2 Store clientID and token provided on the command prompt as the provider secrets in the secrets manager (so the engine can use these later at integration runtime):
4me-app-builder/4me-demo.com/wdc
{
  "clientID": "ufTd...FMyJ",
  "token": "AZkD...LtNQ",
}
Step 3 Retrieve a (temporary) accessToken for the 4me GraphQL API based on the clientID and token. This token is used to perform the initial deployment of the integration to 4me in the following steps.
Step 4 Lookup the Service Instance of the integration engine in 4me based on the service instance name from step 1.
Step 5 Create the AWS S3 Bucket product in 4me linked to the service instance found in step 4, using the /library/config_4me/s3_product.json template.
Step 6 Create the AWS Lambda UI extension and product in 4me linked to the service instance found in step 4, using the /library/config_4me/lambda_ui_extension.json and /library/config_4me/lambda_product.json templates.
Step 7 Create the Webhook Policy in 4me for the secrets webhook.
Step 8 Add the policy details to the provider secrets:
4me-app-builder/4me-demo.com/wdc
{
  "clientID": "ufTd...FMyJ",
  "token": "AZkD...LtNQ",
  "policy": {
    "id": "NG1l...kvMQ",
    "name": "fab4...7dac",
    "jwtAlg": "es512",
    "jwtAudience": "integrations provided by [email protected]",
    "publicKeyPem": "-----BEGIN EC PRIVATE KEY-----\nMIHc...da5g==\n-----END EC PRIVATE KEY-----\n"
  },
}
Step 9 Provision the secrets-lambda in AWS, which is an implementation of the secrets webhook listener.
Step 10 Create the s3-4me-integrations-1 configuration item in 4me, linked to the AWS S3 Bucket product defined in step 5.
Step 11 Create the lambda-secrets-1 configuration item in 4me, linked to the AWS Lambda product defined in step
6.
Step 12 Create the app_instance.secrets-update webhook in 4me that connects to the secrets lambda defined in step 9.
Step 13 Add the webhook details in the provider secrets:
4me-app-builder/4me-demo.com/wdc
{
  "clientID": "ufTd...FMyJ",
  "token": "AZkD...LtNQ",
  "policy": {
    "id": "NG1l...kvMQ",
    "name": "fab4...7dac",
    "jwtAlg": "es512",
    "jwtAudience": "integrations provided by [email protected]",
    "publicKeyPem": "-----BEGIN EC PRIVATE KEY-----\nMIHc...da5g==\n-----END EC PRIVATE KEY-----\n"
  },
  "webhook": {
    "id": "NG1l...svMQ",
    "name": "app_instance.secrets-update",
    "uri": "https://cr...oh.execute-api.eu-west-1.amazonaws.com/Prod/secrets/"
  },
}
Lambda location:/library/aws/secrets-lambda/app.jsProvisioned by: The bootstrap.js scriptSAM template:/library/aws/template.yamlFunctionality: Default implementation of the 4me secrets webhook listener.
This serverless script listens to events described in the secrets webhook section of the topology.
It will first use policy from the provider secrets stored by the bootstrap.js script to validate that the message is indeed coming from 4me. And it will check whether it should handle messages about the App Offering of the message.
All customer secrets for a single integration will be stored in the AWS Secrets Manager using the 4me-app-builder/<app offering reference>/<4me domain>/instances/<customer account> key.
Based on the Typeform example the secret may look something like this:
4me-app-builder/typeform/4me-demo.com/instances/wdc
{
  "secrets": {
    "typeform_token": "G2HG...3sBA"
  },
  "application": {
    "nodeID": "NG1l...4vMw",
    "client_id": "Pv4C...G80E",
    "client_secret": "1XzR...Kk1Ap"
  },
  "typeform_secret": "360e...74a7"
}
The secrets hash contains all customer secrets retrieved from secret fields defined in the UI extension.
The application hash contains the secret 4me application token used to access the
4me GraphQL API in the customer account. If this integration would have defined any authorization code grant scopes an
authorization_application hash would also have been present, with the details of the token allowing those scopes to be
used.
Not present in this example is the policy hash (as the this integration does not define any webhooks from the customer
account). The policy hash would contain the details of webhook policy generated in the customer's account. These
should be used to validate webhook messages related to
the app webhook and automation rules. It would look something like:
"policy": {
  "nodeID": "NG1l.kvMg",
  "audience": null,
  "algorithm": "RS512",
  "public_key": "-----BEGIN PUBLIC KEY-----\nMIIB...AQAB\n-----END PUBLIC KEY-----\n"
}
Note that next to these 3 hashes that are maintained by the secrets-lambda, it is also possible to include integration specific secrets.
For example the typeform_secret is a custom secret that is added by the Typeform example integration after the Typeform webhook was created.
It is used to validate incoming webhook messages from Typeform.
This helper provides access to the AWS Secrets Manager.
It is used to:
- update the provider secrets from the bootstrap.js script.
- read the provider secrets and update the customer secrets from the secrets-lambda.
- read the provider secrets and read/update the customer secrets from the 4me-integration-lambda.
This handler is a helper that should be used in all AWS lambda functions that respond to automated 4me webhook messages.
It will first use the policy from the customer secrets maintained by the secrets-lambda to validate that the webhook message is indeed coming from 4me.
It is used to validate webhook messages originating from:
- the 4me provider account in the secrets-lambda where the webhook policy details defined in step 8 of the bootstrap.js script are used for validation.
- the 4me customer account in the 4me-integration-lambda where the webhook policy details are retrieved from the policy hash created by the secrets-lambda.
This helper gathers provider and/or customer data and uses it to configure js_4me_helper instances that can be used to interact with 4me in the actual integration's implementation. By separating this in a shared helper both writing and testing the integration implementations becomes easier.
This helper provides access to the 4me API and to validate webhook messages coming from 4me.
It is used to access the:
- 4me provider account from the bootstrap.js script.
- 4me provider and customer account from the 4me-integration-lambda.
After constructing an instance of the class the getToken method can be used to generate a fresh access token for the 4me GraphQL API.
Use that access token in the following methods:
getGraphQLQueryto retrieve data from the 4me account.executeGraphQLMutationto update data in the 4me account.deleteRecordto remove data from the 4me account.
The get4meData method is available to validate webhook messages coming from 4me webhooks.
This helper comes in handy in case the installation changes as described in app added or updated listener are implemented using an AWS CloudWatchEvent.
Simply construct the helper using the AWS CloudWatchEvent and the helper will inform the caller of the customer and type of installation change.
See the Typeform installation changed handler for an example of how it works.
This helper is used by the bootstrap.js script and the deploy scripts for the example integrations.
It contains a lot of helper methods to provision 4me and AWS.
For each integration that requires configuration in the external application or 4me when an app instance is installed or updated by the customer this lambda has to be provisioned, see app added or updated listener.
Some use cases for this lambda:
- To register a webhook in the external application, see Typeform installation changed handler
- Initial (bulk) upload of data from the external application to 4me, or vice-versa.
For each integration that is to receive webhooks from 4me an implementation of this lambda has to be provisioned. It may be combined with the external-application-lambda into one lambda.
Typically this lambda will use the 4me integration webhook listener that processes incoming webhook messages from 4me.
These serverless functions contain the actual glue between 4me and the external application.
An implementation is found in the note-dispatcher lambda.
For each integration that is to receive webhooks of the external application an implementation of this lambda has to be provisioned. It may be combined with the 4me-integration-lambda into one lambda.
It is an implementation of the external application webhook listener processing data coming in from the external application.
These serverless functions contain the actual glue between the external application and 4me.
An implementation is found in the Typeform webhook handler.
Two example integrations are included in this demo repository. They are relatively simple and aimed at showcasing the different components defined in the topology.
Besides these sample integrations this demo repository also contains an actual integration we use to import Configuration Items from the discovery tool Lansweeper. That one is a bit more complex but can provide some further insight once you understand the example ones.
When a customer installs the Note-Dispatcher app all notes added to requests in the 4me customer account will be dispatched to an external site. Before they are sent there the note will also be translated in a fun language.
This example explains the use of the app webhook and automation rules in detail.
Make sure to understand the bootstrap.js script as that is a prerequisite for this example.
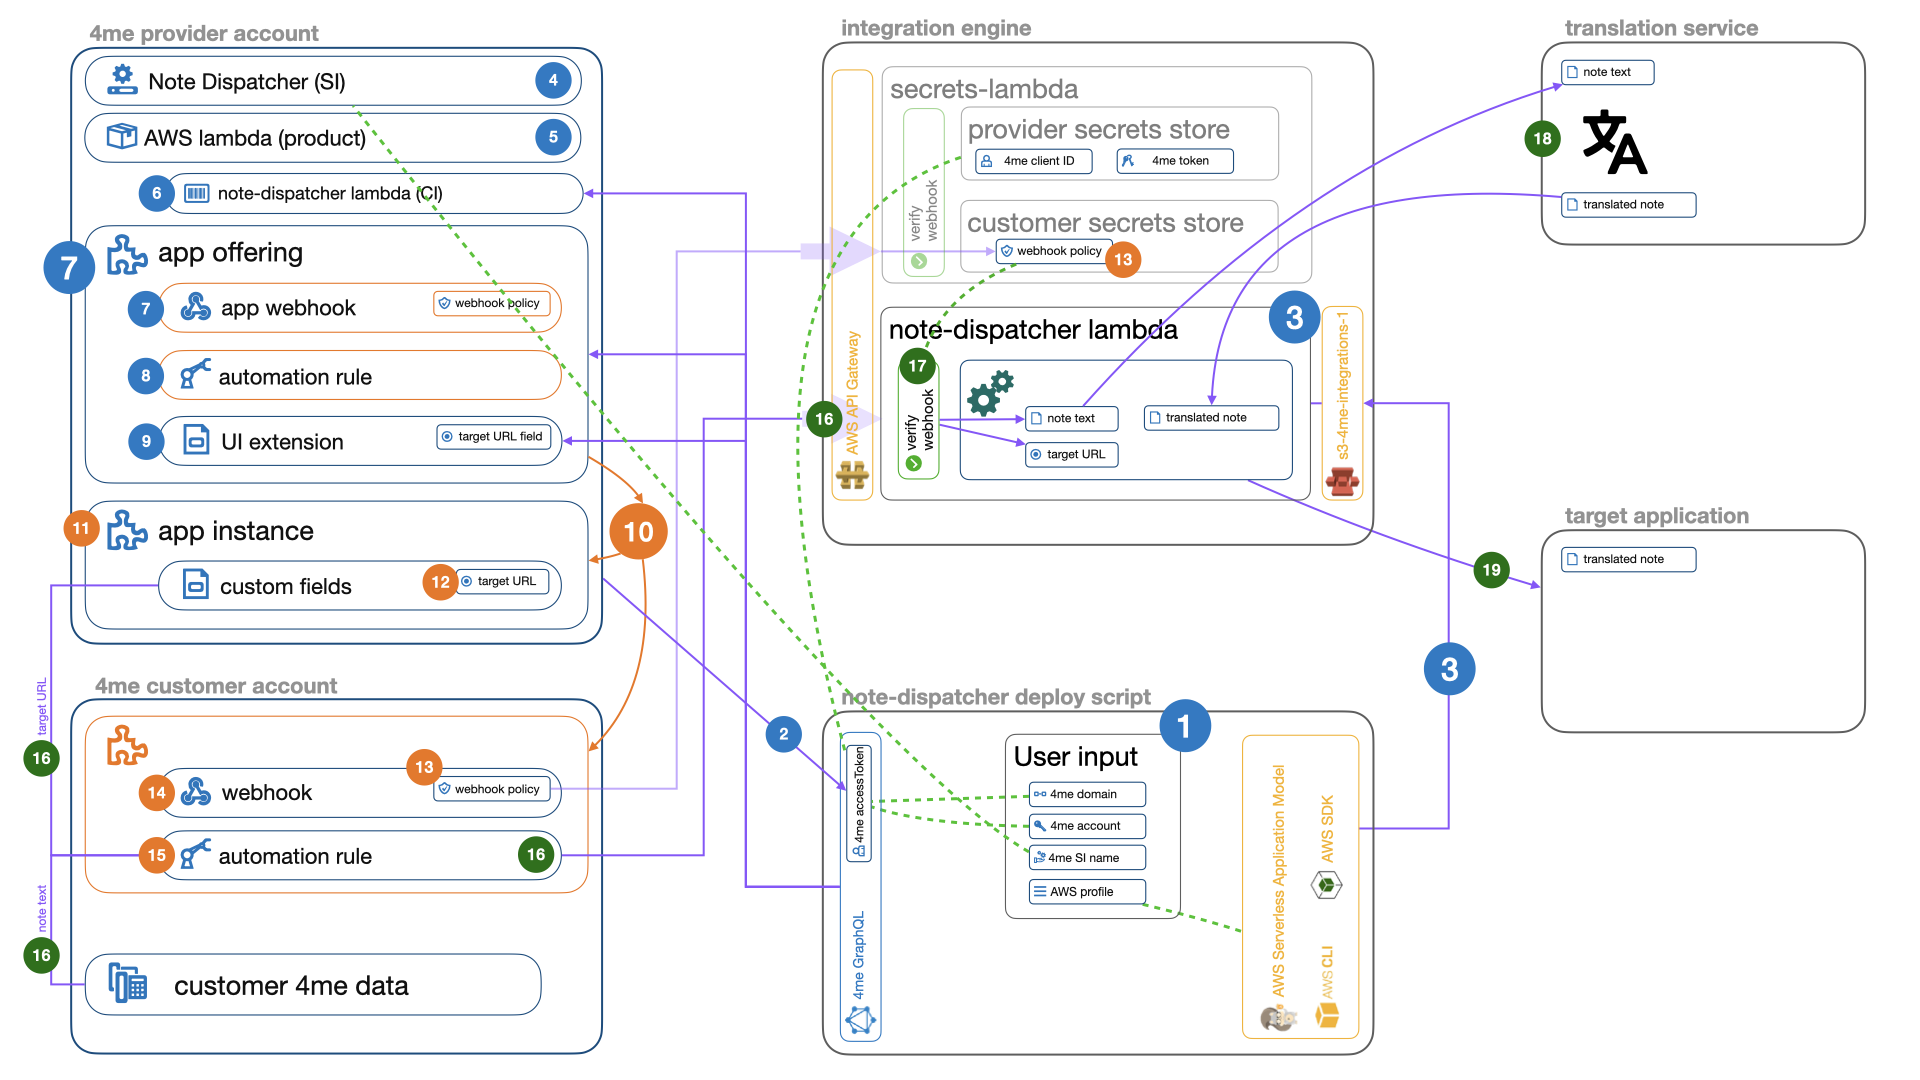
Script location:/note-dispatcher/deploy_integration.jsFunctionality: Provision the components for the note-dispatcher integration.
The deploy integration section describes how to run this script.
Step 1 Gathering user input
First the script will gather user input from the command prompt that informs the script how to access AWS and the 4me provider account.
Normally this script is not run very frequently, only when the integration needs to be updated. In case it needs to be run more frequently, e.g. when testing enhancements to the script, the gatherInput function can be extended with default values.
Those default values will then used when pressing enter on the command prompt. The input gathered is:
4me domainThe 4me domain to install the integration in, e.g.4me.com,4me.qaor4me-demo.com.4me accountThe provider account, e.g.wdcin demo.service instanceThe name of the service instance representing this integration, e.g.Mainframe 1in demo.AWS profileThe profile to be used to access AWS, should be defined in~/.aws/config, e.g.default.
Step 2 Retrieve a (temporary) accessToken for the 4me GraphQL API based on the clientID and token that was remembered in the provider secrets store when running the bootstrap.js script.
Step 3 Provision the note-dispatcher-lambda in AWS, which is an implementation of the 4me integration webhook listener.
Step 4 Lookup the Service Instance of the integration engine in 4me based on the service instance name from step 1.
Step 5 Lookup the AWS Lambda product created earlier in the bootstrap.js script.
Step 6 Create the lambda-note-dispatcher-1 configuration item in 4me, linked to the AWS Lambda product found in
step 5.
Step 7 Create the App offering record in 4me that includes the integration webhook URI pointing to the lambda created in step 6.
Step 8 Create the App offering automation rules in 4me in the app offering record created in step 7.
Step 9 Create the UI Extension in 4me linked to the app offering record created in step 7.
After the deployment is ready the provider can manually publish the app offering in 4me.
Once that is done the Note-Dispatcher app becomes available in the 4me App Store of all trusted accounts.
The App installation process consists of a number of (mostly automated) steps:
Step 10 A 4me customer manually clicks on the Add button of the Note Dispatcher app in the 4me App Store.
Step 11 An app instance record is created in the provider account.
Step 12 The customer had to fill out the (required) target URL field from the UI Extensions created in step 9
above. The target URL points to the target application where the translated request notes need to be sent to. The value
provided by the customer is be stored in the custom_fields of the integration instance created in step 11.
Step 13 A new webhook policy is created in the customer account, the details of the policy are shared with the integration using the secrets-lambda that was provisioned in the bootstrap.js script. These policy details are used in the note-dispatcher lambda to validate the incoming webhook messages from 4me.
Step 14 A webhook record is created in the customer account.
Step 15 An automation rule is created in the customer account, that uses the webhook defined in step 14 to push data to the note-dispatcher lambda.
Script location:/note-dispatcher/aws/integration-lambda/app.jsFunctionality: Dispatch request notes to an external application after translating them into a fun language.
Now that the customer has installed the Note-Dispatcher app, the request automation rule created in step 15 has become active in the customer account.
The trigger of the request automation rule is On note added, so the rule will be executed each time the customer adds
a note to a request. This results in the following actions:
Step 16 The automation rule in the customer account is triggered and collects
the note text from the request and the target URL from the app instance and sends the data to
the note-dispatcher lambda.
Step 17 The webhook message is validated using the webhook policy created in step 13.
Step 18 The translation service is used to translate the note text to a fun language.
Step 19 Finally the translation is dispatched to the target application defined by the customer in the target URL field in step 12.
When a customer installs the Typeform app all completed requests will receive a note with a link to a survey. Once the survey is filled out the results will be added as a note to a generic Survey request in 4me.
This example explains the use of the scopes and 4me application token in detail.
Make sure to understand the bootstrap.js script as that is a prerequisite for this example.
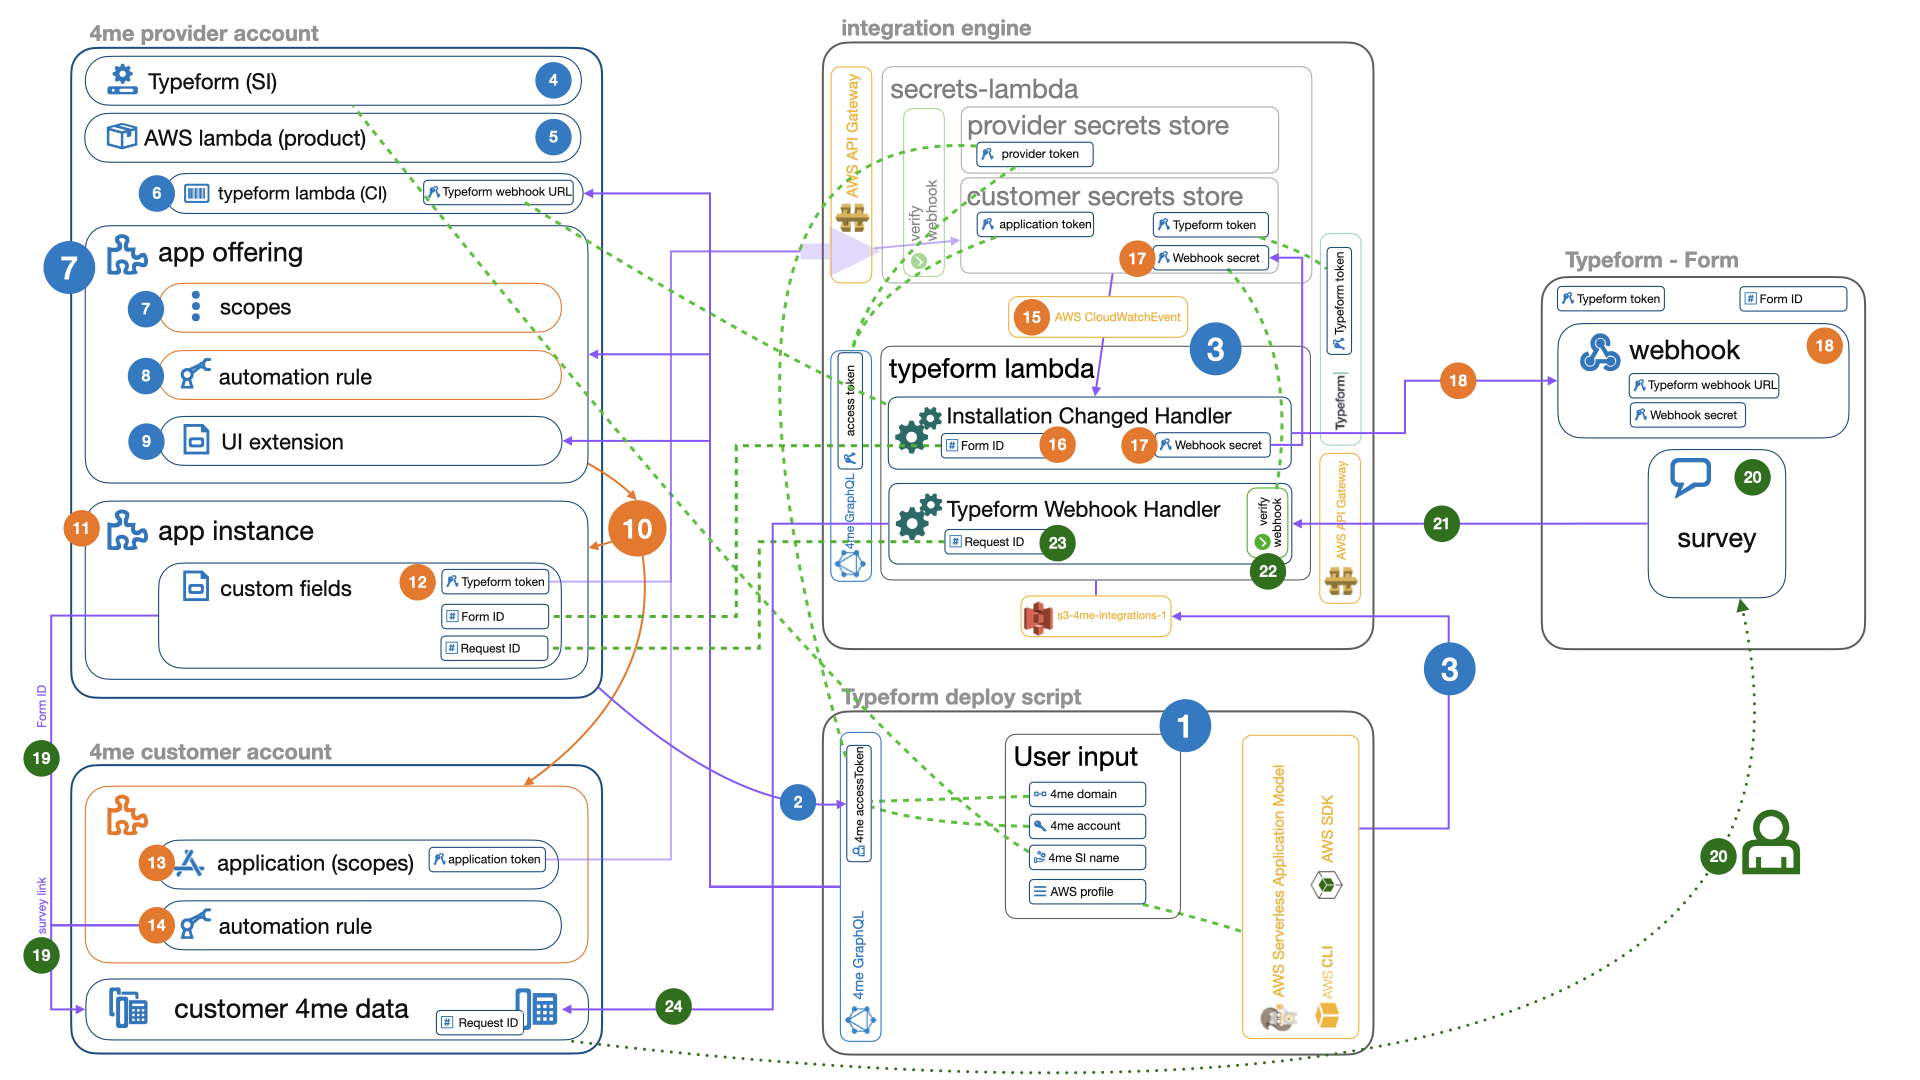
Prepare a sample Typeform customer environment.
- Setup a (free) Typeform account.
- Create a sample form (based on one of their templates) and locate it's URL. For
example
https://mysite.typeform.com/to/u6nXL7. - Generate a Typeform personal access token. Instructions on how to obtain this token can be found in their support documentation.
Script location:/typeform/deploy_integration.jsFunctionality: Provision the components for the Typeform integration.
The deploy integration section describes how to run this script.
Step 1 Gathering user input
First the script will gather user input from the command prompt that informs the script how to access AWS and the 4me
provider account. Normally this script is not run very frequently, only when the app offering needs to be updated. In
case it needs to be run more frequently, e.g. when testing enhancements to the script, the gatherInput function can be
extended with default values. Those default values will then used when pressing enter on the command prompt. The input
gathered is:
4me domainThe 4me domain to install the integration in, e.g.4me.com,4me.qaor4me-demo.com.4me accountThe provider account, e.g.wdcin demo.service instanceThe name of the service instance representing this integration, e.g.Mainframe 1in demo.AWS profileThe profile to be used to access AWS, should be defined in~/.aws/config, e.g.default.
Step 2 Retrieve a (temporary) accessToken for the 4me GraphQL API based on the clientID and token that was remembered in the provider secrets store when running the bootstrap.js script.
Step 3 Provision the typeform-lambda in AWS, which is an implementation of the installation changed lambda and external application webhook listener. The lambda is connected to the AWS API Gateway for incoming events on filled out surveys. Next to that the lambda is connected to the secrets lambda using the AWS CloudWatchEvent so that it is informed of new installations by monitoring newly received Typeform tokens in the customer secrets store.
Step 4 Lookup the Service Instance of the integration engine in 4me based on the service instance name from step 1.
Step 5 Lookup the AWS Lambda product created earlier in the bootstrap.js script.
Step 6 Create the lambda-typeform-1 configuration item in 4me, linked to the AWS Lambda product found in step 5.
It includes the Typeform webhook URL custom field pointing to the Typeform lambda
provisioned in step 3.
Step 7 Create the App offering record in 4me that includes the scopes for the application token required to access the 4me customer account.
Step 8 Create the App offering automation rules in 4me in the app offering record created in step 7.
Step 9 Create the UI Extension in 4me linked to the app offering record created in step 7.
After the deployment is ready the provider can manually publish the app offering in 4me.
Once that is done the Typeform app becomes available in the 4me App Store of all trusted accounts.
The App installation process consists of a number of (mostly automated) steps:
Step 10 A 4me customer manually clicks on the Add button of the Typeform app in the 4me App Store.
Step 11 An app instance record is created in the provider account.
Step 12 The customer filled out the 3 custom fields Form URL, Typeform token and Request ID from the UI
Extensions created in step 9 above. The secret Typeform token is sent to the secrets lambda. The
other values provided by the customer are stored in the custom_fields of the app instance created in step 11.
Step 13 A new application is created in the customer account based on the
scopes defined in step 7. The secret application token is shared with the integration using
the secrets-lambda that was provisioned in the bootstrap.js script.
Step 14 An automation rule is created in the customer account, that will add a note to completed requests with a link to the survey. The link to the form is taken from the custom fields provided by the customer in step 12.
Step 15 When the Typeform token is added to the customer secrets store in step 12,
an AWS CloudWatchEvent is sent
to the Typeform installation changed handler. Note that this event is also
triggered when the application token is stored in the customer secrets store in step 13.
The Typeform installation changed handler will ensure it only continues when
the Typeform token is present.
Script location:/typeform/aws/integration-lambda/app.jsFunctionality: Processes incoming events from the AWS CloudWatchEvent and create the Typeform Webhook.
An example implementation of the app added or updated listener.
In this case the code to configure the external application is triggered using an AWS CloudWatchEvent, see step 15 above.
The SAM definition is located in the /typeform/aws/template.yaml file under the SecretsEventListener event for the
lambda function.
Step 16 The Form URL is retrieved from the custom fields provided in step 12 using the provider token to access
4me.
Step 17 A Webhook secret is generated and stored in customer secrets store. It will be used later on to verify the
incoming webhook messages from Typeform.
Step 18 The Typeform webhook is added to the Typeform Form (the Form ID is extracted from the URL retrieved in
step 16). The Webhook secret from step 17 is shared with Typeform and the Typeform webhook URL is retrieved from
4me (step 6) so that messages can be sent to the Typeform webhook handler. Note that
the Typeform token provided in step 12 is used to access the Typeform API.
The setup is now complete and the actual integration will start once a request is completed in the customer account.
Script location:/typeform/aws/integration-lambda/typeform_lambda_handler.jsFunctionality: Processes incoming webhook messages from Typeform and adds the survey results in a 4me request note.
An example implementation of the external application webhook listener.
Now that the customer has installed the Typeform app, the request automation rule created in step 14 has become active in the customer account.
The trigger of the request automation rule is On status changed with a condition on status = completed, so the rule
will be executed each time the customer completes a request. This results in the following actions:
Step 19 The automation rule in the customer account is triggered and collects
the Form URL from the app instance and adds a note with the survey link to the completed request.
Step 20 The requester clicks on the survey link and fills out the survey form.
Step 21 The Typeform webhook defined in step 18 is triggered and sends a webhook message to the Typeform webhook handler created in step 3.
Step 22 The Typeform webhook message is validated using the Webhook secret from step 17.
Step 23 The Request ID is retrieved from the custom fields provided in step 12 using the provider token to access 4me.
Step 24 Finally the survey results are added as a note to the request with the given Request ID using the customer token to access 4me.
The Lansweeper integration allows configuration items discovered by the Lansweeper tool to be uploaded into a customer's 4me account on a regular interval. So this integration is a bit different from the sample integrations as it is run according to a schedule.
Script location:/lansweeper/deploy_integration.jsFunctionality: Provision the components for the Lansweeper integration.
The functionality of this script is similar to the one for the typeform integration.
For this integration this document will not go into the details of how it does its job. Instead we give an high-level overview of the events it processes. More details should be obtained by studying the code.
The Lansweeper integration is triggered by multiple events:
- it responds to customer installation or secrets changes in 4me (like the example integration with Typeform);
- it receives a 'refreshToken' from Lansweeper when the application is authorized for one or more Lansweeper sites;
- it receives a trigger event from AWS at a fixed interval to check which customer accounts to synchronize and finally
- it responds to Simple Queuing Service (SQS) messages to start synchronization of a specific customer account.
Luckily AWS has a standard facility to trigger a lambda at regular intervals. Our integration queries the App Instances for customers at these intervals to check which ones are eligible for re-synchronization. For each customer account it will send an SQS message to execute the actual synchronization for that customer.
The integration's lambda handles such a re-synchronization SQS message by querying all the customer's assets from Lansweeper in batches, sending each batch to 4me and then polling for all batches to be completed by 4me.
Handling the installation (update) events from 4me and receiving the authorization from Lansweeper is similar to the how that is done in the Typeform example.
We could have split the handling of each event into its own lambda function, but instead opted to combine them in a single one. This keeps the deployment and version management a bit simpler. The code for this lambda, and the 4me configuration for the App Offering, can be found in the lansweeper directory of this repository.
The entry point of this single lambda is lansweeper/aws/integration-lambda/app.js.
After cloning or downloading this repository some more configuration is required before you can see them in action.
To run the provider side of the examples in this repository you need a development environment to work with AWS and nodeJS. Furthermore you will need an AWS account and a 4me (demo or test) account. For each customer that will install an example integration (i.e. each app instance) you will create an environment for that customer in an external application so that an actual data exchange can occur.
This section will first guide you through the process of setting up the app offering in the provider's 4me account and on AWS. Once those steps are completed we will configure the sample customer environment and enable the app offering so that you can see it in action.
The development environment for these examples can be either MacOS, Linux or Windows. We created them on MacOS. On Windows we recommend the usage of Windows Subsystem for Linux.
To provide a 4me app offering you need a 4me environment to work with. For these examples a demo account is probably best, but you can of course also use the QA environment. If you don't have a 4me (demo) account yet, you can request one at: https://www.4me.com/trial/.
These examples are all based on cloud services that are part of Amazon Web Services (AWS). To use these you'll need an AWS account to work with. If you don't have one already follow the steps at https://aws.amazon.com/premiumsupport/knowledge-center/create-and-activate-aws-account/.
Properly configuring an AWS account is far beyond our scope. Here we will only briefly touch on the subject.
These examples need extensive permission on the AWS account used. Therefore we tested these examples using multi-factor authentication (MFA), setting that up is described at: https://docs.aws.amazon.com/IAM/latest/UserGuide/id_credentials_mfa_enable_virtual.html. Furthermore we used users that did not have access to our account's resources directly. Instead we used roles that our users switched to when performing tasks. To enable the usage of roles we configured profiles as described at: https://docs.aws.amazon.com/IAM/latest/UserGuide/id_roles_use_switch-role-cli.html
The roles used need to have full access permissions on: IAM roles, S3 buckets, lambda's, API gateways, secrets in the secret manager, EventBridge, and CloudFormation stacks. Some more information can be found at: https://docs.aws.amazon.com/serverless-application-model/latest/developerguide/sam-permissions.html
To ensure we can trigger lambdas from secret manager you need to ensure CloudTrail is enabled for your account.
To allow the examples to access data in the provider's 4me account an application token is required. The following steps will create one:
- In the 4me environment you are using login to the provider account as a user with the administrator role (for instance login to the
wdcaccount using[email protected]). - Go to the OAuth Applications console in the settings section (e.g. https://wdc.4me-demo.com/oauth_applications) and create a new application:
- Using 'Client credentials grant'
- And a scope that allows:
- Account (Read)
- Service (Read)
- Team (Read)
- App Instance (Update, Read)
- App Offering (Create, Update, Read)
- App Offering Automation Rule (Update, Create, Read, Delete)
- App Offering Scope (Update, Create, Read)
- Configuration Item (Create, Read, Update)
- Service Instance (Update, Read)
- Product (Create, Read, Update)
- UI Extension (Create, Update, Read)
- Webhook (Read, Create, Update)
- Webhook Policy (Update, Read, Create)
- On saving the OAuth application you will get a Client ID and token. Copy these and store them in a safe location.
The examples are based on NodeJS (version 20).
We installed NodeJS using Node Version Manager, via a Homebrew formula. This is only available to Mac and Linux.
Once installed go to the directory where you cloned this repository and run:
    nvm install `cat .nvmrc`
    nvm use
Once NodeJS is installed and configured we can use Node Package Manager (NPM) to download and install the dependencies required for these examples. Open a terminal, or command prompt, ensure you are in the directory where you cloned this repository and run:
npm install
- Install the AWS command line interface. See https://docs.aws.amazon.com/cli/latest/userguide/install-cliv2.html. Once installed:
- Go to https://console.aws.amazon.com/iam/home#/security_credentials
- Setup a Multi-factor authentication (MFA) device
- Create an access key for CLI, SDK, & API access and store its values in
~/.aws/credentials:- 'Access key ID' as
aws_access_key_id - 'Secret access key' as
aws_secret_access_key
- 'Access key ID' as
[default]
aws_access_key_id = ...
aws_secret_access_key = ...
- In
~/.aws/config- create AWS profile to be used, for instance
stagingand ensure it containsregioncontaining the AWS region to use for the integrationrole_arnthe identifier of the role to usemfa_serialthe identifier of the multi-factor device that was set up above
- ensure a
defaultprofile is defined (its values do not matter, but some tools don't work when not present)
- create AWS profile to be used, for instance
[default]
region = us-east-1
[profile staging]
source_profile = default
region = eu-west-1
role_arn = arn:aws:iam::...
mfa_serial = arn:aws:iam::...
- Install the AWS Serverless Application Model (SAM) command line interface. See https://docs.aws.amazon.com/serverless-application-model/latest/developerguide/serverless-sam-cli-install.html
Once these tools are installed you are ready to go!
The bootstrap process populates some generic records in the provider's 4me account and performs initial
configuration in their AWS account so that specific app offerings can be set up. In these
examples the bootstrap process is implemented in bootstrap.js. To run it open a terminal, or command prompt:
npm run bootstrap
The process will prompt you for the following parameters to configure it:
4me domain: which 4me instance should be used, typical values would be either '4me-demo.com' or '4me.qa'4me account: the account of the provider in the selected 4me domain, in '4me-demo.com' you could for instance use 'wdc'service instance: the name of the Service instance in the provider account that will represent the integration engine in 4me.enabled offeringsthe references of the App Offerings for which the secrets-lambda should create new AWS secrets, you can probably accept the default:*.client ID: the client ID that will be used (with the token) to access the provider's account, you received this value when you created the OAuth Applicationclient secret: the client secret (the application's token) that will be used (with the client ID) to access the provider's account, you received this value when you created the OAuth ApplicationAWS profile: the name of the AWS profile, in your~/.aws/config, that contains the correct parameters (e.g. region, role, MFA device) to access your AWS account.MFA code: the current authentication code of the multi-factor authentication device used to protect your AWS account. (You probably will be asked this code twice: once for the secrets configuration and once for the lambda deployment; please ensure you enter the next token for the second prompt as each token can only be used once.)
Based on this input the Integration engine of these examples is installed using the steps described in the bootstrap.js section above.
When deploying multiple times (e.g. when debugging) it might be convenient to store defaults for these questions. This can be done by creating a file called default_input.json and placing it next to bootstrap.js. By adding a key skipQuestionWithDefault with value true you can prevent the script from displaying prompts for any inputs that have a default.
{
  "skipQuestionWithDefault": true,
  "domain": "4me.qa",
  "account": "wna-it",
  "serviceInstanceName": "Email",
  "clientID": "gs...",
  "token": "a....",
  "profile": "qa"
}
If you place secrets such as your client ID or token in this file: be sure not to add it to version control!
Defaults to be used for both bootstrap and integrations, or multiple integrations, can be placed in a default_input.json in their parent's directory. The scripts will search up the directory hierarchy for these files.
Environment specific settings can be used by setting an environment variable ENV_4ME (e.g. giving it the valueqa) and using nested values inside the defaults.
{
  "skipQuestionWithDefault": true,
  "account": "wna-it",
  "serviceInstanceName": "Email",
  "demo": {
    "clientID": "ba...",
    "token": "b....",
    "domain": "4me-demo.com",
    "profile": "demo"
  },
  "qa": {
    "clientID": "gs...",
    "token": "a....",
    "domain": "4me.qa",
    "profile": "qa"
  }
}
After this script has completed you can review the created secret (4me-app-builder/<domain>/<provider-account>) and
lambda (app-builder-engine-SecretsFunction-<version>) in the AWS console. The lambda's logs are stored in the
CloudWatch (when on the lambda's page: activate the 'Monitor' tab and click 'View logs in CloudWatch').
(Be sure to switch to correct region and role so you have access to them.)
We are using the provider secrets (via the 4me helper) to set up the app offering (and related records) in the
provider's 4me account during the bootstrap process to keep the sample a bit simpler. A separate token (e.g. a personal
access token) could be used by prompting for it, and assigning it to accessToken field in bootstrap.js.
This repository contains some example integrations that can be installed after the bootstrap process is run. They can be installed from a terminal, or command prompt, in the directory where this repository was cloned.
typeformwhich allows customers to gather information from their customers using a form they manage in Typeform. The responses provided are added as notes to a 4me Request.note-dispatcherwhich allows customers to have notes that are added to their requests translated using Fun Translations (that offers translations not normally provided by 4me such as 'Yoda', 'Minion', 'Pirate', 'Gungan', or 'Morse') and dispatched to an external server.
npm run deploy-<integration-name>
The process for either example will prompt you for the following parameters to configure it:
4me domain: which 4me instance should be used, typical values would be either '4me-demo.com' or '4me.qa'4me account: the account of the provider in the selected 4me domain, in '4me-demo.com' you could for instance use 'wdc'service instance: the name of the Service instance in the provider account that will represent this integration in 4me.AWS profile: the name of the AWS profile, in your~/.aws/config, that contains the correct parameters (e.g. region, role, MFA device) to access your AWS account.MFA code: the current authentication code of the multi-factor authentication device used to protect your AWS account. (You probably will be asked this code twice: once for the secrets configuration and once for the lambda deployment; please ensure you enter the next token for the second prompt as each token can only be used once.)
Based on this input the example is installed using the steps described in either the Note-dispatcher section or Typeform section above.
When deploying multiple times (e.g. when debugging) it might be convenient to store defaults for these questions. This can be done by creating a file called default_input.json and placing it next to the integration's deploy script (i.e. note-dispatcher/deploy_integration.js or typeform/deploy_integration.js). By adding a key skipQuestionWithDefault with value true you can prevent the script from displaying prompts for any inputs that have a default.
{
  "skipQuestionWithDefault": true,
  "domain": "4me.qa",
  "account": "wna-it",
  "serviceInstanceName": "Email",
  "profile": "qa"
}
If you place secrets such as your client ID or token in these files: be sure not to add them to version control!
Defaults to be used for both bootstrap and integrations, or multiple integrations, can be placed in a default_input.json in their parent's directory. The scripts will search up the directory hierarchy for these files.
Environment specific settings can be used by setting an environment variable ENV_4ME (e.g. giving it the valueqa) and using nested values inside the defaults.
{
  "skipQuestionWithDefault": true,
  "account": "wna-it",
  "serviceInstanceName": "Email",
  "demo": {
    "domain": "4me-demo.com",
    "profile": "demo"
  },
  "qa": {
    "domain": "4me.qa",
    "profile": "qa"
  }
}
We are using the provider's secrets (via the 4me deploy helper) to set up the app offering (and related records) in the
provider's 4me account during the deploy process to keep the sample a bit simpler. A separate token (e.g. a personal
access token) could be used by prompting for it, assigning it to accessToken field in deploy_integration.js and
creating a Js4meHelper for the correct domain and account, instead of
calling Js4meDeployHelper.logInto4meUsingAwsClientConfig().
Once an integration (or both) is deployed you can check its behaviour. Let's first review it by looking it up in the App Offerings console (in the Settings section of your 4me account). A link to this record should be visible in your terminal, something like:
Success. App Offering is available at: https://wdc.4me-demo.com/app_offering/NG1lLXASDFSDGH84fDSF
You'll see the app offering's configuration, matching the configuration files contained
in <integration-name>/config/4me. When you navigate to the service instance that represents your integration you'll
see that a new Configuration Item, representing the lambda, is linked to it.
At this time the app offering will not yet be visible in the 4me App Store (as that only shows published and enabled app offerings). But to test it you can add an Instance to your (provider) account. This is done by pressing the 'Add App Instance' which will take you to the same form as your customers will see when adding the app to their accounts, via the 4me App Store. The Configuration tab will be opened which will show the UI extension linked to the app offering, so the customer can fill in the correct parameters.
Once you filled the required fields you can create the app instance in your account by pressing 'Save'. Which values should be provided, of course, depends on the integration. The next paragraphs will go into details for each of the sample integrations.
The Log Note Dispatcher Integration is quite simple and only requires a single URL to be configured. This is the location where the translated notes will be sent to. We will create a dummy location before configuring a Log Note Dispatcher App Instance to use that location.
A simple setup so we can see this Integration in action is to create a dummy target via Webhook.site. Just visiting their sites will create a unique address to direct the integration's output to.
- Open Webhook.site in a new tab of your browser.
- Copy the value of 'Your unique URL', for instance
https://webhook.site/8682b8c6-38e6-42ab-be98-4d29b4dd6077, to the clipboard.
Now the target has been created we can fill in its address in 4me.
- Switch back to 4me and open the 'Log Note Dispatcher Integration' in the app offering console.
- Press the 'Add App Instance' button.
- Paste the URL copied on Webhook.site above to the
URLfield of the Configuration tab of the form. - Press 'Save'. You will be taken to the screen showing the app offering and see a message that integration was added to your account.
- Follow the link in that success message to see what the app instance looks like to a customer once it has added the App. (You can also navigate to that screen via the 4me App Store. Now it is installed the app instance will be listed in your account as one of the Installed Apps.)
Now the app is installed in your account you can see it in action.
- Open any Request, for instance Request 70414 from the inbox, and add a Note.
- Go to Webhook.site and see that it received a message at the URL you configured. If you check 'Format JSON' the 'Raw Content' field will show something like
{
  "input": {
    "webhook_id": 2,
    "webhook_nodeID": "asddaLXN0YWdpbmcuY29tL1dlYmhvasdasvMg",
    "account_id": "wdc",
    "account": "https://wdc.4me-demo.com",
    "name": "Log Note Dispatcher Integration",
    "event": "automation_rule",
    "object_id": 108,
    "object_nodeID": "asddaLXN0YWdpbmcuY29tL0F1ddfgdfgtYXRpb25SdWxlLzEwOA",
    "person_id": 6,
    "person_nodeID": "asddaXN0YWdpbmcuY29tL1BlcnNvbi82",
    "person_name": "Howard Tanner",
    "payload": {
      "text": "You are too sure!",
      "url": "https://webhook.site/c07a995f-2db3-4cc0-a9c9-17f8d937324sdf"
    }
  },
  "translationResponse": {
    "translated": "ye be too sure!",
    "text": "You are too sure!",
    "translation": "pirate"
  }
}
You can also lookup the secret (4me-app-builder/note-dispatcher/<domain>/instances/<account>) and lambda (app-builder-note-dispatcher-IntegrationFunction-<version>) in the AWS console. The lambda's logs are stored in the CloudWatch (when on the lambda's page: activate the 'Monitor' tab and click 'View logs in CloudWatch').
(Be sure to switch to correct region and role so you have access to them.)
The Typeform Integration assumes that the customer already has a Typeform account and Form containing the questions to be asked. So to test it we will first set up an account and create a form, before connecting it to our 4me account.
- Signup for a (free) Typeform account by visiting https://typeform.com/signup and going the process.
- Confirm the e-mail address by clicking on the button in the activation mail they send you.
- Complete the 'Welcome to Typeform' form. This will bring you to their 'Template gallery'.
- Choose a template to create a sample form, for instance the 'Customer Satisfaction Survey Template'. This will allow you to preview the template.
- Click 'Use this template' to start creating the form.
- Give it a name, for instance 'Customer Satisfaction Survey'.
- Click 'Continue'. Now a draft form is created. You can customize it as you like. We will reduce the number of question so we can publish this form using a free account. We are only going to keep: 'Overall, how likely are you to recommend our products to a friend or colleague?' and 'And finally, could you kindly tell us why you chose...'. The other questions/section you can delete by clicking the ellipses ('...') button, and clicking 'Delete' in the menu that pops up.
- Now click 'Publish' at the top of the screen, it will turn grey once successful.
- Click the avatar at the top rightmost corner of the screen and choose 'Settings'.
- Select 'Personal tokens' below the 'Profile' header on the left.
- Click 'Generate a new token'.
- Give the token a name, for instance '4me test', and click 'Generate token'.
- Copy the token and paste it somewhere so you can enter it in 4me in a while.
- Click 'Got it' to close the popup.
- Go back to your form by clicking 'Workspaces' on the top-left and then on the form you just created (e.g. 'Customer Satisfaction Survey').
- Go to the 'Share' tab and copy the link below 'Share your typeform' (something like
https://smi81w2gr8i.typeform.com/to/u6nXL7). This is the URL is the location where people can fill out the form.
Quite a few steps, but now we have a Typeform account, a form in it and a token so our integration can interact with it. In the next paragraph we will connect the form to our 4me account.
Now the Typeform form has been created we can fill its details 4me.
- Switch back to 4me and open the 'Typeform Integration' in the app offering console.
- Press the 'Add App Instance' button.
- Fill the Form URL (copied above at 'Share your typeform').
- Enter the token you created for your Typeform account above as the 'Typeform token'.
- Fill the 'Request ID' field with the ID of a request in your account. In the 'wdc' account in 4me-demo you could use ' 70454'.
- Press 'Save'. You will be taken back to the screen showing the app offering and see a message that integration was added to your account.
- Follow the link in that success message to see what the app instance looks like to a customer once it has added the App. (You can also navigate to that screen via the 4me App Store. Now it is installed the app instance will be listed in your account as one of the Installed Apps.)
Now the app is installed in your account you can see it in action.
Let's test the flow:
- Complete a request, for instance request #70486.
- Open the request in 'Edit mode'.
- Choose 'Completed' for 'Status' and 'Solved' for 'Completion reason'.
- Enter a note and fill 'Time spent'.
- Save the request.
- The last note of the request will be 'Please complete our survey at: ...'.
- Click on the survey link. The form will open in a new tab.
- Answer the questions (for instance choose '9' and enter 'Great').
- Will see your answers in a new Note at the bottom of the Request you chose (e.g. on Request 70454). The integration's lambda was notified when you completed the form and then sent it to 4me.
You can lookup the secret created for this Integration instance (4me-app-builder/typeform/<domain>/instances/<account>) and the lambda (app-builder-typeform-IntegrationFunction-<version>) handling the Typeform webhooks in the AWS console. The lambda's logs are stored in the CloudWatch (when on the lambda's page: activate the 'Monitor' tab and click 'View logs in CloudWatch').
(Be sure to switch to correct region and role so you have access to them.)
You can also view the webhook created by the integration in Typeform.
- Go back to typeform and open the form in your workspace.
- Go the 'Connect' tab, and then on that tab open the 'Webhooks' tab.
- You will see a single webhook.
- Click the 'Edit' button to see the webhook is configured to be your lambda's API URL, and that a secret has been filled.
- Click 'Cancel' and click 'View deliveries' to see the single request that was sent to the lambda (you should be able to match this to an invocation of the lambda in the AWS console).
Once you are satisfied with your app offering you can make it available to potential customers (all accounts you have a trust relationship with). To make it available:
- Open the offering in the 4me app offering console.
- Press the green 'Publish' button.
- Confirm that the app offering is ready for use by customers by pressing 'Publish' in the popup.
You're all set: the integration can now be installed by customers via the 4me Apps console. Your customers will see it under the 'Recommend Apps' header. You will now find the app offering in both the 'Draft' and 'Published' lists of your account's app offering console. This is intentional.
The Draft version allows you to change all parameters of the offering and try them out in your own account. The changes will only be accessible to customers after you publish updated version. After the upgrade the customers that already have it installed are not immediately switched to the new version. They can 'Update' their instance to the new version, so they can review the changed settings before accepting them. This also means you have to be prepared to support the older version until all your customer have updated their app instance!
In the 'Published' list you will see the latest Published version of the offering and any versions still in use by Customers. You can make small changes to these published versions (e.g. fix a typo in the Description), which will take effect without a need for customers to explicitly update.
In a demo environment you can try out the real customer experience.
- Log into another account that has a trust relation with the provider account (e.g. 'wna-it' if you used 'wdc' as provider account).
- Go to the Apps console, in the Settings section (e.g. https://wna-it.4me-demo.com/apps).
- Locate the example integration under the 'Recommended Apps' header and click it (do not use the 'Add' button just yet).
- Click the various tabs to see the information you configured for the app. There is no 'Configuration' tab yet, as the App is not yet installed. On the 'Security & Compliance' tab the customer can see the details of the scopes, automation rules, webhook of the offering as well as the 'Compliance' statement.
- Click 'Install App' to be taken to the form to fill the configuration parameters for this customer.
- From here on the process is identical as described above for the Log Note Dispatcher Integration Configuration or Typeform Integration Configuration.
No new lambda will be created for each customer, but each customer account will get its own AWS Secret, holding its specific secrets. This is done via the 4me Secrets Webhook Listener.
When we install the example integrations integrations in 4me demo domain for the wna-it account the following secrets are created in the AWS Secret Manager: 4me-app-builder/note-dispatcher/4me-demo.com/instances/wna-it and 4me-app-builder/typeform/4me-demo.com/instances/wna-it.
![dependabot[bot] avatar](https://avatars.githubusercontent.com/in/29110?v=4 "dependabot[bot]")


