- NODE 2023 Video
- REDUX 2023 Video
Hi, This is course page of CoderDost Youtube Channel React JS 2023 Course Video Link ,
-
Git Commands
-
use
git clone <repository_url> -
checkout branch according to Chapter number
git checkout react-1 -
run
npm installinside the root directory before running the code
-
-
If you are not comfortable with git, directly download the branch as Zip.
-
Choose branch related to the Chapter e.g.
react-1 -
run
npm installinside the root directory before running the code
-
-
Assignment 1 : If we delete
node_modules. How to run our app again successfully ? -
Assignment 2 : How to remove double
console.logsfrom React ? [ it is not needed in real life to remove them, its just an assignment problem ]. [ Hint: Some special Component at top level is of App is causing it ]. We explore more about - why this is needed in later videos.
-
Assignment 3 : Create a Page with multiple React Apps. Both React Apps should be independent of each other.
-
Assignment 4 : Try to build a react app using other toolchains like
Vite
- De-structuring Assignment : Long Video | Object De-structure Short Video | Array De-structure Short Video
- Import/Export : Long Video | Short Video
-
Assignment 1 : Create a simple React app for RESUME Builder. It will be static website. You have to make components like Resume as top level and under it - Skills, Education, Experience etc as components. All resume data will be under 1 big JavaScript object like which you can us in components via props. You can fix the number of items in Skills, Education, Experience or any section. Example you can say that only 3 experience items is allowed.
 resume = {
    experience : [ { year:2012, company:'xyz', role:'something' }],
    education:[ ],
    skills : [ 'react js', 'node js']
    .....
    ...
    }
You can choose any simple HTML layout and convert it to React Components
Example Link : Resume HTML
-
Assignment 2 : Create a Parent Component called Border which can provide some CSS border to any component nested into it. [Hint : You will need to use
childrenprops here< Border> < Component > < Border />
- De-structuring Assignment : Long Video | Object De-structure Short Video | Array De-structure Short Video
- Import/Export : Long Video | Short Video
- Spread Operator : Long Video | Short Video
- Assignment 1 : Make a simple component which can conditionally render a list with number or alphabets or bullets in HTML for number. e..g. use a prop like
layoutfor this. Also use a propitemsfor array of items in list.
< List layout="numbered" items={items}/>
< List layout="alpha"  items={items}/>
< List layout="bullet" items={items}/>-
Assignment 2 : This is continuation of previous assignment RESUME Builder
- In this part you have to make some conditional rendering. Suppose if any section doesn't exist you have to remove that section from Resume. Example if
skillsis empty array than don't displayskillssection in Resume. - You have to use
mapin most places where there are arrays. Like Skills, Education, Experience if there are 3 entries, usemapto display 3 experience items. You don't need fix number of items. Any array can have 1 to 10(or some Limit) any number of items. You can put some Limit, so that your layout is not affected. - Conditionally put some styling to Resume. Like
lighttheme ordarktheme or any other way you can switch the CSS layouts.
 resume = {
    experience : [ { year:2012, company:'xyz', role:'something' }],
    education:[ ],
    skills : [ 'react js', 'node js']
    .....
    ...
    }
You can choose any simple HTML layout and convert it to React Components
- In this part you have to make some conditional rendering. Suppose if any section doesn't exist you have to remove that section from Resume. Example if
Example Link : Resume HTML
- Ternary Operator : Video
- Logical AND (&&) : Video
- Higher Order functions (map, filter, reduce) : Video
- Import/Export : Long Video | Short Video
-
Assignment 1 : Make a simple page with 1 Image, 1button, 1 form Input text box and try to apply these events .
- Image : onMouseOver : when you hover on image. Image should increase in size. Think of any way where you can do it. Also, try that when you "move out" the mouse, it should be back to normal size.
- Button : onDoubleClick: when you doubleClick a button. show some alert box. Also make a console.log for single click event. Is console.log printed twice on double click ? check this ?
- Input Textbox : onFocus, onBlur are 2 events which occur when you enter or exit an input text box by click of mouse etc. Use it to display some console.log, which print "focused on the textbox", "out of textbox".
- onCopy, onCut, onPaste are 3 events which you can use on any text value etc. try to use it on a paragraph and just alert the user that something is copied, cut or pasted.
-
Assignment 2 : Make a form using
< Form>tag and put an textbox and button inside this form. try to click the button after entering into textbox. Does form reloads ? Can you try to stop is usinge.preventDefault. Try it. -
Assignment 3 : use an Input Textbox : after you enter some text. try to press ENTER button and show the an alert or console.log. You can capture the onKeyPress event, button how you will you make it work only for "Enter" ? It should not work on pressing of other keys. [Hint: Explore the synthetic event object ]
-
Assignment 4 : This is continuation of previous assignment RESUME Builder.
- Add a print button to print the current resume. You can use a DOM method
window.printto print the PDF.
- Add a print button to print the current resume. You can use a DOM method
-
Assignment 5 : Can you try the challenge of passing the function in one Prop like
onPlayand the message inside that function to be accessed from other propmessage[ As shown in Chapter Video ]
-
Assignment 6 : Using event bubbling concept print the name of Parents to Child of any clicked element. It should be order in "GrandParent >Parent > Child" this kind of order. Where "Child" represents the current clicked element.
-
Assignment 7 : Make a custom event called onClose. this event should close the current browser tab. you can apply it to a button on click or anywhere.
-
Assignment 1 : Make a digital CLOCK Component using useEffect Hook. We need to only update the time Upto seconds in it. HH:MM:SS format can be used. Can you make it send a Console.log at end of every minute ?
-
Assignment 2 : Implement a simple TIMER that displays the elapsed time since the start button was pressed, and it can be stopped and reset. Like a stopwatch.
- Assignment 1 : Create a Dropdown (< Select >) menu which is formed by a
nationsarray. You can push to this array new items using a 2 input textbox (for country name and code) and button. On selection of the any option from dropdown, its value should be displayed on console.log
const  nations  = [
{ name:  'India', value:  'IN' },
{ name:  'Pak', value:  'PK' },
{ name:  'Bangladesh', value:  'BG' },
] -
Assignment 2 : FILTERED LIST : Make a List of something using an Array (a list can of cricket player /countries/ movie name etc). Now make this list it searchable, you have to put a input textbox at top of list. When you type in textbox it should only show you items matching from text typed. For example - If you type only "in" it should show things like "India" / "China" as both have
inin it. -
Assignment 2.1 : FILTERED LIST : Make above List as separate components for List, Input form and pass the states from each other using concepts learnt till now.
-
Assignment 3 :
This is continuation of previous assignment RESUME Builder. Now you have to make a separate component ResumeEditor which has a FORM. This form will have many input boxes. Each one related to one section. For example you can have one input box or experience section. Another input box for skill section and like this. Every input box should have an Add button in front of it. Once you press this add button that information is stored in the state , which you can update at top of the App level. Now this state should update the Resume Component and its child you have built.
-
first component will be your RESUME document which is only for reading purpose.
-
second component will be this FORM
-
you have to manage the state in between
-
only Add functionality is required in this assignment
-
you can change input boxes according to your need depending on your format of Resume. You can have multiple textboxes also for same section. Like for date + experience item etc.
-
Assignment 4 : Try this challenge : https://beta.reactjs.org/learn/state-a-components-memory#challenges
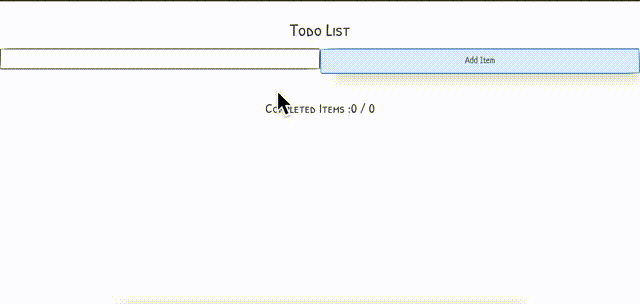
Todo app can be used to maintain a list of your pending daily items. A Simple todo list must have these features
- You can add any new item to TODO list
- You can click on any item to mark it as done, if you have done that by mistake - you can click again to undo.
- You can delete any item (completed or pending)
- You get a total of completed items and overall items on the list.
- You can move list items "Up" or "Down" using buttons.
KEYBOARD BASED Features :
- use ENTER key on keyboard to add a new item.
- when you click on an item, it should be selected (you can change style to show it is selected)
- If you press the DELETE key on the keyboard after selecting the list item it should delete that list item. If you have not selected any item the last item should be deleted.
- You can select list item and press UP arrow key to Move It Up. And you can press the DOWN key to move it down.
Other Features :
- Pin element to Top of List : On double click make element reach top of list. You can show a different color also to show that element is pinned.
- Show the date & time at which list item was added.
- Order by : Todo Item names, Date added, Completed.
- Due date feature : Add a due date of task of any todo item. You will need to add another input box for this at top. Whenever you are in 24 hour limit of due date - Task outline will be shown in ORANGE color. e.g if a task is due on 23 May - from 22nd May it should show in ORANGE outline color. If a due date is passed task should show RED Outline.
- Use some component like
https://github.com/react-component/progressto show a progress bar at top of list. This progress bar will show how much of total percent of tasks are completed. - Delete item via swipe gesture - like swipe to right on mobile phone. [Hint: You have to find an event type for this ]
Advanced Features :
- Use localStorage in browser using libraries like
https://github.com/localForage/localForageto make your todo list permanent in browser. This will have your list stored in browser database and will not delete it on refresh or closing of browser. LocalStorage Video LocalForage Video
ANIMATION BASED Features [optional] :
- Enter Animation : Animate list item on adding.
- Exit Animation : Animate list item at removal.
-
Assignment 1 : The method shown in this video was just to introduce useEffect hook. However that was not the correct use of useEffect hook. Can you change the code to remove useEffect and still have the editVideo functionality. [ Hint : use the concept that Component is rendered every time prop changes ]
-
Assignment 2 : This is continuation of previous assignment RESUME Builder.
- Add functionality to delete the items from resume.
- Add functionality to update the items from resume.
- you have to manage the state in between
- you can change input boxes according to your need depending on your format of Resume. You can have multiple textboxes also for same section. Like for date + experience item etc.
- Check the output can be printed perfectly in PDF.
-
Assignment 1 : Try this challenge : https://beta.reactjs.org/learn/extracting-state-logic-into-a-reducer#challenges
-
Assignment 2 : Convert your RESUME BUILDER Application from
useStatetouseReducerby converting states logic to a common reducer. Your reducer can have as many switch cases as you want. You can also divide them based on sections.ADD_SKILL,ADD_EXPERIENCEetc. to make logic even simpler for developer.
- REDUX - Understand it in Simple way Video
-
Assignment 1 : Try this challenge : https://beta.reactjs.org/learn/passing-data-deeply-with-context#challenges
-
Assignment 2 : Add a Context to your RESUME BUILDER to change font-size, font-color and some other font-properties. Also add a form to changed these property at top of App.
-
Assignment 3 : Add a Context to your RESUME BUILDER to change Dark Mode and Light Mode. You can also use a
React Switchkind of library to make it more user friendly to switch.
- Assignment 1 : Make a useCounter Hook: To keep track of a number that can be incremented or decremented.
const [count, increment, decrement] = useCounter(0);- Assignment 1 : Try this challenge:
https://beta.reactjs.org/learn/referencing-values-with-refs#challenges
-
Assignment 2 : Try this challenge:
https://beta.reactjs.org/learn/manipulating-the-dom-with-refs#challenges -
Assignment 3 : Make a useWindowSize Hook: which returns size of current browser window.
const [width, height] = useWindowSize();- Complete DOM Course playlist Video
- Assignment 1 : Try this challenge :
https://beta.reactjs.org/learn/synchronizing-with-effects#challenges
- Assignment 2 : Try this challenge :
https://beta.reactjs.org/learn/removing-effect-dependencies#challenges
- Assignment 3 : Try this challenge :
https://beta.reactjs.org/learn/reusing-logic-with-custom-hooks#challenges
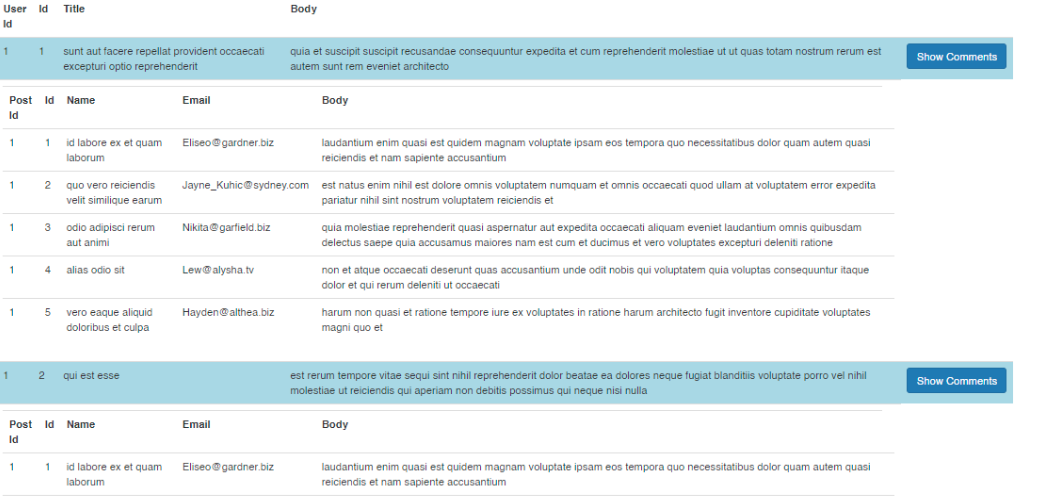
- Assignment 4 Use JSON Placeholder API (link given below).
-
You have to create a button which can get some posts and show them in a List.
-
You have to a show comments button on each list item. On click of show comments, Post's comments should be fetched below that list item. [ Comments are available for each post in API]
-
When you click on a particular list item's show comments, it should expand and show comments, otherwise it should collapse and hide the comments.
-
Try to optimize by :
- Only getting comments of required Post items (not all at a time)
- Storing somehow the old comments of closed list items. So you will not fetch them again, when your show comments again.
-
-
Assignment 1 : Implement a component that displays a list of items. The component should memoize the list of items to prevent unnecessary re-rendering.
-
Assignment 2: How to use memoization in the JSON Placeholder API assignment in previous problem. Can you try to optimize it using useMemo/useCallback ?
-
Assignment 3: useMemo and useCallback are same hook. useCallback is just a convenient hook way to write useMemo for functions. Prove this using useMemo in place of useCallback in any previous problem. [ Hint : you will have to change the useMemo callback and return the function definition ]
- Assignment 1 :
Try to apply
useDeferredValueanduseTransistionhooks on API based components. Either make a new one or use any existing code you have from other assignments. You can useChrome Network throttlingfrom Devtools > Performance Tabs and use Slow 3G option to see the effects
- Assignment 1 :
Try to use
window.printfunctionality as show in code without flushSync and see if really make a difference. Also, try the same onalertfunctionality, can it also work ?
--- END OF REACT COURSE ------
Hi, This is course page of CoderDost Youtube Channel NODE JS 2023 Course Video Link
You can download code in 2 ways :
-
Git Commands
-
use
git clone <repository_url> -
checkout branch according to Chapter number
git checkout node-1 -
run
npm installinside the root directory before running the code
-
-
If you are not comfortable with git, directly download the branch as Zip.
-
Choose branch related to the Chapter e.g.
node-1 -
run
npm installinside the root directory before running the code
-
NOTE : Code for React JS app is available in final code node-12 branch in folder react-app. It can be used in previous chapters also like chapter-8 etc (however it's the final code, so step-wise code is not available for React, However one can follow the tutorial and make it , sorry for inconvenience)
- Node JS installation from official site nodejs.org - use only LTS versions
- Use terminal / command prompt to check installation :
node -vnpm -v - VS Code installation directly from code.visualstudio.com site
- Use VS code terminal to run commands
- Node REPL interface can be used directly by typing
nodein terminal / command prompt . Use Ctrl+D to exit interface. Use CTRL+C to exit terminal - Running any JavaScript file from node using
node filename.js - Modules are basic containers in Node/JavaScript system. 1 file can be one module in Javascript.
- Two type of Module Systems in node JS are - CommonJS module and ES Modules.
- CommonJS Module
//lib.js
exports.sum = function(){}

//index.js
const module = require('./lib.js')
module.sum();
- ES Module
//lib.js
export {sum}

//index.js
import {sum} from './lib.js'
-
FileSystem Module(fs) is one of core modules of Node JS. fs can be used to read/write any file. There are many more core modules in NodeJS which you can check in NodeJS API docs.
-
Reading files can be Synchronous or Asynchronous. Async is most preferred method in NodeJS. As there is NO blocking of I/O in NodeJS
-
Node project can be initialized with
npm initcommand which also createspackage.jsonfile -
package.json is a configuration file for node projects which has scripts, dependencies, devDependencies etc
-
npm install <package-name>is used to install any online modules available for node on NPM repository online. -
nodemonis a package for running node server and track live changes to re-start again. -
scriptsinside package.json can be used likenpm run <script-name>e.gnpm run dev. Only fornpm startyou can avoidrun. -
use
npm install -g <package.json>to install packages globally on your system. Not just in the project but useful all over your system. -
Node versions are formatted like 4.1.9 where these are
major.minor.patchversions. -
you can install all dependencies again using
npm installagain -
package-lock.json has exact versions installed and link of dependencies of each package.
-
use
npm updateto update packages safely.npm outdatedshows outdated and latets versions of packages installed in your package.json -
use
npm uninstall <package-name>to uninstall packages frompackage.json -
node_modulesshould not be shared - you can make.gitignoreto ignore them to be uploaded.
- Assignment 1 : If we delete
node_modules. How to run our application again successfully ? - Assignment 2 : How to use command line arguments in Node JS. Like
node index.js 3 2- how can I get 3 and 2 to be used in my programs. [ Hint : search for command line arguments in node ] - Assignment 3 : Explore the
osmodule in Node Js from their documentation. What all info you can access from it about your operating system ? - Assignment 4 : Explore about Asynchronous nature of JS as a single threaded language and how it is achieved using Event Loop. Video are given below in related videos sections.
- Assignment 5 [Challenge] : Can you run a system command from Node JS javascript file e.g.
lsdircommands ? and can you store its output in a text file ?
Request object comprises of many properties, but important ones are :
- Type of Request : GET, POST, PUT, DELETE etc.
- Headers : Meta data sent by your browser like browser name, cookies, authentication information etc.
- Query Parameters (url?
name=john) : This is used in GET requests to send data to server - Route Params (url/
john) - Body data : This is used in POST and other requests to send data to server
Response object comprises of many properties, but important ones are :
- Headers : Meta data sent by your server back to client like server name, content size, last updated time etc.
- Response status code (
200,404,403,502) - Response body : Actual data to be sent to client : HTML, JS, JSON, CSS, Image etc.
-
HTTP requests and responses can be tracked from Dev Tools > Network Tab
-
In Node, we can use core http module to create a Server which listens to requests, modify data in-between and provides responses. Server needs a PORT to be bound to - use only port number > 1024.
-
Server can simply be said as a function which receives a request and returns a response. [ This is just for understanding]
-
There are many Headers which exists on request and responses - shared a link below with list of existing headers.
-
We can use Server to do 3 things:
- Static file Hosting : Sending normal files without formatting or modifying.
- Server Side Rendering : Mixing data with templates and rendering dynamic views (dynamic web pages)
- Web APIs : Sending data via some APIs/ endpoints.
-
Every Request has one and only one response. If there is more than 1 response which you want to send - you will encounter a error - "Headers already sent"
-
POSTMAN is a software for doing complex API requests.
- Assignment 1 : Capture the request which goes when you like a post on facebook (using Chrome network). What are the headers ? What is the payload ?
- Assignment 2 : In the chapter we developed a server with only URL switch, but you have to make that more efficient by making it check both METHOD (GET,POST) + URL path
- So output of a request with GET /demo will be different from POST /demo [ Use POSTMAN for requests]
- Assignment 3 [Challenge] : Try and run 2 different server using the same code you have
index.js. You will need to use 2 different ports. But can you do it using the same file and changing PORTS dynamically somehow ? - Assignment 4 [Challenge] : You can also send some data to server using /demo?product=123. where product=123 is called query parameters. Can you capture that data and make the product page work according to the ID (123) . [ This we will do in next chapters using express, but you can give it a try ]
-
ExpressJS is de-facto Node framework - and used in most Node applications which are used as web server.
-
You can install express
npm install express -
Express has few level of methods :
- Application methods : e.g. app.use()
- Request methods
- Response methods
- Middleware methods
- Router methods
-
Response methods (res is our response objects)
- res.send() - for sending HTML
- res.sendFile() - for sending File
- res.json - for sending JSON
- res.sendStatus(404) - for sending HTTP status only
-
HTTP Request Types we generally use :
- GET
- POST
- PUT
- DELETE
- PATCH
-
API / Endpoints / Routes are used inter-changeably but they are related to server paths.
-
Middle-ware : Modifies the request before it reaches the next middleware or endpoints.
-
Sequence of middleware is very important, as first middleware is first traversed by request.
-
Middle-wares can be used for many use cases, like loggers, authentication, parsing data etc.
-
Middle-ware can be :
- Application level : server.use(middleware)
- Router level : server.get('/', middleware, (req,res)=>{})
- Built-in middleware : express.json() [ for parsing body data], express.static()[for static hosting]
- External Middle-wares - like morgan
-
Request properties (req is our request object)
- req.ip - IP address of client
- req.method - HTTP method of request
- req.hostname - like google.com / localhost
- req.query - for capturing query parameters from URL e.g. localhost:8080 ? query=value
- req.body -for capturing request body data (but its needs a middleware for body data decoding)
- req.params - for capturing URL parameters for route path like
/products/:id
-
Static Hosting : we can make 1 or more folders as static hosted using express.static middleware.
server.use(express.static(< directory >))Static hosting is like sharing a folder/directory and making its file readable as it is. Note :index.htmlis default file which would be read in a static hosted folder, if you don't mention any file name.
3 major ways of sending data from client to server via request are :
1. Send data via URL in Query String
This is easiest method to send data and mostly used in GET request.
When you have URL with ?name=Youstart&subject=express at end, it translates in a query string. In query string each key,value pair is separated by = and between 2 such pairs we put &.
To read such data in express you can use req.query :
server.get("/demo",function(req,res){
    console.log(req.query) // prints all data in request object
    res.send(req.query);  // send back same data in response object
})- Assignment 1 :
Make above server with API endpoint /demo as shown above :
-
Try to call this API in your browser
http://localhost:8080/demo?name=Youstart- this will return a response ofreq.queryJSON object -
Create 3 query parameters
name,age,subjectwith some values. Check the final output ofreq.query- can you find all data on server side. Can you send it back to client viaresobject.
2. Send data via Request Params
In this method you can have a URL with url path like /Youstart/express at end it translates in a param string. In param part string each value is separated by /. As you can see that URL only contains value not the key part of data. key part is decided by the endpoint definition at express server
server.get("/demo/:name/:subject",function(req,res){ console.log(req.params) // prints all data in request object res.send(req.query); // send back same data in response object })
So sequence of values matter in this case. As values sent from client are matched with name and subject params of URL later.
- Assignment 2 :
Make above server with API endpoint /demo as shown above :
-
Try to call this API in your browser
http://localhost:8080/demo/Youstart/Express- this will return a response ofreq.paramsJSON object -
Create 3 URL params
name,age,subject. Call the URL and check the final output ofreq.params- can you find all data on server side. Can you send it back to client viaresobject.
3. Send data via Request Body
Final method of sending data is via body part of request. We can send data directly to body using URL. We have to either use one of these methods
-
Use a HTML Form and make
methodvalue asPOST. This will make all name=value pair to go via body of request. -
Use special browsers like POSTMAN to change the body directly. (We will see this example in next classes)
server.post("/demo",function(req,res){
    console.log(req.body) // prints all data in request object
    res.send(req.body);  // send back same data in response object
})- Middleware Explanation video
- List of useful 3rd party middleware for Express
- List of HTTP response status
The HTTP method is the type of request you send to the server. You can choose from these five types below:
-
GET: This request is used to get a resource from a server. If you perform aGETrequest, the server looks for the data you requested and sends it back to you. In other words, aGETrequest performs aREADoperation. This is the default request method. -
POSTThis request is used to create a new resource on a server. If you perform aPOSTrequest, the server creates a new entry in the database and tells you whether the creation is successful. In other words, aPOSTrequest performs anCREATEoperation. -
PUTandPATCH: These two requests are used to update a resource on a server. If you perform aPUTorPATCHrequest, the server updates an entry in the database and tells you whether the update is successful. In other words, aPUTorPATCHrequest performs anUPDATEoperation. -
DELETE: This request is used to delete a resource from a server. If you perform aDELETErequest, the server deletes an entry in the database and tells you whether the deletion is successful. In other words, aDELETErequest performs aDELETEoperation.
REST API are a combination of METHODS( GET, POST etc) , PATH (based on resource name)
Suppose you have a resource named task, Here is the example of 5 REST APIs commonly available for task.
- READ APIs :
-
GET
\tasks: to read all -
GET
\task\:id: to read a particular task which can be identified by uniqueid
- CREATE APIs :
- POST
\tasks: to create a new task object (data will go inside request body)
- UPDATE APIs :
- PUT
\task\:id: to update a particular task which can be identified by uniqueid. Data to be updated will be sent in the request body. Document data will be generally totally replaced. - PATCH
\task\:id: to update a particular task which can be identified by uniqueid. Data to be updated will be sent in the request body. Only few fields will be replace which are sent in request body
- DELETE APIs :
- DELETE
\task\:id: to delete a particular task which can be identified by uniqueid.
- REST API is a standard for making APIs.
- We have to consider a resource which we want to access - like Product
- We access Product using combination of HTTP method and URL style
REST API ( CRUD - Create , Read , Update, Delete) :
-
CREATE
- POST /products - create a new resource (product)
-
READ
- GET /products - read many resources (products)
- GET /products/:id - read one specific resource (product)
-
UPDATE
- PUT /products/:id - update by replacing all content of specific resource (product).
- PATCH /products/:id - update by only setting content from body of request and not replacing other parts of specific resource (product).
-
DELETE
- DELETE /products/:id - delete a specific resource (product).
- Assignment 1 : Make an API similar to explained above for
Quotestake dummy data from same site (dummy json quotes)
MVC (Model-View-Controller) is a pattern in software design commonly used to implement user interfaces (VIEW), data (MODEL), and controlling logic (CONTROLLER). It emphasizes a separation between the software's business logic and display.
In Our Project this will be : Model - Database Schema's and Business logics and rules View - Server Side Templates (or React front-end) Controller - functions attached to routes for modifying request and sending responses. It's a link between the Model and View.
Router
- These are like mini-application on which you can make set of Routes independently.
- Routers can be attached to main Server App using
server.use(router)
Arrange Directory in Server like this :
Controllers - file containing functions which are attached to each route path Routes - files containing routers Models : to be discussed in later chapters Views: to be discussed in later chapters
- Assignment 1 : Read More about Model View Controller online, link given below.
MongoDB is NoSQL database which has a JSON like (BSON data) data storage.
After installing MongoDB community server package on your system - you will have to start the database server using command :
mongodThis will start MongoDB server on default port 27017. You might have to create a directory for storage in MongoDB - if server asks for storage directory
Once server is started - you can use mongo client to connect to local server
mongoNow you can use several commands to work with database:
show dbs
This will list all the database in your system
use <dbname>
This will command will let you switch to a particular
- Hostname
- Database
- Collection
- Document
Hostname is Database server address - like localhost or db.xy.com. In mongoDB hostname generally uses mongodb protocol to connect.
So URLs are generally are of shape : mongodb://localhost:27017
Database are topmost storage level of your data - mostly each application has 1 database - however complex application might have more than 1 databases. Database is something like university database
There can be many collections inside a database - collection is a group of documents of similar kind - students, teachers, courses etc
Finally document is basic entity of storage in Mongod, it looks very similar to an object in JSON. (However it is BSON)
Mongo DB community server comes with in-bulit Mongo CLI which can act as a terminal based client. You can use the CRUD functionality from here
Read the commands here
- Try these commands given in Mongo CLI reference docs.
- Show database
- Use database
- Show collection
- Create Query (insertOne, insertMany)
- Read Query (find, findOne)
- Update Query (updateOne)
- Delete Query (deleteOne, deleteMany)
- Delete database (drop)
These utilities comes with community server and can be found in CMD/terminal. They are not the part of Mongo CLI client.
- Mongodump command is used to take backup of complete database or some collections
mongodump --db accounts Above command takes backup of database accounts and stores into a directory named dump
- Mongorestore command is used to restore database
mongorestore --db accounts dump/accounts
Above command restore your database accounts from backup directory dump
Task : Use these commands on terminal/CMD (not inside mongo client)
-
Take a backup of database you created in assignment 1.
-
Restore the backup of database from
dumpdirectory.
To install MONGODB NODE.JS DRIVER use this command
npm install mongodbYou can setup database in Node server using following commands :
const MongoClient = require('mongodb').MongoClient;
const assert = require('assert');

// Connection URL
const url = 'mongodb://localhost:27017';

// Database Name
const dbName = 'myproject';

// Use connect method to connect to the Server
MongoClient.connect(url, function(err, client) {
  assert.equal(null, err);
  console.log("Connected correctly to server");

  const db = client.db(dbName);

});
Now this db handle can be used to perform any CRUD operation using MongoDB NodeJS driver.
- Create - Shell Version / Node Version
- Read - Shell Version / Node Version
- Update - Shell Version / Node Version
- Delete - Shell Version / Node Version
Mongo Server
- You can install MongoDB community server for your system and set the Path to
binfolder - You can choose your own database path while starting the mongod server
mongod --dbpath <path-to-db-directory>
Mongo Compass : UI Client to see mongo server (local or remote)
Mongo Shell : Command-line based mongo client for checking mongo database.
Some Mongo Commands:
(run from anywhere inside the shell)
- show dbs;
- use < database-name > - to choose a database and go inside its prompt
(run only from inside a database)
- db.< collectionName >.insertOne( newDocument )
- db.< collectionName >.insertMany( documentArray )
- db.< collectionName >.find( filterObject ) - to read all docs
- db.< collectionName >.findOne( filterObject ) - to read one document
- db.< collectionName >.countDocuments( filterObject ) - shows total number of documents.
filter Object : { fieldName : {operator: value}} fieldName : database fields name operator : $eq = equal , $gt= greater than, $lt : less than, $gte = greater than equal, $and and $or operator value : what value we are comparing with operator.
e.g { age : {$gt:5}}. - age is greater than value 5
Cursor functions : These are applied to find() query .
- sort( {fieldName: 1}) : 1 for ascending -1 for descending
- limit( x ) : only gives x documents
- db.< collectionName >.updateOne( filterObject, updateObject, options )
- update Objects = { $set : {field: value}}
- options : {upsert: true}
Upsert : Update + Insert, when we want a new info to create a new obejcts if no existing object matches filter queries.
- db.< collectionName >.replaceOne( filterObject, updateObject ) Overwrites other fields also which are not in updateObject.
- db.< collectionName >.deleteOne( filterObject )
Projection
- Only return selected fields while returning result documents.
- db.< collectionName >.find( filterObject, projectionObject ) e.g. {name:1, age:1, id:0} - only show name and age and don't show id
MONGO ATLAS CLOUD SETUP : Check the video in tutorial
** Enviroment Variable** : To use environment variable we can use a npm package called dotenv which will create new process.env variables.
- Install
dotenvusingnpm install dotenv - just have use
.envfile in your root directory - and call
require('dotenv').config()
Mongo Atlas Setup Detailed Video
You can install mongoose using npm :
npm install mongooseAfter installing , you can import mongoose to your project :
const mongoose = require("mongoose");To connect mongoose to your database test, you have to use the following commands :
var mongoose = require('mongoose');
await mongoose.connect('mongodb://127.0.0.1:27017/test');
Connection can also be stored in a variable to check whether it is connected properly or not. Also to disconnect database later on. You can read more details Here
Schema is the specification according to which data object is created in Database.
taskSchema which contains title, status, date fields. So every task object saved in database will have these 3 fields according to Schema given
const mongoose = require('mongoose');
const Schema = mongoose.Schema;

const taskSchema = new Schema({
    title:  String,
    status: Boolean,
    date: { type: Date, default: Date.now }
  });
Many types of data are allowed in Mongoose Schema. The common SchemaTypes are:
- String
- Number
- Date
- Boolean
- Mixed
- ObjectId
- Array
You can put a lot of conditions inside the Schema object :
    age: { type: Number, default:18, min: 18, max: 65, required :true }
    // default value of Number is 18 and should be between 18-65, and can't be null or empty
Detailed information on SchemaTypes is Here
Model are similar to classes, they create a Class from Schema. These classes(i.e Models) can be used to create each new database object.
const mongoose = require('mongoose');
const { Schema } =  mongoose;

const taskSchema = new Schema({
    title:  String,
    status: Boolean,
    date: { type: Date, default: Date.now },
  });

const Task = mongoose.model('Task', taskSchema);  //Task Model to create new database objects for `tasks` Collection
Connect mongoose to a database named todolist if you don't have a database with this name. Mongoose will create it after you perform any insert operation.
Creata a Schema named taskSchema and model named Task as shown above.
To Create new obejct in database we can use new keyword and create an object from Model. We can use save() function to save the object in database. Unless, you call save function - the object remains in memory. If your collection not yet created in MongoDB, it will created with name of Model pluralized (e.g Task will make a collection named tasks)
server.post("/task",function(req,res){
    let task = new Task();

    task.title = "shopping";
    task.status = true;
    task.date = new Date();

    task.save();
})You have to create an API Endpoint to type POST named /task. It will create a new task item in database whenever called properly. All 3 fields title, status, date must be mandatory (required). If someone is not passing all fields properly, no database entry should be created.
//request body :

{
    "title" : "task1",
    "status" : true,
    "date" :'2010-05-30"

}

// response body should return the newly created object.

res.json(task);
Check using Mongo Compass/or Mongo Shell that new record in database is created. Also check name of collection. Is is tasks ?
To read new obejcts from database, one can use find query or similar queries. find queries also contain some conditions which can restrict what kind of data objects you want to read from database.
server.get("/task/:name",function(req,res){
    Task.findOne({name:req.params.name},function(err,doc){
        console.log(doc)  // this will contain db object
    })
})


server.get("/tasks",function(req,res){
    Task.find({},function(err,docs){
        console.log(docs)  // this is an array which contains all task objects
    })
})
You have to create an API Endpoint to type GET named /tasks. It will return all task available in collection tasks.
//request is GET so no data in body :


// response body should return the all db objects of collection tasks.

res.json(tasks);
Check Mongo Compass/or Mongo Shell - if all records are returned in response. How you will change this API to make it return only one database record in which title is matched with title sent in request query.
To Update an existing object in database we need to first find an object from database and then update in database. This might be considered as a combination of find and save methods.
There are generally 2 cases in update :
- Updating all values and overwriting the object properties completely.
- Updating only few values by setting their new values.
First scenario is covered using this query. Here you are overwriting all properties and resulting object will only have name property.
server.put("/task/:name",function(req,res){
    Task.findOneAndReplace({name:req.params.name},{name:'YouStart'},{new:true},function(err,doc){
        console.log(doc)  // this will contain new db object
    })
})
Second scenario is covered using this query. Here you are only changing value of name property in existing object without changing other values in Object.
server.put("/task/:name",function(req,res){
    Task.findOneAndUpdate({name:req.params.name},{name:'YouStart'},,{new:true},function(err,doc){
        console.log(doc)  // this will contain db object
    })
})You have to create an API Endpoint to type PUT named /task/:id. It will update existing task item in database which has ObjectId set to id you have passed.
//request params will have id in URL path :

{
    "title" : "task-changed",
}

// response body should return the newly updated object.

res.json(task);
Check using Mongo Compass/or Mongo Shell that only title of record in database is changed. All other properties remain the same.
To Delete existing object from database we need to first find an object from database and then delete. This might be considered as a combination of find and delete methods.
server.delete("/task/:name",function(req,res){
    Task.findOneAndDelete({name:req.params.name},function(err,doc){
        console.log(doc)  // this will contain deleted object object
    })
})You have to create an API Endpoint to type DELETE named /task/:id. It will delete existing task item in database which has ObjectId set to id you have passed.
//request params will have id in URL path :

// response body should return the deleted object.

res.json(task);
Check using Mongo Compass/or Mongo Shell that the record is deleted or not.
- install mongoose
npm install mongoose - Mongoose connection code
main().catch(err => console.log(err));

async function main() {
  await mongoose.connect('mongodb://127.0.0.1:27017/test');

  // use `await mongoose.connect('mongodb://user:[email protected]:27017/test');` if your database has auth enabled
}- Mongoose Schema : Each schema maps to a MongoDB collection and defines the shape of the documents within that collection.
const  productSchema  =  new  Schema({

title: {type:  String, required:  true, unique:  true} ,
description:  String,
price: {type:  Number, min:[0,'wrong price'],required:  true},
discountPercentage: {type:  Number, min:[0,'wrong min discount'], max:[50,'wrong max discount']},
rating: {type:  Number, min:[0,'wrong min rating'], max:[5,'wrong max rating']},
brand: {type:  String,required:  true},
category: {type:  String, required:  true},
thumbnail: {type:  String, required:  true},
images: [ String ]

});- Mongoose Model : model are built using a combination of Schema and name of Collection.
const Product = mongoose.model('Product', productSchema);- Mongoose Document - its is instance of a model. so Model is like a class and documents are like its objects. These documents are directly saved in mongoDB.
  const document = new Product();
 // document is actually saved in database after save()
  await document.save();
Mongoose Schema/Model can act as Model of Model-View-Controller concept.
CREATE :
- create product - use **POST ** HTTP Method
   const product = new Product();
   await product.save()
READ :
- read all products - use GET HTTP Method
const  products  =  await  Product.find();

const products = await Product.find({price:{$gt:500}});- read 1 product - use GET HTTP Method
const product = await Product.findById(id);UPDATE :
- replace product fields (all fields) - use PUT HTTP Method
const doc = await Product.findOneAndReplace({_id:id},req.body,{new:true})- update only some product fields - use PATCH HTTP Method
const doc = await Product.findOneAndUpdate({_id:id},req.body,{new:true})DELETE :
- delete 1 product - use DELETE HTTP Method
const doc = await Product.findOneAndDelete({_id:id})-
Assignment 1 : Make a Schema for
userwithuserSchemawhich has these conditions :firstNameis required, maximum length 16 charslastNameis not required, maximum length 16 charsageis a Number, minimum value 12, maximum 100emailmake a validator of email, as given in mongoose documentation.addressmake address a nested data structure which has its own Schema [ AddressSchema ??] [ Hint: check mongoose documentation for sub-documents to do it
Create
addressSchemaneeded in above example as :pincode: Number, requiredstreet: String, requiredphone: String, length=10
Now try to create this user object and save it to database.
- What happens to addresses ? How address document is stored ? check if it creates a new collection in database
- What happens if you don't provide validated data in any field. [Note: Throw proper errors strings ]
Queries in Mongoose : Link
Sending data from front-end to Server
- Fetch : it is in-built API in the browser
- Axios : we will use axios as it is easier to use.
CORS Issues :
CORS - Cross-Origin Resource Sharing (CORS) is a standard that allows a server to relax the same-origin policy
- we will use CORS package to allow cross origin request from React JS server to NodeJS server as they are on different hosts.
npm install cors- to use cors -
const cors = require('cors');

server.use(cors())
HTML Forms
nameattribute on input elements is used to send data keys which are validated with schema in backend.
- Run
npm run build - use
buildfolder to be hosted on public hosting/static hosting
you can use build folder of react and add it to static hosting of express.
server.use(express.static('build'));
use wildcard in express route to point to React single page applications (index.html)
res.sendFile(path.resolve(__dirname,'build','index.html'))__dirname is a variable
Preparation for deployment
- First check whether front-end routes are independent of server, and make all of them relative to
/ - Connect MongoDB atlas - in-place of mongo local database
- Commit you code on a github account (personal account for free services)
- Set Environment Variables on Vercel - like MONGO_URL, PUBLIC_DIR
- Put a vercel config file -
vercel.jsonin your project root directory. - After every change, commit your changes - and push code on github.
- You have to provide permission for github directory to vercel. It will pickup
vercel.jsonandpackage.jsonand deploy your code accordingly. - Check video for more details.
- Assignment 1 : Deploy your own application or API only to a live server like
Vercel - Assignment 2 [Challenge] : Deploy your own application or API only to a live server
Railway.app
Server side rendering is done using many templating languages
- EJS
- Pug
- Handlebars
We have used EJS which is one of the most popular one.
Install
npm install ejs
- Control flow with
<% %> - Escaped output with
<%= %>(escape function configurable)
<% if (product) { %>
 <h2><%= product.title %></h2>
<% } %>
For passing variable to template engine and render a new page :
const ejs = require('ejs');


ejs.renderFile(path.resolve(__dirname,'../pages/index.ejs'), {products:products}, function(err, str){
    res.send(str); // this is the rendered HTML
});- You need to have input boxes have proper
namewhich will be used askeyto objects sent to backend. Mostly in form likename=value - use action or for API destination
action="/products" - use method or for API type
method="POST" - use enctype with value
application/x-form-urlencoded
- Assignment 1 : Create Server rendered page for
quotescollection created in 1 of previous assignment. Use a very simple HTML template to display each quote in a list format. You can use other render method of EJS for this task. (not renderFile)
`npm install jsonwebtoken`
- Use jwt.io to understand 3 parts of JWT - headers, payload, signature
jwt.sign(payload, secret) this returns a token
jwt.verify(token, secret) this returns decoded value of payload
We will use HTTP Authorization headers for exchanging these tokens
e.g. Authorization = 'Bearer JWT_TOKEN_VALUE'
Using RSA algorithm (public-private key) : check video.
you can use a library like bcrypt to hash password, so they are not stored in plain text format
npm install bcrypt
bcrypt.hashSync(userProvidedPassword, saltRounds)
bcrypt.compareSync(loginPassword, AlreadyHashedPassword)
return true of false based on verification of password
- Assignment 1 : Try to make a application which stores JWT in localstorage. So that even after you close browser and open site again. Server will still remember you JWT and authenticates you.
Session middleware is used to store session variable for each user on server side. This middleware can make use of any data storage depending on settings. By default it stores session variables in Memory (RAM).
First install express-session middleware
npm install express-sessionNow you can use it in your express server
var server = express()
const session = require('express-session')


server.use(session({
  secret: 'keyboard cat',
  resave: false,
  saveUninitialized: true,
  cookie: { secure: false }   // make secure : true incase you are using HTTPS
}))
Now you can use req.session object to store any value for a particular user in server session. This value will not interact with similar variable of other users.
server.get('/user', function(req, res) {
  if (req.session.views) {
    req.session.views++
    res.json({views:req.session.views})
  } else {
    req.session.views = 1
    res.send('welcome to the session demo. refresh!')
  }
})In above example we are initializing a variable session for each user. Write similar code in your server
- Checkout if its value increases every time you refresh the page.
- What happens when you open URL in another tab.
- What happens when you open URL in another browser
Sorting:
find().sort({fieldname: 1}) // ascending can be 1, asc, ascending , Descending values can be -1, desc, descending
Pagination related queries:
find().limit(pageSize).skip( pageSize*(pageNumber-1)) // where pageSize is number of document results you want to show.
Population
Populate() lets you reference documents in other collections.
const  userSchema  =  new  Schema({
firstName: { type:  String, required:  true },
lastName:  String,
cart:[{ type:  Schema.Types.ObjectId, ref:  'Product' }],
email: {
    type:  String,
    unique:  true,
    validate: {
       validator:  function (v) {
        return /^[\w-\.]+@([\w-]+\.)+[\w-]{2,4}$/.test(v);
          },
       message: (props) =>  `${props.value} is not a valid email!`,
     },
    required:  true,
},
password: { type:  String, minLength:  6, required:  true },
token:  String,
});

//cart populated example
const  user  =  await  User.findById(id).populate('cart');
For More details : Detailed Population Video
const em = new EventEmitter()

em.on(eventName, (payloadData)=>{} ) // listeners

em.emit( eventName , payloadData ) // emit eventsA readable stream
const  rr  =  fs.createReadStream('./data.json');

rr.on('data', (data) => { // received data event on every file read
 console.log({data});
});

rr.on('end', (data) => {  // received end of stream event
 console.log({data});
});npm install socket.io
const  server  =  express();
const  app  =  require('http').createServer(server);
const  io  =  require('socket.io')(app);

io.on('connection', (socket) => {
console.log('socket',socket.id)

socket.on('msg',(data)=>{ // listener to client-side events 'msg'
console.log({data})
})
socket.emit('serverMsg',{server:'hi'} //emitting 'serverMsg' for Client-side
});

app.listen(port)// embeding client-side library which will be downloaded from module installed on Server
<script src="/socket.io/socket.io.js"></script>
<script>
const socket = io();
console.log('socket',socket.id)
socket.emit('msg',{player:'one'}) // emitting 'msg' to server-side
socket.on('serverMsg',(data)=>{ // listener to server-side events 'serverMsg'
console.log({data});
})
</script>- Assignment 1 :
- Make a simple group chat application using Socket.io library.
- You need to have a user enter their name in textbox (you can store that in localstorage)
- After user enters the name : they can see a text box where they can start entering the text messages.
- Display messages from user and others in a simple html list format.
- You can align incoming messages from other users to left and your own messages to right side.
- Optionally, you can use database to store the old text messages in case you want old chat to be reloaded.
------------END OF COURSE---------------------
An online resume generator application will able to generate resume for students and professional based on their input data. We will have options of downloading the resume or hosting the resume on a particular URL (which user can share). Users will be able to choose between many Template designs for their resume. User data will be stored in database and can be edited later on.
- User Login (Social Logins)
- Saving user info using validated forms
- HTML/CSS based templates to design different style of resumes
- PDF generation of completed resume
- Providing link on online resume of a person (HTML version / PDF version)
Tic Tac Toe is quite ubiquitous popular game. We have a 3 x 3 grid with traditional cross and circle notation. However playing tic tac toe with a distant friend connected via social media is a dream come true. Here is the simple game :
- Connect with Facebook/Google Login for user Identity.
- Find all people logged in via Facebook on this application
- Challenge someone to play with you.
- Have a separate scorecard for each pair of users.
- show world leaderboard - where you can have your algorithms to show chart toppers - may be number or wins or win/lose ratio.
- UI should be simple and understandable.
- Use of animation is preferable but should not be too much
- Mobile friendliness is required
- Sounds are optional but can add a lot to the game.
An Amazon like store to find and buy things. The site will have to interface one for admin and other for general users :
User site features :
- User must be able to search product via name/ category etc.
- Each item will belong to atleast one category of items (like electronics)
- Each item will have some fields - name, price, description, image etc.
- User can sort items by any field - name , price etc.
- Cart will have features to add item, remove item, change item quantity, show total etc.
- User order will be saved in database.
- User can check details of their old orders.
Admin site features :
- Admin must login using a secret password.
- Admin panel should show you list of all available products with their available quanities.
- Admin can add new items to store or delete old items. You can optionally provide them access to edit item details.
- Admin can update quantity of any item.
PhotoGram Project is a web app similar to instagram. Purpose of app is to store your photos in an album and add some filters. Users can login and browse their old photos, search them by name, sort using name/date added etc. They can also apply instagram style filters to their photos.
Features :
- The user can sign up and create a new account. Check for email duplicate scenario and show an appropriate message if the same email is used for login.
- The user can log in using the previous email/password combination. If email/pass is incorrect to show the appropriate error.
- If the user successfully creates a new account take him to create a new post form - which will have fields photo, caption etc. Date will also be stored in database along with these information.
- After submitting the above form user should automatically be redirected/routed to the photo Gallery page.
- Gallery page should show all cards of logged in user. Only photos uploaded by the same user must be displayed.
- If user login into existing account he must be redirected to Gallery page if he has 1 or more cards uploaded. If no cards are there he must be redirected to the same form as after signup.
- Gallery page should also have a link to form page - using button - “Create new card”.
- The user can also delete cards from gallery page by click on a cross Icon “X” which you can add to all cards in front-end.
- To maintained loggedIn user use sessions and localStorage.
PokeMon requires your help. Save them by picking the right ones. There are some good characters and there are the bad ones. Create a 8×8 Div to make a gameboard.
Game Rules (Offline)
- Pikachu should appear at random places.
- At the same time bad guy (giovanni) will also appear.
- Pikachu and bad guy can’t be on same grid box.
- You have to click Pikachu Grid to save it.
- One correct click means +1
- Consecutive 3 correct means +5 bonus also.
- Wrong answer will mean a strike.
- 3 strikes in continuation means “Game Over”
- A total of 30 points mean Level Complete.
- 1st Level will have Pikachu and Other Guy appearing for 2 second.
- There will be a gap of 3 seconds in between next round.
- With every increasing Level Pikachu and other will appear for lesser time. And gap of round will also be decreased after each Level.
Game Rules (Online)
- All above rules will be applicable accept for their is no 'Game Over' and correct point is given to only the first person who click the pikachu.
Multi-user chat will be a web application where users can chat privately or in group chat.
- Google Login and Custom Login for users
- User will see a whatapp web like interface on left hand side menu
- Multi user group chat (For all logged in users)
- File sharing and File upload
- Chat Room Should be accessed via name credentials ( later on social login)
- You can upload a picture in your profile
- You can change profile settings
- All online users should be shown in side pane
- click on a user to selectively chat with him/her
- Group chat should be visible to all
- Provide theme color to user which will be used as there chat text also
- Allow #tag feature where one can tag a statement which be later searched on via a search box
- Search box should be able to search all text, usernames
- Time stamp must be visible in Chat (in form of time Ago)
- Chat should auto scroll to lowest part
- Use filters to filter out any blacklisted words
- Block user based on use of blacklisted words
- See the chat from where you have left
- only show last 100 messages and load old ones on demand via a scroll function.
- Use a sound directive for special characters
Chat bots are the need of the time. With too much information overload and lots of application to interact with - humans need a way to interact with devices in more human way. Chat bots makes your life easy by putting up intelligent question, suggestions and making choice simple enough. We are designing a chat bot which may diagnose simple disease or common problem with health.
- Chatbot should be invoked as soon as you open the website
- Chatbot should provide few options for any questions you put up
- By navigation through choices you should be able to reach to final search results.
- Chat bot should start with category of malice you have and then dive into details of each
- You can categorize few common symptoms like headache, flus and food allergies.
- This app will not recommend any medicine but can recommend simple cure which are available in household.
Admin Panel
- Add a question
- Edit a question
- Remove question
- Change the order of questions(Move the questions up or down)
- Choose the type of answer for the question(short answer, long answer, MCQ etc.)
- Time limit for a question
- Time limit for the test
- Negative marking
- Choose randomization of questions for adjacent systems
- Choose different question for different students(Set - A,B,C,D)
- Save the state of answers and auto submit at the end of test if the student has not submitted the test himself
- Making test go live after editted in private mode.
Examinee side
- Login
- One question per page.
- Mark a question as “remind me” later
- Show overall progress which show attempted / unattempted questions.
- Timer showing the timing remains or time completed
- Submit paper at end of time automatically.
- Manual submit option.
This app can be used to manage expenses between friends who are planning an event/trip/party. This app will help in adding all expenses done by any individual. It will provide the report of who owes how much and money should be given to whom.
Features :
- Social login
- Creating a group of friends who have account on this app.
- Make a new event/trip (name of event)
- Adding entries of money given by individuals. (Who paid, for what, how much)
- Updating any old entry (but with having updated date shown and count of updated version)
- Deleting entry by confirmation of multiple users.
- Functionality to end the event - so no new entries can be made.
- Functionality to show who owes and who should get the money.
- Automating mails and messages to every member about how much they owe or will get at end of trip.
- Create a spatial database for adding and searching your favorite place on map.
- You can take a city map via google map Api.
- Coordinates should be marked with extra information stored on your own database.
- One should be able to add points on map via clicking on map and filling a simple form.
- Form must contain name of place, description and category of place like (Cafe, restaurant etc.)
- Also you can represent you places with some icons on map.
- In Search Section, one must be able to search places according to category, distance from you, name of the place etc.
- Results must be arranged according to relevance and then according to distance from you. For e.g a direct name matching should be of higher priority to that of distance of that place. But in case someone is searching by category names one should prefer to go by distance.
- In Search, If somebody click on a place they must get a small info box about the place.
- In Search, if somebody clicks on a place there must be a provision to get direction which must redirect to google maps application for exact direction. Note : you don’t need to integrate google maps in your application for this. Just redirect them in another tab or app.
- Only admin can edit place in the account, admin account should be kept secret.
- Search must be available to all people. However they can give feedback about the place but that will only be visible after approved by admin.
- Create a todo list application with a Nice UI
- You can add/remove tasks etc.
- which should have task with given date and time
- Use system date and time pickers
- Each task will have some starting time which should integrate with your system calendar.(Google calendar)
- Whenever task is pending system will reminds you through calendar app or email or SMS (you can choose notification preferences)
- Create a todo list styled task your perform daily like Reading, Jogging, cooking etc.
- Track every task in terms of pomodoro breaks ( 1break 25 min)
- After 4 short break take a long break
- Pomodoro Timer should be circular and it should raise and alarm after time is over.
- You can take a break and start pomodoro timer again on same task or differs task
- Your list will show how many pomodoro times you have given to each task
Refer to this URL
https://zapier.com/blog/best-pomodoro-apps/
- Use #hashtags to search content through many social apps like facebook, instagram, twitter, reddit etc.
- Sort by popularity
- Show different media into one list - images, videos, status etc.
- Bookmark content for making collections and pins
- You can save items in diff boards - sports, tech, weather, politics
- Login
- Sign up - Ask for interested in buying or selling or both
- Messages/offers for buy
- Push notifications for any buy/ sell offer
- category of item
- negotiable / non negotiable
- send an offer
- mark as favorite
When you visit a restaurant you have to book a table for people. If you book in advance, restaurant has to plan according to available options.
- Choose restaurnt
- Auto detect location and resturant nearby sorted by distance
- filter - number of persons, pure veg, cuisines, ratings etc.
- Book seats
- On restaurant side they will have a limited number of seats.
- Show how many seats are available now.
- If seats are over disable booking at restaurant
- Admin panel : Can login into restaurant and change number of seats available
- Login to account,
- ratings,
- add/ edit / delete a review,
- the social reading graph
- recommendations of books
- Author’s information
- user’s information -
- search book by title / ISBN / author
- read reviews of a book by providing its title / ISBN / author
- read/write comment for a book
- Follow / unfollow an author
- Follow/ unfollow other users
- Find a group
- Join a particular group
- Create a new group
- Like / unlike a resource
- Add/ edit / delete a book shelf
- add /delete books to book shelf
- User’s read status- set status and get any user’s status
- generator a short url
- redirect to the main webpage
- track how many people visited that url
- how many clicked on the short url and navigated to the designated page
- which device they used - mobile / desktop
- optional - require a user to log in to view private url
- search for movies by title
- get all the episodes of any TV series.
- get year of release of a movie
- get rating of movie
- get movie by genre
- get movie by release year
- get movie by actors
- login
- add my journey details (PNR)
- get current PNR status
- push notifications on day of journey
- set timing for reminder - a day before, an hour before etc.
- get train running live status by API
- Login
- Create a new blog - image, title, text content (rich text containing HTML based content)
- Use can see list of their own blogs and can delete any old blog.
- Show list of blogs in home page with card format.
- You can see your blogs and everyone else blog on home page
- Sort blogs by author, date created etc.
- Create category of blogs and classify blogs under a catgeory.
- Create option to share blog via social media.
- Create like feature for blog. A use can one like once for same blog.
- User can login
- Make a note making application similar to Google Keep.
- User can make a board in which they can add some notes. Boards are like study, watch, books etc.
- User can make text notes, add images and files attachements also.
- User can change card color according to priority of tasks (Red, yellow, green)
- User can update and delete cards.
- User can search cards with text search.
- Show a list of top currencies and countries sorted by their value for today.
- List of countries will be displayed with their flag icons. Example UI Link
- There should be two input "Current Currency" and "Exchange Currency". e.g Current Currecy as "INR" and Exchange Currency as "USD".
- Automatic conversion should be done on change of any change in Dropdown menus.
- You can reverse the currency options by simple click.
- Application should store old conversion records and create a simple list of it.
Appointment book app creates and event in which you can book slots. It can help a professional like doctor, interviewer to provide slots to other person in which they can visit. Calendly site is a good example of such an app
- User can login
- Creates an event with name / description/ Date. Start and endtime.
- User chooses how long will be slots between start and end time. (10 mins).
- Final user saves the event setting and gets a URL.
- User shares the URL with all non logged in users.
- These user can only see Name of the event, date, start time/endtime and available slots.
- User books a slot by passing his email, name information.
- If a slot is booked that will be removed from available slot list and other users will not be able to book the same slot.
- If all slots are booked, users will be shown a message that no slot is available.
This news application will be something similar to google news and will pull news from major news channels and apis.
- News will be categoriesed according to tags India, sports, world, movies etc.
- News can be bookmarked by user for later reading.
- User can search new according to their keywords.
- Database will store old news items and they will also be searchable.
- News will be sorted according to new to old.
Make an advanced interface for creating memes! Allow the user to upload an image, write a caption, and build a meme with the Imgflip api. To take it to the next level, allow the user to share their meme on Twitter, Facebook, and other social platforms.
- User should upload a image of some restricted dimension (max width fixed)
- User can provide some caption to the image.
- Captions can be changed in font-size, font-color and orientation.
- Also one can move captions up or down in the image.
- Finally user can generate the meme and get a final URL.
- User can share the URL to other friends to show the meme.
- As an extra feature one can provide download image feature to user.
Example : Check this
It is easy to make travel booking for direct journey from one city to another. But in case you don't find direct flights, trains etc. You might have to break the journey and find trains from a intermediate station and change from their to get to end destination.
- User will provide start and end destination
- User will provide a intermediate city from where they can change.
- Interface will provide the connecting journey options on same date.
- Care must be taken in timings of arrival and departure - so that one can continue the journey.
Hi, This is course page of CoderDost Youtube Channel Redux JS 2023 Course Video Link ,
- Git Commands
-
use
git clone <repository_url> -
checkout 'redux' branch - All Chapters are in same branch but different folders
git checkout redux -
run
npm installinside the each folder before running the code
- If you are not comfortable with git, directly download the branch as Zip.
-
Choose branch related to the Redux e.g.
react. It contains all chapter -
run
npm installinside each chapter folder before running the code
-
Assignment 1 : Using the concepts learnt in this chapter. Make a Async type of call from a new reducer to any online API like JSON Placeholder Posts. Also show proper loading messages in console. Like -
loading posts...,posts loaded,posts fetching failed. Also add those posts to a state of reducer in a sorted manner (sort bytitle) -
Assignment 2 : Check out IMMER library and run some example and see how you can make mutating updates like
state.amount++inside reducer logic. And still it work perfectly in redux. Immer Link
- De-structuring Assignment : Long Video | Object De-structure Short Video | Array De-structure Short Video
- Import/Export : Long Video | Short Video
- Spread Operator : Long Video | Short Video
- Callbacks
- Promises
- Async Await
-
Assignment 1 : Add more cases in Account Reducer called
decrementByAmount. Also check that amount should not be decremented in caseamountto be decremented is less than account Balance. For e.g. if total amount in account is 10, you can't decrement by 11. Also show an error in that situation to user. -
Assignment 2 : Check out IMMER library and run some example and see how you can make mutating updates like
state.amount++inside reducer logic. And still it work perfectly in redux. Immer Link
-
Assignment 1 : Add more cases in Account Reducer called
decrementByAmount. Also check that amount should not be decremented in caseamountto be decremented is less than account Balance. For e.g. if total amount in account is 10, you can't decrement by 11. Also show an error in that situation to user. -
Assignment 2 : Create more async thunk examples, we only tried GET USER-
READexample. But try theCRUDexample toCreatenew user,Updatethe user,Deletethe user. - You have to create a list ofuserswhich has names of all users in local database - You anINPUT BOXto add new users tolist, users show also add to database and updated in list.[Hint: use REST API concepts for Create API, POST method] - You can put adeletebutton on end of list item. On clicking of this buttonuserlist item will be deleted from database. [Hint: use REST API concepts Delete API, DELETE method] - You can put aselectedbutton on end of list item. On clicking of this buttonuserlist item will change colors. [Hint: use REST API concepts Update API, PUT/PATCH method] -
- Assignment 1 : Add a
<Select>on Product Card also which shows quantity selector, So user can add item with a particular quantity also initially. - Assignment 2 : Change the
<Select>on Cart Items to+and-buttons which should increment or decrement quantity of item in the cart. Also check if Cart total is coming correct.
- Assignment 1 : Complete the
deleteandupdatefeature using Redux Saga middleware


