How to make a simple EarPlugs mod using Enfusion for DayZ Standalone, this mod will allow you to adjust the in-game volume using the N key
1.Basic Understanding of Object Oriented Programming
2.Basic Understanding of the Enforce Syntax
3.Have DayZ Tools Workbench with the P drive set up
4.Community Offline Mode Set Up for testingTODO
5.Know How to packageTODO and Run a mod in Offline modeTODO
The first thing before creating any mod is setting up the structure of the mod this is essential for organization as well as for the compiler to read everything correctly.
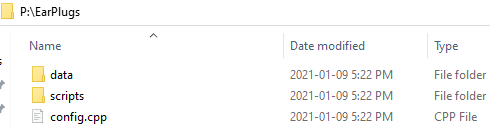
- The first step is to make the folder in the root of your
PDrive calledEarPlugsthis will be your mod's name and the name the PBO will compile to. - Inside the folder create two more folders called
data(which will hold your inputs.xml and GUI elements for later in the tutorial) andscripts(which is where the scripts will go) these folders don't have to be called exactly these but for the purposes of following along in the tutorial it is heavily recommended. - Create a folder called
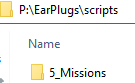
5_Missioninside thescriptsfolder - Create a file named
config.cppand put it in the Root of theEarPlugsfolder
- If done correctly it will look like this
The config.cpp is used by DayZ to determine how to load the mod as well where the scripts and files are located below Go Here to learn more about the config.cpp
- Add the below content to your
config.cppand see the comments for descriptions for each part
class CfgPatches
{
  class EarPlugs //This should match the class in the CfgMods section
  {
    requiredAddons[]={}; //This is the mods required to load before this one since this mod doesn't need any other mods you can leave this blank
  };
};

class CfgMods
{
  class EarPlugs
  {
    // The name for your mod will also show in the keybinds menu when Community Framework is installed
    name="Super Cool Ear Plugs Mod";
    type="mod";

     //This it path to the inputs.xml for defining your keybinds more to follow on this part
    inputs="EarPlugs\data\inputs.xml";

    //The list of dependencies for which modules you will be modding for this example we are only modding the Mission module
    dependencies[]={"Mission"};

    //This is the section where you define where the files are located for each module you are modding
    class defs
    {
      class missionScriptModule
      {
        files[]=
        {
          //This must be the path to the folder in which your scripts are contained for the specificed module
          "EarPlugs/scripts/5_Mission"
        };
      };
    };
  };
};In this section, we are going to go over how to add a key bind to your mod and detect when that key bind is pressed
Create a file called inputs.xml in your data folder and with the below content
<?xml version="1.0" encoding="UTF-8" standalone="yes"?>
<modded_inputs>
	<inputs>
		<actions>
      <!-- The display name for your input, note without using Community Framework you will need to make a localization file(stringtable.csv) and use the localization table for this -->
			<input name="UAEarPlugsToggle" loc="Toggle EarPlugs"/>
		</actions>
	</inputs>
	<preset>
    <!-- The input name is the string used to refrence if they keybind has been pressed -->
		<input name="UAEarPlugsToggle">
      <!-- The btn(Button) name is the default keybind -->
			<btn name="kN"/>
		</input>
	</preset>
</modded_inputs>
Link to information about localization aka stringtables
Note: You must have made sure the path to where you put this file matches the input variable from your config.cpp
One of the best ways to detect a keypress is to use the OnUpdate Function within the class MissionGameplay.
So we are going to create a MissionGameplay.c file in the P:/EarPlugs/scripts/5_Mission folder and add the below content see the comments for what each part does.
//Use the modded key word to tell the compiler you are modding the class
modded class MissionGameplay
{
// You also need to use the override keyword to override the function, it needs to match exactly as it is from the base class you are overriding including the variable name
override void OnUpdate(float timeslice)
{
// Using the super.function ensures that the function is called across other mods as well as the vanilla code
super.OnUpdate(timeslice);
// We are using the GetGame().GetInput().LocalPress("KeyBind") to detect if our keybind is pressed This must match exactly as it is writen in the inputs.xml we did above
if ( GetGame().GetInput().LocalPress("UAEarPlugsToggle") )
{
//If we were running this mod in a server to client environment we could just use
//GetGame().Chat("EarPlugs Toggle is Pressed");
//Since we will be testing in Offline Mod we need to use this method to send a message to chat so we know if the key bind has been pressed
this.m_Chat.Add( new ChatMessageEventParams( CCSystem, "", "EarPlugs Toggle is Pressed", "" ) );
}
}
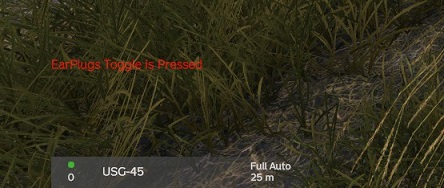
}Once you have created the file with the contents its for our first test Package the mod So following the How to package and Run a mod in Offline mode run the mod and test the mod
You should be able to press the N key and see the message show up in chat like so:
You should also be able to see the key bind in the configure controls menu

Remember without a localization table(Stringtable) you won't see the text
With CF(Community Framework) installed you will see:

The next steps are to now have the in-game volume actually adjust when the key bind has been pressed to do this we are going to add a global variable called m_IsEarPlugsEnabled so we can keep track at which state the EarPlugs are in and we are going to switch the volume from on to off when the key is pressed giving the player the new status in the chat message
modded class MissionGameplay
{
// This is our global varible for keeping track of which state the ear plugs are in and we are initializing it with false since the Ear Plugs start disabled
bool m_IsEarPlugsEnabled = false;
override void OnUpdate(float timeslice)
{
super.OnUpdate(timeslice);
if ( GetGame().GetInput().LocalPress("UAEarPlugsToggle") )
{
//If the EarPlugs are currently disabled we will then enable them
if ( m_IsEarPlugsEnabled == false ){
//Set the m_IsEarPlugsEnabled to be enabled
m_IsEarPlugsEnabled = true;
// we are using the GetGame().GetSoundScene().SetSoundVolume(float vol, float time); to set the volume back to 0.1 (10%) over a period of 1 second
GetGame().GetSoundScene().SetSoundVolume(0.1,1);
this.m_Chat.Add( new ChatMessageEventParams( CCSystem, "", "EarPlugs are now enabled", "" ) );
//Again if are making this mod for a server client you can just use this instead
//GetGame().Chat("EarPlugs are now disabled");
}
else // else (meaning the are enabled) we will disable them
{
//Set the m_IsEarPlugsEnabled to be disabled
m_IsEarPlugsEnabled = false;
// we are using the GetGame().GetSoundScene().SetSoundVolume(float vol, float time); to set the volume back to 1 (100%) over a period of 1 second
GetGame().GetSoundScene().SetSoundVolume(1,1);
this.m_Chat.Add( new ChatMessageEventParams( CCSystem, "", "EarPlugs are now disabled", "" ) );
//Again if are making this mod for a server client you can just use this instead
//GetGame().Chat("EarPlugs are now enabled");
}
}
}
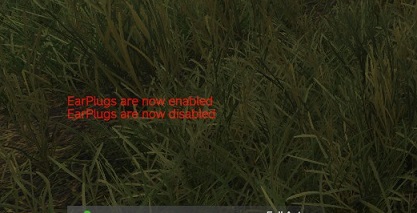
}Now let us pack the mod and test it
You should be able to press the N key and have the volume adjust in-game
Now your mod is ready to be used! But wait there is more
One issue with the above code is it will still trigger the code if a menu is open so one wants to stop it is to check if any menus are currently opened the to do this its easy as check if the currently open menu is null which we will do with GetGame().GetUIManager().GetMenu() == NULL
So in the code, we will add it as
modded class MissionGameplay
{
	bool m_IsEarPlugsEnabled = false;

	override void OnUpdate(float timeslice)
	{
		super.OnUpdate(timeslice);

		// Using the && means both these coniton met before it will work, the current Menu must be null and the key bind must be pressed
		if ( GetGame().GetInput().LocalPress("UAEarPlugsToggle") && GetGame().GetUIManager().GetMenu() == NULL )
		{
			if (m_IsEarPlugsEnabled == false){
				m_IsEarPlugsEnabled = true;
				GetGame().GetSoundScene().SetSoundVolume(0.1,1);

				this.m_Chat.Add( new ChatMessageEventParams( CCSystem, "", "EarPlugs are now enabled", "" ) );
				//Again if are making this mod for a server client you can just use this instead
				//GetGame().Chat("EarPlugs are now disabled");
			} else {
				m_IsEarPlugsEnabled = false;
				GetGame().GetSoundScene().SetSoundVolume(1,1);

				this.m_Chat.Add( new ChatMessageEventParams( CCSystem, "", "EarPlugs are now disabled", "" ) );
				//Again if are making this mod for a server client you can just use this instead
				//GetGame().Chat("EarPlugs are now enabled");

			}
		}
	}
}
Now if a menu is open and you are pressing the N it won't toggle your earplugs
Next, let us configure a GUI for it cause chat message are boring To do this we have first we have to prepare the layout and images
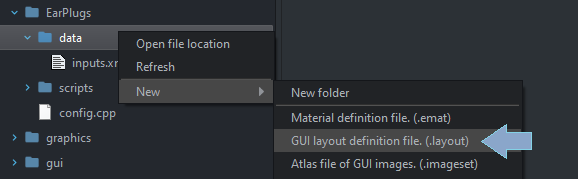
-
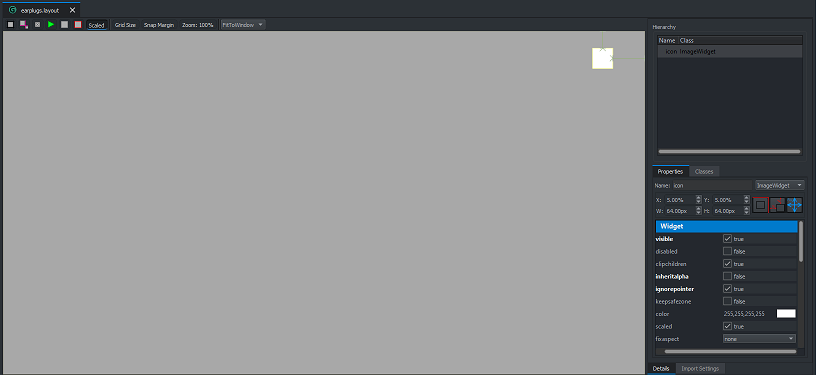
Open Workbench and navigate to the EarPlugs Folder and create a new GUI layout Definition file(.layout) and give it the filename earplugs
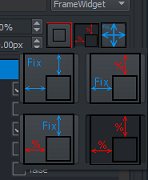
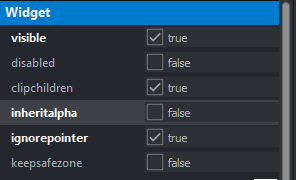
-
Once it is created we are going to switch the icon to be centred with the top left of the screen and set it to be relative spacing make sure to checkbox ignore pointer this ensures if it is over top of something it doesn't block you from clicking what's beneath it.
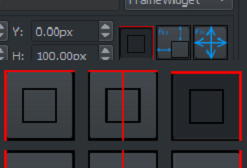
-
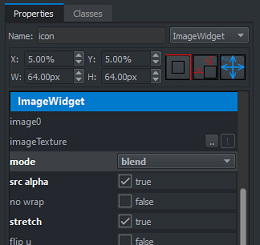
Then Change it from a framewidget to an image widget and rename it to be "icon" as well set the
XandYto be5%as well the width(W) and height(H) to be64px -
Also, scroll down to the ImageWidget Section of the Widget Properties set the mode to blend, as well check box src alpha and stretch
-
This is what it should look like when its done, and don't forget to click save
Now the ideal way for this would be to create image sets and reference images set but for the sake of this tutorial and to make things easier we just going to use .edds files.
- Find some nice free icons for this I am going to use icons from material.io and get the
volume_muteandvolume_upicons download them to your computer - Convert the files to a .tga with the resolution of 64px by 64px(same size as the height and width of the widget)
- Copy each of the .tga files into the
EarPlugs/dataFolder - Open Workbench and right-click on each of them and click
Register resource and import
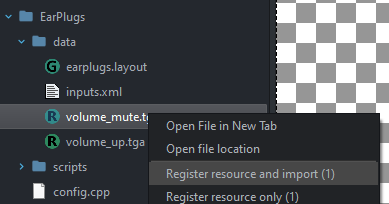
can then delete the .tga files once the edds files are created
Now that all the resources we need are created and added into the mod folder we now are going to create a widget class to control and hold the widget. First we create a EarPlugsWidget.c file in the scripts\5_Mission folder. Then add the below conent read the comments for which each part does.
//We are creating a new class named EarPlugsWidget
class EarPlugsWidget
{
	//We are declaring a ImageWidget variable so we can reference it when neasary
	autoptr ImageWidget		m_icon;

	//When an object of the class is instantiate(created) then we need to create the widget
	void EarPlugsWidget()
	{
		// we are creating the widget using the layout we created, as well as setting it to the ref variable
		m_icon = ImageWidget.Cast(GetGame().GetWorkspace().CreateWidgets( "EarPlugs/data/earplugs.layout" ));

		// you could set the default image path in the layout but just going to set it here to show you how
		m_icon.LoadImageFile( 0, "EarPlugs\\data\\volume_up.edds" );
	}

	//When an object of the object is destroyed this class is called
	void ~EarPlugsWidget()
	{
		//first we make sure the image is hidden
		m_icon.Show(false);
		//Then delete the reference to the icon widget
		delete m_icon;
	}

	//This is the function we will calling to change the image for the icon
	void SetIcon(string imagePath)
	{
		//This set the image to the image path provided in the function call
		m_icon.LoadImageFile( 0, imagePath );
	}

}Now in MissionGameplay now we are going to set up the icon to show and get it to change on the press of the key bind.
modded class MissionGameplay
{
	bool m_IsEarPlugsEnabled = false;

	// Creating a reference variable for the earplugs widget and creating it when the game loads
	autoptr EarPlugsWidget m_earplugswidget = new EarPlugsWidget;

	override void OnUpdate(float timeslice)
	{
		super.OnUpdate(timeslice);

		if ( GetGame().GetInput().LocalPress("UAEarPlugsToggle") && GetGame().GetUIManager().GetMenu() == NULL )
		{
			if (m_IsEarPlugsEnabled == false){
				m_IsEarPlugsEnabled = true;
				GetGame().GetSoundScene().SetSoundVolume(0.1,1);

				//Removing the chat functions as they arn't needed any more

				//Calling our Function to change the icon path to the icons within the mod
				m_earplugswidget.SetIcon("EarPlugs\\data\\volume_mute.edds");
			} else {
				m_IsEarPlugsEnabled = false;
				GetGame().GetSoundScene().SetSoundVolume(1,1);

				//Removing the chat functions as they arn't needed any more

				//Calling our Function to change the icon path to the icons within the mod
				m_earplugswidget.SetIcon("EarPlugs\\data\\volume_up.edds");
			}
		}
	}
}
Now when you spawn in you will see your earplug status in the top right-hand corner of your screen and when you push the N key it will change the icon as well as the icon as shown below


So having the icon in the top right corner at all times will get in the way of a lot of players so to stop this we are going to have the icons disappear, to do this we will use the call ques within DayZ
class EarPlugsWidget
{
	autoptr ImageWidget			m_icon;

	//To make sure we can remove the call que if its active we will have a bool called call
	bool 								m_callqueueactive = false;

	void EarPlugsWidget()
	{
		m_icon 	= ImageWidget.Cast(GetGame().GetWorkspace().CreateWidgets( "EarPlugs/data/earplugs.layout" ));

		//Setting the icon to be hidden by default
		m_icon.Show(false);

    //And since the icon is hidden by default we don't need to load an image here

	}

	void ~EarPlugsWidget()
	{
		m_icon.Show(false);

		//If the call Queue is currently active remove it to prevent null pointer errors
		if (m_callqueueactive){
	 		GetGame().GetCallQueue(CALL_CATEGORY_GUI).Remove(this.HideIcon);
		}

		delete m_icon;
	}

	void SetIcon(string imagePath)
	{
		m_icon.LoadImageFile( 0, imagePath );

		//Since it will now be hidden we need to show it as well
		m_icon.Show(true);

	 	// If the call queue is currently active then remove it so we don't clear it away too quickly
		if (m_callqueueactive){
			GetGame().GetCallQueue(CALL_CATEGORY_GUI).Remove(this.HideIcon);
		}

		//Setting the Call Queue to be active so we know its currently running
		m_callqueueactive = true;

		//Creating a call Queue to hide the Icon 1500 mili(1.5 Seconds) after it is loaded
		GetGame().GetCallQueue(CALL_CATEGORY_GUI).CallLater(this.HideIcon, 1500);
	}

	//This is the function we will use to clear the image off the screen.
	void HideIcon(){

		// Setting the call queue as completed (no longer active)
		m_callqueueactive = false;

		//Hideing the icon off the screen
		m_icon.Show(false);
	}

}
Now you can package the mod and test you should be able to enable and disable the earplugs with the icon disappearing after 1.5 seconds
You can now publish your mod to steam if you wish or add it to your own server mod pack :) of course there is more you can do and maybe there will be more extra's in the future like making the icon fade out instead of just straight disapear, and have mulitple sound levels. You can see my version on github for those features and all the comments will be there


