Giter Site home page Giter Site logo

xosvp's Introduction

Xbox Open Source Video Project

Finished XOSVP Image XOSVP is an open-source alternative to the Microsoft HD AV Pack. The XOSVP strives to produce the absolute best analog video quality out of your original Xbox.

Features

  • Highest possible quality analog Y/Pb/Pr component video out
    • Impedance matched board traces and cabling from original Xbox
    • High quality video filter + amplifier, THS7316
      • Low pass filter removes high-frequency noise and aberrations from the source signal without harming video frequencies
      • Reconstructs + Amplifies original signal to ensure matching with the Y/Pb/Pr Standards
      • Reduces DAC Imaging effects on the video receiver
  • Optical Audio/SPDIF
    • Best possible audio quality from the original Xbox
    • Support Stereo -> 5.1 Surround Sound
    • Cheap, high-quality optical DAC's easy to source on Amazon/Ebay for those without stereo systems

More Details

Check out my in-depth blog post on the XOSVP detailing its construction, evolution, and comparison images.

Designs

All designs are produced with KiCAD 5. This includes all schematic sources, designed footprints, and PCB layout.

Enclosure

XOSVP Enclosure Also within this repo is a 3D printable enclosure for the XOSVP. It is designed for friction fit so please ensure your 3D printer is calibrated properly before printing. All files were exported with Millimeter scale.

The enclosure was designed with Tinkercad, and you can view this design HERE.

License

I want high-quality analog video from the original Xbox to be available to everyone, which is why I open sourced this project. Everything within this repo is covered by CERN Open Hardware License v1.2.

Contributing

If you have any suggested changes/improvements, please feel free to create an issue or a PR. They will be happily accepted!

Build Instructions

Kit

The Following image contains all the parts in the BOM/XOSVP DIY Kit: Kit Contents

PCB Installation

The parts are placed on the board in the following configuration PCB Layout

The 3D Printed enclosure is designed for a friction fit, so it is very important that the Y/Pb/Pr jack and VGA connector are completely flush to the PCB like in the following image: Flush Y/Pb/Pr connector

AVIP to XOSVP

XOSVP Adapter To make the cable that connects the Xbox to the AVIP, you will need to splice the included AVIP connector with the included VGA cable.

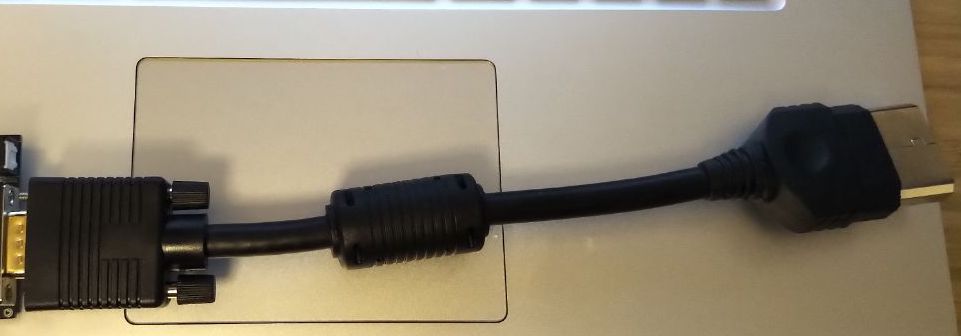
Creating this cable is a rather involved process, and you want to get it right, so I created the following video tutorial to document the process I follow when making them.

YouTube Video Tutorial

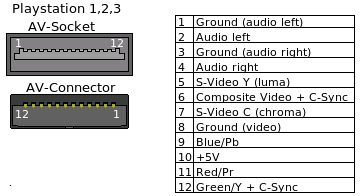
The following pinouts are provided for extra detail and are intended to be used alongside the video tutorial.

This splice must follow the following pinout guide

AVIP Pinout

Each of the colored AVIP pins must be connected so that they match the following pinout of the VGA cable. The only exception is the AVIP JMP 1 and AVIP JMP 2 pins. These need to be jumped together on the top + bottom of the AVIP connector.

VGA Pinout

xosvp's People

Contributors

discostarslayer avatar

Stargazers

 avatar  avatar  avatar  avatar  avatar  avatar  avatar  avatar  avatar  avatar  avatar  avatar  avatar  avatar  avatar  avatar  avatar  avatar  avatar  avatar  avatar  avatar  avatar  avatar  avatar  avatar  avatar  avatar  avatar  avatar  avatar  avatar  avatar  avatar  avatar  avatar  avatar  avatar  avatar  avatar  avatar  avatar  avatar  avatar  avatar  avatar  avatar  avatar  avatar  avatar  avatar  avatar  avatar  avatar  avatar  avatar  avatar  avatar  avatar  avatar  avatar  avatar  avatar  avatar  avatar  avatar  avatar  avatar  avatar  avatar  avatar  avatar  avatar  avatar  avatar  avatar  avatar  avatar  avatar  avatar  avatar  avatar  avatar  avatar  avatar  avatar  avatar  avatar  avatar  avatar  avatar  avatar  avatar  avatar  avatar  avatar  avatar  avatar  avatar

Watchers

 avatar  avatar  avatar  avatar  avatar  avatar  avatar  avatar  avatar  avatar  avatar  avatar  avatar  avatar  avatar  avatar

xosvp's Issues

combine analog and digital audio in one connector to enable both audio options "natively"

By using a regular 3.5mm TRS phone socket and a LED instead of the exclusively optical TOSLINK connector it's possible to provide optical and analog audio (with a Mini-Toslink or 3.5mm TRS cable, respectively) in one connector (and consequently gets rid of the DAC requirement if analog audio is needed).

I've come across that convenient fact when I first dug through the MiSTer (github-)project and its wiki.
The IO addon board for it has an 3.5mm TRS phone connector (BOM: J2, BOM+schematics for further review is accessible on the linked github) which does exactly that by using a LED (BOM: LED4) behind the connector on the PCB.
And apparently this is something which is/was used in other commercial products.
(I have an assembled IO-Board on hand and can take a close-up shot of the connector and LED behind it, if needed for clarification.)

I believe the only thing to keep in mind is that the LED has to have the correct wavelength and brightness. From what I could gather from the TOSLINK specification the wavelength should be around 650-660nm. As for the brightness rating I couldn't find a specific value, but it should obviously be bright and stable enough so that it can drive the optical signal over different cable runs, at least up to spec. There's an official support thread for the MiSTer IO-Board at atari-forum.com, where some values get thrown around (apparently 32-326mcd@650nm should be safe/optimal according to one post).

I just wanted to call attention to this, maybe it is a reasonable suggestion that could be integrated in an updated revision of the board (and probably the enclosure too). If you will make more, that is!

In any case, thank you for your work and for sharing it too!

Screen turned brighter all of a sudden

I am using my XOSVP for quiet a while now and i am enjoying it very much so far. After a few weeks of usage my screen turned brighter all of a sudden without any reason.

At the beginning i was able to get rid of the problem by bending the video cable a bit or by touching, which doesn‘t make any sense for me. But that worked only for a few seconds. The screen did not get any darker ever since.

I double checked every connection from AV-connector to the board. Everything seems fine. There are no solder bridges or anything. I am using an OSSC and a mClassic to get a crisper image. I haven‘t got any issues whatsoever.

What could cause this problem so that at least i know where to search? Have you ever encountered an issue like this? I would appreciate your help very much and keep up the good work!

Best regards

Adapting the kit for the PS2?

Hi there,

First of all, thanks so much for the time and effort you've invested into making an affordable, high-quality, and open-source component cable option for the OG Xbox! I've been using the same cheap eBay cable for years and am looking forward to an upgrade.

As you might be aware, finding a reasonably-priced set of component cables for the PS2 has also been getting pretty challenging. Some people have taken to the old Xbox method of splicing the PS2 A/V connector with a set of X360 component cables, but I'm curious as to whether your general approach with the XOSVP (A/V connector to VGA cable + proper setup with video amp/filters on a connected board) could be easily adapted to the PS2 as well. Looking at the A/V pinout vs the Xbox, the main differences are:

  • No optical audio (consoles have a dedicated TOSLINK out port already)
  • One single ground for Y/Pb/Pr instead of separate ones
  • No "DC Return" pin (not actually sure what this is)

The pinout I found is here:

PS2 A/V Pinout

The first difference would likely make things easier, but would the other two prevent any part of the XOSVP setup from working correctly? If there aren't any obvious problems, I might order an extra kit and a PS2 A/V connector and try modifying it to see if it works. Thanks in advance!

Recommend Projects

  • React photo React

    A declarative, efficient, and flexible JavaScript library for building user interfaces.

  • Vue.js photo Vue.js

    🖖 Vue.js is a progressive, incrementally-adoptable JavaScript framework for building UI on the web.

  • Typescript photo Typescript

    TypeScript is a superset of JavaScript that compiles to clean JavaScript output.

  • TensorFlow photo TensorFlow

    An Open Source Machine Learning Framework for Everyone

  • Django photo Django

    The Web framework for perfectionists with deadlines.

  • D3 photo D3

    Bring data to life with SVG, Canvas and HTML. 📊📈🎉

Recommend Topics

  • javascript

    JavaScript (JS) is a lightweight interpreted programming language with first-class functions.

  • web

    Some thing interesting about web. New door for the world.

  • server

    A server is a program made to process requests and deliver data to clients.

  • Machine learning

    Machine learning is a way of modeling and interpreting data that allows a piece of software to respond intelligently.

  • Game

    Some thing interesting about game, make everyone happy.

Recommend Org

  • Facebook photo Facebook

    We are working to build community through open source technology. NB: members must have two-factor auth.

  • Microsoft photo Microsoft

    Open source projects and samples from Microsoft.

  • Google photo Google

    Google ❤️ Open Source for everyone.

  • D3 photo D3

    Data-Driven Documents codes.