 Scout is an open-source custom quadcopter flight controller firmware that I developed from absolute scratch. The Scout Flight Controller is written in MicroPython and runs on a $4 Raspberry Pi Pico.

Click on the image below to watch a brief video about Scout's development:

Further videos:
- Scout's First Flight
- Scout Demo Flight 1
- Recording of my presentation to the Melbourne, Australia MicroPython Meetup on how I developed the Scout Flight Controller
- The complete source code for the Scout Flight Controller can be found in the
srcfolder. - "Bonus code" snippets (code that isn't immediately required by the flight controller software but can be of help for specific tasks anyway) can be found in the
bonus_codefolder.
If assembled and wired exactly as depicted in my article describing Scout's hardware and electronics, only minor modifications need to be made to the Scout source code before using it in your own quadcopter.
However, this is a list of things that you may want to customize/tweak to tailor to your particular build (perhaps you used a different frame or different motors so my values do not fit your quadcopter well). All of these variables can be found in the first "SETTINGS" section of the Scout Flight Controller main.py module:
throttle_idle- when switched into flight mode (see step 7 in the steps below), the motors will spin up at a low RPM, providing a low level of thrust but not enough to lift the quadcopter off the ground. Thus, this sets the throttle level to achieve minimum thrust when the pilot has the throttle stick in the 0% position. You should customize this value according to your specific quadcopter's motor thrust and weight. You want it to provide a very minor level of power; enough to spin the propellers at a low RPM, but not enough to generate lift.throttle_governor- this is the maximum throttle that Scout will allow the pilot to give. In other words, if the pilot pushes their throttle stick to the 100% position, Scout will use this throttle level, with a linear relationship between thethrottle_governorvalue andthrottle_idlevalue according to the throttle stick position. For easy to control flight (what I prefer), use a relatively low value; enough where the quadcopter can generate significant thrust and ascend with ease, but not too much. For performance-oriented setups, use a higher value (max is 1.0, or 100%).max_rate_roll- the maximum roll rate, in degrees per second, that Scout will allow. So, if the pilot pushes all the way to the right on the roll stick (indicating maximum right roll), Scout will roll at this value. Higher values favor performance, lower values (like I have) favor controllability.max_rate_pitch- same as above, but for pitch.max_rate_yaw- same as above, but for yaw.- All of the PID controller values (gain values), named as
pid_roll_kp,pid_roll_ki,pid_roll_kd, etc. Fortunately, you may be able to get away with leaving these mostly unchanged. Or, if you are not pleased with the way your quadcopter flies, you can increase or decrease these, but I'd recommend doing so proportionally. Or, you can adjust each P, I, and D gain for each axis individually if you'd like. There are plenty of explanations and tutorials online about PID tuning you can reference.
Of the values above, the two most critical to update are throttle_idle and throttle_governor, as these are specific to the motors you have and weight of your quadcopter. In particular, the throttle_idle. Set this value to the minimum (or close to minimum) level of throttle you must apply to your motor for the propellers to begin spinning at a low RPM. You will just have to learn what this is through testing (with propellers off). The remaining values can likely be left as default.
But, if you do use the exact hardware I am using (same frame, motors, ESC's, 4S LiPo battery, etc.), in theory you will not need to make any modifications to Scout's source code whatsoever.
- Assemble the hardware components (i.e. Raspberry Pi Pico, MPU-6050, FlySky FS-iA6B Receiver, motors, etc.) and wire them together as described in my article, How I Developed the Scout Flight Controller, Part: Hardware. Be sure to map each motor to the appropriate GPIO pin on the Raspberry Pi!
- Move all of the code in the
srcfolder onto the Raspberry Pi Pico. Provided you wired up everything exactly as depicted in the hardware article, you will not need to modify any parts of the code. - Turn on your FlySky FS-i6 transmitter. Ensure the throttle position is at 0% (all the way pushed down) and the upper-left switch (which is mapped to channel 5) is in the up position (value of
0). If these either of these is not the case, the Scout flight controller has a built-in safety mechanism which abort at power-up.- You may need to map the top-left-most switch to Channel 5 of your FlySky FS-i6 transmitter as it likely doesn't come this way out of the box. This can be done on the controller itself and there are several YouTube videos/guides you can find online which describe this.
- Plug in the LiPo battery to power up the system.
-
- You should see the onboard small LED light on the Raspberry Pi Pico quickly flash several times. This is just an indicator that the Raspberry Pi Pico is on and the Scout Flight Controller program has been started.
-
- Scout will perform the safety checks described above in step 3, as well as a check to ensure communications with the MPU-6050 are stable. If any of these safety checks fail, Scout will abort the start up. You can tell if the startup was aborted as the Raspberry Pi Pico's onboard LED will pulsate solid on for one second, then off for one second, and will repeat this indefinitely. To re-try, unplug the LiPo battery (power down Scout) and plug it back in.
-
- Scout will perform a gyroscope calibration. For three seconds, Scout will continuously read values from the gyroscope to observe its unique bias. It is extremely important to not touch or move the quadcopter during this time.
- You will then see the Raspberry Pi Pico's onboard LED go solid (on). This means that everything looks good and Scout is now ready to fly!
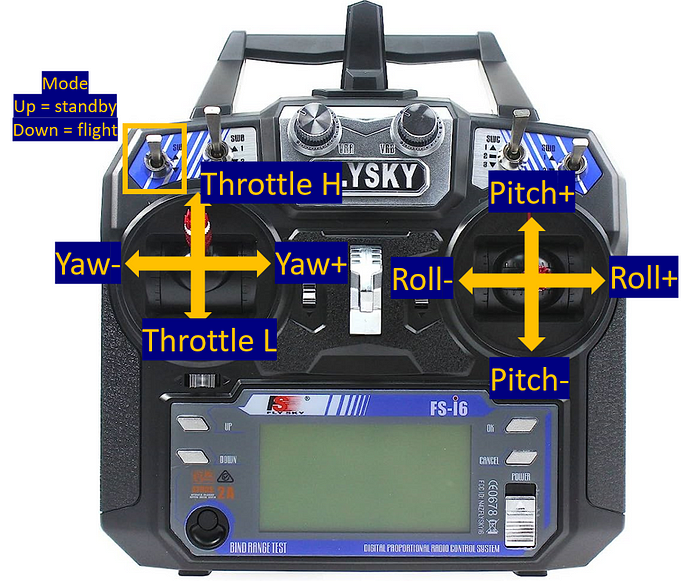
- To switch Scout from standby mode to flight mode, switch the top-left-most switch down to the on position (
1). This will put Scout into flight mode. You will see the propellers begin to spin at a low RPM, providing some thrust, but not enough for the quadcopter to lift off the ground. - Use the left stick to control throttle and yaw and the right stick to control pitch and roll, as depicted here in this image.
- When finished flying (safely landed), flip the top-left-most switch to the off position (
0) to switch back to standby mode, stopping the propellers.
If you're interested in learning how the Scout Flight Controller was made and perhaps making your own flight controller, this is for you! In the spirit of promoting learning, I'm publicly sharing all that I learned during the three months I spent dreaming about and developing Scout. I wrote a 12-chapter series on how I developed the Scout Flight Controller and the hardware requirements. You can find the articles on Medium below:
- Introducing the Scout Flight Controller
- Quadcopter Flight Dynamics
- Capturing Telemetry with a Gyroscope
- Receiving Pilot Input with an RC Receiver
- Stabilizing Flight with PID Controllers
- Controlling Brushless Motors with ESC’s and PWM
- Setting up the Quadcopter Hardware
- Full Flight Controller Code & Explanation
- Taking Flight
- A Lesson in Persistence
- Potential Future Improvements
- Bonus Code
Please be aware that I, Tim Hanewich, the creator of this drone quadcopter code, do not assume any responsibility or liability for any consequences, including but not limited to injuries, damages, breaches of law, or any adverse events that may occur while deploying, testing, or using this code in any other way.
By accessing, modifying, or utilizing this code, you acknowledge and agree that you do so at your own risk. It is essential to exercise caution, adhere to safety regulations, and ensure compliance with all relevant laws and guidelines when working with drones or any related technology.
Furthermore, please note that the code and designs provided are intended solely for educational and informational purposes. While efforts have been made to ensure accuracy and safety, there are inherent risks associated with building and operating unmanned aerial vehicles. While this project is dedicated to promoting benevolent uses of drone technology, it is crucial to understand that unforeseen circumstances and unintended outcomes can arise.
Users and developers are encouraged to prioritize safety, conduct thorough testing, and act responsibly at all times. Your safety and the safety of others should always be your utmost concern. I explicitly disclaim any responsibility for any injuries, damages, or bodily harm that may occur as a result of using or replicating these materials.
