drugsz / blog Goto Github PK
View Code? Open in Web Editor NEW随想,生活与技术
随想,生活与技术


刷一刷leetcode,今天刷到一题链接在这
看到这题的我微微一笑,还能难倒我?
var plusOne = function(digits){
    let num_1 = digits.join('');
    num_1 = Number(num_1);

    num_1++;
    let arr = String(num_1).split('');
    let arr_1 = [];

    arr.forEach( item => {
            arr_1.push(Number(item))

        });
        return arr_1
}
略一思索我写下了如下代码,点下测试代码

内心有点小激动,甚至有点想笑,于是自信的点下提交解答

我去?咋回事,后来仔细一想发现事情并不简单,既然是操作数字的,首先来看看JavaScript是怎么存储数字的,
JavaScript 中所有数字包括整数和小数都只有一种类型 — Number,JavaScript使用 64 位固定长度来表示,也就是标准的 double 双精度浮点数,

如果有想要深入研究的请点这里,我就是从这里查到的具体信息,不然我只是知其然不知其所以然;
请注意上面的,可以表示十五到十六位十进制数字如此看来,之前错误是因为长度超过了,于是改了下思路,既然不能一起算,那么我一个一个算总可以把

,好吧,又错了,但是这次好解决,不光要结算单位,如果进位要同时对前一位进行运算
当当当当

附上最终代码
var plusOne = function(digits) {
        let flag = true;
        let lastIndex = digits.length -1;

        while(flag && lastIndex > -1){
            if(digits[lastIndex] < 9){
                digits[lastIndex]++;
                flag = false;
            }else{
                let prev = lastIndex - 1
                digits[lastIndex] = 0;
                if(digits[prev]){
                    lastIndex--
                }else{
                    digits.unshift(1);
                    flag = false;
                }
            }
        }

        return digits
    };
本文Vuex版本为3.0.1
Vuex是Vue的单一状态树,什么是单一状态树,简单来说就是Vuex把所有需要用到的状态放到了一个对象中,也就是单例模式;首先看一下Vuex的结构;

install
安装 Vue.js 插件。如果插件是一个对象,必须提供
install方法。如果插件是一个函数,它会被作为 install 方法。install 方法调用时,会将 Vue 作为参数传入。该方法需要在调用
new Vue()之前被调用。当 install 方法被同一个插件多次调用,插件将只会被安装一次。
从这段Vue的文档中我们可以推断出来Vuex一定提供了一个install方法,我们首先找一下install,
import { Store, install } from './store'
import { mapState, mapMutations, mapGetters, mapActions, createNamespacedHelpers } from './helpers'

export default {
  Store,
  install,
  version: '__VERSION__',
  mapState,
  mapMutations,
  mapGetters,
  mapActions,
  createNamespacedHelpers
}从中我们可以看到install方法在store文件中,转到store,
let Vue // bind on install
export function install (_Vue) {
  if (Vue && _Vue === Vue) {
    if (process.env.NODE_ENV !== 'production') {
      console.error(
        '[vuex] already installed. Vue.use(Vuex) should be called only once.'
      )
    }
    return
  }
  Vue = _Vue
  applyMixin(Vue)
}_Vue是Vue.use时传入的Vue构造函数,而store维护一个Vue变量,保证vuex只会被安装一次,而具体的安装操作则在applyMixin函数中,
export default function (Vue) {
  const version = Number(Vue.version.split('.')[0])

  if (version >= 2) {
    Vue.mixin({ beforeCreate: vuexInit })
  } else {
    // override init and inject vuex init procedure
    // for 1.x backwards compatibility.
    const _init = Vue.prototype._init
    Vue.prototype._init = function (options = {}) {
      options.init = options.init
        ? [vuexInit].concat(options.init)
        : vuexInit
      _init.call(this, options)
    }
  }

  /**
   * Vuex init hook, injected into each instances init hooks list.
   */

  function vuexInit () {
    const options = this.$options
    // store injection
    if (options.store) {
      this.$store = typeof options.store === 'function'
        ? options.store()
        : options.store
    } else if (options.parent && options.parent.$store) {
      this.$store = options.parent.$store
    }
  }
}在applyMixin中,会判断Vue的版本,如果是2.0以上版本会将vuexInit混入至全局beforeCreate钩子中, 否则就重写Vue的 _init函数,在_init函数中调用vuexInit,而vuexInit本质上只做了一件事,判断当前vue实例中是否有store属性,有的话将自身的$store属性设置为该值,如果没有则将父组件的$store设置为自身的$store这样在整个组件树中,所有的组件都是引用的同一个对象,
Store
Store提供了Vuex的核心流程,首先看一下它的constructor函数
  constructor (options = {}) {
    // Auto install if it is not done yet and `window` has `Vue`.
    // To allow users to avoid auto-installation in some cases,
    // this code should be placed here. See #731
    if (!Vue && typeof window !== 'undefined' && window.Vue) {
      install(window.Vue)
    }

    if (process.env.NODE_ENV !== 'production') {
      assert(Vue, `must call Vue.use(Vuex) before creating a store instance.`)
      assert(typeof Promise !== 'undefined', `vuex requires a Promise polyfill in this browser.`)
      assert(this instanceof Store, `store must be called with the new operator.`)
    }

    const {
      plugins = [],
      strict = false
    } = options

    // store internal state
    this._committing = false
    this._actions = Object.create(null)
    this._actionSubscribers = []
    this._mutations = Object.create(null)
    this._wrappedGetters = Object.create(null)
    this._modules = new ModuleCollection(options)
    this._modulesNamespaceMap = Object.create(null)
    this._subscribers = []
    this._watcherVM = new Vue()

    // bind commit and dispatch to self
    const store = this
    const { dispatch, commit } = this
    this.dispatch = function boundDispatch (type, payload) {
      return dispatch.call(store, type, payload)
    }
    this.commit = function boundCommit (type, payload, options) {
      return commit.call(store, type, payload, options)
    }

    // strict mode
    this.strict = strict

    const state = this._modules.root.state

    // init root module.
    // this also recursively registers all sub-modules
    // and collects all module getters inside this._wrappedGetters
    installModule(this, state, [], this._modules.root)

    // initialize the store vm, which is responsible for the reactivity
    // (also registers _wrappedGetters as computed properties)
    resetStoreVM(this, state)

    // apply plugins
    plugins.forEach(plugin => plugin(this))

    const useDevtools = options.devtools !== undefined ? options.devtools : Vue.config.devtools
    if (useDevtools) {
      devtoolPlugin(this)
    }
}在前面的install中我们提到,Store文件中维护了一个私有变量Vue来判断是否安装过,在Store构造函数中同样进行了判断,如果Vue变量为空,则进行安装流程,之后进行了三次断言,分别判断是否安装,是否存在Promise,当前实例是否通过new操作符构造,
首先我们看一下options的结构
state:Vuex store 实例的根 state 对象。
mutations:在 store 上注册 mutation,处理函数总是接受
state作为第一个参数actions:在 store 上注册 action。处理函数总是接受
context作为第一个参数,getters:在 store 上注册 getter,
modules:包含了子模块的对象,会被合并到 store
plugins:一个数组,包含应用在 store 上的插件方法。这些插件直接接收 store 作为唯一参数,可以监听 mutation或者提交 mutation
strict:使 Vuex store 进入严格模式,在严格模式下,任何 mutation 处理函数以外修改 Vuex state 都会抛出错误。
devtools:为某个特定的 Vuex 实例打开或关闭 devtools。
好,我们来看看vuex是如何使用这些属性的:
    const {
      plugins = [],
      strict = false
    } = options

    // store internal state
    this._committing = false
    this._actions = Object.create(null)
    this._actionSubscribers = []
    this._mutations = Object.create(null)
    this._wrappedGetters = Object.create(null)
    this._modules = new ModuleCollection(options)
    this._modulesNamespaceMap = Object.create(null)
    this._subscribers = []
this._watcherVM = new Vue()首先通过解构赋值从参数中提取出插件列表及是否启用严格模式,同时如果未指定模式,则默认关闭严格模式,下面我们创建一个例子来看一看具体Store是如何执行的
//example.js
export default new Vuex({
  state:{
      count:1
  },
  actions:{
    addcount({commit},payload){
      commit('ADD_COUNT',payload)
    }
  },
  mutations:{
    'ADD_COUNT'(state,payload){
      payload > 0 ? state.count += payload : state.count++
    }
  },
  modules:{
    state:{
      userName:''
    },
    actions:{
      updateUserName({commit},str){
        commit('SET_USER_NAME',str)
      }
    },
    mutations:{
      'SET_USER_NAME'(state,str){
        if(!typeof str == 'string')return
        state.userName = str
      }
    }
  }
})我们来看一下store的源码如何处理,首先,因为我们没有传入plugins和strict字段,所以采用默认值,随后创建多个空对象属性,然后将options传递给ModuleCollection构造函数,
ModuleCollection会以Module类为基础构建自身,将当前传入options构建为根节点,
随后调用installModule(this, state, [], this._modules.root),
function installModule (store, rootState, path, module, hot) {
  const isRoot = !path.length
  const namespace = store._modules.getNamespace(path)

  // register in namespace map
  if (module.namespaced) {
    store._modulesNamespaceMap[namespace] = module
  }

  // set state
  if (!isRoot && !hot) {
    const parentState = getNestedState(rootState, path.slice(0, -1))
    const moduleName = path[path.length - 1]
    store._withCommit(() => {
      Vue.set(parentState, moduleName, module.state)
    })
  }

  const local = module.context = makeLocalContext(store, namespace, path)

  module.forEachMutation((mutation, key) => {
    const namespacedType = namespace + key
    registerMutation(store, namespacedType, mutation, local)
  })

  module.forEachAction((action, key) => {
    const type = action.root ? key : namespace + key
    const handler = action.handler || action
    registerAction(store, type, handler, local)
  })

  module.forEachGetter((getter, key) => {
    const namespacedType = namespace + key
    registerGetter(store, namespacedType, getter, local)
  })

  module.forEachChild((child, key) => {
    installModule(store, rootState, path.concat(key), child, hot)
  })
} installModule调用中首先会判断当前节点是否存在命名空间配置,如果有则分配命名空间至_modulesNamespaceMap,随后将state根据modules的key值注册至根节点;
随后调用 const local = module.context = makeLocalContext(store, namespace, path)
function makeLocalContext (store, namespace, path) {
  const noNamespace = namespace === ''

  const local = {
    dispatch: noNamespace ? store.dispatch : (_type, _payload, _options) => {
      const args = unifyObjectStyle(_type, _payload, _options)
      const { payload, options } = args
      let { type } = args

      if (!options || !options.root) {
        type = namespace + type
        if (process.env.NODE_ENV !== 'production' && !store._actions[type]) {
          console.error(`[vuex] unknown local action type: ${args.type}, global type: ${type}`)
          return
        }
      }

      return store.dispatch(type, payload)
    },

    commit: noNamespace ? store.commit : (_type, _payload, _options) => {
      const args = unifyObjectStyle(_type, _payload, _options)
      const { payload, options } = args
      let { type } = args

      if (!options || !options.root) {
        type = namespace + type
        if (process.env.NODE_ENV !== 'production' && !store._mutations[type]) {
          console.error(`[vuex] unknown local mutation type: ${args.type}, global type: ${type}`)
          return
        }
      }

      store.commit(type, payload, options)
    }
  }

  // getters and state object must be gotten lazily
  // because they will be changed by vm update
  Object.defineProperties(local, {
    getters: {
      get: noNamespace
        ? () => store.getters
        : () => makeLocalGetters(store, namespace)
    },
    state: {
      get: () => getNestedState(store.state, path)
    }
  })

  return local
}这个方法主要是为了命名空间,首先判断当前module是否存在命名空间,如果没有则使用全局dispatch和commit,如果存在则添加一个错误提醒,随后调用全局dispatch,commit,同时如果存在命名空间则只返回该命名空间的getters否则返回全局getters,之后返回当前模块的state值,
之后对当前模块进行遍历注册Mutation Action Getter
function registerMutation (store, type, handler, local) {
  const entry = store._mutations[type] || (store._mutations[type] = [])
  entry.push(function wrappedMutationHandler (payload) {
    handler.call(store, local.state, payload)
  })
}

function registerAction (store, type, handler, local) {
  const entry = store._actions[type] || (store._actions[type] = [])
  entry.push(function wrappedActionHandler (payload, cb) {
    let res = handler.call(store, {
      dispatch: local.dispatch,
      commit: local.commit,
      getters: local.getters,
      state: local.state,
      rootGetters: store.getters,
      rootState: store.state
    }, payload, cb)
    if (!isPromise(res)) {
      res = Promise.resolve(res)
    }
    if (store._devtoolHook) {
      return res.catch(err => {
        store._devtoolHook.emit('vuex:error', err)
        throw err
      })
    } else {
      return res
    }
  })
}

function registerGetter (store, type, rawGetter, local) {
  if (store._wrappedGetters[type]) {
    if (process.env.NODE_ENV !== 'production') {
      console.error(`[vuex] duplicate getter key: ${type}`)
    }
    return
  }
  store._wrappedGetters[type] = function wrappedGetter (store) {
    return rawGetter(
      local.state, // local state
      local.getters, // local getters
      store.state, // root state
      store.getters // root getters
    )
  }
}随后递归的调用installModule,
经过这些处理之后,所有的State都会按照module存放至根节点的state中,所有的Action Mutation会按照相同名称存放在同一数组的方式存放至_actions和_mutations,
随后调用resetStore在内部创建一个Vue实例,通过Vue实现的数据响应来实现其响应化,并且将所有的getter注册为Vue computed属性,以实现根据state变化来实时改变派生状态,同时如果是更新store会存放前一个实例索引,操作完成后释放旧实例,并将_vm指向新生成的Vue实例
function resetStoreVM (store, state, hot) {
  const oldVm = store._vm

  // bind store public getters
  store.getters = {}
  const wrappedGetters = store._wrappedGetters
  const computed = {}
  forEachValue(wrappedGetters, (fn, key) => {
    // use computed to leverage its lazy-caching mechanism
    computed[key] = () => fn(store)
    Object.defineProperty(store.getters, key, {
      get: () => store._vm[key],
      enumerable: true // for local getters
    })
  })

  // use a Vue instance to store the state tree
  // suppress warnings just in case the user has added
  // some funky global mixins
  const silent = Vue.config.silent
  Vue.config.silent = true
  store._vm = new Vue({
    data: {
      $$state: state
    },
    computed
  })
  Vue.config.silent = silent

  // enable strict mode for new vm
  if (store.strict) {
    enableStrictMode(store)
  }

  if (oldVm) {
    if (hot) {
      // dispatch changes in all subscribed watchers
      // to force getter re-evaluation for hot reloading.
      store._withCommit(() => {
        oldVm._data.$$state = null
      })
    }
    Vue.nextTick(() => oldVm.$destroy())
  }
}到这里,基本已经完成了初始化,我们看一下如何去触发;Vuex想要修改state必须要通过Mutation,但是Mutation我们可以选择通过dispatch触发action去触发,也可以直接commit来进行触发,由此来看Vuex中修改state主要有两种方法dispatch和commit
const { dispatch, commit } = this
    this.dispatch = function boundDispatch (type, payload) {
      return dispatch.call(store, type, payload)
    }
    this.commit = function boundCommit (type, payload, options) {
      return commit.call(store, type, payload, options)
}在constructor中的这段代码,保证在任何情况下调用dispatch及commit其作用域都为Store
首先看一下dispatch的实现
  dispatch (_type, _payload) {
    // check object-style dispatch
    const {
      type,
      payload
    } = unifyObjectStyle(_type, _payload)

    const action = { type, payload }
    const entry = this._actions[type]
    if (!entry) {
      if (process.env.NODE_ENV !== 'production') {
        console.error(`[vuex] unknown action type: ${type}`)
      }
      return
    }

    this._actionSubscribers.forEach(sub => sub(action, this.state))

    return entry.length > 1
      ? Promise.all(entry.map(handler => handler(payload)))
      : entry[0](payload)
}首先会对参数进行标准化,这在Vue及Vuex源码中都非常常见(tips:头一次看这种处理的时候真的想说一句,为毛我没想到呢);之后从_actions中找到所以以type为名注册的action,随后遍历调用所有的subscribeAction函数,之后调用找到的action,
再看一下commit的实现,则与dispatch大同小异
commit (_type, _payload, _options) {
    // check object-style commit
    const {
      type,
      payload,
      options
    } = unifyObjectStyle(_type, _payload, _options)

    const mutation = { type, payload }
    const entry = this._mutations[type]
    if (!entry) {
      if (process.env.NODE_ENV !== 'production') {
        console.error(`[vuex] unknown mutation type: ${type}`)
      }
      return
    }
    this._withCommit(() => {
      entry.forEach(function commitIterator (handler) {
        handler(payload)
      })
    })
    this._subscribers.forEach(sub => sub(mutation, this.state))

    if (
      process.env.NODE_ENV !== 'production' &&
      options && options.silent
    ) {
      console.warn(
        `[vuex] mutation type: ${type}. Silent option has been removed. ` +
        'Use the filter functionality in the vue-devtools'
      )
    }
}不同的是,commit会首先调用所有mutation随后在调用_subscribers中注册的订阅函数,之所以这样是因为subscribe订阅函数传入的第二个参数是计算后的state,同时mutations采用了_withCommit来调用则是为了标志是否经由mutation修改state,如果再严格模式开启时,不通过_withCommit函数来调用mutations则会报错.
到这里大致的脉络基本就整理完毕了
VUex源码虽然代码数据量较少,但是其设计**及代码都是极其精湛的,我力图写的简单易懂,但是还是有很多地方因篇幅及文笔无法介绍出来或者无法介绍的更好,所以本文只是一个抛砖引玉的作用,希望大家都可以看看Vuex的源码,其中的代码**很值得学习
前言:虚拟DOM的深入学习是我在学习Vue源码过程中进行的(虽然只是学了皮毛);但是在此过程中我发现其虚拟DOM实现借鉴于snabbdom,所以大部分借鉴于vue,及snabbdom,但同时存在些许异同
在说虚拟DOM之前,思考一下Jquery主要是用来干啥的,讲道理我并没有深入用过Jquery,主要得益于现代HTML,及Js的发展,使的大部分Jquery功能是完全可以用原生来实现的,但是Jquery在当时是划时代的出现,他抹平了各浏览器的差异,手动操作DOM更加快速,方便。
随着前端应用越来越复杂,手动操作DOM也越来越复杂,而且总的来说,整个过程还是从后端请求到数据后,根据数据决定如何去渲染操作DOM,那么能不能通过函数直接将数据渲染为DOM,而我们只需要关心数据呢?这就是Vue/React这类框架的**,创建数据到UI的映射函数来实现只需要关心数据,自动生成UI,这个其实也就是早就已经有的模板引擎的功能,那么React/Vue跟早就已有的模板引擎有什么区别呢?
首先来说,我们简单的想一下,当我们要手动创建一个DOM节点时需要什么?
tag,attr,style,class,event,children
这样的话我们可以简单的通过一个Javascript对象来表示将要创建的DOM节点
const willCreate = {
    tag:'div',
    attr:{},
    style:{},
    className:{},
    event:{},
    children:[]
}

const createElm = (vnode) => {
    if(!vnode) return;
    const {tag,attr,style,className,children} = vnode
    const elm = document.createElement(tag);
    applyAttr(elm,attr);
    applyStyle(elm,style);
    applyClass(elm,className);
    applyEvent(elm,event);
    let len = children.length
    if(len){
        while(len--){
            elm.appendChild(createElm(children[len]));
        }
    }
    return elm;
}通过上面的createElm函数我们可以将一个JS对象树转为真实的DOM树,那么接下来我们要变更数据,然后将变更体现到真实的UI上,最简单的方式就是清空之前的所有DOM重新调用createElm进行渲染,如果如此做的话那么首先会有很严重的性能问题,重排重绘,JS与DOM通信都是耗时耗性能的,所以这个时候就需要diff算法了,很多文章在说到虚拟DOM的时候都说通过JS模拟DOM结构所以性能好,我觉得其实还是有一些不严谨的,应该是diff算法使得其避免了很多不必要的DOM操作,所以性能好,那么diff算法到底是如何?
在做对比的时候,如果我们逐一对比会花费大量的时间,传统的diff算法复杂度为O(n^3)
传统Diff算法需要找到两个树的最小更新方式,所以需要[两两]对比每个叶子节点是否相同,对比就需要O(n^2)次了,找到差异后还要计算最小转换方式,最终结果为O(n^3)
而React的工程师做了大胆假设,DOM的更改是极少会出现跨层级的移动的,所以如果我们完全忽略这种情况,只去对比同层的树节点,就可以节省大量的时间,使得时间复杂度只有O(n)
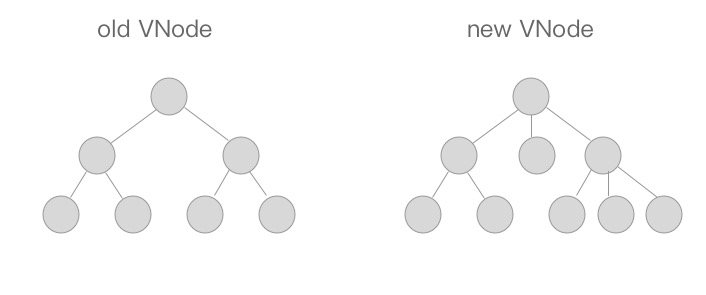
图片引用自染陌同学blog
看一下snabbdom的patch
function sameVnode(vnode1: VNode, vnode2: VNode): boolean {
  return vnode1.key === vnode2.key && vnode1.sel === vnode2.sel;
}

function patch(oldVnode: VNode | Element, vnode: VNode): VNode {
    let i: number, elm: Node, parent: Node;
    const insertedVnodeQueue: VNodeQueue = [];
    for (i = 0; i < cbs.pre.length; ++i) cbs.pre[i]();

    if (!isVnode(oldVnode)) {
      oldVnode = emptyNodeAt(oldVnode);
    }

    if (sameVnode(oldVnode, vnode)) {
      patchVnode(oldVnode, vnode, insertedVnodeQueue);
    } else {
      elm = oldVnode.elm as Node;
      parent = api.parentNode(elm);

      createElm(vnode, insertedVnodeQueue);

      if (parent !== null) {
        api.insertBefore(parent, vnode.elm as Node, api.nextSibling(elm));
        removeVnodes(parent, [oldVnode], 0, 0);
      }
    }
    return vnode;
};首先patch会对新旧两个VNode节点对比key,在snabbdom及Vue中还会判断其他的属性,如果通过则判定当前的旧节点可以复用,进去patchVnode函数进行具体的复用对比,如果不通过则删除旧节点,调用createElm函数渲染新Vnode节点,然后插入到父节点,
看一下patchVnode的代码
function patchVnode(oldVnode: VNode, vnode: VNode, insertedVnodeQueue: VNodeQueue) {
    let i: any, hook: any;
    if (isDef(i = vnode.data) && isDef(hook = i.hook) && isDef(i = hook.prepatch)) {
      i(oldVnode, vnode);
    }
    const elm = vnode.elm = (oldVnode.elm as Node);
    let oldCh = oldVnode.children;
    let ch = vnode.children;
    if (oldVnode === vnode) return;
    if (vnode.data !== undefined) {
      for (i = 0; i < cbs.update.length; ++i) cbs.update[i](oldVnode, vnode);
      i = vnode.data.hook;
      if (isDef(i) && isDef(i = i.update)) i(oldVnode, vnode);
    }
    if (isUndef(vnode.text)) {
      if (isDef(oldCh) && isDef(ch)) {
        if (oldCh !== ch) updateChildren(elm, oldCh as Array<VNode>, ch as Array<VNode>, insertedVnodeQueue);
      } else if (isDef(ch)) {
        if (isDef(oldVnode.text)) api.setTextContent(elm, '');
        addVnodes(elm, null, ch as Array<VNode>, 0, (ch as Array<VNode>).length - 1, insertedVnodeQueue);
      } else if (isDef(oldCh)) {
        removeVnodes(elm, oldCh as Array<VNode>, 0, (oldCh as Array<VNode>).length - 1);
      } else if (isDef(oldVnode.text)) {
        api.setTextContent(elm, '');
      }
    } else if (oldVnode.text !== vnode.text) {
      if (isDef(oldCh)) {
        removeVnodes(elm, oldCh as Array<VNode>, 0, (oldCh as Array<VNode>).length - 1);
      }
      api.setTextContent(elm, vnode.text as string);
    }
    if (isDef(hook) && isDef(i = hook.postpatch)) {
      i(oldVnode, vnode);
    }
}从代码中来看patchVnode核心规则主要如下
children则调用updateChildren来对子节点进行diffchildren而新节点存在,则清空挂载DOM,然后渲染新节点childrenchildren而新节点不存在,则调用removeVnodes清空老节点所有子节点children时
从上面的代码中可以看出,updateChildren是整个patch最核心的函数,就是这个函数中所运用的diff算法,使得整个节点复用效率大大提高,看一下updateChildren
function updateChildren(parentElm: Node,
                          oldCh: Array<VNode>,
                          newCh: Array<VNode>,
                          insertedVnodeQueue: VNodeQueue) {
    let oldStartIdx = 0, newStartIdx = 0;
    let oldEndIdx = oldCh.length - 1;
    let oldStartVnode = oldCh[0];
    let oldEndVnode = oldCh[oldEndIdx];
    let newEndIdx = newCh.length - 1;
    let newStartVnode = newCh[0];
    let newEndVnode = newCh[newEndIdx];
    let oldKeyToIdx: any;
    let idxInOld: number;
    let elmToMove: VNode;
    let before: any;

    while (oldStartIdx <= oldEndIdx && newStartIdx <= newEndIdx) {
      if (oldStartVnode == null) {
        oldStartVnode = oldCh[++oldStartIdx]; // Vnode might have been moved left
      } else if (oldEndVnode == null) {
        oldEndVnode = oldCh[--oldEndIdx];
      } else if (newStartVnode == null) {
        newStartVnode = newCh[++newStartIdx];
      } else if (newEndVnode == null) {
        newEndVnode = newCh[--newEndIdx];
      } else if (sameVnode(oldStartVnode, newStartVnode)) {
        patchVnode(oldStartVnode, newStartVnode, insertedVnodeQueue);
        oldStartVnode = oldCh[++oldStartIdx];
        newStartVnode = newCh[++newStartIdx];
      } else if (sameVnode(oldEndVnode, newEndVnode)) {
        patchVnode(oldEndVnode, newEndVnode, insertedVnodeQueue);
        oldEndVnode = oldCh[--oldEndIdx];
        newEndVnode = newCh[--newEndIdx];
      } else if (sameVnode(oldStartVnode, newEndVnode)) { // Vnode moved right
        patchVnode(oldStartVnode, newEndVnode, insertedVnodeQueue);
        api.insertBefore(parentElm, oldStartVnode.elm as Node, api.nextSibling(oldEndVnode.elm as Node));
        oldStartVnode = oldCh[++oldStartIdx];
        newEndVnode = newCh[--newEndIdx];
      } else if (sameVnode(oldEndVnode, newStartVnode)) { // Vnode moved left
        patchVnode(oldEndVnode, newStartVnode, insertedVnodeQueue);
        api.insertBefore(parentElm, oldEndVnode.elm as Node, oldStartVnode.elm as Node);
        oldEndVnode = oldCh[--oldEndIdx];
        newStartVnode = newCh[++newStartIdx];
      } else {
        if (oldKeyToIdx === undefined) {
          oldKeyToIdx = createKeyToOldIdx(oldCh, oldStartIdx, oldEndIdx);
        }
        idxInOld = oldKeyToIdx[newStartVnode.key as string];
        if (isUndef(idxInOld)) { // New element
          api.insertBefore(parentElm, createElm(newStartVnode, insertedVnodeQueue), oldStartVnode.elm as Node);
          newStartVnode = newCh[++newStartIdx];
        } else {
          elmToMove = oldCh[idxInOld];
          if (elmToMove.sel !== newStartVnode.sel) {
            api.insertBefore(parentElm, createElm(newStartVnode, insertedVnodeQueue), oldStartVnode.elm as Node);
          } else {
            patchVnode(elmToMove, newStartVnode, insertedVnodeQueue);
            oldCh[idxInOld] = undefined as any;
            api.insertBefore(parentElm, (elmToMove.elm as Node), oldStartVnode.elm as Node);
          }
          newStartVnode = newCh[++newStartIdx];
        }
      }
    }
    if (oldStartIdx <= oldEndIdx || newStartIdx <= newEndIdx) {
      if (oldStartIdx > oldEndIdx) {
        before = newCh[newEndIdx+1] == null ? null : newCh[newEndIdx+1].elm;
        addVnodes(parentElm, before, newCh, newStartIdx, newEndIdx, insertedVnodeQueue);
      } else {
        removeVnodes(parentElm, oldCh, oldStartIdx, oldEndIdx);
      }
    }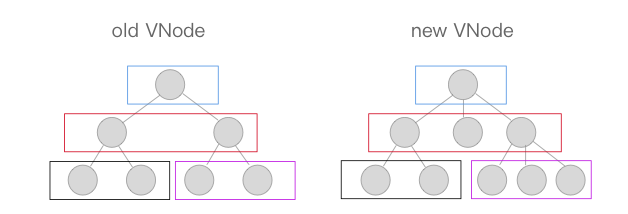
}在updateChildren中snabbdom使用了双索引对比,新旧节点同时维护前后两个索引,然后像中间进发,逐个对比,
在每次对比时会存在四个节点newStartVnode,newEndVnode,oldStartVnode,oldEndVnode两两对比
两两对比,基本会有几种方式
oldStartIdx <= oldEndIdx && newStartIdx <= newEndIdx限制条件时
newStartVnode,oldStartVnode符合sameVnode时,调用patchVnode函数对比两节点,同时新旧头索引右移newEndVnode,oldEndVnode符合sanmeVnode时,调用patchVnode函数对比两节点,同事新旧尾索引左移newStartVnode,oldEndVnode符合sanmeVnode时,调用patchVnode函数对比两节点,然后将oldEndVnode节点挂载DOM移动至oldStartVnode节点挂载DOM前方,以对应newStartVnode的位置,之后新节点头索引右移,旧节点尾索引左移newEndVnode与oldStartVnode符合sanmeVnode是,调用patchVnode函数对比两节点,然后将oldStartVnode节点挂载DOM移动至oldEndVnode节点挂载DOM之后,然后新节点尾索引左移,旧节点头索引右移vnode的key值创建map按照newStartVnode.key进行匹配,如果匹配成功则进行对比操作,否则调用createElm渲染newStartVnode节点while的限制条件时
oldStartIdx > oldEndIdx则说明新节点的子节点中存在旧节点不存在的节点,调用addVnodes将新增节点逐一插入至newCh[newEndIdx+1]前方,因为此时newCh[newEndIdx+1]节点已匹配完成,oldStartIdx < oldEndIdx则说明新节点删除了部分旧节点中存在的子节点,调用removeVnodes从oldStartIdx到oldEndIdx逐一删除.从上面的diff过程中我们可以反向理解为什么在React/Vue这一类框架中推荐为列表项绑定key值,同时不推荐使用index作为key值了,
如果我们使用index作为key的值,不管数组内数据如何变更,其渲染的子节点key值都是从0开始增长的,就无法起到通过sameVnode函数来确定是否可以复用,大大增加了diff算法的运行时间,而不绑定key值则有可能导致大量本可以被复用的节点被移除后重新创建,影响性能
antd组件库大量使用了react-component的组件,而antd我们可以理解为是对react-component的上层封装,比如Form,同时有大量的react-component组件并不是想Form一样被封装一下使用,而是在其中起到了重要的协助作用,比如负责动画效果的rc-animate组件,
简单的来看一下整体组件的架构,分工明显
AnimateChild组件则负责对具体要执行效果的节点进行处理,包括对css-animate的调用,回调函数的封装处理实际上回调函数是在Animate中封装,AnimateChild更适合比作Animate与css-animate中的润滑剂css-animate则负责具体元素的动画执行,随后调用各种传入的回调,并不关心上层,只关心传入的这个元素通过上面的架构,我们可以看出rc-animate组件的责任划分及其清晰明确,Animate组件作为一个容器组件,随后将更加细化的处理逻辑下放到AnimateChild中处理,而Animate则只处理整体子元素的处理,分别推入相应队列后对各个队列进行处理,我们来详细查看这三部分
我们从应用初始化的步骤来看一下整个程序的逻辑
  constructor(props) {
    super(props);

    this.currentlyAnimatingKeys = {};
    this.keysToEnter = [];
    this.keysToLeave = [];

    this.state = {
      children: toArrayChildren(getChildrenFromProps(props)),
    };

    this.childrenRefs = {};
}我们可以看到,constructor中初始化了多个属性,从名称上我们就可以看到其作用,包括正在进行动画的元素key,将要移入移出的队列,对子元素引用的map,随后将当前子元素节点缓存至state中,
我们继续往下看一下render函数
render() {
    const props = this.props;
    this.nextProps = props;
    const stateChildren = this.state.children;
    let children = null;
    if (stateChildren) {
      children = stateChildren.map((child) => {
        if (child === null || child === undefined) {
          return child;
        }
        if (!child.key) {
          throw new Error('must set key for <rc-animate> children');
        }
        return (
          <AnimateChild
            key={child.key}
            ref={node => { this.childrenRefs[child.key] = node }}
            animation={props.animation}
            transitionName={props.transitionName}
            transitionEnter={props.transitionEnter}
            transitionAppear={props.transitionAppear}
            transitionLeave={props.transitionLeave}
          >
            {child}
          </AnimateChild>
        );
      });
    }
    const Component = props.component;
    if (Component) {
      let passedProps = props;
      if (typeof Component === 'string') {
        passedProps = {
          className: props.className,
          style: props.style,
          ...props.componentProps,
        };
      }
      return <Component {...passedProps}>{children}</Component>;
    }
    return children[0] || null;
}在render函数中,大致做了两件事,
AnimateChild包装每一个子节点,然后获取其ref存储至我们前面所说的childrenRefs属性中,(AnimateChild我们稍后再说,目前只需要记住上面两点就可以)component属性,也就是我们可以自定义容器组件,这个没什么好说的,如果没有传入则使用spanrender结束后,componentDidMount回调函数会被调起,
  componentDidMount() {
    const showProp = this.props.showProp;
    let children = this.state.children;
    if (showProp) {
      children = children.filter((child) => {
        return !!child.props[showProp];
      });
    }
    children.forEach((child) => {
      if (child) {
        this.performAppear(child.key);
      }
    });
}在componentDidMount中我们看到其首先获取我们之前缓存的子元素节点,随后通过showProp属性筛选出来所以配置为显示项的子节点,推入children队列,随后遍历调用performAppear方法,可以看到componentDidMount生命周期函数是极其简单的,只是做了两件事,筛选和遍历,而performAppear我们从字面意思上来看是执行原本就存在的动画,那我们先不管他,跟随React的生命周期继续往下
componentWillReceiveProps函数可以说是当前整个组件的核心
我们现在自己想象一下,如果我们要实现一个动画调节的容器组件,最重要也是最核心的就是我们要分辨哪些元素应该应用哪些动画,也就是说,我们需要知道哪些是移入,哪些是移除,也就是我们在初始化中提到的keysToEnter和keysToLeave两个队列.而要分别的时机就是在componentWillReceiveProps生命周期中,我们可以对新旧两组子元素进行对比,这也就是state.children的作用,我们可以认为state.children是一个缓冲区,它存储了新旧子节点中所有节点,这其中包括我们提到了,没存在将要移入的,存在将要移除的,原本一直存在的,我们具体看一下代码的处理
componentWillReceiveProps(nextProps) {
    this.nextProps = nextProps;
    const nextChildren = toArrayChildren(getChildrenFromProps(nextProps));
    const props = this.props;
    // exclusive needs immediate response
    if (props.exclusive) {
      Object.keys(this.currentlyAnimatingKeys).forEach((key) => {
        this.stop(key);
      });
    }
    const showProp = props.showProp;
    const currentlyAnimatingKeys = this.currentlyAnimatingKeys;
    // last props children if exclusive
    const currentChildren = props.exclusive ?
      toArrayChildren(getChildrenFromProps(props)) :
      this.state.children;
    // in case destroy in showProp mode
    let newChildren = [];
    if (showProp) {
      currentChildren.forEach((currentChild) => {
        const nextChild = currentChild && findChildInChildrenByKey(nextChildren, currentChild.key);
        let newChild;
        if ((!nextChild || !nextChild.props[showProp]) && currentChild.props[showProp]) {
          newChild = React.cloneElement(nextChild || currentChild, {
            [showProp]: true,
          });
        } else {
          newChild = nextChild;
        }
        if (newChild) {
          newChildren.push(newChild);
        }
      });
      nextChildren.forEach((nextChild) => {
        if (!nextChild || !findChildInChildrenByKey(currentChildren, nextChild.key)) {
          newChildren.push(nextChild);
        }
      });
    } else {
      newChildren = mergeChildren(
        currentChildren,
        nextChildren
      );
    }

    // need render to avoid update
    this.setState({
      children: newChildren,
    });

    nextChildren.forEach((child) => {
      const key = child && child.key;
      if (child && currentlyAnimatingKeys[key]) {
        return;
      }
      const hasPrev = child && findChildInChildrenByKey(currentChildren, key);
      if (showProp) {
        const showInNext = child.props[showProp];
        if (hasPrev) {
          const showInNow = findShownChildInChildrenByKey(currentChildren, key, showProp);
          //之前存在但是showProp为false  所以未显示,现在要显示了
          if (!showInNow && showInNext) {
            this.keysToEnter.push(key);
          }
        } else if (showInNext) {
          this.keysToEnter.push(key);
        }
      } else if (!hasPrev) {
        this.keysToEnter.push(key);
      }
    });

    currentChildren.forEach((child) => {
      const key = child && child.key;
      if (child && currentlyAnimatingKeys[key]) {
        return;
      }
      const hasNext = child && findChildInChildrenByKey(nextChildren, key);
      if (showProp) {
        const showInNow = child.props[showProp];
        if (hasNext) {
          const showInNext = findShownChildInChildrenByKey(nextChildren, key, showProp);
          if (!showInNext && showInNow) {
            this.keysToLeave.push(key);
          }
        } else if (showInNow) {
          this.keysToLeave.push(key);
        }
      } else if (!hasNext) {
        this.keysToLeave.push(key);
      }
    });
  }
我们来逐步分析一下
首先,通过相同的方式解析新props中的子节点,随后判断是否传入了exclusive,也就是是否只允许一组动画进行,如果是,则调用下面的语句
Object.keys(this.currentlyAnimatingKeys).forEach((key) => {
    this.stop(key);
});我们从字面意思中可以看到,对currentlyAnimatingKeys队列,也就是正在执行的动画队列每个元素调用停止,我们姑且这样认为,继续向下
 const currentChildren = props.exclusive ?
      toArrayChildren(getChildrenFromProps(props)) :
this.state.children;这个我们暂且不管,我们当做我们并没有传入exclusive,那么取值为this.state.children;,也就是在constructor中存储下来的子节点
if (showProp) {
      currentChildren.forEach((currentChild) => {
        const nextChild = currentChild && findChildInChildrenByKey(nextChildren, currentChild.key);
        let newChild;

          //判断1
        if ((!nextChild || !nextChild.props[showProp]) && currentChild.props[showProp]) {
          newChild = React.cloneElement(nextChild || currentChild, {
            [showProp]: true,
          });
        } else {
          newChild = nextChild;
        }
        if (newChild) {
          newChildren.push(newChild);
        }
      });
    //判断2
      nextChildren.forEach((nextChild) => {
        if (!nextChild || !findChildInChildrenByKey(currentChildren, nextChild.key)) {
          newChildren.push(nextChild);
        }
      });
    } else {
      newChildren = mergeChildren(
        currentChildren,
        nextChildren
      );
    }

  	// need render to avoid update
	this.setState({
      children: newChildren,
});随后进入到核心步骤,因为核心都在showProp为true的判断项,我们来看一下,我们对上面获取到的currentChildren进行遍历,对每一个组件根据key通过findChildInChildrenByKey函数在新props的子节点中进行查找,查找在新的子节点中是否还存在这个子节点,随后继续进行判断,如果新节点不再存在或者新节点的showProp属性为false,同时原先缓存子节点中存在该节点,则克隆一个showProp为true的子节点赋值给newChild,如果判断未通过,则直接将nextChild赋值给newChild,随后只要newChild存在值,则将其推入newChildren中,判断2则对新props中的所有子节点进行遍历,新节点的处理则非常简单,如果当前节点值为false或者是我们之前缓存的节点中没有找到新节点,则将其推入newChildren,
现在我们回过头来看,判断1主要是计算了之前没有,或者之前没显示,也就是将要移入的又或者是一直存在的子节点,而判断2则计算了将要移除的子节点,随后将他们赋值到state.children,这也就是我们前面说道的缓存的作用,他综合了新旧两个子节点中所有要执行动画的值,缓存下来,等待后续的进一步处理
队列处理
nextChildren.forEach((child) => {
      const key = child && child.key;
      if (child && currentlyAnimatingKeys[key]) {
        return;
      }
      const hasPrev = child && findChildInChildrenByKey(currentChildren, key);
      if (showProp) {
        const showInNext = child.props[showProp];
        if (hasPrev) {
          const showInNow = findShownChildInChildrenByKey(currentChildren, key, showProp);
          //之前存在但是showProp为false  所以未显示,现在要显示了
          if (!showInNow && showInNext) {
            this.keysToEnter.push(key);
          }
        } else if (showInNext) {
          this.keysToEnter.push(key);
        }
      } else if (!hasPrev) {
        this.keysToEnter.push(key);
      }
    });

    currentChildren.forEach((child) => {
      const key = child && child.key;
      if (child && currentlyAnimatingKeys[key]) {
        return;
      }
      const hasNext = child && findChildInChildrenByKey(nextChildren, key);
      if (showProp) {
        const showInNow = child.props[showProp];
        if (hasNext) {
          const showInNext = findShownChildInChildrenByKey(nextChildren, key, showProp);
          if (!showInNext && showInNow) {
            this.keysToLeave.push(key);
          }
        } else if (showInNow) {
          this.keysToLeave.push(key);
        }
      } else if (!hasNext) {
        this.keysToLeave.push(key);
      }
    });
这段代码应该很好理解,主要是根据各种属性判断将其推入相应队列中,等待下一个生命周期函数进行处理
当render结束,进入componentDidUpdate生命周期,这个周期中做的事情就简单多了
componentDidUpdate() {
    const keysToEnter = this.keysToEnter;
    this.keysToEnter = [];
    keysToEnter.forEach(this.performEnter);
    const keysToLeave = this.keysToLeave;
    this.keysToLeave = [];
    keysToLeave.forEach(this.performLeave);
  }
这里我们可以看到,只是对移入移出两个队列分别调用不同的函数,
前面我们说了,state.Children中存储了三种类型的子元素,移入,移出,原本就存在的,那么在更新的时候我们只需要处理移入移出,那么现在当整体重新render结束,我们要开始应用动画,我们可以从字面意思上看出componentDidUpdate就是在做这个事情,我们分别看一下performEnter和performLeave做了什么
performEnter = (key) => {
    // may already remove by exclusive
    if (this.childrenRefs[key]) {
      this.currentlyAnimatingKeys[key] = true;
      this.childrenRefs[key].componentWillEnter(
        this.handleDoneAdding.bind(this, key, 'enter')
      );
    }
  }

  performLeave = (key) => {
    // may already remove by exclusive
    if (this.childrenRefs[key]) {
      this.currentlyAnimatingKeys[key] = true;
      this.childrenRefs[key].componentWillLeave(this.handleDoneLeaving.bind(this, key));
    }
}我们从这可以看到,不过是根据key去遍历调用我们之前存储的AnimateChild实例的componentWillLeave和componentWillEnter方法,并传入相应的函数,从名称来看应该是动画结束的回调函数,那么我们来看看这两个函数分别做了什么
 handleDoneAdding = (key, type) => {
    const props = this.props;
    delete this.currentlyAnimatingKeys[key];
    // if update on exclusive mode, skip check
    if (props.exclusive && props !== this.nextProps) {
      return;
    }
    const currentChildren = toArrayChildren(getChildrenFromProps(props));
    if (!this.isValidChildByKey(currentChildren, key)) {
      // exclusive will not need this
      this.performLeave(key);
    } else if (type === 'appear') {
      if (animUtil.allowAppearCallback(props)) {
        props.onAppear(key);
        props.onEnd(key, true);
      }
    } else if (animUtil.allowEnterCallback(props)) {
      props.onEnter(key);
      props.onEnd(key, true);
    }
  }

 handleDoneLeaving = (key) => {
    const props = this.props;
    delete this.currentlyAnimatingKeys[key];
    // if update on exclusive mode, skip check
    if (props.exclusive && props !== this.nextProps) {
      return;
    }
    const currentChildren = toArrayChildren(getChildrenFromProps(props));
    // in case state change is too fast
    if (this.isValidChildByKey(currentChildren, key)) {
      this.performEnter(key);
    } else {
      const end = () => {
        if (animUtil.allowLeaveCallback(props)) {
          props.onLeave(key);
          props.onEnd(key, false);
        }
      };
      if (!isSameChildren(this.state.children,
        currentChildren, props.showProp)) {
        this.setState({
          children: currentChildren,
        }, end);
      } else {
        end();
      }
    }
}我们可以看到,这两个函数大同小异,核心确实是跟我们按照名称猜测的一样是去获取传入的各种动画状态的结束回调,值得一提的是,这两个函数都会调用this.isValidChildByKey函数来检测当前的props中是否存在当前key的子节点,上面注释也说的很清楚是为了防止状态过快变动,我们假设一个很简单的例子就很好理解了,
如果一个子节点经历了,移入=>移出=>再移入,按照我们上面说的处理流程来说,如果数据变更过快极有可能出现上面预防的情况,也就是再移入已经生效了,移出特效才刚刚结束,移出回调被调用,这是就要做出一定的补救措施,这也就是这两个函数这么做的原因,
好我们上面说了这么多Animate组件,我们再来回头看看AnimateChild组件,看看他作为一个协调器的作用是如何工作的
在Animate组件中,我们介绍了,Animate会调用AnimateChild组件实例上的某些方法,他们名称类似于React原有的生命周期函数,所以我为了顺口叫做自定义生命周期,(不要在意),
 componentWillEnter(done) {
    if (animUtil.isEnterSupported(this.props)) {
      this.transition('enter', done);
    } else {
      done();
    }
  }

  componentWillAppear(done) {
    if (animUtil.isAppearSupported(this.props)) {
      this.transition('appear', done);
    } else {
      done();
    }
  }

  componentWillLeave(done) {
    if (animUtil.isLeaveSupported(this.props)) {
      this.transition('leave', done);
    } else {
      done();
    }
}我们看到,这三个函数其实都是一样的,都是调用了this.transition同时传入动画类型和回调函数,也就是我们上面说的performEnter等三个处理函数中传入的handleDoneLeaving等函数,那么我们来看看transition做了什么
  transition(animationType, finishCallback) {
    const node = ReactDOM.findDOMNode(this);
    const props = this.props;
    const transitionName = props.transitionName;
    const nameIsObj = typeof transitionName === 'object';
    this.stop();
    const end = () => {
      this.stopper = null;
      finishCallback();
    };
    if ((isCssAnimationSupported || !props.animation[animationType]) &&
      transitionName && props[transitionMap[animationType]]) {
      const name = nameIsObj ? transitionName[animationType] : `${transitionName}-${animationType}`;
      let activeName = `${name}-active`;
      if (nameIsObj && transitionName[`${animationType}Active`]) {
        activeName = transitionName[`${animationType}Active`];
      }
      this.stopper = cssAnimate(node, {
        name,
        active: activeName,
      }, end);
    } else {
      this.stopper = props.animation[animationType](node, end);
    }
  }

stop() {
    const stopper = this.stopper;
    if (stopper) {
      this.stopper = null;
      stopper.stop();
    }
}我们可以看到,transition的核心就是构建cssAnimate需要的参数,随后通过CSSAnimate去完成动画,因为整个Animate组件动画可以通过多种方式配置,所以transition做了多种判断来寻找各种状态下的css类,
通篇Animate组件看下来,我们可以看到一个很常见的分治的**,通过将不同的情况规划到不同的队列,随后分别调用除了函数来处理该状态应有的动画,大大降低了整体的复杂度,如果我们没有进行合理划分整个组件的复杂度会呈指数级上升,同时也不利于维护.同时我在阅读中也学到很多,最后还是说尽信书不如无书,如有谬误之处请不吝斧正.
本文不讲vue数据劫持,响应订阅,所以涉及到的内容都会一带而过,
vue是一个数据驱动的框架,在数据发生变动后自动根据数据来渲染DOM,那么有一个问题,我们在修改完数据后,要对新的视图进行一系列操作,那么这个时候DOM还未更新,数据已经变动,要怎么做呢,
Vue.nextTick就是做这个事情的
Vue.nextTick在下次 DOM 更新循环结束之后执行延迟回调。在修改数据之后立即使用这个方法,获取更新后的 DOM。
那么我们想一想,怎么实现? setTimeout 这样手动将函数压到栈底是否可以?这种方法对也不对,所以看一下源码中是如何实现的
    const callbacks = []

    function flushCallbacks () {
        pending = false
        const copies = callbacks.slice(0)
        callbacks.length = 0
        for (let i = 0; i < copies.length; i++) {
            copies[i]()
        }
    }

    export function nextTick (cb?: Function, ctx?: Object) {
    let _resolve
    callbacks.push(() => {
        if (cb) {
        try {
            cb.call(ctx)
        } catch (e) {
            handleError(e, ctx, 'nextTick')
        }
        } else if (_resolve) {
        _resolve(ctx)
        }
    })
    if (!pending) {
        pending = true
        if (useMacroTask) {
        macroTimerFunc()
        } else {
        microTimerFunc()
        }
    }
    // $flow-disable-line
    if (!cb && typeof Promise !== 'undefined') {
        return new Promise(resolve => {
        _resolve = resolve
        })
    }
    }
这是我从Vue源码中摘下来的两个函数,我们来看一下,Vue.nextTick首先实现了一个私有数组,当我们调用Vue.nextTick时,将传入的函数push到callbacks中,然后周期性的调用flushCallbacks来执行callbacks的代码,执行后清空回调列表,等待下一次操作,这个是不是很像JavaScript中的Event Loop?
实际上,JavaScript中的Event Loop复杂很多,同时,作者在实现周期调用flushCallbacks时确实是实现了类似于JavaScript的Event Loop的处理方法;
    if (typeof setImmediate !== 'undefined' && isNative(setImmediate)) {
        macroTimerFunc = () => {
            setImmediate(flushCallbacks)
        }
    } else if (typeof MessageChannel !== 'undefined' && (
    isNative(MessageChannel) ||
    // PhantomJS
    MessageChannel.toString() === '[object MessageChannelConstructor]'
    )) {
        const channel = new MessageChannel()
        const port = channel.port2
        channel.port1.onmessage = flushCallbacks
        macroTimerFunc = () => {
            port.postMessage(1)
        }
    } else {
    /* istanbul ignore next */
        macroTimerFunc = () => {
            setTimeout(flushCallbacks, 0)
        }
}我们看上面的代码,首先测试是否有setImmediate,这个方法是node.js中的,相当于浏览器中settimeout,我们暂且不提,其主要是应用于服务端渲染,如果有MessageChannel则使用,否则通过setTimeout压栈到最后执行,到这里基本上macroTimerFunc函数的逻辑就基本清楚了,主要区别不过是触发方法不同罢了,然后向下看
    /* istanbul ignore next, $flow-disable-line */
        if (typeof Promise !== 'undefined' && isNative(Promise)) {
            const p = Promise.resolve()
            microTimerFunc = () => {
                p.then(flushCallbacks)
                // in problematic UIWebViews, Promise.then doesn't completely break, but
                // it can get stuck in a weird state where callbacks are pushed into the
                // microtask queue but the queue isn't being flushed, until the browser
                // needs to do some other work, e.g. handle a timer. Therefore we can
                // "force" the microtask queue to be flushed by adding an empty timer.
                if (isIOS) setTimeout(noop)
            }
        } else {
            // fallback to macro
            microTimerFunc = macroTimerFunc
}这段代码主要是microTimerFunc的逻辑,如果存在Promise则创建一个resolve状态的Promise对象,然后microTimerFunc函数设置该promise对象的then回调,否则将microTimerFunc设置等于为macroTimerFunc,这样看来两种方式都是设置回调,那么为什么要这么做呢?
接下来说一说JavaScript的Event Loop(大家可以看一下这答案)或者这篇文章
JavaScript为了协调事件(event),事件(event),用户交互(user interaction),脚本(script),渲染(rendering),网络(networking)等,用户代理(user agent)必须使用事件循环(event loops)。
Event Loop中维护有两个task,macrotask,mircotask,是不是挺眼熟,对,Vue.nextTick实现中的macroTimerFunc和mircoTimerFunc;
JavaScript在运行时碰到不同源头的程序会有选择的加入到不同的task;大致上的分类是这样的
macrotasks: setTimeout, setInterval, setImmediate, requestAnimationFrame, I/O, UI rendering
microtasks: process.nextTick, Promises, Object.observe, MutationObserver
JavaScript在执行中首先查看mircotasks是否为空,如果不为空,会执行mircotasks中的任务,直到mircotasks为空,然后在macrotask去取出一个task,执行,然后查看mircotasks周而复始,直到两个列表都为空;
我们可以测试一下
    setTimeout(()=>{
        console.log(1)
    },0)

    new Promise((resolve,reject)=>{
        console.log(2)
        resolve()
        setTimeout(()=>{
            console.log(3)
        },0)
    }).then(()=>{
        console.log(4)
    })

    console.log(5)
可以点这里查看执行动画,不过跟我写的不是太一样
我们按照上面的情况来看一下为什么输出这个结果
那么我们会看上面两段代码;如果有Promise则通过then回调调用,否则使用setTimeout将其添加到后面,来看种类,Promise回调会被添加到mircotask中,而setTimeout会被加到marcotasks的最后,这样做是为了最快的对callbacks中的任务进行执行,
那么回过头来,如果仅仅是这样,我们是不是可以不需要使用nextTick,手动使用promise.resolve()来进行调用事件,当然是可以的,但是nextTick还是有一些特殊处理的,我们回过头看nextTick函数;
    function flushCallbacks () {
        pending = false
        const copies = callbacks.slice(0)
        callbacks.length = 0
        for (let i = 0; i < copies.length; i++) {
            copies[i]()
        }
    }


    if (!pending) {
        pending = true
        if (useMacroTask) {
        macroTimerFunc()
        } else {
        microTimerFunc()
        }
}下面一部分是nextTick中对flushCallbacks调用的部分,首先判断是否flushCallbacks是否已经在执行,如果未执行,就开始执行,接下来判断userMacroTask,这里才是调用nextTick与我们手动调用setTimeout或者promise.resolve()的区别;
那么我们看看这个userMacroTask是标志什么的?
    /**
     * Wrap a function so that if any code inside triggers state change,
     * the changes are queued using a Task instead of a MicroTask.
     */
    export function withMacroTask (fn: Function): Function {
        return fn._withTask || (fn._withTask = function () {
            useMacroTask = true
            const res = fn.apply(null, arguments)
            useMacroTask = false
            return res
        })
}我们看看注释,当发生事件触发是,使用Task,而不是微队列,那我们看看如何实现的,我们全局搜索一下withMacroTask,在events.js的add方法中handler被调用,传入一个handler,如果当前掺入handler存在_withTask属性,则返回,否则设置_withTask,也就是对其进行了二次包装,整体逻辑就是在事件回调函数被调用时设置useMacroTask为true,执行结束后再将useMacroTask设置为false,这样当数据发生变动,触发了回调函数时,而未执行完毕时,nextTick被触发,则会将所有回调函数添加入macroTasks,以保证数据变更全部完成后调用nextTick函数中传入的回调;
Vue其实说简单的话主要是两部分组成,数据响应式,虚拟DOM,当数据发生变动时调动render函数,重新渲染UI,而响应式总的则是采用的观察者模式(又称发布-订阅模式)来保证当数据发生变动时通知所有依赖他的对象进行更新
我们现在构想一下以下情景,
当我们去买水果,那肯定有好多家水果店,那如果我们跑了好几家都有各种优惠措施,我们肯定不可能每次都跑过去问最近有没有优惠措施,那我们就可以把电话留给店里面,每当他们有什么优惠微信通知我们,然后我们再决定.这就是发布订阅模式,我们订阅店里面的信息,每当店里面有什么优惠信息,根据我们留下的电话去通知我们,这就是一个观察者模式,
在Javascript中有一个很重要的思路是事件,当事件发生调用回调,是不是很类似我们上面说的情景,那么我们自己尝试着来实现以下EventEmitter
 let EventEmitter = (function(){
  class _EventEmitter{
    constructor() {
      this._events = Object.create(null);
    }

    get events() {
      return this._events;
    }

    set events(value) {
      throw `can not set events,please call addListener or removeListener to set events`
    }

    on(type, callback) {
      if(!this._events[type]){
        this._events[type] = [];
      }
      if(typeof callback !== 'function')return;

      this._events[type].push(callback)
    }

    addListener(type, callback){
      this.on(type, callback)
    }

    removeListener(type, callback){
      if(!this._events[type])return;
      let callbacks = this._events[type];
      let idx = callbacks.findIndex(item === callback);
      if(idx > -1){
        callback.splice(idx,1)
      }
    }

    emit(type,...args){
      if(!this._events[type]) { return; }

      let callbacks = this._events[type]
      callbacks.forEach(callback => {
        Reflect.apply(callback,this,args)
      })
    }
  }

    let instance;
    let EventEmitter = new Proxy(_EventEmitter,{
      construct(target,args){
        if(instance){
          return instance
        }
        return instance = Reflect.construct(target,args)
      }
    })

    return EventEmitter
})()这样,我们就实现了一个简易的事件系统,每当某个事件被触发,系统会根绝我们注册的函数一个个的调用,是不是很类似上面例子所说的情况,事实上,Vue的早期版本就是采用了事件机制来进行UI的更新,但是新版本的Vue则使用了另外一种方式来实现,
现在我们想象怎么去实现,
//首先我们定义一个筐存放所有的回调函数,同时在我们观测的的数据发生变化是调用订阅者

let deps = [];

a={
    b:1
};

const property = Object.getOwnPropertyDescriptor(a, 'b');
const getter = property && property.get;
const setter = property && property.set;
Object.defineProperty(a,'b',{
    enumerable:true,
    configurable:true,

    get:getter,
    set: function reactiveSetter(newVal) {
        const value = getter

        if (Object.is(value, newVal)) {
            return;
        }

        if (setter) {
            setter.call(obj, newVal);
        }

        deps.forEach(function(dep){
           dep.apply(this)
        },a)
    },
})

deps.push(()=>{
  console.log('目标被改动了')
})这样我们就完成了一个很初级的版本,每当a.b被改动,deps内的函数就会被依次调动,但是这个版本有很多的问题
deps的创建也不是自动的那么我们来思考一下如何去解决,首先,我们可以对每个属性在被观察时进行创建deps同时在重设setter时来做这一步,这样首先所有的deps是可以跟我们观察的对象一一对应的,同时在setter时进行可以将其创建成私有变量,避免其被修改,
那么依赖的收集如何自动进行呢?首先我们想想,为什么要收集依赖,是因为这个值被使用了,所以我们才要收集这个值的依赖,那么我们创建一个变量用来存储订阅函数,在使用这个值的时候,设置该变量为我们要设置的订阅函数,是不是就可以自动收集依赖呢?
class Dep {
  constructor() {
    this.subs = new Set();
  }

  addSub(sub) {
    this.subs.add(sub)
  }

  depend() {
    Dep.target.addDep(this);
  }

  removeSub(sub) {
    let result;
    if (this.subs.has(sub.id)) {
      result = this.subs.get(sub.id);
      this.subs.delete(sub.id);
    }
    return result;
  }

  notify() {
    this.subs.forEach(sub => sub());
  }
}

const defineReactive = (obj, key, val = obj[key]) => {
  const dep = new Dep();

  const property = Object.getOwnPropertyDescriptor(obj, key);
  if (property && property.configurable === false) return;

  const getter = property && property.get;
  const setter = property && property.set;


  Object.defineProperty(obj, key, {
    enumerable: true,
    configurable: true,

   get: function reactiveGetter() {
      const value = getter ? getter.call(obj) : val;

      if (Dep.target) {
        dep.addSub(Dep.target);
      }

      return value;
    },
    set: function reactiveSetter(newVal) {
      const value = getter ? getter.call(obj) : val;

      if (Object.is(value, newVal)) {
        return;
      }

      if (setter) {
        setter.call(obj, newVal);
      } else {
        val = newVal;
      }

      dep.notify();
    },
  });
};


const walk = (obj) => {
  const keys = Object.keys(obj);
  for (let i = 0; i < keys.length; i++) {
    if(obj[keys[i]] instanceof Object){ //暂时不考虑数组的情况
      walk(obj[keys[i]])
    }
    defineReactive(obj, keys[i]);
  }
};

class Observe {
  constructor(value) {
    this.value = value;
    walk(value);
  }
}

class Watch{
  constructor(content, expOrFn,cb){
    Dep.target = cb;
    if(typeof expOrFn === 'function'){
        this.value = expOrFn.call(content);
    }else{
        this.value = expOrFn
    }
  }
}
let a = {
  b:{
    c:1
  },
  d:{
    foo:2,
    boo:3
  }
}

new Observe(a)
new Watch(a,()=>{
  return a.b.c + a.d.foo
},()=>{
  console.log('是我')
})在这个版本我们实现了上面说的两个情况,从我们的示例中可以看出已经比较类似于Vue的计算属性了,实际上本段代码就是在Vue的核心代码的基础上做了一定的删减与修改,
现在我们来看一下Vue中的一个API,
vm.$watch( expOrFn, callback, [options] )]
用法:
观察 Vue 实例变化的一个表达式或计算属性函数。回调函数得到的参数为新值和旧值。表达式只接受监督的键路径。对于更复杂的表达式,用一个函数取代。
vm.$watch返回一个取消观察函数,用来停止触发回调:
我们看一下最后一句话,vm.$watch 返回一个取消观察函数,用来停止触发回调,如果要实现这个功能,那么上面的代码就无法达成了;那么要如何改动呢?
let uid = 0;
class Dep {
  constructor() {
    this.id = uid++;
    this.subs = new Map();
  }

  addSub(sub) {
    if (!this.subs.has(sub.id)) {
      this.subs.set(sub.id, sub);
    }
  }

  depend() {
    Dep.target.addDep(this);
  }

  removeSub(sub) {
    let result;
    if (this.subs.has(sub.id)) {
      result = this.subs.get(sub.id);
      this.subs.delete(sub.id);
    }
    return result;
  }

  notify() {
    this.subs.forEach(sub => sub.update());
  }
}

const targetStack = [];
export const pushTarget = (_target) => {
  if (_target)targetStack.push(_target);
  Dep.target = _target;
};

export const popTarget = () => {
  Dep.target = targetStack.pop();
};

const defineReactive = (obj, key, val = obj[key]) => {
  const dep = new Dep();

  const property = Object.getOwnPropertyDescriptor(obj, key);
  if (property && property.configurable === false) return;

  const getter = property && property.get;
  const setter = property && property.set;


  Object.defineProperty(obj, key, {
    enumerable: true,
    configurable: true,

   get: function reactiveGetter() {
      const value = getter ? getter.call(obj) : val;

      if (Dep.target) {
        dep.addSub(Dep.target);
      }

      return value;
    },
    set: function reactiveSetter(newVal) {
      const value = getter ? getter.call(obj) : val;

      if (Object.is(value, newVal)) {
        return;
      }

      if (setter) {
        setter.call(obj, newVal);
      } else {
        val = newVal;
      }

      dep.notify();
    },
  });
};


const walk = (obj) => {
  const keys = Object.keys(obj);
  for (let i = 0; i < keys.length; i++) {
    if(obj[keys[i]] instanceof Object){ //暂时不考虑数组的情况
      walk(obj[keys[i]])
    }
    defineReactive(obj, keys[i]);
  }
};

class Observe {
  constructor(value) {
    this.value = value;
    walk(value);
  }
}

const bailRE = /[^\w.$]/;
export function parsePath(path) {
  if (bailRE.test(path)) {
    return;
  }
  const segments = path.split('.');
  return function getter(obj) {
    for (let i = 0; i < segments.length; i++) {
      if (!obj) return;
      obj = obj[segments[i]];
    }
    return obj;
  };
}
let wid = 0;
class Watcher {
  constructor(content, expOrFn, cb) {
     this.id = wid++;
    this.cb = cb;
    this.expOrFn = expOrFn;
    this.content = content;
    this.deps = new Map();
    this.newDeps = new Map();
    if (typeof expOrFn === 'function') {
      this.getter = expOrFn;
    } else {
      this.getter = parsePath(this.expOrFn);
    }


    this.value = this.get();
  }

  addDep(dep) {
    const { id } = dep;
    if (!this.newDeps.has(id)) {
      this.newDeps.set(id, dep);
      if (!this.deps.has(id)) {
        dep.addSub(this);
      }
    }
  }

  cleanupDeps() {
    this.deps.forEach((dep) => {
      if (!this.newDeps.has(dep.id)) {
        dep.removeSub(this);
      }
    });

    [this.deps, this.newDeps] = [this.newDeps, this.deps];
    this.newDeps.clear();
  }

  get() {
    pushTarget(this);
    let value;
    // const value = this.content[this.expOrFn];
    try {
      value = this.getter.call(this.content, this.content);
    } catch (error) {
      console.log(error);
    } finally {
      popTarget();
      this.cleanupDeps();
    }
    return value;
  }

  update() {
    const oldVal = this.value;
    this.value = this.get();

    if (!Object.is(oldVal, this.value)) {
      this.cb.call(this.content, this.value, oldVal);
    }
  }

  teardown() {
    this.deps.forEach(dep => dep.removeSub(this));
  }
}

let a = {
  b:{
    c:1
  },
  d:{
    foo:2,
    boo:3
  }
}
那么这个版本跟上一个版本又有什么改进呢?
首先,我们对Watcher类进行了修改,使其不光去订阅,同时再起内部维护一个Map来保存其订阅的所有Dep类,这样,我们就可以去实现$watch返回值取消触发回调的功能,这样一个基本的数据响应模式就完成了,当然这个代码有很多的问题,和各种边界问题我们没有考虑到,所以请大家主要思考其中的**.同时表达对Vue的感谢,我在阅读Vue的源码时,对其中的很多方法及设计思路都赞叹不已,只能说一句,学海无涯啊.观察者与响应式
在说深拷贝之前我们先来说说为什么要有拷贝,在js中存在两种传值方式,
    //值传递
    let a = 1;
    let b = a;
    a = 7;
    console.log(b) => 1

    //引用传递
    let a = {
        value:1
    }
    let b = a;
    a.value = 7
console.log(b.value) => 7在值传递中,我们将b = a,这个时候,a的值会被复制一份,赋值给b,然后我们修改a,虽然a被修改了,但是b不会被修改,
可是在引用传递中我们再次将b = a 这个时候就不一样了,a的地址会被复制一份,然后赋值到b,也就是这个时候a,b都是在指向我们定义的这个对象(暂时称之为Object_1),那么在我们修改a.value的时候,其实是将Object_1的value给修改了,这个时候我们去访问b.value,引擎通过b的地址找到Object_1的value,因为之前已经被修改为7了,所以会被打印出7;
那么我说出那么多废话是要干什么呢, 主要就是为了讲一讲deepCopy是干什么的,想象一下,我们在具体的业务实现中需要实现一个场景,我们要获取某个对象作为初始值,但是我们不能修改这个初始值,因为在接下来的业务中一直都要用到这个初始值,那么怎么办,拷贝一份出来,那么好,我们来看一看怎么实现,
    let target = {
        value_1:1,
        value_2:2
    }
let a = {};
a.value_1 = target.value_1;
a.value_2 = target.value_2; const deepCopy = (source) => {
let result = {};
let keys = Object.keys(source);
keys.forEach( key => {
result[key] = typeof source[key]==='object'?(source[key]): source[key];
})
return result
} const deepCopy = (source) => {
return JSON.parse(JSON.stringify(source))
}object这个可是连数组啊什么的都能处理,简直完美,实际上是这样吗?我们来看一看
    const deepCopy = (source) => {
        return JSON.parse(JSON.stringify(source))
    }
let o = {
a: 1,
b: 2,
sum: function() { return a + b; }
};
var o2 = JSON.parse(JSON.stringify(o));
console.log(o2); => Object {a: 1, b: 2}这样看来JSON实现的方式,千好万好,但是他复制不了方法,通过JSON实现的方法只能实现对可序列化的数据进行拷贝,但是想方法这种无法序列化的就束手无测了,那么我们是不是无法实现完美的deepCopy了呢,当然不是了,我们第二版方法只需要对各种方法进行特殊处理就可以了,这里只是讲一讲为什么不能用JSON,具体的完美实现可以去看一看lodash的cloneDeep方法;当然在我们的具体实现上是要进行具体抉择的,如果我们明确源目标不存在方法的时候JSON实现的deepCopy是多么美妙的实现啊;
相信大家对let并不陌生,毕竟ES2019了都,当我们问let是什么其实是在说它到底有什么用?与var有什么不同,
相信这是很多基础的面试题的部分,大多数人的答案是下面这些
let声明的变量不会像var一样挂载到window上(毕竟现在的开发模式很少会直接这么做)这个问题就是在一个偶然的环境下我无意发现的,也就是为啥名字为啥会带上两个不是太强相关的东西,因为这一次解开了我两个疑惑
首先我们来看一段代码
var windowNum = 0;
function wrapper() {
  let wrapperNum = 1;
  function test() {
    let testNum = 2;
    return wrapperNum + testNum;
  }
  return test;
}
let currentTest = wrapper();
console.dir(currentTest);这段代码集齐了我们标题上的四个元素,let与var,闭包与作用域链,那么让我们来思考一个简单的问题,运行currentTest会返回什么?相信都能知道是 3,因为wrapperNum是 1,testNum2,加一起等于三,然后因为test形成了闭包,所以它能够读取到跟他处于同一作用域下的wrapperNum,所以可以得到正确的结果,
那么说到这里,我们再来说一下'wrapperNum是如何拿到的?'我们说闭包,作用域都是建立在我们看到的情况下,但是 V8 不会用眼睛看着这段代码去执行,所以就必然需要一个机制来让currentTest被推入执行环境的时候可以获取到它需要的值,我们回过头来看一下console.dir(currentTest);

我们看一下[[Scope]]这个内部属性?同时对比一下我们思考中的作用域链是否相同,[[Scope]]属性就是对作用域链的具体表现,当currentTest被执行,其内部会使用wrapperNum和testNum,引擎会按顺序对[[Scope]]内部的对象进行遍历,进行匹配,一旦获取到同名变量就进行下一步,这也就是为什么同名变量会使用离得相对近的,因为其属性在[[Scope]]中相对靠前,那么这又有let和var有什么关系呢? 我们分析一下[[Scope]]中的值,第一个Closure字面就可以看出是闭包的意思,当然也确实是闭包,第二个Script,我们暂时跳过,第三个Global可以看出是全局环境,也就是window,那么Script是什么?我们换一个简单的函数就好理解了.
let foo = 1;
var foo1 = 2;
function fooTest() {}
console.dir(fooTest);
let fooTest1 = function() {};
console.dir(fooTest);
我们看一下这个的结果,

我们看到,通过let声明的变量都会被放置在Script中,而通过var声明的则不会,我们回头看一下let可生成块级作用域这个特性,那么Script是不是函数声明时的作用域呢? 我们来看第三个例子
let testScript = 1;
function foo() {
  let testFunctionScope = 2;
  function test() {}
  console.dir(test);
}
foo();
结果如下,

通过这个例子,我们可以看出,Script是一个在window下的作用域,也就是说只有在window环境下通过let声明的变量才会被放入其中,而通过var声明的贼会被挂载到window上成为一个属性,那么不禁要尝试一下了,通过let与var去重复声明同一个变量是否可行呢?很可惜,是不行的,应该是引擎在声明是会检查两者,避免其发生重复.
tip:最后,尽信书不如无书,请各位试验之后做出判断,如有错误,请不吝指正
ps:本文只是本人的一些思考,难免会有错误和纰漏,如有错误,请读者不吝斧正
        this.$store.dispatch('addMapTab', obj).then(()=>{
            this.$store.dispatch('getAreaList',param)
        })
最近在做一个项目,大部分都是用的以前项目的组件,但是当前一个电子围栏的组件虽然界面相同,但是逻辑我进行了重写,于是就有看到了这段代码,然后这段代码让我发现了几个问题,
我们先来看看这段代码,在执行addMapTab成功后执行getAreaList,于是我来到addMapTab看一看他到底做了什么
  addMapTab({commit},obj){
  	commit(types.ADD_MAP_TAB,obj)
  },
很奇怪,他没做什么操作,只是commit了一个mutations,
哇,我发现了个以前代码的bug!
桥豆麻袋! 如果是个bug,那么为什么一直没发现呢,我测试了一下确实可以啊,那么到底是哪里的问题呢,既然是执行的dispatch方法,那我就去看看dispatch是怎么实现的;
dispatch (_type, _payload) {
  // check object-style dispatch
  const {
    type,
    payload
  } = unifyObjectStyle(_type, _payload)

  const action = { type, payload }
  const entry = this._actions[type]
  if (!entry) {
    if (process.env.NODE_ENV !== 'production') {
      console.error(`[vuex] unknown action type: ${type}`)
    }
    return
  }

  this._actionSubscribers.forEach(sub => sub(action, this.state))

  return entry.length > 1
    ? Promise.all(entry.map(handler => handler(payload)))
    : entry[0](payload)
}这个是vuex中关于dispatch的实现方法,我们重点看一看这段代码
  return entry.length > 1
    ? Promise.all(entry.map(handler => handler(payload)))
: entry[0](payload)如果actions中存在handler就通过Promise.all来返回处理结果;那么我们来看看
Promise.all做了什么!>
Promise.all方法接受一个数组作为参数,p1、p2、p3都是 Promise 实例,如果不是,就会先调用下面讲到的Promise.resolve方法,将参数转为 Promise 实例,再进一步处理。
我们重点来看看这句
如果传入的参数不包含任何 promise,则返回一个异步完成(asynchronously resolved) Promise。
为什么要注意这句呢?回到刚才的业务代码,我们看到addMapTab方法并未做任何其他处理就直接的commit了mutations,那么按照文档中的说法,当我们执行
this.$store.dispatch('addMapTab', obj)的时候,会直接通过Promise.resolve返回一个处于resolve状态的Promise对象,
那么我们来可以来试试Promise.resolve是什么效果
    Promise.resolve(
        setTimeout(function(){
            console.log(1)
        },0)
    ).then(()=>{
        console.log(2)
    })

    // 2,1

    Promise.resolve(
        console.log(1)
    ).then(()=>{
        console.log(2)
    })
//1,2我们从打印顺序来看,Promise.resolve并没有在setTimeout中进行任何处理,就直接触发了then回调,这也符合文档中提到的,如果传入的对象中没有Promise实例会直接返回一个resolve状态的Promise对象,那么回到我们之前的业务代码
        this.$store.dispatch('addMapTab', obj).then(()=>{
            this.$store.dispatch('getAreaList',param)
})因为addMapTab中并没有任何的异步处理,所以会同步执行addMapTab``getAreaList,
也就是说相当于下面的代码
        this.$store.dispatch('addMapTab', obj)
this.$store.dispatch('getAreaList',param)由此我们可以看出,如果不是在actions中通过promise进行异步操作,那么在调用时没必要注册then回调,因为不管是否通过then来执行,都会按照顺序来一步一步的来进行执行;
Antd提供了Form组件组件来进行复杂表单的处理,
使用
Form.create处理后的表单具有自动收集数据并校验的功能,但如果您不需要这个功能,或者默认的行为无法满足业务需求,可以选择不使用Form.create并自行处理数据。
那我们肯定需要,因为其灵魂就在于其,那么我们抛开布局,单纯来看一下,Form.create是如何实现
form.create调用rc-form的createDOMForm,而createDOMForm则直接调用了createBaseForm,所以不严谨来说的话,ant-design的form.create我们可以认为只是createBaseForm别名,所以我们来看看createBaseForm是如何实现的?
经过
Form.create包装的组件将会自带this.props.form属性,
而form属性中提供的getFieldDecorator则是实现数据自动收集的核心;
说到这个话题,我们跑一下题,目前国内前端呈现React与Vue双足鼎立的态势,ng的使用量是远远低于这两大框架的,可能有人会说了,不是说Form组件吗?又要开始写娱乐圈了?并不是,
我们来思考一下,简单了解过Vue的都能知道Vue的核心卖点是数据的双向绑定,而React则多为单向数据流,写两个简单的例子
let data = 0

//Vue
<input v-model = "data"/>

//React
<input value={data} onChange={(e) => data = e.target.value}/> 假设data在这两个例子中都是被观测的,那么Vue和React的例子都实现了对data的双向绑定,也就是说,Vue总的来说也是单向数据流,在这两个例子中不同的是绑定方式,不同的是Vue提供了v-model语法糖,而React则给我们提供了更细粒度处理事件的机会,但是Vue也可以写成这种方式,只不过是v-model代劳了而已,那么到这里,我们回头再看看getFieldDecorator是不是跟v-model越看越像呢,
getFieldDecorator('name',{})(
    <input/>
)
<input v-model = "data"/>那么是不是Form是对React在表单上类似于Vue的另类实现呢?
是,也不是
为什么说是呢,因为getFieldDecorator默认绑定了value和onChange事件,这和Vue是相同的**,那么不是又在哪里呢,我们回想一下,通过Vue的创建表单跟我们使用antd最大区别在哪里? 在于表单项,诚然Vue从底层API为我们实现了数据与UI的双向绑定,但是我们还是要自己去管理数据的,当然现在的现代框架提出的**就是用数据去驱动UI,但是当我们使用Form时我们没有必要去管理它的数据,我们只需要在我们要提交数据时获取到Form中的值就可以了,这种更符合组件的**,局部的数据,存储在局部的组件中,如果用这种**来看Vue的Form的话,就会觉得Form的数据被提升到了父组件来进行管理.这对我们来说是不必要的
当然,这是我的个人看法,如果Vue的相关组件库有类似实现,请各位不吝指正,同时此观点只是个人看法,希望各位不要认为我的**就是对的
那我们说了这么多看一下其具体实现,因为我们在使用Form组件是使用最多的就是getFieldDecorator方法,所以我们首先来看一下他的实现原理
getFieldDecorator(name, fieldOption) {
        const props = this.getFieldProps(name, fieldOption);
        return (fieldElem) => {
          // We should put field in record if it is rendered
          this.renderFields[name] = true;

          const fieldMeta = this.fieldsStore.getFieldMeta(name);
          const originalProps = fieldElem.props;
          fieldMeta.originalProps = originalProps;
          fieldMeta.ref = fieldElem.ref;
          return React.cloneElement(fieldElem, {
            ...props,
            ...this.fieldsStore.getFieldValuePropValue(fieldMeta),
          });
        };
},看一下这个函数的构成,调用getFieldProps方法构建props,随后将props跟其他相关配置挂载到传入的ReactNode上,所以从此来看,主要的逻辑配置在getFieldProps方法上,我 们来看一下getFieldProps的实现
 getFieldProps(name, usersFieldOption = {}) {

        const fieldOption = {
          name,
          trigger: DEFAULT_TRIGGER,
          valuePropName: 'value',
          validate: [],
          ...usersFieldOption,
        };

        const {
          rules,
          trigger,
          validateTrigger = trigger,
          validate,
        } = fieldOption;

        const fieldMeta = this.fieldsStore.getFieldMeta(name);
        if ('initialValue' in fieldOption) {
          fieldMeta.initialValue = fieldOption.initialValue;
        }

        const inputProps = {
          ...this.fieldsStore.getFieldValuePropValue(fieldOption),
          ref: this.getCacheBind(name, `${name}__ref`, this.saveRef),
        };
        if (fieldNameProp) {
          inputProps[fieldNameProp] = formName ? `${formName}_${name}` : name;
        }

        const validateRules = normalizeValidateRules(validate, rules, validateTrigger);
        const validateTriggers = getValidateTriggers(validateRules);
        validateTriggers.forEach((action) => {
          if (inputProps[action]) return;
          inputProps[action] = this.getCacheBind(name, action, this.onCollectValidate);
        });

        // make sure that the value will be collect
        if (trigger && validateTriggers.indexOf(trigger) === -1) {
          inputProps[trigger] = this.getCacheBind(name, trigger, this.onCollect);
        }

        const meta = {
          ...fieldMeta,
          ...fieldOption,
          validate: validateRules,
        };
        this.fieldsStore.setFieldMeta(name, meta);
        if (fieldMetaProp) {
          inputProps[fieldMetaProp] = meta;
        }

        if (fieldDataProp) {
          inputProps[fieldDataProp] = this.fieldsStore.getField(name);
        }

        // This field is rendered, record it
        this.renderFields[name] = true;

        return inputProps;
},我删除了部分主要逻辑无关代码,我们看一下整个函数的思路,该函数首先进行了默认值的配置,如果未配置trigger和valuePropName则使用默认值,随后调用fieldsStore.getFieldMeta,fieldsStore在整个form中尤为关键,其作用是作为一个数据中心,让我们免除了手动去维护form中绑定的各个值,同时也是我刚才说的局部的数据存储于局部的组件**.那么我们看一下fieldsStore.getFieldMeta做了什么
//getFieldMeta在src/createFieldsStore下
  getFieldMeta(name) {
    this.fieldsMeta[name] = this.fieldsMeta[name] || {};
    return this.fieldsMeta[name];
}它的作用和它的名字一样是根据name获取FieldMeta,如果没有则创建,所以我们想象一下,整个form则会根据每个field的name值去创建索引表,现在我们知道在初始化情况下它返回的为空对象,
继续往下则是获取initialValue,关于这个可以看一下antd form的文档继续往后,下面到了最重要的inputProps构建环节,首先调用getFieldValuePropValue去获取field初始值,随后创建ref函数,我们暂时略过,我们来看一下最重要的数据收集
const validateRules = normalizeValidateRules(validate, rules, validateTrigger);
const validateTriggers = getValidateTriggers(validateRules);
validateTriggers.forEach((action) => {
    if (inputProps[action]) return;
    inputProps[action] = this.getCacheBind(name, action, this.onCollectValidate);
});

// make sure that the value will be collect
if (trigger && validateTriggers.indexOf(trigger) === -1) {
    inputProps[trigger] = this.getCacheBind(name, trigger, this.onCollect);
}我们着重来看一下这一部分代码,根据名称我们来看,validateRules应该是所有的校验规则,validateTriggers则是所有的校验规则触发事件的集合,我们来看一下这两个函数
export function normalizeValidateRules(validate, rules, validateTrigger) {
  const validateRules = validate.map((item) => {
    const newItem = {
      ...item,
      trigger: item.trigger || [],
    };
    if (typeof newItem.trigger === 'string') {
      newItem.trigger = [newItem.trigger];
    }
    return newItem;
  });
  if (rules) {
    validateRules.push({
      trigger: validateTrigger ? [].concat(validateTrigger) : [],
      rules,
    });
  }
  return validateRules;
}

export function getValidateTriggers(validateRules) {
  return validateRules
    .filter(item => !!item.rules && item.rules.length)
    .map(item => item.trigger)
    .reduce((pre, curr) => pre.concat(curr), []);
}我们看一下normalizeValidateRules函数,其会将validate``rules组合,返回一个数组,其内部的元素为一个个规则对象,并且每个元素都存在一个可以为空的trigger数组,并且将validateTrigger作为rule的triggers推入validateRules中,我们回回头看一下validateTrigger,
 const fieldOption = {
     name,
     trigger: DEFAULT_TRIGGER,
     valuePropName: 'value',
     validate: [],
     ...usersFieldOption,
 };

const {
    rules,
    trigger,
    validateTrigger = trigger,
    validate,
} = fieldOption;看一下这两个赋值,取值的语句,当我们没有配置trigger时使用DEFAULT_TRIGGER作为收集值的触发事件也就是onChange而当我们没有设置validateTrigger的时候使用trigger,这样说可能有点绕,简单点说,当我们配置了validateTrigger也就是验证触发函数时使用用户配置,未配置则使用用户配置的trigger,如果trigger用户都没有配置则全部使用默认配置也就是onChange,回过头来继续看着两个函数,getValidateTriggers则是将所有触发事件统一收集至一个数组,随后将所有validateTriggers中的事件都绑定上同一个处理函数,也就是接来下要说
 validateTriggers.forEach((action) => {
          if (inputProps[action]) return;
          inputProps[action] = this.getCacheBind(name, action, this.onCollectValidate);
});我们看到,不管validateTriggers中哪一种事件被触发都会通过this.getCacheBind(name, action, this.onCollectValidate);来进行处理,首先来看一下getCacheBind
getCacheBind(name, action, fn) {
        if (!this.cachedBind[name]) {
          this.cachedBind[name] = {};
        }
        const cache = this.cachedBind[name];
        if (!cache[action] || cache[action].oriFn !== fn) {
          cache[action] = {
            fn: fn.bind(this, name, action),
            oriFn: fn,
          };
        }
        return cache[action].fn;
},我们可以看到getCacheBind只是做了一下bind,真正的处理函数则是 this.onCollectValidate,那我们来看一下 this.onCollectValidate做了什么?
onCollectValidate(name_, action, ...args) {
    const { field, fieldMeta } = this.onCollectCommon(name_, action, args);
    const newField = {
        ...field,
        dirty: true,
    };

    this.fieldsStore.setFieldsAsDirty();

    this.validateFieldsInternal([newField], {
        action,
        options: {
            firstFields: !!fieldMeta.validateFirst,
        },
    });
},当onCollectValidate被调用,也就是数据校验函数被触发时主要做了四件事情,我们一条一条的来看
onCollectCommon(name, action, args) {
    const fieldMeta = this.fieldsStore.getFieldMeta(name);
    if (fieldMeta[action]) {
        fieldMeta[action](...args);
    } else if (fieldMeta.originalProps && fieldMeta.originalProps[action]) {
        fieldMeta.originalProps[action](...args);
    }
    const value = fieldMeta.getValueFromEvent ?
          fieldMeta.getValueFromEvent(...args) :
    getValueFromEvent(...args);
    if (onValuesChange && value !== this.fieldsStore.getFieldValue(name)) {
        const valuesAll = this.fieldsStore.getAllValues();
        const valuesAllSet = {};
        valuesAll[name] = value;
        Object.keys(valuesAll).forEach(key => set(valuesAllSet, key, valuesAll[key]));
        onValuesChange({
            [formPropName]: this.getForm(),
            ...this.props
        }, set({}, name, value), valuesAllSet);
    }
    const field = this.fieldsStore.getField(name);
    return ({ name, field: { ...field, value, touched: true }, fieldMeta });
},我们可以看出onCollectCommon主要是获取了包装元素新的值,随后将其包装在对象中返回,返回后将其组装为一个新的名为newField的对象,执行fieldsStore.setFieldsAsDirty,而fieldsStore.setFieldsAsDirty则是标记校验状态,我们暂且略过,随后执行validateFieldsInternal我们看一下validateFieldsInternal
validateFieldsInternal(fields, {
        fieldNames,
        action,
        options = {},
      }, callback) {
        const allFields = {};
        fields.forEach((field) => {
          const name = field.name;
          if (options.force !== true && field.dirty === false) {
            if (field.errors) {
              set(alreadyErrors, name, { errors: field.errors });
            }
            return;
          }
          const fieldMeta = this.fieldsStore.getFieldMeta(name);
          const newField = {
            ...field,
          };
          newField.errors = undefined;
          newField.validating = true;
          newField.dirty = true;
          allRules[name] = this.getRules(fieldMeta, action);
          allValues[name] = newField.value;
          allFields[name] = newField;
        });
        this.setFields(allFields);
        // in case normalize
       ...dosometing
},因为validateFieldsInternal主要篇幅为调用AsyncValidator进行异步校验,我们暂时略过只看数据收集部分,
我们看到起最后调用了this.setFields(allFields);并传入了新的值,
看一下setFields
setFields(maybeNestedFields, callback) {
        const fields = this.fieldsStore.flattenRegisteredFields(maybeNestedFields);
        this.fieldsStore.setFields(fields);
        if (onFieldsChange) {
          const changedFields = Object.keys(fields)
            .reduce((acc, name) => set(acc, name, this.fieldsStore.getField(name)), {});
          onFieldsChange({
            [formPropName]: this.getForm(),
            ...this.props
          }, changedFields, this.fieldsStore.getNestedAllFields());
        }
        this.forceUpdate(callback);
},我们可以看到,setFields首先对传入的只进行与初始化相似的验证,随后,将值存入fieldsStore,调用传入的onFieldsChange,之后调用React.forceUpdate更新视图.至此,我们简单的描述了整个流程,我们简述起具体流程则类似于Vue的V-model
获取初始值=>存储值数据中心也就是fieldsStore=>绑定收集值时机函数=>触发函数=>更新最新值至数据中心=>随后调用forceUpdate强制刷新视图.
A declarative, efficient, and flexible JavaScript library for building user interfaces.
🖖 Vue.js is a progressive, incrementally-adoptable JavaScript framework for building UI on the web.
TypeScript is a superset of JavaScript that compiles to clean JavaScript output.
An Open Source Machine Learning Framework for Everyone
The Web framework for perfectionists with deadlines.
A PHP framework for web artisans
Bring data to life with SVG, Canvas and HTML. 📊📈🎉
JavaScript (JS) is a lightweight interpreted programming language with first-class functions.
Some thing interesting about web. New door for the world.
A server is a program made to process requests and deliver data to clients.
Machine learning is a way of modeling and interpreting data that allows a piece of software to respond intelligently.
Some thing interesting about visualization, use data art
Some thing interesting about game, make everyone happy.
We are working to build community through open source technology. NB: members must have two-factor auth.
Open source projects and samples from Microsoft.
Google ❤️ Open Source for everyone.
Alibaba Open Source for everyone
Data-Driven Documents codes.
China tencent open source team.