Learn how to build web applications using the Elm ("Model Update View") Architecture in "plain" JavaScript.


We think Elm is the future of Front End Web Development
for all the reasons described in: github.com/dwyl/learn-elm#why
However we acknowledge that Elm is "not everyone's taste"!
What many Front-End Developers are learning/using is React.js.
Most new React.js apps are built using Redux which "takes cues from"
(takes all it's best ideas/features from) Elm:

Therefore, by learning the Elm Architecture, you will intrinsically understand Redux
which will help you learn/develop React apps.
This step-by-step tutorial is a gentle introduction to the Elm Architecture,
for people who write JavaScript and want a functional, elegant and fast
way of organizing their JavaScript code without having the learning curve
of a completely new (functional) programming language!

Organizing code in a Web (or Mobile) Application
is really easy to over-complicate,
especially when you are just starting out and there
are dozens of competing ideas
all claiming to be the "right way"...
When we encounter this type of "what is the right way?"
question,
we always follow
Occam's Razor
and ask:
what is the simplest way?
In the case of web application organization,
the answer is:
the "Elm Architecture".
When compared to other ways of organizing your code, "Model Update View" (MUV) has the following benefits:
- Easier to understand what is going on in more advanced apps because there is no complex logic, only one basic principal and the "flow" is always the same.
- Uni-directional data flow means the "state" of the app is always predictable; given a specific starting "state" and sequence of update actions, the output/end state will always be the same. This makes testing/testability very easy!
- There's no "middle man" to complicate things (the way there is in other application architectures such as Model-view-Presenter or "Model-View-ViewModel" (MVVM) which is "overkill" for most apps).
Note: don't panic if any of the terms above are strange or even confusing to you right now. Our quest is to put all the concepts into context. And if you get "stuck" at any point, we are here to help! Simply open a question on GitHub: github.com/dwyl/learn-elm-architecture-in-javascript/issues

Anyone who knows a little bit of JavaScript
and wants to learn how to organize/structure
their code/app in a sane, predictable and testable way.

- Basic JavaScript Knowledge. see: github.com/dwyl/Javascript-the-Good-Parts-notes
- Basic Understanding of TDD. If you are completely new to TDD, please see: github.com/dwyl/learn-tdd
- A computer with a Web Browser.
- 30 minutes.
No other knowledge is assumed or implied. If you have any questions, please ask:
github.com/dwyl/learn-elm-architecture-in-javascript/issues

Start with a few definitions:
- Model - or "data model" is the place where all data is stored;
often referred to as the application's
state. - Update - how the app handles
actionsperformed by people andupdates thestate, usually organised as aswitchwith variouscasestatements corresponding to the different "actions" the user can take in your App. - View - what people using the app can see;
a way to
viewthe Model (in the case of the first tutorial below, the counter) asHTMLrendered in a web browser.

If you're not into flow diagrams, here is a much more "user friendly" explanation of The Elm Architecture ("TEA"):

Kolja Wilcke's "View Theater" diagram Creative Commons License Attribution 4.0 International (CC BY 4.0)
In the "View Theatre" diagram, the:
modelis the ensamble of characters (or "puppets")updateis the function that transforms ("changes") themodel(the "puppeteer").viewwhat the audience sees through "view port" (stage).
If this diagram is not clear (yet), again, don't panic, it will all be clarified when you start seeing it in action (below)!
git clone https://github.com/dwyl/learn-elm-architecture-in-javascript.git && cd learn-elm-architecture-in-javascriptTip: if you have node.js installed, simply run
npm install! That will installlive-serverwhich will automatically refresh your browser window when you make changes to the code! (makes developing faster!)
When you open examples/counter-basic/index.html you should see:

Try clicking on the buttons to increase/decrease the counter.
In your Text Editor of choice, edit the initial value of the model (e.g: change the initial value from 0 to 9). Don't forget to save the file!

When you refresh the your Web Browser you will see that the "initial state" is now 9 (or whichever number you changed the initial value to):

You have just seen how easy it is to set the "initial state"
in an App built with the Elm Architecture.
You may have taken the time to read the code in Step 3 (above) ...
If you did, well done for challenging yourself
and getting a "head start" on reading/learning!
Reading (other people's) code is the fastest way
to learn programming skills and
the only way to learn useful "patterns".
If you didn't read through the code in Step 3, that's ok!
Let's walk through the functions now!
As always, our hope is that the functions are clearly named and well-commented,
please inform us if anything is unclear please ask any questions as issues:
github.com/dwyl/learn-elm-architecture-in-javascript/issues
The mount function "initializes" the app and tells the view
how to process a signal sent by the user/client.
function mount(model, update, view, root_element_id) {
  var root = document.getElementById(root_element_id); // root DOM element
  function signal(action) {          // signal function takes action
    return function callback() {     // and returns callback
      model = update(model, action); // update model according to action
      view(signal, model, root);     // subsequent re-rendering
    };
  };
  view(signal, model, root);         // render initial model (once)
}
The mount function receives the following four arguments:
model: "initial state" of your application (in this case the counter which starts at 0)update: the function that gets executed when ever a "signal" is received from the client (person using the app).view: the function that renders the DOM (see: section 5.3 below)root_element_idis theidof the "root DOM element"; this is the DOM element
where your app will be "mounted to". In other words your app will be contained within this root element.
(so make sure it is empty beforemounting)
The first line in mount is to get a reference to the root DOM element;
we do this once in the entire application to minimize DOM lookups.
The interesting part of the mount function is signal (inner function)!
At first this function may seem a little strange ...
Why are we defining a function that returns another function?
If this your first time seeing this "pattern",
welcome to the wonderful world of "closures"!
A closure is an inner function that has access
to the outer (enclosing) function's variables—scope chain.
The closure has three scope chains: it has access to its own scope
(variables defined between its curly brackets), it has access to
the outer function's variables, and it has access to the global variables.
In the case of the callback function inside signal,
the signal is "passed" to the various bits of UI
and the callback gets executed when the UI gets interacted with.
If we did not have the callback the signal
would be executed immediately when the button is defined.
Whereas we only want the signal (callback) to be triggered
when the button is clicked.
Try removing the callback to see the effect:

The signal is triggered when button is created, which re-renders
the view creating the button again. And, since the view renders two
buttons each time it creates a "chain reaction" which almost
instantly exceeds the "call stack"
(i.e. exhausts the allocated memory) of the browser!
Putting the callback in a closure means we can pass a reference
to the signal (parent/outer) function to the view function.
- https://developer.mozilla.org/en/docs/Web/JavaScript/Closures
- http://javascriptissexy.com/understand-javascript-closures-with-ease/
- ... if closures aren't "clicking", or you want more detail/examples, please ask!
The last line in the mount function is to render the view function
for the first time, passing in the signal function, initial model ("state")
and root element. This is the initial rendering of the UI.
The next step in the Elm Architecture is to define the Actions that can be taken in your application. In the case of our counter example we only have two (for now):
// Define the Component's Actions:
var Inc = 'inc';                     // increment the counter
var Dec = 'dec';                     // decrement the counter
These Actions are used in the switch (i.e. decide what to do)
inside the update function.
Actions are always defined as a String.
The Action variable gets passed around inside the JS code
but the String representation is what appears in the DOM
and then gets passed in signal from the UI back to the update function.
One of the biggest (side) benefits of defining actions like this is that it's really quick to see what the application does by reading the list of actions!
The update function is a simple
switch
statement that evaluates the action and "dispatches"
to the required function for processing.
In the case of our simple counter we aren't defining functions for each case:
function update(model, action) {     // Update function takes the current model
  switch(action) {                   // and an action (String) runs a switch
    case Inc: return model + 1;      // add 1 to the model
    case Dec: return model - 1;      // subtract 1 from model
    default: return model;           // if no action, return current model.
  }                                  // (default action always returns current)
}
However if the "handlers" for each action were "bigger",
we would split them out into their own functions e.g:
// define the handler function used when action is "inc"
function increment(model) {
  return model + 1
}
// define handler for "dec" action
function decrement(model) {
  return model - 1
}
function update(model, action) {     // Update function takes the current state
  switch(action) {                   // and an action (String) runs a switch
    case Inc: return increment(model);  // add 1 to the model
    case Dec: return decrement(model);  // subtract 1 from model
    default: return model;           // if no action, return current state.
  }                                  // (default action always returns current)
}
This is functionally equivalent to the simpler update (above)
But does not offer any advantage at this stage (just remember it for later).
The view function is responsible
for rendering the state to the DOM.
function view(signal, model, root) {
  empty(root);                                 // clear root element before
  [                                            // Store DOM nodes in an array
    button('+', signal, Inc),                  // create button (defined below)
    div('count', model),                       // show the "state" of the Model
    button('-', signal, Dec)                   // button to decrement counter
  ].forEach(function(el){ root.appendChild(el) }); // forEach is ES5 so IE9+
}
The view receives three arguments:
signaldefined above inmounttells each (DOM) element how to "handle" the user input.modela reference to the current value of the counter.roota reference to the root DOM element where the app is mounted.
The view function starts by emptying
the DOM inside the root element using the empty helper function.
This is necessary because, in the Elm Architecture, we re-render
the entire application for each action.
See note on DOM Manipulation and "Virtual DOM" (below)
The view creates a list (Array) of DOM nodes that need to be rendered.
The view makes use of three "helper" (DOM manipulation) functions:
empty: empty therootelement of any "child" nodes. Essentiallydeletethe DOM inside whichever element's passed intoempty.
function empty(node) {
  while (node.firstChild) { // while there are still nodes inside the "parent"
      node.removeChild(node.firstChild); // remove any children recursively
  }
}button: creates a<button>DOM element and attaches a "text node" which is the visible contents of the button the "user" sees.
function button(buttontext, signal, action) {
  var button = document.createElement('button');  // create a button HTML node
  var text = document.createTextNode(buttontext); // human-readable button text
  button.appendChild(text);                       // text goes *inside* button
  button.className = action;                      // use action as CSS class
  button.onclick = signal(action);                // onclick sends signal
  return button;                                  // return the DOM node(s)
}div: creates a<div>DOM element and applies anidto it, then if sometextwas supplied in the second argument, creates a "text node" to display that text. (in the case of our counter thetextis the current value of the model, i.e. the count)
function div(divid, text) {
  var div = document.createElement('div'); // create a <div> DOM element
  div.id = divid;
  if(text !== undefined) { // if text is passed in render it in a "Text Node"
    var txt = document.createTextNode(text);
    div.appendChild(txt);
  }
  return div;
}Note: in
elmland all of these "helper" functions are in theelm-htmlpackage, but we have defined them in this counter example so there are no dependencies and you can see exactly how everything is "made" from "first principals".
Once you have read through the functions
(and corresponding comments),
take a look at the tests.
Pro Tip: Writing code is an iterative (repetitive) process, manually refreshing the web browser each time you update some code gets tedious quite fast, Live Server to the rescue!
Note: Live Reloading is not required, e.g. if you are on a computer where you cannot install anything, the examples will still work in your web browser.
Live Reloading helps you iterate/work faster because you don't have to
manually refresh the page each time.
Simply run the following command:
npm install && npm start
This will download and start
live-server
which will auto-open your default browser:
Then you can navigate to the desired file.
e.g:
http://127.0.0.1:8000/examples/counter-basic/
In the first example we kept everything in
one file (index.html) for simplicity.
In order to write tests (and collect coverage),
we need to separate out
the JavaScript code from the HTML.
For this example there are 3 separate files:

Let's start by opening the /examples/counter-basic-test/index.html
file in a web browser:
http://127.0.0.1:8000/examples/counter-basic-test/?coverage

Because all functions are "pure", testing
the update function is very easy:
test('Test Update update(0) returns 0 (current state)', function(assert) {
  var result = update(0);
  assert.equal(result, 0);
});

test('Test Update increment: update(1, "inc") returns 2', function(assert) {
  var result = update(1, "inc");
  assert.equal(result, 2);
});

test('Test Update decrement: update(3, "dec") returns 2', function(assert) {
  var result = update(1, "dec");
  assert.equal(result, 0);
});
open: examples/counter-basic-test/test.js to see these and other tests.
The reason why Apps built using the Elm Architecture are so easy to understand
(or "reason about") and test is that all functions are "Pure".
Pure Functions are functions that always
return the same output for a given input.
Pure Functions have "no side effects",
meaning they don't change anything they aren't supposed to,
they just do what they are told; this makes them very predictable/testable.
Pure functions "transform" data into the desired value,
they do not "mutate" state.
The following function is "impure" because it "mutates"
i.e. changes the counter variable which is outside of the function
and not passed in as an argument:
// this is an "impure" function that "mutates" state
var counter = 0;
function increment () {
  return ++counter;
}
console.log(increment()); // 1
console.log(increment()); // 2
console.log(increment()); // 3This example is a "pure" function because it will always return same result for a given input.
var counter = 0;
function increment (my_counter) {
  return my_counter + 1;
}
// counter variable is not being "mutated"
// the output of a pure function is always identical
console.log(increment(counter)); // 1
console.log(increment(counter)); // 1
console.log(increment(counter)); // 1
// you can "feed" the output of one pure function into another to get the same result:
console.log(increment(increment(increment(counter)))); // 3
see: https://repl.it/FIpV
It's easy to get
suckered
into thinking that the "impure" version of the counter
examples/counter-basic-impure/index.html
is "simpler" ...
the complete code (including HTML and JS) is 8 lines:
<button class='inc' onclick="incr()">+</button>
<div id='count'>0</div>
<button class='dec' onclick="decr()">-</button>
<script>
  var el = document.getElementById('count')
  function incr() { el.innerHTML = parseInt(el.textContent, 10) + 1 };
  function decr() { el.innerHTML = parseInt(el.textContent, 10) - 1 };
</script>
This counter does the same thing as
our Elm Architecture example (above),
and to the end-user the UI looks identical:

The difference is that in the impure example is "mutating state" and it's impossible to predict what that state will be!
Annoyingly, for the person explaining the benefits of function "purity" and the virtues of the Elm Architecture
the "impure" example is both fewer lines of code (which means it loads faster!), takes less time to read
and renders faster because only the<div>text content is being updated on each update!
This is why it can often be difficult to explain to "non-technical" people that code which has similar output
on the screen(s) might not the same quality "behind the scenes"!
Writing impure functions is like setting off on a marathon run after tying your shoelaces incorrectly ...
You might be "OK" for a while, but pretty soon your laces will come undone and you will have to stop and re-do them.
To conclude: Pure functions do not mutate a "global" state and are thus predictable and easy to test; we always use "Pure" functions in Apps built with the Elm Architecture. The moment you use "impure" functions you forfeit reliability.
As you (hopefully) recall from our Step-by-Step TDD Tutorial, when we craft code following the "TDD" approach, we go through the following steps:
- Read and understand the "user story"
(e.g: in this case:
issues/5)

- Make sure the "acceptance criteria" are clear (the checklist in the issue)
- Write your test(s) based on the acceptance criteria.
(Tip: a single feature - in this case resetting the counter - can
and often
shouldhave multiple tests to cover all cases.) - Write code to make the test(s) pass.
BEFOREyou continue, try and build the "reset" functionality yourself following TDD approach!
We always start with the Model test(s) (because they are the easiest):
test('Test: reset counter returns 0', function(assert) {
  var result = update(6, "reset");
  assert.equal(result, 0);
});Watch the test fail in your Web Browser:

In the case of an App written with the Elm Architecture, the minimum code is:
- Action in this case
var Res = 'reset'; - Update (case and/or function) to "process the signal" from the UI (i.e. handle the user's desired action)
case Res: return 0;
Once we have the Model tests passing
we need to give the user something to interact with!
We are going to be "adventurous" and write two tests this time!
(thankfully we already have a UI test for another button we can "copy")
test('reset button should be present on page', function(assert) {
  var reset = document.getElementsByClassName('reset');
  assert.equal(reset.length, 1);
});

test('Click reset button resets model (counter) to 0', function(assert) {
  mount(7, update, view, id); // set initial state
  var root = document.getElementById(id);
  assert.equal(root.getElementsByClassName('count')[0].textContent, 7);
  var btn = root.getElementsByClassName("reset")[0]; // click reset button
  btn.click(); // Click the Reset button!
  var state = root.getElementsByClassName('count')[0].textContent;
  empty(document.getElementById(id)); // Clear the test DOM elements
});Watch the UI tests go red in the browser:

Luckily, to make both these tests pass requires
a single line of code in the view function!
button('Reset', signal, Res)
Now that you have understood the Elm Architecture by following the basic (single) counter example, it's time to take the example to the next level: multiple counters on the same page!
Follow your instincts and try to the following:
1. Refactor the "reset counter" example
to use an Object for the model (instead of an Integer)
e.g: var model = { counters: [0] }
where the value of the first element in the model.counters Array
is the value for the single counter example.
2. Display multiple counters on the same page
using the var model = { counters: [0] } approach.
3. Write tests for the scenario where there are multiple counters on the same page.
Once you have had a go, checkout our solutions:
examples/multiple-counters
and corresponding writeup:
multiple-counters.md
The ultimate test of whether you learned/understood something is
applying your knowledge to different context from the one you learned in.
Let's "turn this up to eleven" and build something "useful"!
GOTO:
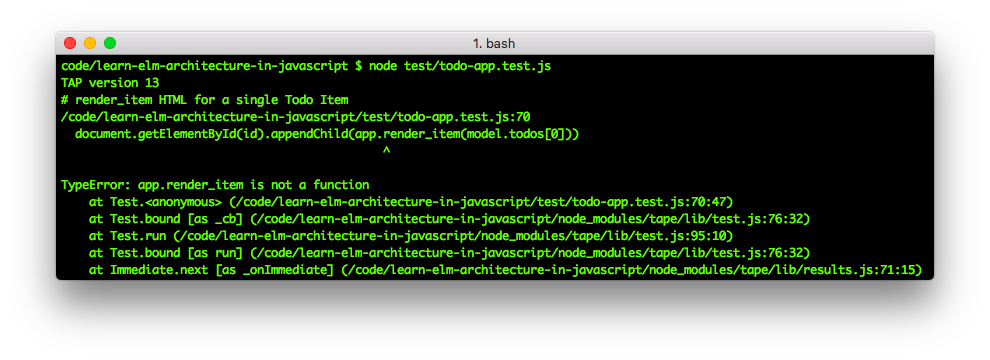
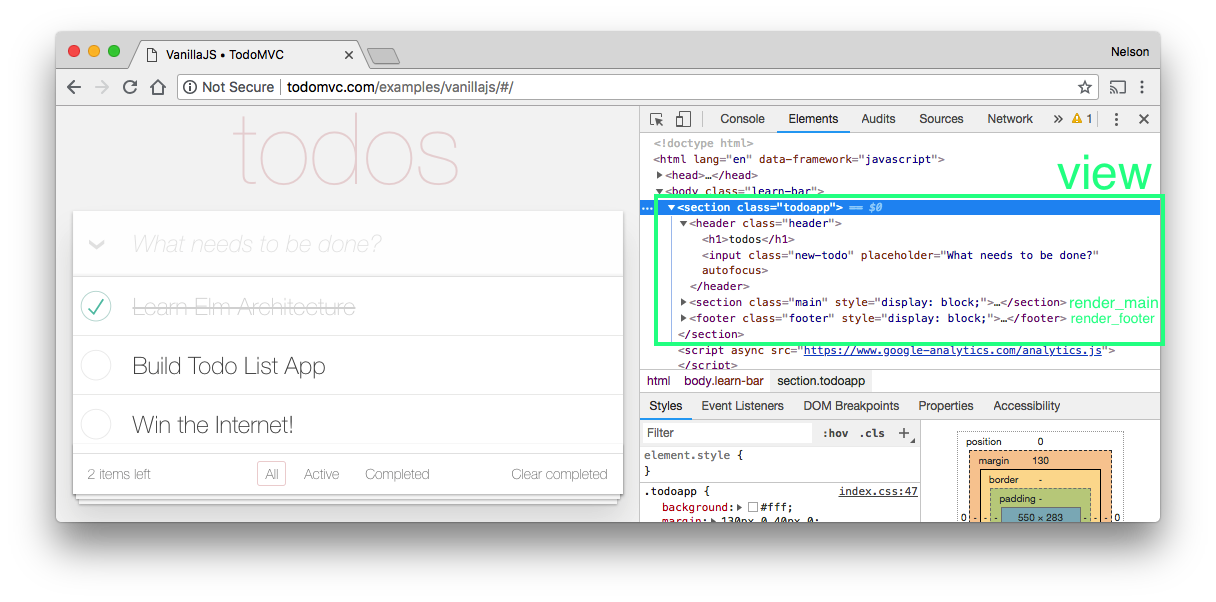
todo-list.md
- The Elm Architecture Simple, yet powerful – An overview by example: https://dennisreimann.de/articles/elm-architecture-overview.html (written in Elm so not much use for people who only know JS, but a good post for further reading!)
- What does it mean when something is "easy to reason about"?
http://stackoverflow.com/questions/18666821/what-does-the-term-reason-about-mean-in-computer-science - Elm Architecture with JQuery by @steos: https://medium.com/javascript-inside/elm-architecture-with-jquery-152cb98a62f (written in JQuery and no Tests so not ideal for teaching beginners good habits, but still a v. good post!)
- Pure functions: https://en.wikipedia.org/wiki/Pure_function
- Higher Order Functions in JavaScript: http://eloquentjavascript.net/05_higher_order.html
- Higher-order functions - Part 1 of Functional Programming in JavaScript: https://youtu.be/BMUiFMZr7vk
The issue of the "Elm Learning Curve" was raised in:
github.com/dwyl/learn-elm/issues/45
and scrolling down to to @lucymonie's
list
we see the Elm Architecture at number four ...
this seems fairly logical (initially) because the Elm Guide
uses the Elm Language to explain the Elm Architecture:
https://guide.elm-lang.org/architecture

i.e. it assumes that people already understand
the (Core) Elm Language...
This is a fair assumption given the ordering of the Guide however
... we have a different idea:
We hypothesize that if we explain the Elm Architecture
(in detail) using a language
people are already familiar with (i.e JavaScript)
before diving into the Elm Language
it will
"flatten"
the learning curve.
Note: Understanding the Elm Architecture will give you a massive headstart
on learning Redux which is the "de facto" way of structuring React.js Apps.
So even if you decide not to learn/use Elm, you will still gain great frontend skills!
DOM manipulation is the slowest part of any "client-side" web app.
That is why so many client-side frameworks (including Elm, React and Vue.js) now use a "Virtual DOM". For the purposes ofthistutorial, and for most small apps Virtual DOM is total overkill!
It's akin to putting a jet engine in a go kart!
"Plain" JavaScript just means not using any frameworks or features that require "compilation".
The point is to understand that you don't need
anything more than
"JavaScript the Good Parts"
to build something full-featured and easy/fast to read!!

If you can build with "ES5" JavaScript:
a) you side-step the
noise
and focus on core skills that already work everywhere!
(don't worry you can always "top-up" your
JS knowledge later with ES6, etc!)
b) you don't need to waste time installing
Two Hundred Megabytes
of dependencies just to run a simple project!
c) You save time (for yourself, your team and end-users!)
because your code is already optimized to run in any browser!


