- 🚩 Capture the Flag competitions
- 💻 Full-Stack Dev
- 📚 Making tech education more accessible

Below is a written format of the livestream for this week, included for future reference. To move on, close this issue.
Last week, you should've learned the basics of how to create an Azure Function, along with the basics of triggers and bindings.
In the livestream, we're going to code a HTTP trigger Azure Function that detects facial hair in a submitted picture.
We'll be going over how to:
Like last week, we'll be creating an HTTP Trigger to parse the image and analyze it for beard data! 🧔
Tip: It might be helpful to keep track of the Function App name and Resource Group for later in the project.
We are going to be using some npm packages in our HTTP Trigger, so we must install them in order for our code to even work.
Think of them like pre-written bits of code that are made for us by other developers. All we have to do is install the package, reference it in our code, and voila! We don't have to write extra code.
Example: Let's say I want to convert an image to a PDF. I can install the images-to-pdf package with
npm i images-to-pdf, and successfully convert my images. I don't have to write extra code to make the file conversion... I can just "depend" on the npm package
Commands to type into your console:
Click on the "Console" tab in the left panel under "Development Tools".

npm init -y
[npm install parse-multipart](https://www.npmjs.com/package/parse-multipart)
[npm install node-fetch](https://www.npmjs.com/package/node-fetch)
Last step:
Be sure to add these initializing statements into the code:
var multipart = require('parse-multipart');
var fetch = require('node-fetch');
This defines multipart and fetch , which we will use soon in the code below. ⬇️
The first step is to navigate to the new HTTP trigger you created earlier. You should see this at the top of the default code:
module.exports = async function (context, req) {
	context.log('JavaScript HTTP trigger function processed a request.');
We're going to be working in this function!
The parse-multipart library (multipart) is going to be used to parse the image from the POST request we will later make with Postman to test.
1️⃣ First let's define the body of the POST request we received.
var body = req.body;If you were to context.log() body , you would get the raw body content because the data was sent formatted as multipart/form-data:
------WebKitFormBoundaryDtbT5UpPj83kllfw
Content-Disposition: form-data; name="uploads[]"; filename="somebinary.dat"
Content-Type: application/octet-stream

some binary data...maybe the bits of a image.. (this is what we want!)
------WebKitFormBoundaryDtbT5UpPj83kllfw
2️⃣ Secondly, we need to create the boundary string from the headers in the request.
var boundary = multipart.getBoundary(req.headers['content-type']);If you were to context.log() boundary , you would receive --WebkitFormBoundary[insert gibberish] , which is a boundary that helps you determine where the image data is. This boundary will help us parse out the image data. Take a look at the boundaries in the raw payload above in step 1 ⬆️
3️⃣ Third! Now we'll be using multipart again to actually parse the image.
var parts = multipart.Parse(body,boundary);This returns an array of inputs, which contains all the different files that were in the body. In our case, we only have one: the picture!
4️⃣ Finally. We can now access the image with this short and sweet line of code:
var image = parts[0].data;The array "image" only has one object, the picture, so we've now successfully parsed the image from the body payload 🎉
Here's what your code should look like now:
var multipart = require('parse-multipart');
var fetch = require('node-fetch');

module.exports = async function (context, req) {
    context.log('JavaScript HTTP trigger function processed a request.');

    // receiving an image from an html form

    //enctype = multipart/form-data
    //parse-multipart library

    var body = req.body;

    //returns ---WebkitFormBoundaryjf;ldjfdlf
    var boundary = multipart.getBoundary(req.headers['content-type']);

    //returns an array of inputs
    //each object has filename, type, data
    var parts = multipart.Parse(body,boundary);

    //array has 1 object(an image)
    var image = parts[0].data;
}We're now going to create a Microsoft Cognitive Services Face API:

Press Face and fill out the necessary information
There are some secret strings we're going to need in order to communicate with the Face API. This includes the endpoint and the subscription key.

Enter into your Face API resource and click on Keys and Endpoint. You're going to need KEY 1 and ENDPOINT
Now, head back to the Function App, and we're going to add these values into the Application Settings. Follow this tutorial to do so.
Naming your secrets
You can name it whatever you want, but make sure it makes sense. We named it "face_key" and "face_endpoint."
Let's begin by defining a new async function (analyzeImage()) that we're going to call later in the module.exports() function. This will take in the image data we parsed as a parameter, make a request to the Face API, and return the beard data.
That's kind of a lot... so let's start!
1️⃣ Start the function and define our secrets 🔑
async function analyzeImage(image){
    const subscriptionKey = process.env['face_key'];
    const endpoint = process.env['face_endpoint'];
Remember the secrets we added in the application settings earlier? Now we're assigning them to the variables subscriptionKey and endpoint. Notice how we access the values with process.env['name'] .
2️⃣ Defining the URI and request parameters 📎
const uriBase = `${endpoint}/face/v1.0/detect`;

    let params = new URLSearchParams({
        'returnFaceAttributes': 'facialHair'
})uriBase is the URI of the Face API resource we are going to be making a POST request to.
params are what we're storing the parameters of the request in. We want the Face API to return beard data from the image, so we put 'facialHair' as the value of 'returnFaceAttributes' .
3️⃣ Sending the request 📨
let resp = await fetch(uriBase + '?' + params.toString(), {
        method: 'POST',
        body: image,
        headers: {
            'Content-Type': 'application/octet-stream',
            'Ocp-Apim-Subscription-Key': subscriptionKey
        }
    })
We're now going to use fetch to make a POST request. Adding all the variables we defined previously in uriBase + '?' + params.toString() we get something like this: [Insert your endpoint]/face/v1.0/detect?returnFaceAttributes=facialHair.
We send the image data (this is the image parameter we will call the function with) in the body and headers. 'Content-Type' is the format our image data is in, and 'Ocp-Apim-Subscription-Key' contains the subscription key of the Face API.
4️⃣ Receiving and returning data 🔢
let data = await resp.json();
return data;
Now all we have to do is access the beard data from resp , which we defined as the response from using fetch to POST, in json format.
We're done with the analyzeImage() function! It returns the beard data we requested using fetch. However, we still have one last step.
5️⃣ Call the function
var analysis = await analyzeImage(image);Head back to the module.exports() function because we need to call analyzeImage() for it to actually execute. Recall that we defined image using var image = parts[0].data; and got the image data from parsing the raw body.
Now, we're simply passing the image data into the async function (note the await!) and directing the output to analysis.
context.res = {
        body: {
            analysis
        }
    }

context.done()
To close out the function, we return analysis (the beard data and what was outputted from analyzeImage()) in context.res. This is what you will see when you successfully make a POST request to our HTTP Trigger.
🥳 Here's what your final HTTP Trigger should look like:
The npm dependencies and module.exports():
var multipart = require('parse-multipart');
var fetch = require('node-fetch');

module.exports = async function (context, req) {
    context.log('JavaScript HTTP trigger function processed a request.');

    // receiving an image from an html form

    //enctype = multipart/form-data
    //parse-multipart library

    var body = req.body;

    //returns ---WebkitFormBoundaryjf;ldjfdlf
    var boundary = multipart.getBoundary(req.headers['content-type']);

    //returns an array of inputs
    //each object has filename, type, data
    var parts = multipart.Parse(body,boundary);

    //array has 1 object(an image)
    var image = parts[0].data;

    var analysis = await analyzeImage(image);

    context.res = {
        body: {
            analysis
        }
    }

    context.done()
}
The awesome analyzeImage() function:
async function analyzeImage(image){
    const subscriptionKey = process.env['face_key'];
    const endpoint = process.env['face_endpoint'];

    const uriBase = `${endpoint}/face/v1.0/detect`;

    let params = new URLSearchParams({
        'returnFaceAttributes': 'facialHair'
    })

    let resp = await fetch(uriBase + '?' + params.toString(), {
        method: 'POST',
        body: image,
        headers: {
            'Content-Type': 'application/octet-stream',
            'Ocp-Apim-Subscription-Key': subscriptionKey
        }
    })

    let data = await resp.json();

    return data;
}Nearly there! Now let's just make sure our HTTP Trigger actually works...
Since our Azure Function will be taking a picture in the request, we are going to be using Postman to test it
You can install it from the Chrome Store as a Chrome extension.
What will Postman do?
We are going to use Postman to send a POST request to our Azure Function to test if it works, mimicking what our static website will do.
Our HTTP trigger Azure Function receives an image as an input and outputs beard data!
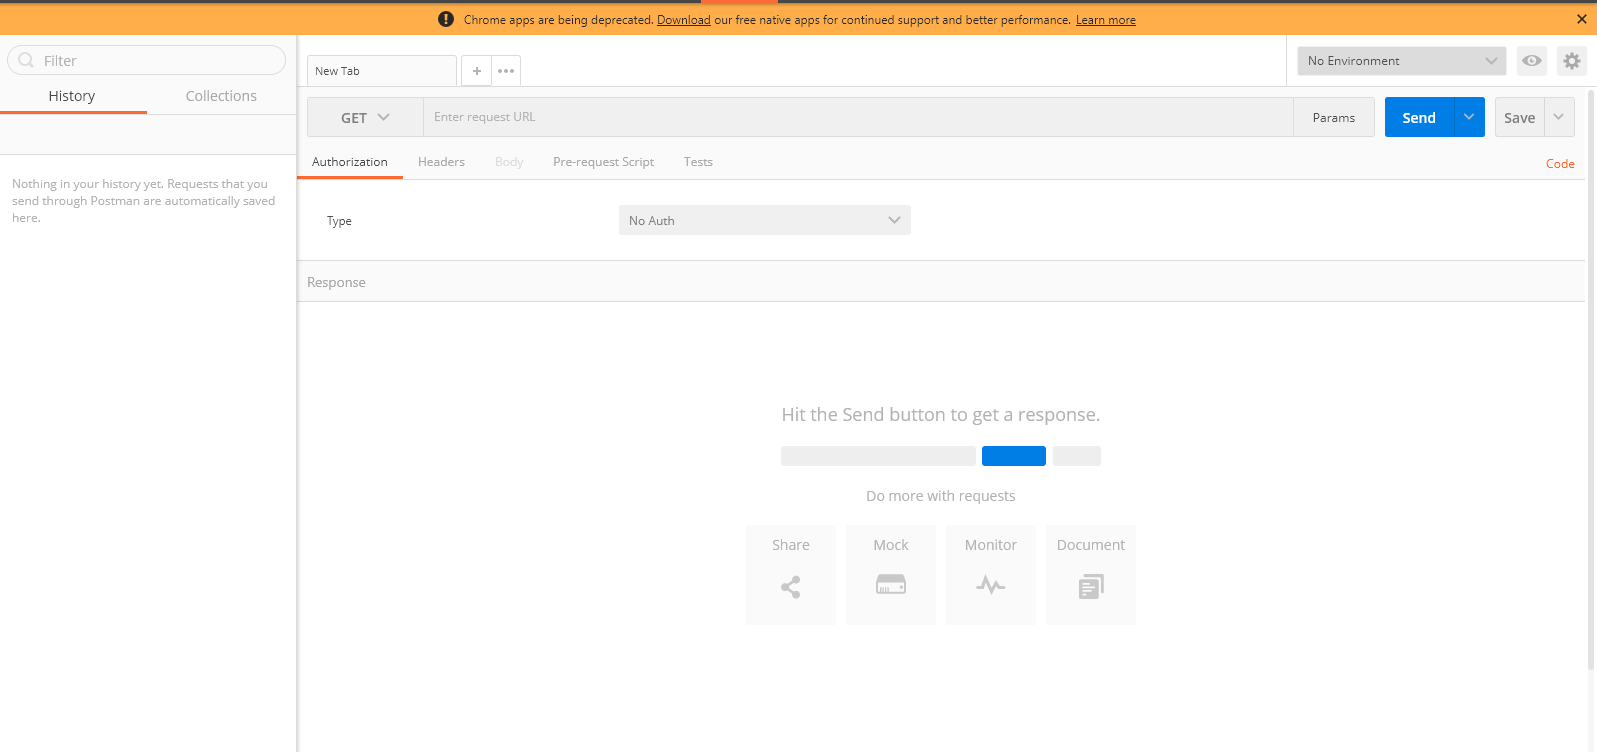
Now it is time to send a POST request to the HTTP Trigger Function, so using the drop-down arrow, change "GET" to "POST"
The goal? Receive beard data from an inputted image.
Go to your Function's code and find this:

Click to copy!
content-type into Key and multipart/form-data into Value.image into Key and use the dropdown to select "file" in order to upload an image.
To move on, comment any questions you have. If you have no questions, comment Done.
This week, you will be going through steps to set up tools needed to be successful in this camp. If you are already familiar with some, feel free to skip to the end and complete the task to move on.
One very important rule...
Don't work on your code in the web editor. This is bad practice, and you will regret it later.
📝 Task 1: Create a new branch named test, add a sentence introducing yourself to the end of the README.md file, and commit the change to test. Then, make a pull request to your main branch and merge the edits.
Pull Request Guidelines
Adding self introductionKey functions you should be familiar with after this task include:
🏕️ To move on, make sure you commit the change and merge the branch!
A declarative, efficient, and flexible JavaScript library for building user interfaces.
🖖 Vue.js is a progressive, incrementally-adoptable JavaScript framework for building UI on the web.
TypeScript is a superset of JavaScript that compiles to clean JavaScript output.
An Open Source Machine Learning Framework for Everyone
The Web framework for perfectionists with deadlines.
A PHP framework for web artisans
Bring data to life with SVG, Canvas and HTML. 📊📈🎉
JavaScript (JS) is a lightweight interpreted programming language with first-class functions.
Some thing interesting about web. New door for the world.
A server is a program made to process requests and deliver data to clients.
Machine learning is a way of modeling and interpreting data that allows a piece of software to respond intelligently.
Some thing interesting about visualization, use data art
Some thing interesting about game, make everyone happy.
We are working to build community through open source technology. NB: members must have two-factor auth.
Open source projects and samples from Microsoft.
Google ❤️ Open Source for everyone.
Alibaba Open Source for everyone
Data-Driven Documents codes.
China tencent open source team.