Congratulations! You have been hired by Access Camp and for your first task, you have been tasked with building out a website to log campers with their activities.
Upon completion of this project, you will be able to:
- Create a Spring Boot project using the Spring Initializr.
- Build and API according the deliverables below.
- Unit test a Spring aplication
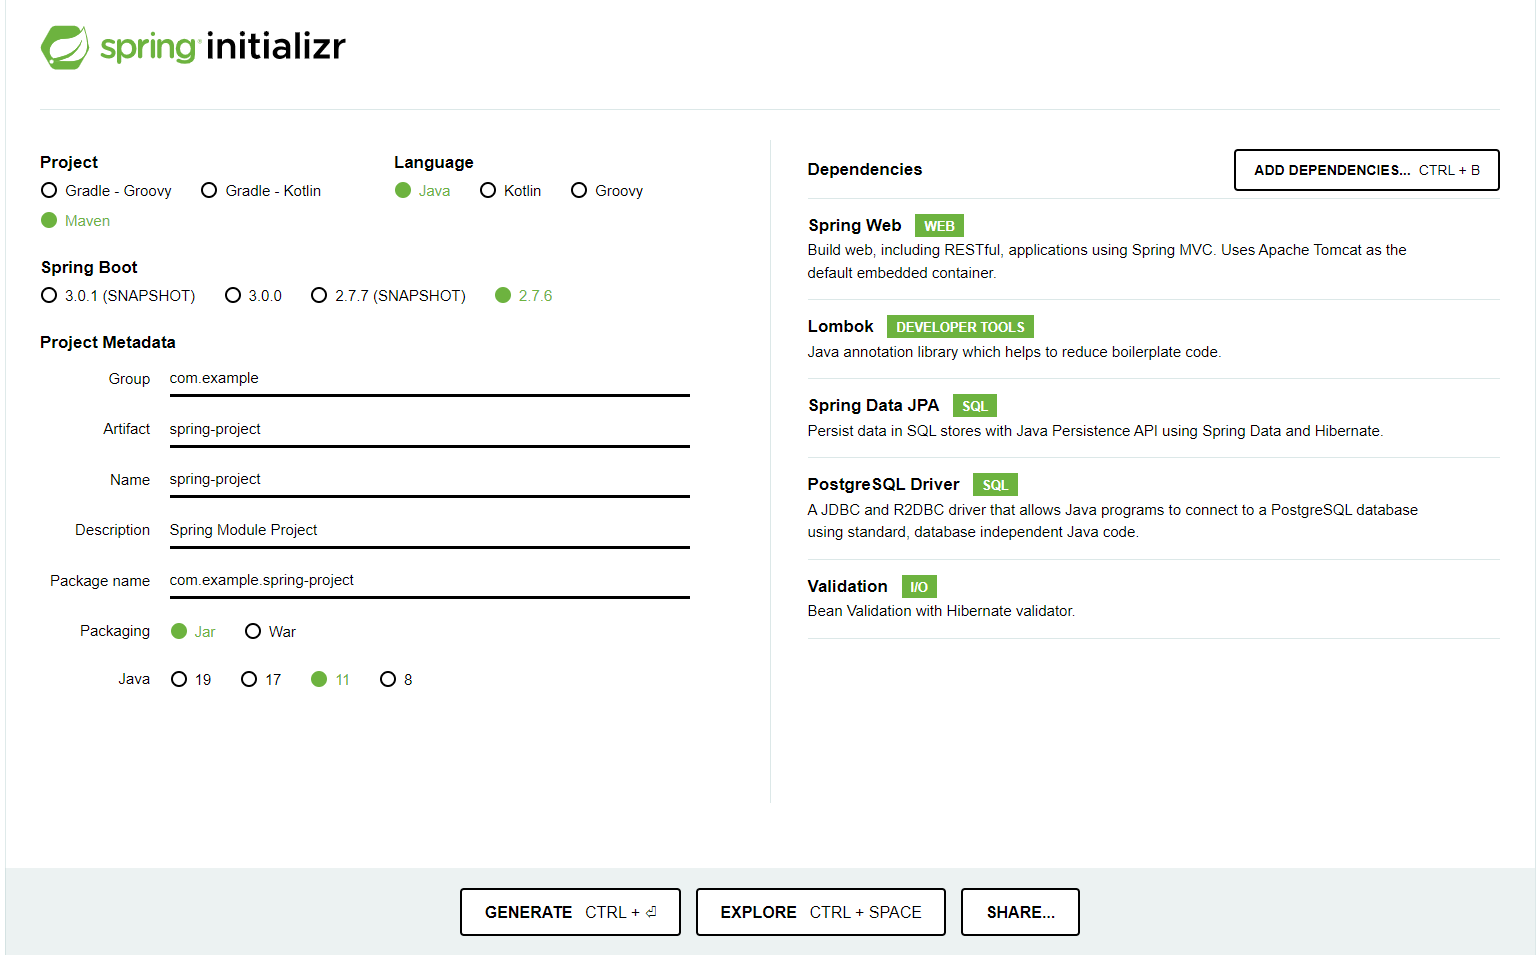
- Go to https://start.spring.io/.
- Select the project properties.
- Select "Maven Project", as we will use Maven as the build tool.
- Select "Java" as the language.
- Select the most recent version of Spring Boot 3. (Make sure it does not have "SNAPSHOT" listed after it.)
- Change the "Artifact" metadata field to "spring-project". (This will update the "Name" and "Package name" metadata fields too).
- Change the "Description" metadata field to "Spring Module Project".
- Select the appropriate Java JDK version.
- Add dependencies.
- Let's add the Spring Web dependency to create a Spring web application.
- Click "ADD DEPENDENCIES".
- Search for "spring web".
- Select "Spring Web" from the list.
- Click on "ADD DEPENDENCIES" again and add "Lombok" from the list.
- Click on "ADD DEPENDENCIES" again and add "Spring Data JPA" from the list.
- Click on "ADD DEPENDENCIES" again and add "PostgreSQL Driver" from the list.
- Click on "ADD DEPENDENCIES" again and add "Validation" from the list.
- Click on the "Generate" button on the bottom. This will download a zip file containing the Spring Boot Project.
- Unzip the archive and open it in IntelliJ or a preferred code editor.
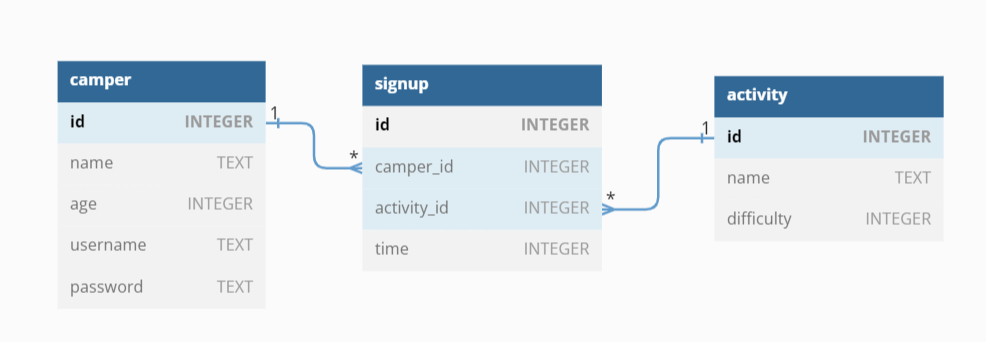
You need to create the following relationships:
- A
Campercan have manySignups. - An
Activitycan have manySignups. - A
Signupcan have aCamperfor a certainActivity
Start by creating the models for the following database tables:
If you clone this Git repository, you'll find the data.sql file that
contains the schema you can import into pgAdmin4.
Create a Spring Boot API that models the campers signing up for activities. Make sure you consider the relationships that are shown in the entity-relationship (ER) diagram above.
It is recommended to follow this outline of how to go about creating the project:
- Create all the classes and interfaces to set up the project structure.
- Write the code for the entity and DTO classes first.
- For example: Create the
Activity,CamperandSignupentities and then write their corresponding DTO classes. - Consider the relationships based on the ER diagram above.
- Consider the validations that should be added to the DTO classes in the section below.
- For example: Create the
- Add the
ModelMapperbean to the configuration file (i.e.,SpringProjectApplication).- Note: You will most likely need to add the
ModelMapperdependency to thepom.xml.
- Note: You will most likely need to add the
- Add the database properties to the
application.propertiesfile to connect to the PostgreSQL database,camp_db. - Write the code for the repository classes to extend the
CrudRepositoryinterface or theJpaRepositoryinterface.- Note: The lessons we have seen thus far have gone over the
CrudRepositoryinterface, but you can use theJpaRepositoryinterface too as it provides some more built-in methods. For more information on theJpaRepositoryinterface, please see JpaRepository Documentation.
- Note: The lessons we have seen thus far have gone over the
- Write the code for the
ActivityServiceandActivityControllerclasses.- It is recommended to do this in iterations.
- For example, write the POST method to add a new activity to the database. Then test and make sure that works using Postman. Once that is working, move onto the next method until all desired methods are working in both the controller and service classes.
- Consider the routes that need to be implemented and the example JSON files in the section below.
- It is recommended to do this in iterations.
- Write the code for the
CamperServiceandCamperControllerclasses.- It is recommended to write the code in iterations.
- Consider the routes that need to be implemented and the example JSON files in the section below.
- Write the code for the
SignupServiceandSignupControllerclasses.- It is recommended to write the code in iterations.
- Consider the routes that need to be implemented and the example JSON files.
REMINDER: Commit your changes to Git every time you get a feature working! This will create a clean git history and allow the instructors to see how you approached this project.
The above requirements are requirements you can start on now, as they make use of concepts from the previous modules.
The following requirements are requirements that you will implement throughout the course of this module:
- Make use of the logging framework and log to a file called
spring-project.log. - Add Spring Security and basic authentication features.
- Add unit testing to confirm everything is still working as expected.
Only submit your project once you are fully finished making changes to it to your instructor.
Add validations to the Camper DTO:
- The name field should not be empty nor
null. - The age field should be an integer between 8 and 18.
- The username to log into the camper portal should not be empty nor
null. - The password to log into the camper portal should not be empty nor
null. This should also have a length of at least 8 characters.
Add validations to the Signup DTO:
- The time field must be between 0 and 23 (referring to the hour of day for the activity).
Hint: Add the validation annotations to the DTO classes and the @Valid
annotation to the respective controller classes. Refer back to the "Validations"
lesson from Spring Module 1.
Set up the following routes. Make sure to return JSON data in the format specified along with the appropriate HTTP verb.
This route should create a new Camper. It should accept an object with the
following properties in the body of the request:
{
  "name":"Suzie Bingham",
  "age":14,
  "username":"sbingham",
  "password":"SuziePoo6626"
}
If the Camper is created successfully, send back a response with the new
Camper:
{
  "id": 1,
  "name": "Suzie Bingham",
  "age": 14
}Return JSON data in the format below. Note: you should return a JSON response in this format, without any additional nested data related to each camper.
[
  {
    "id": 1,
    "name": "Suzie Bingham",
    "age": 14
  },
  {
    "id": 2,
    "name": "Dustin Henderson",
    "age": 14
  }
]If the Camper exists, return JSON data in the format below.
Note: you will need to serialize the data for this response differently than
for the GET /campers route. Make sure to include an array of activities for
each camper.
{
  "id": 1,
  "name": "Suzie Bingham",
  "age": 14,
  "activities": [
    {
      "id": 1,
      "name": "Archery",
      "difficulty": 2
    },
    {
      "id": 2,
      "name": "Physics and Fun",
      "difficulty": 4
    }
  ]
}This route should create a new Activity. It should accept an object with the
following properties in the body of the request:
{
  "name": "Archery",
  "difficulty": 2
}
If the Activity is created successfully, send back a response with the new
Activity:
{
  "id": 1,
  "name": "Archery",
  "difficulty": 2
}Return JSON data in the format below:
[
  {
    "id": 1,
    "name": "Archery",
    "difficulty": 2
  },
  {
    "id": 2,
    "name": "Physics and Fun",
    "difficulty": 4
  }
]If the Activity exists, it should be removed from the database, along with any
Signups that are associated with it (a Signup belongs to an Activity, so
you need to delete the Signups before the Activity can be deleted).
After deleting the Activity, return an empty response body, along with the
appropriate HTTP status code.
This route should create a new Signup that is associated with an existing
Camper and Activity. It should accept an object with the following
properties in the body of the request:
{
  "camper_id": 1,
  "activity_id": 2,
  "time": 9
}
If the Signup is created successfully, send back a response with the data
related to the Signup:
{
  "id": 1,
  "time": 9,
  "camper_id": 1,
  "activity_id": 2
}Consider the following instructions:
- Generate a unit test for the
ActivityControllerclass.- Remember, to generate a test class in IntelliJ, you can right-click anywhere
in the code of the
ActivityControllerclass --> click "Generate..." --> choose "Test...". - Name the test class "ActivityControllerUnitTest". You will want to add a
setUp()method along with all the methods in theActivityControllerto test. - Make use of the Mockito framework when appropriate.
- When testing a void method, use the
doNothing()andverify()methods provided in the Mockito library. To learn more about these methods, please see: Baeldung: Mockito Void Methods.
- When testing a void method, use the
- Remember, to generate a test class in IntelliJ, you can right-click anywhere
in the code of the
- Generate a unit test for the
CamperControllerclass.- Remember, to generate a test class in IntelliJ, you can right-click anywhere
in the code of the
CamperControllerclass --> click "Generate..." --> choose "Test...". - Name the test class "CamperControllerUnitTest". You will want to add a
setUp()method along with all the methods in theCamperControllerto test. - Make use of the Mockito framework when appropriate.
- Remember, to generate a test class in IntelliJ, you can right-click anywhere
in the code of the
- Generate a unit test for the
SignupControllerclass.- Remember, to generate a test class in IntelliJ, you can right-click anywhere
in the code of the
SignupControllerclass --> click "Generate..." --> choose "Test...". - Name the test class "SignupControllerUnitTest". Add all the methods in the
SignupControllerto test. If there is more than one method, add asetUp()method as well. - Make use of the Mockito framework when appropriate.
- Remember, to generate a test class in IntelliJ, you can right-click anywhere
in the code of the
If time allows, and you want to try to implement some stretch goals, consider the following:
- Add PUT requests to update a camper, activity, or signup.
- Add TRACE-level log statements to the application.
- Implement authentication with the campers' credentials.
- Implement authorization so that the camper logged in can only access his or her signups.
- Add integration tests to the controller classes and repository classes.
- Add an acceptance test to test every endpoint in the application.
- Add integration tests to the controller classes and repository classes.
- Add an acceptance test to test every endpoint in the application.