Atualmente trabalho na Zaply com foco no produto Recipe2basket onde sou cofundador e atuo como CTO.
- Javascript
- HTML
- CSS
- React
- Nextjs
- Typescript
- Node.js
- Express.js
- AdonisJs
- Python
- SQL
- NoSQL
- Typescript
- AWS
- E um pouco de Google Cloud
Home Page: https://lab.github.com/vtex-trainings/vtex-io-service-course
Atualmente trabalho na Zaply com foco no produto Recipe2basket onde sou cofundador e atuo como CTO.
![dependabot[bot] avatar](https://avatars.githubusercontent.com/in/29110?v=4 "dependabot[bot]")


With the Analytics client implemented, we want to use the Events as trigger to the requests. This means that, for every event listened, we want to perform a request to the Analytics app. So, for every X seconds, we will have a new data on Live Products.
In VTEX IO, events are often used as triggers to other actions, such as sending e-mails to the final client. To implement this, we need to configure our app's client and event handler.
As the Analytics client is implemented, we just need to use it in the event handler. First, in the node/event/liveUsersUpdate.ts file, import the client we implemented in the previous step:
import { Clients } from '../clients/index'Now, we need to use the EventContext that we already configured before. Import it by updating the method. You can do so like this:
//node/event/liveUsersUpdate.ts
import { Clients } from './../clients/index'
+import { EventContext } from '@vtex/api'

+export async function updateLiveUsers(ctx: EventContext<Clients>) {
...
}
Note: you can also globally declare your event context in the
index.tsfile. If you do so, you doesn't need to import in every file you want to use it.
Now, to use the Analytics client, do the following:
//node/event/liveUsersUpdate.ts
export async function updateLiveUsers(ctx: EventContext<Clients>) {
+  const liveUsersProducts = await ctx.clients.analytics.getLiveUsers()
+  console.log('LIVE USERS: ', liveUsersProducts)
+  return true
}
Finally, run vtex link and for every event fired, you should see the live users retrieved from the Analytics.
The result should be like this:

Now, with the query and resolver implemented, we need to use it to retrieve the top n most viewed products. By using the GraphQL IDE, we can test the query we implemented before.
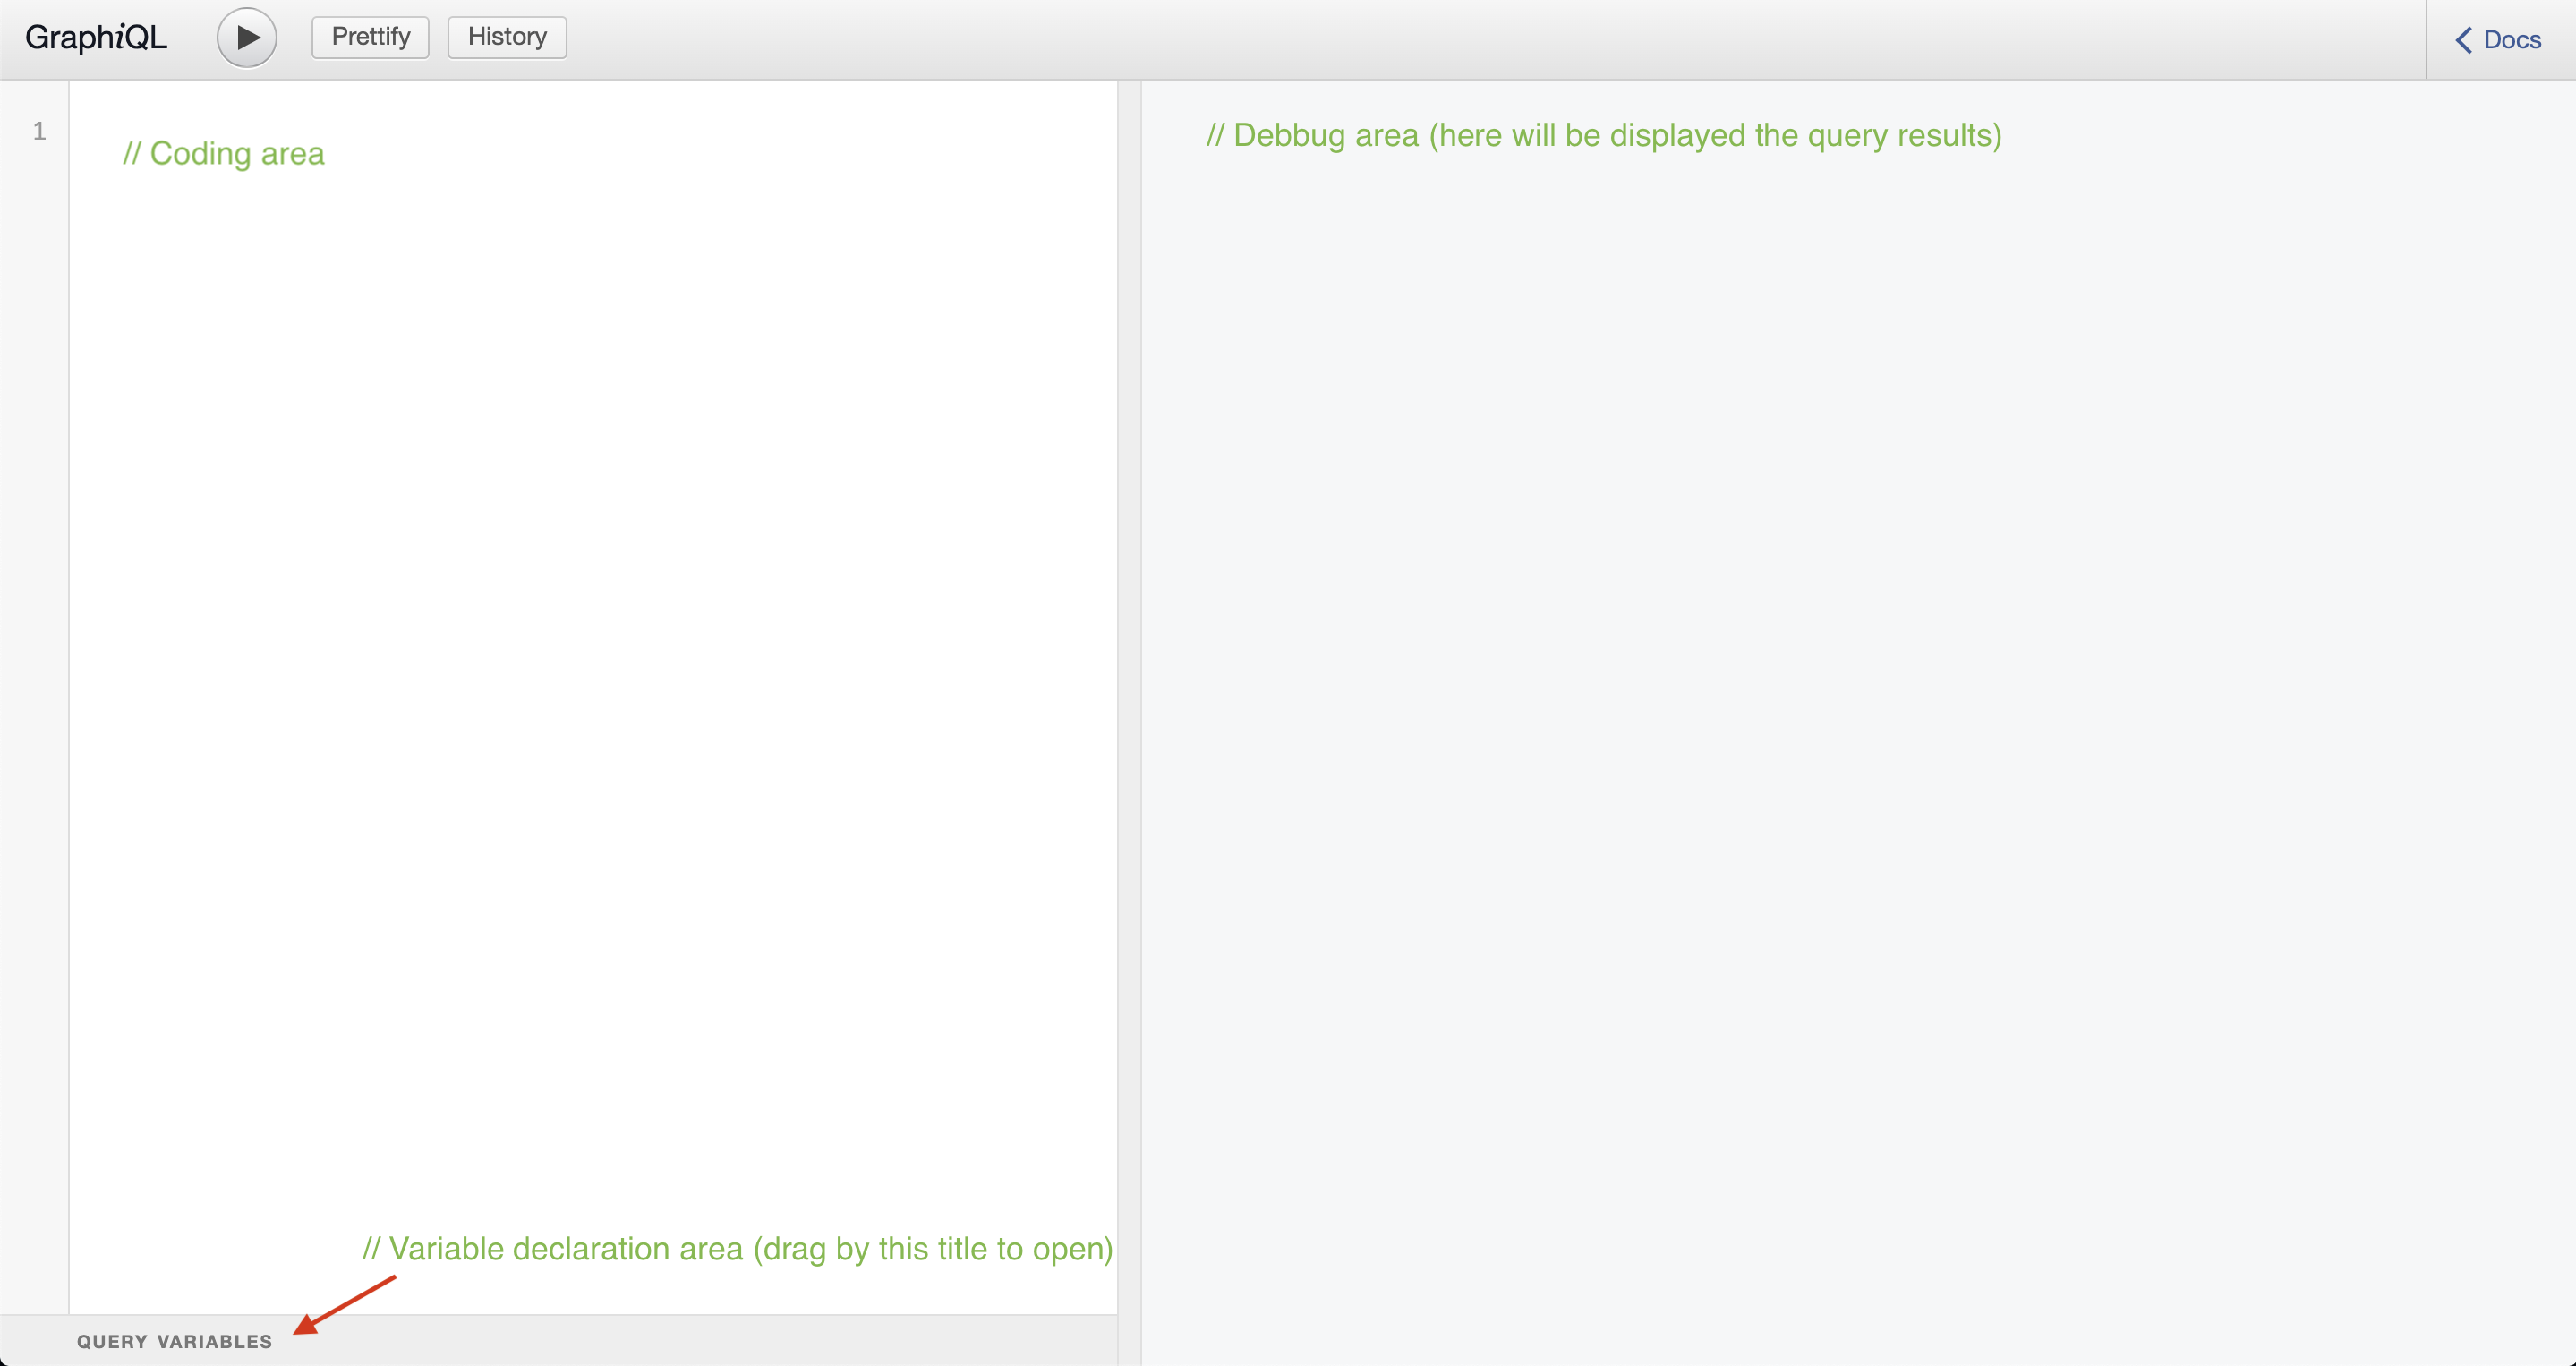
GraphiQL is a graphical interactive in-browser GraphQL IDE. Before using the query in the app, it is interesting to test its functionality. To do so, we will reproduce your query usage in the GraphQL IDE.
Exploring the IDE interface, there are three main areas: the coding area, the query variables area and the debug area. Check where each shows up in the interface in the image below.
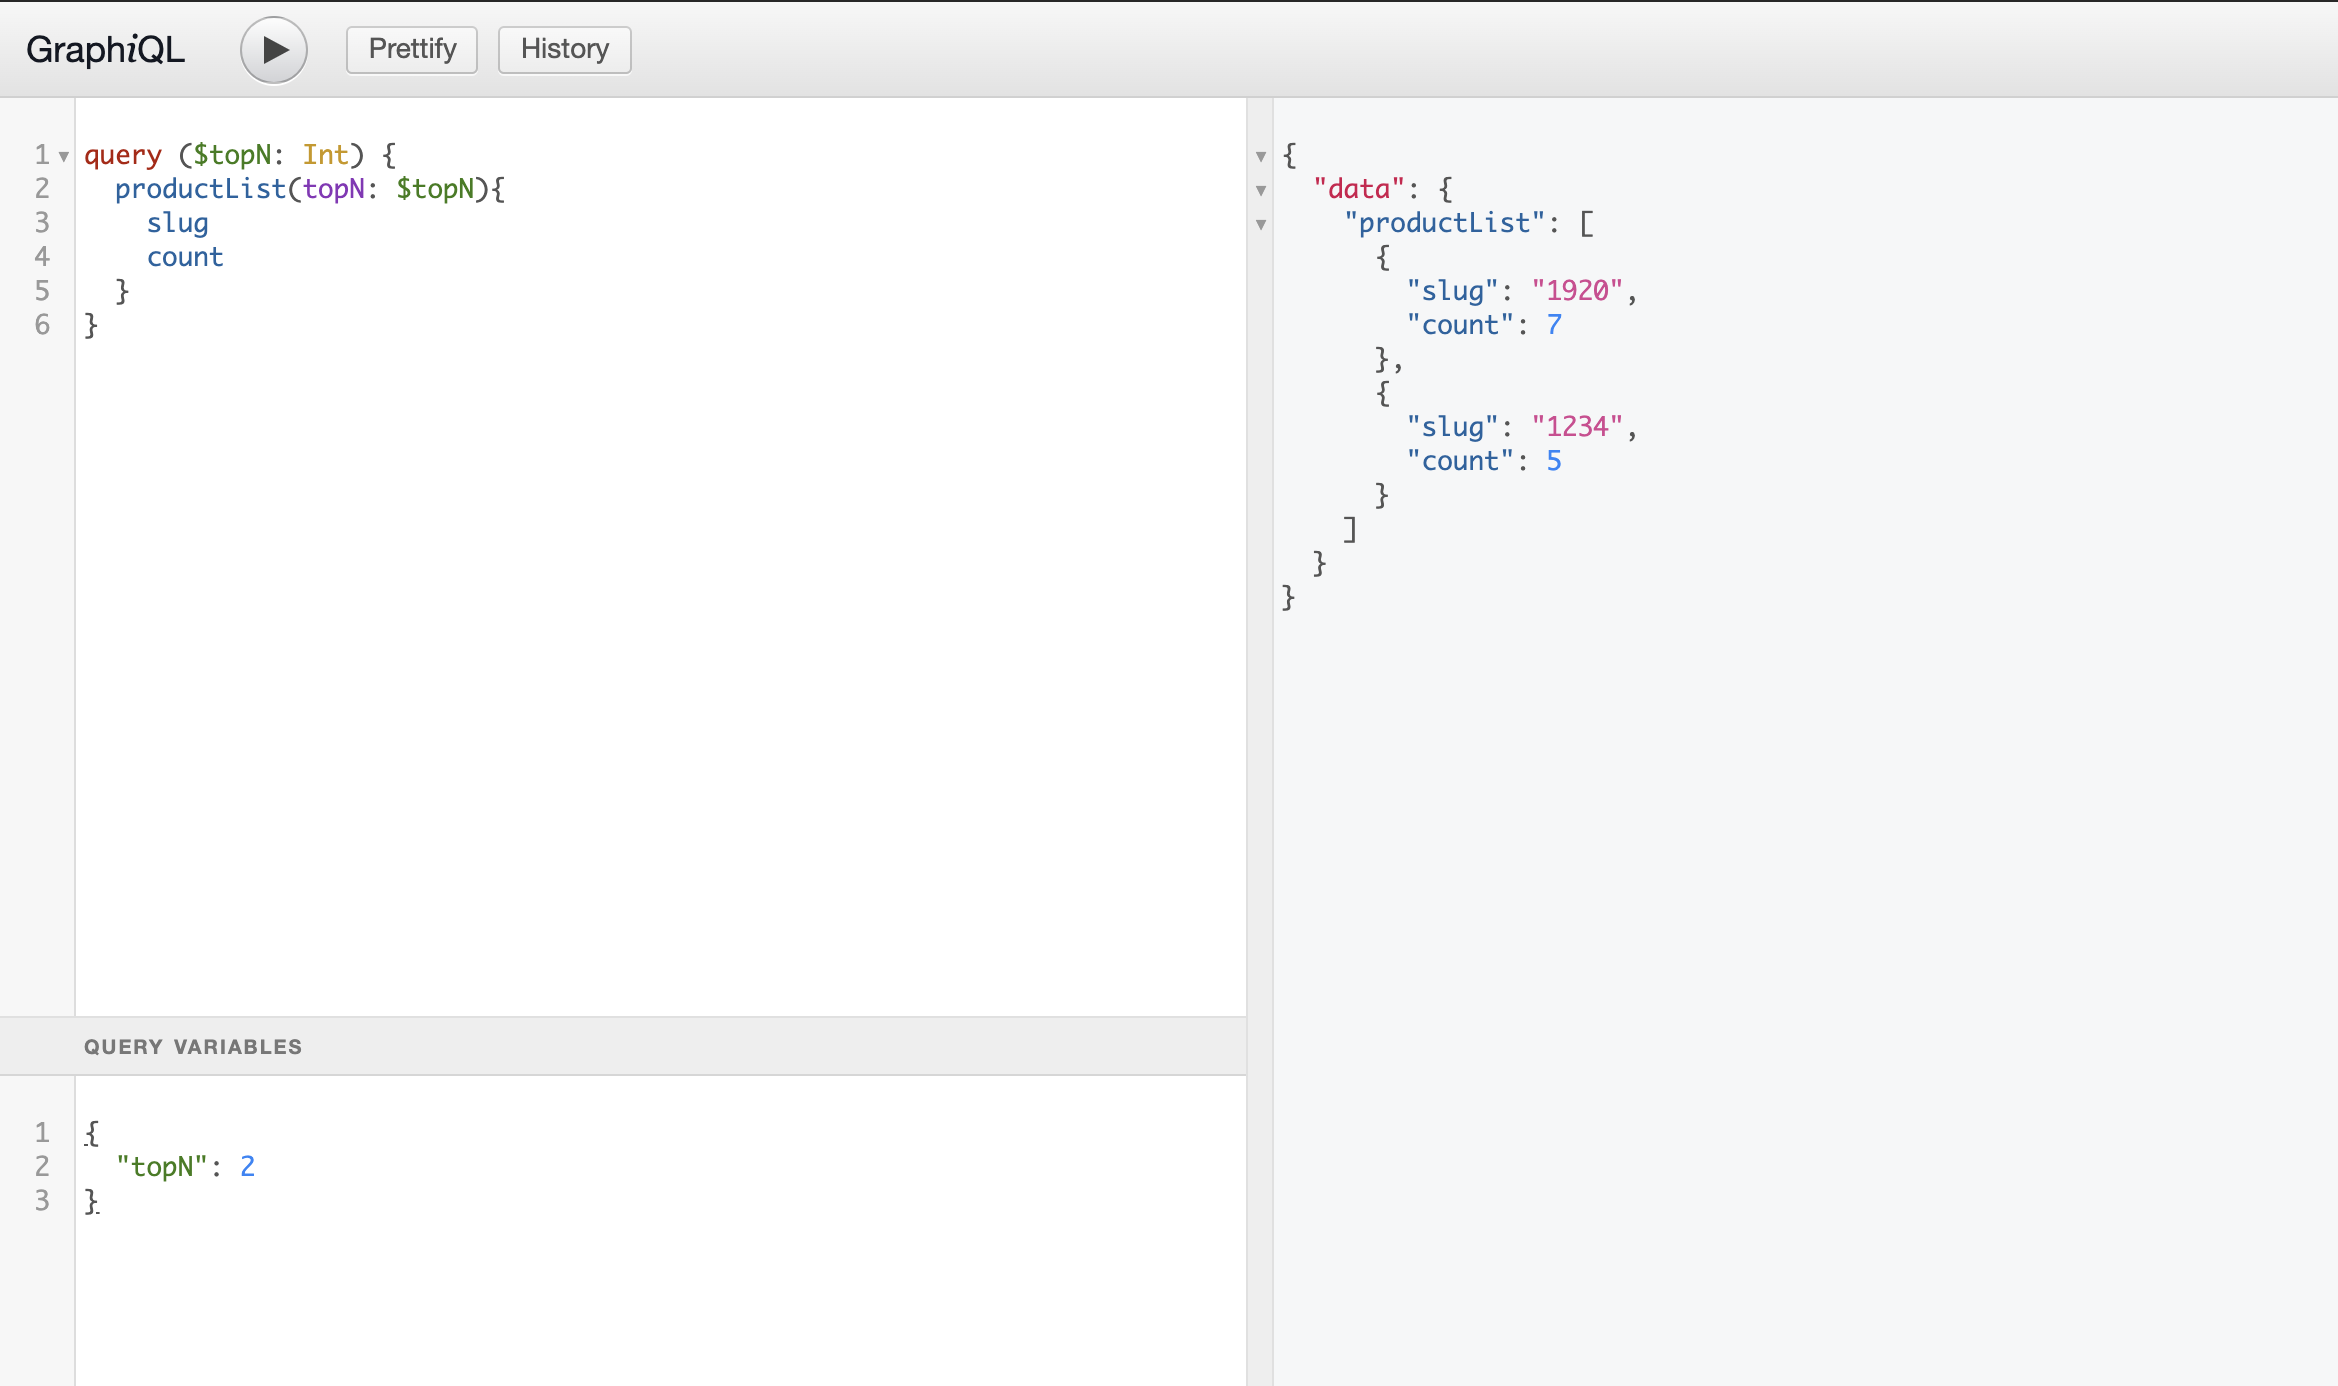
Open the GraphiQL route and type the code below in the coding area:
query ($topN: Int) {
  productList(topN: $topN){
    slug
    count
  }
}
The query that we just declared uses a variable (topN). Now we need to declare it in the Query Variables area:
{
  "topN": 2
}
❗ The Query Variables area is below the coding area, to amplify it's area just drag by the title.
At last, just click on the play button and check the outcome on the debug area. The query results should look like this:
Now that we are using the data retrieved from the Analytics, we need to save this data and update it. So, every time we retrieve new data we want to update it using Master Data (a database-as-a-service product from VTEX).
Master Data is the VTEX service that makes it possible to create database architectures for a store. By default, it's used to store and organize customer data, but it's also widely used by VTEX stores to make business rule customizations and create applications for your virtual store. You can configure applications that use the module as a data repository to create a system on top of Master Data, just by modeling new data.
In the current version of Master Data, we use the concept of data entities and use JSON Schema to validate and index documents. One data entity can have many schemas, depending on how you need to use the data stored. You'll need the name of the JSON Schema to implement a query, as will be seen in the following steps.
Note: the JSON Schema is not required for all endpoints. If you don't need to validate your data, you may save your documents without any setup, just indicate the data entity and some access credential. Like your case now, as we need validation, we must create a JSON Schema.
Master Data Documents have unique IDs and can have many customized fields. In the JSON Schema, you can declare fields and indicate the ones that you want to index. Indexed fields can be retrieved in queries.
A Master Data client is already provided in VTEX IO Node Runtime. It is possible to access this client through the Context, a param which contains all IO Clients in the clients property.
In this step, it will be used to fetch data regarding the top-N most viewed products, where N is a parameter that will be used to get the desired amount of products.
NOTE: It is important to highlight that the Master Data client will be available as long as the correct version of
@vtex/apiis installed in the node folder. It can be used by accessingctx.clients.masterdata.
First, we need to setup the policies in our app, to authorize it to use Master Data. To do so, complement the manifest.json file:
//manifest.json
{
  ...
  },
  "credentialType": "absolute",
  "policies": [
+      {
+        "name": "ADMIN_DS"
+      },
+    {
+      "name": "outbound-access",
+      "attrs": {
+        "host": "api.vtex.com",
+        "path": "/dataentities/*"
+      }
+    }
  ],
  "dependencies": {
  ...
}
By doing this, we are guaranteeing that this app has the authorization to access Master Data.
Now, to save this data in the Master Data, we need to, first, check for each productSlug, if it is already saved. To do so, we will use a method of the Master Data client called searchDocuments. To use it, in the node/event/updateLiveUsers.ts file, do something like this:
//node/event/updateLiveUsers.ts
...
+ import { COURSE_ENTITY } from '../utils/constants'

export async function updateLiveUsers(ctx: EventContext<Clients>) {
  const liveUsersProducts = await ctx.clients.analytics.getLiveUsers()
  console.log('LIVE USERS ', liveUsersProducts)
+  await Promise.all(
+    liveUsersProducts.map(async ({ slug, liveUsers }) => {
+       const [savedProduct] = await ctx.clients.masterdata.searchDocuments<{
+         id: string
+         count: number
+         slug: string
+       }>({
+         dataEntity: COURSE_ENTITY,
+         fields: ['count', 'id', 'slug'],
+         pagination: {
+           page: 1,
+           pageSize: 1,
+         },
+         schema: 'v1',
+         where: `slug=${slug}`,
+       })
+    console.log('SAVED PRODUCT', savedProduct)
+    })
+  )
  return true
}
Note that we are using the
COURSE_ENTITY, from the global constants, to access your data.
Now, to make sure we are handling erros, implement a try-catch structure. To do so, do something like this:
export async function updateLiveUsers(ctx: EventContext<Clients>) {
  const liveUsersProducts = await ctx.clients.analytics.getLiveUsers()
  console.log('MOCKED LIVE USERS ', liveUsersProducts)
  await Promise.all(
    liveUsersProducts.map(async ({ slug, liveUsers }) => {
+      try {
        ...
+      } catch (e) {
+        console.log(`failed to update product ${slug}`)
+        console.log(e)
+      }
    })
  )
  return true
}
If our product is already saved, we need to update it by incrementing its count. Master Data has a method that allows us to update an existing document or create a new document, if the document does not exist - createOrUpdateEntireDocument. To use this method and implement the incrementation on the Master Data entity, in the same file that was changed before, right after the log line of saved product, add this code:
//node/event/updateLiveUsers.ts
export async function updateLiveUsers(ctx: EventContext<Clients>) {
  await Promise.all(
    liveUsersProducts.map(async ({ slug, liveUsers }) => {
      try {
        ...
        console.log({savedProduct})
+       await ctx.clients.masterdata.createOrUpdateEntireDocument({
+          dataEntity: COURSE_ENTITY,
+          fields: {
+            count: liveUsers,
+            slug,
+          },
+          id: savedProduct?.id,
+        })
      } catch {
        console.log(`failed to update product ${slug}`)
        console.log(e)
      }
    })
  )
  return true
}
Note: if an error is thrown inside an event handler, VTEX IO will retry sending this event.
Finally, run vtex link and wait for an event to be fired. Once it does, check your terminal for the logs in the code. Break the vtex link by typing ctrl + C and use the following cURL on the terminal to check the updates on Master Data:
curl --location --request GET 'https://api.vtex.com/api/dataentities/backendproductusers/search?_fields=slug,count&_schema=v1&an=appliancetheme' \
--header 'Content-Type: application/json'
The result should be like this:

The VTEX IO platform allows developers to create unique commerce experiences using Web technologies. It’s possible to create frontend blocks for Store Framework, backend services exposing REST or GraphQL APIs and combine a series of VTEX modules into a complete solution, packaging it into an app.
As VTEX IO powers big e-commerce operations, they require running code on a server. Services are how we run Node.js or .NET code on VTEX IO infrastructure, backed by API abstractions to improve developer experience.
It's important for you to have out test bot installed in this course repository so as for us to see your progress, even though it does not contains any tests or evaluation on each step. So as to install it, follow the steps below:
Open our test bot installation page and click on Configure;
Select the Only selected repositories option, then click on Select repositories and type in store-block;
Click on Gabriel-Eich/store-block and then on Install.

A Service must be exported from a VTEX IO app, just like themes or store blocks, using builders node or dotnet. With these, you are able to develop a REST API without having to set up a server, GraphQL APIs and routes.
Services in VTEX IO support one-command rollbacks and continuous integration. They can export internal and external routes and run on top of Kubernetes. You can count on VTEX IO to manage the scalability of your services.
On the /node folder of a service lives service.json, where it´s possible to declare routes that the service must respond to and other configurations like timeout and memory.
During this course, you will implement some services in VTEX IO and learn a bit more about the possibilities that they offer to your development.
Now that we have updated the products count, we need to retrieve the top n most viewed products. We can, then, use Masterdata to retrieve the product page view data and sort by the count field. We can also limit the length of retrieved products, creating a customized size rank of most visited products.
To get these product page views, we will use GraphQL, the technology used by VTEX IO for data fetching, to implement a query to Masterdata. GraphQL allows us to implement queries in a simple and easy way, specifying the data you want to retrieve. This makes your API reliable, since GraphQL controls the data fetched instead of the server itself.
It's also the only possible way to create an interface between services and front end applications.
Therefore, GraphQL uses types and a query schema to specify the data retrieved and resolvers to get the exact data needed.
On the directory /graphql/types create the productView.graphql file and declare the type of the product list we want to retrieve:
type ProductView {
    slug: String
    count: Int
}
Still in the /graphql directory, define the schema in the schema.graphql file:
type Query {
    productList(topN: Int): [ProductView]
}
Keep in mind that the schema will define the structure of our query and the retrieved data.
Also, in this declaration you can include directives. In some cases, it is required, for example, if you need to get the user token or use cookies (e.g.: OrderForm). To read more about it, check out this link.
With the schema, types and the query defined, we need to create the query's resolver. The resolver is what happens when a query is executed. In our case, we want to perform a scroll on Masterdata, ordering by the count (as we want to get a top most viewed products) and limiting the page size (the top n). To define this resolver, in the /node/resolvers directory, create the file products.ts and do the following:
  //node/resolvers/products.ts
  import { COURSE_ENTITY } from '../utils/constants'

  export const productList = async (
    _: any,
    { topN }: { topN: number },
    { clients: { masterdata } }: Context
  ) =>
    masterdata.scrollDocuments(
      {
        dataEntity: COURSE_ENTITY,
        fields: ['count', 'slug'],
        schema: 'v1',
        size: topN,
        sort: `count DESC`
      }
    ).then((({data}) => data))
Note: you can check the Master Data scroll documentation in this link
At last, we need to update the index.ts file to set up the resolver and the query. Complete the service declaration as below:
    },
        graphql: {
            resolvers: {
                Query: {
                    productList,
                },
        },
    },
})
And, also, remember to add the graphql builder on the manifest.json:
//manifest.json
"builders": {
+        "graphql": "1.x",
    "docs": "0.x",
    "node": "6.x"
},
Finally, link the app and you should get a GraphQL route. The result should be like this:

In this step, some clients concepts are going to be briefly explained and it's presented which are the clients that are necessary for this course: analytics client and master data client. The first one will be implemented on this step and you'll also learn how to use a client that has been already implemented in our API.
Clients, on VTEX IO, are abstractions to other services. We tackle complexities when setting up an HTTP client, for example, so you can focus on the real value of your software. Whenever you need to setup a connection with an external API or another VTEX service, you should create a client! Some standard clients are already baked into VTEX IO, check them here.
If you already got to know more about IO services, you probably know that your implementation exports functions that receive a context object. These functions can be a resolver function to a GraphQL field, a middleware to an HTTP server or an event handler, and, in all of them, you receive a ctx (or however you wanna call it) object of type Context, and it is inside of ctx.clients where you’ll find each client.
It's possible to read more about clients concepts on this document.
In this course, it will be necessary to create a client that will be used to get information regarding product's number of views. The client that will be created will make a REST request in which it'll retrieve information about product views. This client needs to have a function that will be used on a handler for a specific route and this is how it can be tested.
In this step, we will implement the Anaylitcs client. So,
First, in the /node/clients/ directory, you will find a file called analytics.ts, which already has a sketch, just like the code block below. This is where you'll implement your client.
import { AppClient } from '@vtex/api'

export default class Analytics extends AppClient {}
You can noticed in this code block that Analytics is a client that extends from
AppClientbecause this offers pre-configurations that assure that your client has a secure communication with other parts of your app.
The client needs to have a constructor and just a single method, called getLiveUsers. This method returns a promise of an array that its elements are of the type LiveUsersProduct. Using the code below, add the necessary code lines to the client:
//node/clients/analytics.ts
import { AppClient, InstanceOptions, IOContext } from '@vtex/api'

export default class Analytics extends AppClient {
+  constructor(context: IOContext, options?: InstanceOptions) {
+    super('[email protected]', context, options)
+  }

+  public getLiveUsers(): Promise<LiveUsersProduct[]> {}
}

+interface LiveUsersProduct {
+  slug: string
+  liveUsers: number
+}
The interface that is defined is going to be used as a typing on the method that we'll implement.
Now it's necessary to implement the getLiveUsers method. It returns an HTTP GET request to a well-defined endpoint that is responsible for getting the data that is needed in this application. So add the following line to the method getLiveUsers:
return this.http.get('_v/live-products')The method that you've just created will get the necessary data for this application: an array of objects that have two fields:
slug, a string that represents the product ID andliveUsers, a number that is the quantity of users visualizing this product - which are the fields in the interface.
With your analytics client already implemented, it's necessary to declare it as one of the clients in the Clients class, so it will be accessible using the Context that we've talked about at the beginning of this step.
So, in the node/clients/ directory, go to the file called index.ts and add a get method to the class that refers to the analytics client. It's also necessary to import the client that you created.
// node/clients/index.ts
+ import Analytics from '../clients/analytics'

export class Clients extends IOClients {
+  public get analytics() {
+    return this.getOrSet('analytics', Analytics)
  }
}
So as to see it working, it's possible to use getLiveUsers method inside the handler for the analytics client. Using a route that it's already defined in the project, it is possible to send a request to it and the handler responsible for this route will call the method that we created.
Inside the node directory, there is a folder called handlers. There is already a file named analytics.ts, in which its necessary to do two things for your test to work: get the analytics client from ctx and replace the content of ctx.body with the method mentioned before, as you can see in the code block below:
  export async function analytics(ctx: Context, next: () => Promise<any>) {
+    const {
+      clients: { analytics },
+    } = ctx
+    ctx.status = 200
-    ctx.body = 'OK'
+    ctx.body = await analytics.getLiveUsers()
+    ctx.set('cache-control', 'no-cache')
    await next()
  }
Now let's test it! It's possible to use Postman to send a GET request to the following route:
{your workspace}--appliancetheme.myvtex.com/_v/app/analytics/realTime
and it's expected that it replies with the data and status 200.

Making a brief overview of the Boilerplate, there are two directories (/node and /graphql) and the manifest.json file, which is an important file to your VTEX IO app because it will be the first communication point with the VTEX IO.
In the manifest.json file, you will find the app's name, vendor, version, and other information to pay attention to: builders, policies and dependencies. In this initial state, we have the following configurations:
docs builder and the node builder, with their respective versions;events-example app, as it is listed as a dependency for this course app./node Directory OverviewAll directories used over the course are already in this initial project. Most of the directories are empty and will be filled throughout the course.
/node/clients: both files are almost blank and are now just placeholders for the next steps.
/node/handlers: contains a handler that will be used in the next steps.
/node/utils: you will find a file containing global constants declarations (/node/constants.ts).
/node/index.ts: contains the initial declarations for the app functionality like the cache declaration and the service declarations, which will be incremented during the course. Here is also possible to export resolver functions implementations.
/node/service.json: It describes your REST API and some characteristics that will directly impact your app's infrastructure attributes.
Your service.json file will be found inside your app's /node folder, and will look similar to this:
{
"memory": 256,
"timeout": 2,
"minReplicas": 2,
"maxReplicas": 4,
"routes": {
  "status": {
    "path": "/_v/status/:code",
    "public": true
  }
}
| Field | Type | Description |
|---|---|---|
| memory | MegaBytes. | How much memory your app will have allocated. This value will be overwritten if IO detects that your app is abusing memory usage |
| timeout | Seconds | VTEX.IO infra will abort the connection if the request time is longer than timeout |
| minReplicas | Integer | When your app is running, how many minimum replicas will be available |
| maxReplicas | Integer | The largest amount of replicas that will be available |
| routes | - | Describes your app's REST routes, inside you will descibe the name, (ex: ssr), the path, and if its public or private |
/graphql Directory OverviewOn this directory, you will find only the empty directories and the /graphql/schema.graphql blank file. This will all be filled throughout the course, as well.
For this course, this app has a dependency on the events-example app. The events-example app, when linked to your account and workspace, is responsable for providing events examples. Over the course, as we approach the events topic, there will be a more complete overview of the events-example app.
git clone) the events-example app from this repository and run vtex link in it's directory.Without the
events-exampleapp, this course app will not be successfully linked, as theevents-exampleapp is listed as a dependency.
After running vtex link on the events-example app, the terminal should show a healthcheck route that will be used later. It looks like this:

Some interactions on VTEX IO can generate events and they can be used as triggers for actions, like the activity on this step. For now, we will use the events fired by the events-example app.
On VTEX IO apps, events can be fired and used to trigger actions. For example, an app that listens for order placements and triggers a confirmation e-mail. It is important to highlight that events are workspace and account bound, which means that events are only visible for the account and workspace where they were fired. Events fired on your personal workspace will only be listened to by apps linked on this same workspace.
First, we are starting the event firing on the events-example app. This app will fire an event every X seconds. After running vtex link on the events-example directory, click on the healthcheck route available and a "ok" message should appear on the browser:

This healthcheck route access creates a cache context needed for the VTEX IO to fire events. Without it, the
events-exampleapp won't be able to fire the events our app is going to listen to.
We need to add the event handler on the Service declaration to refer to what the app is supposed to do when listening to the event. To do so, on the /node/index.ts file, complement Service declaration:
//node/index/ts

+ const TREE_SECONDS_MS = 3 * 1000
+ const CONCURRENCY = 10

export default new Service<Clients, State, ParamsContext>({
  clients: {
    implementation: Clients,
    options: {
      default: {
        retries: 2,
        timeout: 10000,
      },
+      events: {
+        exponentialTimeoutCoefficient: 2,
+        exponentialBackoffCoefficient: 2,
+        initialBackoffDelay: 50,
+        retries: 1,
+        timeout: TREE_SECONDS_MS,
+        concurrency: CONCURRENCY,
+      },
+    },
+  },
})
Going by each configuration, we have the following:
| Field | Type | Description |
|---|---|---|
exponentialTimeoutCoefficient |
seconds | the exponential factor by which the timeout will increase in each retry |
exponentialBackoffCoefficient |
seconds | the exponential factor by which the backoff delay will increase in each retry |
initialBackoffDelay |
seconds | the time the app will wait until the next retry |
retries |
- | the maximum times the app will retry |
timeout |
seconds | the timeout until consider a failure attempt |
concurrency |
- | the amount of simultaneous processes the event is able to perform |
By adding this code to the
Service, we are adding to theClientof thisService, the capability to handle events. At this point, we are not yet using theClientitself when handling the event.
For now, we are only going to create a log when receiving an event. To create this event handler, in the /node/event directory, go to the liveUsersUpdate.ts file and do the following:
//node/event/liveUsersUpdate.ts
export async function updateLiveUsers() {
  console.log('EVENT HANDLER: received event')
}
Now, we need to declare in the Service the reference to this function. On the /node/index.ts file, add this code:
...
+ import { updateLiveUsers } from './event/liveUsersUpdate'
...

export default new Service<Clients, State, ParamsContext>({
  ...
+  events: {
+    liveUsersUpdate: updateLiveUsers,
+  },
})
We also need to modify the service.json file. In order to listen to events sent, we need to declare this to give the app's service this capability. You may do so, by modifying service.json file:
//node/service.json
{
  "memory": 128,
  "ttl": 10,
  "timeout": 10,
  "minReplicas": 2,
  "maxReplicas": 10,
  "workers": 4,
+  "events": {
+    "liveUsersUpdate": {
+      "sender": "vtex.events-example",
+      "keys": ["send-event"]
+    }
  },
  ...
}
Note that we declare this by using the events resolver and the reference of the app that fires the event (declared as
sender) and the event reference key (declared askeys).
At last, run vtex link and wait for the event to be fired by the events-example app. When listened, the log should appear on the console, like this:

A declarative, efficient, and flexible JavaScript library for building user interfaces.
🖖 Vue.js is a progressive, incrementally-adoptable JavaScript framework for building UI on the web.
TypeScript is a superset of JavaScript that compiles to clean JavaScript output.
An Open Source Machine Learning Framework for Everyone
The Web framework for perfectionists with deadlines.
A PHP framework for web artisans
Bring data to life with SVG, Canvas and HTML. 📊📈🎉
JavaScript (JS) is a lightweight interpreted programming language with first-class functions.
Some thing interesting about web. New door for the world.
A server is a program made to process requests and deliver data to clients.
Machine learning is a way of modeling and interpreting data that allows a piece of software to respond intelligently.
Some thing interesting about visualization, use data art
Some thing interesting about game, make everyone happy.
We are working to build community through open source technology. NB: members must have two-factor auth.
Open source projects and samples from Microsoft.
Google ❤️ Open Source for everyone.
Alibaba Open Source for everyone
Data-Driven Documents codes.
China tencent open source team.