- Initialize a Git repository with
git init. - Check the status of a repository with
git status. - Track file changes with
git add. - Create a commit and apply a commit message with
git commit.
In the previous lesson we learned what a Version Control System (VCS) is and that it can help us do things like back up our work, undo mistakes, and document the changes we've made to our project.
In this lesson, we'll begin learning how to use one of the central Git workflows: saving and tracking the changes we make. The basic process consists of the following three steps:
- Initialize the project directory as a Git repository.
- Tell Git to track the changes we make to individual files.
- When we're ready, tell Git to save the changes.
The process is outlined in this diagram:
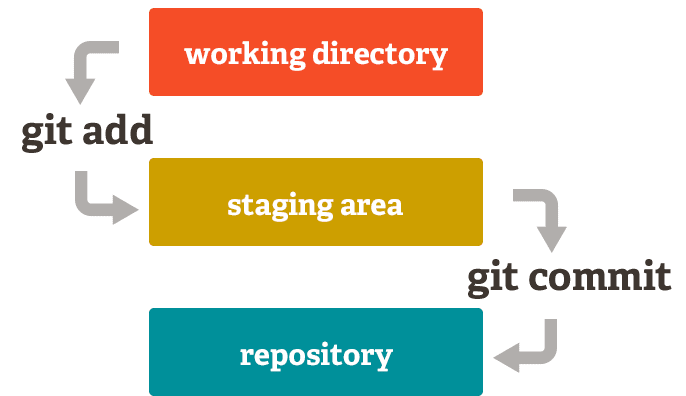
Source: https://dev.to/sublimegeek/git-staging-area-explained-like-im-five-1anh
The "working directory" is what we call our project folder once we've created it and initialized it as a Git repository. From there, we can add files to the staging area, which lets Git know that we want them to be tracked in our history. Finally, once we're ready to actually save the changes we've made to those files, we commit them.
Let's walk through each of these steps in turn.
There are 3 different ways we can create a Git repository:
- Create a new project on our local machine and initialize it as a repo.
- Create a new project in the cloud (on GitHub); in this case, the project will be initialized as a repository automatically.
- Copy an existing project from GitHub; in this case, the project will already be initialized.
In this lesson, we'll be learning the first option.
Let's go ahead and create a new project and set it up so we can track it using Git. To get started, we'll create a new directory. In your terminal, type the following:
Note: Don't type the
$. That symbol represents the command prompt in your terminal application. Any time you see it, it indicates that the command that follows should be typed into the terminal.
$ mkdir my-git-projectThis command creates a new directory.
Git operates on a directory level. If we have a directory that contains (or will contain) all the files for the project we want to track, we need to tell Git to track that directory by initializing it as a Git repository. But before we can do that, we first need to navigate into the directory:
$ cd my-git-projectSo now that we're in the directory where we want Git to watch for changes
(adding, removing, and editing files), we can initialize this directory by
typing git init. It should look something like this:
$ git init
Initialized empty Git repository in /Users/avi/my-git-project/.git/
The message above lets us know that our new directory is now being tracked by Git. We only need to do this step once for each project we want to track.
If you take a look at the file path in the message above you'll see that a new
subfolder .git has been created. You can also see it by typing ls -a in the
terminal (the -a option tells the terminal to list all files and folders,
including hidden ones). This hidden directory is where Git keeps important
stuff, like the commit history. Don't go in there and start randomly deleting
things! That said, if ever you run git init in the wrong directory, you can
run rm -rf .git to delete the .git folder and all its contents and return
the directory to a plain-old, unprotected directory.
Important: Be careful not to make a containing directory, like the home
directory or the desktop, into a Git repository accidentally. Make sure you only
type git init within the directory you want git to track.
As we've seen, when we originally run git init for a directory, we receive a
message telling us the repo has been initialized. However, there will be many
other times as you're working with a project that you'll want to see the current
status of your files. In fact, this is one of those good Git habits we mentioned
earlier: get used to running git status frequently, perhaps even every time
you're getting ready to run any other git command!
The command we use to do this is git status.
$ git statusSince we have not added any files yet, we'll see:
On branch main

No commits yet

nothing to commit (create/copy files and use "git add" to track)
Note: Recall from the previous lesson that the name of your default branch may be
masterrather thanmain, depending on how your Git is configured. If that's the case, the message will stateOn branch masterinstead ofOn branch main. However, whether it saysmainormaster, it's referring to the same thing: the core (main, get it?) branch of a repository.
Next, let's create a README.md that describes the project. Make our new file by
typing touch README.md from within the my-git-project directory. We won't
see any output after we run the touch command so to see that our new file has
been created, we'll also run the ls command.
$ touch README.md
$ ls
README.md
Now, if we type git status, we should see:
$ git status
On branch main

No commits yet

Untracked files:
  (use "git add <file>..." to include in what will be committed)

  README.md

nothing added to commit but untracked files present (use `git add` to track)
Git confirms that our README.md has been created, but note that it's listed as
untracked. In order for Git to keep track of the changes we make to our
README.md file, we need to tell Git to track our file. So let's do that!
Remember: Whenever you want to check the status of your Git repository — which you will often — type
git status.
Currently, the file in our repository is not being tracked by Git. Git doesn't
automatically track our files because there will often be files in our project
directory that we don't want to be tracked (more about this later). This means
we have to tell Git about all the files we want it to keep track of and consider
as part of our project. We can do this by adding the files to our git
repository with git add <filename or path>.
This process is also often referred to as staging the file. When a file is staged, we've told Git we want changes to that file to be tracked, but we haven't yet actually saved the changes and committed them to the file's history.
So let's add our new README.md to the repository and check the status:
$ git add README.md
$ git status
On branch main

No commits yet

Changes to be committed:
  (use "git rm --cached <file>..." to unstage)

  new file:   README.md
We can now see that Git is ready to keep track of README.md. All the changes
in the file at the time we added it (in this case, creating it as an empty
file) are staged. Now, to save these changes and add the current version of
our repo to the Git history, we need to commit the set of changes.
NOTE: When we stage a file, the version of the file at the time we staged it is what will be saved when we commit our changes. If we make additional changes to a file after staging the file and we want those changes to be included in the commit, we need to re-add the file.
Remember: we ran git add to stage our changes in the previous step. Those
changes are the ones that will be "captured" in the commit.
To make our first commit, we will type:
$ git commit -m "Initial commit"The -m flag tells Git that we are including a commit message, in this case
"Initial commit". Any time you make a commit, you should include a message
using this flag. When you run this command, you should see something similar to
this:
$ git commit -m "Initial commit"
[main (root-commit) e55477d] Initial commit
 1 file changed, 0 insertions(+), 0 deletions(-)
 create mode 100644 README.md
In the message above, you can see that we have committed one file. Git has added
this commit — which contains the current "picture" of our repo — to the Git
history. It has also created an SHA (Secure Hash Algorithm) — e55477d in
this example — to refer to this commit (your SHA will be different). You can
think of the SHA as similar to a variable name: it provides a "handle" you can
use to refer to a particular point in time in your project's history.
Aside: SHA's are the identification system that git uses to keep track of
versions. They're long complex series of numbers and letters that are unlikely
to be duplicated, ensuring that we have a unique "handle" to use to refer to
each of our commits. The SHA shown in the commit message above is actually just
the first few characters of the full SHA. In some cases, Git may display the
full version of the SHA, but if it has the same first few characters as the
abbreviated version, they're both referring to the same commit.
Now that we've committed our changes, if we type git status, we'll see that it
is at a "clean state". There are no new changes which means there's nothing to
commit:
$ git status
On branch main
nothing to commit, working tree cleanNext, let's open our project in our text editor and make a change to our README.md file:
code .NOTE: in the examples in this module, we use Visual Studio Code (VS Code) as
our text editor, and have configured it to open the folder we are currently in
with the code . command. If you are using a different text editor, or have not
configured VS Code to use the code command, your process will be different.
Go ahead and open the README.md file, type something in, and save the file. Now, let's go back to the terminal and check our status:
$ git status
On branch main
Changes not staged for commit:
  (use "git add <file>..." to update what will be committed)
  (use "git restore <file>..." to discard changes in working directory)
  modified:   README.md

no changes added to commit (use "git add" and/or "git commit -a")
Now we can see that our README.md file has been modified, but that it's not yet
staged. To add it so it will be included in our next commit, we'll use the git add command again:
$ git add README.md
$ git status
On branch main
Changes to be committed:
  (use "git restore --staged <file>..." to unstage)
  modified:   README.md
This status message looks similar to what we saw when we originally added the file, but now Git shows the file as modified rather than new.
Finally, let's commit our changes:
$ git commit -m "Add text"
[main 29e6774] Add text
 1 file changed, 1 insertion(+)
And that's it! You have now successfully:
- Created a project directory and initialized it as a Git repo.
- Added a file to the project and used
git addto tell Git to track it. - Used
git committo create a commit that contains the current version of the files, so the change will be saved in the project's Git history. - Modified the file and used
git addandgit commitagain to create a new commit with the updated version of the project files.
The workflow you've learned in this lesson is one developers use over and over (and over) when using Git. As a result, Git has created some shortcuts we can use.
You may have wondered why every directory you look at has both
.and... In the file system, these are used to refer to a specific level of the directory. You likely know that..refers to the parent directory of your current directory, but did you know that.simply refers to the directory you are in currently? This may become more apparent using the following shortcut.
If you're working in a project that has multiple files and you want to stage all
of the files that have been changed since the last commit, you can use . in
the git add command instead of the file name. This tells Git to add all files changed in the current directory:
$ git add .You can also combine the two steps of adding and committing our file into a single command:
$ git commit -am "Update README.md"The a flag takes the place of running git add <filename> or git add .
before we run the commit command. As with the add . shortcut, the a flag
tells git to add 'all changes', i.e., all files that have been changed since the
last commit. The -m flag, like before, tells git that we want to specify a
commit message, in this case, "Update README.md".
The command above could also be written as:
$ git commit -a -m "Update README.md"Note: we can only combine staging and committing with files that have
previously been staged. In other words, the first time you stage a file in
your project, you must do so explicitly using git add.
Now, let's practice what we've learned. Before starting, make sure you navigate out of the repo we created in this lesson by typing the following:
$ cd ..
Important: Any time you initialize a new repo it's important to make sure you aren't already inside a directory that is itself a repo — it will cause problems down the road!
Complete the following steps. As you're working, be sure to run git status
often.
- Create a new directory called
todosto contain a new project. - Navigate into the new directory.
- Initialize the new directory as a Git repo.
- Create a new file inside the folder called
todo-list.txt. You can either do this from the terminal or in your text editor. - Stage your changes using the
addcommand, then commit them with the commit messageinitial commit. - Open the
todo-list.txtfile in your text editor, and add a title and a few todo's of your choosing. - Return to the terminal, then add and commit your changes with the commit
message
added todos.
That's it! Before you know it, the steps we've learned in this lesson will be so natural you won't even need to think about them — just keep practicing!
Before moving on to the next lesson, check for your understanding of this material by describing in your own words the three steps of the Git workflow used to track and save changes in our work.
In this lesson, we've learned the basics of using Git to track a directory. Specifically, we learned how to:
- Make a new Git repository out of a directory using
git init. - Check the status of our repo using
git status. - Track files that have been changed using the
git add <filename or path>command. - Save (commit) the changes with an explanatory message using
git commit -m "A message".
So far, however, we've only been using Git with our local repo. In the next two lessons, we'll learn how we can use Git in combination with GitHub to share code with other developers.