윈도우의 경우, 다음과 같이 소스를 다운받아 컴파일후 실행할 수 있습니다.(go-ethereum 버전 v1.7.0 기준)
다른 OS별 설치 가이드는 여기를 확인해주세요.
1단계 : 관련 패키지 설치
https://chocolatey.org에 접속하여 chocolatey를 설치하고 choco명령을 이용해 관련된 패키지를 설치합니다.
$ choco install git
$ choco install golang
$ choco install mingw
2단계 : 이더리움 인스톨 및 환경변수 세팅
// 설치 후 환경설정
$ set “GOPATH=%USERPROFILE%”
$ set “Path=%USERPROFILE%\bin;%Path%”
$ setx GOPATH “%GOPATH%”
$ setx Path “%Path%”
// git clone
$ mkdir src\github.com\ethereum
$ git clone https://github.com/ethereum/go-ethereum src\github.com\ethereum\go-ethereum
$ cd src\github.com\ethereum\go-ethereum
$ go get –u –v golang.org/x/net/context
 ...
// compile
$ go install –v ./...
다음과 같이 소스와 컴파일된 바이너리와 데이터 경로를 설정하면 관리가 용이합니다.
| 경로 | 예시 | 설명 |
|---|---|---|
| %USERPROFILE% | D:\Ethereum | |
| source path | D:\Ethereum\src | git에서 받은 소스 위치 |
| bin path | D:\Ethereum\bin | 컴파일 후, 실행 파일 위치 (geth, bootstrap ...) |
| data path | D:\Ethereum\storage | 이더리움 데이터 파일 위치 (Main, Dev, Private 등으로 나누어 관리) |
NOTICE : 소스를 직접 인스톨하지 않고 release된 바이너리로 바로 설치할 경우, https://geth.ethereum.org/downloads에 접속하여 바로 설치 가능합니다.
이더리움은 메인 네트워크,테스트 네트워크, 사설 네트워크를 선택하여 접속할 수 있습니다.
공식 이더리움 실행 가이드와
geth CLO (Command Line Options)를 참고하세요.
개발자용 테스트를 위해서는 '3)번 사설 네트워크'로 바로 이동 하세요.
$ geth --datadir="D:\Ethereum\storage\Main" --fast --cache=512 console
-
--dirdata : 데이터 폴더를 메인드라이브 쓰는 경우 블럭체인 용량이 커질수록 부담이 됩니다. data 폴더를 시스템 드라이브(예.HOME\AppData\Ethash, HOME\AppData\Roaming\Ethereum) 가 아닌 다른 하드디스크 폴더로 변경합니다.
-
--fast : 빠른 동기화 모드로 시작하여 CPU 사용량이 많은 Ethereum 네트워크의 전체 기록 처리를 피하면서 더 많은 데이터를 다운로드합니다.
-
--cache=512 : 데이터베이스의 메모리 허용량을 512MB로 늘리면 특히 HDD 사용자의 동기화 시간이 크게 단축됩니다. 이 플래그는 선택 사항이며 512MB ~ 2GB 범위를 권장하지만 원하는대로 높이거나 낮게 설정할 수 있습니다.
-
console : Geth의 내장 된 대화식 JavaScript 콘솔을 시작합니다 (Geth의 자체 관리 API는 물론 모든 공식 web3 메소드도 호출 가능함). 이것 역시 선택 사항이며 생략하면 geth attach로 이미 실행중인 Geth 인스턴스에 연결할 수 있습니다.
$ geth --datadir="D:\Ethereum\storage\Dev" --testnet --fast --cache=512 console
- --testnet : 개발자를 위해 실제 돈을 들이지 않고 Ethereum Contract를 생성하고 테스트 해보고 싶은 경우 사용합니다.
1단계: genesis파일을 이용하여 블록 생성
$ geth --datadir "D:\Ethereum\storage\Private" init D:\Ethereum\storage\Private\genesis.json
- init : 별도의 사설망을 구축하기 위해 genesis.json파일을 만들어 생성가능 합니다. (이전 버전에서는 --genesis로 설정 가능 했으나 최신 버전에서는 init으로 변경 되었습니다.)
D:\Ethereum\storage\Private\genesis.json 예시
{
  "config": {
        "chainId": 0,
        "homesteadBlock": 0,
        "eip155Block": 0,
        "eip158Block": 0
    },

  "alloc"      : {},
  "coinbase"   : "0x0000000000000000000000000000000000000000",
  "difficulty" : "0x20000",
  "extraData"  : "",
  "gasLimit"   : "0x2fefd8",
  "nonce"      : "0x0000000000000042",
  "mixhash"    : "0x0000000000000000000000000000000000000000000000000000000000000000",
  "parentHash" : "0x0000000000000000000000000000000000000000000000000000000000000000",
  "timestamp"  : "0x00"
}
NOTICE : 사설명이 성공적으로 생성되면 'WARN : No etherbase set and no accounts found as default' 경고가 발생하는데, 이는 아직 생성된 계정이 없기 때문입니다. (무시하고 계속 진행합니다.)
2단계 : 이더리움을 구동하여 계정 생성
init는 console 명령과 함께 쓸 수 없으므로 genesis.json으로 생성한 노드에 접속하여 계정을 두개 생성합니다.
(console을 이미 사용중일 경우, 'attach'로 접속 가능 합니다.)
$ geth --datadir "D:\Ethereum\storage\Private" console

> personal.newAccount()
Passphrase :
Repeat passphrase :
"0x0000000000000000000000000000000000000001"

> personal.newAccount()
Passphrase :
Repeat passphrase :
"0x0000000000000000000000000000000000000002"
NOTICE : 생성된 계정은 D:\Ethereum\storage\Private\keystore 아래에 두개의 파일로 존재하게 됩니다.
3단계 : 기존 생성된 사설 블록 삭제
일단 2개의 계정이 정상적으로 생성되면, keystore 폴더를 제외한 모든 폴더와 파일을 삭제 합니다. D:\Ethereum\storage\Private\geth 폴더와 D:\Ethereum\storage\Private\history 파일을 삭제합니다.
주의 : D:\Ethereum\storage\Private\keystore 폴더는 지우면 안됩니다.
4단계 : 잔액이 있는 계정으로 블록을 재생성
genesis.json 파일에 alloc 부분을 다음과 같이 수정합니다.
D:\Ethereum\storage\Private\genesis.json 수정된 예시 (alloc 부분 수정)
{
  "config": {
        "chainId": 0,
        "homesteadBlock": 0,
        "eip155Block": 0,
        "eip158Block": 0
    },

  "alloc": {
    "0x0000000000000000000000000000000000000001": {"balance": "100000000000000000000000000000000000000000000000000"},
    "0x0000000000000000000000000000000000000002": {"balance": "200000000000000000000000000000000000000000000000000"}
  },
  "coinbase"   : "0x0000000000000000000000000000000000000000",
  "difficulty" : "0x20000",
  "extraData"  : "",
  "gasLimit"   : "0x2fefd8",
  "nonce"      : "0x0000000000000042",
  "mixhash"    : "0x0000000000000000000000000000000000000000000000000000000000000000",
  "parentHash" : "0x0000000000000000000000000000000000000000000000000000000000000000",
  "timestamp"  : "0x00"
}
수정된 genesis.json으로 init을 재실행하여 계정과 잔액을 확인해 봅니다.
$ geth --datadir "D:\Ethereum\storage\Private" init D:\Ethereum\storage\Private\genesis.json
$ geth --datadir "D:\Ethereum\storage\Private" console
 > eth.accounts()
["0x0000000000000000000000000000000000000001", "0x0000000000000000000000000000000000000002"]
 > eth.coinbase
"0x0000000000000000000000000000000000000001"
NOTICE : 이때 coinbase(etherbase는) 최초 생성된 계정으로 자동으로 할당됩니다.
멀티노드를 구성할 경우 --networkid는 동일하게 해야 한다 한대의 PC를 통해 테스트할 경우 --datadir --port --rpc 를 달리하면 여러 노드를 띄울수 있다.
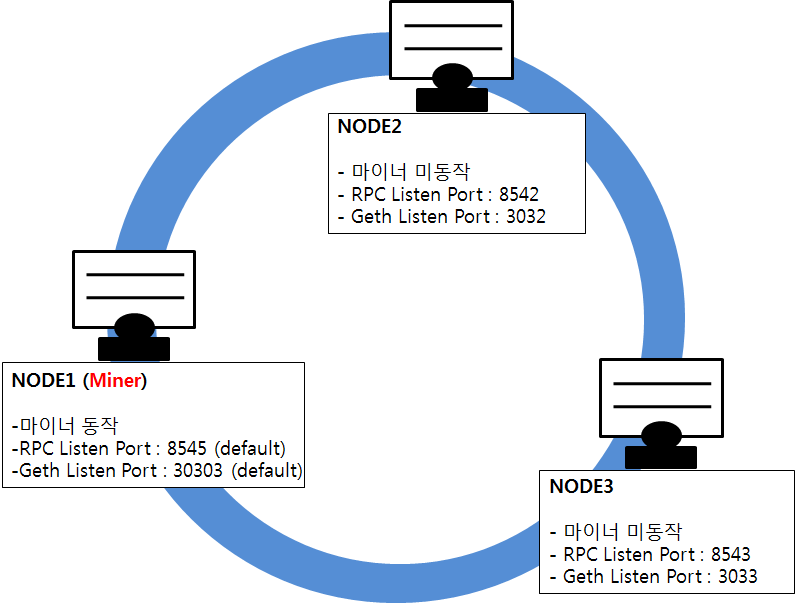
NODE1 (Miner) : 기존 genesis로 생성했던 계정을 그대로 마이너 노드 옵션을 적용하여 실행합니다.
$ geth --datadir "D:\Ethereum\storage\Private" --mine --minerthreads=1 console
- --mine : 마이너를 동작시킵니다.
- --minerthreads=1 : 마이너의 코어수 입니다.
*TIP : 일단 마이닝이 시작되면 DAG 기본 폴더인 %APPDATA%\Ethash 에 파일이 생성되는데, *
시스템 디스크가 아닌 다른 하드디스크로 변경하기 위해 윈도우에서도 심볼릭 링크를 적용할 수 있다.
(mklink /D C:\Users\user\AppData\Ethash D:\Ethereum\storage\Ethash)
NOTICE : 마이너는 --mine --minerthreads=1 geth CLO 옵션 대신 geth 콘솔에서 mine.start(1)라고 입력해도 됩니다.
--etherbase는 별도 추가하지 않으면 coinbase인 최초 생성 계정으로 설정됩니다.
NODE2 : datadir, rpc port, geth 포트를 변경하여 실행합니다.
$ geth --datadir "D:\Ethereum\temp\TestChain2" --rpc --rpcport "8542" --port 3032 --nodiscover --ipcdisable console
- --ipdisable : 한대의 PC에서 테스트 할경우, geth는 IPC-RPC가 기본 enable 상태이므로 disable 처리해야 합니다. HTTP-RPC와 WS-RPC는 기본 disable입니다.
NODE3 : datadir, rpc port, geth 포트를 변경하여 실행합니다.
$ geth --datadir "D:\Ethereum\temp\TestChain3" --rpc --rpcport "8543" --port 3033 --nodiscover --ipcdisable console
NOTICE : 한대의 PC 아닌 경우.. (업데이트중)


