app version: 1.3
3 Modes: SWITCH ON/OFF MODE, GAMEPAD MODE ,VOICE RECOGNITION MODE (more modes in progress).
For HC 05 , HC 06 & HM 10
- ok why plus ultra? first im a fan of all might(Plus ultra means go beyond your limit). :)
So there's a lot of arduino bluetooth controller in googlestore(play store) but there's limited buttons, functions and also limited to hc05 only or hm10 only. So i made this app to circumvent those problems whehe. This app is for those who has two types of bluetooth module and dont want to download each app specifically for that BT module.
This app makes you control your Arduino projects like RC car or any IOT applications using your mobile phone thru bluetooth.
All the files (apk, circuit, program, codes) are all provided) :)
https://github.com/engrpanda/Arduino-Bluetooth-Controller/tree/master/ARDUINO%20PROGRAM
https://github.com/engrpanda/Arduino-Bluetooth-Controller/tree/master/SCHEMATIC%20FRITZING%20DIAGRAM
https://play.google.com/store/apps/details?id=com.ArduBT.panda&hl=en
This app is under beta test. Any bugs or error can be reported or send to my email. ([email protected])
Check the provided Schematic Fritzing for connections. Arduino Pins D0 & D1 are used for Bluetooth Module.


You can choose from Switch ON/OFF mode, Gamepad mode, Voice Recognition mode. (will update more mode soon).

Before uploading to arduino disconnect first any connection in PIN D0 & D1 (TX,RX).
PARTS REQUIRED:
- ARDUINO UNO or similar
- Anything Digital OUTPUT i.e LED's, Relay etc.
- Some resistors
- Connecting wires
- Breadboard
- HC05/06 OR HM10
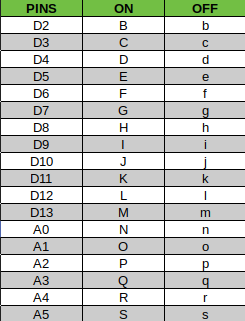
Labels(D2, D3, A0 etc) can be Rename. i.e Light1, LED1, Relay1, .
Digital pins 2-13 & Analog pins A0-A5 can be used.

You can add LED up to 18LEDs (D2-A5) to control.
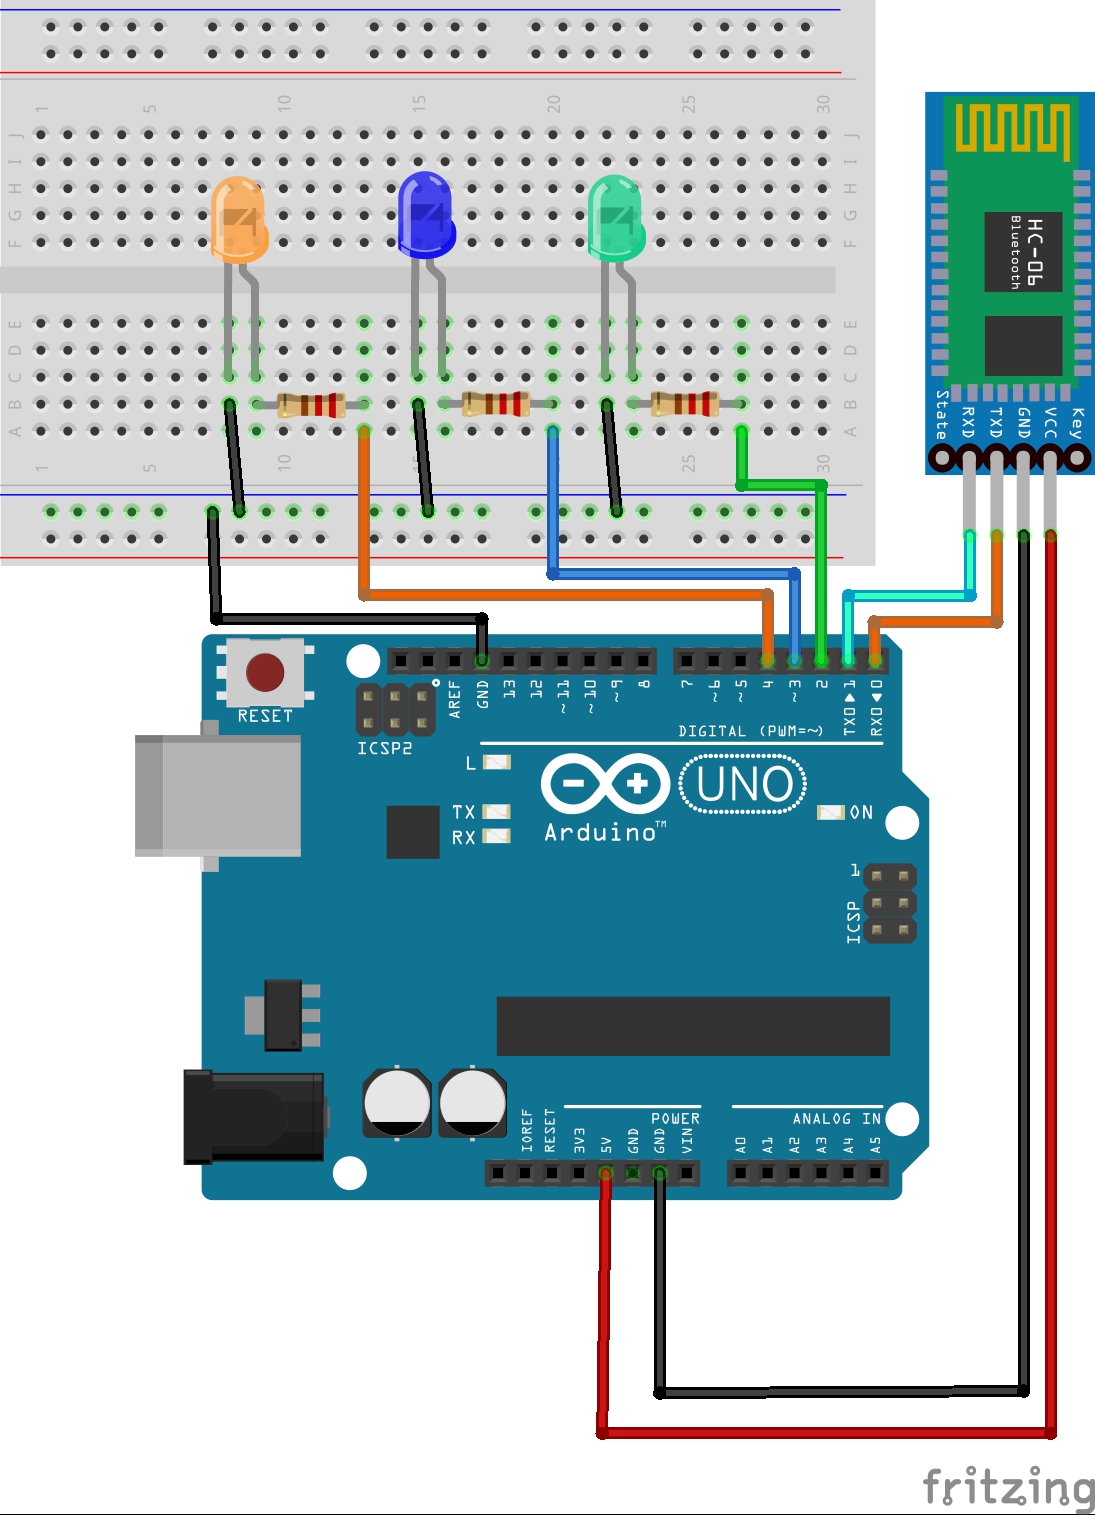

Up to 18 channels (D2-A5) Relay can be used. Using relay you can control your lights i.e bulbs or any appliances for IOT applications.

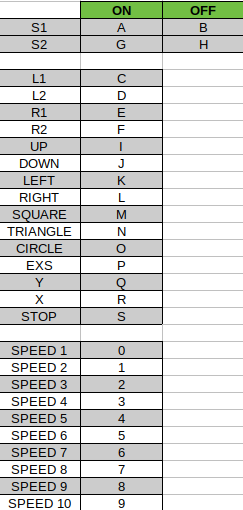
Switch ON/OFF Serial code to Arduino
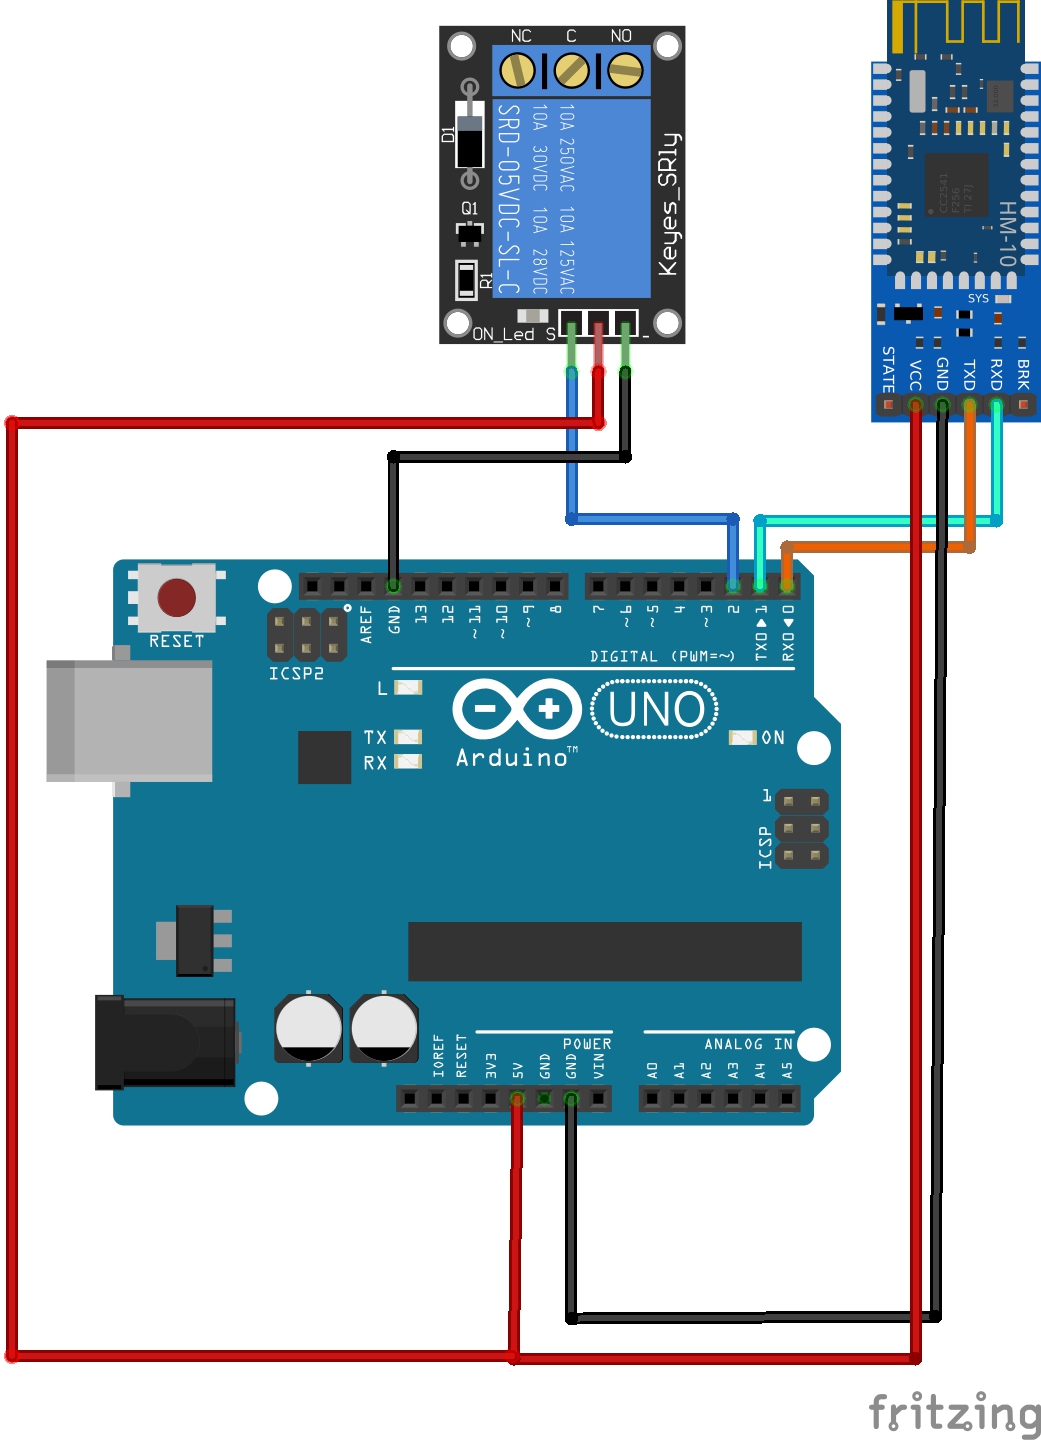
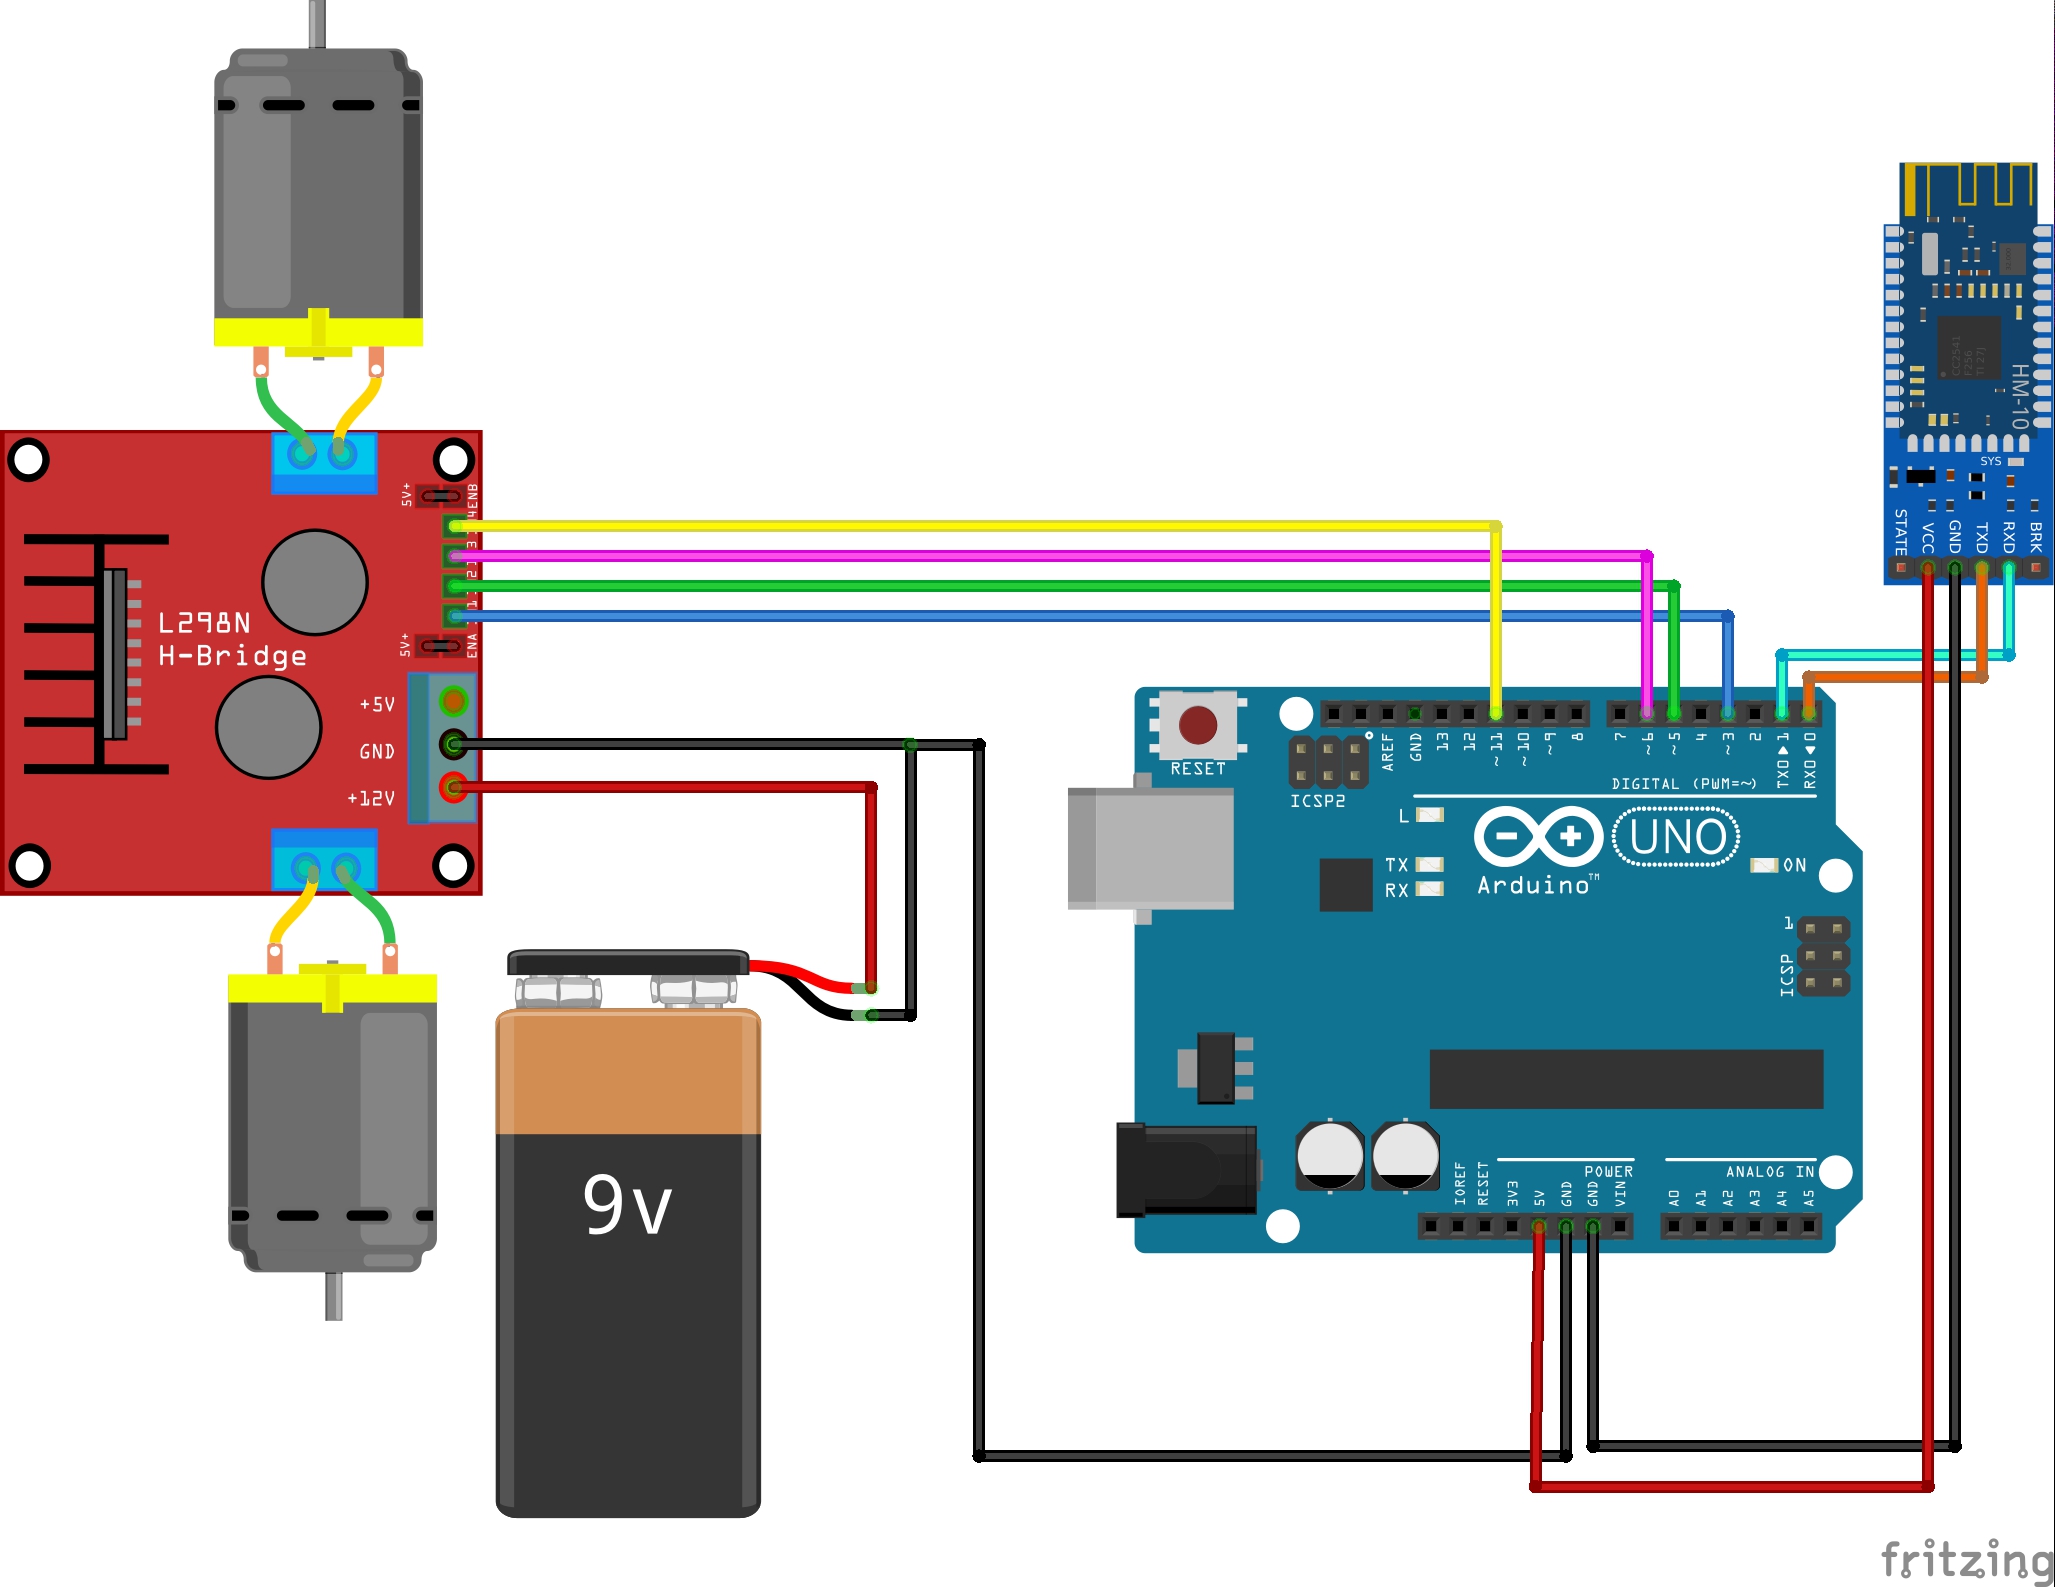
PARTS REQUIRED:
- ROBOT CAR CHASIS WITH DC MOTORS
- ARDUINO UNO or similar
- L298N MOTOR DRIVER
- Connecting wires
- HC05/06 OR HM10

Using this controller you can control your RC car forward, Turnleft, turnright, backward etc.

Gamepad Serial code to Arduino
NOTE: UP, LEFT, RIGHT, DOWN, SQUARE, TRIANGLE, CIRCLE, EXS Buttons can be hold. not holding serial value is "S".
This mode use google tts & speech recognition. Make sure the device has it. This mode lets the user control IOT applications using voice command thru arduino.


AT COMMANDS
FOR TESTING, CHANGING THE SSID & PIN of the BT MODULE for hc05/06
TEST Communications test “AT”
CHANGE SSID Sets the modules name “AT+NAMEPanda“
CHANGE PIN Set the PIN to 1234 “AT+PIN1234”
BT TX - D2 BT RX - D3
// Basic Bluetooth sketch HC-06_01
// Connect the Hc-06 module and communicate using the serial monitor
// The HC-06 defaults to AT mode when first powered on.
// The default baud rate is 9600
// The Hc-06 requires all AT commands to be in uppercase. NL+CR should not be added to the command string
// Use no line ending in serial monitor
/*Command Reply Comment
The HC-06 zs-040 expects commands to be in upper case and does not require carriage return and new line (\r\n) characters. Open the serial monitor and select a baud rate of 9600 and ensure “No line ending” is selected from the drop down list at the bottom of the window.
Enter “AT” (no quotes) into the top text box and hit Send. If the HC-06 likes you it will say OK. AT is a basic communications test command that allows you to check the HC-06 is connected and communicating.
AT OK Communications test
AT+VERSION OKlinvorV1.8 Firmware version.
AT+NAMEPanda OKsetname Sets the modules name to “Panda”
AT+PIN1234 OKsetPIN Set the PIN to 1234
*/
#include <SoftwareSerial.h>
SoftwareSerial BTserial(2, 3); // BT_TX | BT_RX
// Connect the HC-06 TX to the Arduino RX on pin 2.
// Connect the HC-06 RX to the Arduino TX on pin 3.
void setup()
{
Serial.begin(9600);
Serial.println("Enter AT commands:");
// HC-06 default serial speed is 9600
BTserial.begin(9600);
}
void loop()
{
// Keep reading from HC-06 and send to Arduino Serial Monitor
if (BTserial.available())
{
Serial.write(BTserial.read());
}
// Keep reading from Arduino Serial Monitor and send to HC-06
if (Serial.available())
{
BTserial.write(Serial.read());
}
}

