- How to install a new react project
- What is a component?
- What are props?
- What is state?
- What are lifecycle functions?
- How to style things?
- Advanced things to keep in mind -> form handling, apollo / redux. etc.
- Install:
npm install -g create-react-app
create-react-app my-app
- Start the app
yarn start
-
Editing the src/App.js file works. Try it out.
-
Let's try the minimal code though. Remove everything under src/ and then, create one
index.jsfile there with the following content:import React from 'react' import ReactDOM from 'react-dom' class Home extends React.Component { render() { return <div>It is alive!</div> } } ReactDOM.render(<Home />, document.getElementById('root')) -
Let's keep it separated, shall we. Move the
classdefinition to anApp.jsfile.-
App.js:
import React from 'react' class Home extends React.Component { render() { return <div>It is alive!</div> } } export default Home -
index.js:
import React from 'react'
import ReactDOM from 'react-dom'

import Home from './App.js'

ReactDOM.render(<Home />, document.getElementById('root'))
-
TAKEAWAY: We can modularize code and abstract away the logic neatly.
-
Let's display a list of someone's friends:
-
App.js
class Home extends React.Component {
  render() {
    return (
      <div>
        <h1>Someone's friends:</h1>
        <ul>
          <li>1</li>
          <li>2</li>
        </ul>
      </div>
    )
  }
}
-
-
Let's create a
FriendsComponent for this.-
Friends.js
class Friends extends React.Component { render() { return ( <div> <h1>Someone's friends:</h1> <ul> <li>1</li> <li>2</li> </ul> </div> ) } } export default Friends -
Let's use that in our
App.jsimport Friends from './Friends.js' class Home extends React.Component { render() { return <Friends /> } }
-
TAKEAWAY: Notice how we "modularized" that bit? This is what we refer to as
Components. Apart from looking neat, why is this important though? According
to React's own definition, Components let you split the UI into independent, reusable pieces, and think about each piece in isolation.
- Let's personalize the
FriendsComponent and see. Friends.jsclass Friends extends React.Component { render() { return ( <div> <h1>Sami's friends:</h1> <ul> <li>1. Kevin.</li> <li>2. Neville.</li> </ul> </div> ) } }- Depending on who opens up the home page, we want to show their name and
their two friends. So we want something like this for
App.jsclass Home extends React.Component { render() { return <Friends name="Sami" friend1="Kevin" friend2="Neville" /> } } - How do we access these values that we are passing inside the
FriendsComponent? Enterprops. Let's replace theFriendscomponent code with this:class Friends extends React.Component { render() { return ( <div> <h1>{this.props.name}'s friends:</h1> <ul> <li>1. {this.props.friend1}. </li> <li>2. {this.props.friend2}. </li> </ul> </div> ) } }
TAKEAWAY: Try changing the parameters and see. So, props allow us to send
arbitrary data into our components.
-
Let's try and toggle each friend's "friend/unfriend", shall we? Extend the
Friendscomponent and add a few buttons that simply shows an alert on clicking.class Friends extends React.Component { render() { return ( <div> <h1>{this.props.name}s friends:</h1> <ul> <li> 1. {this.props.friend1}. Status: Friend <button onClick={() => alert(this.props.friend1)}>Go</button> </li> <li> 2. {this.props.friend2}. Status: Friend <button onClick={() => alert(this.props.friend2)}>Go</button> </li> </ul> </div> ) } } -
We obviously can't have the
statushardcoded there since when we click the button, we want thestatusto change. How do we store thestatus? Enterstate. Let's start by defining thestates of our friends first. We define that in theconstructor.class Friends extends React.Component { constructor(props) { super(props) this.state = { statusFriend1: 'Friend', statusFriend2: 'Friend' } } render() { return ( <div> <h1>{this.props.name}s friends:</h1> <ul> <li> 1. {this.props.friend1}. Status: Friend <button onClick={() => alert(this.props.friend1)}>Go</button> </li> <li> 2. {this.props.friend2}. Status: Friend <button onClick={() => alert(this.props.friend2)}>Go</button> </li> </ul> </div> ) } } -
Let's display the statuses from the
stateinstead of the hardcoded ones.render() { return ( <div> <h1>{this.props.name}s friends:</h1> <ul> <li> 1. {this.props.friend1}. Status: {this.state.statusFriend1} <button onClick={() => alert(this.props.friend1)}>Go</button> </li> <li> 2. {this.props.friend2}. Status: {this.state.statusFriend2} <button onClick={() => alert(this.props.friend2)}>Go</button> </li> </ul> </div> ) } -
Nice. For each friend, we want to toggle the current state. So we'll add a function that checks the current state, and toggles it accordingly. And we'll replace the
alertcall we had with our function.class Friends extends React.Component { constructor(props) { super(props) this.state = { statusFriend1: 'Friend', statusFriend2: 'Friend' } } toggleStatusFriend(friend) { if (friend === 'friend1') { if (this.state.statusFriend1 === 'Friend') { this.setState({ statusFriend1: 'Not Friend' }) } else { this.setState({ statusFriend1: 'Friend' }) } } else { if (this.state.statusFriend2 === 'Friend') { this.setState({ statusFriend2: 'Not Friend' }) } else { this.setState({ statusFriend2: 'Friend' }) } } } render() { return ( <div> <h1>{this.props.name}s friends:</h1> <ul> <li> 1. {this.props.friend1}. Status: {this.state.statusFriend1} <button onClick={() => this.toggleStatusFriend('friend1')}} > Go </button> </li> <li> 2. {this.props.friend2}. Status: {this.state.statusFriend2} <button onClick={() => this.toggleStatusFriend('friend1')}} > Go </button> </li> </ul> </div> ) } } -
Try clicking the button. It should toggle the status.
-
You should ALWAYS use
setStatewhile modifying a state. The reason why thestatuschanged on the browser was because React refreshed theComponentdetecting that astatechanged had occurred. React will only detect that if you usesetStateto set the value of astateand not if you simply assign the value likethis.state.statusFriend1 = 'Not Friend'. -
While the example demonstrates the use of
states, you should always think ofstateas something specific to that component. In the real world, the "friend status" would be updated on the server and not just managed in the UI.
TAKEAWAY: In React's own words: props (short for “properties”) and state are both plain JavaScript objects. While both hold information that influences the output of render, they are different in one important way: props get passed to the component (similar to function parameters) whereas state is managed within the component (similar to variables declared within a function).
- PS: Has something already irked you about the above code? If yes, then you
have already grasped the idea of
components. Acomponentlet's you build "resuable" UI elements. Try converting each "Friend" up there into their own components so that we don't do the1,2business.
-
Think of these as optional pitstops that React takes on the way to rendering the component and as soon as after the component has rendered.
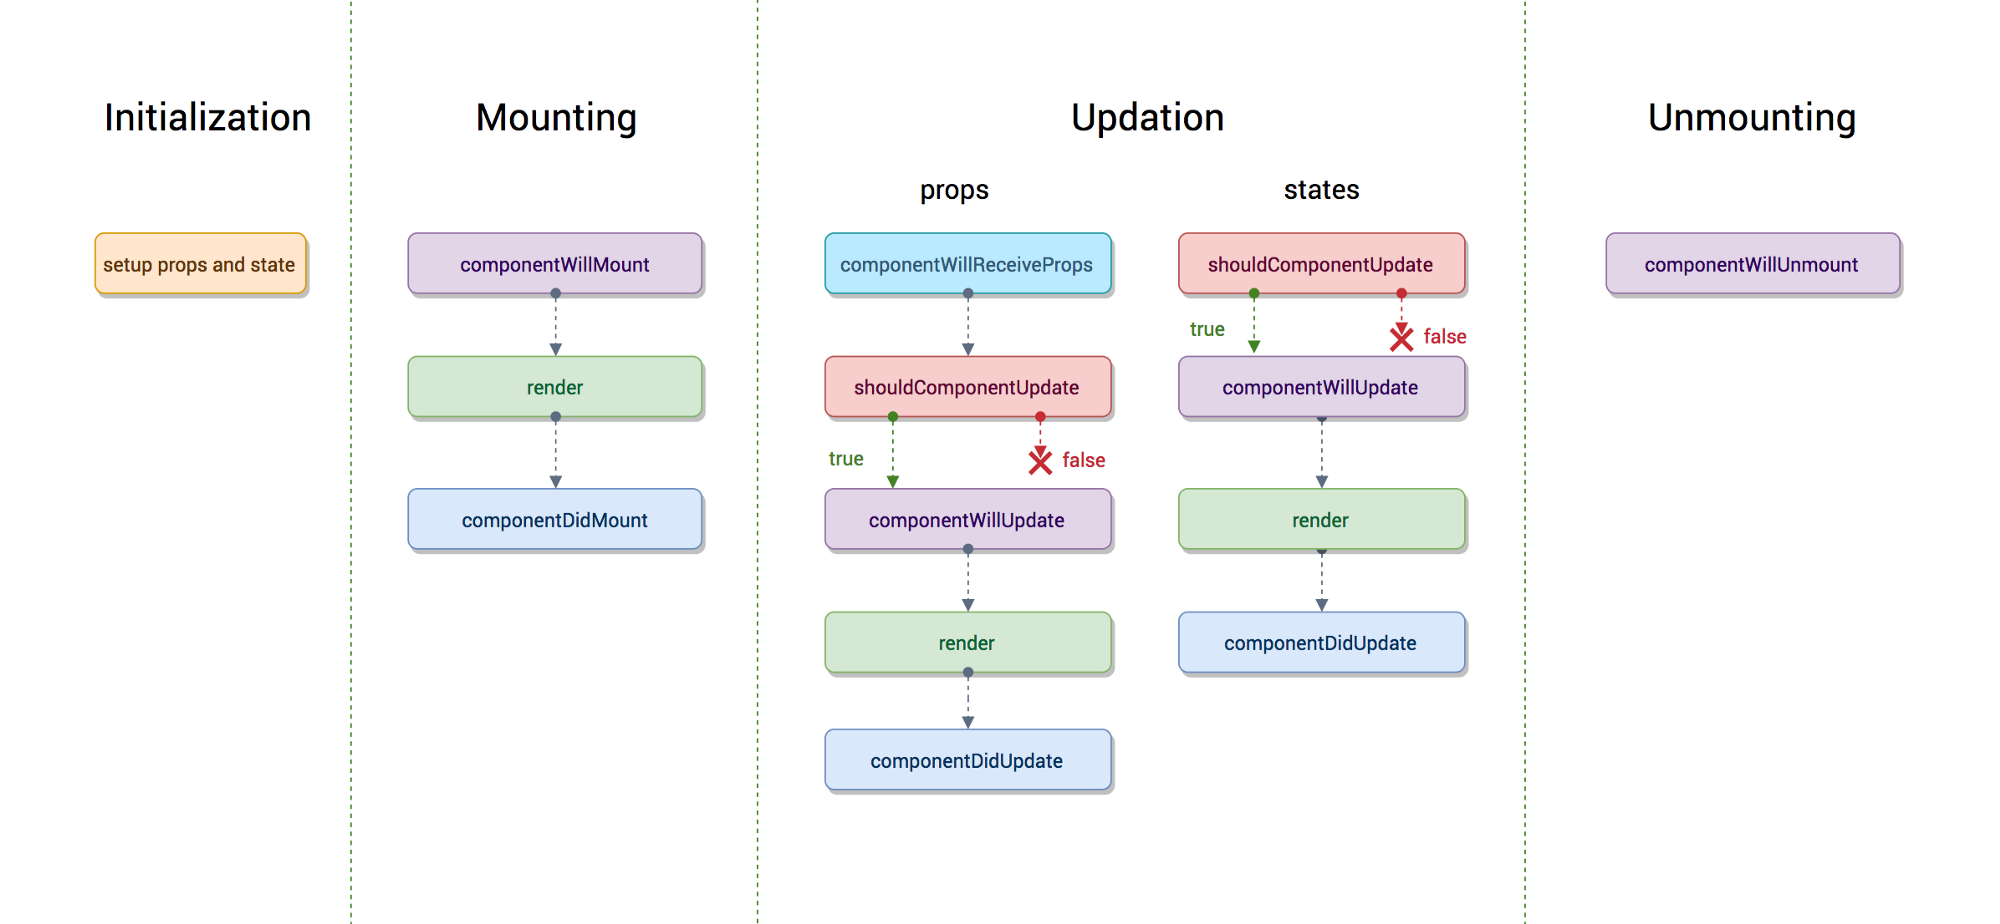 (Image courtesy https://hackernoon.com/reactjs-component-lifecycle-methods-a-deep-dive-38275d9d13c0)
- Initialization -
constructoranddefaultProps. - Mounting -
componentWillMount,renderand thencomponentDidMount. - Updating -
shouldComponentUpdate,componentWillUpdate,renderand thencomponentDidUpdate. If new props are sent to the component, thencomponentWillReceivePropsdeals with that. - Unmounting -
componentWillUnmount
- Initialization -
- Let's make our page look good (koff koff), shall we? For starters, we are
throwing in some inline CSS.
render() { return ( <div style={{ textAlign: 'center' }}> <h1>{this.props.name}s friends:</h1> <ul style={{ display: 'inline-block', textAlign: 'left' }}> <li> 1. {this.props.friend1}. Status: {this.state.statusFriend1} <button onClick={() => this.toggleStatusFriend('friend1')}> Go </button> </li> <li> 2. {this.props.friend2}. Status: {this.state.statusFriend2} <button onClick={() => this.toggleStatusFriend('friend2')}> Go </button> </li> </ul> </div> ) } - See the
style={{}}construct there? While you "can" use it, it SHOULD NOT be your primary choice of styling your website. You should create a separate css file and put your styles there. To demonstrate, create aFriends.cssfile with the following.Friends.css:.Row { text-align: center; }- Import and use that in your
Friends.jsfile like so:import './Friends.css'render() { return ( <div className="Row"> <h1>{this.props.name}s friends:</h1> <ul style={{ display: 'inline-block', textAlign: 'left' }}> <li> 1. {this.props.friend1}. Status: {this.state.statusFriend1} <button onClick={() => this.toggleStatusFriend('friend1')}> Go </button> </li> <li> 2. {this.props.friend2}. Status: {this.state.statusFriend2} <button onClick={() => this.toggleStatusFriend('friend2')}> Go </button> </li> </ul> </div> ) }
