In this Code Pattern, we'll demonstrate how to build and deploy a custom perceptive application within a TRIRIGA instance. This perceptive application demonstrates how to render and update interactive floor plans from TRIRIGA. We also demonstrate how to deploy an indoor positioning system to render markers on the floor plan indicating the location of each user. The positioning system works by measuring the signal strength of all WiFi routers within the area.
This Pattern is a continuation of the previous "tririga-occupancy" project here. If you have previously completed that pattern, you can skip steps 1-3 in this one.
TRIRIGA is a system used to monitor enterprise facilities by integrating data from real estate portfolios, construction projects, workplace assets, etc. We can extend the TRIRIGA capabilities with custom business logic by deploying a "Perceptive Application". A Perceptive App is a dynamic, custom application built using the TRIRIGA UX Framework. This is structured as a model-view-controller (MVC) architecture. The application "View" is built using the Polymer library, which makes it simple to create an interactive dashboard using modular web components. Web components can provide visual elements such as graphs, maps, images, and so on. Each component can be rendered by data pulled from internal TRIRIGA reports and/or API data from other offerings (Building Insights, "FIND" Location server).
The project dependencies (Polymer, Web Components, UX Framework) are all pre-installed within the TRIRIGA instance. Additional third-party dependencies can be uploaded along with the project code.
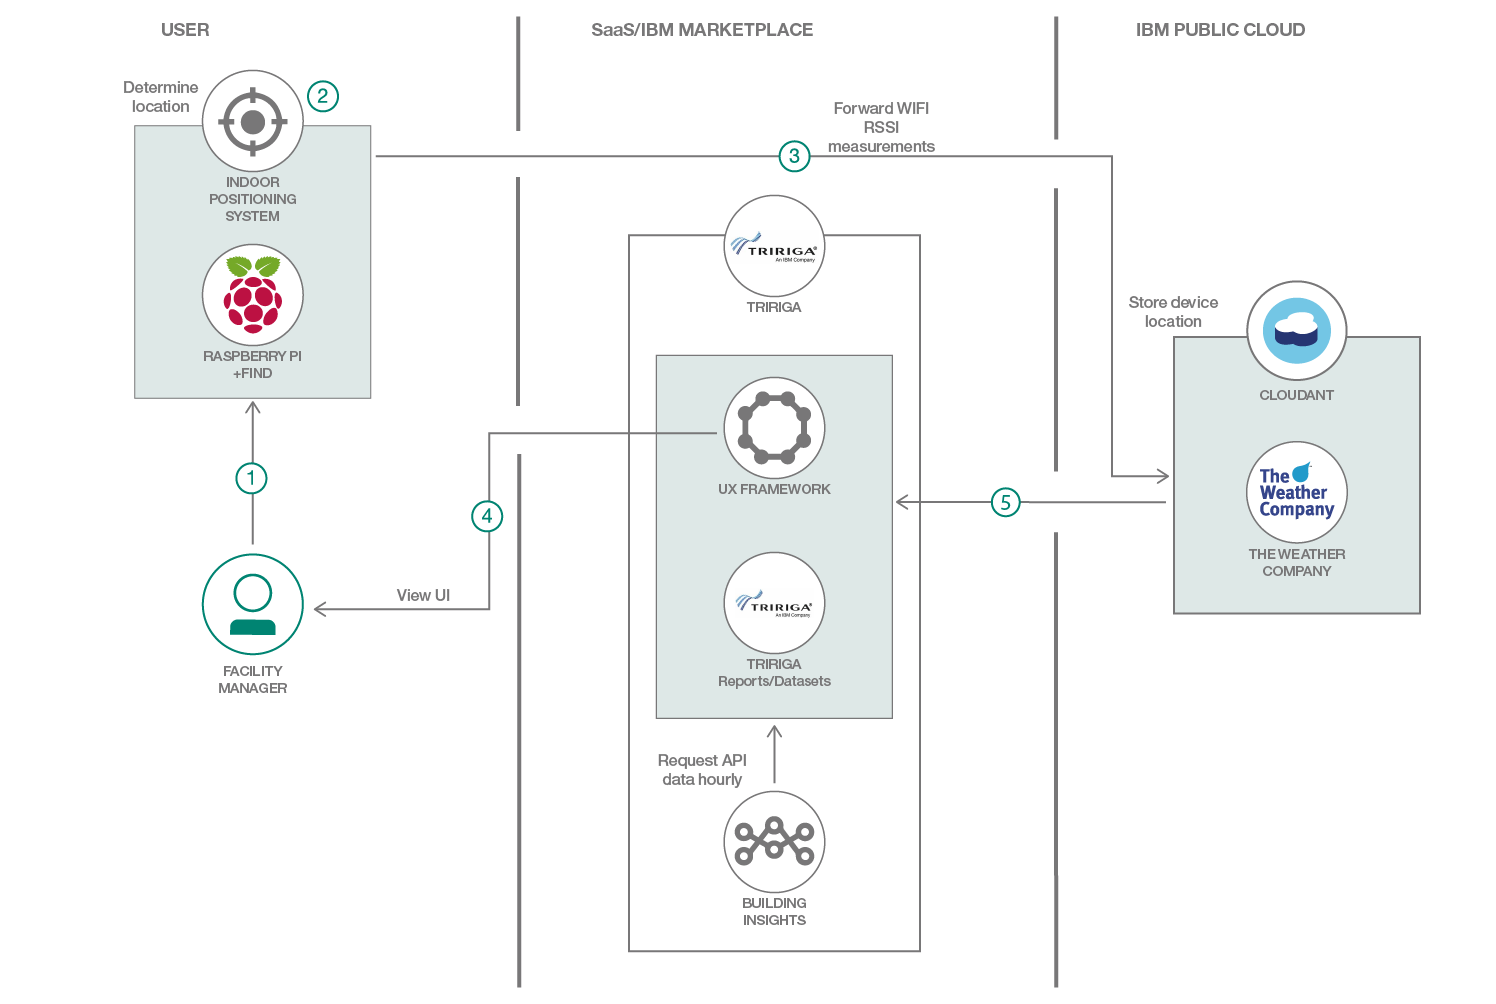
- User mobile devices periodically measures signal strength of all WiFi endpoints in the area, and forwards measurements to indoor positioning system (Raspberry Pis)
- Indoor positioning system processes measurements to determine mobile device location.
- Mobile device location is updated in Cloudant.
- User loads TRIRIGA Perceptive app.
- Perceptive app queries building floor plan from TRIRIGA, and Location Data from Cloudant. Located devices are marked on the frontend floor plan.
- Deploy Cloud Services
- Register Application In TRIRIGA Dashboard
- Deploy Node.js application
- Push Perceptive App to TRIRIGA
- Deploy positioning system
To interact with the hosted offerings, the IBM Cloud CLI will need to be installed beforehand. The latest CLI releases can be found at the link here. An install script is maintained at the mentioned link, which can be executed with one of the following commands
# Mac OSX
curl -fsSL https://clis.ng.bluemix.net/install/osx | sh

# Linux
curl -fsSL https://clis.ng.bluemix.net/install/linux | sh

# Powershell
iex(New-Object Net.WebClient).DownloadString('https://clis.ng.bluemix.net/install/powershell')
After installation is complete, confirm the CLI is working by printing the version like so
ibmcloud -v
Also install the container service plugin
ibmcloud plugin install container-service
Linux
sudo apt-get update && sudo apt-get install -y apt-transport-https
curl -s https://packages.cloud.google.com/apt/doc/apt-key.gpg | sudo apt-key add -
echo "deb http://apt.kubernetes.io/ kubernetes-xenial main" | sudo tee -a /etc/apt/sources.list.d/kubernetes.list
sudo apt-get update
sudo apt-get install -y kubectl
MacOS
brew install kubernetes-cli
If expecting to run this application locally, please continue by installing Node.js runtime and NPM. We'd suggest using nvm to easily switch between node versions, which can be done with the following commands.
curl -o- https://raw.githubusercontent.com/creationix/nvm/v0.33.11/install.sh | bash
# Place next three lines in ~/.bash_profile
export NVM_DIR="$HOME/.nvm"
[ -s "$NVM_DIR/nvm.sh" ] && \. "$NVM_DIR/nvm.sh"  # This loads nvm
[ -s "$NVM_DIR/bash_completion" ] && \. "$NVM_DIR/bash_completion"  # This loads nvm bash_completion
nvm install v8.9.0
nvm use 8.9.0
Create the following services:
To upload our application to TRIRIGA, we'll need to first enter a few metadata records.
Log in to the TRIRIGA Dashboard and click on the "Tools" section in the top menu
Next, click "Model Designer"

Click the "Add" button, and then enter a name for the application into the "Name", "ID", and "Exposed Name" Fields

Click on the "Tools" section in the top menu again, and select the "Model and View Designer" icon

Click the "Add" button, and then enter a name for the application. The name entered in the previous step can go into the "Name", "ID", and "Exposed Name" fields. Also confirm the "View Type" section has "Web View" selected.

Return to the "Tools" section again, and select "Application designer". The same value entered in the previous step can go into the "Name", and "ID", and "Exposed Name" fields. Also add a string descriptor in the "Label" section

Return to the "Tools" section a final time, and select "Web View Designer". The name entered in the previous steps can go into the "Name", and "ID" fields. The "Exposed Name" field will need to include a underscore, we'll use "tut-occupancy" in this case.

Next, open a terminal and navigate to the app directory
Run the following command using the included WebViewSync_3.6.0.jar binary to authenticate to the TRIRIGA server. This will prompt for the URL, and credentials, and place them in a WebViewSync.json file.
java -jar WebViewSync_3.6.0.jar init
To generate a custom view, we can execute the "add view" command. This generates and pulls a template that can be used as a starting point. In this case, we've already placed a modified starter template in the app directory, so this step can be bypassed.
java -jar WebViewSync_3.6.0.jar addview --view <app_name> --starter
After configuring the TRIRIGA dashboard, we can continue on to deploy the nodejs backend. The purpose of this process is to add additional logic to periodically query for building sensor data, perform data transformations, and to persist data in a database.
Fill out .env credentials for Building Insights and Cloudant instances like so
usr=<building insights username>
password=<building insights password>
instance_id=<>
login_domain=https://<bi endpoint>-agg/api/v1/user/activity/login
agg_domain=https://<bi endpoint>-agg.mybluemix.net/api
kitt_domain=https://<bi endpoint>-KITT.mybluemix.net/api
domain=https://<bi endpoint>-agg.mybluemix.net/api
cloudant_username=<cloudant password>
cloudant_password=<cloudant password>
source .env
Create a kubernetes cluster
ibmcloud ks cluster-create --name my_cluster
Export the KUBECONFIG path. This value will be printed just after creating the container cluster
export KUBECONFIG=/Users/$USER/.bluemix/plugins/container-service/clusters/mycluster/kube-config-hou02-mycluster.yml
Create a kubernetes "secret", which allows the above credentials to be set as environment variables in the container runtime
kubectl create secret generic auth --from-file=.env
Deploy the kubernetes application with the following command
kubectl apply -f kubernetes/kube-config.yml
Finally, get the public ip address of the Kubernetes cluster with the following commands
# Get id of cluster
ibmcloud ks clusters

# Print workers associated with cluster, take note of public ip.
ibmcloud ks workers <cluster_name>
# Load credentials
source .env

# Start server
node app.js

# In a separate tab, run
ngrok http 3000
Open the file at ./app/tut-occupancy/tut-occupancy.html, and edit lines 236-242, replacing each of the iron-ajax URLs with the public kubernetes cluster ip from the previous step.
Next, run the following commands to push the application code to the TRIRIGA server.
cd app
java -jar WebViewSync_3.5.3.jar push -a
If the push is successful, the application should be accessible at the following endpoint
http://${TRIRIGA_URL}/tririga/p/web/${APP_NAME}
To render an interactive floor plan in the application, we'll need to first find the ID associated with the floor we'd like to render. This can be done by navigating to the TRIRIGA dashboard, clicking "Portfolio" in the upper right menu, and then "Floors" in the "Locations" section, as outlined in the image below.

Next, select one of the floor IDs. This ID can then be placed in the line with the triplat-graphic call as seen below
<triplat-graphic record-id="{{recordID}}" drawing-id-loading="{{drawingIdLoading}}" has-graphic="{{hasGraphic}}">></triplat-graphic>
If the record has an associated graphic, we should see a floor plan at the very top of the application like so.

Next, we can continue on to utilize an open source Indoor Positioning system called find. This solution works by measuring the signal strength of WiFi and Bluetooth sources to determine the approximate location of a device. To begin training a model associated with a specific room, we can install the library by running the following steps.
# clone scanner
git clone https://github.com/schollz/find3-cli-scanner

# build docker image
cd find3-cli-scanner
docker build -t schollz/find3-cli-scanner .

# start docker image
docker run --net="host" --privileged --name scanner -d -i -t schollz/find3-cli-scanner

# get network interface
ifconfig

# train machine learning model for 10 minutes
LOCATION='Conference Room 101'
DEVICE="Rasp Pi"
NET_INTERFACE="wlan0"
TIME=10
docker exec scanner sh -c "find3-cli-scanner -i ${NET_INTERFACE} -device ${DEVICE} -family dev -server https://cloud.internalpositioning.com -scantime ${TIME} -bluetooth -location ${LOCATION}"
After training one or more locations, the location of a given device can then be estimated by running the following command.
docker exec scanner sh -c "find3-cli-scanner -i ${NET_INTERFACE} \
    -device ${DEVICE} -family dev \
    -server https://cloud.internalpositioning.com \
    -scantime 10 -bluetooth"
TRIRIGA Perceptive App Documentation https://www.ibm.com/developerworks/community/wikis/home?lang=en#!/wiki/IBM%20TRIRIGA1/page/What%20are%20Perceptive%20apps
Perceptive Space Assessment https://www.ibm.com/developerworks/community/wikis/home?lang=en#!/wiki/IBM%20TRIRIGA1/page/What%27s%20the%20new%20Space%20Assessment%20app
UX Framework Starter Tutorial https://www.youtube.com/watch?v=69QPCkQNsJ8
This code pattern is licensed under the Apache License, Version 2. Separate third-party code objects invoked within this code pattern are licensed by their respective providers pursuant to their own separate licenses. Contributions are subject to the Developer Certificate of Origin, Version 1.1 and the Apache License, Version 2.


