I no longer have time to work on this bot and have deleted the source code to avoid any confusion. I have left this readme to indicate what is possible with a pixel bot.
-
Uses a modified version of the addon: https://github.com/FreeHongKongMMO/Happy-Pixels to read the game state. Sorry but the addon is coded for an english wow client and would need to be modified to work with any other languages.
-
Uses Blazor Server to show the bot state in a browser, and so can be monitored from your phone or a tablet while you do something else. https://docs.microsoft.com/en-us/aspnet/core/blazor
-
No DLL injection or memory watching, just screen capture, mouse and keyboard clicking.
-
The bot was written from scratch in C#. The Pathing calculation is mostly from an old library called PPather.
-
All classes are working except Hunter.
-
Pathing to grind route, vendor and repair.
-
Further detail about the bot can be found in my Blog post.
https://www.youtube.com/watch?v=CIMgbh5LuCc
You are welcome to create pull requests. Some ideas of things that could be improved:
- This readme
- The stuck detector
- The route recording and editing
- More routes
Create an issue rather than emailing me so that others can comment.
Put the contents of the repo into a folder. e.g "C:\WowClassicGrindBot". I am going to refer to this folder from now on, so just substitute your own folder path.
W In this repo is a folder called Addons e.g. C:\WowClassicGrindBot\Addons. Copy the contents into your wow classic Addons folder. e.g. c:\World of Warcraft_classic_\Interface\AddOns. You will need to restart Wow if it is running.
There are 2 addons:
- Bindpad - This makes it easier to bind keys to commands or macros. e.g. F1-F12
- DataToColor - This is the addon which reads and displays the game state.
You only need the common-2.MPQ (1.7Gb) file.
This file is required to find paths from where you are to the grind area, vendor and repair.
Copy it into the \PathingAPI\MPQ folder (e.g. C:\WowClassicGrindBot\PathingAPI\MPQ)
You will probably already have Visual Studio or Visual Studio Code installed. You need to build the bot using either one of them, or use powershell.
You will need .net core 3.1 x86 SDK installed. https://dotnet.microsoft.com/download/dotnet-core/3.1
Note: you need the x86 version, not the x64 one.
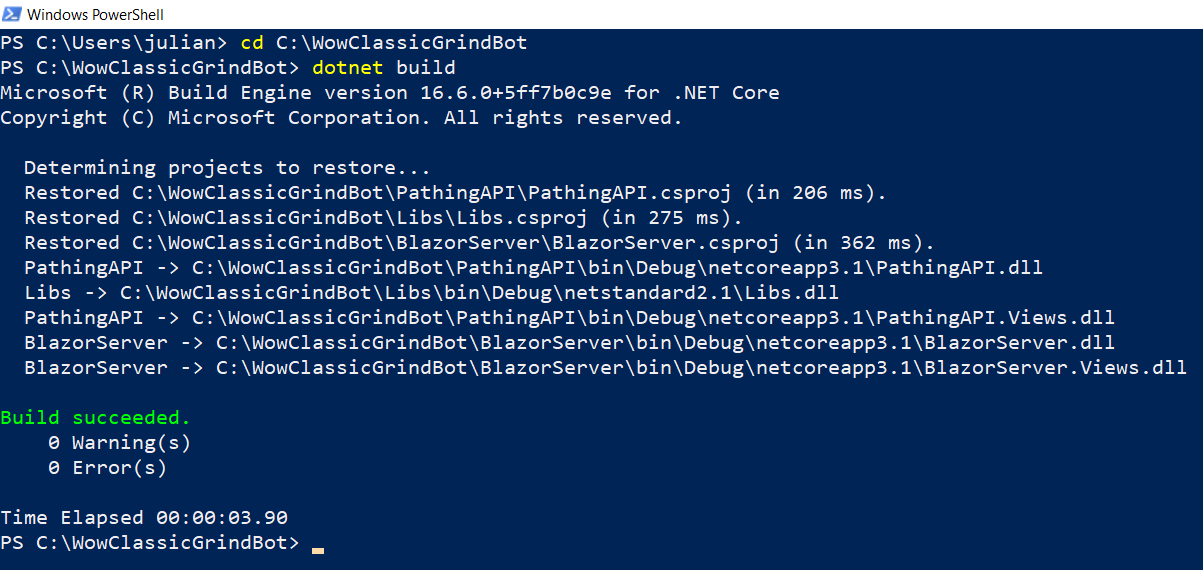
e.g. Build from powershell
cd C:\WowClassicGrindBot
dotnet build
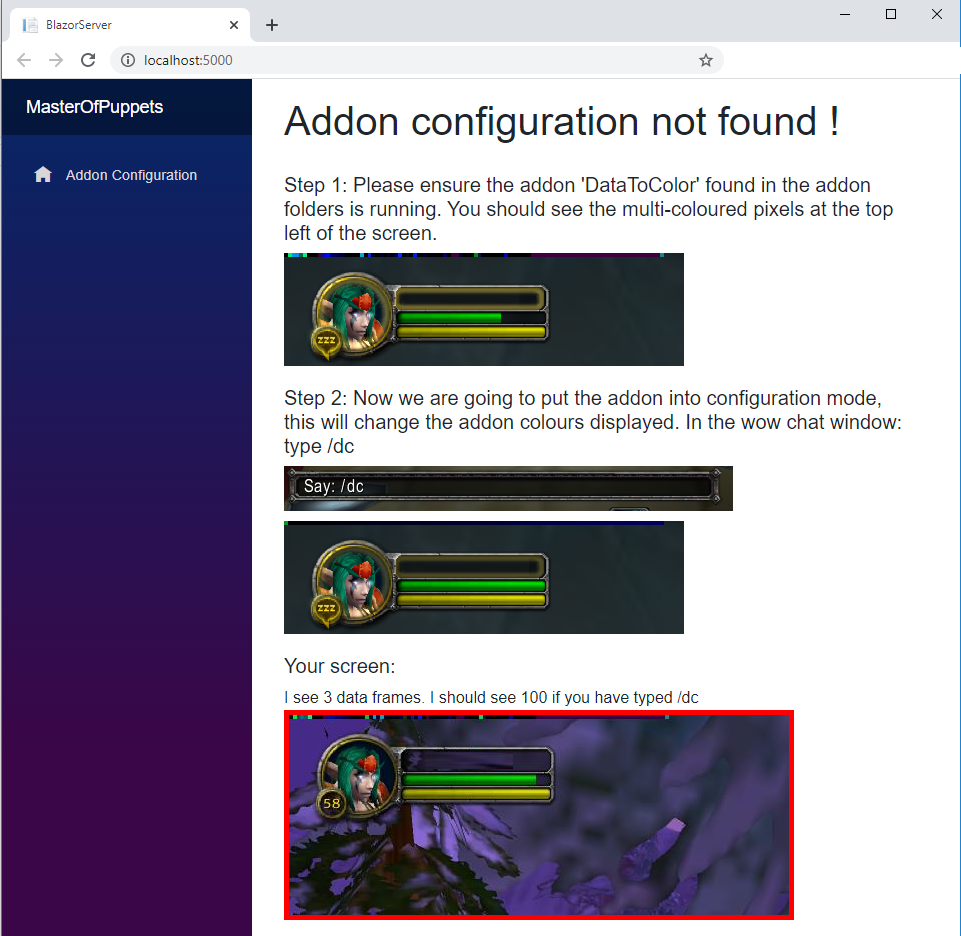
The bot reads the game state using small blocks of colour shown at the top of the screen by an Addon. This needs to be configured.
-
Delete the existing config.json file found in c:\WowClassicGrindBot\BlazorServer, we are going to recreate it. This is important as your screen may not be the same size as mine 1920 x 1080.
-
Edit the batch script in c:\WowClassicGrindBot\BlazorServer called run.bat, change it to point at where you have put the repo BlazorServer folder e.g.
start "C:\Program Files (x86)\Google\Chrome\Application\chrome.exe" "http://localhost:5000" c: cd C:\WowClassicGrindBot\BlazorServer dotnet run pause -
Execute the run.bat. This will start the bot and Chrome, Wow must be already running. If you get "Unable to find the Wow process is it running ?" in the console window then it can't find wow.exe.
-
You should see the 'Addon configuration' screen (See screenshot below).
-
Check these settings in the wow game client. Other values will stop the bot from being able to read the addon data.
- System>Advanced>Constrast: 50
- System>Advanced>Brightness: 50
- System>Advanced>Gamma from: 1.0
-
The bot needs to record the position of the blocks of colour and to do this we need to put the addon into configuration mode by typing /dc. Follow the instructions on the configuration page and Save the configuration.
-
Restart the bot and when it starts it should show the dashboard page.
We need to make sure that certain interface options are set. The most important are Click to move and screen flashing on low health. See the list below.
From the main menu (ESC) set the following:
- Interface Options - Controls - Auto Loot - Ticked.
- Interface Options - Controls - Interact on Left click - Not ticked.
- Interface Options - Combat - Do Not Flash Screen at Low Health - Ticked.
- Interface Options - Combat - Auto Self Cast - Ticked.
- Interface Options - Camera - Auto-Follow Speed - Fast
- Interface Options - Camera - Camera Following Style - Always
- Interface Options - Mouse - Click-to-Move - Ticked
- Interface Options - Mouse - Click-to-Move Camera Style - Always
The "Interact with Target" keybind is super important as it allows the bot to turn towards and approach the target. The "Target Last Target " keybind helps with looting.
From the main menu (ESC) set the following:
"Targeting" Key Bindings:
| Command | Key |
|---|---|
| Interact With Target | H |
| Target Last Target | N |
Bindpad allows keys to be easily bound to commands and macros. Type /bindpad to show it.
For each of the following click + to add a new key binding. The most important ones are marked with a *.
| Key | Command | Description |
|---|---|---|
| i | /use hearthstone | |
| o | /use Chestnut Mare Bridle | Your mount here |
| u | /tar targettarget | Warlock only |
| y | /cast counterspell | Mage only |
| t | /cast blink | Mage only |
| F1 | See below | Buff weapon 16 (Melee classes) |
| F2 | See below | Buff weapon 17 (Melee classes) |
| * F3 | /cleartarget | |
| * F4 | /use Superior Healing Potion | Heal |
| F5 | See below | Delete various crap |
| F6 | /equipslot 18 Wicked Throwing Dagger | Equip thown (Rogue) |
| F7 | /cast Desperate Prayer | Heal - Priest only |
| F8 | /cancelform | Druid |
| * F9 | /stand | |
| * F10 | /stopattack | |
| F11 | /cast Power Infusion | Priest only |
| F12 | /tar pet | Warlock only |
| L | /cast Ice Barrier | Mage only |
Rogue weapon buff (use 17 for second weapon):
    /use Instant Poison V
    /use 16
    /click StaticPopup1Button1

Melee weapon buff:
    /use Dense Sharpening Stone
    /use 16
    /click StaticPopup1Button1

Delete various
    /run for b=0,4 do for s=1,GetContainerNumSlots(b) do local n=GetContainerItemLink(b,s) if n and (strfind(n,"Slimy") or strfind(n,"Red Wolf") or strfind(n,"Mystery") or strfind(n,"Spider L")) then PickupContainerItem(b,s) DeleteCursorItem() end end end
Each class has a configuration file in /Json/class e.g. the config for a Rogue it is in file C:\WowClassicGrindBot\Json\class\Rogue.json.
The configuration file determines what spells you cast when pulling and in combat, where to vend and repair and what buffs you give yourself.
Take a look at the class files in /Json/class for examples of what you can do (BTW hunter is not supported.). Your class file probably exists and just needs to be edited to set the pathing file name, but note they may be set up for level 60.
The path that the class follows is a json file in C:\WowClassicGrindBot\Json\path\ which contains a list of x & y coordinates the bot will traverse while looking for mobs.
    "PathFilename": "58_Winterspring.2.json", // the path to walk when alive
    "SpiritPathFilename": "58_Winterspring_SpiritHealer.2.json", // the path from the spirit healer back to the main path.
    "PathThereAndBack": true, // if true walks the path and the walks it backwards.
    "PathReduceSteps": true,  // uses every other coordinate.
Note: The SpiritPathFilename is not really needed anymore as the bot should be able to path from the spirit healer to the corpse.
The rest of the file contains a set of commands
e.g.
{
    "Name": "Slice And Dice",
    "Key": "3",
    "MinEnergy": 25,
    "MinComboPoints": 2,
    "Cooldown": 3,
    "Requirement": "Slice And Dice"
  },
Commands have the following parameters, only a subset will be used by each command.
| Property Name | Description | Default value |
|---|---|---|
| Name | Name of the command | |
| HasCastBar | Does the spell have a cast bar | false |
| StopBeforeCast | Should the char stop moving before casting the spell | false |
| Key | The key to click (ConsoleKey) | |
| PressDuration | How many milliseconds to press the key for | 250 |
| ShapeShiftForm | For druids the shapeshift form to be in to cast this spell | None |
| CastIfAddsVisible | If the bot can "See" any adds | false |
| Cooldown | The cooldown in seconds until the command can be done again | 0 |
| MinMana | The minimum Mana required to cast the spell | 0 |
| MinRage | The minimum Rage required to cast the spell | 0 |
| MinEnergy | The minimum Energy required to cast the spell | 0 |
| MinComboPoints | The minimum combo points required to cast the spell | 0 |
| Requirement | A single "Requirement" (See below) which must be true | |
| Requirements | A list of "Requirements" which must be true | |
| WaitForWithinMelleRange | Wait after casting for the mob to be in melee range | false |
| ResetOnNewTarget | Reset the cooldown if the target changes | false |
| Log | Write to the log when this key is evaluated | true |
| DelayAfterCast | The delay in milliseconds after the spell is cast | 1500 |
| DelayBeforeCast | A delay in milliseconds before this spell is cast | 0 |
| Cost | For Adhoc goals the priority | 18 |
| InCombat | Can it be cast in combat | false |
| StepBackAfterCast | Hero will go back for X sec after casting this spell , usable for spells like Mage Frost Nova | false |
| PathFilename | For NPC goals, this is a short path to get close to the NPC to avoid walls etc. | "Tanaris_GadgetzanKrinkleGoodsteel.json" |
This is the sequence of commands that are used when pulling a mob.
The sequence of commands that are used when in combat and trying to kill a mob. The combat goal does the first available command on the list. The goal then runs again re-evaluating the list before choosing the first available command again, and so on until the mob is dead.
These commands are done when not in combat and are not on cooldown.
These command are for vendoring and repair.
e.g.
"NPC": {
      "Sequence": [
        {
          "Name": "Repair",
          "Key": "C",
          "Requirement": "Items Broken",
          "PathFilename": "Tanaris_GadgetzanKrinkleGoodsteel.json",
          "Cost": 6
        },
        {
          "Name": "Sell",
          "Key": "C",
          "Requirement": "BagCount>65",
          "PathFilename": "Tanaris_GadgetzanKrinkleGoodsteel.json",
          "Cost": 6
        }
      ]
  }
The "Key" is a key that is bound to a macro. The macro needs to target the NPC, and if necessary open up the repair or vendor page. The bot will click the key and the npc will be targetted. Then it will click the interact button which will cause the bot to move to the NPC and open the NPC options, this may be enough to get the auto repair and auto sell greys to happen. But the bot will click the button again in case there are further steps (e.g. SelectGossipOption), or you have many greys or items to sell.
Sell macro example bound to the "C" key using BindPad or Key bindings.
/tar Jannos Ironwill
/run DataToColor:sell({"Light Leather","Cheese","Light Feather"});
Repair macro example:
/tar Vargus
/script SelectGossipOption(1)
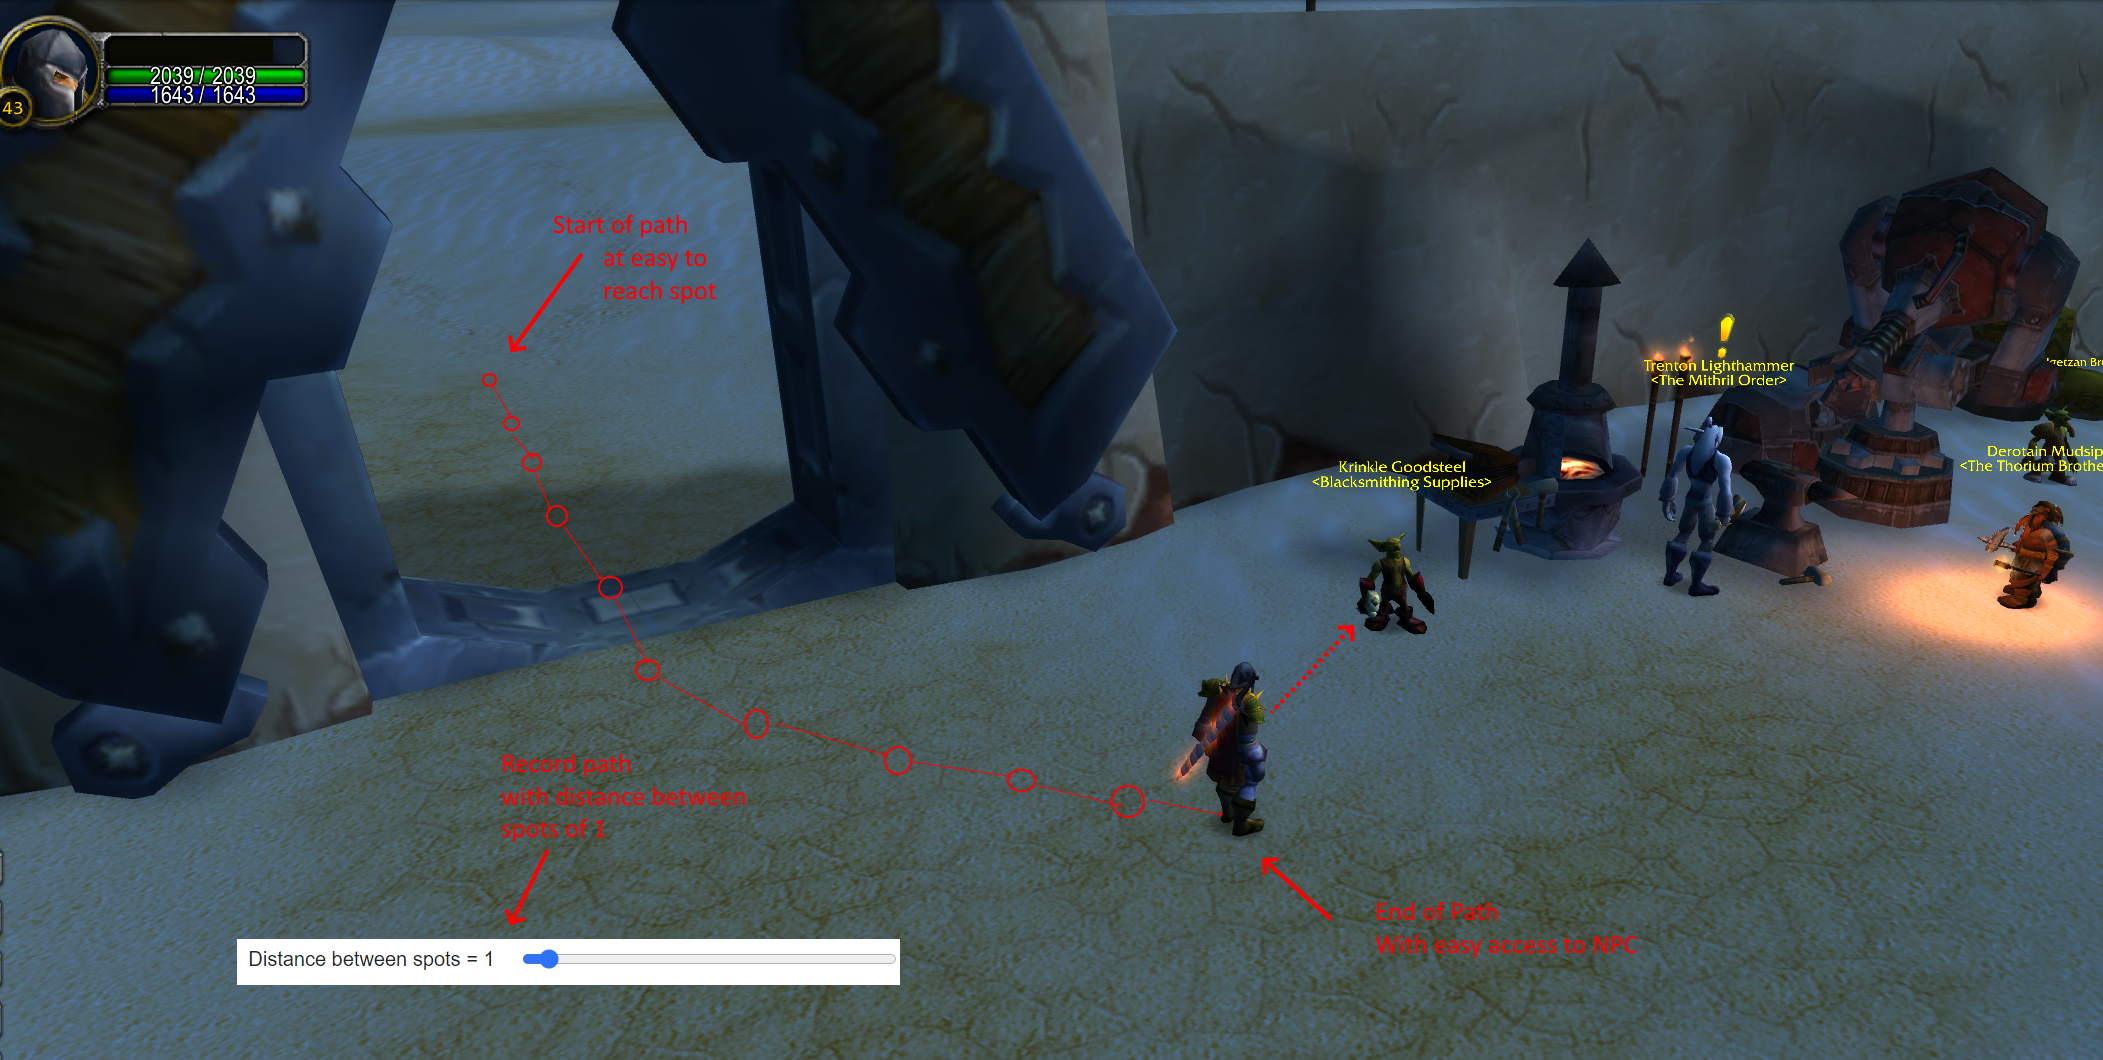
Because some NPCs are hard to reach, there is the option to add a short path to them e.g. "Tanaris_GadgetzanKrinkleGoodsteel.json". The idea is that the start of the path is easy to get to and is a short distance from the NPC, you record a path from the easy to reach spot to the NPC with a distance between spots of 1. When the bot needs to vend or repair it will path to the first spot in the list, then walk closely through the rest of the spots, once they are walked it will press the defined Key, then walk back through the path.
e.g. Tanaris_GadgetzanKrinkleGoodsteel.json in the Json\path folder looks like this:
[{"X":51.477,"Y":29.347},{"X":51.486,"Y":29.308},{"X":51.495,"Y":29.266},{"X":51.503,"Y":29.23},{"X":51.513,"Y":29.186},{"X":51.522,"Y":29.147},{"X":51.531,"Y":29.104},{"X":51.54,"Y":29.063},{"X":51.551,"Y":29.017},{"X":51.559,"Y":28.974},{"X":51.568,"Y":28.93},{"X":51.578,"Y":28.889},{"X":51.587,"Y":28.853},{"X":51.597,"Y":28.808}]
If you have an NPC that is easy to get to such as the repair NPC in Arathi Highlands then the path only needs to have one spot in it. e.g.
[{"X":45.8,"Y":46.6}]
Short Path Example:
In theory if there is a repeatable quest to collect items, you could set up a NPC task as follows. See 'Bag requirements' for Requirements format.
{
    "Name": "Handin",
    "Key": "K",
    "Requirements": ["BagItem:12622:5","BagItem:12623:5"],
    "PathFilename": "Path_to_NPC.json",
    "Cost": 6
}
A requirement is something that must be true for the command to run. Not all commands need a requirement, some just rely on a cooldown or a mana amount. A requirement can be put into a list if there is more than one.
e.g.
  {
    "Name": "Soul Shard",
    "Key": "9",
    "HasCastBar": true,
    "Requirements": ["TargetHealth%<36", "not BagItem:6265:3"], <--- Requirement List
    "MinMana": 55
  },
  {
    "Name": "Curse of Weakness",
    "Key": "6",
    "Cooldown": 10,
    "ResetOnNewTarget": true,
    "Requirement": "not Curse of Weakness", <--- Single Requirement
    "MinMana": 20,
    "Log": false
  },
Value base requirements are made up on a [ Health% or TargetHealth% or Mana% or BagCount] [< or >] [Numeric Value].
e.g.
- "Health%>70",
- "TargetHealth%<10",
- "Mana%<40",
- "BagCount>80",
- "MobCount>1"
If a particular npc is required then this requirement can be used.
e.g.
- "not npcID:6195", - don't cast on npcId 6195 https://classic.wowhead.com/npc=6195
- "npcID:6195", - only cast on npcId 6195 https://classic.wowhead.com/npc=6195
If you only want to cast a spell if there is more than one mob fighting you e.g. Frost nova, or Cleave etc.
e.g. "Requirement": "MobCount>1",
If an item must be in your bag then you can use this requirement. Useful to determine when to create warlock Healthstone or soul shards.
It has the format BagItem:[itemid]:[count]
e.g.
- "BagItem:6265:1 - Must have a soulshard in the bag https://classic.wowhead.com/item=6265
- "not BagItem:19007:1" - Must have a lesser Healthstone in the bag https://classic.wowhead.com/item=19007
- "not BagItem:6265:3"- Must not have 3 soulshards in the bag.
Allow requirements about what buffs you have or the target has to be evaluated.
e.g.
- "not Well Fed" - I am not well fed.
- "not Thorns" - I don't have the thorns buff.
- "Shooting" - I am out of shooting.
- "Items Broken" - Some of my armor is red.
| Class | Buff |
|---|---|
| All | "Items Broken" |
| All | "Well Fed" |
| All | "Eating" |
| All | "Drinking" |
| All | "Mana Regeneration" |
| All | "OutOfCombatRange" |
| All | "InCombatRange" |
| All | "Shooting" |
| Priest | "Fortitude" |
| Priest | "InnerFire" |
| Priest | "Divine Spirit" |
| Priest | "Renew" |
| Priest | "Shield" |
| Priest | "Shadow Word: Pain" |
| Paladin | "Seal" |
| Paladin | "Aura" |
| Paladin | "Blessing" |
| Druid | "Mark of the Wild" |
| Druid | "Thorns" |
| Druid Debuff | "Demoralizing Roar" |
| Druid Debuff | "Faerie Fire" |
| Mage | "Frost Armor" |
| Mage | "Arcane Intellect" |
| Mage | "Ice Barrier" |
| Rogue | "Slice And Dice" |
| Warrior | "Battle Shout" |
| Warlock | "Demon Skin" |
| Warlock | "Has Pet" |
| Warlock | "Curse of Weakness" |
| Warrior Debuff | "Rend" |
Allow requirements about spell range to be used, the spell in question depends upon the class being played. "SpellInRange:0" or "not SpellInRange:0" for a Warrior is Charge and for a Mage is Fireball. This might be useful if you were close enough for a Fireball, but not for a Frostbolt.
e.g. "Requirement": "SpellInRange:4" e.g. "Requirements": ["Health%<80", "SpellInRange:4"]
In the Addon DataToColor.lua is function DataToColor:areSpellsInRange() this tries to get a list of spells unique to each class that are in range. This is read by Libs.SpellInRange.cs.
| Class | Spell | id |
|---|---|---|
| ROGUE | Sinister Strike | 0 |
| ROGUE | Throw | 1 |
| ROGUE | Shoot Gun | 2 |
| DRUID | Wrath | 0 |
| DRUID | Bash | 1 |
| WARRIOR | Charge | 0 |
| WARRIOR | Rend | 1 |
| WARRIOR | Shoot Gun | 2 |
| PRIEST | Shadow Word: Pain | 0 |
| PRIEST | Mind Blast | 1 |
| PRIEST | Mind Flay | 2 |
| PRIEST | Shoot | 3 |
| PALADIN | Judgement | 0 |
| MAGE | Fireball | 0 |
| MAGE | Shoot | 1 |
| MAGE | Pyroblast | 2 |
| MAGE | Frostbolt | 3 |
| MAGE | Fire Blast | 4 |
| HUNTER | Raptor Strike | 0 |
| HUNTER | Auto Shot | 1 |
| WARLOCK | Shadow Bolt | 0 |
| WARLOCK | Shoot | 1 |
The default mode for the bot is to grind, but there are other modes. The mode is set in the root of the class file.
e.g. Rogue.json
{
  ...

  "PathFilename": "Herb_EPL.json",
  "SpiritPathFilename": "Herb_EPL.json",

  "Mode": "AttendedGather", // <---------
  "GatherFindKeys":  [1,2],
}
The available modes are:
| Mode | Description |
|---|---|
| "Grind" | This is the default mode where the bot will pull mobs and follow a route |
| "CorpseRun" | This mode only has 2 goals. The "Wait" goal waits while you are alive. The "CorpseRun" will run back to your corpse when you die. This can be useful if you are farming an instance and die, the bot will run you back some or all of the way to the instance entrance. |
| "AttendedGather" | When this mode is active and the Gather tab in the UI is selected, it will run the path and scan the minimap for the yellow nodes which indicate a herb or mining node. When it finds a node it will stop and alert you by playing a youtube video, you will then have to manually pick the herb/mine and then start the bot again. |
| "AttendedGrind" | This is useful if you want to control the path the bot takes, but want it to pull and kill any targets you select. |
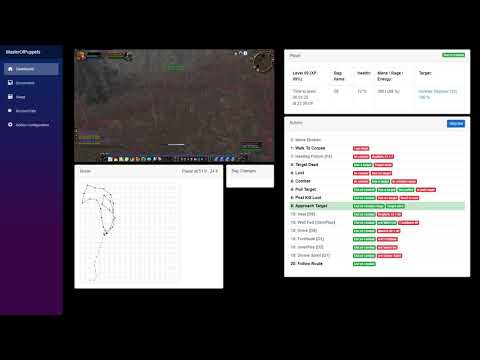
The user interface is shown in a browser on port 5000 http://localhost:5000. This allows you to view it from another device on your lan.
To access you PC port 5000 from another device, you will need to open up port 5000 in your firewall.
Control Panel\System and Security\Windows Defender Firewall - Advanced Settings
- Inbound Rules
- New Rule
- Port
- TCP
- Specific local ports: 5000
- Allow the Connection
- Private, Public, Domain (You may get away with just Private)
- Name "Wow bot"
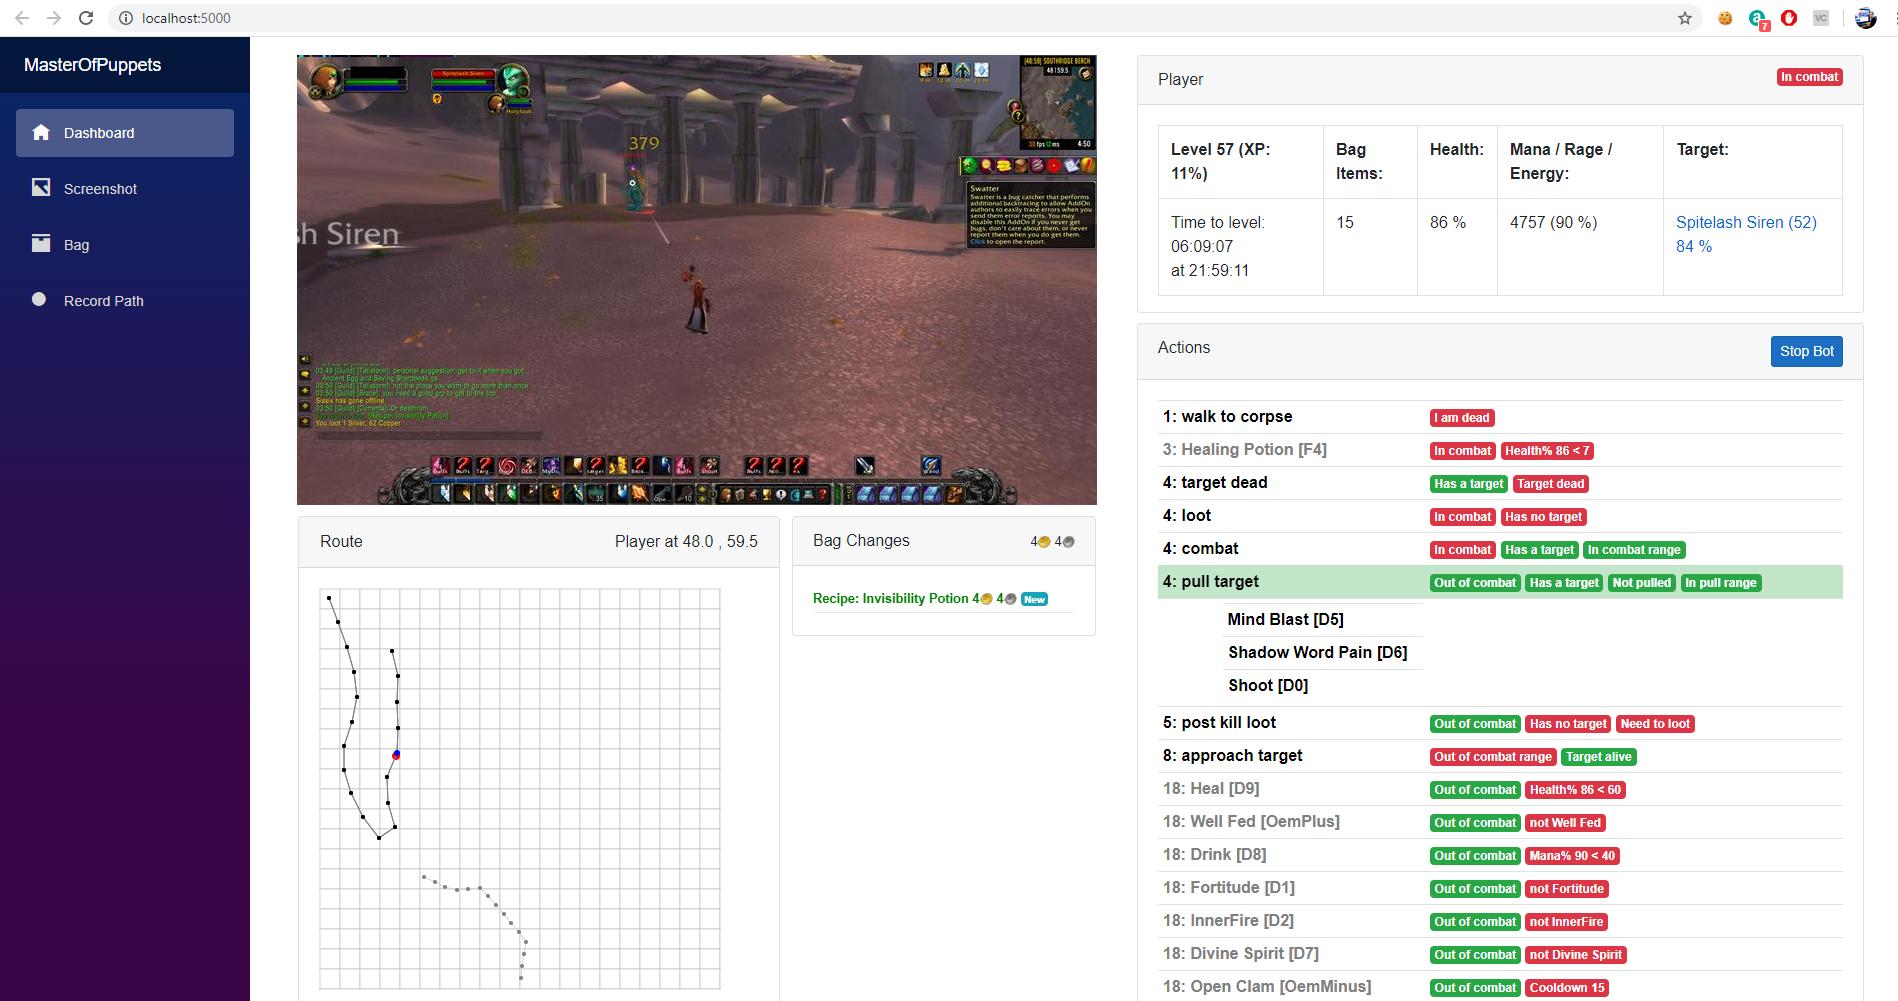
The UI has the following components:
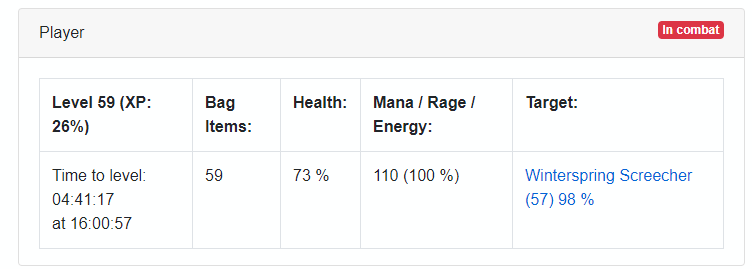
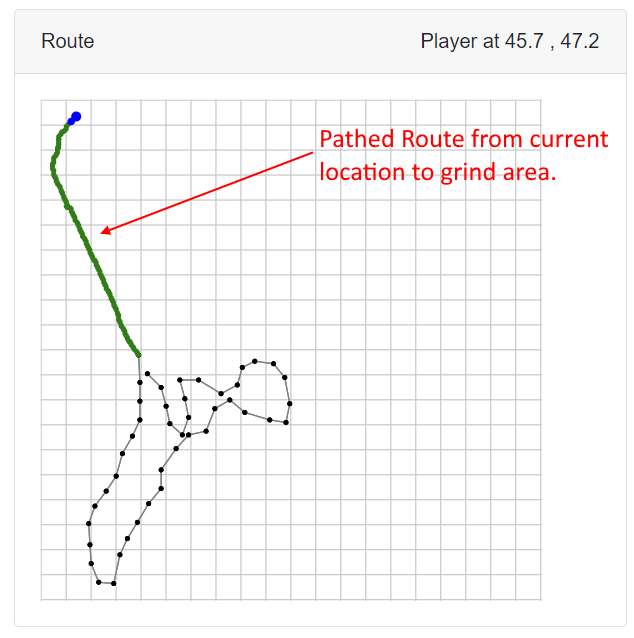
Show the player state. A hyper link to wowhead appears for the mob you are fighting so you can check out what it drops.
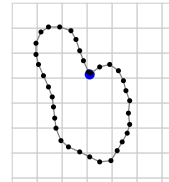
This component shows:
- The main path
- The spirit healer path
- Your location
- The location of any deaths
- Pathed routes
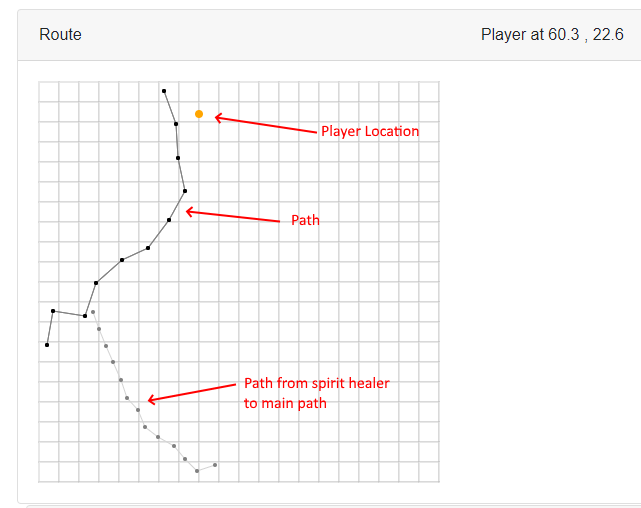
Pathed routes are shown in Green.
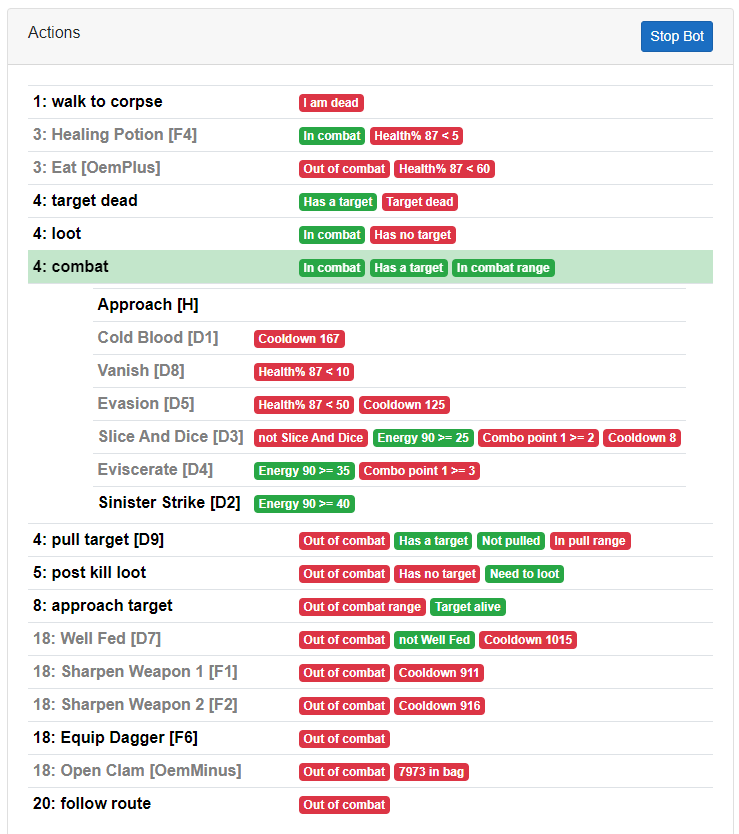
This component contains a button to allow the bot to be enabled and disabled.
This displays the finite state machine. The state is goal which can run and has the highest priority. What determines if the goal can run are its pre-conditions such as having a target or being in combat. The executing goal is allowed to complete before the next goal is determined.
Some goals (combat,pull target) contain a list of spells which can be cast. The combat task evaluates its spells in order with the first available being cast. The goal then gives up control so that a higher priority task can take over (e.g. Healing potion).
The visualisation of the pre-conditions and spell requirements makes it easier to understand what the bot is doing and determine if the class file needs to be tweaked.
Various path are needed by the bot:
The path to run when grinding (PathFilename in root of class files).
The path from the spirit healer to the grind path. (SpiritPathFilename in root of class files):
"PathFilename": "16_LochModan.json",
"SpiritPathFilename": "16_LochModan_Spirithealer.json",
"PathThereAndBack": true,
"PathReduceSteps": false,
The short path to get to the vendor/repairer when there are obstacles close to them (PathFilename withing NPC task):
{
    "Name": "Sell",
    "Key": "C",
    "Requirement": "BagCount>80",
    "PathFilename": "Tanaris_GadgetzanKrinkleGoodsteel.json",
    "Cost": 6
}
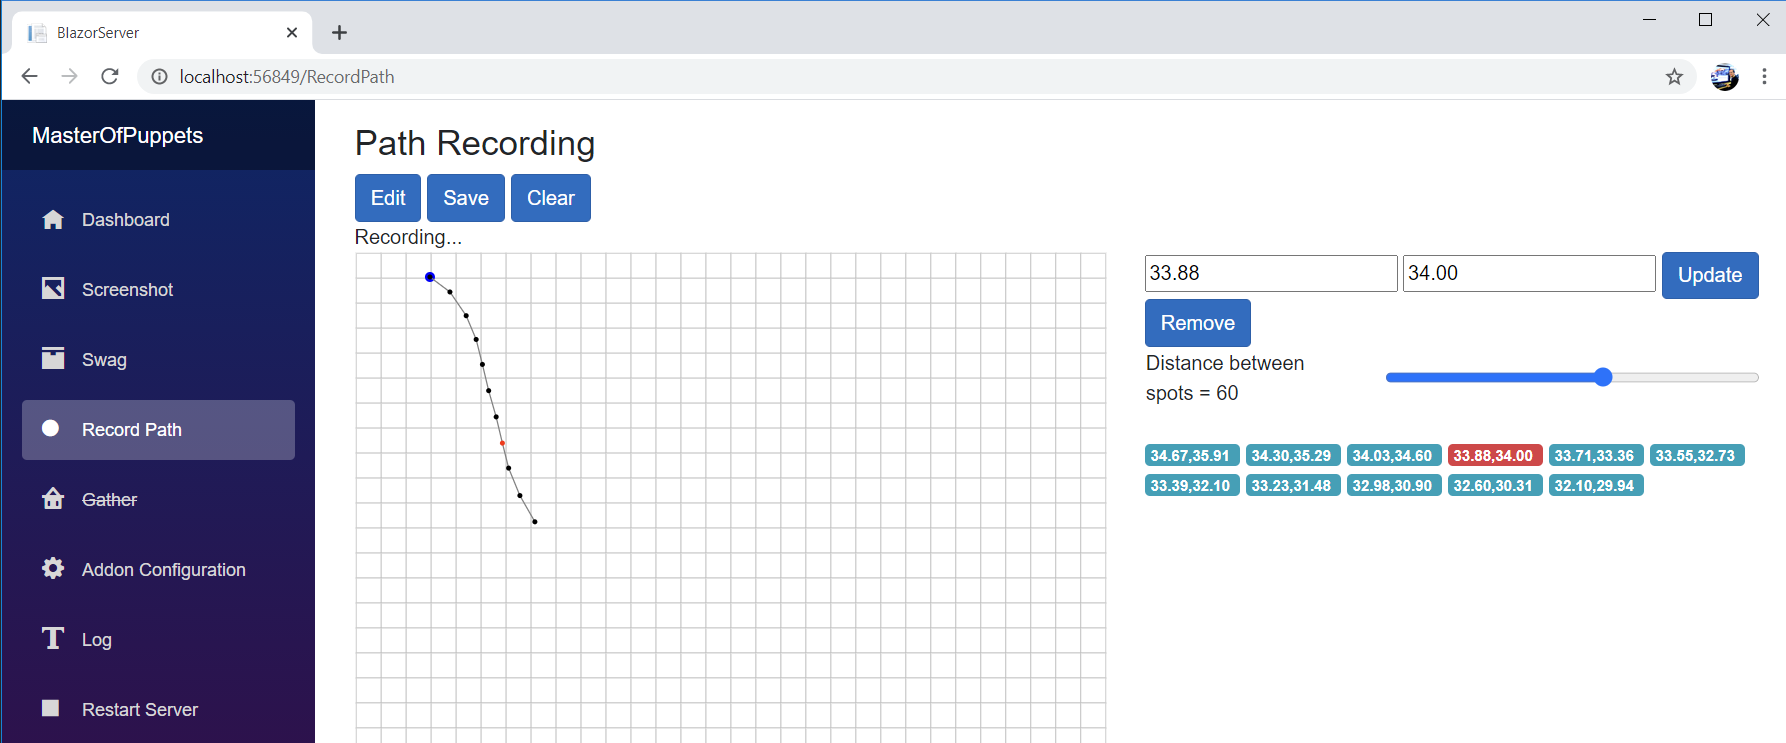
To record a new path place your character where the start of the path should be, then click on the 'Record Path' option on the left hand side of the bot's browser window. Then click 'Record New'.

Now walk the path the bot should take.
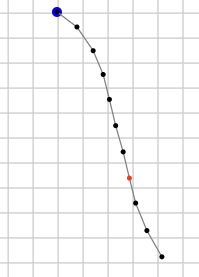
If you make a mistake you can remove spots by clicking on them on the list on the right. Then either enter new values for the spot or click 'Remove'.
For tricky parts you may want to record spots close together by using the 'Distance between spots' slider (Smaller number equals closer together).
Once the path is complete click 'Save'. This path will be saved with a generic filename e.g. Path_20201108112650.json, you will need to go into your \Json\path and rename it to something sensible.
"PathThereAndBack": true,
These paths are run from one end to the other and then walked backwards back to the start. So the end does not need to be near the start.
"PathThereAndBack": false,
These paths are run from one end to the other and then repeated. So the path needs to join up with itself i.e. the end needs to be near the start.
Try to avoid the path getting too close to:
- Obstactles like trees, houses.
- Steep hills or cliffs (falling off one can make the bot get stuck).
- Camps/groups of mobs.
- Elite mob areas, or solo elite paths.
The best places to grind are:
- Places with non casters i.e. beasts. So that they come to you when agro'd.
- Places where mobs are far apart (so you don't get adds).
- Places with few obstacles.
- Flat ground.
Pathing is built into the bot so you don't need to do anything special except download the MPQ files. You can though run it on its own server to visualise routes as they are created by the bot, or to play with route finding.
The bot will try to calculate a path in the following situations:
- Travelling to a vendor or repair.
- Doing a corpse run.
- Resuming the grind path at startup, after killing a mob, or if the distance to the next stop in the path is not a short distance.
https://www.youtube.com/watch?v=Oz_jFZfxSdc&t=254s&ab

In visual studio just set PathingAPI as the startup project or from the command line:
CD C:\WowClassicGrindBot\PathingAPI dotnet run
Then in a browser go to http://localhost:5001
There are 3 pages:
- Watch API Calls
- Search
- Swagger
Requests to the API can be done in a new browser tab like this or via the Swagger tab. You can then view the result in the Watch API calls viewer.
e.g. http://localhost:5001/api/PPather/MapRoute?map1=1446&x1=51.0&y1=29.3&map2=1446&x2=38.7&y2=20.1
Search gives some predefined locations to search from and to.
In visual studio right click the solution and set Multiple startup projects to BlazorServer and PathingApi and run.
Or from 2 command lines dotnet run each.
CD C:\WowClassicGrindBot\PathingAPI
dotnet run

CD C:\WowClassicGrindBot\BlazorServer
dotnet run
The bot will use the PathingAPI to work out routes, these are shown on the route map as green points.


