jinjiaxing / blog Goto Github PK
View Code? Open in Web Editor NEW前端技术心得与总结
前端技术心得与总结


在说Virtual-DOM之前,我们来先说下什么是DOM,DOM从字面上来理解是文档对象模型。
W3C对DOM的定义是:“一个与系统平台和编程语言无关的接口,程序和脚本可以通过这个接口动态地访问和修改文档内容、结构和样式。”
而从上面的定义总结来看,DOM是接口,这个接口可以操作文档。
而文档呢就是Document,在HTML中的Document,可以简单理解成一个节点树,而我们要将这个节点树映射成对象,而对象中自然就存在属性和方法了,其中这些方法就让我们可以操作文档(好像说的还是有点绕)
Virtual-DOM翻译过来就是虚拟DOM,而它其实可以简单理解为,通过JS去创建的表示DOM的对象,并且未加载到真实页面中
有人说用virtual-dom比真实dom快,其实这是相对的,virtual-dom很多时候都不是最优的操作,但它具有普适性,在效率、可维护性之间达平衡
在网上看到一段代码,比较简洁的描述了如何去创建一个virtual-dom:
//建立一个VNode的对象
class VNode {
    constructor(tag, children, text) {
        this.tag = tag
        this.text = text
        this.children = children
    }

    render() {
        if (this.tag === '#text') {
            return document.createTextNode(this.text)
        }
        let el = document.createElement(this.tag)
        this.children.forEach(vChild => {
            el.appendChild(vChild.render())
        })
        return el
    }
}

function v(tag, children, text) {
    if (typeof children === 'string') {
        text = children
        children = []
    }
    return new VNode(tag, children, text)
}

/*
let nodesData = {
  tag: 'div',
  children: [
{
  tag: 'p',
  children: [
    {
      tag: 'span',
      children: [
        {
          tag: '#text',
          text: 'baidu'
        }
      ]
    }
  ]
},
{
  tag: 'span',
    children: [
      {
        tag: '#text',
        text: 'alibaba'
      }
    ]
}
]
}

 */

let vNodes = v('div', [
    v('p', [
        v('span', [v('#text', 'baidu')])
    ]
    ),
    v('span', [
        v('#text', 'alibaba')
    ])
]);
console.log(vNodes.render())//建立真实DOM

// 对比DOM树变更
function patchElement(parent, newVNode, oldVNode, index = 0) {
    if (!oldVNode) {
        parent.appendChild(newVNode.render())
    } else if (!newVNode) {
        parent.removeChild(parent.childNodes[index])
    } else if (newVNode.tag !== oldVNode.tag || newVNode.text !== oldVNode.text) {
        parent.replaceChild(newVNode.render(), parent.childNodes[index])
    } else {
        for (let i = 0; i < newVNode.children.length || i < oldVNode.children.length; i++) {
            patchElement(parent.childNodes[index], newVNode.children[i], oldVNode.children[i], i)
        }
    }
}


let vNodes1 = v('div', [
    v('p', [
        v('span', [v('#text', 'baidu')])
    ]
    ),
    v('span', [
        v('#text', 'ali')
    ])
]
)//虚拟DOM1

let vNodes2 = v('div', [
    v('p', [
        v('span', [
            v('#text', 'jd')
        ])
    ]
    ),
    v('span', [
        v('#text', 'baidu'),
        v('#text', 'map')
    ])
]
)//虚拟DOM2
const root = document.querySelector('#root')
patchElement(root, vNodes1) //对比更新
我们从上面的代码可以清晰的看到 vdom的简单流程
vue2引入的vdom是基于snabbdom进行的修改而来,对于snabbdom的源码解析,我们可以看这里
react的diff算法,在16版本之前,与vue2应该大同小异
而在react16之后的fiber,采用了不同的方式
上面只是简单的介绍了下virtual-dom的概念而已,而对于具体到底是如何进行vdom之间的diff,才是更核心的东西,我们后续再去研究它
 /**
     * 判断某对象在数组中的inde
     * @param obj
     * @param list
     */
    function getObjectInArrayIndex = (obj, list) => {
        if (!list || !(list instanceof Array)) {
            return -1;
        }
        if (!obj) {
            return -1;
        }
        return list.indexOf(list.filter(item => {
            return JSON.stringify(item) === JSON.stringify(obj)
        })[0])
目前想到的比较简单的写法,大家可以讨论下性能,或者提供下更好的写法
关于盒子模型的描述,感觉比较好的一篇文章,收录下来
https://www.cnblogs.com/fsjohnhuang/p/5259121.html
window.performance,目前IE9以上的浏览器都支持。它是一个浏览器中用于记录页面加载和解析过程中关键时间点的对象。放置在global环境下,通过JavaScript可以访问到它。
使用性能API
你可以通过以下方法来探测和兼容performance:
var performance = window.performance ||
    window.msPerformance ||
    window.webkitPerformance;
if (performance) {
    // 你的代码
}
performance.memory 是显示此刻内存占用情况,它是一个动态值,其中:
usedJSHeapSize表示:JS 对象(包括V8引擎内部对象)占用的内存数
totalJSHeapSize表示:可使用的内存
jsHeapSizeLimit表示:内存大小限制
通常,usedJSHeapSize不能大于totalJSHeapSize,如果大于,有可能出现了内存泄漏。
performance.navigation显示页面的来源信息,其中:
redirectCount表示:如果有重定向的话,页面通过几次重定向跳转而来,默认为0
type表示页面打开的方式,
0 表示 TYPE_NAVIGATENEXT 正常进入的页面(非刷新、非重定向等)
1 表示 TYPE_RELOAD 通过 window.location.reload() 刷新的页面
2 表示 TYPE_BACK_FORWARD 通过浏览器的前进后退按钮进入的页面(历史记录)
255 表示 TYPE_UNDEFINED 非以上方式进入的页面
performance.onresourcetimingbufferfull 属性是一个在resourcetimingbufferfull事件触发时会被调用的 event handler 。它的值是一个手动设置的回调函数,这个回调函数会在浏览器的资源时间性能缓冲区满时执行。
performance.timeOrigin是一系列时间点的基准点,精确到万分之一毫秒。
performance.timing是一系列关键时间点,它包含了网络、解析等一系列的时间数据。

下面是对这些时间点进行解释
timing: {
        // 同一个浏览器上一个页面卸载(unload)结束时的时间戳。如果没有上一个页面,这个值会和fetchStart相同。
	navigationStart: 1543806782096,

	// 上一个页面unload事件抛出时的时间戳。如果没有上一个页面,这个值会返回0。
	unloadEventStart: 1543806782523,

	// 和 unloadEventStart 相对应,unload事件处理完成时的时间戳。如果没有上一个页面,这个值会返回0。
	unloadEventEnd: 1543806782523,

	// 第一个HTTP重定向开始时的时间戳。如果没有重定向,或者重定向中的一个不同源,这个值会返回0。
	redirectStart: 0,

	// 最后一个HTTP重定向完成时(也就是说是HTTP响应的最后一个比特直接被收到的时间)的时间戳。
	// 如果没有重定向,或者重定向中的一个不同源,这个值会返回0.
	redirectEnd: 0,

	// 浏览器准备好使用HTTP请求来获取(fetch)文档的时间戳。这个时间点会在检查任何应用缓存之前。
	fetchStart: 1543806782096,

	// DNS 域名查询开始的UNIX时间戳。
        //如果使用了持续连接(persistent connection),或者这个信息存储到了缓存或者本地资源上,这个值将和fetchStart一致。
	domainLookupStart: 1543806782096,

	// DNS 域名查询完成的时间.
	//如果使用了本地缓存(即无 DNS 查询)或持久连接,则与 fetchStart 值相等
	domainLookupEnd: 1543806782096,

	// HTTP(TCP) 域名查询结束的时间戳。
        //如果使用了持续连接(persistent connection),或者这个信息存储到了缓存或者本地资源上,这个值将和 fetchStart一致。
	connectStart: 1543806782099,

	// HTTP(TCP) 返回浏览器与服务器之间的连接建立时的时间戳。
        // 如果建立的是持久连接,则返回值等同于fetchStart属性的值。连接建立指的是所有握手和认证过程全部结束。
	connectEnd: 1543806782227,

	// HTTPS 返回浏览器与服务器开始安全链接的握手时的时间戳。如果当前网页不要求安全连接,则返回0。
	secureConnectionStart: 1543806782162,

	// 返回浏览器向服务器发出HTTP请求时(或开始读取本地缓存时)的时间戳。
	requestStart: 1543806782241,

	// 返回浏览器从服务器收到(或从本地缓存读取)第一个字节时的时间戳。
        //如果传输层在开始请求之后失败并且连接被重开,该属性将会被数制成新的请求的相对应的发起时间。
	responseStart: 1543806782516,

	// 返回浏览器从服务器收到(或从本地缓存读取,或从本地资源读取)最后一个字节时
        //(如果在此之前HTTP连接已经关闭,则返回关闭时)的时间戳。
	responseEnd: 1543806782537,

	// 当前网页DOM结构开始解析时(即Document.readyState属性变为“loading”、相应的 readystatechange事件触发时)的时间戳。
	domLoading: 1543806782573,

	// 当前网页DOM结构结束解析、开始加载内嵌资源时(即Document.readyState属性变为“interactive”、相应的readystatechange事件触发时)的时间戳。
	domInteractive: 1543806783203,

	// 当解析器发送DOMContentLoaded 事件,即所有需要被执行的脚本已经被解析时的时间戳。
	domContentLoadedEventStart: 1543806783203,

	// 当所有需要立即执行的脚本已经被执行(不论执行顺序)时的时间戳。
	domContentLoadedEventEnd: 1543806783216,

	// 当前文档解析完成,即Document.readyState 变为 'complete'且相对应的readystatechange 被触发时的时间戳
	domComplete: 1543806783796,

	// load事件被发送时的时间戳。如果这个事件还未被发送,它的值将会是0。
	loadEventStart: 1543806783796,

	// 当load事件结束,即加载事件完成时的时间戳。如果这个事件还未被发送,或者尚未完成,它的值将会是0.
	loadEventEnd: 1543806783802
}
这些参数非常有用,可以帮助我们获取页面的Domready时间、onload时间、白屏时间等,以及单个页面资源在从发送请求到获取到rsponse各阶段的性能参数。
对我们比较有用的页面性能数据大概包括如下几个,这些参数是通过上面的performance.timing各个属性的差值组成的,它是精确到毫秒的一个值,计算方法如下:
重定向耗时:redirectEnd - redirectStart
DNS查询耗时 :domainLookupEnd - domainLookupStart
TCP链接耗时 :connectEnd - connectStart
HTTP请求耗时 :responseEnd - responseStart
解析dom树耗时 : domComplete - domInteractive
白屏时间 :responseStart - navigationStart
DOMready时间 :domContentLoadedEventEnd - navigationStart
onload时间:loadEventEnd - navigationStart,也即是onload回调函数执行的时间。
H5 input type="search" 不显示搜索 解决方法
在IOS(ipad iPhone等)系统的浏览器里打开H5页面。如下写法:
<input type="search" name="search” id="search">
以上设备的键盘仍然显示“换行”。
解决方法如下:在input外面嵌套一层form:
<form action="">
    <input type="search" name="search" id="search">
</form>
其中form 必须有action。
如果你不想要action,因为它可能影响了你input的提交逻辑,可以重写一下onsubmit onclick等方法来实现。
也可以用简单的方法:action="javascript:return true;"。
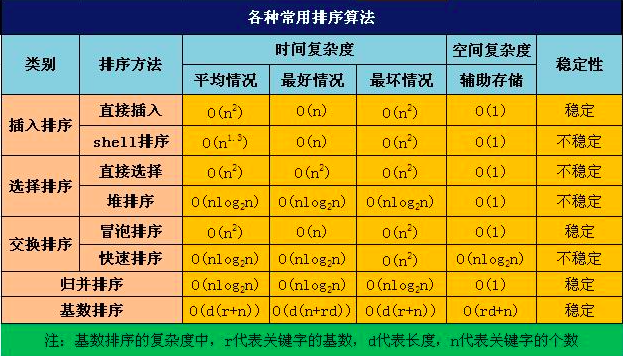
评估执行程序所需的时间。可以估算出程序对处理器的使用程度。
每个算法中语句执行的次数叫做时间频度,叫T(n)
O(f(n))=时间复杂度。
O(f(n)中的f(n)的值可以为1、n、logn、n²等,因此我们可以将O(1)、O(n)、O(logn)、O(n²)分别可以称为常数阶、线性阶、对数阶和平方阶
计算法则:
1.用常数1来取代运行时间中所有加法常数。
2.修改后的运行次数函数中,只保留最高阶项
3.如果最高阶项存在且不是1,则去除与这个项相乘的常数。
常用的时间复杂度按照耗费的时间从小到大依次是:
O(1)<O(logn)<O(n)<O(nlogn)<O(n²)<O(n³)<O(2ⁿ)<O(n!)

常用算法时间复杂度:
function quickSort(arr) {
    if(arr instanceof Array == false) {
        return null;
    }
    if(arr && arr.length <=1) {
        return arr;
    }

    let basePoint = arr[0];
    let leftArr = [];
    let rightArr = [];
    arr.forEach((item,index)=>{
        if(index !==0) {
            if(item<basePoint) {
                leftArr.push(item);
            } else if(item>basePoint) {
                rightArr.push(item);
            }
        }
    });

    return quickSort(leftArr).concat([basePoint]).concat(quickSort(rightArr));
}
2.冒泡排序
 function bubbleSort(array){
    var length = array.length;
    for (var i=0; i<length; i++){
        for (var j=0; j<length-1-i; j++ ){
            if (array[j] > array[j+1]){
                [array[j],array[j+1]] = [array[j+1],array[j]];
            }
        }
    }
    return array;
}; function selectSort(array){
let length = array.length;
let minIndex;
for (var i=0; i<length-1; i++){
minIndex = i;
for (var j=i; j<length; j++ ){
if (array[j]<array[minIndex]){
minIndex = j;
}
}
[array[i],array[minIndex]] = [array[minIndex],array[i]];
}
return array;
};使用redux都快3年了,到现在也没认真去了解一下源码罪过啊,所以需要对它进行一些分析和学习,一方面能更好的去使用它,另一方面也学习一下该框架的设计思路,首先我们看到 redux/src/index.js 文件
export {
  createStore,
  combineReducers,
  bindActionCreators,
  applyMiddleware,
  compose,
  __DO_NOT_USE__ActionTypes
}
所以主要部分也就是上面几个函数,我们下面一点点去分析每一个功能点
其实该文件有着大量的注释了,大家可以先简单的看看代码中的注释了解一遍。
其实createStore就是返回了一个对象,这个对象只有几个方法而已,而我们常用的就是dispatch,subscribe,getState这三个了
 * Creates a Redux store that holds the state tree.
 * The only way to change the data in the store is to call `dispatch()` on it.
该函数的作用呢就是建立一个store(废话嘛),那么什么是store呢?我的理解
就是一个仓库,存着整个程序的状态,且只能有一个,就是用这一个store搞定项目中的全部状态,当然不论多大的项目,统统只有这一个,弄两个肯定不好使,并且只有一个路子去修改里面的数据,那么就是调用dispatch()
function createStore(reducer, preloadedState, enhancer)
可以看到函数体主要三个参数,简单说下
(preState,action) => newState就是说根据action和之前的状态,返回一个新的状态(这里的新是新构建,而不是修改过,这点切记) if (typeof preloadedState === 'function' && typeof enhancer === 'undefined') {
enhancer = preloadedState
preloadedState = undefined
}
也容易理解,在只有两个参数的情况,并且第二个为funcion的时候,那么第二个参数就是enhancer了,交互一下参数位置
  if (typeof enhancer !== 'undefined') {
    if (typeof enhancer !== 'function') {
      throw new Error('Expected the enhancer to be a function.')
    }

    return enhancer(createStore)(reducer, preloadedState)
  }
对enchancer类型判断,可以看到enhancer就是将store传入,在内部处理之后再将store返回来,继续传入reducer和初始状态进行构建
  let currentReducer = reducer
  let currentState = preloadedState
  let currentListeners = []
  let nextListeners = currentListeners
  let isDispatching = false

  function ensureCanMutateNextListeners() {
    if (nextListeners === currentListeners) {
      nextListeners = currentListeners.slice()
    }
  }
建立一些变量保存reducer,state,以及订阅器保存在nextListeners中,ensureCanMutateNextListeners相当于每次对当前的订阅器进行备份,因为每次订阅一个listener的时候都是对nextListeners数组进行添加
function subscribe(listener) {
    if (typeof listener !== 'function') {
      throw new Error('Expected the listener to be a function.')
    }

    if (isDispatching) {
      throw new Error(
        'You may not call store.subscribe() while the reducer is executing. ' +
          'If you would like to be notified after the store has been updated, subscribe from a ' +
          'component and invoke store.getState() in the callback to access the latest state. ' +
          'See https://redux.js.org/api-reference/store#subscribe(listener) for more details.'
      )
    }

    let isSubscribed = true

    ensureCanMutateNextListeners()
    nextListeners.push(listener)

    return function unsubscribe() {
      if (!isSubscribed) {
        return
      }

      if (isDispatching) {
        throw new Error(
          'You may not unsubscribe from a store listener while the reducer is executing. ' +
            'See https://redux.js.org/api-reference/store#subscribe(listener) for more details.'
        )
      }

      isSubscribed = false

      ensureCanMutateNextListeners()
      const index = nextListeners.indexOf(listener)
      nextListeners.splice(index, 1)
    }
  }
订阅器,注册监听函数,每一个listener都是一个func,并且返回了一个取消注册监听的函数unScribe,用于删除listener,其实就是将一个个的函数添加到数组中,之后每次在store发生变化的时候(其实也就是调用dispatch的时候)就会触发它~
  function dispatch(action) {
    if (!isPlainObject(action)) {
      throw new Error(
        'Actions must be plain objects. ' +
          'Use custom middleware for async actions.'
      )
    }

    if (typeof action.type === 'undefined') {
      throw new Error(
        'Actions may not have an undefined "type" property. ' +
          'Have you misspelled a constant?'
      )
    }

    if (isDispatching) {
      throw new Error('Reducers may not dispatch actions.')
    }

    try {
      isDispatching = true
      currentState = currentReducer(currentState, action)
    } finally {
      isDispatching = false
    }

    const listeners = (currentListeners = nextListeners)
    for (let i = 0; i < listeners.length; i++) {
      const listener = listeners[i]
      listener()
    }

    return action
  }
上面呢就是这里比较重要的dispatch函数了,其实非常简单,主要就是它:
currentState = currentReducer(currentState, action)
将当前的全部状态和action传入reducer,得到新的state,这样就完成了state的状态更新了,之后再去遍历全部的listeners,从而在各个listeners的内部去更新view,完成整个流程(返回值其实还是这个action对象),其实以上内容和三个函数应该是redux的核心内容了,下面用一种简单的总结来表达一下store(借鉴的阮一峰的)
const createStore = (reducer) => {
  let state;
  let listeners = [];

  const getState = () => state;

  const dispatch = (action) => {
    state = reducer(state, action);
    listeners.forEach(listener => listener());
  };

  const subscribe = (listener) => {
    listeners.push(listener);
    return () => {
      listeners = listeners.filter(l => l !== listener);
    }
  };

  dispatch({});

  return { getState, dispatch, subscribe };
};
而该文件还有两个函数分别是
function replaceReducer(nextReducer)
function observable()
第一个很明显替换整个reducer用,在一些热加载场景应该会用到
而第二个暂时还不太理解作者意图,用观察者替换订阅发布吗?暂时先不去想
以上就是整个createStore的源码分析~
这个我们就直接举例子去说明一下会让大家更容易去理解compose方法
组合函数,将函数串联起来执行。就像domino一样,推倒第一个函数,其他函数也跟着执行。
首先我们看一个简单的例子。
// 实现公式: f(x) = (x + 100) * 2 - 100
const add = a => a + 100;
const multiple = m => m * 2;
const subtract = s => s - 100;

// 深度嵌套函数模式 deeply nested function,将所有函数串联执行起来。
subtract(multiple(add(200)));
上述例子执行结果为:500
compose 其实是通过reduce()方法,实现将所有函数的串联。不直接使用深度嵌套函数模式,增强了代码可读性。不要把它想的很难。
function compose(...funcs) {
  if (funcs.length === 0) {
    return arg => arg
  }
  if (funcs.length === 1) {
    return funcs[0]
  }
  return funcs.reduce((a, b) => (...args) => a(b(...args)))
}

compose(subtract, multiple, add)(200);1:安装,preact preact-compat preact-redux
npm install preact preact-compat --save-dev
npm install preact-redux --save-dev
2:preact-compat的作用是让我们简单转换升级,只需简单修改代码适配即可
3: 设置 preact-compat 的 Alias,在webpack文件中:
    resolve: {
        alias: {
            // 'react': path.join(__dirname, 'node_modules', 'react')
            "react": "preact-compat",
            "react-dom": "preact-compat",
            // 如果代码使用了createClass,则加入下面
            'create-react-class': 'preact-compat/lib/create-react-class'
        },
    },
4:安装其他对应preact插件
npm install preact-tap-event-plugin --save-dev
(如果之前使用react-tap-event-plugin 则需要,没使用则不需要)
5:一键替换,只需要对应脚本即可
"dev": "NODE_ENV='dev' webpack-dev-server --config webpack.dev.config.js --watch --inline --compress --progress --colors --env development",
"dev:preact": "NODE_ENV='dev' REACT_ENV='preact' webpack-dev-server --config webpack.dev.config.js --watch --inline --compress --progress --colors --env development",
"release": "NODE_ENV='production' webpack --config webpack.release.config.js --display-error-details --progress --colors",
"release:preact": "NODE_ENV='production' REACT_ENV='preact' webpack --config webpack.release.config.js --display-error-details --progress --colors"
1:安全相关
所谓React同构:即可以在服务端通过nodejs渲染,又可以在服务端渲染,之后将控制权交给客户端
技术栈:react+redux+react-router+ compass+express+webpack
为什么需要同构?
1. 性能优化
2. 用户体验
3. 前端扩大技术栈,能够应用node
为什么需要引入nodejs呢?
1. 数据模拟成本高,如需要mock数据
2. api请求强依赖后端,之前联调需要等待后端接口完成,现在可同步进行,且可自由组合接口
3. 适合前端技术落地,比如websocket等,技术栈更加广泛
4. 高性能(不逊色与HHVM),高并发异步请求
5. React可以切前后端渲染,提升首页加载速度
6. 提升SEO效果
7. 可以尝试BigPipe技术,提升页面显示速度
1:React中的ReactDOM,在客户端通过 ReactDOM.render()方法构建页面
2:在服务端则通过 ReactDOMServer.renderToString()方法构建,当然也可以通过renderToStaticMarkup方法,但我们这里就先不介绍了
3:在服务端渲染的页面,会为组件添加 checksum ,而页面渲染完成之后,客户端在拿到直出的HTML页面之后(需要注意的是,此时只是html渲染完成,但事件绑定并未完成),之后客户端会对这个字段进行对比
如果相同,则客户端不会在重新进行页面render,这样大大节省了响应时间,达到页面秒出
4:如果服务端使用的是renderToStaticMarkup方法渲染,则不会有这个checksum,纯服务端渲染的页面推荐用这种方法
1:一种是整体页面在服务端渲染之后,在客户端的componentDidMount生命周期函数去通过ajax调用,这样做法的优势就是服务端写起来简单,只是渲染页面即可
2:另外一种是在是在服务端直接拉取好数据,存入redux的store中,之后一同发给客户端,这样做法的优势是节省了首页加载时间,但同时加大了一定的开发成本
未完待续。。。
`/**
receiver: {String} 上传服务地址
to: {String} 上传路径
data: {Object} 上传时额外的参数
keepLocal: {Boolean} 是否在本地保留编译后静态资源文件,默认true
test: {RegExp|Function} 上传过滤条件,符合条件的资源会进行cdn上传,进行匹配的字段为文件的全路径(包含文件名),如:
文件路径为: /a/b/c.js
test: /\.html$/ ---- 不上传/a/b/c.js
test: function(filepath) { ---上传/a/b/c.js
return filepath.indexOf('c.js') > -1;
}
var async = require('async'),
path = require('path'),
Url = require('url'),
colors = require('colors'),
_ = require('underscore');
/**
*/
function WebpackUpload (options) {
this.wpUploadOptions = options || {};
if (!this.wpUploadOptions.to) {
    throw new Error('options.to is required!');
} else if (!this.wpUploadOptions.receiver) {
    throw new Error('options.receiver is required!');
}

this.wpUploadOptions.retry = this.wpUploadOptions.retry || 2;

if ('undefined' === typeof this.wpUploadOptions.keepLocal) {
    this.wpUploadOptions.keepLocal = true;
}
}
WebpackUpload.prototype.apply = function(compiler) {
var wpUploadOptions = this.wpUploadOptions;
var onEmit = function(compilation, callback) {
    var steps = [];
    async.forEach(Object.keys(compilation.assets), function(file, cb) {
        // 重试次数
        var reTryCount = wpUploadOptions.retry,
            // 目标文件名
            targetFile = file,
            queryStringIdx = targetFile.indexOf("?");

        // 去掉search参数
        if (queryStringIdx >= 0) {
            targetFile = targetFile.substr(0, queryStringIdx);
        }

        var outputPath = compilation.getPath(this.outputPath || compiler.outputPath),
            outputFileSystem = this.outputFileSystem || compiler.outputFileSystem,
            targetPath = outputFileSystem.join(outputPath, targetFile),
            content = compilation.assets[file].source();

        if (!wpUploadOptions.keepLocal) {
            compilation.assets[file].existsAt = targetPath;
            compilation.assets[file].emitted = true;
        }

        // 过滤条件为函数
        if ('function' === typeof wpUploadOptions.test) {
            if (!wpUploadOptions.test(targetFile)) {
                return;
            }
            // 过滤条件为正则
        } else if (Object.prototype.toString.call(wpUploadOptions.test) === '[object RegExp]') {
            if (!wpUploadOptions.test.test(targetFile)) {
                return;
            }
            // 默认不上传html
        }
        // else if (/\.html$/.test(targetFile)) {
        //     return;
        // }

        steps.push(function(cb) {
            var _step = arguments.callee;

            _upload(wpUploadOptions.receiver, wpUploadOptions.to, wpUploadOptions.data, content, targetPath, targetFile, function(error, re) {
                if (error) {
                    if (wpUploadOptions.retry && !--reTryCount) {
                        throw new Error(error);
                    } else {
                        console.log('[retry uploading file] ' + targetPath);
                        _step();
                    }
                } else {
                    cb(null, re);
                }
            });
        });
    }.bind(this), function(err) {
        if (err) {
            console.error(err);
            return callback(err);
        }
    });

    console.log('\n--------begin upload compiled resources--------\n');
    async.series(steps, function(err, results) {
        if (err) {
            console.error(err);
            callback(err);
        }

        console.log('\n--------upload finish!--------\n');
        callback();
    });
};

compiler.plugin('emit', onEmit);
};
/**
上传文件到远程服务
@param {String} receiver 上传服务地址
@param {String} to 上传到远程的文件目录路径
@param {Object} data 上传时额外参数
@param {String | Buffer} content 上传的文件内容
@param {String} filepath 上传前的文件完整路径(包含文件名)
@param {String} filename 上传前的文件相对(相对于webpack环境)路径(包含文件名)
@param {Function} callback 上传结果回调
*/
function _upload (receiver, to, data, content, filepath, filename, callback) {
data = data || {};
// 拼接获取远程上传的完整地址
data['to'] = path.join(to, filename);
// 路径兼容windows以及linux(or macos)
data['to'] = data['to'].replace(/\\/g, '/').replace(/\/g, '/');
_uploadFile(
//url, request options, post data, file
receiver, null, data, content, filename,
function(err, res) {
if (err || res.trim() != '0') {
callback('upload file [' + filepath + '] to [' + data['to'] + '] by receiver [' + receiver + '] error [' + (err || res) + ']');
} else {
var time = '[' + _now(true) + ']';
process.stdout.write(
' - '.green.bold +
time.grey + ' ' +
filepath.replace(/^//, '') +
' >> '.yellow.bold +
data['to'] +
'\n'
);
callback();
}
}
);
};
/**
/**
获取当前时间
@param {Boolean} withoutMilliseconds 是否不显示豪秒
@return {String} HH:MM:SS.ms
@name now
@function
*/
function _now (withoutMilliseconds) {
var d = new Date(),
str;
str = [
d.getHours(),
d.getMinutes(),
d.getSeconds()
].join(':').replace(/\b\d\b/g, '0$&');
if (!withoutMilliseconds) {
str += '.' + ('00' + d.getMilliseconds()).substr(-3);
}
return str;
}
/**
/**
module.exports = WebpackUpload;`
@(FIS3)[构建工具]
1:安装,必须全局安装
npm install -g fis3
2:默认配置文件: fis3-conf.js
3: 发布
fis3 release -d <path>
例:fis3 release -d ./ouput
4:常用命令
fis.match(selector, props):匹配selector后,进行props设定
例:fis.match('*.js',{useHash:true}) 匹配全部js文件,使用hash命名
fis.media('xxx'):用户针对不同环境的匹配,如下只针对prod生效
fis.media('prod').match('*.js',{useHash:false})
fis release prod
fis3 inspect 查看哪些文件匹配
fis3 inspect
fis3 inspect prod
5: plugin
// 清除其他配置,只保留如下配置
fis.match('*.js', {
  // fis-optimizer-uglify-js 插件进行压缩,已内置
	 optimizer: fis.plugin('uglify-js')
});

fis.match('*.css', {
	// fis-optimizer-clean-css 插件进行压缩,已内置
	optimizer: fis.plugin('clean-css')
});

fis.match('*.png', {
	// fis-optimizer-png-compressor 插件进行压缩,已内置
	optimizer: fis.plugin('png-compressor')
});
上一篇我们看完了createStore这个自认为最为核心的文件之后,我们再来看下combineReducers.js这个文件,其他它最主要的作用就是合并多个reducer,因为在createStore中的第一个参数就是一个reducer,而平时我们开发过程中如果将全部状态都写在一个文件中有一些过于庞大且不好管理,因此我们可以先拆开去写reducer,之后再用combineReducers合并就ok了,下面我们来看代码
import ActionTypes from './utils/actionTypes'
import warning from './utils/warning'
import isPlainObject from './utils/isPlainObject'

function getUndefinedStateErrorMessage(key, action)
function getUnexpectedStateShapeWarningMessage(
  inputState,
  reducers,
  action,
  unexpectedKeyCache
)
// 这个方法用于检测用于组合的reducer是否是符合redux规定的reducer
function assertReducerShape(reducers)
前面三个函数主要是针对一些警告处理的提示信息函数,另外import了三个文件,第一个ActionTypes只是初始化时定义的action名称没什么了,以后我们也可以按照这种方式去存actionTypeName,第二个也是一个警告函数了,第三个是判断对象是否为plain object,说白一点就是最简单的对象不存在继承,没有proto。下面的combineReducers也就是该文件的核心
export default function combineReducers(reducers) {
    // 遍历全部的reducers,得到一个key数组
    const reducerKeys = Object.keys(reducers)
    const finalReducers = {}
    for (let i = 0; i < reducerKeys.length; i++) {
        const key = reducerKeys[i]
        // 判空警告
        if (process.env.NODE_ENV !== 'production') {
            if (typeof reducers[key] === 'undefined') {
                warning(`No reducer provided for key "${key}"`)
            }
        }

        // 将reducers全部内容拷贝到finalReducers中,日后对该对象进行操作
        if (typeof reducers[key] === 'function') {
            finalReducers[key] = reducers[key]
        }
    }
    // 遍历finalReducers的keys
    const finalReducerKeys = Object.keys(finalReducers)

    // 意外key的缓存对象
    let unexpectedKeyCache
    if (process.env.NODE_ENV !== 'production') {
        unexpectedKeyCache = {}
    }

    // 断言error
    let shapeAssertionError
    try {
        assertReducerShape(finalReducers)
    } catch (e) {
        shapeAssertionError = e
    }

    // 这些内容才是关键合并的地方,返回的就是一个函数,而这个函数就是一个reducer,所以参数也是state和action
    return function combination(state = {}, action) {
        // 依然是异常处理
        if (shapeAssertionError) {
            throw shapeAssertionError
        }

        // 异常处理警告
        if (process.env.NODE_ENV !== 'production') {
            const warningMessage = getUnexpectedStateShapeWarningMessage(
                state,
                finalReducers,
                action,
                unexpectedKeyCache
            )
            if (warningMessage) {
                warning(warningMessage)
            }
        }

        let hasChanged = false
        const nextState = {}
        // 遍历全部的reducer
        for (let i = 0; i < finalReducerKeys.length; i++) {
            const key = finalReducerKeys[i]
            const reducer = finalReducers[key]
            const previousStateForKey = state[key]
            // 执行reducer,得到每个reducer计算后的状态对象
            const nextStateForKey = reducer(previousStateForKey, action)
            if (typeof nextStateForKey === 'undefined') {
                const errorMessage = getUndefinedStateErrorMessage(key, action)
                throw new Error(errorMessage)
            }
            // 把全部的状态对象组合成一个 新的状态对象
            nextState[key] = nextStateForKey
            hasChanged = hasChanged || nextStateForKey !== previousStateForKey
        }
        // 判断是否变化,有变化则返回最新的state
        return hasChanged ? nextState : state
    }
}
其实总结起来也很简单,就是遍历全部的reducer,通过执行每个reducer得到状态对象,最后在将各个得到的计算值组合成一个大的状态对象,因为reducer本身的作用通过action得到变化的最新的状态对象。
更多内容可参考我的https://github.com/jinjiaxing/Blog
react最新脚手架和react组件库请参考:https://github.com/jinjiaxing/react-template-easily
树的概念:
function BinarySearchTree() {
    var Node = function (key) {
        this.key = key;
        this.left = null;
        this.right = null;
    }

    // 根节点
    var root = null;

    this.show = () => {
        console.log('root=', root);
    }

    // 插入
    this.insert = key => {
        let newNode = new Node(key);
        if (root == null) {
            root = newNode;
        } else {
            insertNode(root, newNode)
        }
    }
    let insertNode = (node, newNode) => {
        if (newNode.key < node.key) {
            if (node.left == null) {
                node.left = newNode;
            } else {
                insertNode(node.left, newNode);
            }
        } else {
            if (node.right == null) {
                node.right = newNode;
            } else {
                insertNode(node.right, newNode);
            }
        }
    }

    // 搜索
    this.search = key => { searchNode(root, key) }
    let searchNode = (node, key) => {
        if (node == null) {
            return false;
        }
        if (key < node.key) {
            searchNode(node.left, key)
        } else if (key > node.key) {
            searchNode(node.right, key)
        } else {
            return true;
        }
    }
    // 删除
    this.remove = key => { root = removeNode(root, key) }
    let removeNode = (node, key) => {
        if (node == null) {
            return null;
        }
        if (key < node.key) {
            node.left = removeNode(node.left, key);
        } else if (key > node.key) {
            node.right = removeNode(node.right, key);
        } else {
            // 没有左右子节点的情况
            if (node.left == null && node.right == null) {
                node = null;
                return node;
            }
            // 只有一个子节点(如只有左节点或只有右节点)
            if (node.left == null && node.right !== null) {
                node = node.right;
                return node;
            } else if (node.right == null && node.left !== null) {
                node = node.left;
                return node;
            }
            // 两个子节点的节点(左右节点都存在)
            if (node.left && node.right) {
                // 找到该节点右侧的最小节点,替换当前节点
                let findRightMin = (node) => {
                    while (node && node.left !== null) {
                        node = node.left;
                    }
                    return node;
                }
                // 用右侧最小节点去替换当前节点
                var aux = findMinNode(node.right);
                node.key = aux.key;
                node.right = removeNode(node.right, aux.key);
                // 同事需要删除右侧最小节点
                return node;
            }

        }

    }
    // 中序遍历
    this.inOrder = () => {
        inOrderNode(root, (nodeKey) => { console.log(nodeKey) })
    }
    let inOrderNode = (node, callback) => {
        if (node !== null) {
            inOrderNode(node.left, callback);
            callback(node.key);
            inOrderNode(node.right, callback);
        }
    }
    // 前序遍历
    this.preOrder = () => { preOrderNode(root, (nodeKey) => { console.log(nodeKey) }) }
    let preOrderNode = (node, callback) => {
        if (node !== null) {
            callback(node.key);
            preOrderNode(node.left, callback);
            preOrderNode(node.right, callback);
        }
    }
    // 后序遍历
    this.postOrder = () => { postOrderNode(root, (nodeKey) => { console.log(nodeKey) }) }
    let postOrderNode = (node, callback) => {
        if (node !== null) {
            postOrderNode(node.left, callback);
            postOrderNode(node.right, callback);
            callback(node.key);
        }
    }
    // 树的最小值
    this.min = () => { return minNode(root) }
    let minNode = (node) => {
        if (node) {
            while (node && node.left !== null) {
                node = node.left;
            }

            return node.key;
        }
        return null;
    }
    // 树的最大值
    this.max = () => { return maxNode(root) }
    let maxNode = (node) => {
        if (node) {
            while (node && node.right !== null) {
                node = node.right;
            }

            return node.key;
        }
        return null;
    }


}关于发布/订阅模式不在进行详细的描述了,直接上代码进行解释
var pubsub = {};
(function(myObject) {
    // Storage for topics that can be broadcast
    // or listened to
    var topics = {};
    // An topic identifier
    var subUid = -1;
    // Publish or broadcast events of interest
    // with a specific topic name and arguments
    // such as the data to pass along
    myObject.publish = function( topic, args ) {
        if ( !topics[topic] ) {
            return false;
        }
        var subscribers = topics[topic],
            len = subscribers ? subscribers.length : 0;
        while (len--) {
            subscribers[len].func( topic, args );
        }
        return this;
    };
    // Subscribe to events of interest
    // with a specific topic name and a
    // callback function, to be executed
    // when the topic/event is observed
    myObject.subscribe = function( topic, func ) {
        if (!topics[topic]) {
            topics[topic] = [];
        }
        var token = ( ++subUid ).toString();
        topics[topic].push({
            token: token,
            func: func
        });
        return token;
    };
    // Unsubscribe from a specific
    // topic, based on a tokenized reference
    // to the subscription
    myObject.unsubscribe = function( token ) {
        for ( var m in topics ) {
            if ( topics[m] ) {
                for ( var i = 0, j = topics[m].length; i < j; i++ ) {
                    if ( topics[m][i].token === token ) {
                        topics[m].splice( i, 1 );
                        return token;
                    }
                }
            }
        }
        return this;
    };
}( pubsub ));
#!/usr/bin/env node

var http = require('http');
var formidable = require('formidable');
var fs = require('fs');
var path = require('path');
var mkdirp = require('mkdirp');
var PORT = parseInt(process.argv[2]) || 8999;

var server = http.createServer(function (req, res) {

    function error(err) {
        res.writeHead(500, {'Content-Type': 'text/plain'});
        res.end(err.toString()); //fail
    }

    function next(from, to) {
        fs.readFile(from, function (err, content) {
            if (err) {
                console.log('s.readFile error');
                error(err);
            } else {
                fs.writeFile(to, content, function (err) {
                    if (err) {
                        error(err);
                    }
                    res.writeHead(200, {'Content-Type': 'text/plain'});
                    res.end('0'); //success
                });
            }
        });
    }

    if (req.url == '/') {
        // show a file upload form
        res.writeHead(200, {'content-type': 'text/html'});
        res.end('I\'m ready for that, you know.');
    } else if (req.url == '/receiver' && req.method.toLowerCase() == 'post') {
        var form = new formidable.IncomingForm();
        form.parse(req, function (err, fields, files) {
            if (err) {
                 console.log('form.parse error');
                error(err);
            } else {
                var to = fields['to'];
                fs.exists(to, function (exists) {
                    if (exists) {
                        fs.unlink(to, function (err) {
                            next(files.file.path, to);
                        });
                    } else {
                        fs.exists(path.dirname(to), function (exists) {
                            if (exists) {
                                next(files.file.path, to);
                            } else {
                                mkdirp(path.dirname(to), 0777, function (err) {
                                    if (err) {
                                        error(err);
                                        return;
                                    }
                                    next(files.file.path, to);
                                });
                            }
                        });
                    }
                });
            }
        });
    }
});

server.listen(PORT, function () {
    console.log('receiver listening *:' + PORT);
});A declarative, efficient, and flexible JavaScript library for building user interfaces.
🖖 Vue.js is a progressive, incrementally-adoptable JavaScript framework for building UI on the web.
TypeScript is a superset of JavaScript that compiles to clean JavaScript output.
An Open Source Machine Learning Framework for Everyone
The Web framework for perfectionists with deadlines.
A PHP framework for web artisans
Bring data to life with SVG, Canvas and HTML. 📊📈🎉
JavaScript (JS) is a lightweight interpreted programming language with first-class functions.
Some thing interesting about web. New door for the world.
A server is a program made to process requests and deliver data to clients.
Machine learning is a way of modeling and interpreting data that allows a piece of software to respond intelligently.
Some thing interesting about visualization, use data art
Some thing interesting about game, make everyone happy.
We are working to build community through open source technology. NB: members must have two-factor auth.
Open source projects and samples from Microsoft.
Google ❤️ Open Source for everyone.
Alibaba Open Source for everyone
Data-Driven Documents codes.
China tencent open source team.