Giter Site home page Giter Site logo

jinwyp / one_click_script Goto Github PK

View Code? Open in Web Editor NEW
4.6K 71.0 1.4K 471.18 MB

install latest or LTS linux kernel and enable BBR or BBR plus

License: MIT License

Shell 98.56% Python 1.44%
trojan v2ray v2ray-ws-tls trojan-go xray netflix frp acme bbr bbrplus

one_click_script's Introduction

Easy install latest or LTS linux kernel and enable BBR or BBR plus

Sponsors

Thanks for support this project. Check on patreon

Table of Contents

Features

  1. Easily switch Linux kernel for all versions, including latest kernel, 5.16, 5.10 LTS, 5.4 LTS, 4.19 LTS, 4.14 LTS
  2. Easily enable BBR or BBR plus congestion control algorithm with FQ / FQ-Codel / FQ-PIE / CAKE.
  3. Support Debian9+, Ubuntu 16+ and CentOS 7+ operation systems
  4. Install wireguard and Cloudflare WARP client to avoid Google reCAPTCHA and unlock Netflix ip geo-restriction

Installation

via bash

bash <(curl -Lso- https://git.io/kernel.sh)

via curl to install script

curl -O https://raw.githubusercontent.com/jinwyp/one_click_script/master/install_kernel.sh && chmod +x ./install_kernel.sh && ./install_kernel.sh

via wget to install script

wget --no-check-certificate https://raw.githubusercontent.com/jinwyp/one_click_script/master/install_kernel.sh && chmod +x ./install_kernel.sh && ./install_kernel.sh

功能列表3

Usage

kernel

Install latest or LTS linux kernel and enable BBR or BBR Plus

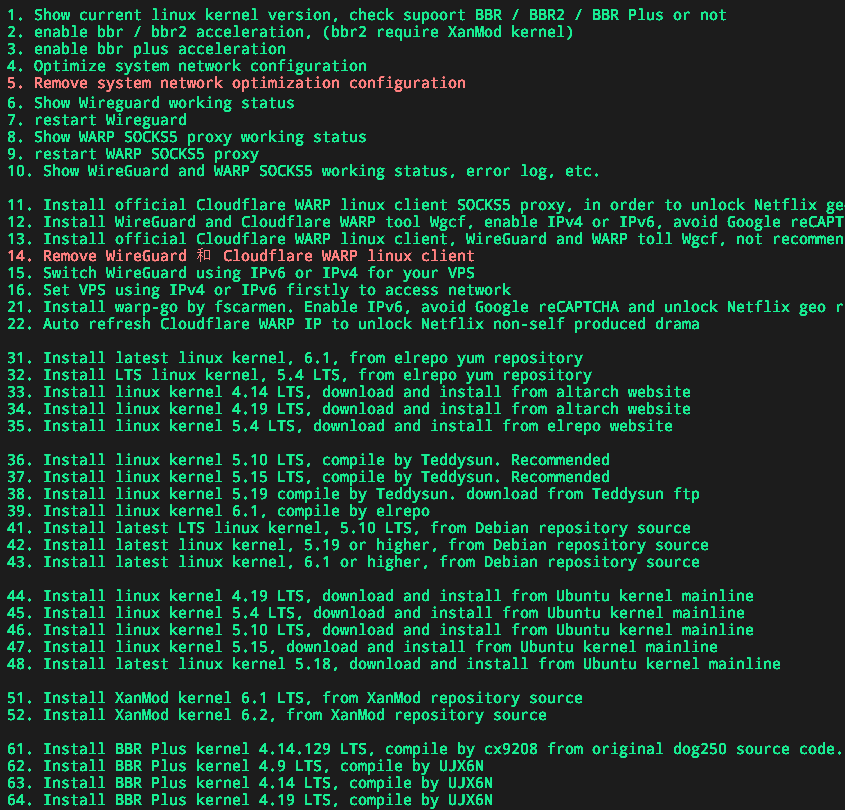
  1. On CentOS / AlmaLinux / Rocky Linux, run script then choose 31 to install latest 5.16 kernel or choose 35 to install LTS 5.10 kernel (recommended). It will reboot twice duiring the whole installation.
  2. On Debian run script then choose 41 to install LTS 5.10 kernel, on Ubuntu please choose 45 to install LTS 5.10 kernel. It will reboot twice duiring the whole installation.
  3. After finished new kernel installation, rerun the script and choose 2 to enable BBR congestion control algorithm with Cake(recommended) or FQ.
  4. To enable BBR Plus. run script then choose 61 to install BBR Plus 4.14.129 kernel , or choose 66 to install BBR Plus 5.10 LTS kernel. It will reboot twice duiring the whole installation. After finished new kernel installation, rerun the script then choose 3 to enable BBR Plus.
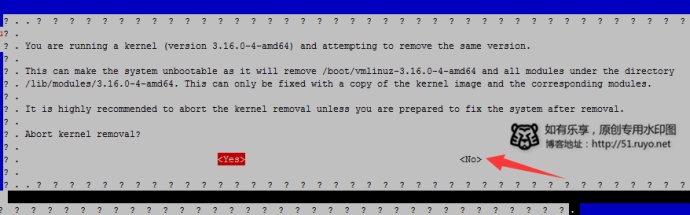
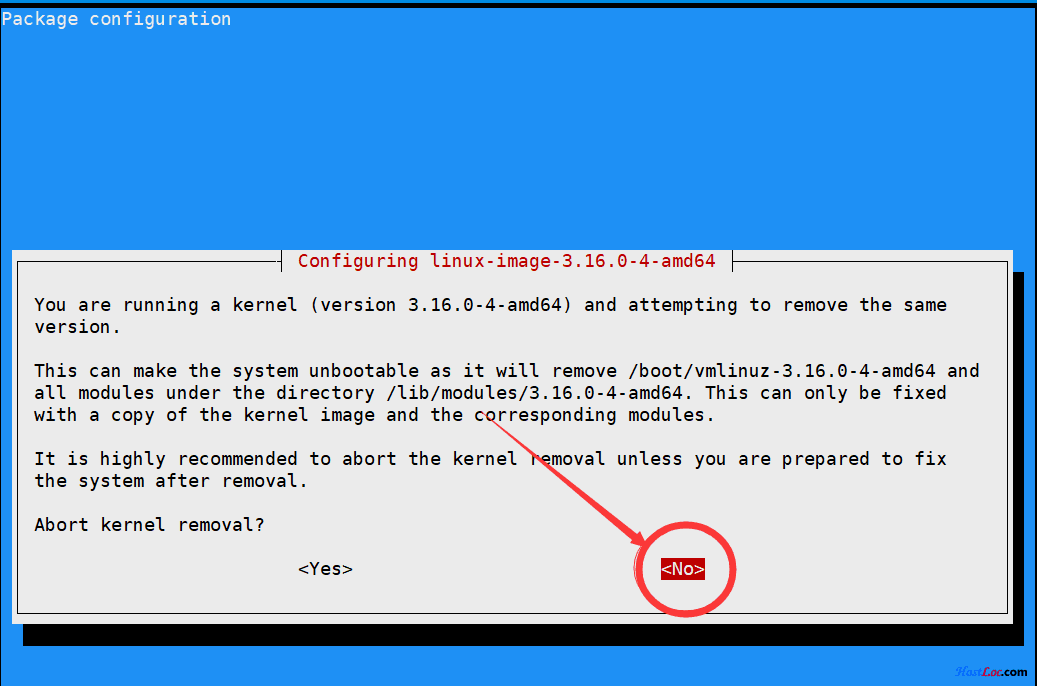
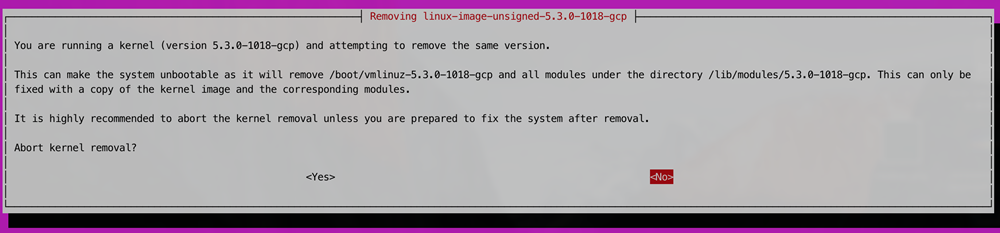
  5. Duiring the the whole installation when show the big warning screen(see below pics), please choose "NO" to continue installation. Do not abort kernel removal.

注意 安装BBR plus 注意 安装BBR plus 注意 安装BBR plus

  1. To install XanMod kernel and enable BBR2 on Debian or Ubuntu. Run script then choose 51 to install XanMod LTS 5.10 kernel, after reboot and finish kernel installation, rerun the script then choose 2 to enable BBR2 congestion control algorithm.

Wireguard

Unlock Netflix(Youtube/Hulu/HBO Now/Disney+) region restriction and avoid Google reCAPTCHA human verification

  1. Unlock with Cloudflare WARP sock5 proxy. Run script then choose 11 to install Cloudflare WARP linux client sock5 proxy, After finish installation, rerun script then choose 21 to test whether Netflix is unlock or not through the WARP sock5 proxy.
  2. Unlock with Cloudflare WARP IPv6. Run script then choose 12 to install Wireguard and Cloudflare WARP. After finish installation, The VPS will enable IPv6. As default the VPS is to use IPv4 to access the network. Rerun script then choose 21 to test whether Netflix is unlock or not through the IPv6.
  3. To unlock Netflix and other stream website. Using the script in the same repo to install v2ray. During the v2ray installation follow the instruction and select different v2ray routing rules (IPv6 or WARP sock5 or DNS or other unlocked v2ray server) to unlock netflix.
  4. To avoid Google reCAPTCHA human verification. Using the script in the same repo to install v2ray. During the v2ray installation follow the instruction and select different v2ray routing rules (IPv6 or WARP sock5 or other unlocked v2ray server) to avoid Google reCAPTCHA. Recommended to use IPv6 to avoid Google reCAPTCHA.

Netflix-Check

Netflix non-self produced drama test script for regions. Support test with IPv6 and Cloudflare WARP Sock5 proxy

via wget to install script

wget --no-check-certificate https://raw.githubusercontent.com/jinwyp/one_click_script/master/netflix_check.sh && chmod +x ./netflix_check.sh && ./netflix_check.sh

via curl to install script

curl -O https://raw.githubusercontent.com/jinwyp/one_click_script/master/netflix_check.sh && chmod +x ./netflix_check.sh && ./netflix_check.sh

FAQ

  1. Netflix non-self produced drama test script can't test through v2ray routing rule. The VPS is already unlocked but the result of the test could not show the right unlocked answer. You can use the test script on the V2ray client computer which connected the unlocked netflix V2ray server to get the right unlocked result. The Netflix non-self produced drama test shell script can be running on Mac and linux. On Windows you can use Ubuntu (windows linux sub-system) to run the test script.

one_click_script's People

Contributors

bcseputetto avatar jinwyp avatar niedong avatar suysker avatar wanah33 avatar

Stargazers

 avatar  avatar  avatar  avatar  avatar  avatar  avatar  avatar  avatar  avatar  avatar  avatar  avatar  avatar  avatar  avatar  avatar  avatar  avatar  avatar  avatar  avatar  avatar  avatar  avatar  avatar  avatar  avatar  avatar  avatar  avatar  avatar  avatar  avatar  avatar  avatar  avatar  avatar  avatar  avatar  avatar  avatar  avatar  avatar  avatar  avatar  avatar  avatar  avatar  avatar  avatar  avatar  avatar  avatar  avatar  avatar  avatar  avatar  avatar  avatar  avatar  avatar  avatar  avatar  avatar  avatar  avatar  avatar  avatar  avatar  avatar  avatar  avatar  avatar  avatar  avatar  avatar  avatar  avatar  avatar  avatar  avatar  avatar  avatar  avatar  avatar  avatar  avatar  avatar  avatar  avatar  avatar  avatar  avatar  avatar  avatar  avatar  avatar  avatar  avatar

Watchers

 avatar  avatar  avatar  avatar  avatar  avatar  avatar  avatar  avatar  avatar  avatar  avatar  avatar  avatar  avatar  avatar  avatar  avatar  avatar  avatar  avatar  avatar  avatar  avatar  avatar  avatar  avatar  avatar  avatar  avatar  avatar  avatar  avatar  avatar  avatar  avatar  avatar  avatar  avatar  avatar  avatar  avatar  avatar  avatar  avatar  avatar  avatar  avatar  avatar  avatar  avatar  avatar  avatar  avatar  avatar  avatar  avatar  avatar  avatar  avatar  avatar  avatar  avatar  avatar  avatar  avatar  avatar  avatar  avatar  avatar

one_click_script's Issues

只能通过全局模式访问Google,pac模式和manual模式都访问不了

大神,你好!非常感谢您的无私奉献,为开源社区提供了如此好的工具!用了您的安装脚本感觉非常好用,同时也有一些困惑。我只能通过全局模式访问Google,pac模式和manual模式都访问不了,我用的是V2RayX客户端(mac版),不知道您遇到过类似的问题吗?
期待您的回复!

web面板安装后的问题

1、web面板安装后,访问域名还是welcome to nginx!页面
2、终端关掉后没有保存面板后台地址,第二次在哪看,貌似打开也是welcome to nginx!

请问大佬,如果想使用多个二级域名,nginx应该如何设置

首先感谢大佬的脚本,非常简单好用。请教大佬一个问题,对web不是很熟悉,请见谅。

目前我搭建好了trojan-go + ws 。现在我想使用多个二级域名来区分流量是否走cdn,比如客户端使用www.abc.com域名走直连,使用cdn.abc.com域名走cdn。因为申请证书的时候使用的是www域名申请的,现在我直接在nginx.conf的servename中加入cdn域名,cloudflare这边提示525错误,应该是证书验证不通过。所以想问一下nginx应该如何设置,能让两个二级域名用同一个trojan服务。感谢大佬

安装bbr后 三个启动项都不能启动了

vultr 的centos8 在用脚本安装bbr时 bbr plus 和bbr魔改版重启后都不发进入系统。用自带console进去看到三个启动项,不管选哪个都不发正常启动系统。

V2ray的文件地址是否改动了?

自动升级时,v2ray升级不成功,提示如下:

==========================================
开始升级 V2ray Version: !

--2020-07-27 03:45:28-- https://github.com/v2ray/v2ray-core/releases/download/v/v2ray-linux-64.zip
Resolving github.com (github.com)... 140.82.112.3
Connecting to github.com (github.com)|140.82.112.3|:443... connected.
HTTP request sent, awaiting response... 404 Not Found
2020-07-27 03:45:29 ERROR 404: Not Found.

Archive: /root/v2ray/upgrade/v2ray-linux-64.zip
End-of-central-directory signature not found. Either this file is not
a zipfile, or it constitutes one disk of a multi-part archive. In the
latter case the central directory and zipfile comment will be found on
the last disk(s) of this archive.
unzip: cannot find zipfile directory in one of /root/v2ray/upgrade/v2ray-linux-64.zip or
/root/v2ray/upgrade/v2ray-linux-64.zip.zip, and cannot find /root/v2ray/upgrade/v2ray-linux-64.zip.ZIP, period.
mv: cannot stat '/root/v2ray/upgrade/v2ray': No such file or directory
mv: cannot stat '/root/v2ray/upgrade/v2ctl': No such file or directory
升级成功!

v2ray项目已经搬迁到v2fly,最新版的v2ray地址是否需要改动?请大神参考。

安装的时候乱码。

` OS info: centos, yum, /usr/lib/systemd/system/, bash
Package wget-1.14-18.el7_6.1.x86_64 already installed and latest version
Package curl-7.29.0-59.el7_9.1.x86_64 already installed and latest version
Package git-1.8.3.1-23.el7_8.x86_64 already installed and latest version
Nothing to do

Trojan Trojan-go V2ray 一键安装脚本 2020-12-6 更新. 系统支持:centos7+ / debian9+ / ubuntu16.04+
*请不要在任何生产环境使用此脚本 请不要有其他程序占用80和443端口
*若是已安装trojan 或第二次使用脚本,请先执行卸载trojan

  1. 安装 BBR-PLUS 加速4合一脚本

  2. 安装 trojan 和 nginx 不支持CDN

  3. 修复证书 并继续安装 trojan

  4. 升级 trojan 到最新版本

  5. 卸载 trojan 与 nginx

  6. 安装 trojan-go 和 nginx 不支持CDN, 不开启websocket (兼容trojan客户端)

  7. 修复证书 并继续安装 trojan-go 不支持CDN, 不开启websocket

  8. 安装 trojan-go 和 nginx 支持CDN, 开启websocket (兼容trojan客户端, 但不兼容websb'ocket)\x1b[0m\r\n\x1b[32m\x1b[01m 9. \xe4\xbf\xae\xe5\xa4\x8d\xe8\xaf\x81\xe4\xb9\xa6 \xe5\xb9\xb6\xe7\xbb\xa7\xe7\xbb\xad\xe5\xae\x89\xe8\xa3\x85 trojan-go \xe6\x94\xaf\xe6\x8c\x81CDN, \xe5\xbc\x80\xe5\x90\xafwebsocket \x1b[0m\r\n\x1b[32m\x1b[01m 10. \xe5\x8d\x87\xe7\xba\xa7 trojan-go \xe5\x88\xb0\xe6\x9c\x80\xe6\x96\xb0\xe7\x89\x88\xe6\x9c\xac\x1b[0m\r\n\x1b[31m\x1b[01m 11. \xe5\x8d\xb8\xe8\xbd\xbd trojan-go \xe4\xb8\x8e nginx\x1b[0m\r\n\r\n\x1b[32m\x1b[01m 12. \xe5\xae\x89\xe8\xa3\x85 v2ray\xe6\x88\x96xray \xe5\x92\x8c nginx, \xe6\x94\xaf\xe6\x8c\x81 websocket tls1.3, \xe6\x94\xaf\xe6\x8c\x81CDN\x1b[0m\r\n\x1b[32m\x1b[01m 13. \xe5\x8d\x87\xe7\xba\xa7 v2ray\xe6\x88\x96xray \xe5\x88\xb0\xe6\x9c\x80\xe6\x96\xb0\xe7\x89\x88\xe6\x9c\xac\x1b[0m\r\n\x1b[31m\x1b[01m 14. \xe5\x8d\xb8\xe8\xbd\xbdv2ray\xe6\x88\x96xray \xe5\x92\x8c nginx\x1b[0m\r\n\r\n\x1b[32m\x1b[01m 15. \xe5\x90\x8c\xe6\x97\xb6\xe5\xae\x89\xe8\xa3\x85 trojan + v2ray\xe6\x88\x96xray \xe5\x92\x8c nginx, \xe4\xb8\x8d\xe6\x94\xaf\xe6\x8c\x81CDN\x1b[0m\r\n\x1b[32m\x1b[01m 16. \xe5\x8d\x87\xe7\xba\xa7 v2ray\xe6\x88\x96xray \xe5\x92\x8c trojan \xe5\x88\xb0\xe6\x9c\x80\xe6\x96\xb0\xe7\x89\x88\xe6\x9c\xac\x1b[0m\r\n\x1b[31m\x1b[01m 17. \xe5\x8d\xb8\xe8\xbd\xbd trojan, v2ray\xe6\x88\x96xray \xe5\x92\x8c nginx\x1b[0m\r\n\x1b[32m\x1b[01m 18. \xe5\x90\x8c\xe6\x97\xb6\xe5\xae\x89\xe8\xa3\x85 trojan-go + v2ray\xe6\x88\x96xray \xe5\x92\x8c nginx, \xe4\xb8\x8d\xe6\x94\xaf\xe6\x8c\x81CDN\x1b[0m\r\n\x1b[32m\x1b[01m 19. \xe5\x90\x8c\xe6\x97\xb6\xe5\xae\x89\xe8\xa3\x85 trojan-go + v2ray\xe6\x88\x96xray \xe5\x92\x8c nginx, trojan-go \xe5\x92\x8c v2ray \xe9\x83\xbd\xe6\x94\xaf\xe6\x8c\x81CDN\x1b[0m\r\n\x1b[32m\x1b[01m 20. \xe5\x8d\x87\xe7\xba\xa7 v2ray\xe6\x88\x96xray \xe5\x92\x8c trojan-go \xe5\x88\xb0\xe6\x9c\x80\xe6\x96\xb0\xe7\x89\x88\xe6\x9c\xac\x1b[0m\r\n\x1b[31m\x1b[01m 21. \xe5\x8d\xb8\xe8\xbd\xbd trojan-go, v2ray\xe6\x88\x96xray \xe5\x92\x8c nginx\x1b[0m\r\n\r\n\x1b[32m\x1b[01m 28. \xe6\x9f\xa5\xe7\x9c\x8b\xe5\xb7\xb2\xe5\xae\x89\xe8\xa3\x85\xe7\x9a\x84\xe9\x85\x8d\xe7\xbd\xae\xe7\x94\xa8\xe6\x88\xb7\xe5\xaf\x86\xe7\xa0\x81\xe4\xbf\xa1\xe6\x81\xaf\x1b[0m\r\n\x1b[32m\x1b[01m 29. \xe5\xae\x89\xe8\xa3\x85 trojan \xe5\x92\x8c v2ray \xe5\x8f\xaf\xe8\xa7\x86\xe5\x8c'b'\x96\xe7\xae\xa1\xe7\x90\x86\xe9\x9d\xa2\xe6\x9d\xbf\x1b[0m\r\n\x1b[32m\x1b[01m 30. \xe4\xb8\x8d\xe5\xae\x89\xe8\xa3\x85nginx,\xe5\x8f\xaa\xe5\xae\x89\xe8\xa3\x85trojan\xe6\x88\x96v2ray,\xe5\x8f\xaf\xe9\x80\x89\xe6\x8b\xa9\xe6\x98\xaf\xe5\x90\xa6\xe5\xae\x89\xe8\xa3\x85SSL\xe8\xaf\x81\xe4\xb9\xa6\x1b[0m\r\n\x1b[32m\x1b[01m ==================================================\x1b[0m\r\n\x1b[32m\x1b[01m 31. \xe5\xae\x89\xe8\xa3\x85OhMyZsh\xe4\xb8\x8e\xe6\x8f\x92\xe4\xbb\xb6zsh-autosuggestions, Micro\xe7\xbc\x96\xe8\xbe\x91\xe5\x99\xa8 \xe7\xad\x89\xe8\xbd\xaf\xe4\xbb\xb6\x1b[0m\r\n\x1b[32m\x1b[01m 32. \xe8\xae\xbe\xe7\xbd\xae\xe5\x8f\xaf\xe4\xbb\xa5\xe4\xbd\xbf\xe7\x94\xa8root\xe7\x99\xbb\xe9\x99\x86\x1b[0m\r\n\x1b[32m\x1b[01m 33. \xe4\xbf\xae\xe6\x94\xb9SSH \xe7\x99\xbb\xe9\x99\x86\xe7\xab\xaf\xe5\x8f\xa3\xe5\x8f\xb7\x1b[0m\r\n\x1b[32m\x1b[01m 34. \xe8\xae\xbe\xe7\xbd\xae\xe6\x97\xb6\xe5\x8c\xba\xe4\xb8\xba\xe5\x8c\x97\xe4\xba\xac\xe6\x97\xb6\xe9\x97\xb4\x1b[0m\r\n\x1b[32m\x1b[01m 41. VPS \xe6\xb5\x8b\xe7\xbd\x91\xe9\x80\x9f\xe5\xb7\xa5\xe5\x85\xb7\x1b[0m\r\n\x1b[32m\x1b[01m 0. \xe9\x80\x80\xe5\x87\xba\xe8\x84\x9a\xe6\x9c\xac\x1b[0m\r\n\r\n\xe8\xaf\xb7\xe8\xbe\x93\xe5\x85\xa5\xe6\x95\xb0\xe5\xad\x97:' `

V2RAY的安装脚本是否要更新?

==========================================
开始安装 V2ray !

ERROR: This script has been DISCARDED, please switch to fhs-install-v2ray project.
HOW TO USE: https://github.com/v2fly/fhs-install-v2ray
TO MIGRATE: https://github.com/v2fly/fhs-install-v2ray/wiki/Migrate-from-the-old-script-to-this
./trojan_v2ray_install.sh: line 1474: /etc/v2ray/config.json: No such file or directory
sed: can't read /etc/systemd/system/v2ray.service: No such file or directory
Failed to restart v2ray.service: Unit v2ray.service not found.
Failed to restart caddy.service: Unit caddy.service not found.

有没有人的Google Cloud被封锁了?申诉过去几天了 也没恢复。

提出申诉
概要
您的项目 My First Project (id: even-aloe-290301) 因为采取欺骗性或误导性的做法(向网站发送自动流量或查询来人为地提升网站流量)而违反了 Google Cloud Platform 服务条款或使用限制政策(包括您可能在使用的 Google API 的服务条款),因此已被暂停。

详细信息
受影响的项目:My First Project (id: even-aloe-290301)

说明:采取欺骗性或误导性的做法,人为地提升网站流量,因而导致项目 My First Project (id: even-aloe-290301) 被暂停。

后续步骤
要解决此问题,请进行检查,确保自己的项目未遭入侵,并花一点时间查看适用的服务条款,从而确保您在以后不会违反我们的政策。

若不采取措施并提交申诉,您的项目可能会被删除。

V2ray install script outdated and removed

Hi, this is an amazing project but I've found that the official v2ray install script this project is using has been removed by the source. Could you please kindly consider replacing it with the new script (provided by the v2fly project) or changing the source? Thank you very much and good day to you

ubuntu 18 Nginx安装失败

==================================================
开始安装 Web服务器 nginx !

Reading package lists... Done
Building dependency tree
Reading state information... Done
The following additional packages will be installed:
fontconfig-config fonts-dejavu-core libfontconfig1 libgd3 libjbig0 libjpeg-turbo8 libjpeg8 libnginx-mod-http-geoip libnginx-mod-http-image-filter libnginx-mod-http-xslt-filter
libnginx-mod-mail libnginx-mod-stream libtiff5 libwebp6 libxpm4 nginx-common nginx-core
Suggested packages:
libgd-tools fcgiwrap nginx-doc ssl-cert
The following NEW packages will be installed:
fontconfig-config fonts-dejavu-core libfontconfig1 libgd3 libjbig0 libjpeg-turbo8 libjpeg8 libnginx-mod-http-geoip libnginx-mod-http-image-filter libnginx-mod-http-xslt-filter
libnginx-mod-mail libnginx-mod-stream libtiff5 libwebp6 libxpm4 nginx nginx-common nginx-core
0 upgraded, 18 newly installed, 0 to remove and 0 not upgraded.
Need to get 153 kB/2462 kB of archives.
After this operation, 8210 kB of additional disk space will be used.
Ign:1 http://asia-east2-a.gce.clouds.archive.ubuntu.com/ubuntu bionic-updates/main amd64 libtiff5 amd64 4.0.9-5ubuntu0.3
Err:1 http://security.ubuntu.com/ubuntu bionic-updates/main amd64 libtiff5 amd64 4.0.9-5ubuntu0.3
404 Not Found [IP: 91.189.88.246 80]
E: Failed to fetch http://security.ubuntu.com/ubuntu/pool/main/t/tiff/libtiff5_4.0.9-5ubuntu0.3_amd64.deb 404 Not Found [IP: 91.189.88.246 80]
E: Unable to fetch some archives, maybe run apt-get update or try with --fix-missing?
Failed to enable unit: Unit file nginx.service does not exist.
Failed to stop nginx.service: Unit nginx.service not loaded.
./trojan_v2ray_install.sh: line 831: /etc/nginx/nginx.conf: No such file or directory

在现在第29项后,再安装15项能不能不检测域名?

  1. 不安装nginx, 只安装 trojan 或 v2ray
    再选择第
  2. 只安装v2ray (VLess 或 VMess协议) 开启websocket, 支持CDN, 不安装nginx, 方便与现有网站或宝塔面板共存
    能不能不忽略ip地址,不正确的选项?我已经设置好了cdn了,并且是ipv6的服务器,修改起来太麻烦了。

客户端"address"填Cloudflare CDN无法连接

v2ray, Xray, trojan-go 客户端"address"填Cloudflare CDN无法连接,且无log 输出。xray-ws-tls客户端配置如下:

{
"log": {
"access": "~/v2ray/access.log",
"error": "~/v2ray/error.log",
"loglevel": "warning"
},

"inbounds": [
{
"port": 10800,
"listen": "127.0.0.1",
"protocol": "socks",
"settings": {
"udp": true
}
}
],
"outbounds": [
{
"protocol": "vless",
"settings": {
"vnext": [
{
"address": "x.y.z",
"port": 443,
"users": [
{
"id": "xxx-xxx-xxx",
"encryption": "none",
"level": 0
}
]
}
]
},
"streamSettings": {
"network": "ws",
"security": "tls",
"tlsSettings": {
"serverName": "a.b.c"
},
"wsSettings": {
"path": "/xxxx"
}
}
}
]
}

当x.y.z 填Cloudflare CDN ip时,没网络连接,也没log输出,当x.y.z填自己的域名a.b.c 时可以正常联网。请问在ws-tls 模式下x.y.z 是否只能填自己的域名?如果填Cloudflare CDN ip,该如何设置?

可用用15年证书来取代3个月续签吗?

请教一下,用设定19,因为cdn需要cloudflare的源证书,现在已经有了,能否将其取代nginx的证书?如果可用的话,怎么样设定可以取消3个月续签证书的设定?另外vless正常,但terojan-go的二次加密的密码如何选择设定?server.json里面没有相应的选项,client里面没有找到config.json,需要自己在server.json里面添加这一段吗?

修改配置文件就报错启动不了

● v2ray.service - V2Ray
Loaded: loaded (/usr/lib/systemd/system/v2ray.service; enabled; vendor preset: disabled)
Active: failed (Result: exit-code) since Sun 2021-01-24 18:42:24 CST; 2s ago
Docs: https://www.v2fly.org/
Process: 65962 ExecStart=/root/v2ray/v2ray -config /root/v2ray/config.json (code=exited, status=2)
Main PID: 65962 (code=exited, status=2)

Jan 24 18:42:24 baron systemd[1]: v2ray.service: Main process exited, code=exited, status=2/INVALIDARGUMENT
Jan 24 18:42:24 baron systemd[1]: v2ray.service: Failed with result 'exit-code'.
Jan 24 18:42:24 baron systemd[1]: v2ray.service: Service RestartSec=100ms expired, scheduling restart.
Jan 24 18:42:24 baron systemd[1]: v2ray.service: Scheduled restart job, restart counter is at 5.
Jan 24 18:42:24 baron systemd[1]: Stopped V2Ray.
Jan 24 18:42:24 baron systemd[1]: v2ray.service: Start request repeated too quickly.
Jan 24 18:42:24 baron systemd[1]: v2ray.service: Failed with result 'exit-code'.
Jan 24 18:42:24 baron systemd[1]: Failed to start V2Ray.

xray核心

我明明选择xray核心为何安装后还是v2ray核心

证书签发错误

================================================== 
       Web服务器 nginx 安装成功!!
    伪装站点为 http://l02.9XXXX.xyz
    伪装站点的静态html内容放置在目录 /root/website/html, 可自行更换网站内容!
    nginx 配置路径 /etc/nginx/nginx.conf 
    nginx 访问日志 /root/nginx-access.log 
    nginx 错误日志 /root/nginx-error.log 
    nginx 停止命令: systemctl stop nginx.service  启动命令: systemctl start nginx.service  重启命令: systemctl restart nginx.service
 ================================================== 
  % Total    % Received % Xferd  Average Speed   Time    Time     Time  Current
                                 Dload  Upload   Total   Spent    Left  Speed
100   937    0   937    0     0   9277      0 --:--:-- --:--:-- --:--:--  9277
  % Total    % Received % Xferd  Average Speed   Time    Time     Time  Current
                                 Dload  Upload   Total   Spent    Left  Speed
100  202k  100  202k    0     0  7493k      0 --:--:-- --:--:-- --:--:-- 7493k
[Sun Jan 31 15:18:09 CST 2021] Installing from online archive.
[Sun Jan 31 15:18:09 CST 2021] Downloading https://github.com/acmesh-official/acme.sh/archive/master.tar.gz
[Sun Jan 31 15:18:11 CST 2021] Extracting master.tar.gz
[Sun Jan 31 15:18:11 CST 2021] Installing to /root/.acme.sh
[Sun Jan 31 15:18:11 CST 2021] Installed to /root/.acme.sh/acme.sh
[Sun Jan 31 15:18:11 CST 2021] Installing alias to '/root/.bashrc'
[Sun Jan 31 15:18:11 CST 2021] OK, Close and reopen your terminal to start using acme.sh
[Sun Jan 31 15:18:11 CST 2021] Installing cron job
55 0 * * * "/root/.acme.sh"/acme.sh --cron --home "/root/.acme.sh" > /dev/null
[Sun Jan 31 15:18:11 CST 2021] Good, bash is found, so change the shebang to use bash as preferred.
[Sun Jan 31 15:18:11 CST 2021] OK
[Sun Jan 31 15:18:11 CST 2021] Install success!
==========================================
  开始第一次申请证书 acme.sh nginx mode !
[Sun Jan 31 15:18:13 CST 2021] Using CA: https://acme-v02.api.letsencrypt.org/directory
[Sun Jan 31 15:18:13 CST 2021] Creating domain key
[Sun Jan 31 15:18:13 CST 2021] The domain key is here: /root/.acme.sh/l02.9XXXX.xyz/l02.9XXXX.xyz.key
[Sun Jan 31 15:18:13 CST 2021] Single domain='l02.9XXXX.xyz'
[Sun Jan 31 15:18:13 CST 2021] Getting domain auth token for each domain
[Sun Jan 31 15:18:15 CST 2021] Getting webroot for domain='l02.9XXXX.xyz'
[Sun Jan 31 15:18:15 CST 2021] Verifying: l02.9XXXX.xyz
[Sun Jan 31 15:18:19 CST 2021] l02.9XXXX.xyz:Verify error:Fetching http://l02.9XXXX.xyz/.well-known/acme-challenge/N3cr22tUa6HfMejqe7gqeAPQZyEjXqU4nWCZ5uaafso: Connection refused
[Sun Jan 31 15:18:19 CST 2021] Please add '--debug' or '--log' to check more details.
[Sun Jan 31 15:18:19 CST 2021] See: https://github.com/acmesh-official/acme.sh/wiki/How-to-debug-acme.sh
[Sun Jan 31 15:18:19 CST 2021] Installing key to:/root/website/cert/private.key
[Sun Jan 31 15:18:19 CST 2021] Installing full chain to:/root/website/cert/fullchain.cer
cat: /root/.acme.sh/l02.9XXXX.xyz/fullchain.cer: No such file or directory
===================================
 https证书没有申请成功,安装失败!
 请检查域名和DNS是否生效, 同一域名请不要一天内多次申请!
 请检查80和443端口是否开启, VPS服务商可能需要添加额外防火墙规则,例如阿里云、谷歌云等!
 重启VPS, 重新执行脚本, 可重新选择修复证书选项再次申请证书 ! 
 可参考 https://www.v2rayssr.com/trojan-2.html 
===================================

服务器: Azure Debian 10

选项19

使用其他脚本都可以签发成功。

脚本创建的配置文件格式似乎不再受支持

开发者您好,这应该是一个小问题,之前版本的trojan go似乎是支持conf格式的配置文件,今天突然用脚本装完不能用了,查看Trojan go错误日志,发现如下内容
[FATAL] 2020/06/12 15:46:06 github.com/p4gefau1t/trojan-go/proxy.(*Option).Handle:option.go:30 unsupported filename suffix /root/trojan-go/src/server.conf . use .yaml or .json instead.
我是小白,不太懂,但应该是近期才不支持conf格式的,之前我也用的好好得

脚本执行权限问题

没有sudo 执行./trojan_v2ray_install.sh 需要不但输入sudo 用户密码,但是很多时候还是不行, 比如这个pam_authenticate failed: trojanuser 用户有sudo 权限,但是脚本执行不下去。
ubuntu 18.04 amd x64 .

==== AUTHENTICATING FOR org.freedesktop.systemd1.reload-daemon === Authentication is required to reload the systemd state. Authenticating as: user,,, (user) Password: polkit-agent-helper-1: pam_authenticate failed: Authentication failure ==== AUTHENTICATION FAILED === Failed to reload daemon: Access denied Sibt==== AUTHENTICATING FOR org.freedesktop.systemd1.reload-daemon === Authentication is required to reload the systemd state. Authenticating as: user,,, (user) Password: polkit-agent-helper-1: pam_authenticate failed: Authentication failure ==== AUTHENTICATION FAILED === Failed to reload daemon: Access denied

Recommend Projects

  • React photo React

    A declarative, efficient, and flexible JavaScript library for building user interfaces.

  • Vue.js photo Vue.js

    🖖 Vue.js is a progressive, incrementally-adoptable JavaScript framework for building UI on the web.

  • Typescript photo Typescript

    TypeScript is a superset of JavaScript that compiles to clean JavaScript output.

  • TensorFlow photo TensorFlow

    An Open Source Machine Learning Framework for Everyone

  • Django photo Django

    The Web framework for perfectionists with deadlines.

  • D3 photo D3

    Bring data to life with SVG, Canvas and HTML. 📊📈🎉

Recommend Topics

  • javascript

    JavaScript (JS) is a lightweight interpreted programming language with first-class functions.

  • web

    Some thing interesting about web. New door for the world.

  • server

    A server is a program made to process requests and deliver data to clients.

  • Machine learning

    Machine learning is a way of modeling and interpreting data that allows a piece of software to respond intelligently.

  • Game

    Some thing interesting about game, make everyone happy.

Recommend Org

  • Facebook photo Facebook

    We are working to build community through open source technology. NB: members must have two-factor auth.

  • Microsoft photo Microsoft

    Open source projects and samples from Microsoft.

  • Google photo Google

    Google ❤️ Open Source for everyone.

  • D3 photo D3

    Data-Driven Documents codes.