- 🔭 I am a master's student in Computer Science from Korea
, currently living in LA, USA
.
- 📫 How to reach me: [email protected]
![counselorbot[bot] avatar](https://avatars.githubusercontent.com/in/127924?v=4 "counselorbot[bot]")

hellohelloworld.js, write and export a JS function hello that returns "Hello World"hello branch move onhello to main, but do not merge it -- you will find the next step once you have successfully created the pull request and committed correct code💡 Tip: When we tell you to name a file called directory/thefile.js, the first part before the / is a directory (otherwise known as a folder).
If you run node helloworld.js in the terminal, the output should be Hello World
Note: From now on, you will never need to close an issue. The Counselor will do that for you, create new issues, and new comments for further instructions!
No worries, check this out to help resolve the issue.
💡 TIP: If you want to re-run a check without comitting something else, check this out.
An IDE is a software application that provides comprehensive facilities to computer programmers for software development. An IDE normally consists of at least a source code editor, build automation tools, and a debugger. Although there are hundreds of IDEs to choose from, we are going to use Visual Studio Code due to its popularity and integration with Azure (via extensions and libraries).
Download VS Code for your operating system and check out this tutorial before getting started.
Inside VS Code, download the following extensions:
All of the Azure extensions allow you to work on your Azure Function App in VS Code instead of working directly through the Microsoft portal. Live Server is a quick and temporary testing server, and you can use it to test HTML pages. To launch, right click on your html file and press "Open with Live Server" or click "Go Live" in the bottom right corner:


💡 Note: Dark Theme is our personal favorite, but feel free to choose whichever theme you like best. Go to this site to view your options!
Check out this awesome documentation about how to set up Git on your local computer
git branchgit checkout --b name-of-branchgit checkout name-of-branchgit pull before making any changes to your local repo!!
JavaScript enables the ability to export functions in a program so that you can access them in other parts of the program via the import statement. In this case, we want to export your programs in order for CounselorBot to check your code.
❗ Make sure you have Node.js and npm installed before moving forwards: https://www.npmjs.com/get-npm
node -v in your terminalnpm -v in your terminalIf you would like to read more, refer to this article on JavaScript and this article on Node.
Example:
function hello() {
    // your code
}

exports.hello = hello;
When you commit the file, we will try to run the function by importing it and compare it's output to the expected output like so:
let hello = require('../../helloworld.js')
let output = hello.hello()Just like you can import code from modules other people have written, you can also import functions you wrote from other files to reuse them. In function oriented programming, you use functions over and over again to save code. If you want to use the function hello() in another file, you would need to import it.
week1 and commit your helloworld.js file in the root directory.💡 Try to not use the web editor! Commit from your command line.
Start out by downloading Git. Then, open your command line.
Navigate to the directory in your command line where you want to keep your repository.
Tip: Use
cd ./your-directoryto change directories,pwdto find out where you are, andlsto list files & directories. More information is here.
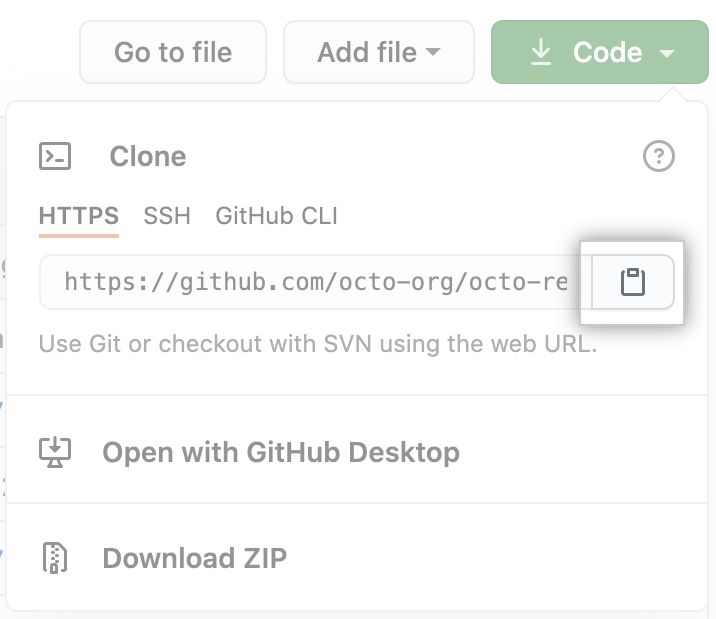
Use the git clone command and replace the url to get your repository's files onto your local computer:
git clone https://github.com/example/example.git
Now is the time to make your changes to your code!
Stage helloworld.js changes only:
git add helloworld.js
Stage ALL your changes to the repository:
git add *
Next, let's commit the code. Usually, your commits will be a group of changes that make sense together. Add a description!
git commit -m "insert your description"
Save your commits to the repository on Github!
git push
For more information, refer to this link
❗ Don't forget to git pull before making any changes to your local repo!! This gets any changes that were made by the bot.
In this step, you will be using Postman Desktop Application to test the CataaS API by sending a GET request.
Close with comment, the picture you receive from the API in this issue to move onCATAAS is a RESTful API that exclusively delivers images of cats. The main feature is that we can change the properties of images, add text, truncate the image, add a filter and more. It's not an API with many real-world applications, but it's perfect for learning.
⭐ Interested in playing around with the API? Documentation is here.
"The cloud" refers to servers that are accessed over the Internet, and the software and databases that run on those servers. Cloud servers are located in data centers all over the world. By using cloud computing, users and companies don't have to manage physical servers themselves or run software applications on their own machines.
A server is a computer that provides (serves) data to other computers, called clients. Clients connect to servers through the internet.
Clients communicate with servers with through HTTP requests. For example, when you are on your favorite browser and look up YouTube.com, you are making an HTTP "get" request to the server to load the contents from YouTube.com.
Below are some of the most common HTTP requests. Read through each one, and try to get familiar with their functions!
⭐ Get Request: gets data from a server (hence the name). The data we want is specified using a URL we call a Request URL. In this case, you will use a Get Request URL from the Catass API to receive a cat picture.
⭐ Post Request: used to send data to a server, to create or update a resource. The information submitted to the server is archived in the request body of the HTTP request. This is often used to send user-generated data to a server. An example could be uploading a picture to a Post URL.
⭐ Put Request: similar to a Post Request, but a put request will always have the same result every time you use one, whereas a post request might not. We call this property "idempotency."
⭐ Delete Request: used to delete resources indicated by the URL and will remove the targeted resources.
An API is a piece of software that lets two other pieces of software talk to each other! Imagine you're driving a car - the wheel and pedals would be like APIs between you and the car, since they allow you to controll the car easily.
Most of the time, an API will be used to connect an app to an external service. For example, the Twitter API could allow a user to automatically receive updates on tweets concerning a particular topic or event.
Any API that follows these 5 rules is, by definition, RESTful.
You don't need to worry about the 5 rules, but if you're curious...
In this step, we'll be using a desktop application called Postman to test an API. Postman is a debugging tool for RESTful APIs, which allows you to test both pre-existing, community made APIs, or your own self-made APIs, without having to write any HTML test code!
Postman offers a web tool to test API's, but during the camp we will be using the desktop application.
The Postman documentation covers:
Open up the Postman application and try it out yourself:
color (color of the text) and size (font size)Enter https://cataas.com/cat/cute/says/Serverless, which is the API endpoint, into the text box next to GET

Click on "Params" and enter color into Key and the color you want (eg. blue) into Value. Enter size into the next Key row and a number (eg. 50) into Value.
Note on parameters:
- the
sizeparameter refers to the font size of your caption. It has a limit at around 1,200.- Colors are pretty hit or miss; since the Cat API is on the web, but it generally adheres to HTML color names. Expect values such as "blue, green, yellow" to work.
- The API can take very large words as input for the caption, however only 34 characters can be seen on the picture at one time .
Click Send to get your cat picture
In this step, you will be using Postman Desktop Application to test the CataaS API by sending a GET request.
Close with comment, the picture you receive from the API in this issue to move onCATAAS is a RESTful API that exclusively delivers images of cats. The main feature is that we can change the properties of images, add text, truncate the image, add a filter and more. It's not an API with many real-world applications, but it's perfect for learning.
⭐ Interested in playing around with the API? Documentation is here.
"The cloud" refers to servers that are accessed over the Internet, and the software and databases that run on those servers. Cloud servers are located in data centers all over the world. By using cloud computing, users and companies don't have to manage physical servers themselves or run software applications on their own machines.
A server is a computer that provides (serves) data to other computers, called clients. Clients connect to servers through the internet.
Clients communicate with servers with through HTTP requests. For example, when you are on your favorite browser and look up YouTube.com, you are making an HTTP "get" request to the server to load the contents from YouTube.com.
Below are some of the most common HTTP requests. Read through each one, and try to get familiar with their functions!
⭐ Get Request: gets data from a server (hence the name). The data we want is specified using a URL we call a Request URL. In this case, you will use a Get Request URL from the Catass API to receive a cat picture.
⭐ Post Request: used to send data to a server, to create or update a resource. The information submitted to the server is archived in the request body of the HTTP request. This is often used to send user-generated data to a server. An example could be uploading a picture to a Post URL.
⭐ Put Request: similar to a Post Request, but a put request will always have the same result every time you use one, whereas a post request might not. We call this property "idempotency."
⭐ Delete Request: used to delete resources indicated by the URL and will remove the targeted resources.
An API is a piece of software that lets two other pieces of software talk to each other! Imagine you're driving a car - the wheel and pedals would be like APIs between you and the car, since they allow you to controll the car easily.
Most of the time, an API will be used to connect an app to an external service. For example, the Twitter API could allow a user to automatically receive updates on tweets concerning a particular topic or event.
Any API that follows these 5 rules is, by definition, RESTful.
You don't need to worry about the 5 rules, but if you're curious...
In this step, we'll be using a desktop application called Postman to test an API. Postman is a debugging tool for RESTful APIs, which allows you to test both pre-existing, community made APIs, or your own self-made APIs, without having to write any HTML test code!
Postman offers a web tool to test API's, but during the camp we will be using the desktop application.
The Postman documentation covers:
Open up the Postman application and try it out yourself:
color (color of the text) and size (font size)Enter https://cataas.com/cat/cute/says/Serverless, which is the API endpoint, into the text box next to GET
Click on "Params" and enter color into Key and the color you want (eg. blue) into Value. Enter size into the next Key row and a number (eg. 50) into Value.
Note on parameters:
- the
sizeparameter refers to the font size of your caption. It has a limit at around 1,200.- Colors are pretty hit or miss; since the Cat API is on the web, but it generally adheres to HTML color names. Expect values such as "blue, green, yellow" to work.
- The API can take very large words as input for the caption, however only 34 characters can be seen on the picture at one time .
Click Send to get your cat picture
main named late.running_late(date) in JavaScript that returns It is late! if the time is at or after 10:00 PM, and It is still early! if it is not.exports.running_late = running_late (so we can test your code!)late branch.late branch onto main, and only merge the pull request when the bot approves your changes.❗ for this step, edit the
late.jsfile
Function name: running_late(date)
Arguments:
date - a string that the new Date() is created from.Do NOT use
Date.now()
The
dateargument will be in this format:December 17, 1995 03:24:00
Return:
It is late! or It is still early!, depending on the time.⭐ if the time is 8:00 AM, your function should return It is still early!
⭐ if the time is 11:30 PM, your function should return It is late!
💡 Make sure to put the line module.exports = running_late at the end of your file so we can test your code!
main named max.find_max(arr) that takes in an array as a parameter and returns the element with the maximum value in the array.exports.find_max = find_max (so we can test your code!)max branch.max branch onto main, and only merge the pull request when the bot approves your changes.❗ for this step, edit the
max_nums.jsfile
Function name: find_max(arr)
Arguments:
arr - the array that is passed into the find_max functionReturn:
arr array⭐ if the array passed in is [1, 78, 12, 2, 5, 10], the function should return 78
⭐ if the array passed in is [1, 2, 3, 3, -1], the function should return 3
💡 Make sure to put the line module.exports = find_max at the end of your file so we can test your code!
Click the big green button that says Submit new issue, and you'll be good to go!
This week, you will be going through steps to set up tools needed to be successful in this camp. If you are already familiar with some, feel free to skip to the end and complete the task to move on.
test.About Me section in the blog.md file in root.test.main branch, naming it Adding self introduction and add a detailed description of your contribution.ready for reviewGitHub is a industry-standard platform allows developers to save and collaborate on code. You can use GitHub to manage your files, changes in your project, version control (the ability to revert back to previous versions of your code as well as versions developed by other programmers), and more.
Check out "The Github Flow" for more information on issues, pull requests, committing, and branches!
If you want to learn more about what it is and how to use it, try taking this GitHub Learning Lab Course. After finishing it, you will have a strong understanding of all the features GitHub has to offer.
Repositories (or repos) are essentially folders where you can store files of code. The repo of our camp was duplicated into your account when you clicked "Create Template" so that you can commit changes and complete each lesson.
For our camp, each week is placed inside an issue. Only when you complete the week (committing the necessary code and commenting), will the issue close and you can move on to the next issue. Don’t worry – committing changes is easier than it sounds.
💡 On usual repositories in the contributing world issues are tasks or bugs that need to be completed or fixed.
If you want to contribute to someone else's code, you would "fork" it. This creates a copy of the code under your account that you can make changes to. Create a fork when you want to make changes to someone else's code and contribute to it.
Creating a branch on a repository is like forking a repository. You would do this when you want to make changes to your code without harming a working version.
Once you make changes on a forked repository or another branch, you might need to bring the changes into the "main" repository. This allows YOUR changes to be visible in the main project! *You are basically asking for permission to "merge" your changes."
This allows you to:
⭐ Collaborate on code
⭐ Make comments
⭐ Review the contributions made
A Command Line Interface (CLI) is your computer's visual application for accessing its operating system. There are different types of CLIs for different operating systems, such as Terminal for MacOs and PowerShell for Windows. If you have Windows, make sure to also install Git Bash for a better tool. In upcoming issues, we will refer to your CLI as your Terminal or Command Line, but remember that they mean the same thing!
Key functions you should be familiar with after this task include:
| Emoji | Meaning |
|---|---|
| 💡 | Helpful tips |
| Important info | |
| ❓ | Question you may have |
| ⭐ | Features |
A declarative, efficient, and flexible JavaScript library for building user interfaces.
🖖 Vue.js is a progressive, incrementally-adoptable JavaScript framework for building UI on the web.
TypeScript is a superset of JavaScript that compiles to clean JavaScript output.
An Open Source Machine Learning Framework for Everyone
The Web framework for perfectionists with deadlines.
A PHP framework for web artisans
Bring data to life with SVG, Canvas and HTML. 📊📈🎉
JavaScript (JS) is a lightweight interpreted programming language with first-class functions.
Some thing interesting about web. New door for the world.
A server is a program made to process requests and deliver data to clients.
Machine learning is a way of modeling and interpreting data that allows a piece of software to respond intelligently.
Some thing interesting about visualization, use data art
Some thing interesting about game, make everyone happy.
We are working to build community through open source technology. NB: members must have two-factor auth.
Open source projects and samples from Microsoft.
Google ❤️ Open Source for everyone.
Alibaba Open Source for everyone
Data-Driven Documents codes.
China tencent open source team.