Encryption extension to Evernote and Onenote platforms
To quickly start Saferoom app on your CentOS/Ubuntu desktop, do the following:
cd ~
wget https://raw.githubusercontent.com/saferoom-app/saferoomlinux/master/install.py
python install.py
git clone https://github.com/saferoom-app/saferoomlinux
cd saferoomlinux
python server.py
If something goes wrong, please check the detailed installation procedures below
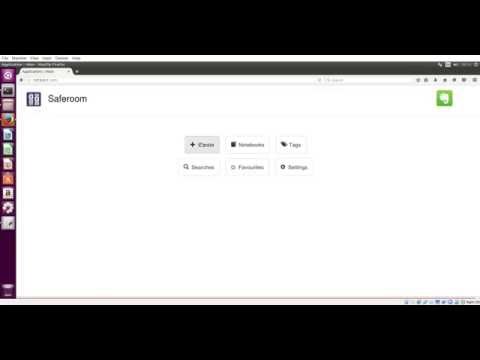
Open your browser and type http://127.0.0.1:5000/. If everything is OK, you should see the main Saferoom page. Then go to Generating master password section.
Now, you can run the Saferoom app on any platform using Saferoom docker image. Go to Saferoom Docker page and follow the instructions.
This section contains the instructions for installing the environment required by Saferoom app. This procedure was tested on Ubuntu desktop 16.04. Below we assume that everything is done under root user. If you're using non-root user, every command should be preceeded by sudo
Open terminal and check that Python is installed on your system (it should be installed by default, but nevertheless)
python --version
This application was tested with Python 2.7 version
Install Python PIP utility using the following command
apt-get install python-pip
After the installation make sure that PIP has been successfully installed
pip --version
Install GIT client using the following command:
apt-get install git
Saferoom is using Flask Python microframework. To install Flask type the following command:
pip install flask
Requests is a Python module used to work with HTTP requests. TO install this module, type the following command:
pip install requests
Pycrypto library is needed to perform cryptographic operations (encryption and decryption). Pycrypto is installed using the following command:
pip install pycrypto
Evernote Python SDK is used to interact with Evernote API. The installation steps are the following:
cd /tmp
git clone https://github.com/evernote/evernote-sdk-python
cd evernote-sdk-python
python setup.py install
BeautifulSoup4 is the HMTL parser written in Python. The installation steps are the following:
pip install beautifulsoup4
This section contains the instructions for installing the environment required by Saferoom app. This procedure was tested on CentOS 7. Below we assume that everything is done under root user. If you're using non-root user, every command should be preceeded by sudo
Open terminal and check that Python is installed on your system (it should be installed by default, but nevertheless)
python --version
This application was tested with Python 2.7 version
Install Python PIP utility using the following command
cd /tmp
curl "https://bootstrap.pypa.io/get-pip.py" -o "get-pip.py"
python get-pip.py
Or
yum install epel-release
yum install python-pip
After the installation make sure that PIP has been successfully installed
pip --version
Install GIT client using the following command:
yum install git
Saferoom is using Flask Python microframework. To install Flask type the following command:
pip install flask
Requests is a Python module used to work with HTTP requests. TO install this module, type the following command:
pip install requests
Pycrypto library is needed to perform cryptographic operations (encryption and decryption). Pycrypto is installed using the following command:
yum install python-devel
yum install gcc
pip install pycrypto
Evernote Python SDK is used to interact with Evernote API. The installation steps are the following:
cd /tmp
git clone https://github.com/evernote/evernote-sdk-python
cd evernote-sdk-python
python setup.py install
BeautifulSoup4 is the HMTL parser written in Python. The installation steps are the following:
pip install beautifulsoup4
Now, let's download the Saferoom application and start it on local machine
Clone this repository and start the server:
cd ~
git clone https://github.com/saferoom-app/saferoomlinux
cd saferoomlinux
python server.py
If everything is ok, you should see the following:
* Running on http://127.0.0.1:5000/ (Press CTRL+C to quit)
* Restarting with stat
Now open your browser and type the following address:
http://127.0.0.1:5000/
You should see Saferoom main page
Before generating the master password, please check this. Summarizing, the Master password is the password that you use to encrypt and decrypt your data. This password is stored on your local PC and never sent anywhere
OTP or One-Time password is the password that is used to encrypt/decrypt specific note. This password can be useful when you want to share the encrypted note with someone you know and you don't want to compromise your Master password
Master password is generated using small CLI utility. To generate the master password, please navigate to Saferoom app root folder and type the following:
python passwd.py
Then follow the intructions
This section contains necessary instructions how to connect Saferoom App to your Evernote account
To interact with Evernote API Saferoom app needs the developer token. This token for your specific account can be generated here
If you're not logged in, you need to login with your account. After you receive the developer token, open config.ini file in application root folder, find section [tokens] and paste your developer token as the following:
[tokens]
evernote_developer = <developer_token>
 ...
Save config.ini, open main Saferoom page and click Evernote icon in the upper-right corner of the page. If everything is OK, then you will see the basic info about your account.
This section contains instructions how to connect Saferoom app to your Onenote account
Client ID, Client Secret and Redirect URI are required to authtenticate Saferoom app into your Onenote account.
Please follow the steps below to get Client ID, Client Secret and Redirect URI:
- Go to Windows Live application management site
- Sign in with your Windows Live ID (Microsoft Account)
- If credentials are OK, you will be redirected to Application Registration portal
- Click Add an app button
- In the New Application Registration window type your Application Name
- When the application will be created, you will be redirected to Application configuration page
- Client ID will be in Application ID section
- In Application Secrets click Generate new password. New window with Client Secret opens
- Click Add Platform. Then select Web
- In the Redirect URIs type your Redirect URI. This URI should match the following pattern: https://[hostname]:5000/onenote/callback. "" can be any hostname, because it will be bound to http://127.0.0.1 or https://localhost. By default app includes the certificates for www.saferoomapp.com hostname, so as the Redirect URI you can use the following URI: https://www.saferoomapp.com:5000/onenote/callback
- Click Save button in the page bottom
Next step is to add these values to Saferoom configuration. It can be done in two ways:
- Open config.ini file in the root folder and paste these values as the following:
[tokens]
client_id = <your_client_id>
client_secret = <your_client_secret>
...
[uris]
redirect_uri = <your_redirect_uri>
Since the Onenote API requires that your Redirect URI should be only HTTPs connection, we need to configure your Redirect URI and HTTPs. If you're using the default hostname (https://www.saferoomapp.com), then you need to skip this section, because by default Saferoom includes two SSL certificates (server.key and server.crt) binded to www.saferoomapp.com hostname. If you're using custom hostname, then you need to generate the SSL certificate for your local server. Please follow these steps (for demonstration we will be using www.saferoomapp.com as a hostname):
-
Open /etc/hosts file and add your hostname. This hostname must be resolved into 127.0.0.1 address. For example:
vi /etc/hosts 127.0.0.1 www.saferoomapp.com -
Check that your hostname is resolved into 127.0.0.1 address. Open your terminal and ping your hostname. If everything is fine you should see the following output:
PING www.saferoomapp.com (127.0.0.1) 56(84) bytes of data. 64 bytes from localhost (127.0.0.1): icmp_seq=1 ttl=64 time=0.041 ms 64 bytes from localhost (127.0.0.1): icmp_seq=2 ttl=64 time=0.045 ms -
If you're using www.saferoomapp.com as your hostname, then skip this section and go section 5
-
Using OpenSSL utility generate self-signed certificate using the following command:
openssl req -x509 -newkey rsa:4096 -keyout server.key -out server.crt -days 365 -nodesThis command will generate the certificate (server.crt) and private key (server.key). Option -nodes is used not to protect your private key with the password. Since you will be using these certificate and key only in local environment, you should not worry about security.
After you issue this command, system will prompt you to fill some values. Since this is just a local certificate, you can use default values. The most important is CN or Common Name field. For this field you should specify the hostname, you're using for your Redirect URI. For example, if you're using www.myapp.com as a hostname, so the CN value should be www.myapp.com or *.myapp.com
-
Import server.crt into the list of Trusted Certificate Authorities. For every this procedure may vary. Here is the example, how to do in Chrome on Ubuntu Desktop:
- Open your Chrome browser
- Open Settings > Show advanced settings > ** Manage certificates **
- Select Authorities tab. Click Import
- Select your generated server.crt and import it to browser
- Restart your browser
- Start Saferoom app (python server.py) and type in your browser: https://www.saferoomapp.com:5000/. Theoretically you shouldn't see any security warnings. However on some browsers you can see Security Exception, because they just don't allow Self-Signed certificates. In such cases just confirm security exception and add it to Exceptions list
-
Open server.py file, navigate to bottom and comment this line:
app.run()Uncomment the following lines:
context = ssl.SSLContext(ssl.PROTOCOL_TLSv1_2) context.load_cert_chain('server.crt', 'server.key') app.run(ssl_context=context) -
Copy server.crt and server.key to Saferoom root folder. Please don't change names, because they're hardcoded in the application code. However if you want use other names, then you need to open server.py, navigate to bottom and modify the following line:
context.load_cert_chain('server.crt', 'server.key')
This sections contains steps, necessary to connect Saferoom application to Onenote account. The steps are the following:
- Start Saferoom app and navigate to its main page
- Click Settings button and check Onenote section. Client ID and Client Secret sections should be OK and Redirect URI field should contain your Redirect URI. Otherwise go to https://[your_hostname]:5000/install and configure all necessary values
- Click the Onenote icon in the upper right corner of page. Onenote modal window appears
- Click Login button. Microsoft registration page opens
- Type your username and password. For some reason, you will the same the page with error message, that your password or username are not corrent. Ignore this and click Sign In once again. Saferoom wil authenticate into your Onenote account and get Access and Refresh Tokens. Since Access Token expires every 1 hour, Refresh token is used to get a new Access Token