jtmobs / apache-jmeter Goto Github PK
View Code? Open in Web Editor NEWLearn Apache JMeter by doing
Home Page: https://lab.github.com/QAInsights/fun-with-jmeter
Learn Apache JMeter by doing
Home Page: https://lab.github.com/QAInsights/fun-with-jmeter


In this exercise, we are going to see about Listeners, how to add them and how to execute JMeter test plan.
Listeners just listens to the test results, but it can perform other tasks.
⚠ Listeners are resource intensive, it should not be used during the load testing.
Listeners are processed at the end of the scope in which they are found.
There are many types of Listeners available in JMeter. In this exercise, we are going to cover View Results Tree.
The View Results Tree shows a tree of all sample responses, allowing you to view the response for any sample. In addition to showing the response, you can see the time it took to get this response, and some response codes.
S01_PetStore test plan, add a View Results Tree element as shown below.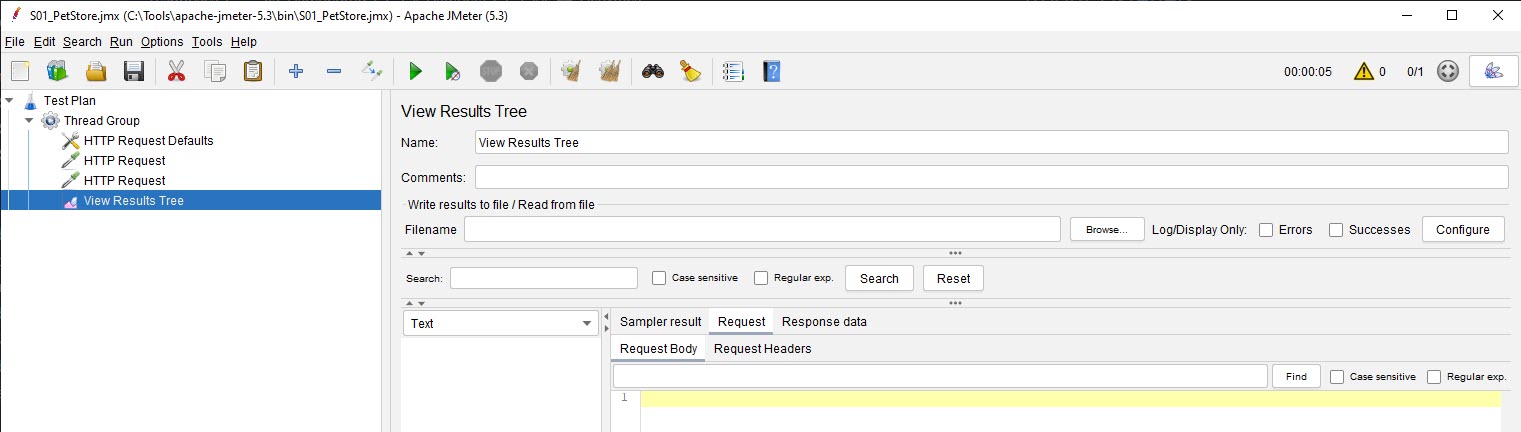
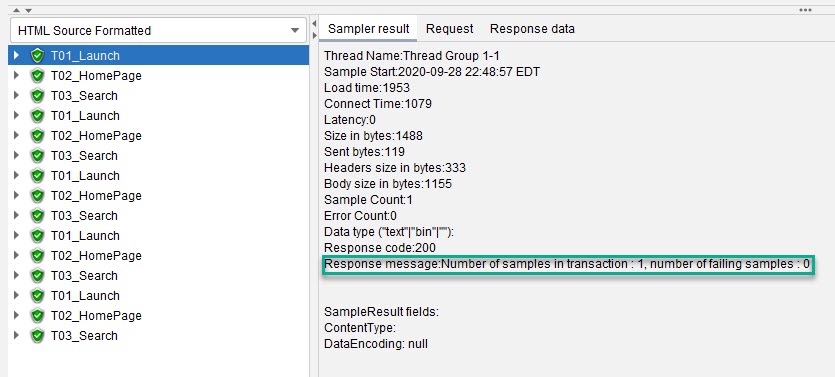
Run button in the toolbar, or hit Ctrl + R. After couple of seconds, you will get two green items in View Results Tree as shown below.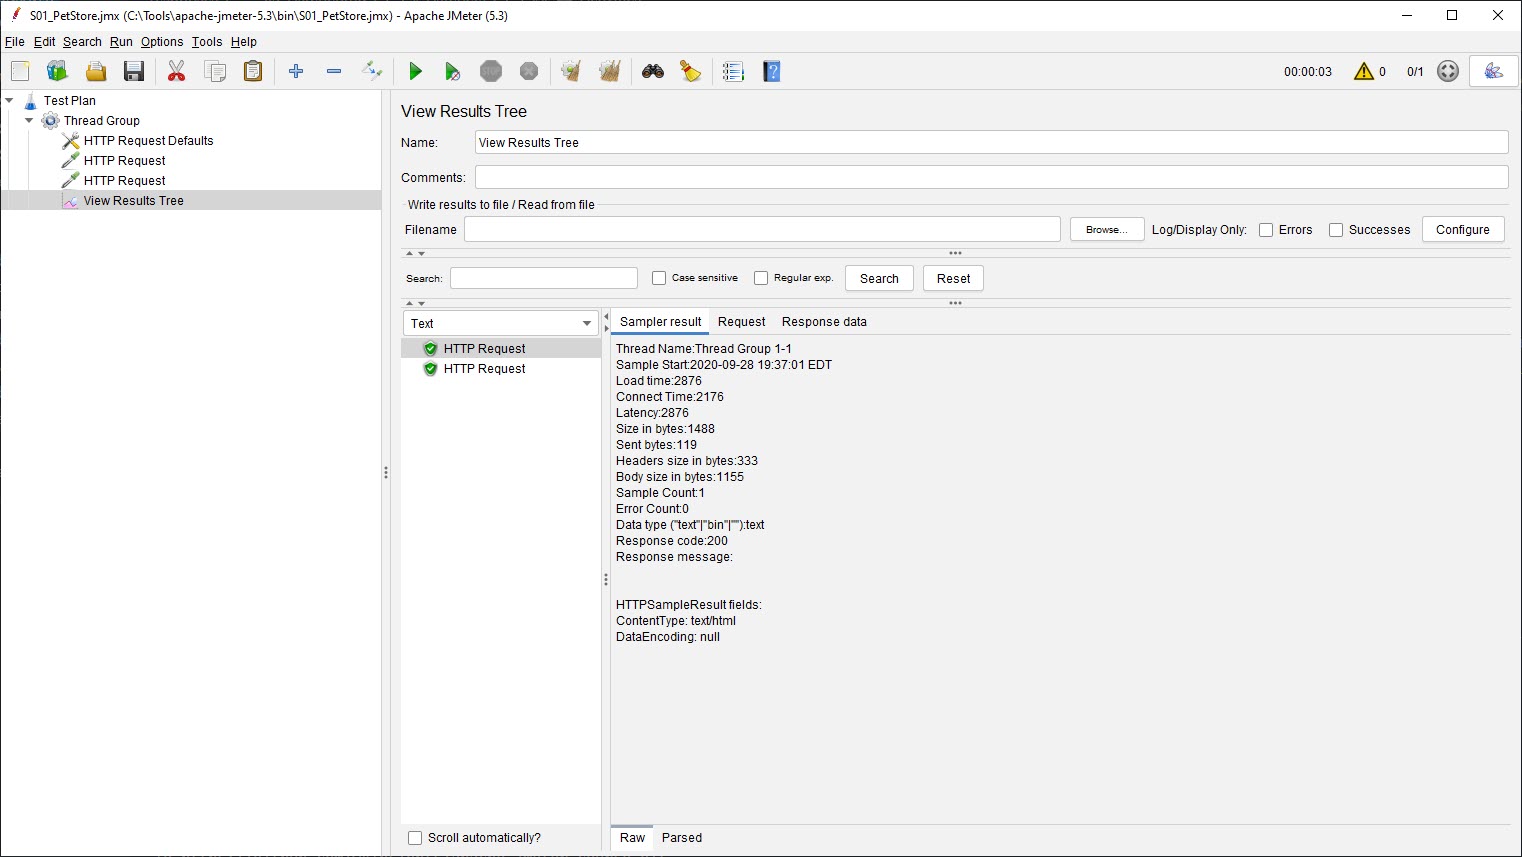
Sampler result, Request, Response data for both of the requests and understand the context.Push the changes to go to your next exercise ➡.
The prerequisite to launch JMeter is to have Java installed in your computer. You can interact with JMeter using the CLI and Non-CLI mode. Command Line Mode is the recommended mode for performance testing purposes. But to create or edit, you can launch JMeter in Non-CLI mode.
Go to the location where you extracted the content of JMeter file e.g. C:\Tools\apache-jmeter-5.3
Navigate to bin folder and launch jmeter.bat for Windows OS or jmeter.sh for Linux/macOS systems.
If Java is installed properly, JMeter will launch as shown below.
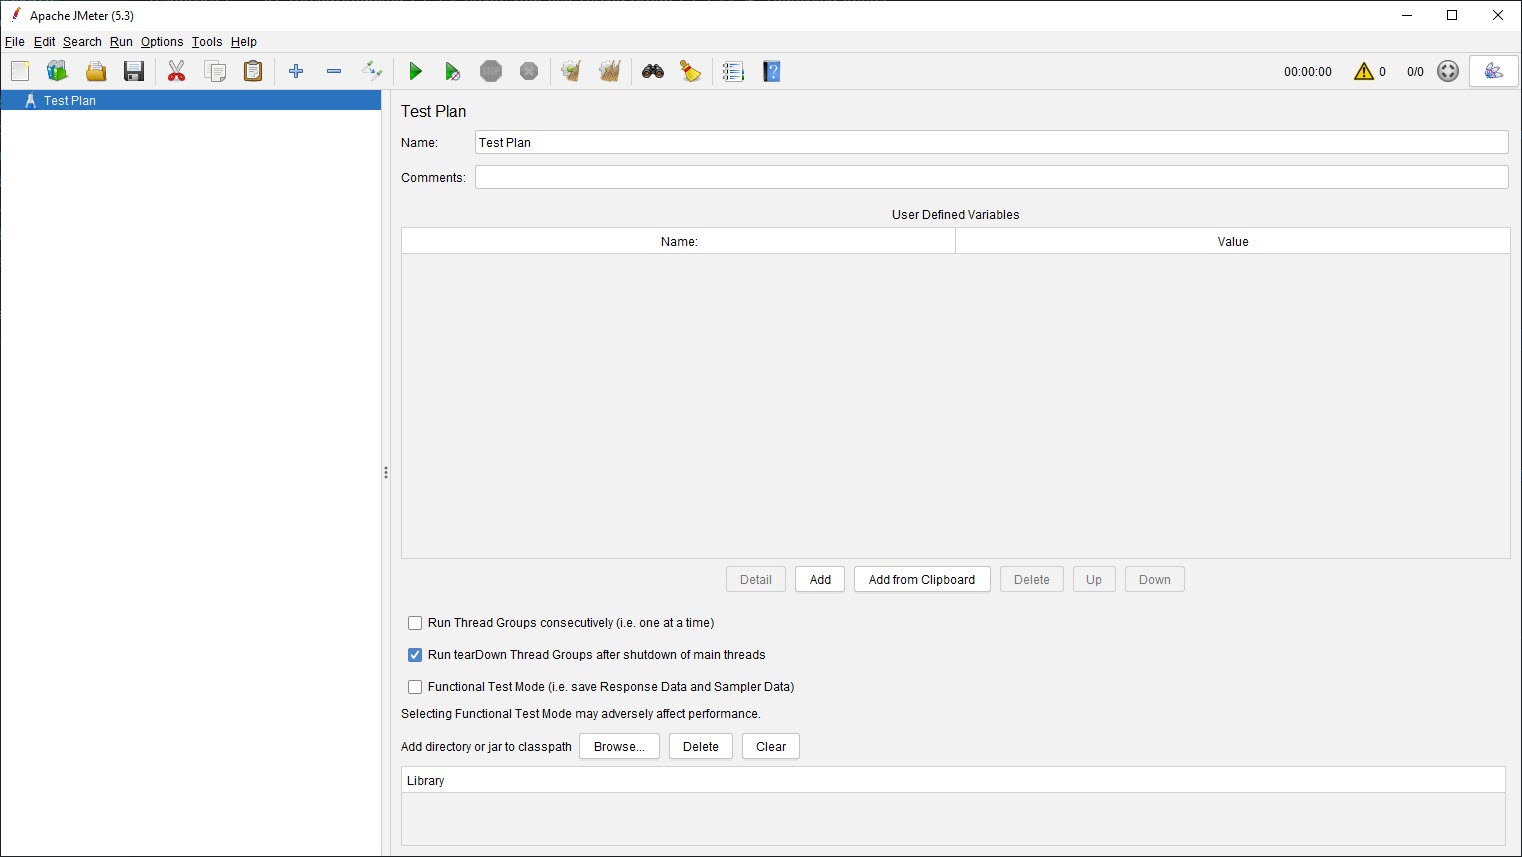
Congratuations on launching JMeter 🎉
In JMeter world, you create test plans which has the file extension of .jmx. If you open .jmx file in your favorite editor, you can see the XML tags.
A typical JMeter test plan consists of at least one Test Plan element and one or more Thread Groups and/or Samplers/Other elements.
📌 You cannot delete Test Plan element
Thread Group is the inception for any JMeter tests. In Thread Group you can configure the number of threads/users, duration, ramp up period etc.
In this exercise, we are going with the default values of Thread Group.
Let's get started 🚀
Thread Group by right clicking on Test Plan > Threads (Users) > Thread GroupFile > Save, enter S01_PetStore.jmx and hit Save buttonAfter successful push, I will let you know the next steps.
Tips
📌 Whenever you want to add any type of elements, just right click on the appropriate parent element.
📌 If you want to delete any element, press Delete key in your keyboard.
⚠ CAUTION: Undo is not possible in JMeter.
📌 Instead of deleting, you can disable the element by clicking on right clicking on it > Disable.
Note that timers are processed before each sampler in the scope in which they are found; if there are several timers in the same scope, all the timers will be processed before each sampler.
JMeter has different types of Timers. Frequently useds timers are: Constant Timer, Uniform Random Timer, Precise Throughput Timer etc.
⏳ Timers injects a delay before it executes Samplers in scope.
A user who knows how to place an order in the ecommerce application navigates faster in their pace. But if a user is new to the application, then the user's pace is slow. Because every user is unique.
To simulate the real world scenario in the test plan, it is important to add relevant delay between the requests. Also, it will help you test the application in a right way, instead of throwing up the load without delay which will trigger a server crash 💥.
Pet Store plan, let us add a Constant Timer for each HTTP request.HTTP Request, go to Add > Timer > Constant Timer.1000 in Thread Delay. Unit of time in JMeter is milliseconds.
View Results Tree element and then click on RunYou can observe a delay between the HTTP requests when the test is running.
👏 Kudos! Now you know how to add Timers to JMeter test plan.
Push the changes to navigate further. We are almost there, keep up the pace.
Assertions - the action of stating something or exercising authority confidently and forcefully.
Assertions are used to perform additional checks on samplers, and are processed after every sampler in the same scope. To ensure that an Assertion is applied only to a particular sampler, add it as a child of the sampler.
JMeter has different types of Assertions. Few assertions are expensive. It is not advisable to enable them during the load test. Commonly used Assertions are Response Assertion, JSON Assertion, Size Assertion etc.
Response Assertion for the Search HTTP request. Before we get started, let us change the name of the HTTP Requests as shown below.
To add a Response Assertion, right click on 03_Search HTTP request > Add > Assertions > Response Assertion.
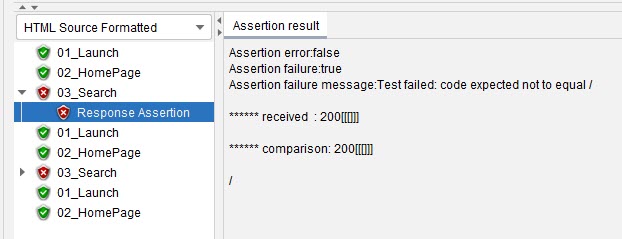
Set the below properties as shown below for the assertions. Below assertion validates the HTTP Response Code exactly matches 200, if not it will show it as failure in the View Results Tree.

Run to observe the results.Below is the sample failed assertion.
Push the changes to proceed further.
As you aware, we are going with the default number of threads in Thread Group. In this exercise, you will learn about HTTP Request element.
HTTP Sampler lets you send an HTTP/HTTPS request to a web server. It also lets you control whether or not JMeter parses HTML files for images and other embedded resources and sends HTTP requests to retrieve them.
Before adding HTTP Sampler, let's add the default settings to your HTTP Requests. To define the default settings for HTTP Requests we are going to add HTTP Request Defaults.
HTTP Request Defaults element lets you set default values that your HTTP Request controllers use.
In this exercise, we are going to add two HTTP requests to the test plan.
Let's dive into the activities.
HTTP Request Defaults by right clicking on Thread Group > Config Element > HTTP Request Defaults.HTTP Request Defaults as shown below.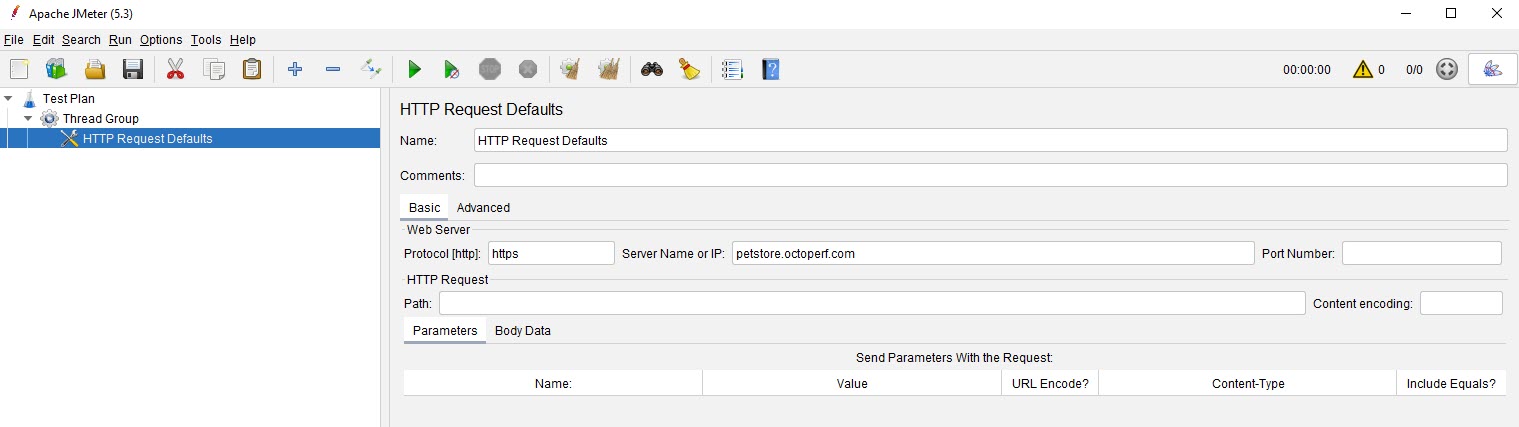
HTTP Sampler by right clicking on Thread Group > Sampler > HTTP Request./ to the Path
HTTP Sampler/actions/Catalog.action to the Path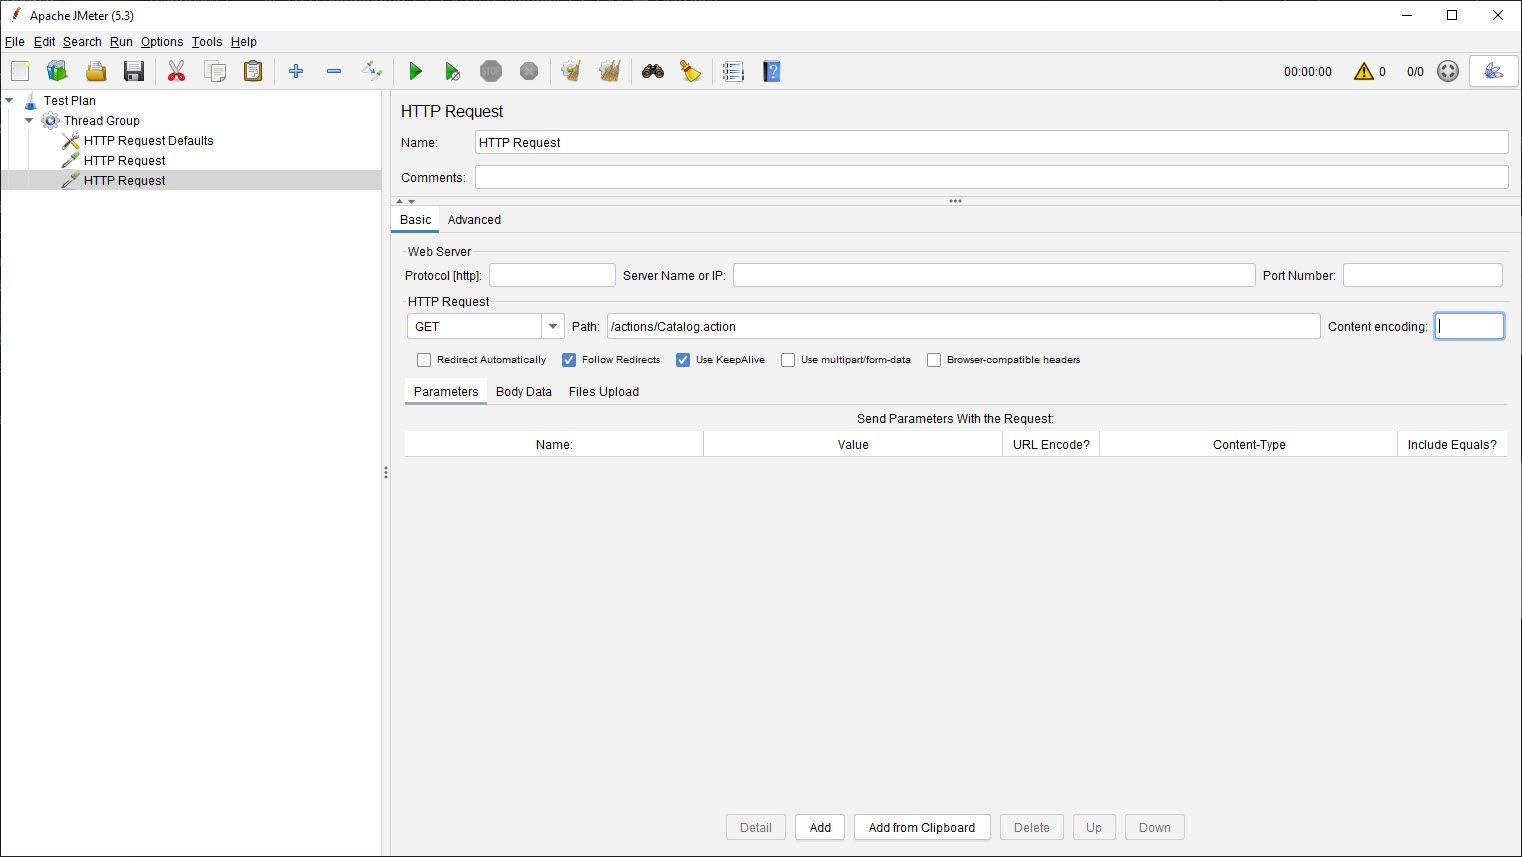
Ctrl + SIt is recommended to run the test using the CLI mode to get the optimal results.
Here is the command to run the test in CLI mode.
.\jmeter.bat -n -t .\S01_PetStore.jmx -l Run1.jtl
DISCLAIMER
In this exercise, we are going to run the test using just only one thread and for 30 seconds only. Because, we are not authorized to run the test in the desired environment.
ALL THE PERFORMANCE TESTING ACTIVITIES MUST BE CARRIED OUT IN THE NON-PRODUCTION ENVIRONMENT.
I AM NOT RESPONSIBLE FOR ANY SORT OF DAMAGE CAUSED DUE TO YOUR LOAD TESTING FOR ANY WEBSITES/APPS/SERVICES/SYSTEM/ENTITY.
Please act responsibly.
Before we start the test, click on Thread Group, select Specify Thread lifetime and enter 30 in the Duration (seconds) text box.
Disable View Results Tree
Hit Save and close the JMeter.
Launch Command Prompt (for Windows) or Terminal (for Linux/macOS). Navigate to JMeter directory bin folder.
Issue the below command.
.\jmeter.bat -n -t .\S01_PetStore.jmx -l Run1.jtl
During the test, you can observe the statistics in the command prompt. Once the run is done, you will get the status as shown below.

jtl file which got generated in the bin folder.
Literally you can add any type of listener to visualize the results.
Push the changes to proceed further to conclude your exercise.
Just like any other programming language, you can control the execution flow using Logic Controllers in JMeter.
Logic Controllers which determines the order in which Samplers are processed.
There are different types of controllers in JMeter. Commonly used ones are: If, Transaction, While, Loop etc.
We are going to measure the performance of Search functionality. Transactions are nothing but the collection of sequential steps/requests. Let us add transactions to the Pet Store test plan.
Instead of adding the transaction controller, we are goint to insert it to the HTTP requests.
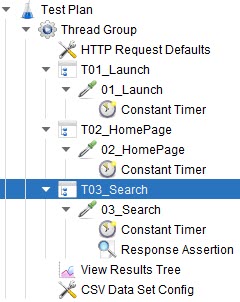
Right click on 01_Launch > Insert Parent > Logic Controller > Transaction Controller. This will insert a transaction controller to the selected request. Rename the transaction controller to T01_Launch.
Check Generate parent sample checkbox.
Repeat the steps for other two HTTP requests as shown below.
Hit Run to view the results.
Push the changes to proceed further.
In this exercise, we are going to see about data parameterization and add Login request in our test plan.
In real world, every user is unique. To simulate the real world scenario, it is critical to test the application with different sets of data.
If you test your application with the same test data, your response likely will be served from the cache. Your performance test results will not yield the real performance.
Generating test data in run time is expensive. It is important to generate the test data well ahead.
Creating test data is beyond the scope of this training.
In JMeter, data parameterization can be achieved using CSV Data Set Config.
CSV Data Set Config is used to read lines from a file, and split them into variables. It is easier to use than the __CSVRead() and __StringFromFile() functions. It is well suited to handling large numbers of variables, and is also useful for testing with "random" and unique values.
As you know we are working on Pet Store application. Assume that you need to create a test plan for Search scenario.
https://petstore.octoperf.com/actions/Catalog.actionangelfish
cat
dog
bird
bulldog
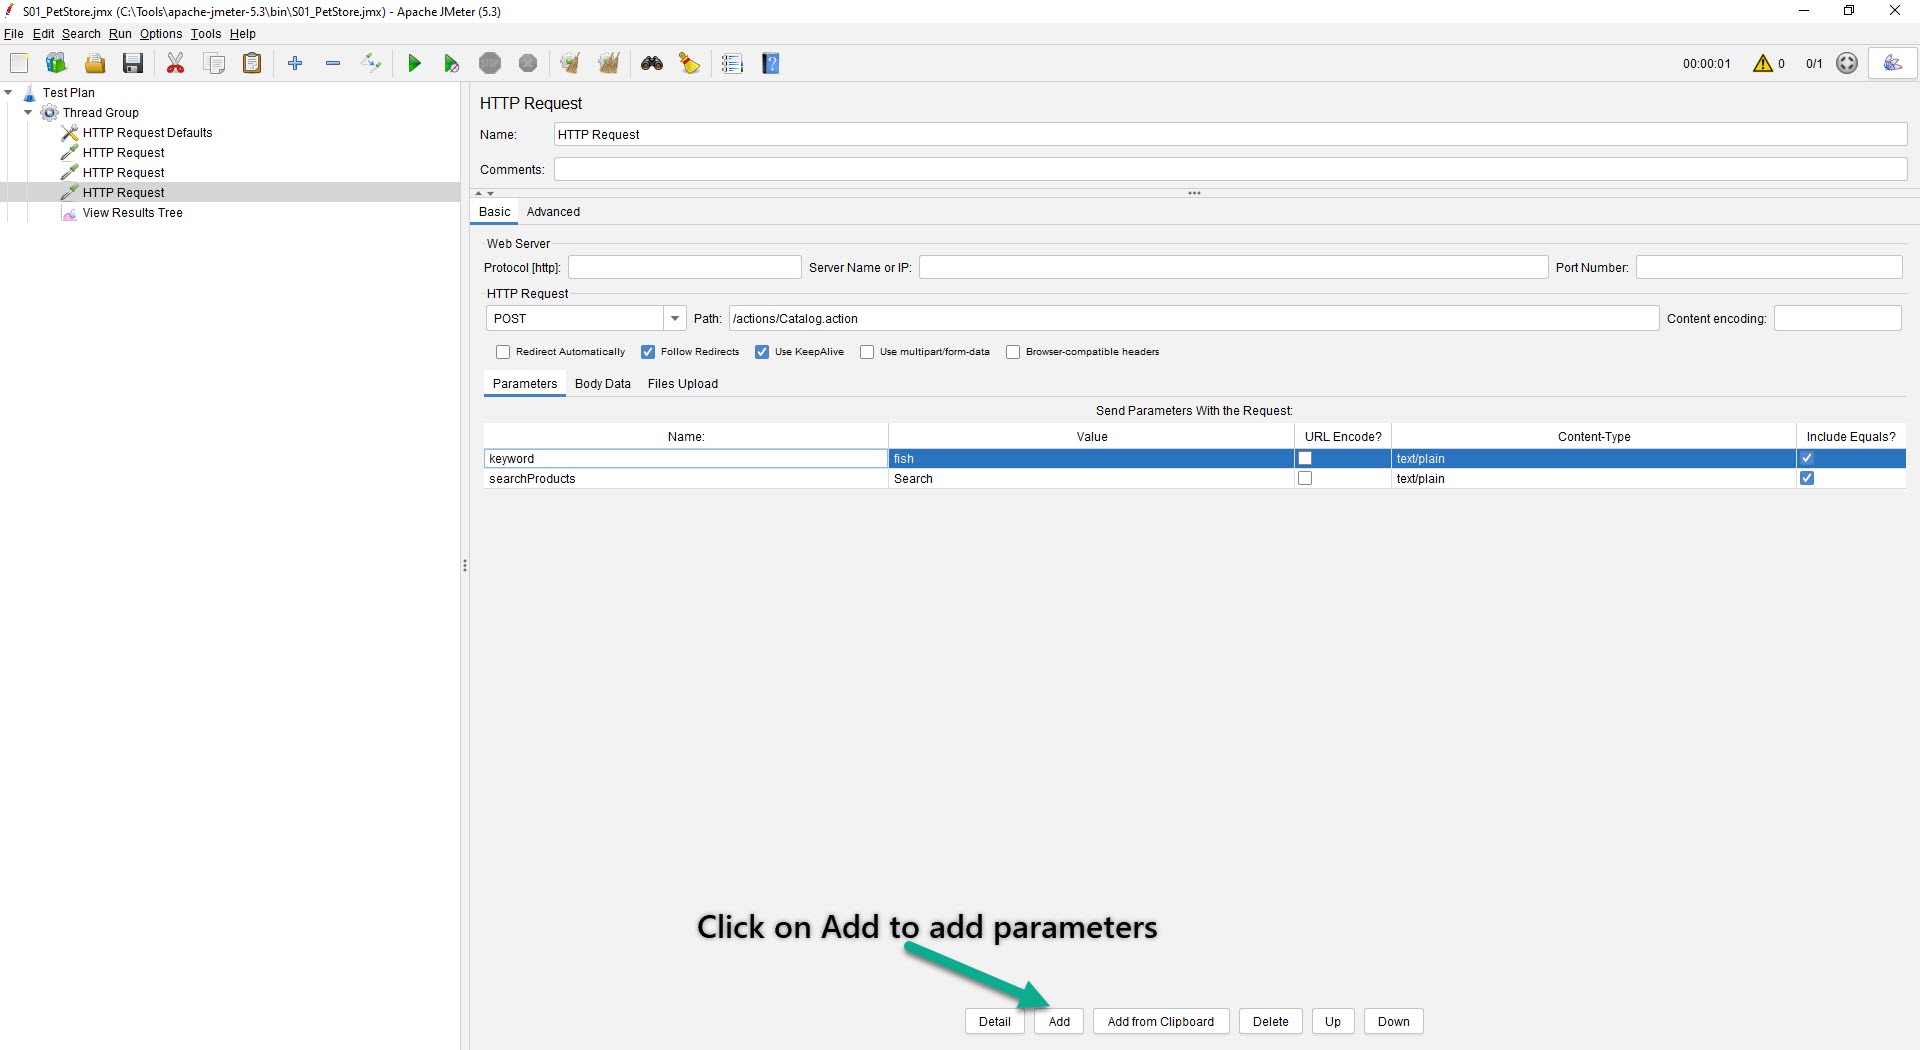
S01_PetStore, add a new HTTP Sampler and fill the below properties.HTTP Method: POST
Path: /actions/Catalog.action
Parameters:
keyword as fish
searchProducts as Search
As you see, we have not done with the parameterization. Let's get started.
Add a CSV Data Set Config by right-clicking on the Thread Group > Add > Config Element > CSV Data Set Config
Copy the above test data and save it as PetSearch.csv in your bin folder.
Configure the CSV Data Set Config as shown below.
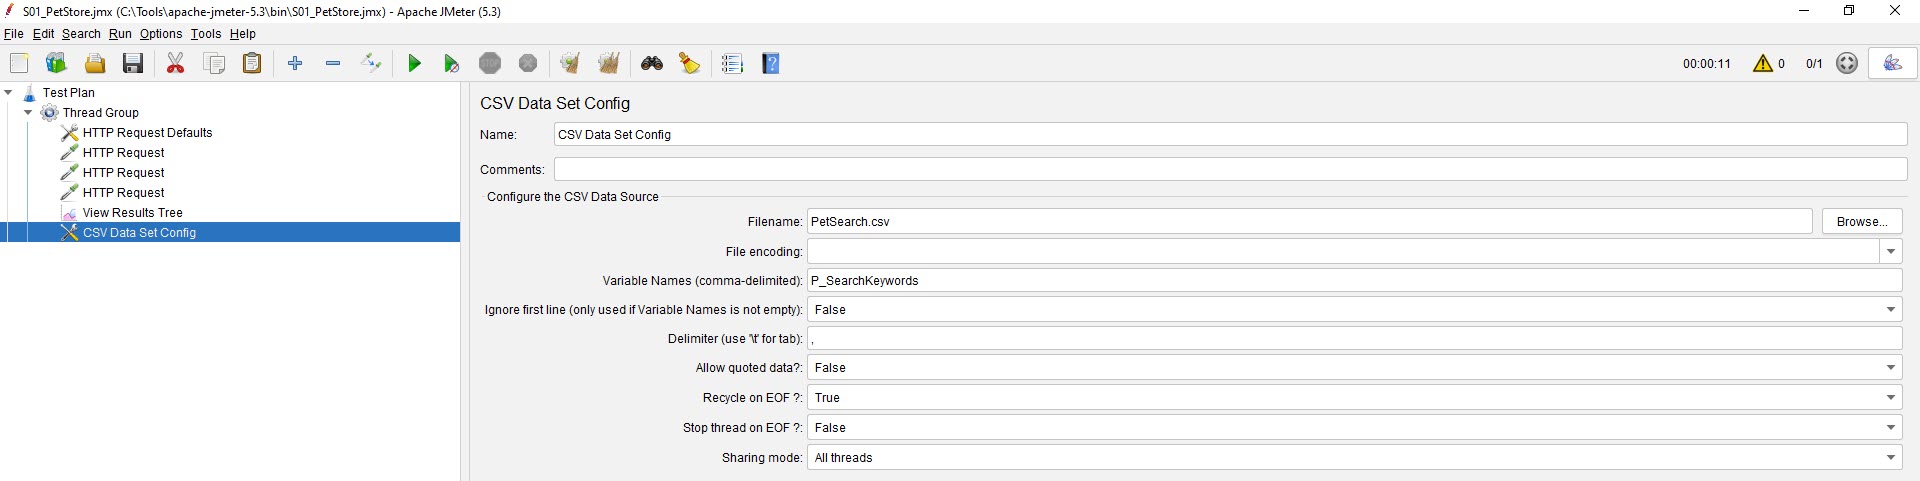
You can add multiple Variable Names if the CSV test file has multiple columns.
keyword to ${P_SearchKeywords}. ${P_SearchKeywords} holds the value of the variable from CSV Data Set Config in runtime.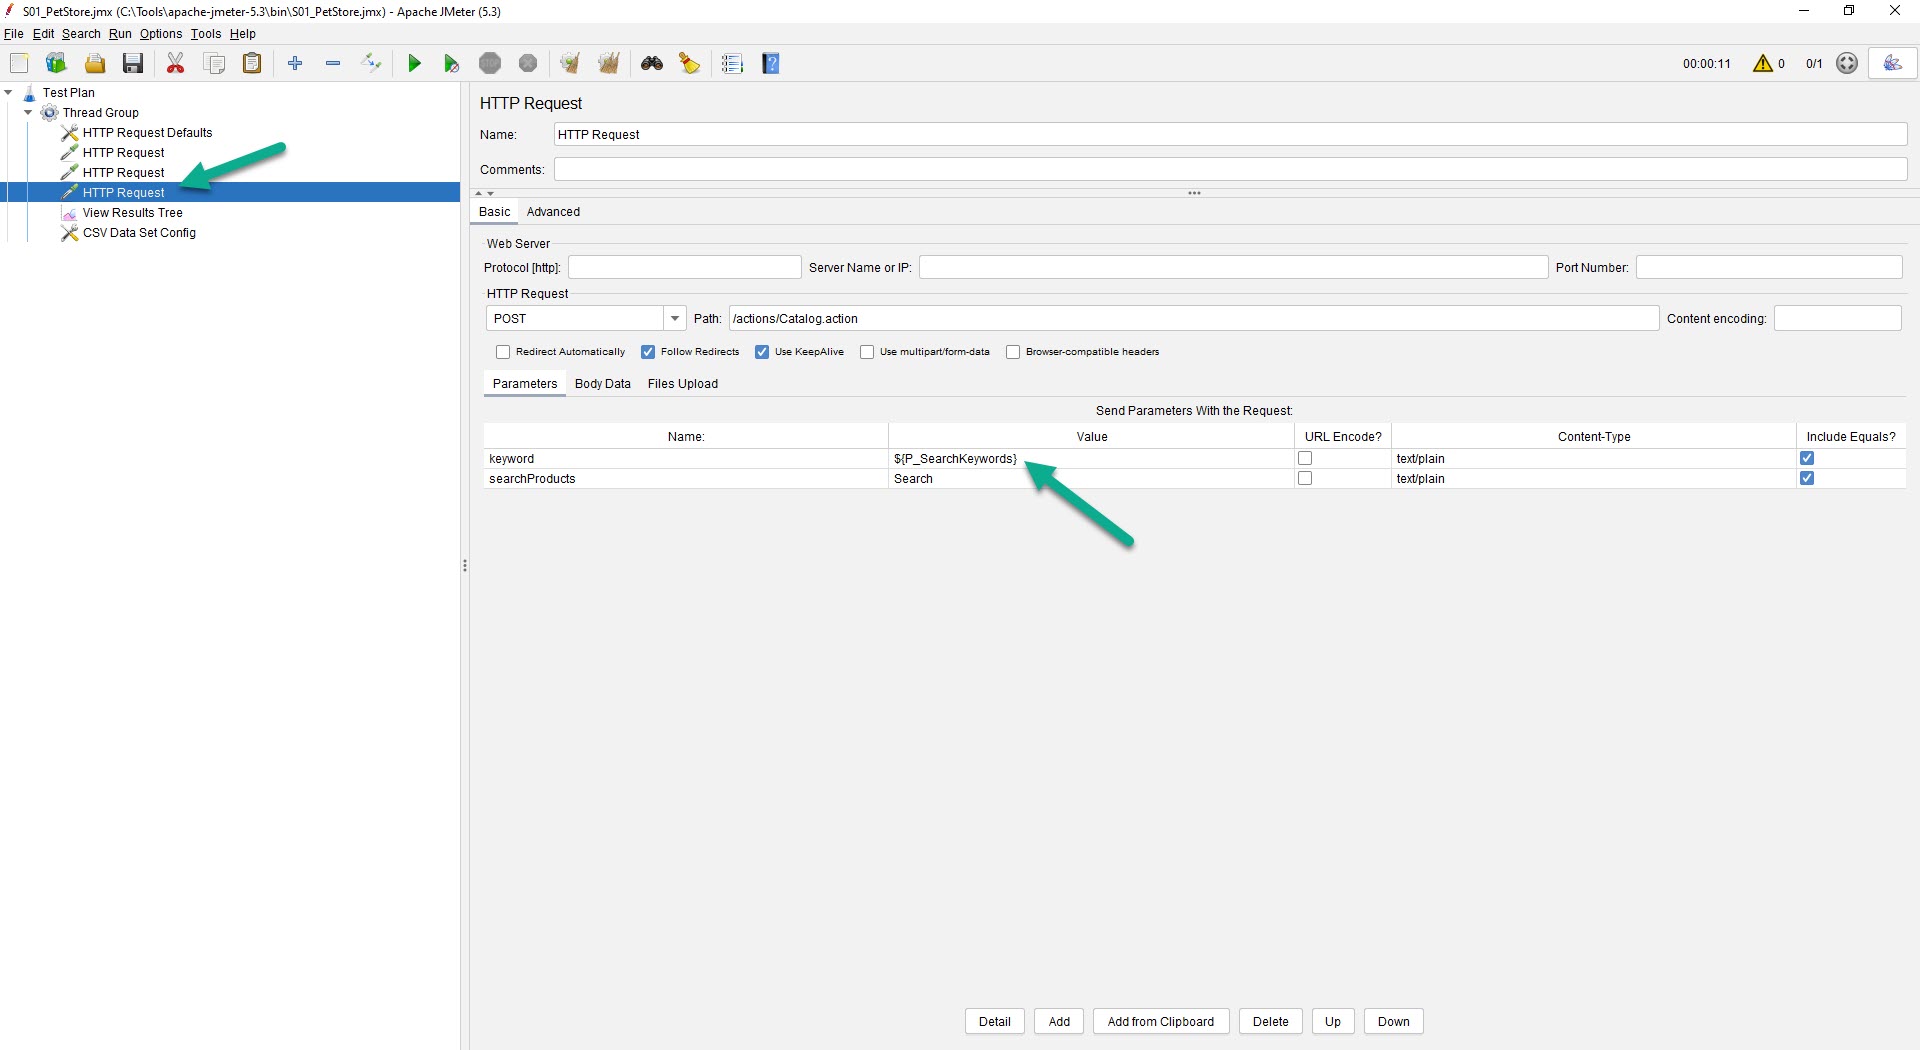
Since we have 5 rows in our test data, click on Thread Group and change the Loop count to 5.
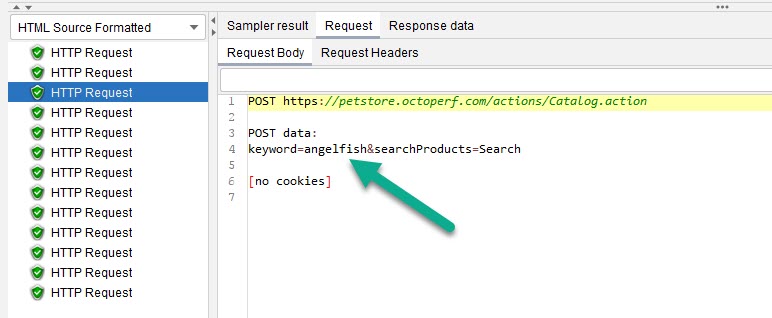
Hit the Run button and click on View Results Tree to view the results for each test data.
You are a super star 🌟!
Push the changes to go to your next exercise ➡.
Welcome to this course!
Before we can start learning JMeter, let us make sure you have the right setup. You need to install the following things to learn effectively.
Let's get started.
Points to note:
📌 Always install the latest stable versions of the software unless the version specified.
📌 Below exercises have been tested using JMeter 5.3 in OpenJDK 15.
There are additional components you can install if you are planning to develop JMeter, but those are completely optional and beyond the scope of this training.
This is your workspace to learn JMeter. Clone this repository by issuing the below command.
git clone <repository-url>
Once you have everything installed, let's get started.
Close this issue, and I will comment with your next steps.
Points to note:
📌 Sometime I respond too fast ⚡, please bear with me.
📌 Sometime I respond slow, just refresh your browser 😊
A declarative, efficient, and flexible JavaScript library for building user interfaces.
🖖 Vue.js is a progressive, incrementally-adoptable JavaScript framework for building UI on the web.
TypeScript is a superset of JavaScript that compiles to clean JavaScript output.
An Open Source Machine Learning Framework for Everyone
The Web framework for perfectionists with deadlines.
A PHP framework for web artisans
Bring data to life with SVG, Canvas and HTML. 📊📈🎉
JavaScript (JS) is a lightweight interpreted programming language with first-class functions.
Some thing interesting about web. New door for the world.
A server is a program made to process requests and deliver data to clients.
Machine learning is a way of modeling and interpreting data that allows a piece of software to respond intelligently.
Some thing interesting about visualization, use data art
Some thing interesting about game, make everyone happy.
We are working to build community through open source technology. NB: members must have two-factor auth.
Open source projects and samples from Microsoft.
Google ❤️ Open Source for everyone.
Alibaba Open Source for everyone
Data-Driven Documents codes.
China tencent open source team.