This repository contains my personal notes that I take on during preparation for Linux Foundation Certified SysAdmin exam.
II. Filesystem layout
III. Processes
IV. Signals
V. Package managers
VII. dpkg
X. APT
XI. System monitoring
XII. Process monitoring
XIII. Memory monitoring
XIV. IO monitoring
XV. IO scheduling
XVI. Filesystems
XVII. Disk partitioning
XVIII. Filesystem features
XIX. Filesystem features
XX. ext filesystems
XXI. XFS and btrfs filesystems
XXII. Encrypting disks
XXIII. LVM
XXIV. RAID
XXV. Kernel services and configuration
XXVI. Kernel modules
XXVII. Devices and udev
XXVIII. Virtualization
XXIX. Containers
XXX. User account management
XXXI. Group management
XXXII. File permissions
XXXIII. PAM
XXXIV. Network addresses
XXXV. Network devs and configuration
XXXVI. Firewalls
XXXVII. System startup and shutdown
XXXVIII. GRUB
XXXIX. SysV, upstart and systemd
Initiative to standardise filesystem organization across different distributions
Essential binaries required when no other filesystems have yet been mounted. Also in single user mode or recover mode.
System binaries for booting, recover or restore. Also capable of mounting /usr, /home etc.
A secondary hierarchy that is not needed for system booting. It contains multi-user applications. Package managers touch here. /usr/bin, /usr/lib, /usr/local, /usr/sbin, /usr/bin, /usr/share, /usr/src (kernel source)
Contains compressed kernel image, initrd, GRUB
Isolated installation directory (not scattered in multiple directories). Helpful for proprietary sw or packages downloaded without package managers
Pseudo-fs. Persists only in memory for processes to keep internal state. Each process has its place as a subdirectory
Home of root user
For variable data that changes frequently. Logs, spool directories (for mail and cron), transient data for cache (e.g. packages) , lock files (linked to /run/lock)
Pseudo-fs. For transient data that contains runtime information as lock files
Mount filesystems for removable media such as USBs
A temporary place to mount filesystems such as NFS
orphan: A child process whose parent has terminated. Its PPID is set to 1 that is, it's adopted by init.
zombie: A child process terminates without its parent gets notified of this. A zombie releases its resources, however, it waits to notify its exit state to parent. It still has an entry in the process table.
wait is a system call that may be submitted by a process after forking a child process. Parent suspends execution and wait child process to complete and gets notified of its exit status. wait is skipped if child process is started in the background.
PID is 16 bit integer located in /proc/sys/kernel/pid_max and can be altered.
ulimit gets or sets the limits on resources to the shell and processes started by shell. That enables to restrict users to restrict system resources. On the other hand, it's also used to expand limits of some processes.
There is hard and soft limits where hard limit can only be set by root and it's the upper limit a soft limit can reach that is set by a user.max cpu time, max file locks, max open files, max threads, stack size, memory size, file size etc.
To see current limits
ulimit -a
To set stack size. This is not permanent, however, only current shell session is affected. To persist it, set it in /etc/security/limits.conf.
ulimit -s 4096
Too see max file numbers hard and soft limits
ulimit -H -s
ulimit -S -s
A process can inherit permissions from
- executor - the user who executes it
- executable - executable binary file,
setuidbit set.
At any given time, a process is running in a certain execution mode.
- user mode
us: when executing application code in user-space - system mode
sy: when executing system calls (kernel code) in kernel-space
$ ls
bash process forks itself and a new copy, i.e. child process is created. fork() returns child's PID to parent. bash process goes into sleep state with wait system call on its child.
copy process makes exec system call and loads ls code in the child process space and executes it.
when execution completed, child process terminates via exit system call and returns exit code to kernel.
bash receives exit status either via polling or SIGCHLD signal handler from kernel, removes child's entry from process table (i.e. reaped) and it resumes execution.
| state code | Description |
|---|---|
| D | uninterruptible sleep (usually IO) |
| R | running or runnable (on run queue) |
| S | interruptible sleep (waiting for an event to complete) |
| T/t | stopped by job control signal (Ctrl+Z) / by debugger |
| Z | defunct ("zombie") process, terminated but not reaped by its parent |
Kernel-created processes can run in
- kernel space for maintenance work
- user space - usually short lived
Kernel processes are created by kthreadd pid=2 and their names are in encapsulated brackets.
nice executes a command with adjusted niceness. The lower the niceness, the higher is the process priority - between -20 and 19.
Execute ls with args and increase its default nice by +3 (priority decreased). Default niceness is 10 (priority decreased by 10)
nice -n +3 ls /proc
Only root can decrease niceness.
renice to prioritize an existing process
renice -n -5 2002
-
static: An application compiled with a static library doesn't change thereafter even if static library is updated.
-
shared: Such libraries can be loaded into application at runtime - also called dynamic link libraries (DLL). I think it can be thought as an external dependency that is satisfied from the environment and not during application build time. Shared libraries have
*.soextension.
To find shared libraries of a program depends
ldd /usr/bin/vim
A way of communication with a process (basic IPC). It can originate from
- user: via
killcommand - process: must be via system call through kernel
- kernel: e.g. a process makes an illegal memory reference
kill <pid> is the command to send signals to a process id.
Default kill action is to terminate given process gracefully. However, not all kill actions terminate.
kill 1234
To list signal types and values
kill -l
There are default handlers for every signal provided kernel. However, signal handlers can also be implemented in the application code to override default behavior. It's not allowed to handle SIGKILL and SIGSTOP.
| Signal | Default action | Description |
|---|---|---|
| SIGHUP | Terminate | convention: for daemons, it reloads configuration file. |
| SIGINT | Terminate | interrupt from keyboard Ctrl-C |
| SIGFPE | Core dump | sent from kernel to a process that attempts to divide by 0 |
| SIGKILL | Terminate | abnormal termination (cannot be handled nor ignored) |
| SIGTERM | Terminate | graceful termination (default in kill) |
| SIGSTOP | Stop | Cannot be handled nor ignored |
| SIGTSTP | Stop | Ctrl-Z |
| SIGCONT | Continue | Resume |
| SIGCHLD | Ignore | Child stopped/terminated |
| SIGPIPE | Terminate | Broken pipe; socket closed |
To kill processes in batch mode by a criteria, use pkill <command>.
Kill all cat processes by user tom with a signal 15
pkill -15 -u tom cat
pgrep prints PIDs to stdout with the same options.
In general, two families of package managers can be considered.
rpm: RedHat Package Managerdpkg: Debian Package Manager
Packaging systems can be classified in two levels:
-
Low-level PMs deal with installation/removal only. They don't carry out dependency management. If a package is missing a dependency during installation, it will fail. Similarly, if a removal depends on some other package, it will also fail.
- rpm in RedHat family
- dpkg in Debian family
-
High-level PMs are based on the low-level ones. They handle dependency management, automatic dependency resolving and accesses external software repositories i.e. downloading/installing/removing of dependencies when needed.
yum(RHEL, CentOS),dnf(Fedora) andzypper(SUSE) in RedHat familyaptsuite in Debian family
dpkg database is located at /var/lib/dpkg/. dpkg is not aware of any central repository. However, it keeps track what's been installed through apt or manual installations. Remember apt is based on dpkg.
Binary package name:
<name>_<version>-<revision>_<architecture>.deb, e.g. logrotate_3.7.8-1-_amd64.deb
* x86, 64 bit architecture is called amd64.
Src package consists of
- upstream src package *.tar.gz (from package maintainer)
- metadata file *.dsc describing the package
- second src package that contains patches to the upstream source *.debian.tar.gz
To search what package installed (bin, conf etc.)
$ dpkg -S /usr/bin/dig
dnsutils: /usr/bin/dig
List installed packages
dpkg -l
List all files installed from a package
dpkg -L package
To query status of an installed package
dpkg -s package
List contents of deb package
dpkg -c package.deb
Install/update pkg.deb
`dpkg -i pkg.deb
Remove/purge (-P)
dpkg -r pkg.deb
APT (Advanced Packaging Tool) software suite contains mainly apt-cache, apt-get and apt-file which are based on dpkg.
apt-cache queries packages from internal database (package index) at /var/lib/apt/lists.
Full text search on name and desc on all package lists
apt-cache search term
Show information on pkg - exact name search
apt-cache show/showpkg pkg
Show packages whose name starts with prefix
apt-cache pkgnames openjdk
Search all packages that contains file
apt-file search file
List all files in the pkg. pkg doesn't need to be installed or fetched
apt-file list pkg
Uninstall not needed dependencies
apt-get autoremove
Delete installed package archives from cache
apt-get clean
Sync package index lists with remote repos
apt-get update
Install/update pkg
apt-get install pkg
Remove/purge pkg
apt-get [--purge] remove pkg
Apply all available updates to all pkgs
apt-get upgrade
Many monitoring tools make use of /proc and /sys pseudo-filesystems.
| tool | monitors |
|---|---|
| top, ps, pstree | processes |
| uptime | uptime and load |
| mpstat | multiprocessor usage |
| strace | system calls tracing |
| tool | monitors |
|---|---|
| free | brief memory usage |
| vmstat | detailed memory and block io usge |
| pmap | process memory map |
| iostat | cpu/io stats |
| tool | monitors |
|---|---|
| netstat | |
| iptraf | ? |
Important log files are kept under /var/log/. System-wide logging is managed by syslogd daemon. It collects logs from various services and the kernel and stores them under /var/log/syslog.
| log file | purpose |
|---|---|
| boot.log | system boot messages |
/var/log/kern.log |
kernel only logs, read with dmesg |
/var/log/syslog |
logs everything (services and kernel) |
/var/log/messages |
general logs (info, warn and notice levels) |
/var/log/auth.log |
security logging (authn, pam, sudo etc.) |
/proc/ and /sys/ are pseudo-filesystems and contain information about the system state.
- Current state of each process running: child processes, memory usage, oom_score
- /proc/interrupts contain statistics on interrupts
- how many times an interrupt type was handled by which CPU?
- /proc/meminfo: meminfo
- /proc/sys/ contain tunable system parameters in plain text files
/proc/sys/kernel: kernel paramters/proc/sys/vm: virtual memory paramters
Kernel tunables can be edited directly or set with sysctl.
sysctl kernel.panic
Also VM tunables can be get/set again via sysctl.
sysctl vm.dirty_ratio
aka sysfs. Provides unified information on device and drivers of various types, unified device model. Much of the hw information moved from /proc to /sys.
/dev vs /sys: /dev contains device nodes to access the devices themselves whereas /sys contains device information as powered on, vendor, model, bus etc.
System activity reporter for humans. Report is made up from the data that is collected by SADC in /var/log/sa periodically. Report can contain about
- IO, paging, network, per CPU, swap and memory, context switching etc.
$ sudo sar 3 3 # CPU usage report 3 times in intervals of 3 seconds
Interactive process monitoring tool. Press
Pto sort by %CPUMto sort by %MEMNto sort by PID
CPU usage output %Cpu(s): 99.9 us, 0.1 sy, 0.0 ni, 0.0 id, 0.0 wa, 0.0 hi, 0.0 si, 0.0 st
us: %cpu for user processessy: %cpu for kernel processesni: %cpu for niced user processesid: time spent idlewa: time spent on IO completion
ps [pid]...
ps grabs the information from /proc fs.
| column | description |
|---|---|
| VSZ | virtual memory size in KB |
| RSS | resident set size (physical mem size excl. swap) |
| %CPU | cpu utilization |
| WCHAN | kernel function where process is sleeping |
| TTY | attached terminal |
| PRI | priority |
| NI | nice |
| comm | executable name only |
| args | command with all its args |
ps aux # interpret options in BSD style grouped
ps -aux # interpret options in UNIX style grouped
| opiton | purpose |
|---|---|
| a | BSD style all processes |
| u | output in user-oriented format |
| x | remove "must have tty" restriction |
| -e | UNIX style all processes |
| -o | customize output like ps -o pid,uid,cmd |
| -l | long format |
| -f | full format |
ps -p 2,3,4 # get process with pid=2, 3 or 4ps -C bash,java # list processes with cmdline javaps -u root,karakays # select processes with user id
pstree to visualize process hierarchy by pid or uid.
pstree [options] [pid,user]
Virtual memory consists of resident memory and swap area. Memory usage and IO throughput are much related because in most cases, most of the memory is used to cache the contents of files on disk. Kernel stages disk writes into cache and over time it flushes them to disk. dirty page are memory pages that still need to be flushed. And page is the smallest unit of memory that can be accessed, allocated by processes or swapped in/out to disk.
#### buffervs.cache bufferis a type of cache for filesystem metadata and block devices. That is, buffers remember filesystem superblocks, directory contents, file permissions etc. Of course, this kind of metadata always need to stay in memory since it's a must-have to access filesystem.cacheis related to caching file contents in order to improve disk read access.vm.dirty*` tunables are related here.
/proc/sys/vm/ contains tunables for the virtual memory system.
| vm.entry | purpose |
|---|---|
dirty_bg_ratio |
% of system memory for dirty pages before flush kicks in. |
dirty_ratio |
abs. maximum of system memory for dirty pages. if reached here, all new IO blocks until dirty pages flushed. |
expire_centisecs |
dirty data expiry time |
overcommit_memory |
0=kernel estimates overcm allocation, 1=permits any overcm allocations, 2=prevents overcm |
overcommit_ratio |
if overcm_memory=2, max overcm can reach swap + this % of RAM |
oom_kill_allocating_task |
let oom-killer kill the task that triggered |
panic_on_oom |
kernel panic on oom |
swapiness |
how aggressively kernel swaps between 0 and 100. 0 means kernel only swaps agains OOM faults. |
vmstat [options] [delay] [count]
vmstat is mainly for virtual memory stats but also for CPU, process and disk statistics.
- -a option includes active and inactive memory namely pages recently used (might be clean or dirty) and pages not been recently used.
- -d option is for disk statistics.
- processes
- r: # of processes in runnable state (but not running)
- b: # of processes in blocked state (uninterruptable)
- memory and io
- swpd: swap size being used
- free: current free memory
- buff: buff vs cache??
- cache: cache for file contents
- si: memory swapped in (from disk)
- so: memory swapped out (to disk)
- bi: blocks/sec read from disk
- bo: blocks/sec written to disk
- system and cpu
- in: interrupts per sec
- cs: context switches per sec
- us: %CPU spent running user-space
- sy: %CPU spent running kernel-space
- id: %CPU spent idle
- wa: %CPU spent on WAiting for IO
- st: %CPU time spent stolen from vm
/proc/meminfo contains memory figures and statistics.
- SwapTotal, SwapFree, Dirty etc.
-
swap-inoccurs (swap area moves back to memory) when enough memory is freed or priority in swap becomes higher. -
To come out of the memory pressure, kernel overcommits memory (exceeds RAM + swap) by means of that many processes don't use all requested memory. Overcommission applies to user-space only. For kernel, pages are allocated at request time.
-
In case available memory is exhauseted, OOM-killer exterminates process(es) selected to free up memory. The hard part here is which process will be killed to keep the system alive. To avoid the whole system to crash, a victim process is selected to free up memory. Selection is based on the value
badnessthat is at /proc/{id}/oom_score`. -
Check
/proc/swapsto see if any swap partition or file is used. The file is blank in case no swap is used/disabled.
swapon/swappoff [devices...] # enable/disable devices for paging/swapping
In an I/O-bound system, the CPU is mostly idle waiting IO ops to complete such as disk or network ops.
A disk block is the smallest readable or writable unit that can be addressed in disk - an abstraction that comes through the filesystem. That means a file size cannot be smaller than filesystem block size, usually 4K.
$ iostat [delay] [count]
iostat is main utility for IO monitoring. It shows mainly RW transfer rates by disk partition including CPU utilization. The first report (row) is stats since the system boot.
By default, disk IO is expressed in number of blocks, the unit of work. Every read and write is done in multiple units of blocks. 1B = 512 bytes
- logical IO requests can be merged into one actual request
| field | desc |
|---|---|
| device | disk device [or partition] |
| tps | io transactions per second |
| kB_read/s | blocks/s read |
| kB_wrtn/s | blocks/s written |
| kB_read | total block read in kB |
| kB_wrtn | total block written in kB |
- -x option to include IO requests (actual + merged) and await times
| field | desc |
|---|---|
| rrqm/s | # of read requests merged per sec, queued to device |
| wrqm/s | # of write requests merged per sec, queued to device |
| r/s | actual # of read requests/s, to the device |
| w/s | actual # of write requests/s, to the device |
| rkB/s | KB read per sec |
| wkB/s | KB written per sec |
| avgrq-sz | average request size in 512 bytes per sector |
| avgqu-sz | average queue length??? |
| await | avg time elapsed in queue + servicing request |
| svctime | avg service time in ms for IO request |
| %util | %CPU time blocked |
-
displays current IO usage by process updated periodically as in top.
-
output columns
| field | desc |
|---|---|
| SWAPIN | time percentage process blocked waiting swap in |
| IO | time percentage process blocked waiting io |
| PRIO | io priority |
- Every process is associated with an IO classifier which defines the priority in the scheduling queue.
ioniceis to prioritize a process in io scheduling
ionice [-c class] [-n pri] [-p pid] [cmd args]
Apply io scheduling either for existing pid or by starting new process
| class | c value | desc |
|---|---|---|
| none | 0 | none |
| real-time | 1 | real time. Might starve other processes. |
| best effort 2 | default | |
| idle | 3 | served when there are no more requests |
real-time and best-effort take priority between 0-7 where 0 is highest priority.
-
VM and VFS submit IO requests and it's the job of IO scheduler to prioritize and order these requests before they are given to block devices.
-
IO scheduling (sometimes conflicting) requirements:
- Minimize HW access:
- requests ordered according to the physical location on disk: elevator scheme. SSDs don't require elevator scheme (rotational = 0)
- requests are merged to get as big a contiguous region as possible
- Write ops can be done in
pagecaches without blocking the process. however, read requests need satisfied immediately so reads are favored over writes for better parallelism.
- There are different IO scheduling strategies available. Different schedulers can be applied per device.
- Completely Fair Queueing (CFQ)
- Deadling scheduling
- noop
- IO scheduler strategy can be specified per device at kernel cmdline or at runtime.
- to see current strategy for
sda, check/sys/block/sda/queue/scheduler - to switch the io scheduler for
sdaecho noop > /sys/block/sda/queue/scheduler
- IO scheduling tunables are at
/sys/block/<device>/queue/iosched/directory. These parameters are based on the strategy and change from one strategy to another.
- In CFQ, each process have its own request queue. There is a global dispatcher queue that submits actual requests from process queues to the device. Dequeuing (from process queue to dispatcher) is done in round-robin style and FIFO order and then requests are sorted in the dispatcher by priority. Tunables are
- quantum: max len of dispatcher queue
- fifo_expire_async: expiry time of async request (buffered write) in queue. After it expires, it goes to dispatcher queue.
- back_seek_max: max distance for backwards seeking. repositioning the head backwards is bad performance.
- Deadline strategy is based on request deadline - expiry of each request that guarantees to be served. There are 2 queues for r and w ordered by starting block (elevator queue), another 2 ordered by submission time (expire queue) and one global dispatcher queue. Scheduler checks expired requests first and only then moves to the elevator queue. Tunables:
- read_expire: deadline for r request
- write_expire: deadline for w request
- write_starved: reads are preffered to writes. how many w requests can be starved?
- fifo_batch: # of requests to move from sorted list to dispatcher when deadlines expired.
- front_merges: related with contiguous requests?
Applications do not access the physical disk directly. Instead, application code access data contents by file names which is an abstraction by the filesystem.
Every file is associated with an inode. inode is a datastructures that holds following metadata about the file:
- permissions
- owner / owner group
- size
- timestamps (last accessed, modified, change)
To read a file content, you need to have inode number, first. File names are not stored in the file inodes but in the directory inode. Directory is a special file which holds a table that maps file names to inode ids. The name-inode mapping is called link.
ln [-s] target link-name # creates a link
- Hard link points to an inode. As a result, the same file can have multiple names mapped to the same inode.
- Soft link points to a filename
The entire filesystem tree doesn't need to be in one local disk partition. Some branches may be in another partition, network or removable media (usb etc.) Such branches are mounted to the filesystem tree.
Application code doesn't change when accessing files in different disk partitions which might be using different filesystems. VFS is an abstraction layer that provides transparent data access from the underlying filesystem. This permits Linux to work with many filesystems:
- Linux native fs: ext4
- Windows native fs: fat32, vfat, ntfs
- Pseudo-fs: /proc, /sys, /dev
- Network fs; ntfs
- xfs: default fs in RHEL
/proc/filesystemholds the filesystem list suppored by the kernel.pageis smallest unit of data for virtual memory and a fixed-length contiguous block.
Kernel employs them for certain tasks, not available to user space.
| Filesystem | Mount point | purpose |
|---|---|---|
| rootfs | none | |
| proc | /proc | |
| tmpfs | Anywhere | file storage in RAM |
| sysfs | /sys |
See disk usage on all mounted filesystems
df
See disk usage of filsystem where resides```
df <file>
Common disk types
- HDD
- USB
- SSD
Common drive (bus) types
- SATA
- SCSI
Device naming scheme /dev/sd{order}{partition}
/dev/sd\*is the entire disk device file which could be of type SCSI, SATA or USB. Following letter identifies the order,/dev/sdais the first device,/dev/sdbthe second etc. The number refers to partition number,/dev/sda2is the second partition on/dev/sda.
SSD device naming scheme is /dev/nvme{order}n{ns}p{part}. {order} represents order, /dev/nvme0n1 is the first entire disk device, /dev/nvm1n1 the second etc. {ns} is the namespace and {part} is the partition number, e.g. /dev/nvme0n1p1 represents device nvme0, with namespace 1 and partition 1.
A partition can be identified by device-node, a label or a UUID.
blkid prints block device attributes and requires root access.
blkid -k # list all known filesystems
lsblk lists block devices and mount points for each.
lsblk -f # list with filesystem type and uuid
Rotational disks consist of platters, each of which is read by heads as disk spins. Tracks are divided into sectors in 512 byte size. SSDs are not rotational and have no moving parts.
Disk is divided into contiguous groups of sectors called partitions. Partitioning promotes:
- separation of user space from system space.
- easier backups
- performance and security enhancement on certain parts
- swap can be isolated
A partition is associated with
- type: primary, extended or logical
- start: start sector
- end: end sector
- filesystem
The content of hardware disk starts disk metadata, e.g. partition tables.
MBR
- Dates back to early days of MSDOS. In some tools, aka, dos or msdos. Table is stored in the first 512 bytes of the disk. Up to 4 primary partitions of which one as an extended partition.
- Table has 4 entries and each 16 bytes size. Entry in the table contains active bit, file system code (xfs, ext4, swap etc.) and number of sectors.

GPT
- modern. disk starts with the GPT header (and also proactive MBR for backwards compatibility)
- Up to 128 partitions in the table and each 128 bytes of size.

- The partition table and filesystem comes with the vendor and it's possible to migrate it from MBR to GPT.
To backup MBR, copy MBR table
sudo dd if=/dev/sda of=mbrbackup bs=512 count=1
To restore MBR write it back to the disk
sudo dd if=mbrbackupk of=/dev/sda bs=512 count=1
To backup GPT, use sgdisk
sudo sgdisk --backup=sdabackup /dev/sda
Tools below at hardware device level. No filesystems need to be mounted ahead.
| tool | purpose |
|---|---|
| fdisk | most standard interactive tool, works for MBR and GPT |
| sfdisk | non-interactive fdisk for scripting |
| parted | GNU version, interactive tool, works for MBR and GPT |
| gdisk | guid partition table manipulator |
| sgdisk | script interface for gdisk |
fdisk -l # list all partitions
fdisk <device> # go to interactive mode for device
parted [options] [device [command]]
parted -l # list partition tables on all devices
parted /dev/sdb print # partition table for /dev/sdb
(parted) mktable gpt # create a partition table (destroys data)
(parted) mkpart primary 0 8000 # create part
-
/proc/partitions is what kernel is aware of partitions.
-
losetupto associate a file or block device with a loop device. A loop device is pseudo device which makes a file to be accessed as a block device. Certain commands likelsblkwork only with block devices.
Extended file attributes are metadata that filesystem does not handle directly. lsattr to list and chattr to change file attributes.
File flags:
- a: file is append-only
- i: immutable (no modification, renaming etc.)
- d: skip dump
- A: set access time only when mod-time changes
Formatting a filesystem means creating a filesystem on a partition. mkfs utility exists for this. Formatting a filesystem deletes existing content!
mkfs -t [fs] [devnode]
is equivalent to mkfs.ext4 [devnode]
mkfs.ext4 options are not the same with those of mkfs.msdos. Check fs-specific options with
mkfs.ext4 --help
Check and fix filesystem error with fsck. It should only run on unmounted systems.
sudo fsck -t [fs] [device-file]
equivalent to sudo fsck.ext4 [device-file]
journaling filesystems are much faster to check than older systems because not the whole filesystem needs to be checked only last failed transactions.
In Linux, all files are accessible from the root tree /. A filesystem needs to be attached to the root / before it can be accessed. Be the filesystem in a remote device, USB etc. Mounting is always related with the filesystem rather then the disk device itself directly.
mount [target] [mount-point] and umount [mount-point] to unmount. Mount point directory needs to exist before. Non-empty directories can be used as mount points.
[target] can be a device-node, a partition label/UUID or filesystem label/UUID. device-node can change at boot time (based on which device picked up first) and labels do not force unique names. UUIDs are reliable because they are unique and consistent. Filesystem UUIDs are generated when creating (format) a filesystem.
mount UUID=<fs-uuid> /mount-point
mount LABEL=<fs-label> /mount-point
mount PARTUUID=<part-uuid> /mount-point
mount PARTLABEL=<part-label> /mount-point
-t option for filesystem, is optional mount can detect a filesystem.
List all mounted filesystems
mount -l
unmount [devicel-file | mount-point]
If any terminal is open or any process is working in the mountpoint, unmount will fail with target is busy error.
Mount remote filesystem with same mount command and work locally. The most common remote type is Network File System (NFS).
sudo mount -t nfs example.com:/home/karakays /mount
mount -a is used to mount all filesystems specified in /etc/fstab. Filesystems are mount as in their order in fstab. It contains space-separated values and also describes who may mount with what permissions. During boot time, mount -a is executed.
<device, uuid, label> <mount-point> <type> <options in csv> <fsck pass or not>
You can let filesystems mount automatically at the moment they are accessed. systemd has built-in support for that using /etc/fstab file. This saves you extra mount commands.
\# sample entry in /etc/fstab
LABEL=yubikey /mount ext4 noauto,x-systemd.automount,x-systemd.device-timeout=10,x-systemd.idle-timeout=30
noauto to disable auto mounting at boot. x-systemd.automount indicates systemd automount facility used. idle-timeout lets filesystem umount automaticaly after it stays idle timeout.
-
Most memory is used to cache file contents to prevent going to the disk more than necessary. Such pages are never swapped out. dirty pages (file content in memory != of in disk) are flushed out to disk.
-
Memory use by Linux kernel never swapped out!
mkswap device [size] to set up a swap are in a device or file given.
swapon [device/file...] to enable swapping on device given.
swapoff [device/file...] to disable swapping on device given.
Disk quotas control maximum space particular users can have on the disk. Quotas are based per filesystem basis. There are limits on number of blocks and inodes. These limits are expressed as soft and hard limits. Hard limits can never be exceeded. Soft limits can be exceeded for a grace period.
- To create a quota, filesystem must be mounted with
usrquotaorgrpquotaoptions.
sudo mount -o usrquota /dev/sda1
quotacheckgenerates quota accounting files initially. This is stored in root of quoted filesystem i.e.aquota.user,aquota.group. Such files must exist for quota operations.
sudo quotacheck -v /media/usb
quotacheck is also used to update quota file.
- Turn on quotas
sudo quotaon -v /media/usb
- Set up quotas per user or group
sudo edquota <user>
In the quota editor, only soft and hard limits can be edited, other fields are informational only.
To change grace period,
sudo edquota -t
- To query quota information of current user, type
quota
disk free lists all filesystems mounted, mountpoints and available space on each.
disk usage shows disk usage recursively starting from cwd. -s option to display a total for each argument without being recursive, -c to display grand total.
ext4 is default filesystem on most Linux distributions. Many enhancements achieved over ext2/3 such as, maximum filesystem size, maximum number of subdirectoeis, block allocation optimizations, faster fsck, more reliable journaling etc. Another improvement is using extents for large files. ext3 used to hold a list of individual block pointers that a file allocates. That didn't scale well for large files, for a 1GB file, it needs 256K pointers (in 4K blocks). In ext4 instead, a group of contiguous blocks are used which are called extents.
-
Block size is selected when filesystem is formatted, 512, 1024, 2048 or 4096 bytes. A block must fit into a memory page and because of that you cannot have 8K block in 4K pages.
-
inode reservationis used to improve performance where a certain number of inodes are alocated ahead when directory is created.
The first 1024 bytes in the partition is reserved for boot sector. After that, there is a series of block groups each in the same size. A block group is a group of disk blocks that have the same size. The layout of a ext4 block groups is as

Redundant superblock and group descriptors are written to some of the block groups for fault tolerance. However, not every block group has a redudant copy - those begin with data block bitmap. Kernel uses first superblock (primary) and references other back superblock copies only during fsck until a healthy one is found.
block and inode bitmaps contain 0s and 1s to indicate whether block/inode is free/used in the respective block group. Each block bitmap and inode bitmap must fit into one disk block (4K).
inode table?
superblock contains global metadata about the filesystem itself.
- filesystem health status and details on
fsck. Checked during OS boot and if not cleanly unmounted,fsckis run before it gets mounted. - mount details like mount count (reset in every
fsck) max mount count, mount date etc.- if max mount count is reached, filesystem is forced to be
fscked.
- if max mount count is reached, filesystem is forced to be
- filesystem block size (set with
mkfs) - disk blocks per group
- free block count
- free inode count
- OS id etc.
To print ext4 superblock details, use dumpe2fs.
dumpe2fs <device>
tune2fs to tune ext filesystem parameters like
- maximum mount count before
fsckcalled - time interval interval
fsckchecks - etc.
To see all parameters and its values that can be updated, call
tune2fs -l <dev-node>
As new files get written and some deleted over the time, gaps are created in the disk. Sometimes, a new file doesn't quite fit in a gap so it needs to be split into parts and written into multiple areas in the disk. Reading a fragmented file is slow. Defragmentation tools enable to look for such files and restore them in contiguous blocks for faster reads.
Next generation filesystems with roboust capabilities challenge the dominance of ext4 in Enterprise Linux distributions.
-
Some of the features include handling of filesystems up to 16EB, of invidual files up to 8EB, Direct Memory Access IO, IO rate guarantee etc.
-
As opposed to
ext4, most of the maintenance tasks can be done online (while fs mounted): defragmentation, resize, dumping
-
Intended to address lack of some features like efficiency via COW technique, snapshots, pooling, checksums in
ext4. It's the default fs in OpenSUSE. -
Revert to earlier snapshopts of the filesystem.
LUKS is a disk encryption method at the block-device level. Linux Unified Key Setup is the standard method in Linux that provides this facility. LUKS is installed on top of cryptsetup utility.
cryptsetup command is to manage LUKS encrypted partitions.
cryptsetup [options...] <action> <action args>
-
luksFormataction initializes LUKS partition. It sets the symmetric key.sudo cryptosetup luksFormat /dev/sda2 -
luksOpencreates a device mapper whose name is provided as action argument.luksOpenasks for the secret before creating device mapper. The device mapper is located at/dev/mapper/name.sudo cryptosetup luksOpen /dev/sda2 my-luks-dev -
Use the device as if it were unencrypted partition. Format filesystem first and mount
sudo mkfs.ext4 /dev/mapper/my-luks-devsudo mount /dev/mapper/my-luks-dev /media/karakays/usb1
NAME             FSTYPE      LABEL  UUID                                 MOUNTPOINT
sda
├─sda1           crypto_LUKS        42a2b0ea-19f8-47a9-af1e-930464c7ed2d
│ └─my-luks-dev ext4               3cc849f2-984c-48cc-93e6-806a1d9f83da /media/karakays/usb1
└─sda2           ext4               a2fcd826-29de-435e-98af-696e1f707b03
-
When done, unmount it and remove the mapping with
luksClose.sudo umount /dev/mapper/my-luks-devsudo cryptsetup luksClose /dev/mapper/my-luks-dev
To mount an encrypted partition at boot time, add a normal entry to /etc/fstab. /etc/fstab is not aware that device is encrypted.
/dev/mapper/my-luks-dev /media/karakays/usb1 ext4 defaults 0 0
Add entry to /etc/crypttab to specify mapping. target is mapped device name, source is actual block device which can be device file, uuid or label. If key-file is omitted, secret will be asked from the console.
my-luks-dev /dev/sda1 luks-secret-file
Swap partitions can be encrypted, too.
Logical Volume Management enables to create a filesystem that spans out into multiple disk partitions. Physical layer is abstracted by the LVM. This is done through grouping physical partitions together from one or more devices into a big volume group. This volume pool is subdivided into logical volumes of which each mimics a physical disk partition to the system. A filesystem is placed in a logical volume and ultimately, volume gets mounted to be accessible.
Advantages: * Room for parallelization improvements with data striping (spreading out a filesystem to more than one disk, i.e. a logical volume spread to more one disk) * Logical volumes can be easily resized even if it already contains a filesystem.
.png)
-
pvcreate: Convert a partition to physical volume. Refer to a physical partitition directly.pvcreate /dev/sda7 /dev/sdb3 -
pvdisplay: List physical volumes -
pvmove: Moves data from one physical volume to the other -
pvremove: Removes physical volume from a partition
-
vgcreate: Create volume group. Refer to a physical volumes to include. Creates /dev/myvg device file.vgcreate myvg /dev/sda7 /dev/sdb3 -
vgextend: Add physical volumes into a VG.vgextend <vg> <pv1>... -
vgreduce: Remove physical volumes from a VG.vgremove <vg> <pv1>...
A logical volume is always bound to a volume group.
-
lvcreate: Creates a logical volume in the specified volume group. A device node is created under volume group/dev/myvg/mylv01.lvcreate -L 50G -n mylv01 myvgmkfs.ext4 /dev/myvg/mylv01 -
lvdisplay: list logical volumes
- Create physical volumes from partitions, 1-to-1 mapping
- Create a volume group by including physical volumes
- Extend volume group with extra physical volumes if need be
- Create logical volumes within the group. Specify the size in bytes or number of extents (size unit in a volume group, by default 4MB). That means a logical volume do not reference any physical partition or disk, which, I suppose, explains how a logical volume can be spread into multiple physical partitions.
- Format a logical volume via mkfs
- Mount the logical volume
Resizing can be done even if lv contains a filesystem. In this case, however, filesystem needs to resized separately.
lvextendlvreduceresize2fslvresize
To expand a lv, volume, first, needs expanded, then the filesystem.
lvextend -L +500M /dev/vg/mylvm
resize2fs /dev/vg/mylvm
To shrink a volume, first shrink the filesystem then the volume.
resize2fs /dev/vg/mylvm 200M
lvreduce -L -200MB /dev/vg/mylvm
-r option in lvresize command does this automatically by resizing both the volume and filesystem. -L option to set absolute size or use [+|-] to set relative size changes.
lvresize -r -L 20 GB /dev/VG/mylvm
A snapshot of an existing logical volume is useful for backup, app testing or deployin VMs etc.
- When original lv changes, original data blocks are copied to the snapshot??
- But if data is added to the snapshot, it's only stored there
RAID (Redundant Array of Independant Disks) is clustering of physical disks to promote data integrity and recoverability. Disk IO activity is spread into the cluster. Data striping provides parallel writes that increases performance.
RAID can be implemented either in software or in hardware. Linux kernel supports software RAID. mdadm is the tool to create and manage software RAID devices.
On the other hand, hardware RAID is transparent to OS.
RAID provides:
- mirroring - duplicate data for availability
- striping - splitting filesystems to more than one disk to increase performance
- parity - fault tolerant with extra data for error recovery
Raid levels increas by complexity.
- RAID 0: striping only
- RAID 1: mirroring only
- RAID 5: striping and fault-tolerant up to 1 disk loss. Requires at least 3 disks.
- RAID 6: striping and fault-tolerant with dual parity up to 2 disk loss. Requires at least 4 disks.
- RAID10: mirroring and strping.
Create a software raid device
mdadm --create /dev/md0 --level=1 --raid-disks=2 /dev/sdb1 /dev/sdc1
A hot spare is used as a failover mechanism. It is active in the cluster and is switched into operation when a disk fails. A hot spare can be created when creating RAID array or later on via the mdadm.
Linux is the kernel and includes libraries and applications that interact with the system. It manages system resources such as CPU, memory and disk. Kernel makes other periphereal devices available through device drivers.
kernel command line is the command to get the kernel started and found in /boot/grub/grub.cfg. Any options not understood are are passed to init. Available options can be found in man bootparam.
linux /boot/vmlinuz-4-19.0 root=<uuid> ro quiet
- root = root filesystem, can be
device nodeor UUID - ro = mount root read-only
- quiet = less verbose logging
- LANG = system language
Parameters are passed as key=value format. Kernel options are separated by spaces. There are two types of kernel parameters
- boot (start-up) parameters
- set during boot by editing
kernel cmdlinethroughGRUB
- set during boot by editing
- runtime parameters
- set via
sysctl
- set via
sysctl is to tune kernel and also system parameters at runtime. Parameters are in key = value format. To list runtime parameters
sysctl -a
kernel.pid_max=111
net.ipv4.forward=1
net/ipv4.icmp_echo_ignore_all=0
vm.swapiness=30
...
To print a single kernel parameter
sysctl kernel.pid_max
Each key corresponds to a pseudofile under /proc/sys/key and its file content corresponds to parameter value, e.g. kernel.pid_max value can be found in file /proc/sys/kernel/pid_max.
To set a parameter, either write to corresponding file or
sudo sysctl net.ipv4.forward=1
/etc/sysctl.conf contains parameters that are applied during boot. To make current runtime parameters permanent, add it to sysctl.conf. To apply the current configuration set without a reboot
sudo sysctl -p
Linux retains monolithic architecture. Kernel modules are facilities that can be loaded or unloaded at runtime. Modules are mostly device drivers but also could be a custom network protocol (tcp, ip, iptables) or a filesystem (ext4, vfat) etc. It's responsibility of the distribution to include driver modules for every device model, filesystems etc.
Once a module is loaded, it becomes a fully funcitonal native part of the monolithic kernel, with few restrictions. Modules might depend on each other and can be used by one or more processes at a time.
Modules have *.ko file extension and can be found in /lib/modules/<kernel-version>/. Modules are built with a specific kernel version. A modules can also be used by one or more other modules.
List loaded modules also displaying # of processes using the module and its dependants,
lsmod
Load or unload a modules with dependency management for both load and unload.
modprob <module>
modprob -r <module>
Load a module straight,
insmod <module>
Unload a module straight. It's not possible to unload if the module is used by another module or by a process.
rmmod <module>
Generate or update module dependency db,
depmod
Display module details such as version, module dependencies, supported hardwares, what parameters can be supploed during loading etc.
modinfo <modulename>
Modules can be loaded specifying parameters
modprobe e1000e debug=2 copybreak=256
/etc/modprobe.d/ contains default parameters applied when loading a module with modprob.
udev is used by the system to discover hardware and peripheral devices (when they are plugged-in) during boot or runtime. Based on the discovery, device nodes (/dev/*) are created.
Character and block devices have filesystem entries associated with them which are called device nodes. As an example, a block disk device has a file in /dev/sda. Programs read and write over device nodes through system calls open(), read(), write() to communicate with the hardware.There is an exception. Network devices do not have device nodes.

Major and minor numbers are used to identify the device driver that a device node is using. It's a POSIX standard. While a major number identifies device driver, minor number represents different device of the same type. They appear in ls output where file size would show for normal files. Below, 8, 0 is the major/minor versions.
$ ll /dev/sda
brw-rw---- 1 root 8, 0 Aug  6 20:46 /dev/sda
Managing all device nodes in /dev had become difficult as Linux evolved. Distributions had to create all kinds of device nodes by default (most of them were not used at all) because they can never be sure which hw would be present on system. This resulted around 20k device nodes and subdirectories during kernel version 2.4 series.
udev is to generate device nodes dynamically. u stands for user indicating device node operations done in user space.
udev runs as a daemon and monitors netlink socket for device events. If a device is plugged-in or removed, uevent sends a message and udev takes appropriate action like
- device node naming
- device node creation
- file permissions
- initialize and make device available
Upon kernel boot, /dev/ directory is empty. initramfs image contains preliminary devices nodes such as integrated disk drives, memory, etc. Initial device nodes are created based on this.
Main configuration file is /etc/udev/udev.conf. It contains details such as where to create device nodes, default permissions, ownership etc. Rules are located in /lib/udev/rules.d (global) and /etc/udev/rules.d/ (local) with higher precedence. All *.rules are collectively sorted and processed in lexical order.
A rule file can have multiple rule statements in lines. A rule statement is made of key-value pairs. There are two types of keys
- Match keys
- Assignment keys
<match>==<value> [, ...] <assignment>=<value> [, ...]
Rule gets applied if all match keys match against their values. If no rule is matched, default device attributes are used.
SUBSYSTEM=="usb", ATTR={idVendor}=="0781", SYMLINK+="myusb", MODE="0666"
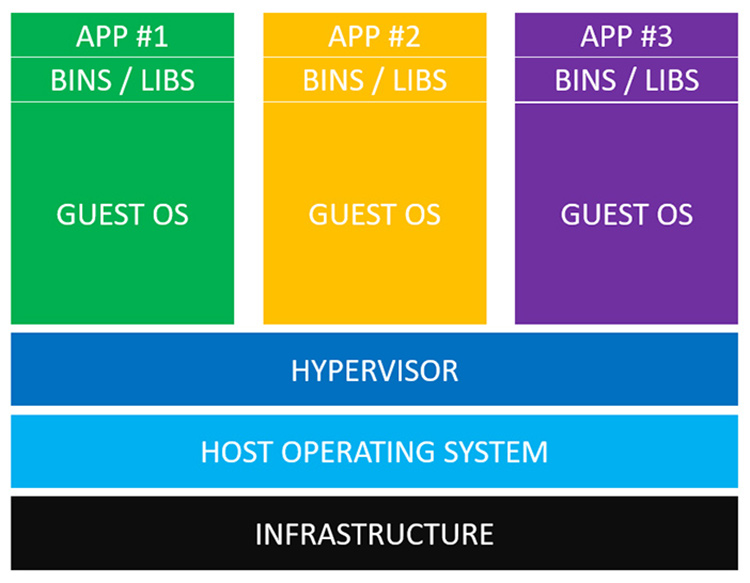
Virtualization is about replacement of physical resource by an abstraction layer. In terms of virtualizing an entire OS, it's a virtual machine (VM) running under a hypervisor. A VM is a virtualized instance of an entire OS to create an isolated environment.
- Efficient use of hardware
- Software isolation
- Isolated development environment
- Run multiple OS without rebooting
Other types of virtualization
- Network - Software Defined Networking.
- Storage - Network Attached Storage.
- Application - Container
Host is the physical OS managing one or more VMs. Guest is the VM that is an instance of a complete OS.
Emulator is an application running in an OS that appears to another OS or application as a specific hardware. It's a software that replaces hardware constructs, it simulates the behaviour of a HW.
Hypervisor is responsible for initiating, managing and terminating guests. A VM is a self-container computer packed into a single file. But something needs to run that file. It sits between the physical hardware and VM to virtualize the hardware.
- Hardware virtualization (full virtualization): Guest is not aware it's running in a virtual environment. It requires CPUs with virtualization support.
- Para-virtualization: Guest is aware it's running in a virtualized environment and is modified to work with it. There is no full-fledged hardware virtualization.
- type i - bare-metal (native): It runs directly on the hardware, no host OS inbetween. As a result, VMs can access hardware directly so better performance. Examples: VMware vSphere, kvm, Microsoft Hyper-V

- type ii - hosted hypervisor: It runs on the host OS as a process. VM have no direct accesss to hardware, it goes through host system which lowers VM performance. Examples: Oracle VirtualBox, VMware Workstation

libvirt is the library that provides management of virtual machines, virtual networks, virtual storage. Tools such as
virt-manager, virt-viewer, virt-install, virsh` use this library.
Quick EMulator is hypervisor also capable of CPU emulation of different archictectures. QEMU can be used together with third party hypervisor to boost performance.
KVM is a kernel module which works as a hypervisor, linux turned into hypervisor. It's of type i with full-virtualization capabilities.

A container narrows the scope of virtualization and is at the OS-level virtualization. Instead of virtualizing the entire OS, application runtime environment is abstracted.
A container sits on top of physical server and the host OS. Multiple containers share the same host OS.
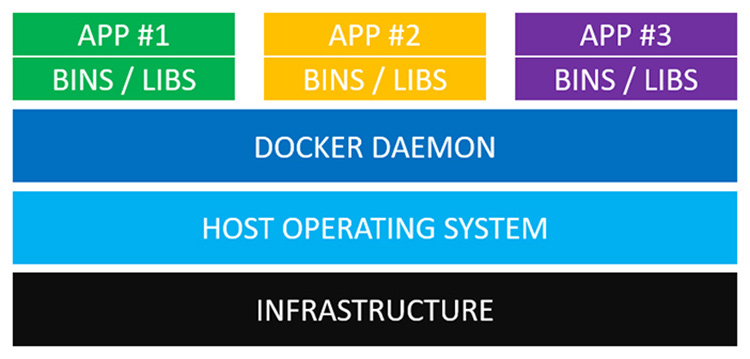
- VM is a virtual copy of both OS and hardware. It takes up a lot of resources.
- It takes VM minutes to start up.
- Containers are lightweight because no virtualization is needed as it runs directly on the host OS.
- It takes container seconds to start up.
- Containers are portable.
- VM can run many services and applications. Container runs one application only.
Docker daemon (engine) replaces hypervisor. It ensures each container is isolated from each other and the host OS.
base image, bins, libs and application code are contained altogether in the docker image, all bundled together. Dockerfile tells Docker how to build the image. A container is created and started with running a docker image
You can create a Docker image in two ways
docker run -it <base-image> # manually interactive shell into base imagedocker run <image> # build an image from Dockerfile
# create container from image `ubuntu`
# checks local repository for image named `ubuntu` if not exists
# check central repository
docker run --name my-container -it ubuntu:latest bash
# pulls ubuntu:latest from docker hub, starts a docker container and shell login into it
# install some packages with package managers or manually here
exit
# docker container stopped at this point
# turn container into an image with versioning
docker commit -m "my-container-init" -a "Selcuk" my-container karakays/my-container:latest
Dockerfile is a declarative way of for creating a Docker image.
# Dockerfile
FROM ubuntu:latest
RUN apt-get update
# make some installations
EXPOSE 6379
ENTRYPOINT  ["app.sh"]
Run a container from an image
docker build -t my-image <path>
# start a container from Dockerfile in <path>
# -d to detach (let container run in bg)
# -p to publish port to the hostj
docker run -d -p 8888:6379 <my-image>
/etc/passwd is the local user directory. Users are defined in /etc/passwd and each account has its own entry in /etc/passwd that holds basic user attributes like
- username, uid, gid
- home, default shell
karakays:x:1000:1000:Selcuk Karakayali,,,:/home/karakays:/bin/bash
Password field contains hashed password. If this field is blank, no password is required to login for the user. It's left with x if passwords are managed with /etc/shadow (default). Any other value is treated as encryped password.
/etc/passwd has 644 permissions that means anyone can read it. This is because system programs and user apps need to read the information in that file. On the other hand, /etc/shadow has 400 permissions. /etc/shadow is preferred way to keep passwords as it prevents anyone to read hashed passwords.
/etc/shadow contains one entry line for each user and contains password-related attributes with colon separated fields
acme:$6$WWFDxsbs$7tFoaoCdErof8VyvHF9vO9kMAIeHk9FTc790VDZpUevYTh4/hcA/IvX.YGkZJU/Qm0:18100:0:99999:7:::
- username
- hashed password:
$6$followed by 8 chars salt, followed by$and sha512'ed password
!means password is invalid and user cannot login with password (default behavior for newly created users)!<digest>means password is locked
- lastchange of passwd
- minimum and maximum passwd age
- password warning and inactivity period
- account expiration date - default=empty, no expiry
- reserved
When a new user is created, by default, its password is invalid nd cannot login with password. This is indicated with x in passwd and ! in the shadow file.
passwd is to change a password for a user interactively. root can change any password. To change dexter's passowrd,
sudo passwd dexter
chpasswd is to update password non-interactively.
echo 'dexter:P@ssw0rd' | sudo chpasswd
chage is used to edit password aging attributes in shadow.
chage [options] LOGIN
-d LAST_DAY is then the password was last changed in number of days since epoch. 0 days means user needs to change password immediately in next successful login. After user changes password, LAST_DAY is set back to normal date.
-E expiredate is to lock the account on date yyyy-mm-dd. User cannot login if account expired.
chage -l LOGIN # show account aging information
Create new user account for username dexter
sudo useradd dexter
whereas with following defaults for new user from /etc/default/useradd -
- next available uid assigned to dexter. By convention, any account id less than
1000is considered special and is a system account. - a group
dextercreated where gid=uid and assigned as primary group - home directory is not created
/bin/shset as default shell/etc/skelcontents copied to home as default dotfiles
Any attribute can be overridden with options to the useradd command.
sudo useradd -m -c 'Dexter Dog' -s /bin/bash dexter
System-wide login configurations are hold in /etc/login.defs.
Remove a user and all its references in /etc/shadow, /etc/passwd, /etc/group etc.
sudo userdel dexter
/home/dexter is kept by default.
Edit user attributes with using the options to usermod command. To lock the user password
sudo usermod -L dexter
or
sudo passwd -l dexter
This is achieved by prepending a ! in password hash. Unlocking removes the !.
A locked password prevents a user to authenticate with that password, however, user can authenticate by other means, e.g. ssh keys etc. Locking an account eliminates to authenticate and use that account in any way,
Unlocking is done with -U or -u option, respectively.
System accounts are created with -r option in useradd command. Properties
- system accounts should never login provided with
- shell set
/usr/sbin/nologin. even if a valid/correct password is entered, this shell prevents login - they have invalid password by default
- shell set
- no aging information
- uid's in a different range
System account should only be able to run programs. Default shell should be set to /sbin/nologin or /usr/sbin/nologin which prevents account to login. User is prompted with This account is currently is not available. message if it attempts to login.
sudo useradd -r -s /usr/sbin/nologin tomcat
A restriced shell is a tightly controlled shell. It can be invoked with r option.
bash -r
It prevents a user to
- cd directories
- changing certain env variables
- specify an absolute path in any command
- io redirecting
A restricted account is set to use restricted shell /bin/rbash in /etc/passwd whereas /bin/rbash is a symlink to /bin/bash. This is a workaround as flags may not be specified in /etc/passwd.
root account should only be used when absolutely necessary and never be used as a regular account. sudo makes an audit trail of any root access. It should be prohibited to login directly to root account.
Configurations
| file | purpose |
|---|---|
| id_rsa.pub | default public key |
| id_rsa | default private ky |
| authorized_keys | list of identities who can login in this host |
| known_hosts | trusted hosts (public keys) |
| config | ssh client config |
ssh-keygen is to generate identity keys.
VNC (virtual network computing) is to login remotely with full graphical desktop. tigervnc is an implementation.
Groups are defined in /etc/group. It contains group name, group password, gid and comma-separated list of users.
groupname:passwd:GID:user1,user2,...
Group identifiers between 0 and 99 are reserved for system groups. Values between 100 and GID_MIN are for special. A user is not listed in the members if this is its primary group.
Groups are managed with following tools. They basically modify /etc/groups
- groupadd
- groupdel
- groupmod
To modify groups of dexter, use the following
usermod -G staff,group1,group2 dexter
To set user's primary group when creating a new user
useradd -g primary-group dexter
A user private group, UPG, is a group where
- GID = UID, group name = user name
- UPG is set as the user's primary group
By default, useradd creates a UPG for the new user.
Every user has one primary group, however it also belong from 0 to 15 secondary groups. To list the groups dexter belongs to
groups dexter
Any request to kernel to access a file requires authorization - whether calling user has file permission for that action. File permissions are checked in the following order
- owner
- if not owner, check group
- otherwise, others
Multiple permissions can be specified separated with comma
chmod ug+w,o+r somefile
Setting permissions with octal digits require to set whole permissions. In contrast to this, symbolic form lets you specify only what's needs to be changed, not more.
How permissions work for a directory?
rbit needed to access directoryxbit needed to list directory contents. otherwise, each content item shown with?marks. solelyxmeans nothing because you neeed access directory first.rxbits neded to properly list the directory - first access and then listwxbits neded to create a file in the directory
Set or get file creation mask.
Default permissions at kernel level for newly files are
- 0666 for file
- 0777 for directories
umask is a global permission mask that is applied to newly created files and directories. That means, actual permissions are made up by combining these defaults with the umask value. More precisely, umask's XORed value is ANDed with default permissions = 0666 & ~022 = 0664
To get current umask value,
$ umask
0002
or to get it in symbolic form
$ umask -S
u=rwx,g=rwx,o=rx
to set the umask,
umask 0022
Filesystem permissions can be controlled in a more fine-grained way with ACL than simple users, groups. Major filesystems support ACL extensions and to enable it, one can use the acl option when mounting. To see ACLs of a file
getfacl file
To give read and write permission to dexter via ACLs
setfacl -m u:dexter:rw file
To remove ACLs for rocky on file
setfacl -x u:rocky file
Pluggable Authentication Modules provides authentication policies in a uniformed and modular way for various applications. Historically, applications such as ssh, su, login did authentication management independently of each other.
PAM configuration files are found in /etc/pam.d. Each file corresponds to a service that relies on PAM for authentication, e.g.
- sshd
- sudo
- su
- login
- passwd
A PAM-aware application invokes libpam which in turn checks these configuration files to apply rules and invokes PAM modules.
PAM configuration is made up of rules each in a single line -
<type> <control> <module-path module-args>
PAM modules are libraries with *.so extension located in the /lib/security. They are stacked together and build up the authentication process. Modules are executed in the order and the result of each module (either success or failure) affects overall authentication.
Specifies the module interface to be used
| type | desc |
|---|---|
auth |
Instructs the user to authenticate |
account |
Checks users account attributes such as if account has expired or authn allowed at that time |
password |
Used for updating authn mechanisms |
session |
functions before and after session is established |
Controls how success of failure of current module in the stacks affects overall process
| control | desc |
|---|---|
required |
Module must pass but on failure it doesn't fail immediately and other modules in stack continue |
requisite |
same as required but failes immediately on failure and control is returned to application |
optional |
module optional, result only matters it's the only module in the stack |
sufficient |
if module succeeds, control returned immediately to application with success |
Path of the PAM module to invoke and with its arguments.
PAM can be configured to work with an LDAP server. LDAP provides a centralized identity directory over the network.
-
IPv4 is of 4 bytes where IPv6 is of 16 bytes.
-
A IPv4 address consists of a network portion and a host portion. Bother together identifies a host's network and address in the network.
netmaskis used to determine how much of the address belongs to network portion and host portion.- unicast: associated with a specific host
- network: host portion is set to 0, e.g. x.x.x.0
- broadcast: host portion is set to 1, e.g. x.x.x.1
- multicast: only nodes that are appropriately configured will listen to a multicast.
Reserved addresses:
- 0.0.0.0 denotes unknown address of the host. DHCP uses this address when communicating to server.
IPv4 address classes:
| class | most significant octet range | network portion in bits | netmask |
|---|---|---|---|
| A | 1-127 | 8 | x.0.0.0 |
| B | 128-191 | 16 | x.x.0.0 |
| C | 192-223 | 24 | x.x.x.0 |
| D | 224-239 | na - multicast only | na |
| E | 240-254 | na - reserved | na |
network address = unicast & netmask
-
In DNS, hostnames are appended with a dot and domain name to qualify FQDN, e.g. debian.karakays.com
-
hostname is kept at
/etc/hostname.hostnamecommand displays it. To change it,
hostname foo
This change is not permanent. For a permanent change, edit /etc/hostname and reboot. Or to save a reboot, use hostnamectl.
Network devices, also known as network interfaces, are not associated with a device file, they are known by names as
- eth0, eth1 for ethernet devices
- wlan0, wlan1, wlp3s0, wlp3s1 for wireless devices
ip is a multiplex used to configure, control and query network devices or interface parameters. It's preferred tool over the deprecated ifconfig.
ip [options] object <command> where object can be
| object | function |
|---|---|
| address | IPv4 or v6 address |
| link | manage network devices |
| maddress | manage multicast addresses |
| route | routing table entries |
| rule | rule in routing policy database |
| monitor | watch for netlink messages |
ip addr show wlp3s0 # show address of interface
ip addr add x.x.x.x dev eth0 # add address to device eth0
ip link show eth0 # list network devices
ip link set eth0 down # bring eth0 down
ip route show default # print default route
ip route get 1.1.1.1 # get route entry for dest. address
ip route add x.x.x.x via y.y.y.y # add route
Traditional network device naming scheme is unpredictable. One network device name can be assigned to another device in the next boot. To solve that, Predictable Network Interface Device Names is introduced which incorportes udev and systemd.
- Firmware or BIOS provided index numbers, e.g. eno1
- Firmware or BIOS provided PCI Express hotplug slot index numbers, e.g. ens1
- Physical/geographical location of hw connection, e.g. enp2s0
- MAC address, e.g. enx7837d1ea46da
- old classic method, e.g. eth0
Network configurations applied by ip or ifconfig tools are non-persistent, in other words, this configuration is lost after reboot. To make it persistent, network interface configuration files, NIC, need to be used whose path and format depends on distro
- RedHat: /etc/sysconfig/network
- Debian: /etc/network/interfaces
- SUSE: /etc/sysconfig/network
Network Manager is a systemd service that manages network configurations which change across distributions. It generates the ultimate NIC file and saves manual editing of NIC files. It is also used to list wireless networks in range, enter network passwords, turn devices on/off etc. It comes in several client interfaces.
- GUI offered by Desktop Environment, e.g. gnome-network-manager
nmtui: text user interface (on terminal) for network manager.nmcli: CLI for network manager.
nmtui and nmcli are distro-independent and abstract differences in NICs. Any changes applied with these tools are permanent!
nmcli device wifi list # list wifi networks in range
nmcli device wifi connect <ssid> # connect to network
nmcli connection show # list connection profiles
nmcli connection show <name> # show details of connection with name
Add a new permanent address to existing connection and acticate it. The same network interface will have now 2 addresses.
nmcli con modify <name> +ipv4.addreses 192.168.1.10
nmcli con up <name>
Add a new permanent route.
nmcli con modify karakays +ipv4.routes 2.2.0.0/16
For every TCP/IP packet being transmitted, sometimes network interfaces cannot transmit packets directly to the destination and need to forward to intermediate routers. Kernel's routing table is here to help find the next stop of a packet. This is done by comparing routing entries in the table with the final destination address of the packet. Packet is forwarded to the gateway address of the routing entry found, Some routing entries might not have a gateway which is indicated with the absence of G flag. To see current routing table
$ ip route show
A typical routing entry contains
| Column | Desc |
|---|---|
| destination | target network or host address |
| gateway | Route packets via gateway. Indicated with G flag. |
| genmask | destination network mask. must be set if target is network address. |
| iface | network device to send datagram through |
| flag | e.g. U for up, G for network has gateway |
| metric | priority in case multiple matches are found |
Default route chosen in case destination address doesn't match any entry in the routing table. It has 0.0.0.0 in the desintation.
It can be obtained dynamically using DHCP or configured manually via nmcli or editing NIC. To set it in the NIC file, gateway keywork is used in the configuration. Static routing entries can be added to the table via ip command. By default, local network address is setup as a static route so that peer to peer requests can be made in the LAN without involving the default gateway.
To add a route for target network -n ,
route add -n <nw-ip> netmask <mask> metric 10 dev eth0
route command doesn't make persistent changes. One must edit NIC file to persist route entries.
-
/etc/hostsis the place for static name resolutions, a local host database. If a name resolution cannot be done here, a DNS resolver gets queried whose addresses are at/etc/resolv.conf. NetworkManager can edit this file invoking DHCP on the primary network interface. -
/etc/hosts.allowand/etc/hosts.denycontain access control rules for TCP wrappers. A rule is related to clients (based on ip or domain name) can access what service (sshd, ftpd, etc.) on the system.
traceroute traces the path of a request along its way to the final destination. It shows how router packets flow.
mtr combines ping and traceroute commands. It constantly sends requests and continuously updates trace display like top.
Firewalls are based on packet filtering for both incoming and outgoing network traffic. It applies a set of rules to each packet and consequently, a packet is accepted, rejected, altered or redirected etc.
Network services with standard ports are listed in /etc/services. Well-known ports for TCP and UDP are shown.
Common firewalls are
iptablescomplex tool to configure firewall rules.ufw(uncomplicated firewall) is a front-end foriptablesto assist and comes with Ubuntu.firewall-cmdis front-end forfirewalldto assist.
firewalld is the modern firewall service and replaces iptables.
A zone defines a level of trust and a known profile applied for incoming/outgoing traffic. Each network interface belongs to a zone. Rules can be applied in runtime or in a permanent way. Some of the zones are
- drop; incoming dropped without a reply. only outgoing permitted.
- block: incoming rejected
- public: don't trust any host, only selected connections allowed. default zone on all interfaces.
- external
- dmz: some services are allowed to be used publicly. particular incoming allowed.
- work
- home
- internal
- trusted: all connections allowed
Zones can be assigned in three different ways
- to a network interface
- to a source network address
- to a service and port
To assign a network interface to a zone, permanently
firewall-cmd --permanent --zone=internal --change-interface=en01
Assign a zone to a source network address. Any packets coming from this source - where source address equals is associated with the zone.
To assign a network (all hosts in the network) to a zone, permanently
firewall-cmd --permanent --zone=trusted --add-source=192.168.1.0/24
Assign a zone to system service (http, dhcp, ftp, dns, mysql etc.)
firewall-cmd --permanent --zone=home --add-service=dhcp
Assign a zone to a listening port
firewall-cmd --permanent --zone=home --add-port=21/tcp
Basic steps for a boot sequence are:
- Machine's boot firmware loads and looks up for bootloaders. UEFI compatible bootloaders are located in
/boot/efi/*.efi.- provided by computer vendor
- initial hardware checks
- Bootloader is executed with configuration from
/boot/grub/grub.cfg.- Bootloader uses hardware firmware to access the disk directly because kernel is not loaded yet
- Bootloader loads kernel image from
/boot/vmlinuz-versionspecified withrootoption into memory and runs it. Kernel path is specified in/boot/efi/grub.cfg. - Kernel does hardware checks, get access to peripheral devices, mounts
rootand startsinitprocess. initsets the rest of the system in motion.
- can boot multiple OS
- has commandline interface
- network-based diskless booting
- most popular for embedded systems
Default configuration for services can be found in /etc/default
/etc/default/useradd/etc/default/grub- etc.
Q: Can be overridden somewhere?
shutdown is used to bring the system down gracefully and optionally sending a wall message to all logged-in users. Shutdown modes are
- halt: put it in sleep mode and leaves it powered on
- poweroff: power-off the machine
- reboot
shutdown -h +15 # shutdown in 15 mins
shutdown -r now # reboot now
reboot, halt and poweroff commands are legacy.
GRUB is usually installed in a separate partition like /boot/grub. It cannot installed in the root partition because GRUB runs before the kernel gets executed so root filesystem is not mounted yet.
If GRUB is not installed during system installation or to install it later in /dev/sda, use
sudo grub-install /dev/sda
Features
- Lists multiple OS to boot including Microsoft etc.
- Lists multiple kernel versions and
initrdto boot - Change boot parameters by entering into interactive GRUB shell by pressing
eto edit. GRUB has its own shell. Changes here apply for current boot and are not permanent
initrd or initial ramdisk is a temporary root filesystem used to detect hardware detection, module loading and device discovery at boot time. This is a mandatory step before the real root file system can be mounted. GRUB loads both initrd and kernel into memory, then starts the kernel passing the memory address of initrd.
initrd image is found in /boot directory just as where the kernel image resides.
GRUB configuration contains kernel boot parameters and is found in /boot/grub/grub.cfg. It is auto-generated by update-grub command. It's based on /etc/default/grub and /etc/grub.d. Any update on these files requires running update-grub.
You see that kernel command line and its boot parameters are specified in GRUB_CMDLINE_LINUX and it is just one part of the whole GRUB configuration. There are many others like GRUB_TIMEOUT, GRUB_TERMINAL, GRUB_INIT_TUNE and some others which come from /etc/grub.d/
/sbin/init or just init is the first process in the user-space with PID=1. It's also the last one until system shuts down. It's considered as the parent of all user processes (except those started by kernel)
lrwxrwxrwx 1 root 20 Oct 28 2018 /sbin/init -> /lib/systemd/systemd
Traditionally, all distributions are based on UNIX's SystemV to manage init. SysV manages the boot process sequentially which results with poor start-up performance.
Modern systems use upstart or systemd which enables parallel system startup. init is the general name (like it's interface and there are multiple implementations)
upstartdeveloped by Ubuntu in version 6.10.systemddeveloped later on and is now the standard.
- compatible with
SysV- you can still use
sysvinitcommands because it's backwards compatible - runlevels are supported via runlevel targets.
- you can still use
systemduses*.servicefiles instead of shell scripts- keeps track of processes using cgroups
Main utility to manage services.
systemctl [options] command [name]
systemctl # list active units
systemctl status <unit>
systemctl start <unit> # activate unit
systemctl stop <unit> # inactivate
systemctl restart <unit> # restart
systemctl reload <unit> # reload after configuration change
systemctl enable <unit> # enables a unit, doesn’t activate it,
systemctl disable <unit> # disables and removes symlinks
systemctl cat <unit> # cat unit-file of <unit>
systemctl edit <unit> # edit unit-file of <unit>
SysV runlevels denote different system states as SysV is running.
| runlevel | Desc |
|---|---|
| 0 | shutdown system |
| 1 | single user mode |
| 2 | multi-user mode, no NFS, only text login |
| 3 | multi-user mode, with NFS and network, only text login |
| 4 | not used |
| 5 | multi-user mode, with NFS and network, graphical login |
| 6 | reboot system |
You can change current run level with telinit.
telinit 5
To get the current runlevel, run where N is the previous level meaning unknown.
runlevel
N 5
runlevel can be set in kernel command line, too and system goes into this runlevel after boot. For example, to go into single user mode, just append 1 to the end of kernel commandline.
Historically, /etc/inittab file is used to tell SysV which scripts to run to bring the system to a runlevel. The format is
id:runlevel(s):action:process
upstart-based distributions have only the default runlevel in this file. The default level is usually 5.
id:5:initdefault
systemd-based recent distributions do not use this file at all.
Traditional method is to run /etc/rc.sysinit script which performs initial functions. Next, rc script is run with the desired runlevel as argument. This causes the system to go to /etc/rc[0-6].d directory and run all scripts there to reach specified runlevel.
All service scripts are located in /etc/init.d. To create a new SysV service, its script needs to be put in /etc/init.d directory. Scripts from runlevel directories link back to /etc/init.d.
- Startup script links start with
Sin the name wheresa kill script links withK. - The number following the script type letter determines execution order.
$ ll /etc/rc5.d/
lrwxrwxrwx 1 root S01ssh -> ../init.d/ssh
lrwxrwxrwx 1 root S01rsync -> ../init.d/rsync
lrwxrwxrwx 1 root S01lightdm -> ../init.d/lightdm
...
/etc/rc.local contains custom startup scripts that is run after a multiuser runlevel scripts has completed.
Used to check if a system is running, to start/stop a service during boot (enable/disable) etc.
Used to manage services, start, stop, status, reload etc. It's systemctl equivalent in systemd.
upstart is event-driven. Events are sent to init process to tell it to execute certain commands. initctl is systemctl equivalent in systemd.


