A progressive Node.js framework for building efficient and scalable server-side applications.


Basic CRUD operation program to write posts.
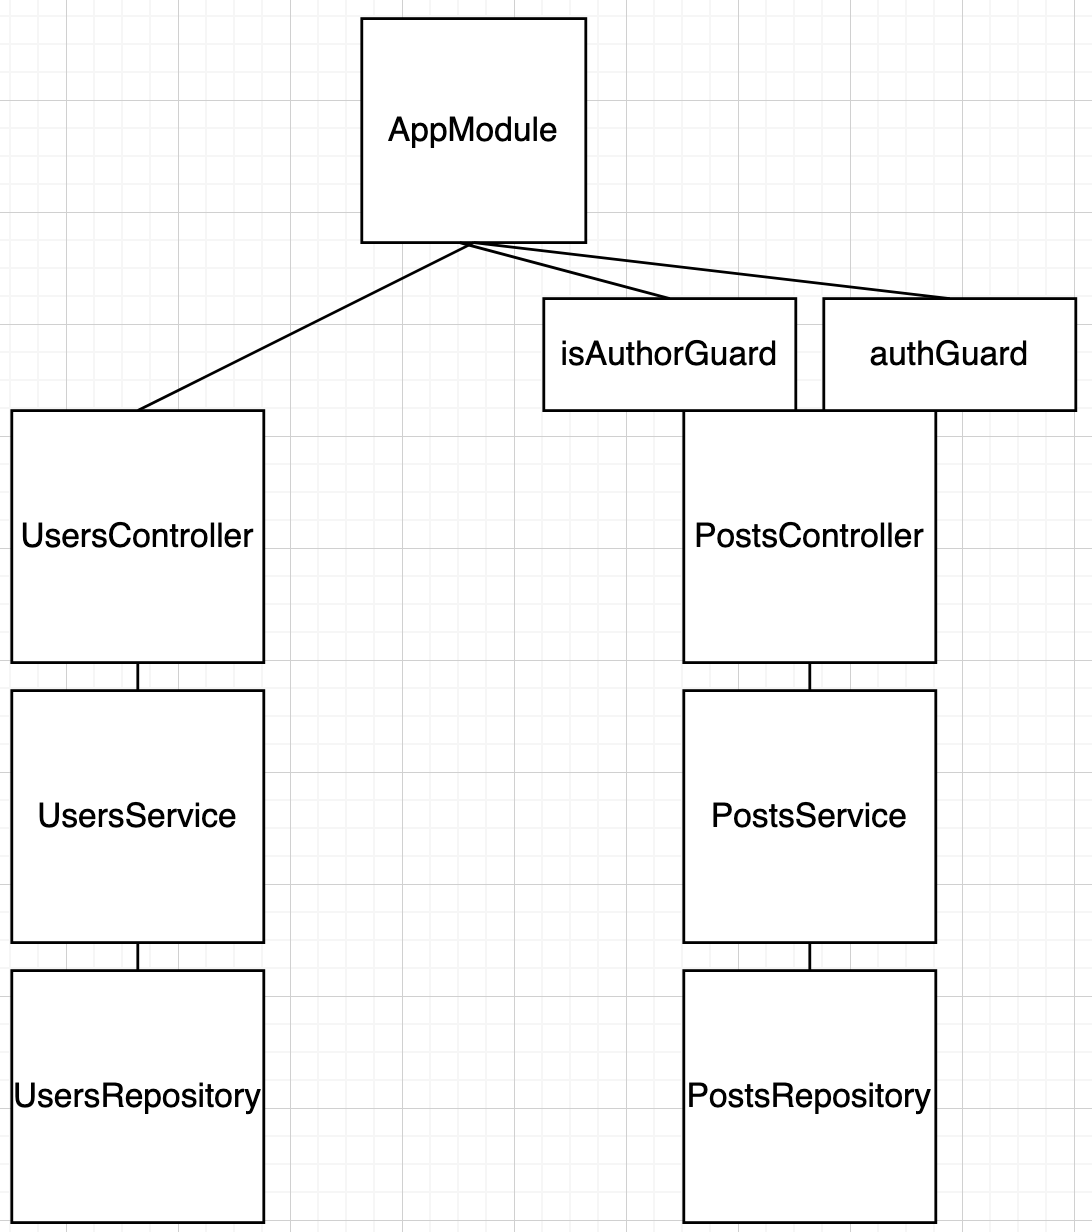
I followed the architecture provided by Nestjs out-of-the-box. I have two main modules: Users and Posts. For each module there is a controller, service, and repository (the repository is automatically generated by TypeOrm). To give a brief overview of how this architecture works, all the HTTP requests first go to the controller then the relevant business logic that is stored in the service is executed. All access to the database is in the repository. See the diagram below for extra reference.
I created CRUD operations for the Posts module using the architecture mentioned above but I did not do so for the Users module. I created signin, signout, and signup functionalities for the Users module (I understand that signin, signout, etc. methods are usually in a separate authentication module but did not find it necessary for this project).
I used a cookie session to implement authentication. This means that when a user signs in the program passes in a user id into the session which then allows the user to write, update, etc. relevant posts.
The password was hashed before storing in the database to prevent anyone from accessing it.
Instead of simply hashing the password I combined it with a salt(random string) because even though the password is hashed malevolent hackers may be able to guess the password by brute forcing different passwords (rainbow attack). By hashing the password with a salt it makes it significantly more difficult to find the password.
In order to read, create, update, or delete any post, you have to be signed in. I implemented this using a Nestjs Guard which returns a session userId if the user is signed in.
If authentication deals with whether a user is signed in or not, authorization deals with whether a user is authorized to execute some action. For example, there are actions only "admin" level users can do. In this project only the user that is the author of a post can update or delete it. This, I also implemented using a Nestjs Guard called "isAuthorGuard" that returns a boolean depending on whether the post's author id is the same as the currently signed in user's id. If false, the user is not authorized to udpate or delete the post.
- Back-End :


- ETC :


To make it easier to test the APIs I implemented Swagger. After installing this project, access http://localhost:3000/api/ to go the site seen in the picture below. Directions for installation is provided below.

POST users/signin
Request
{
  "email": "[email protected]",
  "password":"test"
}
Response
Success
{
  "id": 1,
  "email": "[email protected]",
}
Error
{
  "statusCode": 404,
  "message": "user not found",
  "error": "Not Found"
}
POST users/signout
POST users/signup
Request
{
  "email": "[email protected]",
  "password":"test1"
}
Response
Success
{
  "email": "[email protected]",
  "id": 1
}
Error
{
  "statusCode": 400,
  "message": "Email in use",
  "error": "Bad Request"
}
Check to see who is currently signed in
GET users/whoami
POST posts
Request { "post": "test1" }
Response
Success
{
  "post": "test3",
  "date": "2021-10-26T22:56:19.257Z",
  "user": {
    "id": 1,
    "email": "[email protected]",
  },
  "author": 1,
  "id": 4
}
Error
{
  "statusCode": 403,
  "message": "Forbidden resource",
  "error": "Forbidden"
}
GET posts/{id}
Response
Success
{
  "id": postId,
  "post": "postContent",
  "date": "DatePosted",
  "author": authorId
}
Error
{
  "statusCode": 404,
  "message": "Post not found",
  "error": "Not Found"
}
GET posts?limit={number}&offset={number}
Response
Success
{
  "posts": [
    {PostEntity},
    {PostEntity}
  ],
  "count": "countNumber"
}
Error
{
  "statusCode": 403,
  "message": "Forbidden resource",
  "error": "Forbidden"
}
PATCH posts/{id}
Request
{
    "post": "updateTest1"
}
Response
Success
{
  "id": postId,
  "post": "updatedPostContent",
  "date": "datePostFirstCreated",
  "author": authorId
}
Error
{
  "statusCode": 403,
  "message": "Forbidden resource",
  "error": "Forbidden"
}
DELETE posts/{id}
Error
{
  "statusCode": 403,
  "message": "Forbidden resource",
  "error": "Forbidden"
}
$ npm install# development
$ npm run start
# watch mode
$ npm run start:dev
# production mode
$ npm run start:prod