- Set up your local environment for deploying with Render
- Deploy a basic Rails application to Render
In this lesson, we'll be deploying a basic, standalone Rails API application to Render. We'll give instructions to generate the application from scratch and talk through the steps to get the code running on a Render server.
In coming lessons, we'll learn how to add more complexity to the application with a React frontend. Since the setup for a Rails-React application is a bit trickier, it'll be beneficial to see the setup for Rails alone first. Let's get started!
To make sure you're able to deploy your application, you'll need to do the following:
You can sign up for a free account at https://dashboard.render.com/register. We recommend that you sign up using GitHub as that will make it a little easier for you to connect Render to your GitHub account. The instructions below assume you've done that.
Once you've completed the signup process, you will be taken to the Render dashboard:

In order to connect Render to your GitHub account, you'll need to click the "New Web Service" button in the "Web Services" box. On the next page, you will see a GitHub heading on the right side and below that a link labeled "Configure account". (If you didn't sign up using GitHub, it will say "Connect account" instead.)
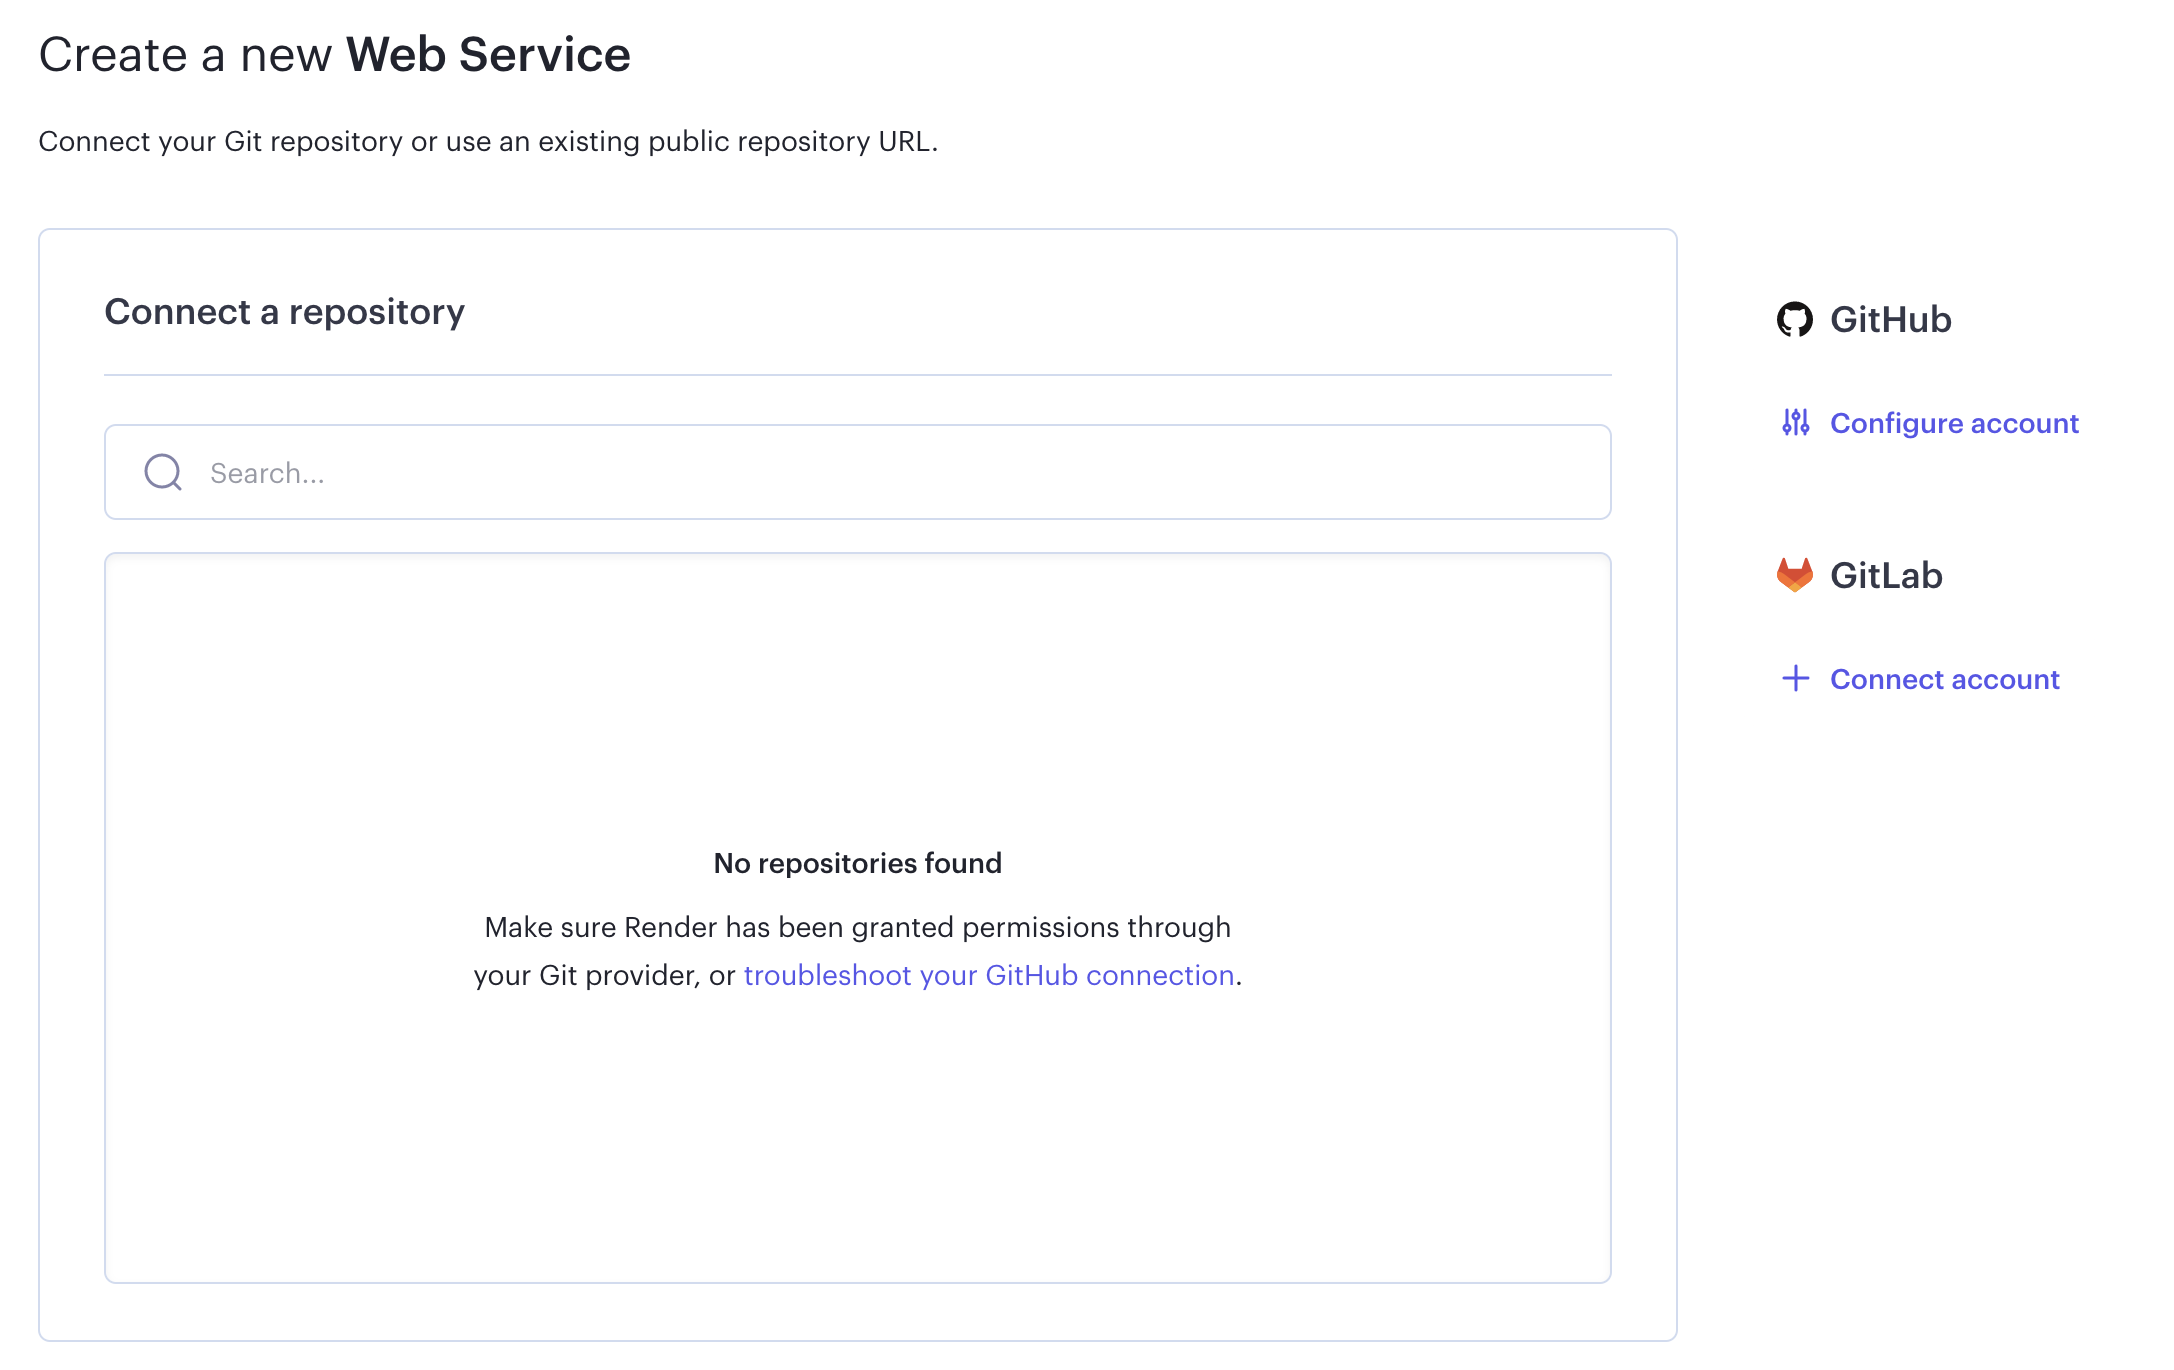
Click that link; a modal will appear asking you for permission to install Render on your GitHub account:

Click "Install." You should then be taken back to the "Create a New Web Service" page, which should now show a list of your GitHub repos. We won't actually create a web service just yet so you are free to navigate away from the page at this point.
Verify which version of Ruby you're running by entering this in the terminal:
$ ruby -vWe recommend version 2.7.4. If you need to upgrade you can install it using rvm:
$ rvm install 2.7.4 --defaultYou should also install the latest versions of bundler and rails:
$ gem install bundler
$ gem install railsRender requires that you use PostgreSQL for your database instead of SQLite. PostgreSQL (or just Postgres for short) is an advanced database management system with more features than SQLite. If you don't already have it installed, you'll need to set it up.
To install Postgres for WSL, run the following commands from your Ubuntu terminal:
$ sudo apt update
$ sudo apt install postgresql postgresql-contrib libpq-dev
Then confirm that Postgres was installed successfully:
$ psql --versionRun this command to start the Postgres service:
$ sudo service postgresql startFinally, you'll also need to create a database user so that you are able to connect to the database from Rails. First, check what your operating system username is:
$ whoamiIf your username is "ian", for example, you'd need to create a Postgres user with that same name. To do so, run this command to open the Postgres CLI:
$ sudo -u postgres -iFrom the Postgres CLI, run this command (replacing "ian" with your username):
$ createuser -sr ianThen enter control + d or type logout to exit.
This guide has more info on setting up Postgres on WSL if you get stuck.
To install Postgres for OSX, you can use Homebrew:
$ brew install postgresqlOnce Postgres has been installed, run this command to start the Postgres service:
$ brew services start postgresqlPhew! With that out of the way, let's get started on building our Rails application and deploying it to Render.
We'll be following the steps in the Getting Started with Ruby on Rails on Render guide, so if you get stuck and are looking for more assistance, check that guide first.
The first thing we'll need to do is create our new Rails application. Make sure you're in a non-lab directory, then run:
$ rails new bird-app --api --minimal --database=postgresqlThis will set up our app to run in API mode, with the minimum dependencies needed, and with PostgreSQL as the database.
Next, we'll need to configure our Gemfile.lock file to support the same OS as
Render, which runs Ubuntu. This way, regardless of what OS you're using in
development, bundler will be able to install the same gems on Render using any
Ubuntu-specific gem dependencies.
cd into the app's directory, and run this command:
$ bundle lock --add-platform x86_64-linuxThis will add additional platforms to your Gemfile.lock file that will allow
the necessary dependencies to be installed after you deploy your app.
Next, let's set up up a migration, model, route, and controller so we have some data to display in our application:
$ rails g resource Bird name speciesAdd this data to the db/seeds.rb file:
Bird.create!(name: 'Black-Capped Chickadee', species: 'Poecile Atricapillus')
Bird.create!(name: 'Grackle', species: 'Quiscalus Quiscula')
Bird.create!(name: 'Common Starling', species: 'Sturnus Vulgaris')
Bird.create!(name: 'Mourning Dove', species: 'Zenaida Macroura')
Then run this command to generate the database and run the migrations and seed file:
$ rails db:create db:migrate db:seed
rails db:createcreates a new PostgreSQL database to be associated with your application based on the configuration in theconfig/database.ymlfile. Unlike with SQLite, the actual database file isn't created in thedbfolder; it lives elsewhere in your file system, depending on your PostgreSQL configuration. If you have problems with this step, see the Troubleshooting section below.
Next, edit the app/birds_controller.rb file and add an index action:
  # GET /birds
  def index
    birds = Bird.all
    render json: birds
  end
Finally, open config/routes.rb, un-comment out the root path definition and
update it to:
root "birds#index"To make sure the app works locally before deploying, run rails s. If you visit
either http://localhost:3000 or
http://localhost:3000/birds, you should see the
JSON for the list of birds.
Before we can deploy our app, we need to make a few modifications.
First, open the config/database.yml file, scroll down to the production
section, and update the code to the following:
production:
  <<: *default
  url: <%= ENV['DATABASE_URL'] %>
Next, open config/puma.rb and find the section shown below. Here, you will
un-comment out two lines of code and make one small edit:
# Specifies the number of `workers` to boot in clustered mode.
# Workers are forked web server processes. If using threads and workers together
# the concurrency of the application would be max `threads` * `workers`.
# Workers do not work on JRuby or Windows (both of which do not support
# processes).
#
workers ENV.fetch("WEB_CONCURRENCY") { 4 } ### CHANGE: Un-comment out this line; update the value to 4

# Use the `preload_app!` method when specifying a `workers` number.
# This directive tells Puma to first boot the application and load code
# before forking the application. This takes advantage of Copy On Write
# process behavior so workers use less memory.
#
preload_app! ### CHANGE: Un-comment out this line
Next, open the config/environments/production.rb file and find the following
line:
config.public_file_server.enabled = ENV["RAILS_SERVE_STATIC_FILES"].present?Update it to the following:
config.public_file_server.enabled = ENV['RAILS_SERVE_STATIC_FILES'].present? || ENV['RENDER'].present?Finally, inside the bin folder create a birds-build.sh script and copy the
following into it:
#!/usr/bin/env bash
# exit on error
set -o errexit

bundle install
# bundle exec rake assets:precompile # These lines are commented out because we have an API only app
# bundle exec rake assets:clean
bundle exec rake db:migrate
bundle exec rake db:seed
Our API-only app doesn't include any assets, so we've commented out the lines to precompile and clean them.
Then run the following command in the terminal to update the permissions on the script and make sure it's executable:
chmod a+x bin/birds-build.shThere will be no output from this command, but if you run ls -l bin, you
should see the three x's in the permissions string, indicating that the file is
executable:
-rwxr-xr-x 1 <username> staff 253 Oct 23 07:44 birds-build.shIn order to deploy our app to Render, we first need to create a remote repo and push our code up. Start by making a commit to save your local changes:
$ git add .
$ git commit -m 'Initial commit'
Then, on the repository list page of your GitHub account, click the green "New"
button in the upper right corner. (Alternatively, you can navigate to
https://github.com/new). In the form that opens, enter
a name for your repo (bird-app makes sense) and make sure "Public" is
selected; leave everything else as is. Click the "Create repository" button at
the bottom of the page.
On the next page, copy the code in the "push an existing repository from the command line" section and run it in your terminal:
git remote add origin [email protected]:<your-github-name>/bird-app.git
git branch -M main
git push -u origin main
When you refresh the GitHub page, you should see that your code has been pushed up.
One limitation of Render is that it only allows one PostgreSQL instance to be created per user account. With this instance, we can create an app, give it some seed data, and deploy it, storing the data in the PostgreSQL instance's database. But then what happens if you want to deploy additional apps to Render? You can probably see how using a single database for multiple apps could get complicated very quickly and potentially cause problems. Fortunately, Render allows users to create multiple databases within a single PostgreSQL instance so you can have a separate database for each app you deploy.
Let's start by creating the PostgreSQL instance.
Go to the Render dashboard, click the "New +" button and select
"PostgreSQL". Enter a name for your database. This can be whatever you like —
we're using my_database.
For "PostgreSQL Version", first you need to check which version you have on your
local machine. Run psql --version anywhere in your terminal. The output should
look something like this, but with your version instead:
$ psql --version
psql (PostgreSQL) 15.x
Then, back in Render, select the version you have from the dropdown.

Scroll to the bottom of the page and click "Create Database". Leave the database page open — you'll need to copy information from it as we proceed.
Next, let's create a database specifically for our bird app. We'll do this using
the PostgreSQL interactive terminal, psql.
The command to launch the interactive terminal is provided in the Render
database page. Scroll down to the "Connections" section and copy the PSQL
command. Paste it into your terminal and press enter. This command connects you
to the remote database. You should now see the psql command prompt,
my_database=>, and if you run the \l command to list the databases, you'll
see a table that includes my_database.
To create the database for our bird app, we'll run the CREATE DATABASE SQL
command. Again, you can name your database whatever you like; we're using
bird_app_db. Be sure to include the semi-colon at the end of the command:
CREATE DATABASE bird_app_db;Now if you run the \l command again, you should see that bird_app_db has
been added to the list of databases.
You can now exit psql using the \q command.
Note: The Render database page will not show the information about the
bird_app_dbdatabase; it will only show the name you assigned when you created the PostgreSQL instance on Render (my_database). To see any other databases you have on your PostgreSQL instance, you'll need to usepsql. For now, be sure to make a note of your new database's name as we'll need to use it in the next step.
Open a new browser tab and navigate back to the Render dashboard. Click the "New +" button and select "Web Service". You'll see a list of all the repositories in your GitHub account. Find the repo you just created for the bird app and click the "Select" button.
In the page that opens, enter a name for your app and make sure the Environment is set to Ruby:

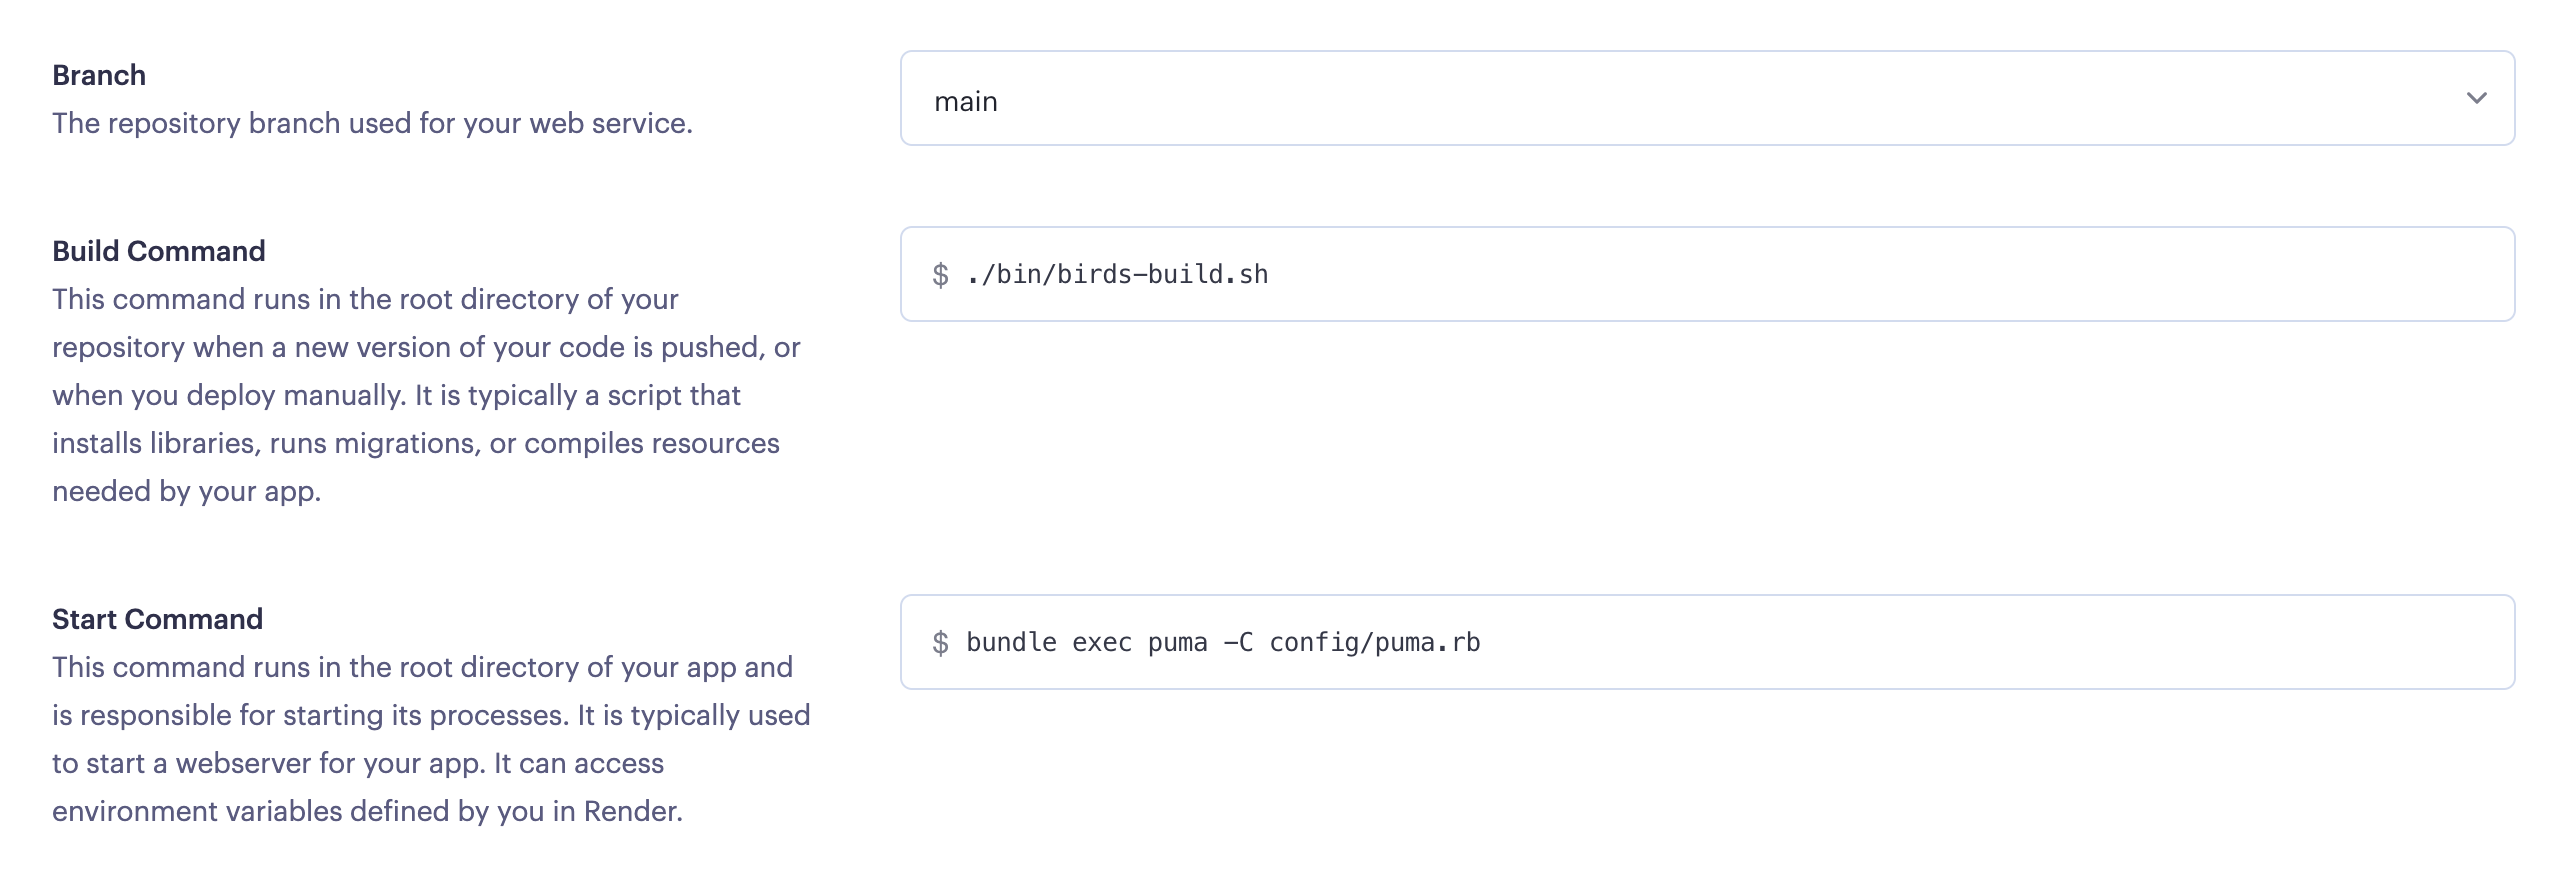
Scroll down and set the Build Command to ./bin/birds-build.sh and the Start
Command to bundle exec puma -C config/puma.rb:
Next, scroll down and click the "Advanced" button, then click "Add Environment
Variable." Enter DATABASE_URL as the key, then navigate back to the tab you
left open with your database information. Click the "Connect" button in the
upper right corner, copy the Internal Database URL, and paste it into the value
box. You will see a long URL that ends with my_database. You'll need to remove
the my_database and replace it with bird_app_db (or whatever you named it).
It should look something like this:
postgres://my_database_user:#################################################/bird_app_dbClick "Add Environment Variable" again. Add RAILS_MASTER_KEY as the key. The
value is in the config/master.key file in your app's files. Copy the value and
paste it in.

Scroll down to the bottom of the page and click "Create Web Service". The deploy process will begin automatically. Warning: this process can take a while! You might want to go for a walk or get a snack.
When the deploy process is complete, you should see something like this in the log:

Click on your app's URL in the upper left corner of the screen (just below the name of the app). Once the page has loaded (which may take a few moments), you should see the JSON for the list of birds. If you get a "Page not found" error, wait a few minutes and refresh the page.
Since Render integrates the deploying process with GitHub, it's straightforward
to add new features to your code and deploy them. Let's start by adding a new
controller action in the BirdsController:
def show
  bird = Bird.find(params[:id])
  render json: bird
rescue ActiveRecord::RecordNotFound
  render json: "Bird not found", status: :not_found
end
Test your code locally by running rails s and visiting
http://localhost:3000/birds/1.
Next, we'll commit and push our changes and deploy the app. Before we do that,
however, we need to modify the build script, bin/birds-build.sh. The reason
for this is the script currently contains the db:seed command. If we keep that
command in the script, it will re-seed the data every time we push up a change,
resulting in duplicate records. Go ahead and open the script and delete (or
comment out) the last line.
Now we can go ahead and make a commit and push it to GitHub:
$ git add .
$ git commit -m 'Add show action'
$ git push
After pushing the new code, start the deploy process by returning to the app's page on Render, clicking the "Manual Deploy" button in the upper right corner and selecting "Deploy latest commit." You will now see the deploy based on the new commit in progress:

Once the deploy is complete, refresh the page and verify that the show action is working. Remember that it may take a few minutes for the new content to become available.
If you ran into any errors along the way, here are some things you can try to troubleshoot:
-
If you're on a Mac and got a server connection error when you tried to run
rails db:create, one option for solving this problem for Mac users is to install the Postgres app. To do this, first uninstallpostgresqlby runningbrew remove postgresql. Next, download the app from the Postgres downloads page and install it. Launch the app and click "Initialize" to create a new server. You should now be able to runrails db:create. -
If you're using WSL and got the following error running
rails db:create:PG::ConnectionBad: FATAL: role "yourusername" does not exist
The issue is that you did not create a role in Postgres for the default user account. Check this video for one possible fix.
-
If your app failed to deploy at the build stage, make sure your local environment is set up correctly by following the steps at the beginning of this lesson. Check that you have the latest versions of Ruby and Bundler, and ensure that PostgreSQL was installed successfully.
-
If you deployed successfully, but you ran into issues when you visited the site, make sure you migrated and seeded the database. Also, make sure that your application works locally and try to debug any issues on your local machine before re-deploying. You can also check the deployment log on the app's page in the Render dashboard.
According to Render's documentation on its Free Web Services:
Web Services on the free plan are automatically spun down after 15 minutes of inactivity. When a new request for a free service comes in, Render spins it up again so it can process the request.
This can cause a response delay of up to 30 seconds for the first request that comes in after a period of inactivity.
This means that, when you try to navigate to your app in the browser, it might take a while to load.
With Render's free tier, databases expire after 90 days. This means that, before the end of the 90 days, you will need to back up your databases, delete the PostgreSQL instance from Render, create a new PostgreSQL instance, and populate it from the database backups. Render should send an email warning you that your database will be expiring soon.
We will go over the process for backing up and recreating your database — along with some other tips for using databases with Render — in the next lesson.
Congrats on deploying your first Rails app to the world wide web! Understanding the deployment process and what it takes to run your application on another computer is an important step toward becoming a full-stack developer.
We've covered a lot of material in this lesson, but the good news is that the process will be simpler moving forward now that you have the environment set up and have created your PostgreSQL instance on Render. We will also provide a template later in this section for a Rails/React app that is already configured for Render (although you are always free to set it up yourself if you prefer).
With these things in place, the process of deploying consists of two steps: 1) creating the database, and 2) creating the web service.
To review, the process is:
- On the page for your PostgreSQL instance, scroll down to the "Connections" section and copy the PSQL command.
- Run the command in the terminal.
- At the PSQL prompt, run the command to create the database:
CREATE DATABASE <db_name>;. - Run
\qto exit PSQL. - In Render, click the "New+" button and select "Web Service".
- Enter a name for your app and set the Environment to Ruby.
- Set the Build Command to
./bin/<name-of-build-script>.sh. - Set the Start Command to
bundle exec puma -C config/puma.rb. - Click the "Advanced" button then "Add Environment Variable".
- Enter
DATABASE_URLin the first box. - Open a new tab and navigate to the database page. Click the "Connect" button in the upper right corner, copy the Internal Database URL, and paste it into the value box. Don't forget to replace the PostgreSQL instance name at the end of the URL with the name of the database you created in step 3.
- Click the "Advanced" button again, then "Add Environment Variable", and
enter
RAILS_MASTER_KEYin the first box. - Navigate to the
config/master.keyfile in your app's files, copy the value in that file, and paste it into the second box. - Scroll down to the bottom of the page and click "Create Web Service". The deploy process will begin automatically.
Once the app is deployed, adding new features is simply a matter of pushing the changes up to GitHub and re-starting the deploy process. To do that, return to the app's page on Render, click the "Manual Deploy" button in the upper right corner and select "Deploy latest commit."
Before you move on, make sure you can answer the following questions:
- When creating a new Rails app from the terminal, what additional flag do you need to use to be able to deploy it on Render?
- What familiar process is used for deploying code to Render?


