For images of the game and build process please refer to our PDF presentation. N.B.: Due to hardware issues we're a bit late with uploading a demo here. Be sure to check back later this month (february) to experience amazing WOOBLI in action!
Woobli is a one dimensional arcade game, operated by a joystick that is a spiral. The playing field is an LED strip (one dimensional array). The player starts at one end of the array and needs to move to the opposite exit. The player is operated by a joystick and can walk forwards and backwards, speed and direction determined by the tilt of the joystick. On the way she will encounter obstacles such as lava and water, and also enemies. To survive an encounter with an enemy, the player needs to attack it by wobbling the joystick-spiral really fast. When a certain threshold is reached the player will go into attack mode, become larger and kill all enemies in reach.
- Arduino Mega
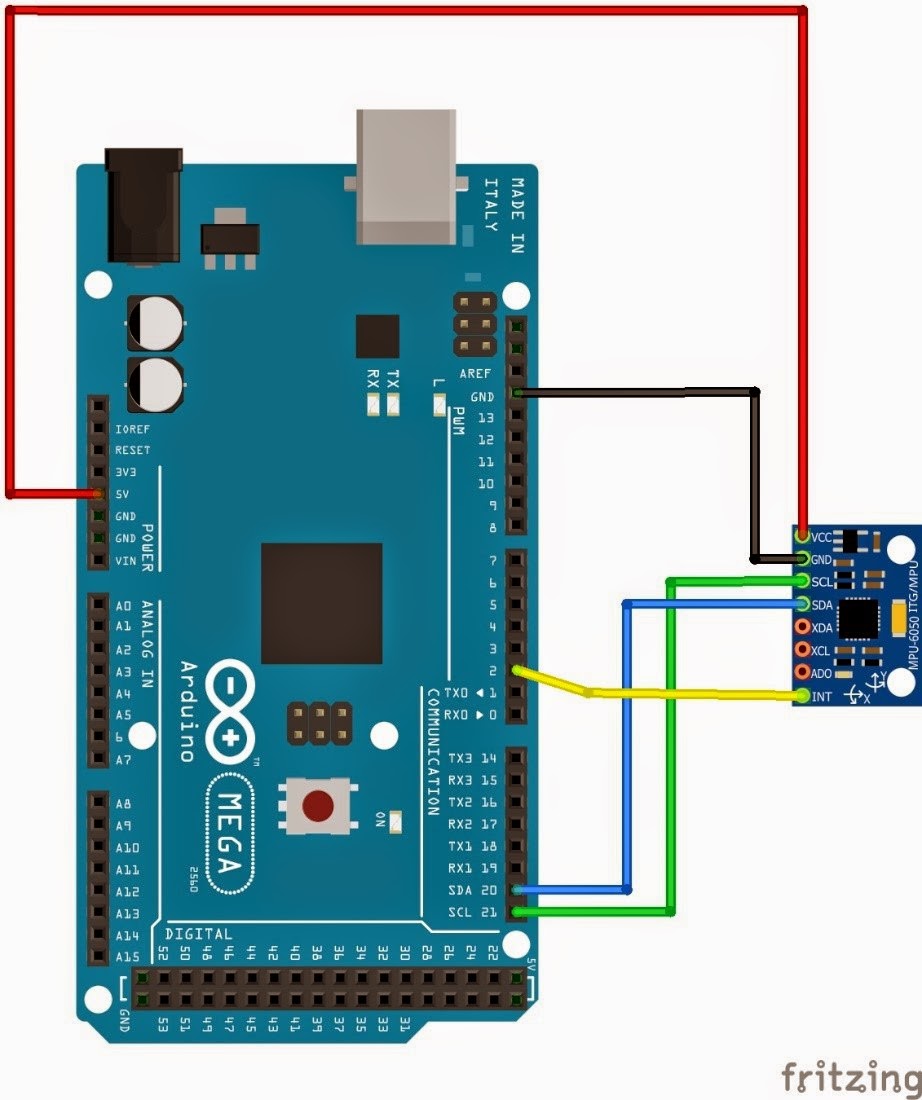
- MPU6050 (Gyroscope & Accelerometer)
- WS2812B (LED Strip(s), we used 2x144LED/m, you can connect as many strips as you want. WS2812B datasheet)
- 8 Ohm Speaker
- 3 standard LEDs (to indicate lives left)
- Cables and 1K Resistors
- One door-stopper spring or other spiral (for the wobble joystick)
- 3D printed case and joystick head (files here)
- 5V/2A Charger (Amper number dependent on number of LEDs)
Libraries needed (included in lib folder)
- FastLED - for the LED strips
- MPU6050 - to measure the joystick tilt and speed
- toneAC - for sound effects
- RunningMedian - to make some calculations for speed measurements
- I2CDev - provides interface classes for devices
- Download the Arduino IDE
- Clone this repository to your computer
- Copy all libraries from the lib folder of the repo to your Arduino Libraries folder
- Connect all the components (see below)
- Open src > wobbly > wobbly.ino with the Arduino IDE.
- In the IDE set Tools > Board and Port to your Arduino Mega board and upload the sketch (including all other classes in the folder wobbly)
- Congrats, WOOBLI should now be running on your Arduino and you shouls be able to navigate by moving the MPU6050 around.
For a first trial it's advisable to use a breadboard.
- MPU6050: see this diagram
- WS2812B: the data wire (usually green) to DataPin 6, the GND (black or white) cable to GND
- Electricity for WS2812B the red (+) and black (-/gnd) wire should be connected to an external power source, because excessiv power could damage your arduino board. calculate like this: for each of your LEDs add 20mA (each LED has a maximum power of 60mA when all three rgb lights (20mA/each) are on full brightness (=white). however, you will barely ever use all your LEDs at full power, so calculating with 20-30mA per LED will serve most purposes). In our case we had 288 LEDs x 20mA = ca. 6A Note that a higher Amper number doesn't hurt, whereas a higher Voltage number is bad. Stick to 5V and experiment with the Ampers. In our case 2A where enough in the end.
- Important: you need to connect one (-/gnd) cable to the arduino as well, because the data pin will need a closed circuit!
- Life LEDs: connect a 1K resistor and cable to the longer tip (+) of each LED and put them individually into DataPins 28, 42 and 52 (you can use any free DataPin, but would then need to change the declaration in the sketch), connect the shorter legs to GND.
- Sound connect one cable to GND and the other first to a 1K resistor and then to DataPin 8. The sound will be very quiet with that much resistance though. You can run up to 4 1K resistors parallel (not serial!), to get the max volume out of the speaker.
If you encounter problems running the sketch, try checking if all cables are in the correct sockets and/or try reconnecting them. You can check the functionality of individual components with example-sketches from the libraries.
You could e.g. use File > Examples >
- MPU6050 > MPU6050_DMG6 (load to arduino, open serial monitor, set to 115200 bd, see input?) to test the functionality of the MPU
- FastLED > Blink (then select the WS2812B strip from the list and upload sketch, LED strip blinks?) to test the functionality of the LED strips
- Digital > Melody (load to arduino, hear sound?) to select the funtionality of the Speaker
- Basic > Blink (load to arduino, see blinking?) to test functionality of the board
For working on the code with a little bit more comfortable IDE (autocomplete, refactoring) you can use Visual Studio Code with an Arduino plugin. See here how to set it up.
You are a shiny little LED. A pink LED that is. If you don't like to be in the pink, that's fine, you can adjust the color of the player in the method initialize() in wobbly.ino. You can basically adjust a lot of stuff, like game speed, all the colors, brightness, sound volume and much more in wobbly.ino. Anyway, you are a pink LED, you can move by tilting the Joystick (or to whatever device you attached your MPU6050 chip). You can move backwards and forwards in a 1D-LED-world. And you can wobble by, well, wobbling the joystick sidewards (you can adjust attacking range and attacking threshold in the wobbly.ino too!). This way you can kill enemies (those pesky little red LED dots approaching you). You're goal is to reach the exit in each level - the golden LED dots. If you reach level 10, you win the game!
Enemies are little red dots approaching you. They may move straight to you or move somewhat irrationally back and forth - you can adjust enemy behavior in the wobbly.ino! You can kill them by wobbling. Or they can kill you, if they reach you. You have three lives, if you loose all of 'em that's gameover.
Did you ever wonder where all these little enemey dots come from? No, not what you thought! They come from enemy spawners of course. You can see them (indicated by a dark red color or - again - by any color YOU choose), theyn spawn enemies but you can't kill them! You can pass them though luckily.
Traps are mean. They are usually between you and your goal. Now that's really nasty because Woobli is a 1D-game so how on earth pass a trap if there's no way around it? Now fortunately there is a trick to it: from time to time traps begin to flicker and change their color. Why? We don't know. Maybe they are recharching, maybe they just want to party. Anyway, if the do so, you can pass them! Oh - and you can adjust stuff like color and size of the traps.
There's water, too! Sometimes you can go with the flow, meaning you'll move with the water, which makes you, the player, move faster. And sometimes it just feels like everything is against you, meaning the water will make you go slower. Cheesy, isn't it? So that's probably hard to imagine, see https://youtu.be/0I160ADb4Sk to get an idea of how that works. In the example the creek (the little one) would make you slower, and rapid stream would make you faster.
The game is made the way that it is as adjustable as possible. Here is a list of stuff you can adjust - you find all these variables in the wobbly.ino
- TICKTIME: defines how long a game tick is and thus, how fast the game is. The higher this value is, the slower is the game
- LED_NUM: If you want to set the game up with 50 LEDs - that's fine; if you want to do it with 323 LEDs that's fine too; just define the amount of LEDs here
- DATA_PIN: Define the data input for your LEDs here
- Playercolor: (player->setColor(COLOR)) in init() -> Here you can choose your favorite color for your favorite token in your favorite game
- Color and size of any in-game-object: See the methods ShowWater, ShowExits, Show... at the bottom of wobbly.ino You can pass any HTMLColorCode you want. Plus you can define direction of water, size of traps etc. in the corresponding calls. See LightEffects.h reference for details.
The joystick can be used as an independent module for input and deployed in other games and projects. To do this add the Joystick library (Joystick.cpp & Joystick.h) to your Arduino > Libraries folder. The library gives you access to two main input values: joystickTilt and joystickWobbleSpeed.
Tilt of the Joystick, which is measured in degrees and has a value of -90 to 90. In our game we use this as two parameters joystickTilt < 0 walking backwards and joystickTilt >0 walking forwards. The value of the tilt determines the speed of walking: a 90° angle indicates a very tiltet joystick and the player moves very fast. At a 10° angle the player moves slow. The tilt is measured from an erect joystick downwards along one axis (in our case back and forth, can be set with JOYSTICK_ORIENTATION).
How fast the joystick wobbles (if you let the spiral wobble). You can either use this variable as a linear function (the faster it wobbles, the more of something happens, or the stronger something appears), or in combination with a threshold. If the joystick wobbles faster than the threshold, an action is triggered. In our case we use the letter method, and if the joystickWobbleSpeed reaches the threshold our player goes to attack mode. For this we implemented the method isAttacking() which returns true if the threshold is reached.
The LightEffects.h and .cpp files are responible for - you guessed it - the light effects in the game, i.e. the output. You can use it as a standalone module as well though, there are some pretty neat effects, check 'em out!
LightEffects work with FastLED and thus with any of its compatible chipsets. Depending on how many LEDs, which chipset, colorcode and datapin you use, you need to adjust LighEffects.h. Check the lines 4 - 7:
- #define NUM_LED (e.g. 135)
- #define CHIPSET (e.g. WS2812)
- #define DATAPIN (e.g. 6)
- #define COLORCODE (e.g. GRB)
Clears existing LED values - works together with any add-method of the module. Clears all previously added animations.
Shows existing LED values - works together with any add-method of the module. An addXY methods adds an animation to the LEDs. You can add several animation to the LEDs and then call show() to show all of 'em at once.
Adds a water animation to the LEDs. You can define the origin of the animation, the size (how many LEDs it'll have), the direction (will it flow backwards or forwards) and the code of the animation in the call.
addTrapAnimation(uint16_t origin, uint16_t size, CRGB::HTMLColorCode activeColor, CRGB::HTMLColorCode inactiveColor, int tick)
Adds a trap animation, that is an animation which flickers from time to time to the LEDs. You can define the origin of the animation, the size (how many LEDs it'll have), and the color of the trap when it's active (not flickering) or inactive (flickering). By passing it a tick value, the method determines if the animation should flicker right now or not. So e.g. passing it millis() during the main-loop() will make the animation flicker every second millisecond. addTrapAnimation(uint16_t origin, uint16_t size, CRGB::HTMLColorCode color, int tick, bool active); A variant of above's method where you just define one color for flickering and not flickering.
Adds a point with a position and a color to the LEDs.
addWaveAnimation(uint16_t origin, uint16_t size, CRGB::HTMLColorCode endWaveColor, CRGB::HTMLColorCode middleWaveColor)
Immediatly shows a wave animation originating from the LED defined with origin of the LEDs and spreading evenly to both sides depending on size. The middle of the wave will me as defined with middleWaveColor, the end as defined with endWaveColor.
Immediatly shows a snake animation with a direction (0 = up or right, 1 = down or left) with a defined color. The animation lights one color after another of the LED stripe until all are lighted.
showCrippleAnimation(int center, uint16_t steps, CRGB::HTMLColorCode crippleColor, CRGB::HTMLColorCode bgColor)
Immediatly shows an animation with a waving animation centered around the defined center with the whole LED strip flashing intermittently. See https://youtu.be/nW1wG6Tooc4


