maxbbraun / pisight Goto Github PK
View Code? Open in Web Editor NEWApple iSight with a Raspberry Pi inside
Home Page: https://pisight.camera
License: MIT License
Apple iSight with a Raspberry Pi inside
Home Page: https://pisight.camera
License: MIT License


Has anyone used this camera model for their pisight project?
I am going to start mine and I'm wondering if there is any major difference between this one and the one reported in the README
Ordering from McMaster-Carr for delivery to Canada ends up being an eye-watering $70. Having a hard time justifying for the 6 screws and 1 o-ring actually required for the build.
Has anyone had luck with another source?
Hi Max!
Awesome project mate. I've bought a second-hand iSight and I'm in the throes of recreating this setup for myself. One question though: why did you switch down to 720p?
I used Dave's original 1080 setup and I noticed that the field of view was quiet a lot narrower than expected. Is this related? I haven't actually gotten your fork working yet, so I'm yet to compare the pair.
Many thanks.
Sam
I built a PiSight that works great when the lid of my MacBook Pro is opened. However, as soon as I close the lid, the camera shuts off – just like the internal FaceTime camera. I went into the System Report, and it appears the PiSight and FaceTime camera have the same VendorID (1452). Because of that, I'm wondering if macOS thinks the PiSight is a FaceTime camera, and that's why it behaves like one?
Is it possible to change the VendorID of the camera, so that macOS doesn't (apparently) confuse it with being a FaceTime camera?
Hey Max. Big fan.
I'm working on this project and can only get my hands on a pi zero 2 w, rather than the original. Unfortunately when I use your script, the camera feed shows up for half a second, and then the camera becomes unresponsive. Unfortunately showmewebcam hasn't yet added support for zero 2 w. I wonder if you have any ideas?
Not sure where to put feedback/comments. Maybe a feedback section in the wiki?
On balance, this went well. I'd recommend purchasing at least 2x the number of ribbon cables you anticipate since they're extremely easy to puncture when working the excess into the case-area recess. Further, I think V2 of the model could do away with the strut supporting the upper ring on the (looking directly-on) left-hand side. There's enough flex in the print that without it you can easily slip the camera underneath. In terms of camera-module sizing, I found nail clippers work extremely well. I found a pair with a curved blade that allowed me to match the corner of the camera module PCB to the case housing.
Total time (including a re-order of camera module + ribbon cables after breakage) was 4 weeks from inception to completion.


I've bought a used iSight & have the Raspberry pi lying around, but I was curious if anyone has tried to print the enclosure with an FDM printer?
With a 0.2mm nozzle I'd think it would likely be possible, curious as I would prefer that than ordering a resin printed piece.
thank you for this project, I finally finished this project after 4 months ;)


even with the LED (sadly not original anymore)

printed

had to slice here, a corner was in the way


original LED, somehow I killed it later, so I had to use a very big and "normal" LED that I had to hone down from both sides

this is where the LED can be stored

how to store the flex cable


alternative LED with 330 resistor (< you need this)
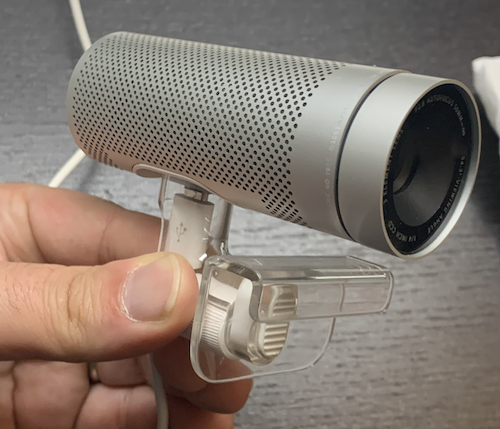
my used iSight camera had no firewire adapter anymore, so I modeled with blender my own for USB (in my case I used a micro usb to usb-c amazon basics cable, an amazon kindle usb cable worked here also, pretty standard size)


mark 1 without the support on both sides


mark 2 with supports to stabilize the camera

done :) thank you for watching
here is the download for .stl and .blend file
Hi!
First congrats for your great project 👍
I built from scratch step by step PiSight project:
Results:
I thought Apple idVendor could have conflicts so I tried to change idVendor from Apple to another (for example TP-Link => 0x200, listed here https://usb-ids.gowdy.us/read/UD/) but with same result: on my Mac PiSight doesn't work.
Could you suggest me what i could check? Maybe some logs?
Anyway thanks again!
Lewix
Hey maxbbraun,
In what's probably a mistake in hindsight, I decided to save $5 on the Zero by not purchasing the Wifi version, forgetting that I lack the adapters to connect a monitor and keyboard to the Pi. This meant I had to jump through some hoops to get the Pi set up which don't seem to have worked...
By any chance, would you (or anybody else!) be able to supply an image of the operating image post-install? I've been unable to get the Pi to show up as a USB device - probably related to me running the installation script in a chroot.
Thanks a bunch!
j-james
Can you share any photos or experiences from your assembly?
Assembly issues:
Things that work well:
I initially had built this using the original plans, but found I could not reliably get the camera cable to bend enough to close the case without breaking the cable. Also, the original 3D geometry had extremely tight tolerances (hard to insert the camera board) and was very challenging to print on consumer grade mSLA resin printers like mine due to many unsupported overhangs. I also really wanted that nice pivot joint from the original iSight back. Starting from the original housing model, I modified the plans.
Strip iSight for casing and original status LED
Solder connection wires to LED, resistor, and Pi I/O pads #13
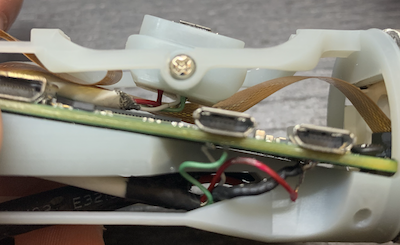
Solder connection wires to micro-usb plug and test points on Pi. These connections will be pretty fragile.

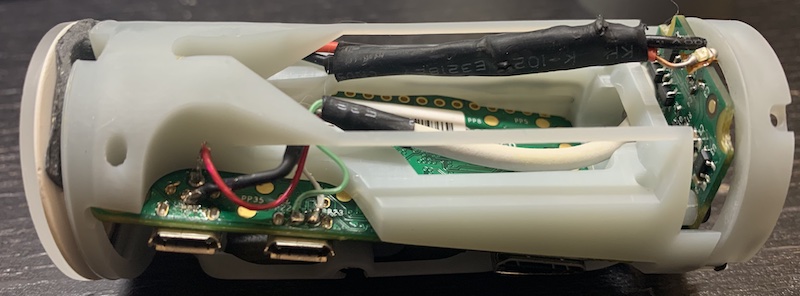
Mount board in housing, screw in. Add micro SD card. Bend wires to position LED. Route micro-usb wires and plug down into pivoting connector.
Snap in and screw down pivoting connector into main housing (M2x6mm screws):
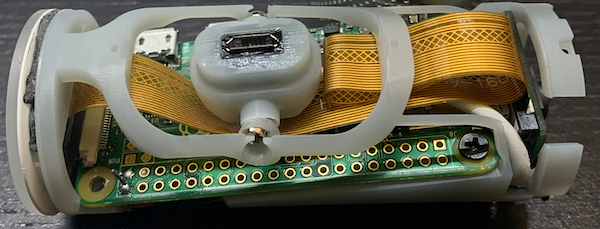
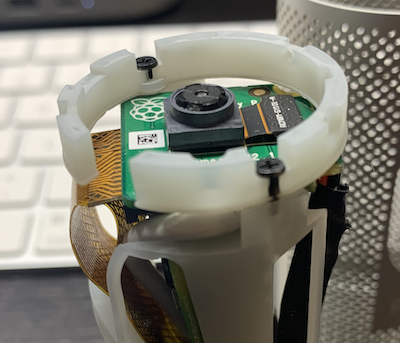
Mount camera board like in original plans
Mount and screw in the lens cap mounting ring (M2 screws). This is fragile, do not overtighten. If the screw caps protrude too far over to the outside or inside of the ring, sand/file them down to flush.
Connect up camera board and Pi, gently fold excess cable. You will still need to bend the cable close to the Pi end almost 90 degrees. It’s best to do this while bracing the contacts between pages of a book or something to avoid damaging the contact surfaces, which don’t like bending. Only bend it once if possible and have extra camera cables on hand because I went through 3 camera cables before I got this to work.
Test the camera, make sure everything works.
Slide assembled housing into case. Add lens cap/cover with very gentle wiggling. I was not able to get the rear cover to snap on, so I used double sided foam tape to hold it on.
Plug it in, wiggle the connector onto your choice of stand:
STL files for the main housing, the lens cap mount, and the pivoting connector are attached. STLs.zip
I sourced the micro-usb female plug here: https://www.amazon.com/dp/B01A6M86YI

It was useful to see everyone else's completed builds here when I was doing mine so I figured I'd add mine too (I even used @phenomeus adaptor as well).
Blog post: https://rknight.me/building-a-pisight/
The printed casing:

The finished product:

Nice work in the project!
It's a shame the article pisight.camera points to is behind the Medium paywall. I had to use a Safari Private Window to read it.
Pretty much the title ^
I was not able to verify it via photos in this guide
P.S. Also what about an Audio?
Dell just announced a new 4K webcam that is heavily inspired by the original iSight design. The good news is we may be able to fit this camera module inside of an iSight body. The bad news is the casing on the Dell webcam seems to be bigger than that of the iSight...

I've never really done any hardware hacks before. Is this a simple case of pulling out the Dell camera module and seeing it if fits inside the iSight tube? If It does I assume we'll need to also need to make sure there's enough room for a 3D printed frame like Max's original design so it fits snug.
Does anyone have any additional advice on how to go about this? I may try and pick one of these webcams up over the weekend and tinker around with it to verify if it fits.
Thanks for the excellent project. After getting a build working I've been playing around with adding an LED to show when the camera is active.
Showmewebcam handily switches GPIO 21 to HIGH when the camera is in-use so it's possible to put an LED in the place of the one that would have been on the original iSight.
All that's required is a 330ohm resistor and an LED. As seen in this test run:

I pulled out the original LED from the iSight and carefully soldered two cables either side of the surface mount LED. I used some shrinkwrap to shield the connections from the case and used shrinkwrap with a hole punched in it to aim to get the light only going up into the small clear plastic diffuser. A small amount of rearwards leakage was fixed with some Aluminum tape on the body.
Here's the end result:

The v3 Camera Module that was recently released looks like a potential upgrade opportunity. Has anyone attempted to use it yet?
Thank you so much for making this, I have always wanted to resurrect my iSight Camera!
I have started to order the parts for this project and I am at the point where I can start installing the software. I have both a Raspberry Pi Zero W and a Raspberry Pi Camera Module v2 (and a micro-sd card too). I also have the Anker Micro-USB cord too.
I started the software part of this project by installing Raspbian and followed the installation instructions via SSH over a Micro-USB Ethernet Adapter. I also connected it to my WiFi network too. After I finished all of the installation steps, I plugged it into my 2017 MacBook Pro 15" running MacOS Catalina (10.15.6). My MBP didn't detect it, even in a "System Report".
I have tried troubleshooting by doing the following:
I am not sure how to proceed as I couldn't find anything online. This is my first Raspberry Pi Project so I am sorry if there is something obvious that I am missing.
I've been looking into alternative camera modules which include UVC functionality. I found this in particular which looks like a good form factor: http://www.camera-module.com/product/autofocuscameramodule/small-auto-focus-8mp-usb-camera-module-sony-imx179.html
Unfortunately I can't find any resellers and direct purchase has a 2 unit minimum + freight.
Did you have any other cameras in mind?
A declarative, efficient, and flexible JavaScript library for building user interfaces.
🖖 Vue.js is a progressive, incrementally-adoptable JavaScript framework for building UI on the web.
TypeScript is a superset of JavaScript that compiles to clean JavaScript output.
An Open Source Machine Learning Framework for Everyone
The Web framework for perfectionists with deadlines.
A PHP framework for web artisans
Bring data to life with SVG, Canvas and HTML. 📊📈🎉
JavaScript (JS) is a lightweight interpreted programming language with first-class functions.
Some thing interesting about web. New door for the world.
A server is a program made to process requests and deliver data to clients.
Machine learning is a way of modeling and interpreting data that allows a piece of software to respond intelligently.
Some thing interesting about visualization, use data art
Some thing interesting about game, make everyone happy.
We are working to build community through open source technology. NB: members must have two-factor auth.
Open source projects and samples from Microsoft.
Google ❤️ Open Source for everyone.
Alibaba Open Source for everyone
Data-Driven Documents codes.
China tencent open source team.