modular redux: scalable redux in half the code
Hooks-for-redux implements the Modular Redux design pattern and gives you access to all the power of Redux in a way that's much easier to use and, more importantly, scales to very large applications.
Hooks-for-redux's goal is to make Redux code dramatically easier to write, maintain and scale. The strategy is to consistently apply the 5 elements of modular design to Redux.
The result is a elegant API that allows you to reduce Redux code by half and reduce Redux-related complexity by 3x.
- Install
- Usage
- Comparison
- Tutorial
- API
- How it Works
- TypeScript
- Prior Work
- Contribution
- License
- Produced at GenUI
npm install hooks-for-redux
Tiny, complete example. See below for explanations.
import React from 'react';
import ReactDOM from 'react-dom';
import {useRedux, Provider} from 'hooks-for-redux'

const [useCount, {inc, add, reset}] = useRedux('count', 0, {
  inc: (state) => state + 1,
  add: (state, amount) => state + amount,
  reset: () => 0
})

const App = () =>
  <p>
    Count: {useCount()}
    {' '}<input type="button" value="+1"    onClick={inc} />
    {' '}<input type="button" value="+10"   onClick={() => add(10)} />
    {' '}<input type="button" value="reset" onClick={reset} />
  </p>

ReactDOM.render(
  <Provider><App /></Provider>,
  document.getElementById('root')
);- source: examples/tiny
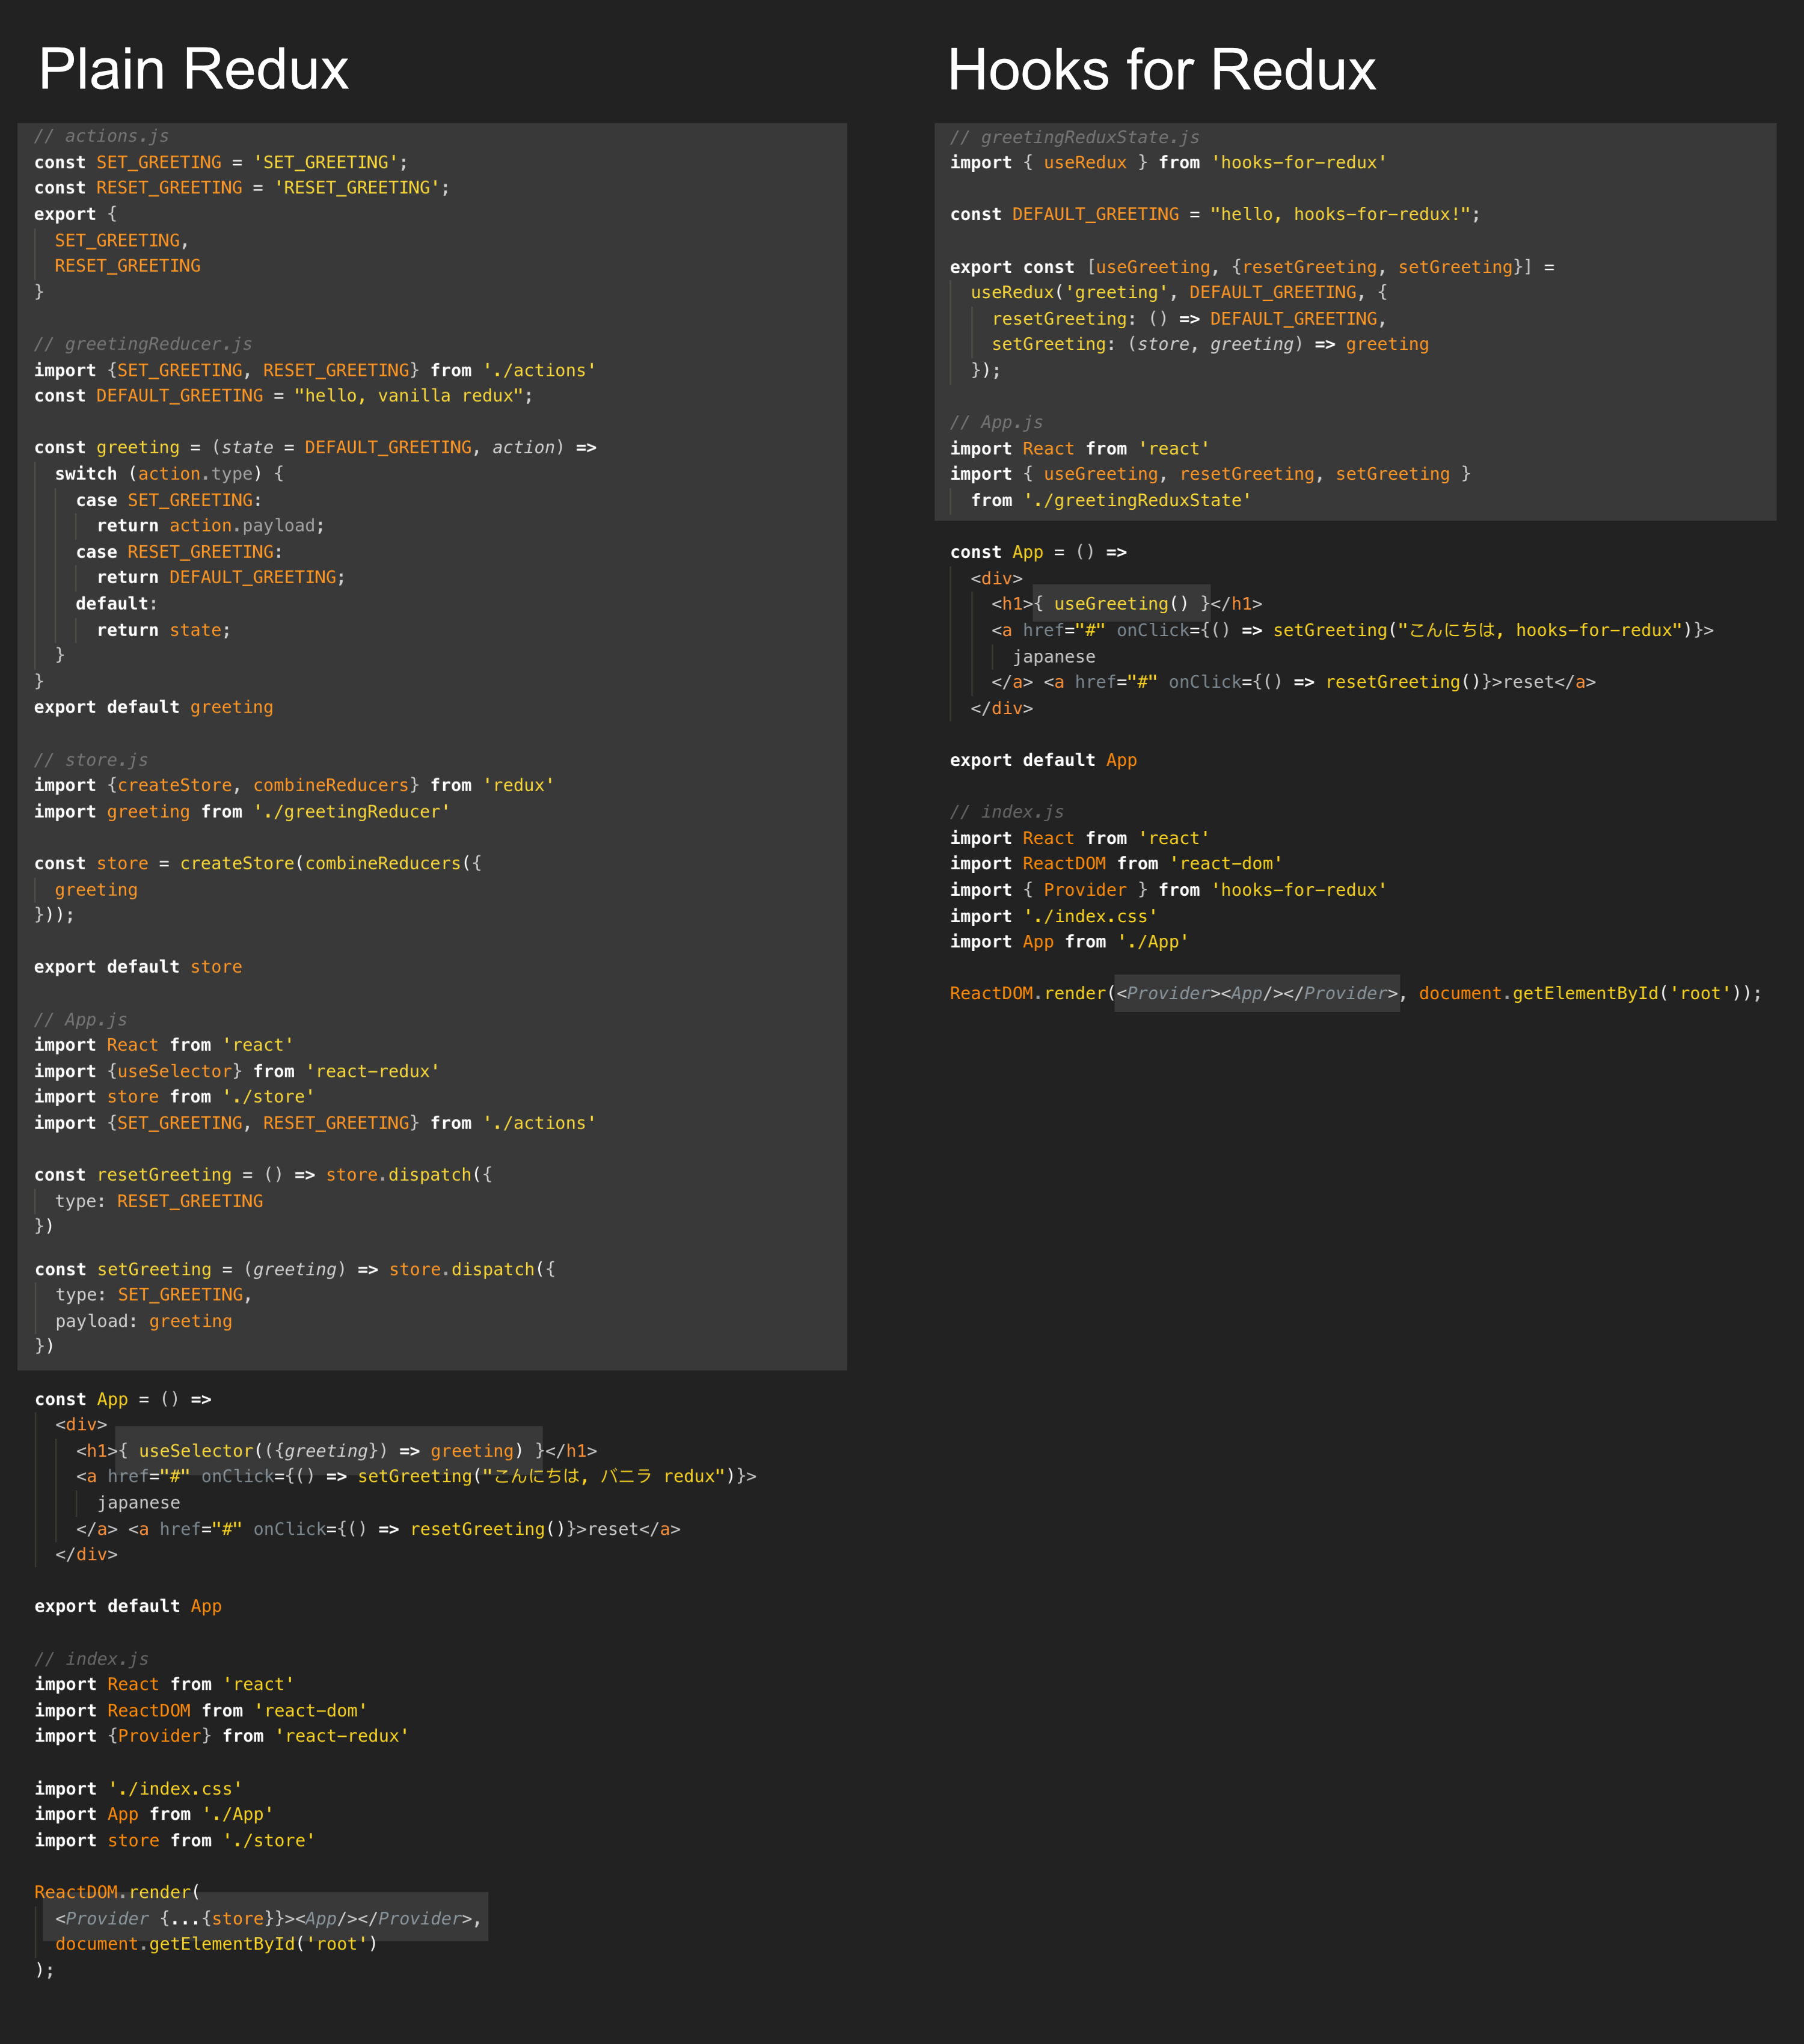
This is a quick comparison of a simple app implemented with both plain Redux and hooks-for-redux. In this example, 66% of redux-specific code was eliminated.
View the source:
This example is primarily intended to give a visual feel for how much code can be saved. Scroll down to learn more about what's going on.
The core of hooks-for-redux is the useRedux method. There are two ways to call useRedux - with and without custom reducers. This first tutorial shows the first, easiest way to use hooks-for-redux.
Concept:
useReduxinitializes redux state under the property-name you provide and returns an array, containing three things:
- react-hook to access named-state
- dispatcher-function to update that state
- virtual store
First, you'll need to define your redux state.
// NameReduxState.js
import { useRedux } from "hooks-for-redux";

//  - initialize redux state.name = 'Alice'
//  - export useCount hook for use in components
//  - export setCount to update state.name
export const [useCount, setCount] = useRedux("count", 0);
Use your redux state:
- add a "+" button that adds 1 to count
- useCount()
- returns the current count
- re-renders when count changes
// App.jsx
import React from 'react';
import ReactDOM from 'react-dom';
import {useCount, setCount} from './NameReduxState.js'

export default () => {
  const count = useCount()
  const inc = () => setCount(count + 1)
  <p>
    Count: {count}
    {' '}<input type="button" onClick={inc} value="+"/>
  </p>
}
The last step is to wrap your root component with a Provider. H4R provides a streamlined version of the Provider component from react-redux to make your redux store available to the rest of your app. H4R's Provider automatically connects to the default store:
// index.jsx
import React from "react";
import { Provider } from "hooks-for-redux";
import App from "./App";

ReactDOM.render(
  <Provider>
    <App />
  </Provider>,
  document.getElementById("root")
);
And that's all you need to do! Now, let's look at a fuller tutorial with custom reducers.
Instead of returning the raw update reducer, you can build your own reducers. Your code will be less brittle and more testable the more specific you can make your transactional redux update functions ('reducers').
Concept: When you pass a reducer-map as the 3rd argument, useRedux returns set of matching map of dispatchers, one for each of your reducers.
This example adds three reducer/dispatcher pairs: inc, dec and reset.
// NameReduxState.js
import { useRedux } from "hooks-for-redux";

export const [useName, { inc, add, reset }] = useRedux("count", 0, {
  inc: state => state + 1,
  add: (state, amount) => state + amount,
  reset: () => 0
});
Now the interface supports adding 1, adding 10 and resetting the count.
// App.jsx
import React from "react";
import { useName, inc, add, reset } from "./NameReduxState.js";

export default () => (
  <p>
    Count: {useCount()} <input type="button" onClick={inc} value="+1" />{" "}
    <input type="button" onClick={() => add(10)} value="+10" />{" "}
    <input type="button" onClick={reset} value="reset" />
  </p>
);
Use
index.jsfrom Example-A to complete this app.
You may have noticed none of the code above actually calls Redux.createStore(). H4R introduces the concept of a default store accessible via the included getStore() and setStore() functions. The first time getStore() is called, a new redux store is automatically created for you. However, if you want to control how the store is created, call setStore() and pass in your custom store before calling getStore or any other function which calls it indirectly including useRedux and Provider.
Below is an example of creating your own store with some custom middleware. It uses H4R's own createStore method which extends Redux's create store as required for H4R. More on that below.
// store.js
import { setStore, createStore } from "hooks-for-redux";
import { applyMiddleware } from "redux";

// example middle-ware
const logDispatch = store => next => action => {
  console.log("dispatching", action);
  return next(action);
};

export default setStore(createStore({}, applyMiddleware(logDispatch)));
// index.jsx
import React from "react";
import "./store"; // <<< import before calling useRedux or Provider
import { Provider } from "hooks-for-redux";
import App from "./App";
ReactDOM.render(
<Provider>
<App />
</Provider>,
document.getElementById("root")
);NOTE: You don't have to use hooks-for-redux's createStore, but setStore must be passed a store that supports the injectReducer method as described here: https://redux.js.org/api/combinereducers
If you are interested in seeing a more complicated example in TypeScript with asynchronous remote requests, please see:
import {useRedux} from 'hooks-for-redux'
useRedux(reduxStorePropertyName, initialState) =>
  [useMyStore, setMyStore, virtualStore]

useRedux(reduxStorePropertyName, initialState, reducers) =>
  [useMyStore, myDispatchers, virtualStore]
Define a top-level property of the redux state including its initial value, all related reducers, and returns a react-hook, dispatchers and virtualStore.
-
IN: (reduxStorePropertyName, initialState)
- reduxStorePropertyName: string
- initialState: non-null, non-undefined
- reducers: object mapping action names to reducers
- e.g.
{myAction: (state, payload) => newState}
- e.g.
-
OUT: [useMyStore, setMyStore -or- myDispatchers, virtualStore]
- useMyStore: react hook returning current state
- One of the following:
- setMyStore: (newState) => dispatch structure
- myDispatchers: object mapping action names to matching myDispatchers
- virtualStore: object with API similar to a redux store, but just for the state defined in this useRedux call
const [useMyStore] = useRedux(reduxStorePropertyName, initialState)
const MyComponent = () => { // must be used in render function
  useMyStore() => current state
  // ...
}- OUT: current state
- REQUIRED: must be called within a Component's render function
- EFFECT:
- Establishes a subscription for any component that uses it. The component will re-render whenever
updateis called, anduseMyStorewill return the latest, updated value within that render. - Internally, useMyStore is simply:
useSelector(state => state[reduxStorePropertyName])
see: https://react-redux.js.org/next/api/hooks for details.
- Establishes a subscription for any component that uses it. The component will re-render whenever
const [__, {myAction}] = useRedux(reduxStorePropertyName, initialState, {
  myAction: (state, payload) => state
})
myAction(payload) => {type: MyAction, payload}- IN: payload - after dispatching, will arrive as the payload for the matching reducer
- OUT: {type, payload}
- type: the key string for the matching reducer
- payload: the payload that was passed in
- i.e. same as plain redux's store.dispatch()
The virtual store is an object similar to the redux store, except it is only for the redux-state you created with useRedux. It supports a similar, but importantly different API from the redux store:
import {useRedux, getStore} from 'hooks-for-redux'
const [,, myVirtualStore] = useRedux("myStateName", myInitialState)
myVirtualStore.getState() =>
  getStore().getState()["myStateName"]
The getState method works exactly like a redux store except instead of returning the state of the entire redux store, it returns only the sub portion of that redux state defined by the useRedux call.
- IN: (nothing)
- OUT: your current state
import {useRedux, getStore} from 'hooks-for-redux'
const [,, myVirtualStore] = useRedux("myStateName", myInitialState)
myVirtualStore.subscribe(callback) => unsubscribe- IN: callback(currentState => ...)
- OUT: unsubscribe()
The subscribe method works a little differently from a redux store. Like reduxStore.subscribe, it too returns a function you can use to unsubscribe. Unlike reduxStore.subscribe, the callback passed to virtualStore.subscribe has two differences:
- callback is passed the current value of the virtualStore directly (same value returned by virtualStore.getState())
- callback is only called when virtualStore's currentState !== its previous value.
import {Provider} from 'hooks-for-redux'
<Provider>{/* render your App's root here*/}<Provider>
hooks-for-redux includes its own Provider component shortcut. It is equivalent to:
import {Provider} from 'react-redux'
import {getState} from 'hooks-for-redux'

<Provider state={getState()}>
  {/* render your App's root here*/}
<Provider>Getting started, you can ignore the store registry. It's goal is to automatically manage creating your store and making sure all your code has access. However, if you want to customize your redux store, it's easy to do (see the custom middleware example above).
import {getStore} from 'hooks-for-redux'
getStore() => store
Auto-vivifies a store if setStore has not been called. Otherwise, it returns the store passed to setStore.
- IN: nothing
- OUT : redux store
import {setStore} from 'hooks-for-redux'
setStore(store) => store
Call setStore to provide your own store for hooks-for-redux to use. You'll need to use this if you want to use middleware.
- IN: any redux store supporting .injectReducer
- OUT: the store passed in
- REQUIRED:
- can only be called once
- must be called before getStore or useRedux
import {createStore} from 'hooks-for-redux'
createStore(reducersMap, [preloadedState], [enhancer]) => store
Create a basic redux store with injectReducer support. Use this to configure your store's middleware.
-
IN
- reducersMap: object suitable for Redux.combineReducers https://redux.js.org/api/combinereducers
- OPTIONAL: preloadedState & enhancer: see Redux.createStore https://redux.js.org/api/createstore
-
OUT: redux store supporting .injectReducer
store.injectReducer(reducerName, reducer) => ignoredIf you just want to use Redux's createStore with custom parameters, see the Custom Middleware Example. However, if you want to go further and provide your own redux store, you'll need to implement injectReducer.
-
IN:
- reducerName: String
- reducer: (current-reducer-named-state) => nextState
-
EFFECT: adds reducer to the reducersMaps passed in at creation time.
-
REQUIRED:
- {[reducerName]: reducer} should be suitable for React.combineReducers https://redux.js.org/api/combinereducers
Hooks-for-redux requires a store that supports the injectReducer. You only need to worry about this if you are using setState to manually set your store and you are note using hooks-for-redux's own createStore function.
The injectReducer method is described here https://redux.js.org/recipes/code-splitting. Its signature looks like:
NOTE: Just as any other reducer passed to React.combineReducers, the reducer passed to injectReducer doesn't get passed the store's entire state. It only gets passed, and should return, its own state data which is stored in the top-level state under the provided reducerName.
Curious what's happening behind the scenes? This is a tiny library for all the capabilities it gives you. Below is a quick overview of what's going on.
Note: All code-examples in this section are approximations of the actual code. Minor simplifications were applied for the purpose of instruction and clarity. See the latest source for complete, up-to-date implementations.
To keep things simple, this library has only two dependencies: redux and react-redux. In some ways, H4R is just a set of elegant wrappers for these two packages.
- source: src/storeRegistry.js
You might notice when using hooks-for-redux, you don't have to manually create your store, nor do you need to reference your store explicitly anywhere in your application. Redux recommends only using one store per application. H4R codifies that recommendation and defines a central registry to eliminate the need to explicitly pass the store around.
The implementation is straight forward:
let store = null;
const getStore = () => (store ? store : (store = createStore()));
const setStore = initialStore => (store = initialStore);- source: src/Provider.js
H4R wraps the react-redux Provider, combining it with a default store from the store registry. It reduces a small, but significant amount of boilerplate.
const Provider = ({ store = getStore(), context, children }) =>
React.createElement(ReactReduxProvider, { store, context }, children);- source: src/useRedux.js
The big win, however, comes from one key observation: if you are writing your own routing, you are doing it wrong. The same can be said for dispatching and subscriptions.
The useRedux function automates all the manual routing required to make plain Redux work. It inputs only the essential data and functions necessary to define a redux model, and it returns all the tools you need to use it.
The implementation of useRedux is surprisingly brief. Details are explained below:
const useRedux = (storeKey, initialState, reducers, store = getStore()) => {
  /* 1 */ store.injectReducer(
    storeKey,
    (state = initialState, { type, payload }) =>
      reducers[type] ? reducers[type](state, payload) : state
  );

  return [
    /* 2 */ () => useSelector(storeState => storeState[storeKey]),
    /* 3 */ mapKeys(reducers, type => payload =>
      store.dispatch({ type, payload })
    ),
    /* 4 */ createVirtualStore(store, storeKey)
  ];
};- H4R's redux store uses the injectReducer pattern recommended by Redux to add your reducers to the store. Because the reducers are defined as an object, routing is dramatically simplified. Instead of a huge switch-statement, reducer routing can be expressed as one line no matter how many reducers there are.
- The returned React Hook wraps react-redux's useSelector, selecting your state.
- The returned dispatchers object is generated from the reducers passed in. The
typevalue is set from each key in reducers. The dispatchers themselves take a payload as input and return the standard result of Redux's dispatch function. - Last, a new virtual-store is created for your redux model. See below for details.
- source: src/VirtualStore.js
The VirtualStore object allows you to access your state, a value bound to the Redux store via your storeKey, as-if it were a Redux store. It is implemented, again, as simple wrappers binding the virtual store to the state defined in useRedux.
const createVirtualStore = (store, storeKey) => {
  const /* 1 */ getState = () => store.getState()[storeKey];
  return {
    getState,
    /* 2 */ subscribe: f => {
      let lastState = getState();
      return store.subscribe(
        () => lastState !== getState() && f((lastState = getState()))
      );
    }
  };
};getStatewraps Redux's getState and returns the state of your storeKey.subscribewraps Redux's subscribe, but it provides some additional functionality:- It only calls
fif your state changed (using a!==test). In Redux's subscribe,fis "called any time an action is dispatched" - which is extremely wasteful. fis passed your current state, so you don't have to manually call getState.
- It only calls
TypeScript support is provided in the library. Configuring the generics for H4R was tricky, particularly for the useRedux method. Please send feedback on how we can improve the typing.
Several people have attempted to simplify Redux and/or make it act more like React hooks, but none have succeeded in providing a general-purpose, fully DRY solution.
- https://www.npmjs.com/package/edux
- https://www.npmjs.com/package/no-boilerplate-redux
- https://www.npmjs.com/package/reduxless
- https://www.npmjs.com/package/redux-actions
- https://www.npmjs.com/package/redux-arc
- https://www.npmjs.com/package/@finn-no/redux-actions
- https://www.npmjs.com/package/@mollycule/redux-hook
- https://www.npmjs.com/package/easy-peasy
- https://www.npmjs.com/package/conventional-redux
And then there's
Redux Toolkit: The official, opinionated, batteries-included tool set for efficient Redux development - https://redux-toolkit.js.org
Redux-Toolkit claims to be efficient, but when compared to H4R it still falls far short. Below is a comparison H4R vs Redux-Toolkit using their own intermediate and advanced tutorials.
58% less code
Taking from the intermediate code-example provided in the Redux-Toolkit Package:
Redux-Toolkit's implementation:
- tutorial: redux-toolkit.js.org
- interactive: codesandbox.io
- ~390 lines of JavaScript
I reduced the code by about 2x using H4R - including eliminating several files. Even the tests got simpler.
H4R solution
- interactive: codesandbox.io
- source: github
- ~160 lines of JavaScript
Here is a roughly apples-to-apples slice of the code from each project:
Part of the key is how well H4R links into React. Redux-toolkit takes 50 lines of code just to do this:
import React from 'react'
import Todo from './Todo'
import { useFilters } from '../filters/filtersSlice'
import { useTodos } from './todosSlice'

export const VisibleTodoList = () =>
  <ul>
    {useTodos()
      .filter(useFilters())
      .map(todo => (
        <Todo key={todo.id} {...todo} />
      ))}
  </ul>
NOTE: The normal use of H4R is React-specific while Redux-Toolkit is agnostic to the rendering engine. Let me know if there is interest in non-react H4R support. It shouldn't be hard to do.
48% less code
Now to take on a bigger challenge. The advanced tutorial is a capable github issue and issue-comment-browser. Even here, H4R shines. Redux-Toolkit has two main problems:
- It still makes you manually dispatch your updates. H4R avoids making you manually create and dispatch your actions entirely by returning ready-to-use dispatchers. They just look like normal functions you can call to start your updates.
- Redux-Toolkit's pattern mixes business-logic with view-logic. Redux-related code, particularly updates, should never be in the same files as view and view-logic files like components.
Blending UX-logic with business-logic creates excessive dependencies between modules. This dependency hell literally took me hours to unwind before I could convert it to H4R. Once I was done, though, it all simplified and became clear and easy to edit. If you open the code you will see that all the business logic in the H4R solution resides in the src/redux folder in 4 files and 100 lines of code - total. All the components are clean and have zero business logic.
For example, compare the IssueListPage.tsx from each project:
import React from 'react'
import { useIssues } from 'redux/issues'
import { RepoSearchForm } from './IssuesListLib/RepoSearchForm'
import { IssuesPageHeader } from './IssuesListLib/IssuesPageHeader'
import { IssuesList } from './IssuesListLib/IssuesList'
import { IssuePagination } from './IssuesListLib/IssuePagination'

export const IssuesListPage = () => {
  const { loading, error } = useIssues()
  return error
    ? <div>
      <h1>Something went wrong...</h1>
      <div>{error.toString()}</div>
    </div>
    : <div id="issue-list-page">
      <RepoSearchForm />
      <IssuesPageHeader />
      {loading ? <h3>Loading...</h3> : <IssuesList />}
      <IssuePagination />
    </div>
}- github/h4r/IssuesListPage
- 21 lines, 693 bytes
to this:
- github/redux-toolkit/IssuesListPage
- 87 lines, 2000 bytes
Redux-toolkit's solution mixes in the business logic of fetching the remote data. This is all handled by H4R's useRedux slices. Further, RT makes IssuesListPage dependent on many things such that it only passes to child-components but never uses itself - a false dependency. For example, the pagination details (currentPage, pageCount, etc...) should only be a dependency of IssuePagination.
Compare the full source of each project below:
Redux-Toolkit solution:
- tutorial: redux-toolkit.js.org
- interactive: codesandbox.io
- source: github
- ~1170 lines of TypeScript
H4R solution:
- interactive: codesandbox.io
- source: github
- ~613 lines of TypeScript
If you have suggestions for improvement, please feel free to start an issue on github.
hooks-for-redux is MIT licensed.
hooks-for-redux was developed in JavaScript for React and Redux at GenUI.co.