

oled js

What is this?
This repo is a library compatible with Rick Waldron's johnny-five project. It adds support for I2C/SPI compatible monochrome OLED screens. Works with 128 x 32, 128 x 64 and 96 x 16 sized screens, of the SSD1306 OLED/PLED Controller (read the datasheet here).
Got a MicroView from GeekAmmo/SparkFun? That'll work too.
Interested in the nerdy bits going on behind the scenes? Read my blog post about how OLED screens work!
OLED screens are really cool - now you can control them with JavaScript!
Install
If you haven't already, install NodeJS and the Arduino IDE to your computer.
npm install oled-js- Upload the Standard Firmata sketch (prepackaged with the Arduino IDE) to your Arduino of choice. This can be found under
File > Examples > Firmata > StandardFirmata[ further help]
I2C screens
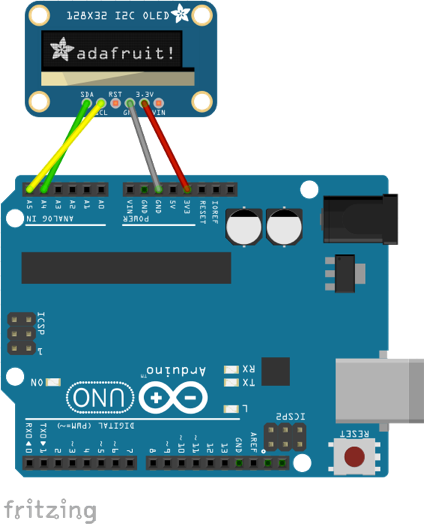
Hook up I2C compatible oled to the Arduino. If using an Arduino Uno, pins are as follows:
- SDL to pin A4
- SCL to pin A5
Fritzing diagram is here. Look up the correct pins if using a board other than Arduino.
If you'd like to run the demo:
git clonethis repo (get latest release instead of master branch)npm install- Replace width, height, and other values in the options with your own in tests/demoTime.js
node tests/demoTime.js
I2C example
var five = require('johnny-five'),
    board = new five.Board(),
    Oled = require('oled-js');

board.on('ready', function() {
  console.log('Connected to Arduino, ready.');

  var opts = {
    width: 128,
    height: 64,
    address: 0x3D
  };

  var oled = new Oled(board, five, opts);
  // do cool oled things here
});
Wait, how do I find out the I2C address of my OLED screen?
Yeah this sounds like a nightmare, but it's pretty simple! Before uploading standard firmata to your Arduino, upload the following sketch from the Arduino Playground called 'I2C scanner'. Does what it says on the box. Open up your serial monitor, and you'll see your device address pop up there. Make a note of it, then re-upload standard firmata to your Arduino again.
SPI screens
IMPORTANT NOTE: Using SPI will make your screen update and draw VERY slow. Manual hardware SPI over USB is the only way currently to do this within Johnny-Five, which is not optimized for the normal speed you can expect from SPI in general. Sorry about that. Here is a video I took to show this.
Hook up SPI compatible oled to the Arduino. If using an Arduino Uno, pins are as follows:
- Data/MOSI to pin D9
- CLK to pin D10
- D/C to pin D11
- RST to pin D13
- CS/SS to pin 12 (you can change this one if you really want to)
Fritzing diagram coming soon.
SPI example
var five = require('johnny-five'),
    board = new five.Board(),
    Oled = require('oled-js');

board.on('ready', function() {
  console.log('Connected to Arduino, ready.');

  var opts = {
    width: 128,
    height: 64,
    slavePin: 12
  };

  var oled = new Oled(board, five, opts);
  // do cool oled things here
});
MicroView
MicroView uses SPI, so please see the note about drawing speed in the SPI section above.
This one is pretty simple - use the USB programmer that should have come with your MicroView. Insert the MicroView's header pins into the slots on the USB programmer. Plug it in to your nearest USB port, and you're done! No pin mappings, no sweat.
Microview example
var five = require('johnny-five'),
    board = new five.Board(),
    Oled = require('oled-js');

board.on('ready', function() {
  console.log('Connected to Arduino, ready.');

  var opts = {
    width: 64,
    height: 48,
    microview: true
  };

  var oled = new Oled(board, five, opts);
  // do cool oled things here
});
Available methods
clearDisplay
Fills the buffer with 'off' pixels (0x00). Optional bool argument specifies whether screen updates immediately with result. Default is true.
Usage:
oled.clearDisplay();dimDisplay
Lowers the contrast on the display. This method takes one argument, a boolean. True for dimming, false to restore normal contrast.
Usage:
oled.dimDisplay(true|false);invertDisplay
Inverts the pixels on the display. Black becomes white, white becomes black. This method takes one argument, a boolean. True for inverted state, false to restore normal pixel colors.
Usage:
oled.invertDisplay(true|false);turnOffDisplay
Turns the display off.
Usage:
oled.turnOffDisplay();turnOnDisplay
Turns the display on.
Usage:
oled.turnOnDisplay();drawPixel
Draws a pixel at a specified position on the display. This method takes one argument: a multi-dimensional array containing either one or more sets of pixels.
Each pixel needs an x position, a y position, and a color. Colors can be specified as either 0 for 'off' or black, and 1 or 255 for 'on' or white.
Optional bool as last argument specifies whether screen updates immediately with result. Default is true.
Usage:
// draws 4 white pixels total
// format: [x, y, color]
oled.drawPixel([
	[128, 1, 1],
	[128, 32, 1],
	[128, 16, 1],
	[64, 16, 1]
]);
drawLine
Draws a one pixel wide line.
Arguments:
- int x0, y0 - start location of line
- int x1, y1 - end location of line
- int color - can be specified as either 0 for 'off' or black, and 1 or 255 for 'on' or white.
Optional bool as last argument specifies whether screen updates immediately with result. Default is true.
Usage:
// args: (x0, y0, x1, y1, color)
oled.drawLine(1, 1, 128, 32, 1);
fillRect
Draws a filled rectangle.
Arguments:
- int x0, y0 - top left corner of rectangle
- int x1, y1 - bottom right corner of rectangle
- int color - can be specified as either 0 for 'off' or black, and 1 or 255 for 'on' or white.
Optional bool as last argument specifies whether screen updates immediately with result. Default is true.
Usage:
// args: (x0, y0, x1, y1, color)
oled.fillRect(1, 1, 10, 20, 1);
drawBitmap
Draws a bitmap using raw pixel data returned from an image parser. The image sourced must be monochrome, and indexed to only 2 colors. Resize the bitmap to your screen dimensions first. Using an image editor or ImageMagick might be required.
Optional bool as last argument specifies whether screen updates immediately with result. Default is true.
Tip: use a NodeJS image parser to get the pixel data, such as pngparse. A demonstration of using this is below.
Example usage:
npm install pngparse
var pngparse = require('pngparse');

pngparse.parseFile('indexed_file.png', function(err, image) {
	oled.drawBitmap(image.data);
});
This method is provided as a primitive convenience. A better way to display images is to use NodeJS package png-to-lcd instead. It's just as easy to use as drawBitmap, but is compatible with all image depths (lazy is good!). It will also auto-dither if you choose. You should still resize your image to your screen dimensions. This alternative method is covered below:
npm install png-to-lcd
var pngtolcd = require('png-to-lcd');

pngtolcd('nyan-cat.png', true, function(err, bitmap) {
  oled.buffer = bitmap;
  oled.update();
});
startScroll
Scrolls the current display either left or right. Arguments:
- string direction - direction of scrolling. 'left' or 'right'
- int start - starting row of scrolling area
- int stop - end row of scrolling area
Usage:
// args: (direction, start, stop)
oled.startscroll('left', 0, 15); // this will scroll an entire 128 x 32 screen
stopScroll
Stops all current scrolling behaviour.
Usage:
oled.stopscroll();setCursor
Sets the x and y position of 'cursor', when about to write text. This effectively helps tell the display where to start typing when writeString() method is called.
Call setCursor just before writeString().
Usage:
// sets cursor to x = 1, y = 1
oled.setCursor(1, 1);
writeString
Writes a string of text to the display.
Call setCursor() just before, if you need to set starting text position.
Arguments:
- obj font - font object in JSON format (see note below on sourcing a font)
- int size - font size, as multiplier. Eg. 2 would double size, 3 would triple etc.
- string text - the actual text you want to show on the display.
- int color - color of text. Can be specified as either 0 for 'off' or black, and 1 or 255 for 'on' or white.
- bool wrapping - true applies word wrapping at the screen limit, false for no wrapping. If a long string without spaces is supplied as the text, just letter wrapping will apply instead.
Optional bool as last argument specifies whether screen updates immediately with result. Default is true.
Before all of this text can happen, you need to load a font buffer for use. A good font to start with is NodeJS package oled-font-5x7.
Usage:
npm install oled-font-5x7
var font = require('oled-font-5x7');

// sets cursor to x = 1, y = 1
oled.setCursor(1, 1);
oled.writeString(font, 1, 'Cats and dogs are really cool animals, you know.', 1, true);
update
Sends the entire buffer in its current state to the oled display, effectively syncing the two. This method generally does not need to be called, unless you're messing around with the framebuffer manually before you're ready to sync with the display. It's also needed if you're choosing not to draw on the screen immediately with the built in methods.
Usage:
oled.update();Future
- better documentation
- 16-bit color oled support
