Comments (2)
 MuYunyun
commented on June 19, 2024
MuYunyun
commented on June 19, 2024
内网穿透原理架构
本文中,我们使用了frp,frp 是一个专注于内网穿透的高性能的反向代理应用。
todo: 补充流程图。
服务端(云主机) nginx 配置
首先将域名(笔者为 frp.muyunyun.cn )解析到服务器 ip。
为了方面后续的调试运行,需放开以下几个服务器端口。
- 90 端口:(Nginx 接收 http 请求用)
- 6000 端口:(转发映射 SSH 服务用)
- 8080 端口:(转发映射 http 服务用)
- 7000 端口:(服务器端 frps 运行端口)
配置 Nginx,转发对 frp.muyunyun.cn 域名请求到 8080 端口。
/etc/nginx/nginx.conf 设置如下:
user www-data;
worker_processes auto;
pid /run/nginx.pid;
include /etc/nginx/modules-enabled/*.conf;
load_module /usr/lib/nginx/modules/ngx_stream_module.so;

stream {
	map $ssl_preread_server_name $backend_name {
		frp.muyunyun.cn        frp_muyunyun_cn;
		default web;
	}

	upstream frp_muyunyun_cn {
		server 127.0.0.1:8080;
	}

	upstream web {
		server 127.0.0.1:80;
	}
}

events {
	worker_connections 768;
	# multi_accept on;
}

http {
	##
	# Basic Settings
	##

	sendfile on;
	tcp_nopush on;
	tcp_nodelay on;
	keepalive_timeout 65;
	types_hash_max_size 2048;
	# server_tokens off;

	# server_names_hash_bucket_size 64;
	# server_name_in_redirect off;

	include /etc/nginx/mime.types;
	default_type application/octet-stream;

	##
	# SSL Settings
	##

	ssl_protocols TLSv1 TLSv1.1 TLSv1.2 TLSv1.3; # Dropping SSLv3, ref: POODLE
	ssl_prefer_server_ciphers on;

	##
	# Logging Settings
	##

	access_log /var/log/nginx/access.log;
	error_log /var/log/nginx/error.log;

	##
	# Gzip Settings
	##

	gzip on;

	# gzip_vary on;
	# gzip_proxied any;
	# gzip_comp_level 6;
	# gzip_buffers 16 8k;
	# gzip_http_version 1.1;
	# gzip_types text/plain text/css application/json application/javascript text/xml application/xml application/xml+rss text/javascript;

	##
	# Virtual Host Configs
	##

	include /etc/nginx/conf.d/*.conf;
	include /etc/nginx/sites-enabled/*;
}
服务端(云主机) nginx 添加 http 服务
🤔 问题:
/etc/nginx/conf.d/frp.muyunyun.cn.conf文件中的配置与/etc/nginx/nginx.conf中的配置作用的对象分别是什么?
以配置域名 frp.muyunyun.cn 为例,新建配置文件 /etc/nginx/conf.d/frp.muyunyun.cn.conf
touch /etc/nginx/conf.d/frp.muyunyun.cn.conf在 /etc/nginx/conf.d/frp.muyunyun.cn.conf 中添加 http 服务相关内容
server {
	server_name      frp.muyunyun.cn;
	listen           90;
	root             /usr/share/nginx/html/frp.muyunyun.cn;

	location / {
		proxy_pass http://127.0.0.1:8080;
		proxy_set_header Host $host:90;
		proxy_set_header X-Real-IP $remote_addr;
		proxy_set_header X-Forwarded-For $proxy_add_x_forwarded_for;
	}

	error_page 404 /404.html;
		location = /40x.html {
	}

	error_page 500 502 503 504 /50x.html;
		location = /50x.html {
	}
}
端口使用 80 页面会提示
网站暂时无法访问,该网站未根据工信部相关法律规则进行备案,了解更多备案相关内容,笔者这里将它修改为 90。

新建 frp.muyunyun.cn 对应的网站文件夹与文件
mkdir -p /usr/share/nginx/html/frp.muyunyun.cn
touch /usr/share/nginx/html/frp.muyunyun.cn/index.html
在 /usr/share/nginx/html/fpr.muyunyun.cn/index.html 中输入
<!DOCTYPE html>
<html lang="en">
<head>
<meta charset="UTF-8">
<meta http-equiv="X-UA-Compatible" content="IE=edge">
<meta name="viewport" content="width=device-width, initial-scale=1.0">
<title>云随风</title>
</head>
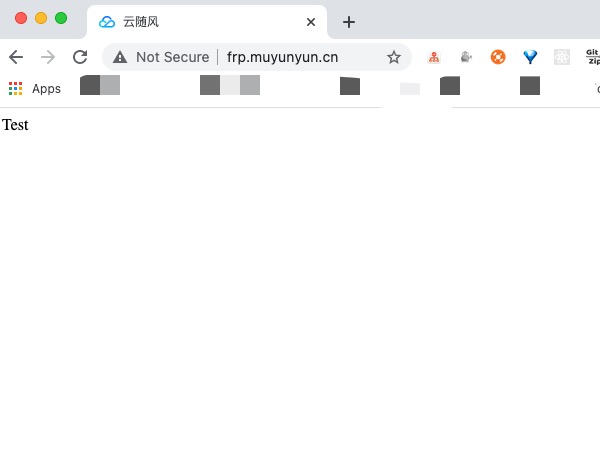
<body>Test</body>
</html>控制台输入 sudo systemctl restart nginx。
此时在浏览器访问 http://frp.muyunyun.cn:90 可以看到目标内容:
frp
服务端(云主机)配置
在云主机端执行如下命令:
cd /opt/
sudo wget https://github.com/fatedier/frp/releases/download/v0.37.0/frp_0.37.0_linux_386.tar.gz
sudo tar zxvf frp_0.37.0_linux_386.tar.gz
进入 /opt/frp_0.37.0_linux_arm64

备份服务端 frps 的配置文件 frps.ini
sudo cp frps.ini frps.ini_backup修改服务端配置文件 frps.ini,增加一行 vhost_http_port = 8080:
[common]
bind_port = 7000
+ vhost_http_port = 8080
以上配置含义为: 服务端 frps 程序运行在 7000 端口,并将指向 8080 端口的请求转发到客户端。
运行如下命令,开启 frp 的服务端程序
./frps -c frps.ini
进一步地使用 pm2 运行 frps
安装 node 环境
全局安装 pm2
npm i pm2 -g使用 pm2 守护运行 frps 服务
sudo echo "/opt/frp_0.37.0_linux_386/frps -c /opt/frp_0.37.0_linux_386/frps.ini" > /opt/frp_0.37.0_linux_386/start_frpc.sh
pm2 start /opt/frp_0.37.0_linux_386/start_frps.sh
pm2 save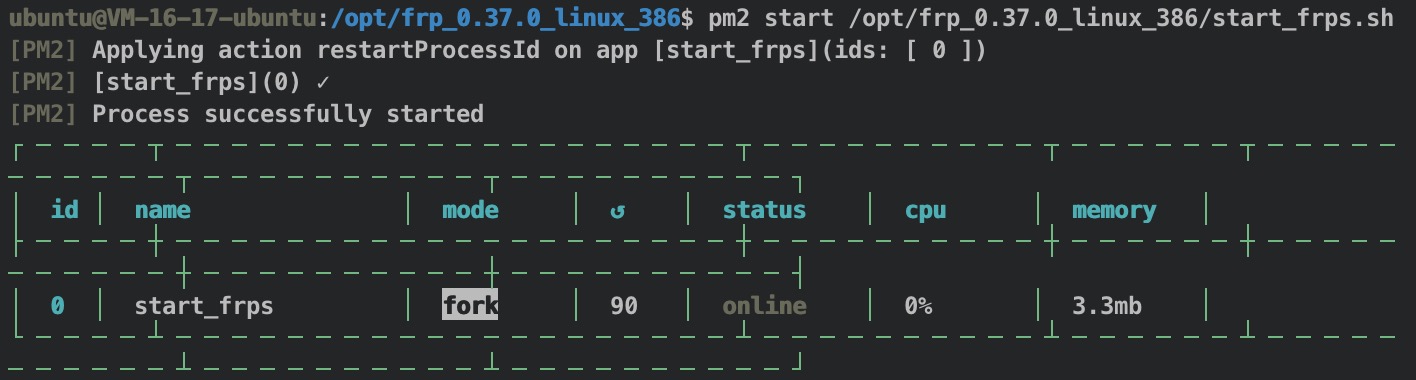
客户端(树莓派)配置
在树莓派内执行以下命令,下载 frp,并解压。
cd /opt/
sudo wget https://github.com/fatedier/frp/releases/download/v0.37.0/frp_0.37.0_linux_arm64.tar.gz
sudo tar zxvf frp_0.37.0_linux_arm64.tar.gz
进入 /opt/frp_0.37.0_linux_arm64
备份客户端 frpc 的配置文件 frpc.ini
sudo cp frpc.ini frpc.ini_backupfrpc.ini 文件备份如下:
[common]
server_addr = 127.0.0.1
server_port = 7000

[ssh]
type = tcp
local_ip = 127.0.0.1
local_port = 22
remiote_port = 6000
编辑 frpc.ini:
sudo vim frpc.ini[common]
server_addr = 81.69.252.246
server_port = 7000
[web]
type = http
local_port = 8080
custom_domains = frp.muyunyun.cn启动客户端
./frpc -c frpc.ini接着从公网访问 frp.muyunyun.cn:90,验证内网穿透是否成功。

可以看到来自公网的请求在树莓派的 frp 客户端已经有了反应,接着我们在树莓派搭建一个简单服务。
安装 Node.js
使用 ARMv8 版本的稳定版 Node.js。
cd /opt/
sudo wget https://nodejs.org/dist/v14.18.0/node-v14.18.0-linux-arm64.tar.xz
sudo tar xvf node-v14.18.0-linux-arm64.tar.xz
将 Node.js 添加到系统变量
sudo echo "export NODE_HOME=/opt/node-v14.18.0-linux-arm64" >> ~/.bashrc
sudo echo "export PATH=\$NODE_HOME/bin:\$PATH" >> ~/.bashrc
source ~/.bashrc
此时在树莓派中输入 node -v,可以看到对应版本如下:
ubuntu@ubuntu:~$ node -v
v14.18.0
ubuntu@ubuntu:~$ npm -v
6.14.15
接着安装 http-server 服务
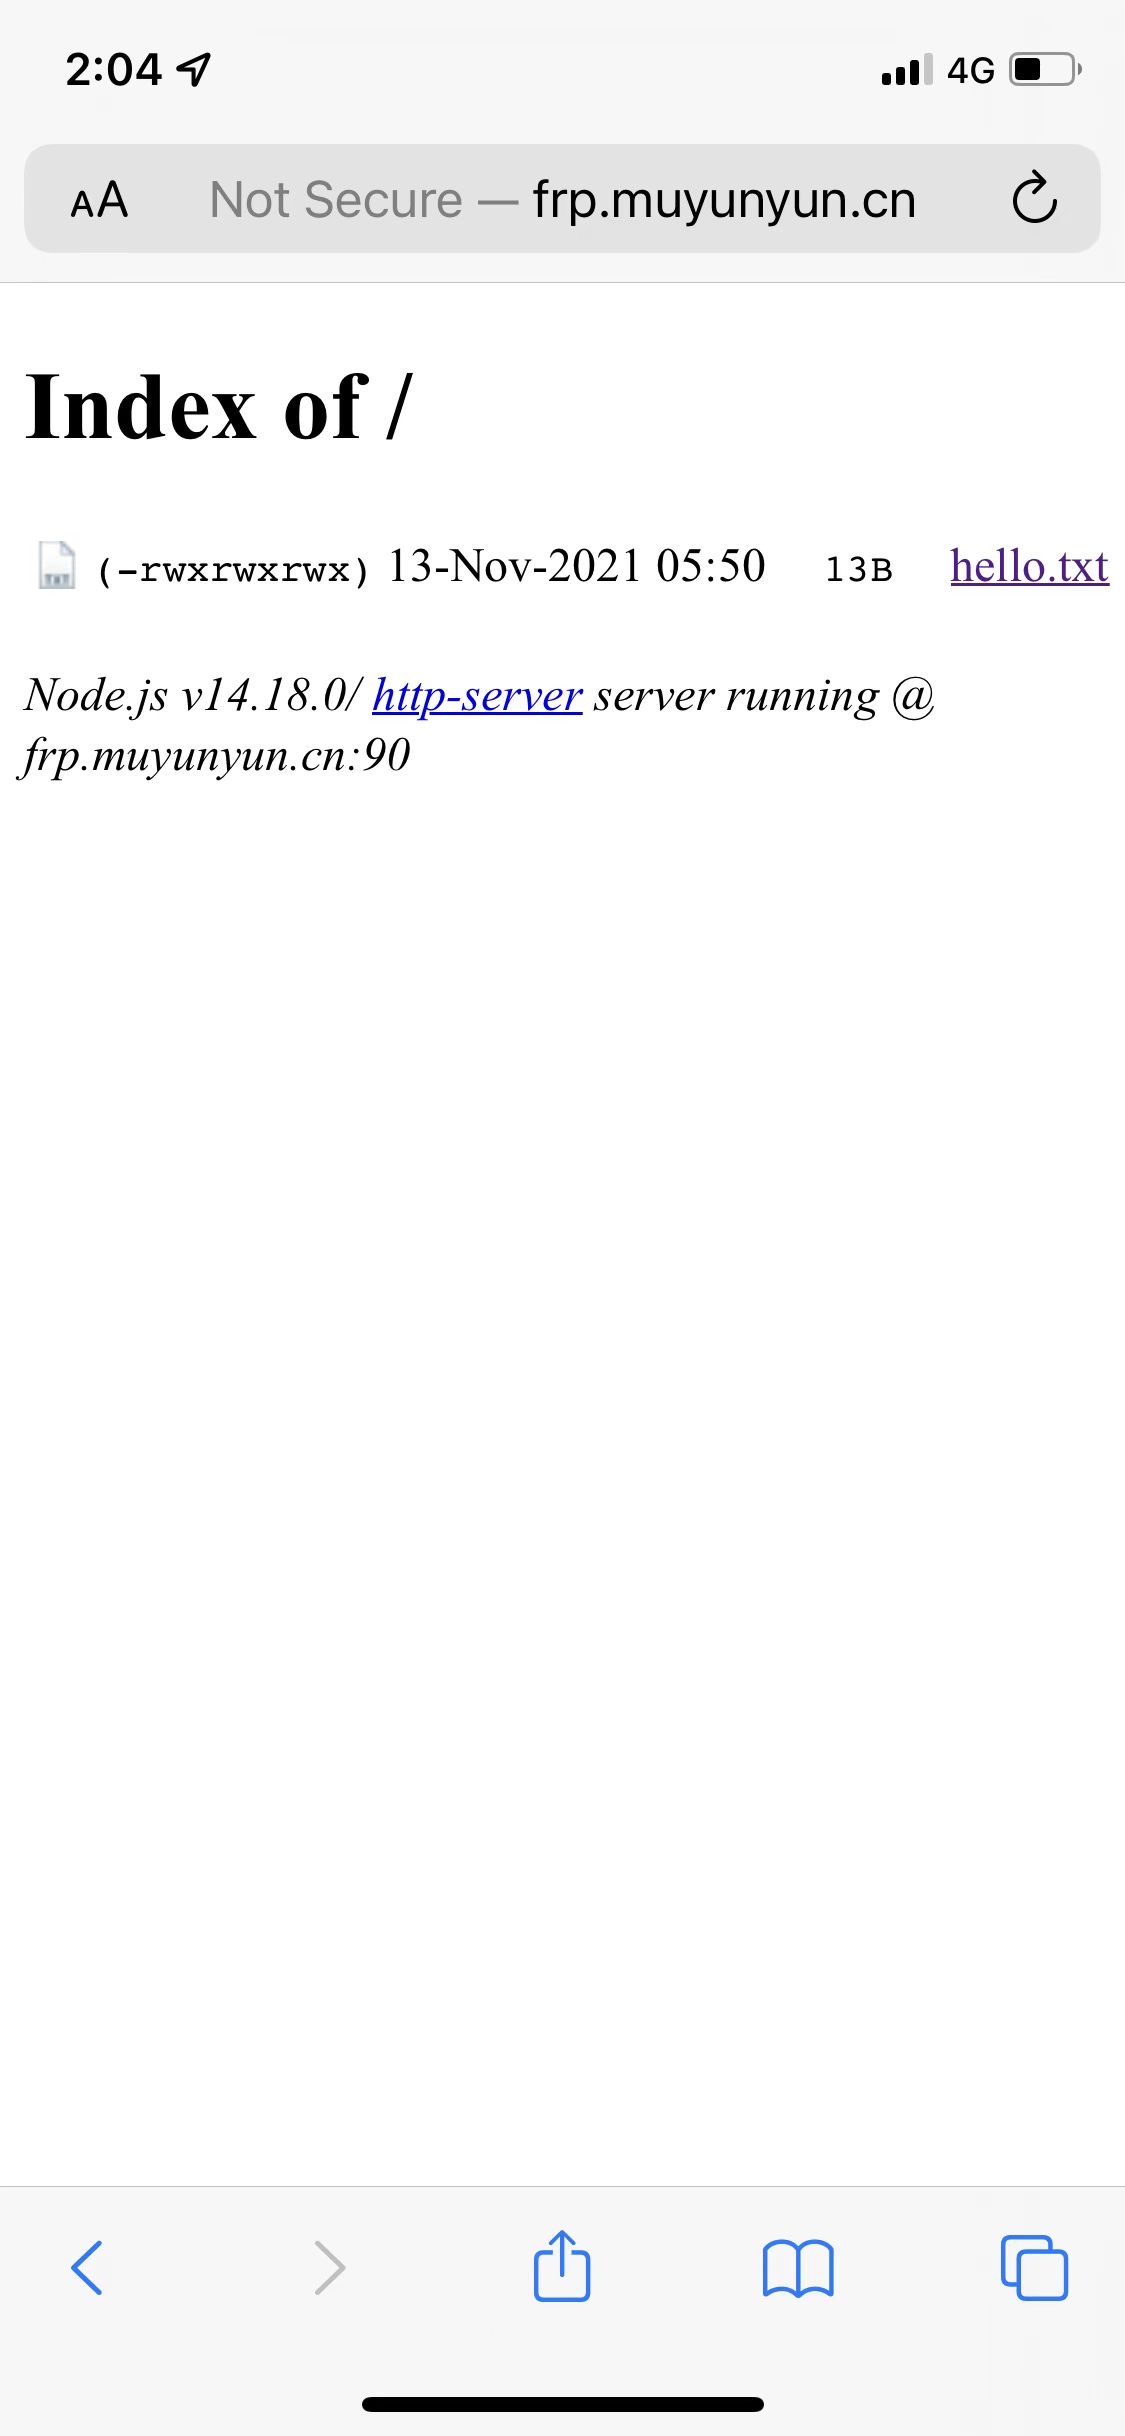
npm install http-server -g在 /opt 文件夹 新建 frp.muyunyun.cn 文件夹, 并创建 hello.txt 文件。
sudo mkdir /opt/frp.muyunyun.cn
sudo chmod 777 -R /opt/frp.muyunyun.cn
sudo touch /opt/frp.muyunyun.cn/hello.txt
sudo chmod 777 -R /opt/frp.muyunyun.cn/hello.txt
sudo echo "Hello World!" > /opt/frp.muyunyun.cn/hello.txt
安装 pm2
npm install pm2 -g使用 pm2 守护运行 http-server 服务
cd /opt/frp_0.37.0_linux_arm64
sudo touch start_http_server.sh
sudo chmod 777 start_http_server.sh
sudo echo "http-server /opt/frp.muyunyun.cn -p 8080" > start_http_server.sh
pm2 start /opt/frp_0.37.0_linux_arm64/start_http_server.sh
pm2 save
使用 pm2 守护运行 frpc 服务
sudo touch /opt/frp_0.37.0_linux_arm64/start_frpc.sh
sudo chmod 777 /opt/frp_0.37.0_linux_arm64/start_frpc.sh
sudo echo "/opt/frp_0.37.0_linux_arm64/frpc -c /opt/frp_0.37.0_linux_arm64/frpc.ini" > /opt/frp_0.37.0_linux_arm64/start_frpc.sh
cd /opt/frp_0.37.0_linux_arm64/
pm2 start /opt/frp_0.37.0_linux_arm64/start_frpc.sh
pm2 save
可以使用 pm2 list 查看当前树莓派中的服务列表。

在公网访问 frp.muyunyun.cn:90。💐💐💐至此有了外网可以访问的家庭服务器。
添加 SSH 服务
[ssh]
type = tcp
local_ip = 127.0.0.1
local_port = 22
remote_port = 6000
如上配置是指将树莓派的默认 ssh 的 22 号端口映射到 frp.muyunyun.cn 的 6000 端口。
重启 frpc 服务:
cd /opt/frp_0.37.0_linux_arm64
pm2 restart start_frpc.sh
通过公网 frp.muyunyun.cn 的 6000 端口进行 ssh 登录。
ssh [email protected] -p 6000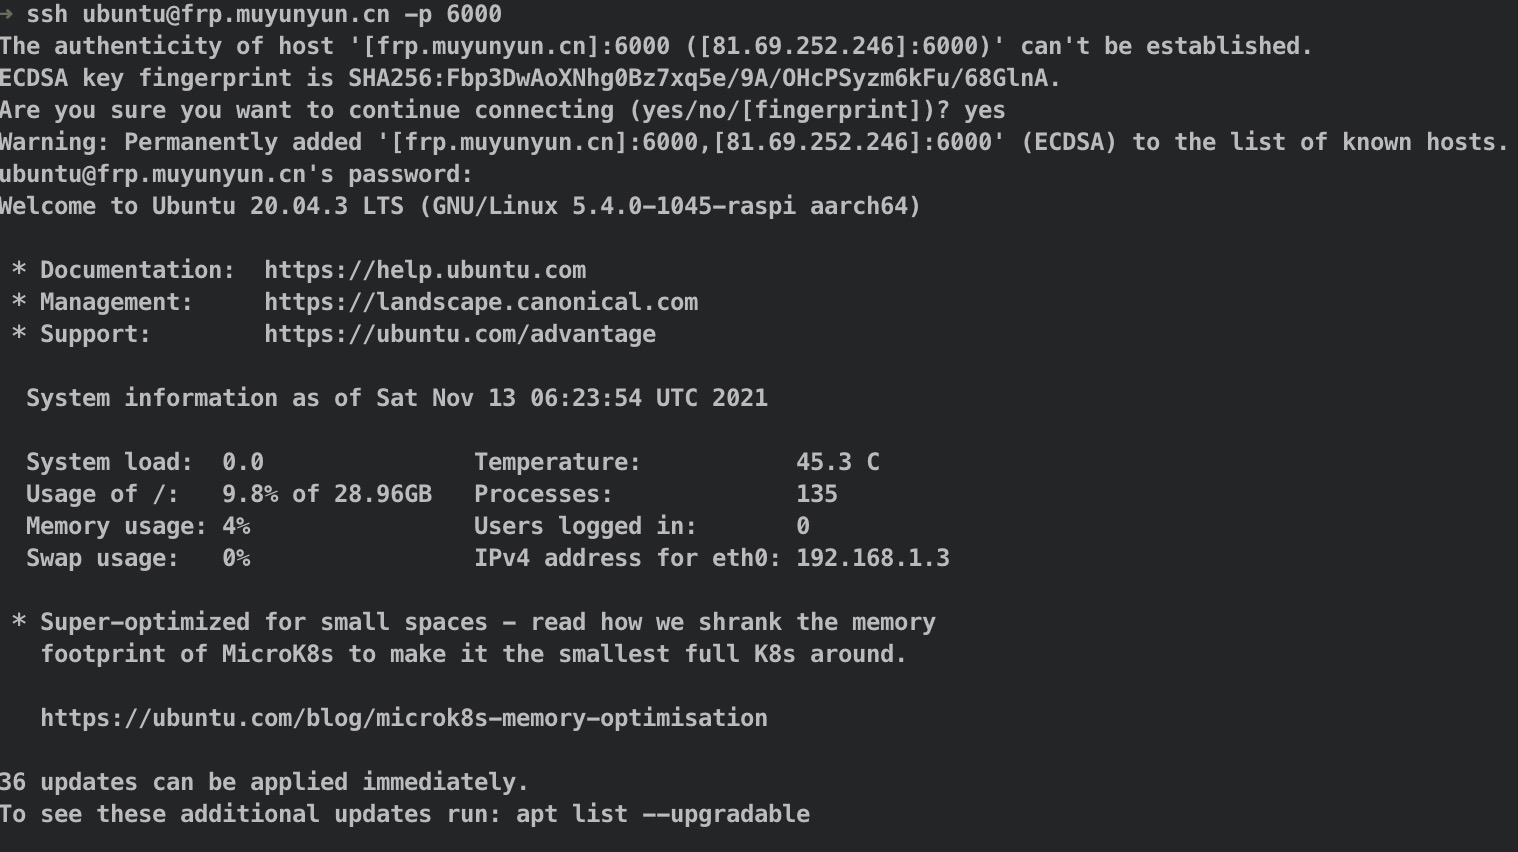
from blog.
 stale
commented on June 19, 2024
stale
commented on June 19, 2024
This issue has been automatically marked as stale because it has not had recent activity. It will be closed if no further activity occurs. Thank you for your contributions.
from blog.
Related Issues (20)
- 设计模式--单例篇 Error: Missing initializer in const declaration HOT 4
- http://muyunyun.cn/blog/ 404了 HOT 5
- http://muyunyun.cn/blog/ 又404了 HOT 2
- 拼多多内推 HOT 1
- 提供个人博客的 RSS 资源 HOT 1
- TypeScript extends 精读与实践 HOT 14
- 基于树莓派部署 code-server HOT 1
- React Conf 2021 HOT 3
- 2021-d2-conf
- 提供文章推荐页 HOT 1
- 搭建树莓派网盘 HOT 1
- 添加我阅读过的书/书籍推荐章节 HOT 2
- 【开源自荐】推荐一个每日更新的前端面试题库 HOT 1
- Todo: 在 React 使用 Rust 编写的函数 HOT 2
- Todo: 截图转代码 AI 试用实践 HOT 1
- 首页增加最近新增的前 10 篇文章列表 HOT 1
- husky 未生效解决方案 HOT 2
- 简版 express.js 的实现 链接失效 HOT 2
- SEO 在 SPA 站点中的实践 HOT 3
Recommend Projects
-
 React
React
A declarative, efficient, and flexible JavaScript library for building user interfaces.
-
Vue.js
🖖 Vue.js is a progressive, incrementally-adoptable JavaScript framework for building UI on the web.
-
 Typescript
TypeScript is a superset of JavaScript that compiles to clean JavaScript output.
-
TensorFlow
An Open Source Machine Learning Framework for Everyone
-
Django
The Web framework for perfectionists with deadlines.
-
 Laravel
A PHP framework for web artisans
-
D3
Bring data to life with SVG, Canvas and HTML. 📊📈🎉
-
Recommend Topics
-
javascript
JavaScript (JS) is a lightweight interpreted programming language with first-class functions.
-
web
Some thing interesting about web. New door for the world.
-
server
A server is a program made to process requests and deliver data to clients.
-
Machine learning
Machine learning is a way of modeling and interpreting data that allows a piece of software to respond intelligently.
-
Visualization
Some thing interesting about visualization, use data art
-
Game
Some thing interesting about game, make everyone happy.
Recommend Org
-
Facebook
We are working to build community through open source technology. NB: members must have two-factor auth.
-
Microsoft
Open source projects and samples from Microsoft.
-
Google
Google ❤️ Open Source for everyone.
-
Alibaba
Alibaba Open Source for everyone
-
D3
Data-Driven Documents codes.
-
Tencent
China tencent open source team.
from blog.