


This module enables to use a BDD-style approach for cross-browser testing:
- Describe user stories in Cucumber using Gherkin syntax
- Map them to browser operations and assertions in Nightwatch.js
- Run using either real browser, headless browser or cloud based WebDriver services such as SauceLabs or BrowserStack
Please note that a lot of new syntax changes are inroduced. For all changes please read the (readme diff).
- latest cucumber 2 support
- promised based external nightwatch client
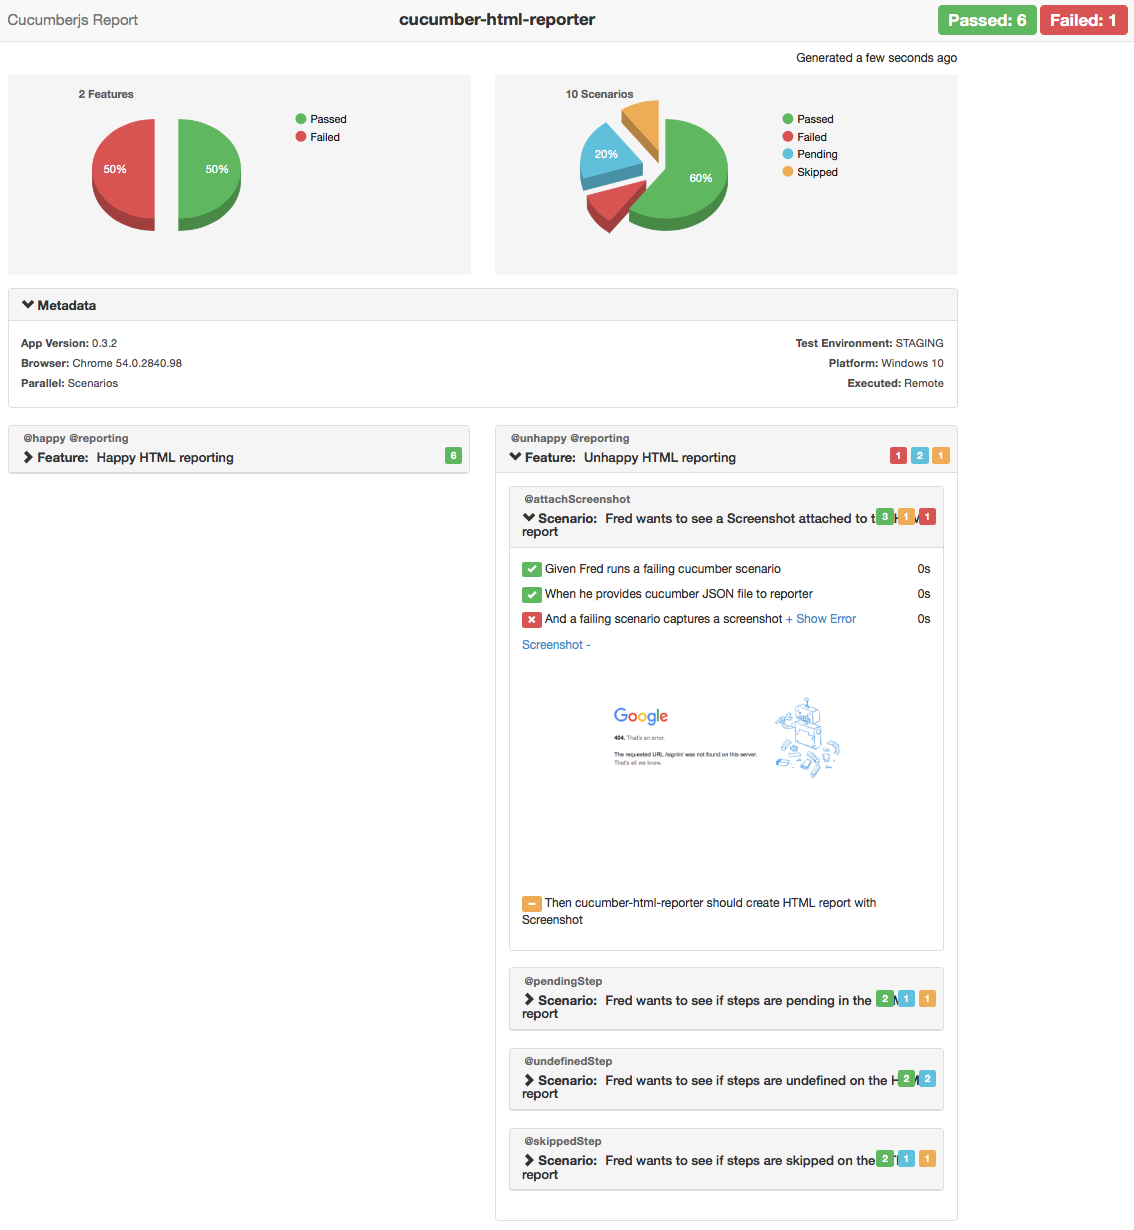
- html report generation now can be done using external package (cucumber-html-reporter)
- junit reporting generation now can be done using external package (cucumber-junit)
- almost all configuration options removed in favour of
cucumberArgswhich brings the package closes to Cucumber.js - Node.js version < 6 is dropped.
First you need to have Nightwatch.js and Cucumber.js to be installed locally.
$ npm install --save-dev nightwatch cucumber
or shorter
$ npm i -D nightwatch cucumber
you can also install nightwatch globally
$ npm i -g nightwatch
If you are new to Nightwatch.js you can read the developer guide.
Install nightwatch-cucumber
$ npm install --save-dev nightwatch-cucumber
or shorter
$ npm i -D nightwatch-cucumber
In project root create a JavaScript configuration file for Nightwatch.js. Use nightwatch.conf.js instead of nightwatch.json. More details You don't need to specify src_folders.
// nightwatch.conf.js

module.exports = {
  ...
}Require nightwatch-cucumber at the top of the configuration file.
// nightwatch.conf.js

require('nightwatch-cucumber')({
  /* other configuration options */
})

module.exports = {
  ...
}
For more examples check out the examples folder
By default feature files are located in features folder. You can change this using configuration object.
# features/google.feature

Feature: Google Search

Scenario: Searching Google

  Given I open Google's search page
  Then the title is "Google"
  And the Google search form exists
Step definitions files are located in features/step_definitions folder by default.
// features/step_definitions/google.js

const {client} = require('nightwatch-cucumber');
const {defineSupportCode} = require('cucumber');

defineSupportCode(({Given, Then, When}) => {
  Given(/^I open Google's search page$/, () => {
    return client
      .url('http://google.com')
      .waitForElementVisible('body', 1000);
  });

  Then(/^the title is "([^"]*)"$/, (title) => {
    return client.assert.title(title);
  });

  Then(/^the Google search form exists$/, () => {
    return client.assert.visible('input[name="q"]');
  });

});
For more examples check out the examples folder
You can run the test by executing
node_modules/.bin/nightwatch
or if you installed Nightwatch globally you can run test by executing
nightwatch

You can write tests using latest ECMAScript features using Babel. Using async function is especially useful.
For that you need install babel-core, setup .babelrc and add Babel as compiler
// nightwatch.conf.js

require('nightwatch-cucumber')({
  cucumberArgs: ['--compiler', 'js:babel-core/register', '--require', 'features/step_definitions', 'features']
})
...
// features/step_definitions/google.js
import { client } from 'nightwatch-cucumber';
import { defineSupportCode } from 'cucumber';
defineSupportCode(({ Given, Then, When }) => {
Given(/^I open Google's search page$/, async () => {
await client.url('http://google.com')
await client.waitForElementVisible('body', 1000);
});
Then(/^the title is "([^"]*)"$/, async (title) => {
await client.assert.title(title);
});
Then(/^the Google search form exists$/, async () => {
await client.assert.visible('input[name="q"]');
});
});For complete working example check out the examples folder
For that you can use the cucumberArgs configuration property. For available Cucumber.js CLI options see the Cucumber.js docs
// nightwatch.conf.js

require('nightwatch-cucumber')({
  cucumberArgs: [
    '--require', 'hooks.js',
    '--require', 'features/step_definitions',
    '--format', 'progress',
    '--format', 'json:reports/cucumber.json',
    '--format-options', '{"colorsEnabled":false}',
    'features'
  ]
})

module.exports = {
  ...
}
Step definitons which uses Nightwatch client should return the result of api call as it returns a Promise. Please note that this behaviour is different from plain Nightwatch client API.

You can enable screenshot generation on step failure using following Nightwatch configuration
module.exports = {
  test_settings: {
    default: {
      screenshots : {
        enabled : true,
        on_failure : true,
        path: 'screenshots/default'
      },
      ...
    }
  },
  ...
}You can create HTML reports using cucumber-html-reporter As input you need to provide a Cucumber JSON report generated by this package.
You can create JUnit XML reports using cucumber-junit As input you need to provide a Cucumber JSON report generated by this package.
For running test using Grunt task runner you can use the following Gruntfile.js as template. More details
// Gruntfile.js
const nightwatch = require('nightwatch')

module.exports = (grunt) => {
  grunt.initConfig({
    nightwatch: {
      'default': {
        argv: {}
      }
    }
  })

  nightwatch.initGrunt(grunt)

  grunt.registerTask('default', ['nightwatch'])
}For running test using Gulp task runner you can use the following gulpfile.js as template. More details
// gulpfile.js
const gulp = require('gulp')
const nightwatch = require('gulp-nightwatch')

gulp.task('default', () => {
  return gulp.src('')
    .pipe(nightwatch({
      configFile: 'nightwatch.conf.js'
    }))
})You can execute tests using the following programmatical API
const nightwatch = require('nightwatch')

nightwatch.runner({
  _: [], // Run single feature file
  config: 'nightwatch.conf.js',
  env: 'default',
  filter: '',
  tag: ''
}, () => {
  console.log('done');
})You can use feature background to avoid copying and pasting of steps. The background runs before each scenario after beforeScenario hooks.
Feature: Feature background example

Background:
  Given there are 10 cucumbers

Scenario: eating

  When I eat 3 cucumbers
  Then I should have 7 cucumbers

Scenario: adding

  When I add 1 cucumbers
Then I should have 11 cucumbersYou can use scenario outlines to avoid copying and pasting of scenarios.
Scenario Outline: eating
  Given there are <start> cucumbers
  When I eat <eat> cucumbers
  Then I should have <left> cucumbers

  Examples:
  | start | eat | left |
  |  12   |  5  |  7   |
| 20 | 5 | 15 |For making you tests more readable and maintainable you can use the Page Object pattern. Nightwatch reads the page objects from the folder (or folders) specified in the page_objects_path configuration property. More details. Add the following line to Nightwatch.js configuration file.
// nightwatch.conf.js

require('nightwatch-cucumber')({
  /* configuration */
})

module.exports = {
  page_objects_path: 'page-objects',
  ...
}
//page-objects/yahoo.js
module.exports = {
url: 'http://yahoo.com',
elements: {
body: 'body',
searchBar: 'input[name="p"]'
}
}Now we can use page objects from step definitions
//step-definitions/yahoo.js

const {client} = require('nightwatch-cucumber');
const {defineSupportCode} = require('cucumber');

defineSupportCode(({Given, Then, When}) => {
  Given(/^I open Yahoo's search page$/, () => {
    const yahoo = client.page.yahoo();

    return yahoo
      .navigate()
      .waitForElementVisible('@body', 1000);
  });

  Then(/^the Yahoo search form exists$/, () => {
    const yahoo = client.page.yahoo();

    return yahoo.assert.visible('@searchBar');
  });

});You can selectively run features based on groups. To group features together just place them in the same sub-folder. The folder name is the name of the group.
You can use Nightwatch CLI --group, --skipgroup flags. More details
You can selectively run features based on tags. More details
# google.feature

@google @search
Feature: Google Search

Scenario: Searching Google

  Given I open Google's search page
  Then the title is "Google"
  And the Google search form exists
$ node nightwatch.js --tag google
You can also skip features based on tags
node nightwatch.js --skiptags google
You can selectively run scenarios based on tags.
# google.feature

Feature: Google Search

@google @search
Scenario: Searching Google

  Given I open Google's search page
  Then the title is "Google"
  And the Google search form exists
$ node nightwatch.js --tag google
You can also skip scenarios based on tags
node nightwatch.js --skiptags google
For speeding up the execution of tests you can run them parallely. Here is an example Nightwatch configuration file. More details.
// nightwatch.conf.js

require('nightwatch-cucumber')({
  ...
})

module.exports = {
  "test_workers": true,
  ...
}
Event handlers can be provided using Cucumber.js support files. Support files are specified using supportFiles configuration option.
More details
For more examples check out the examples folder
// nightwatch.conf.js

require('nightwatch-cucumber')({
  cucumberArgs: [
    '--require', 'event-handlers.js'
    '--require', 'features/step_definitions',
    '--format', 'pretty',
    '--format', 'json:reports/cucumber.json',
    'features'
  ]
})

module.exports = {
  ...
}
// event-handlers.js
const {client} = require('nightwatch-cucumber');
const {defineSupportCode} = require('cucumber');
defineSupportCode(({registerHandler}) => {
registerHandler('BeforeFeatures', function (features) {
return client.click('.my-button');
});
registerHandler('BeforeFeatures', function (features, callback) {
setTimeout(function() {
callback();
}, 1000);
});
}Hooks can be provided using Cucumber.js support files. Support files are specified using supportFiles configuration option.
More details
For more examples check out the examples folder
// nightwatch.conf.js

require('nightwatch-cucumber')({
  cucumberArgs: [
    '--require', 'hooks.js',
    '--require', 'features/step_definitions',
    '--format', 'pretty',
    '--format', 'json:reports/cucumber.json',
    'features'
  ]
})

module.exports = {
  ...
}
// hooks.js
const {defineSupportCode} = require('cucumber');
defineSupportCode(({Before, After}) => {
Before((scenario, callback) => {
console.log('Before start');
setTimeout(() => {
console.log('Before end');
callback();
}, 1000);
});
After((scenario, callback) => {
console.log('After start');
setTimeout(() => {
console.log('After end');
callback();
}, 1000);
});
})The default configuration object is.
{
  cucumberArgs: [
    '--require', 'features/step_definitions',
    '--format', 'pretty',
    '--format', 'json:reports/cucumber.json',
    'features'
  ]
}
Default configuration could be overwritten in the following way.
// nightwatch.conf.js

require('nightwatch-cucumber')({
    cucumberArgs: [
      '--require', 'step_definitions',
      '--format', 'pretty',
      '--format', 'json:reports/cucumber.json',
      'features'
    ]
})

module.exports = {
  ...
}You can use setDefaultTimeout function in support code to set default timeout for steps.
By default, timeout is 5 seconds. You can find more details in Cucumber.js docs
const {defineSupportCode} = require('cucumber')

defineSupportCode(({setDefaultTimeout}) => {
  setDefaultTimeout(30 * 1000)
})You can use different language in feature files. For setting the language you need to add language comment at the top of the feature file.
#language: pt

Funcionalidade: Pesquisa Google

Cenário: Pesquisando no Google

   Dado que eu abrir a página de pesquisa do Google
   Em seguida, o título é "Google"
E o formulário de busca Google existeThanks goes to these wonderful people (emoji key):


This project follows the all-contributors specification. Contributions of any kind welcome!
See releases
This software is released under the terms of the MIT license.