


SundeedSpotlight is available through CocoaPods. CocoaPods is a dependency manager that automates and simplifies the process of using 3rd-party libraries like MarkdownKit in your projects. You can install CocoaPods with the following command:
gem install cocoapodsTo integrate SundeedSpotlight into your Xcode project using CocoaPods, simply add the following line to your Podfile:
pod "SundeedSpotlight"Afterwards, run the following command:
pod install- withAbilityToTapThroughSpotlight(_ passthrough: Bool): To state whether the user interactions with the spotlighted view is enabled.
- Parameters:
- passthrough (Bool):
- True: SpotlightedView (e.g: UIButton) will perform its action when tapped while in the spotlight
- False: SpotlightedView (e.g: UIButton) will not be notified that it is tapped
- passthrough (Bool):
- Parameters:
- withInfoCornerRadius(_ cornerRadius: CGFloat): To specify the corner radius of the info view
- Parameters:
- cornerRadius: A number to specify the corner radius of the info view
- Parameters:
- withBackgroundColor(_ color: UIColor): To specify the background color of the dimmed view
- Parameters:
- color: A color to full view background color (e.g: UIColor.black.withAlphaComponent(0.7))
- Parameters:
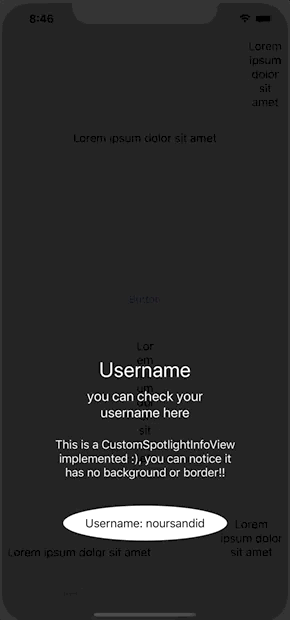
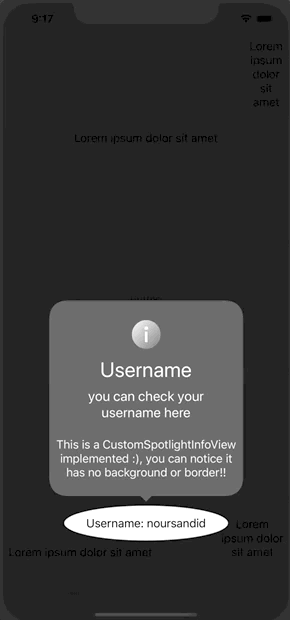
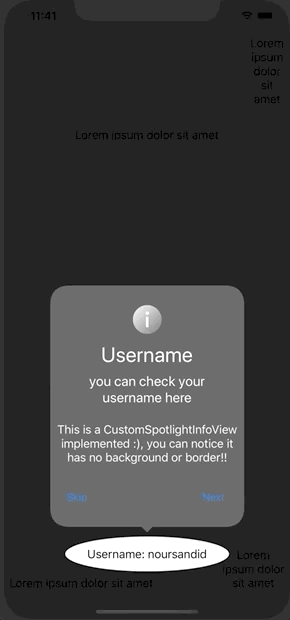
- withCustomInfoView(_ view: CustomSpotlightInfoView): To show a custom info view
- Parameters:
- view: A view conforming to protocol CustomSpotlightInfoView, implementing function to listen to changes happening. (e.g: didMoveToItem)
- Parameters:
- addView(_ view: UIView, withInfo info: String? = nil, withUserInfo: [String: Any?] = [:], withCustomRadius radius: CGFloat? = nil): Add a spotlighted view (UIView) with parameters sent to customize it
- Parameters:
- view: A view that will be in the middle of the spotlight
- info: Value of the string shown in the DefaultInfoView
- userInfo: Dictionary containing any object that will be passed the the CustomSpotlightInfoView to maximize the customization
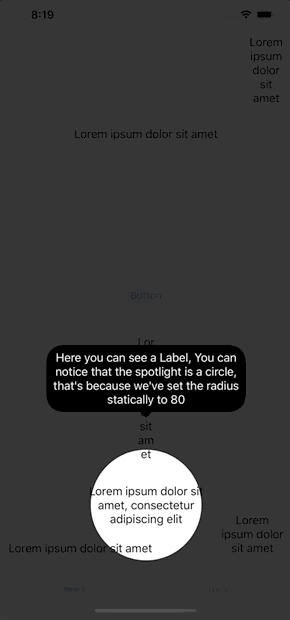
- radius: If specified, the spotlight will be a full circle with the chosen radius, otherwise, the spotlight will be an ellipse circuling exactly the spotlightedView
- Parameters:
- addTabBarItem(at index: Int, in tabBar: UITabBar?, withInfo info: String? = nil, withUserInfo: [String: Any?] = [:], withCustomRadius radius: CGFloat? = nil): Add a tabBarItem by passing the tabBar with a specific index
- Parameters:
- index: An integer indicating the index of the chosen tabBarItem to highlight
- tabBar: The tabBar containing the tabBarItem to highlight
- info: Value of the string shown in the DefaultInfoView
- userInfo: Dictionary containing any object that will be passed the the CustomSpotlightInfoView to maximize the customization
- radius: If specified, the spotlight will be a full circle with the chosen radius, otherwise, the spotlight will be an ellipse circuling exactly the spotlightedView
- Parameters:
- wait(for string: String): To indicate to the library that it should wait for a certain event to happen (e.g: an API call) before continuing the journey
- Parameters:
- string: An identifier to wait for, to be sent with the 'continue' function
- Parameters:
- func
continue(for string: String): To indicate to the library that the event that it was waiting for was done (e.g: an AI call)- Parameters:
- string: The identifier used to wait, so the library knows that it can continue the journey
- Parameters:
- waitForInsertion(): To indicate to the library that other spotlighted views will be inserted and that it should wait for them (e.g: when navigating back and forth between ViewControllers holding spotlighted views in a journey)
- insertView(_ view: UIView, withInfo info: String? = nil, withUserInfo: [String: Any?] = [:], withCustomRadius radius: CGFloat? = nil): Insert a spotlighted view (UIView) in an already running Spotlight journey with parameters sent to customize it
- Parameters:
- view: A view that will be in the middle of the spotlight
- info: Value of the string shown in the DefaultInfoView
- userInfo: Dictionary containing any object that will be passed the the CustomSpotlightInfoView to maximize the customization
- radius: If specified, the spotlight will be a full circle with the chosen radius, otherwise, the spotlight will be an ellipse circuling exactly the spotlightedView
- Parameters:
- insertTabBarItem(at index: Int, in tabBar: UITabBar?, withInfo info: String? = nil, withUserInfo: [String: Any?] = [:], withCustomRadius radius: CGFloat? = nil): Insert a tabBarItem, in an already running Spotlight journey, by passing the tabBar with a specific index
- Parameters:
- index: An integer indicating the index of the chosen tabBarItem to highlight
- tabBar: The tabBar containing the tabBarItem to highlight
- info: Value of the string shown in the DefaultInfoView
- userInfo: Dictionary containing any object that will be passed the the CustomSpotlightInfoView to maximize the customization
- radius: If specified, the spotlight will be a full circle with the chosen radius, otherwise, the spotlight will be an ellipse circuling exactly the spotlightedView
- Parameters:
- show(): Add the previously added views and tabBarItems into the Spotlight journey, either added at the beginning or inserted in between (with insert functions)
- UIView
- TabBarItem
import UIKit

class ViewController: UIViewController {
    @IBOutlet weak var label: UILabel!
    @IBOutlet weak var label1: UILabel!
    @IBOutlet weak var button: UIButton!
    static let sundeedWalkthrough = SundeedWalkthrough()
    override func viewDidLoad() {
        super.viewDidLoad()
        ViewController.sundeedWalkthrough
            .withAbilityToTapThroughSpotlight(true)
            .withInfoCornerRadius(40)
            .withBackgroundColor(UIColor.black.withAlphaComponent(0.8))
            .withCustomInfoView(WalkthroughCustomView())
            .addView(label, withInfo: "1",
                            withCustomRadius: 80)
            .addTabBarItem(at: 1,
                           in: self.tabBarController?.tabBar,
                           withInfo: "2",
                           withCustomRadius: 40) // This will make the user tap on the second item in the tabBar, thus you will move to the secondViewController
            .waitForInsertion() // This will tell the library that second ViewController will insert some of its spotlightedViews here
            .addView(button, withInfo: "7")
            .wait(for: "label1")
            .addView(label1, withInfo: "8")
            .show()
    }

    @IBAction func didPress(_ sender: Any) {
        print("button pressed")  // This will be printed because abilityToTapThroughSpotlight was set to true
        DispatchQueue.main.asyncAfter(deadline: .now()+2) {
            self.label1.isHidden = false
            ViewController.sundeedWalkthrough.continue(for: "label1") // This shal tell the library to continue the flow after waiting 2 seconds
        }
    }
}

class SecondViewController: UIViewController {
    @IBOutlet weak var label1: UILabel!

    override func viewDidLoad() {
        super.viewDidLoad()
        ViewController.sundeedWalkthrough
            .insertView(self.label1, withInfo: "3")
            .insertTabBarItem(at: 0,
                              in: self.tabBarController?.tabBar,
                              withInfo: "6",
                              withCustomRadius: 40) // This will make the user tap on the tabBarItem at 0 and go back to the first ViewController
        .show() // This will tell the library to add label1 and tabBarItem at 0 to the flow in the current flow
    }
}An example for a custom info view instead of the default one
class WalkthroughCustomView: UIView, CustomWalkthroughInfoView {
    @IBOutlet weak var titleLabel: UILabel!
    @IBOutlet weak var subtitleLabel: UILabel!
    @IBOutlet weak var descriptionLabel: UILabel!

    //manager variable is optional, you only need to add it if you wish to have a "Next" or "Skip" buttons and to control the flow manually.
    var manager: SpotlightInfoViewManager? = InfoViewManager()

    override init(frame: CGRect) {
        super.init(frame: frame)
        commonInit()
    }
    required public init?(coder: NSCoder) {
        super.init(coder: coder)
        commonInit()
    }
    private func commonInit() {
        fromNib()
        self.backgroundColor = .clear // set to Clear to remove the borders and the small arrow pointing to the spotlighted view
    }
    func walkthroughIsWaitingForInsertion() {
        self.titleLabel.text = "Waiting..."
        self.subtitleLabel.text = ""
        self.descriptionLabel.text = ""
    }
    func walkthroughDoneWaitingForInsertion() {
        print("walkthroughDoneWaitingForInsertion")
    }
    func walkthroughDidMoveToItem(at index: Int,
                                  withInfo info: String?,
                                  withUserInfo userInfo: [String : Any?]) {
        self.descriptionLabel.text = info
        if let title = userInfo["title"] as? String,
            let subtitle = userInfo["subtitle"] as? String {
                self.titleLabel.text = title
                self.subtitleLabel.text = subtitle
        }
    }
    func walkthroughIsWaiting(for identifier: String) {
        print("waiting for API")
    }
    func walkthroughDidContinue(for identifier: String) {
        print("api responded and the flow continued")
    }
    @IBAction func skipButtonPressed(_ sender: Any) {
        self.manager?.skip()
    }

    @IBAction func nextButtonPressed(_ sender: Any) {
        self.manager?.next()
    }
}MIT


