Framework for communication between Unreal Engine and Python.
We are currently using Unreal Engine 5.3. We recommend using the same version to ensure project stability.
We currently have version 1.2 of the plugin. If you still have version 1.0 please update to this new version.
Mistakes regarding the parallel training of Single Agent Environment have been fixed.
Inference module for trained models has been added.
Install the given dependencies. This is just the python-side of the framework. Remember to create or to open a UE5 scene with the official unray-bridge blueprints.
pip install ray[rllib] torch tensorflow
pip install unray
We recommend conda for creating a virtualenv with anaconda and installing the dependendencies. Currently, Ray is available in Python 3.10 or less, so we recommend creating a virtualenv with version 3.10.
There are currently two examples ready for you to run.

In Unreal Engine, go to the maps folder and start the Cartpole map. Once it is running, go to your terminal an inside the PythonFiles folder run:
python Cartpole.py
If everything is correct, the cartpole will start to move.

In this env, you have two agents competing in a single env.
In Unreal Engine, go to the maps folder and start the MultiAgentArena map. Once it is running, go to your terminal an inside the PythonFiles folder run:
python MultiAgentArena.py
If everything is correct, the agents will start to move.

In Unreal Engine, go to the maps folder and start the MultiAgentArena_BP map. Once it is running, go to your terminal an inside the PythonFiles folder run:
python ParallelMultiAgentArena.py
If everything is correct, the four envs will start to move.
In the Maps folder you'll find some examples to run:

To create a custom env in Unreal Engine, first create your Agent Blueprint.
You can create your agent based on the parent class of your choice. Once you create the blueprint, go to the Class Settings section.

In the details panel, find the Interfaces section:

In the Implemented Interfaces subsection, click the Add button and search for "BI_Agent".


Once you do this, in the blueprint functions, you'll now have these functions:

You have to implement these functions according to your enviornment.
| Function | Description |
|---|---|
Get Reward |
Agent Reward |
Is Done |
Function to specify the way the agent finishes the environment |
Reset |
Reset the agent. Create Actor -> True if you want to destroy the actor and spawn it again in a new place. |
Get State |
Get agent observations |
Step |
What the agent does in each step |
When you've implemented all these functions and you want to try your environment, you'll have to add a Connector to your map.
In the Blueprints folder, you'll find the connectors for both single agent envs and multiagent envs:

If your environment is a single agent env, place a Connector_SA instance in your map. Once you do, you can select it and in the details panel you'll find the Default section. There, you'll find an Actor Agent variable, assign your agent to this variable.
If your environment is a multiagent env, you'll need to place a Connector_MA instance in your map. Once you do, you can select it and in the details panel you'll find the Default section. There, you'll find an array called Actor Agents.

To ensure the framework can recognise all the agents in your environment, add each agent to the array.
Remember that for each agent in your env, you'll have to implement the Reward, Done, Reset, Get State and Step functions.
If you want to train several envs at the same time, we recommend you create your env as a Blueprint.
In the Blueprints folder you'll find a SingleAgent_Env Blueprint.
You can create your env with this Blueprint as a parent Class.
In the Viewport of your env blueprint class, drag one of the Conector_SA from the Content Drawer and place it where you want.

In the Event Graph of your env blueprint class, you'll have to do a few things to configure your env.
Set your Agent to the Agent variable that bellongs to the SingleAgent_Env class and add the following functions in your env class event graph:

In the Blueprints folder you'll find a MultiAgent_Env Blueprint.

You can create your env with this Blueprint as a parent Class.
In the Viewport of your env blueprint class, drag one of the Conector_MA from the Content Drawer and place it where you want.

In the Event Graph of your env blueprint class, you'll have to do a few things to configure your env.
First, each env you create will have an ID (which defaults to 1). You can either set this parameter in the Details pannel of your map or create a function to set it automatically.
Then, you need to add the agents in your env to an Agents array, which belongs to the MultiAgent_Env class. To do so, simply search for the Get Agents function and add each of your agents to this array. For example, in the MultiAgent Arena map it looks like this:

Finally, you'll have to add the following functions to your env class:

This is to set the agents and set the ports in which the communication is going to happen.
NOTE: We recommend reading this documentation with a basic RLlib knowledge. You can read the RLlib documentation here: https://docs.ray.io/en/latest/rllib/index.html
In order to define a custom environment, you have to create an action and observation dictionary. This is called a env_config dict.
# Define the env_config dict for each agent.
env_config = {
  "observation": <Space>,
  "action" :<Space>
}
Each Space is taken from BridgeSpace
from unray.envs.spaces import BridgeSpaces Once you have your env_config dict ready, we'll create the Unray object, which will allow us to train our environment with Unray.
#Create Unray object

from unray.unray_config import UnrayConfig
unray_config = UnrayConfig()
This will allow us to configure our algorithm to be ready for the communication with Unreal Eninge.
Next, we'll need to create an instance of a Single Agent Environment, which takes our env_config as an argument and a name for our env:
#Create Instance of Single Agent Environment

from unray.envs.base_env import SingleAgentEnv

env = SingleAgentEnv(env_config, 'env_name')
Now, we can use unray without problem. After creating the config for our algorithm (like PPO) using RLlib, we'll create our algorithm instance using the configure_algo function from our Unray object, which takes in two arguments: our algorithm config and the single agent environment instance
#Create Algo Instance
algo = unray_config.configure_algo(algo_config, env)
Now, Unray is ready to train your Single Agent Environment.
We'll take the classic cartpole example to start with unray.
First, let's create the action and observation dictionary. We are using the cartpole problem definition used in Gymnausium: https://gymnasium.farama.org/environments/classic_control/cart_pole/
from unray.envs.spaces import BridgeSpaces

high = np.array(
                [
                    1000,
                    np.finfo(np.float32).max,
                    140,
                    np.finfo(np.float32).max,
                ],
                dtype=np.float32,
            )

## Configurations Dictionaries
# Define all the observation/actions spaces to be used in the Custom environment
# BridgeSpaces area based from gym.spaces. Check the docs for more information on how to use then.

# for this example we are using a a BoxSpace for our observations and a
# Discrete space for our action space.


env_config = {
        "observation": BridgeSpaces.Box(-high, high),
            "action": BridgeSpaces.Discrete(2)
}In order to define a custom environment, you have to create an action and observation dictionary. This is called a env_config dict.
# Define the env_config dict for each agent.
env_config = {
  "agent-1": {
    "observation": <Space>,
    "action": <Space>,
    "can_show": int,
    "can_see": int,
    "obs_order":{
         "agent-1": i,
         "agent-2": j,
         ....
      }
    },
  "agent-2": {
    "observation": <Space>,
    "action": <Space>,
    "can_show": int,
    "can_see": int,
    "obs_order":{
         "agent-1": i,
         "agent-2": j,
         ....
      }
    },
    ...
Each Space is taken from BridgeSpace
from unray.envs.spaces import BridgeSpaces This dictionary defines the independent spaces for each of the agents. You will also notice that for each agent there are three new parameters: can_show, can_see and obs_order. This parameters will help us define how each agent will see the other agents in the environment.
| Parameter | Description |
|---|---|
can_show |
The observations which will be available to other agents in the environment |
can_see |
How many observations can this agent see from other agents |
obs_order |
The order of the observations this agent can see from the other agents |
Once you have your env_config dict ready, we'll create the Unray object, which will allow us to train our environment with Unray.
#Create Unray object

from unray.unray_config import UnrayConfig
unray_config = UnrayConfig()
This will allow us to configure our algorithm to be ready for the communication with Unreal Eninge.
Next, we'll need to create an instance of a MultiAgent Environment, which takes our env_config as an argument and a name for our env:
#Create Instance of MultiAgent Environment

from unray.envs.base_env import MultiAgentEnv

env = MultiAgentEnv(env_config, 'env_name')
Now, we can use unray without problem. After creating the config for our algorithm (like PPO), we'll create our algorithm instance using the configure_algo function from our Unray object, which takes in two arguments: our algorithm config and the single agent environment instance
#Create Algo Instance

algo = unray_config.configure_algo(algo_config, env)
Now, Unray is ready to train your Single Agent Environment.
As a simple example we will build a Multiagent-Arena environment in UE5 an train it in ray using the unray-bridge framework.
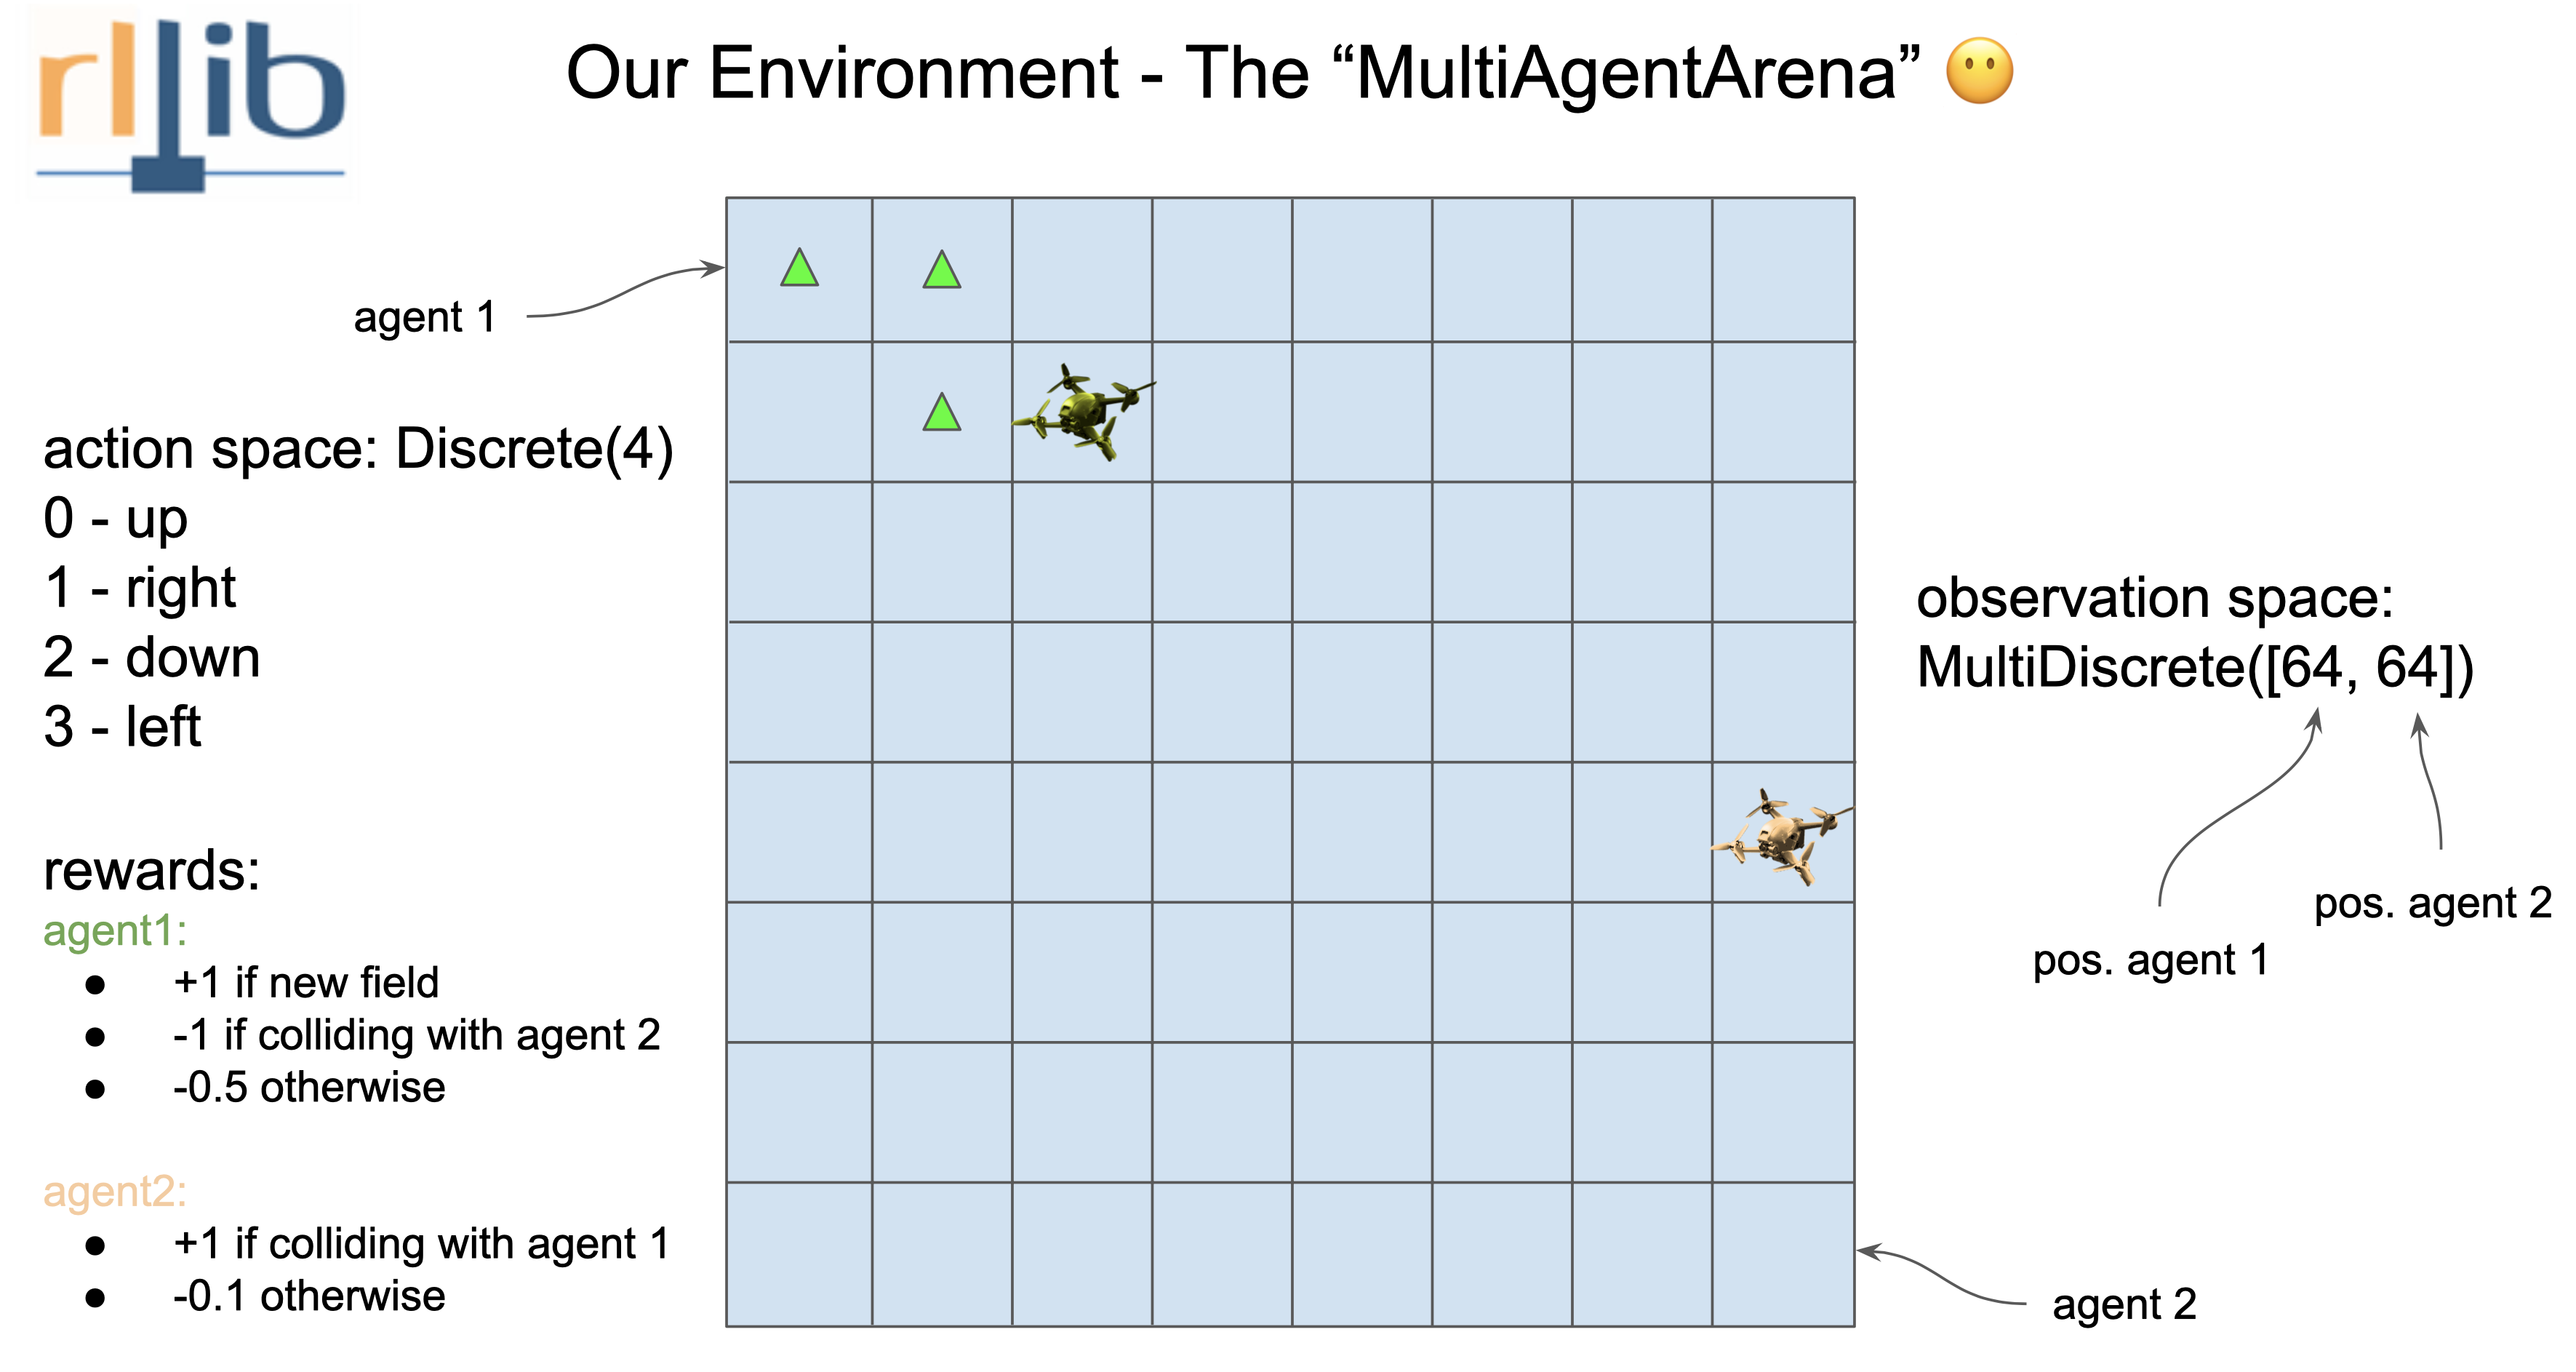
As a Unray-bridge philosophy first we have to break down what the environment need. We have two agents that move in the same scenario, given by a 8x8 square grid. They can only move one no-diagonal square for each episode. (The reward system is defined in the image).
Hence we got:
- Agent 1 and 2 Observation: MultiDiscrete([64])
- Agent 1 and 2 Action: Discrete([4])
Defining the env_config as follows:
from unray.envs.spaces import BridgeSpaces

env_config  = {
        "agent-1":{
            "observation": BridgeSpaces.MultiDiscrete([64, 64]),
            "action": BridgeSpaces.Discrete(4),
            "can_show": 1, # Amount of observations int obs stack
            "can_see": 2, # Amount of observations required in training
            "obs_order": {
                "agent-1": [0],
                "agent-2": [0]
            }
        },
        "agent-2":{
            "observation": BridgeSpaces.MultiDiscrete([64, 64]),
            "action": BridgeSpaces.Discrete(4),
            "can_show": 1, # Amount of observations int obs stack
            "can_see": 2,
            "obs_order": {
                "agent-2": [0],
                "agent-1": [0]
            }
        }
    }
Configure the environment
    from unray.envs.base_env import MultiAgentEnv
    from unray.unray_config import UnrayConfig

    unray_config = UnrayConfig()
    arena = MultiAgentEnv(env_config, "multiagents-arena")
algo = unray_config.configure_algo(ppo_config, arena)- Currently, we support inference only on models trained with pytorch.
- Inside Unreal Engine, we currently support only the CPU Runtime.
- The module has been tested in Single Agent Envs.
Go to the algorithms and check how to choose the framework given your algorithm. Configure it in the python file.
Here is an example with PPO:
    ppo_config = ppo_config.framework("torch")
#Configure the rest of the algorithm
    ppo_config = ppo_config.resources(num_gpus=0)
ppo_config = ppo_config.rollouts(num_rollout_workers=0) We'll need the model in its ONNX format. To export the model, we'll make use of RLlib's policy methods.
    policy = algo.get_policy()
    policy.export_model(outuput_dir,10) # export_model(<output_dir>, <opset_number>
The 10 in this example is the ONNX opset number. To learn more about opset check: https://onnx.ai/sklearn-onnx/auto_tutorial/plot_cbegin_opset.html https://onnxruntime.ai/docs/reference/compatibility.html
Next, we'll need to modify the model to be able to use it inside Unreal Engine. We need to make sure the input values of the module are the observations and the output correspond to the actions. To do that, we'll make use of this repo: https://github.com/ZhangGe6/onnx-modifier. It's an ONNX graphic modifier.
Once you've followed their instructions, run the ONNX modifier and open your ONNX model. In our Cartpole example, the model looks like this:

Click on the Identity node and in the panel on the right, which appears after you click, choose the Delete With Children Option.

You'll notice the state_ins node will look like this:

Next, click on the download button:

You can upload the modified model again to check everything is correct. If you did all the steps, the model should look like this:

If you can see, the input to the model is the obs vector and the output is the output vector.
Now, drag and drop your model to your Content Browser inside Unreal Engine.

It will look like this. Currently, we only support CPU Runtinme inside Unreal Engine.
We'll make use of the BP_Inferencer included in the unray plugin. Simply go to the Unray Content folder, inside the Blueprints folder and you'll see it.

Place it on your map where your agent is.
If you click on it, on the Details panel you'll find an Inference category with the next fields:

In the Agent variable, choose your agent. In the Model Data section, choose the model you imported previously. It should appear in a list.

In the Action Space Type choose your action space (Discrete, MultiDiscrete, MultiBinary, Box). And in the Shape section, input your Action shape separated by commas. (For example, if your env has a MultiDiscrete Action space, with shape (3,2,3), the config will look like this:

Remember that your action space must match the one you set in the Python configuration. Otherwise, the model won't be able to match the vectors.
Play run and your agent should start running.


